horntools HUFJIMII14A Bedienungsanleitung
- Typ
- Bedienungsanleitung

www.horntools.com
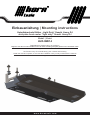
Einbauanleitung | Mounting instructions
Unterfahrschutz Kühler „Light Duty“ Suzuki Jimny GJ
skid plate front cooler “light duty” Suzuki Jimny GJ
Modell | Model
HUFJIMII14
Trägerfahrzeug: Suzuki Jimny GJ 10/2018 –
Beginne erst dann mit dem Einbau wenn du diese Anleitung komplett gelesen und verstanden hast!
Montagezeit: ca. 90 Minuten
fits: Suzuki Jimny GJ manufacturing year 10/2018 and following
Read this manual complete, do not start the installation until you fully understood the manual!
Installation duration: approximate 90 minutes

Datum / date: 2 | 831.05.2022 Seite / page:
Technische Änderungen vorbehalten / technical changes reserved
Allgemeine Hinweise | universal notes
► Fragen / questions
Solltest du noch Fragen zur Montage oder zum Gebrauch deines Produktes haben, kontaktier uns gerne!
If you have further questions regarding the mounting or the useage of your horntools product feel free to contact
us.
► Ersatzteile / spare parts
Erhältst du von deinem horntools Fachhändler / contact your local horntools dealer
► Haftung / liability
Bei Nichtbeachtung der in dieser Anleitung angegebenen Hinweise und Informationen, bei nicht
bestimmungsgemäßem Gebrauch oder bei Einsatz außerhalb des vorgesehenen Verwendungszwecks, lehnt
der Hersteller die Gewährleistung für Schäden am Produkt ab. Die Haftung für Folgeschäden an Elementen aller
Art oder Personen ist ausgeschlossen. Der Hersteller haftet nicht für Schäden, die während des Einbaus des
horntools Produktes entstehen.
In case of non-observance of this manual and its information or non-specied usage of the product, the
manufacturer does not give any kind of warranty of damage on the product. The liability is excluded for
consequential damages in any kind for material or persons. The manufacturer is not liable for any kind of damages
that happen during the installation process.
► Rechtliche hinweise / legal notice
Grak- und Textteile dieser Anleitung wurden mit Sorgfalt hergestellt. Für eventuell vorhandene Fehler und deren
Auswirkung kann keine Haftung übernommen werden! Technische Änderungen am Produkt sowie in dieser
Anleitung sind vorbehalten!
horntools excludes the liability for mistakes in the images or text phrases in this manual. Technical changes
reserved!
► Kennzeichnung von Gefahren / symbols for dangerous operation
Achtung! Dieses Symbol weist auf wichtige Arbeitsschritte hin, bei Nichtbeachtung kann es zu
Beschädigung am Produkt oder Verletzungen kommen!
Whenever this symbol is placed at an installation step special care must be taken. If you don’t
follow the instructions you could either damage the product or injure yourself!
► Nach dem Einbau / after the installation
Mach dich auf eine Testfahrt und prüfe ob durch den Einbau der horntools Komponente keine ungewollten
Geräusche entstanden sind oder sich das Fahrverhalten anderweitig geändert hat.
Make a test drive with the car and check that no unwanted noise or other unwanted changes in the cars
driveability or behaviour have occurred since you’ve installed the horntools components.

3 | 8
Seite / page:
Datum / date: 31.05.2022
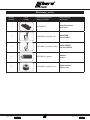
Stückliste | partlist
Anzahl
quantity
Bild
image
Zeichnungsnummer
drawing number
Beschreibung
description
1
HUFJIMII14 Unterfahrschutz
skid plate
1
HUFJIMII14_bracket_drs HalterDRS
bracketDRS
1
HUFJIMII14_bracket_codrs HalterCODRS
bracketCODRS
3
HUFJIMII14_spacer Distanz
spacer
2
HUFJIMII14_spacer_rear Distanz hinten
spacer rear

Datum / date: 4 | 831.05.2022 Seite / page:
Technische Änderungen vorbehalten / technical changes reserved
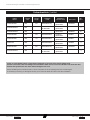
Artikel
article
Größe
size
Länge
length
Koporm
head
Oberäche
surface nish DIN / ISO Stk.
quant.
Schraube/bolt M6 80 Inbus/allen key Verzinkt /
galvanized DIN7991 3
Scheibe/washer M6 für DIN7991
for DIN7991
Verzinkt /
galvanized 3
Scheibe/washer M8 Verzinkt /
galvanized DIN9021 10
Schraube/bolt M8 50 Sechskant/hex Verzinkt /
galvanized DIN931 2
Schraube/bolt M8 70 Sechskant/hex Verzinkt /
galvanized DIN931 2
Mutter/nut M8 Sechskant/hex Verzinkt /
galvanized DIN985 4
Schraube/bolt M8 25 Inbus/allen key Verzinkt /
galvanized DIN7991 4
Scheibe/washer M8 für DIN7991
for DIN7991
Verzinkt /
galvanized 4
Schraubenliste | boltlist
Prüfe vor dem Einbau ob der Lieferumfang komplett ist und alle Teile unbeschädigt sind.
Sollten Teile fehlen oder beschädigt sein kontaktiere bitte deinen horntools Händler und warte mit dem
Einbau des Systems bis alle Teile unbeschädigt bei dir sind.
Before installing the horntools product, check if all parts are in the package and are not damaged!
If something is missing or damaged contact your horntools dealer and don’t start the installation.

5 | 8
Seite / page:
Datum / date: 31.05.2022
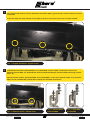
1.
Abb. 1: Original Schrauben / original screws
Im ersten Schritt müssen die drei markierten Schrauben (Abb.1) gelöst werden. Diese werden nicht mehr
verwendet.
In the rst step, the three marked screws (Abb.1) must be unscrewed. These are no longer needed.
2. Jetzt werden die Halter „HalterCODRS“ und „HalterDRS“ an den in Abb. 2 markierten Löchern am
Rahmen montiert Abb. 3-4. Verwende bei allen Schraubverbindungen eine Schraubensicherung (Loctite
243 o. Ä.).
Now mount the holders „bracketCODRS“ and „bracketDRS“ on the holes marked in Abb. 2 on the frame
Abb 3-4. Use a thradlocker (Loctite 243 or similar) for all bolted connections.
Abb. 2: markierte Löcher / marked holes
Abb. 3: HalterCODRS/
brecketCODRS
Abb. 4: HalterDRS/
brecketDRS

Datum / date: 6 | 831.05.2022 Seite / page:
Technische Änderungen vorbehalten / technical changes reserved
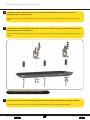
3. Nachdem die Halter montiert wurden, können die drei Distanzstücke, hinter den drei Löchern der
Stoßstange Abb.1, platziert werden.
Once the brackets have been mounted, the three spacers can be placed behind the three holes of the bumper
Abb.1.
Abb. 4: Explosionszeichnung / explosion drawing
4. Jetzt kann der Unterfahrschutz an den zwei neuen Haltern und den drei original Gewindebohrungen der
Stoßstange montiert werden Abb. 4.
Now the skid plate can be mounted to the two new brackets and the three original threaded holes of the bumper
Abb. 4.
5. Kontrolliere, ob alle Schraubverbindungen laut Drehmomenttabelle (letzte Seite) festgezogen wurden.
Check that all bolted connections have been tightened according to the torque table (last page).

7 | 8
Seite / page:
Datum / date: 31.05.2022
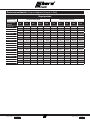
Regelgewinde
Abmessung Vorspannkraft (kN) Anziehmoment (Nm)
Festigkeits-
klasse 4.6 5.6 8.8 10.9 12.9 4.6 5.6 8.8 10.9 12.9
M 4x0,70 1,29 1,71 3,9 5,7 6,7 1,02 1,37 3,0 4,4 5,1
M 5x0,80 2,1 2,79 6,4 9,3 10,9 2,0 2,7 5,9 8,7 10
M 6x1,00 2,96 3,94 9,0 13,2 15,4 3,5 4,6 10,0 15,0 18,0
M 8x1,25 5,42 7,23 16,5 24,2 28,5 8,4 11,0 25,0 36,0 43,0
M 10x1,50 8,64 11,5 26,0 38,5 45,0 17,0 22,0 49,0 72,0 84,0
M 12x1,75 12,6 16,8 38,5 56,0 66,0 29,0 39,0 85,0 125,0 145,0
M 14x2,00 17,3 23,1 53,0 77,0 90,0 46,0 62,0 135,0 200,0 235,0
M 16x2,00 23,8 31,7 72,0 106,0 124,0 71,0 95,0 210,0 310,0 365,0
M 18x2,50 28,9 38,6 91,0 129,0 151,0 97,0 130,0 300,0 430,0 500,0
M 20x2,50 37,2 49,6 117,0 166,0 194,0 138,0 184,0 425,0 610,0 710,0
M 22x2,50 46,5 62,0 146,0 208,0 243,0 186,0 250,0 580,0 830,0 970,0
M 24x3,00 53,6 71,4 168,0 239,0 280,0 235,0 315,0 730,0 1050,0 1220,0
M 27x3,00 70,6 94,1 221,0 315,0 370,0 350,0 470,0 1100,0 1550,0 1800,0
M 30x3,50 85,7 114,5 270,0 385,0 450,0 475,0 635,0 1450,0 2100,0 2450,0
M 33x3,50 107,0 142,5 335,0 480,0 560,0 645,0 865,0 2000,0 2800,0 3400,0
M 36x4,00 125,5 167,5 395,0 560,0 680,0 1080,0 1440,0 2600,0 3700,0 4300,0
M 39x4,00 151,0 201,0 475,0 670,0 790,0 1330,0 1780,0 3400,0 4800,0 5600,0
Drehmomenttabelle | torque diagram [torque in Nm]

www.horntools.com
horntools GmbH
Wallenmahd 23 . 6850 Dornbirn . AUSTRIA
email: o[email protected]
UID: ATU65090439
-
 1
1
-
 2
2
-
 3
3
-
 4
4
-
 5
5
-
 6
6
-
 7
7
-
 8
8


horntools HUFJIMII14A Bedienungsanleitung
- Typ
- Bedienungsanleitung
Verwandte Artikel
-
 horntools HUFJIMII13 Bedienungsanleitung
-
 horntools HUFJIMII04 Bedienungsanleitung
-
 horntools HISDMSPAB01 Bedienungsanleitung
-
 horntools HUFJIMII10A Bedienungsanleitung
-
 horntools HUFJIMII05 Bedienungsanleitung
-
 horntools HSW9940JIMII_X Bedienungsanleitung
-
 horntools HUFJIMII02 Bedienungsanleitung
-
 horntools HSW9940JIMIIPLATE Bedienungsanleitung
-
 horntools HISDMSPTC01 Bedienungsanleitung
-
 horntools HSJ2RSA02 Bedienungsanleitung


