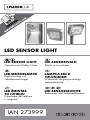
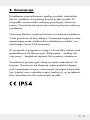
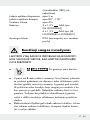
LIVARNO 273999 Bedienungsanleitung
- Kategorie
- Baby Nachtlichter
- Typ
- Bedienungsanleitung

IAN 273999
LED-SENSORIV ALO
Käyttö- ja turvaohjeet
LED SENSOR LIGHT
Operation and Safety Notes
LED-SENSORLEUCHTE
Bedienungs- und Sicherheitshinweise
LED ŽIBINTAS
SU JUTIKLIU
Nurodymai dėl valdymo
ir saugumo
LED-SENSORLAMPA
Bruksanvisning och
säkerhetsanvisningar
LAMPKA LED Z
CZUJNIKIEM
Wskazówki dotyczące obsługi i
bezpieczeństwa
LED SENSOR LIGHT

LED SENSOR LIGHT
GB / IE Operation and Safety Notes Page 5
FI Käyttö- ja turvaohjeet Sivu 14
SE Bruksanvisning och säkerhetsanvisningar Sidan 23
PL Wskazówki dotyczące obsługi i bezpieczeństwa Strona 32
LT Nurodymai dėl valdymo ir saugumo Puslapis 42
DE / AT / CH Bedienungs- und Sicherheitshinweise Seite 52

A
5
5
1
5
2
4
1
1
2
3
HG00896A
HG00896B
HG00896C
334
4
2
3

B
8
10 11
10
11
8
10
11
9
6 7
7
12
HG00896A
HG00896B
HG00896C
6
9

5 GB/IE
Introduction ......................................................... Page 6
Intended use .............................................................. Page 6
Description of parts ................................................... Page 6
Scope of delivery ...................................................... Page 7
Technical data ........................................................... Page 7
General safety instructions .................... Page 8
Battery safety information ......................................... Page 9
Mounting the light ......................................... Page 10
Setting up the light ........................................ Page 11
Start of operation .......................................... Page 11
Replacing batteries ................................................... Page 11
Cleaning and care .......................................... Page 12
Disposal .................................................................. Page 12
Warranty ............................................................... Page 13

6 GB/IE
LED sensor light
Introduction
We congratulate you on the purchase of your new device.
You have chosen a high quality product. The instructions for
use are part of the product. They contain important informa-
tion concerning safety, use and disposal. Before using the
product, please familiarise yourself with all of the safety infor-
mation and instructions for use. Only use the unit as described
and for the specified applications. If you pass the product on
to anyone else, please ensure that you also pass on all the
documentation with it.
Intended use
The product is only intended for use in private households.
This product is designed for indoor and outdoor use. The
product is not intended for commercial use or for use in other
applications.
Not suitable for ordinary lighting in household
room illumination.
This product is suitable for extreme temperature
up to -21 °C.
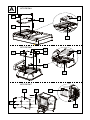
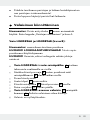
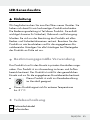
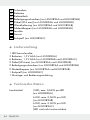
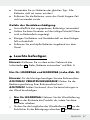
Description of parts
1 Battery compartment cover
2 Insulating strip

7 GB/IE
3 Screws
4 Batteries
5 Battery compartment
6 Mounting screws (only for HG00896A and HG00896B)
7 Dowels (Ø 6 mm) (only for HG00896A and HG00896B)
8 Wall bracket (only for HG00896A and HG00896B)
9 Caps (only for HG00896A and HG00896B)
10 Light
11 Sensor
12 Ground spike (only for HG00896C)
Scope of delivery
1 LED Sensor light
3 batteries, 1.5 V AAA (only for HG00896A)
6 batteries, 1.5 V AAA (only for HG00896B / HG00896C)
2
dowels (Ø 6 mm) (only for HG00896A / HG00896B)
2 mounting screws (only for HG00896A / HG00896B)
2 caps (only for HG00896A / HG00896B)
1 ground spike (only for HG00896C)
1 instructions for assembly and use
Technical data
Illuminant: 3 LEDs, max. 0.06 W per LED (only for
HG00896A)
6 LEDs, max. 0.06 W per LED (only for
HG00896B)
6 LEDs, max. 0.06 W per LED (only for
HG00896C) (LEDs non re-placeable)
Detection range: approx. 3 m

8 GB/IE
Detection angle: approx. 80°–100°
Light on time: approx. 45 s
Battery: 3 x 1.5 V , AAA (only for HG00896A)
6 x 1.5 V , AAA (only for HG00896B /
HG00896C)
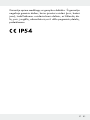
Protection class: IP54 (splashproof)
General safety instructions
KEEP ALL THE SAFETY ADVICE AND INSTRUCTIONS IN
A SAFE PLACE FOR FUTURE REFERENCE!
This is not a toy.
This appliance can be used by children aged from
8 years and above and persons with reduced physical,
sensory or mental capabilities or lack of experience and
knowledge if they have been given supervision or instruc-
tion concerning use of the appliance in a safe way and
understand the hazards involved. Children shall not play
with the appliance. Cleaning and user maintenance shall
not be made by children without supervision.
Electrostatic discharges may cause malfunctions. In the
event of such malfunctions, remove the batteries briefly
and reinsert them.
CAUTION! RISK OF INJURY! Please do not use this
device if you find that it is damaged in any way.
Never cover the LED night light when it is in operation.
This article does not contain any parts that need to be
maintained by the user. The LED cannot be replaced.
The illuminant is not replaceable.

9 GB/IE
If the illuminant fails at the end of its life, the entire light
must be replaced.
Never open one of the items of electrical equipment or
insert any objects into them.
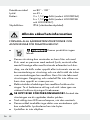
Battery safety information
DANGER TO LIFE! Batteries are not
intended for children. If accidentally swallowed seek im-
mediate medical attention.
EXPLOSION HAZARD! Never recharge
non-rechargeable batteries, short-circuit and /
or open batteries.
Never throw batteries into fire or water.
Do not exert mechanical loads to batteries.
Risk of battery leakage
In the event of a battery leak, immediately remove it from
the device to prevent damage.
Avoid contact with the skin, eyes and mucous membranes.
In the event of contact with battery acid, thoroughly flush
the affected area with plenty of clean water and seek im-
mediate medical attention.
Only use the same type of batteries. Do not mix used and
new batteries.
Remove the batteries if the appliance has not been used
for a long period.

10 GB/IE
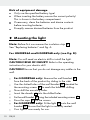
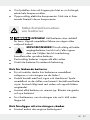
Risk of equipment damage
Only use the specified battery type!
When inserting the battery ensure the correct polarity!
This is shown in the battery compartment.
If necessary, clean the batteries and device contacts
before inserting batteries.
Promptly remove drained batteries from the product.
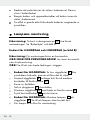
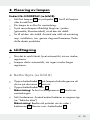
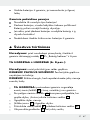
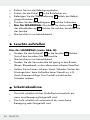
Mounting the light
Note: Before first use remove the insulation strip 2.
See “Replacing batteries” and Fig. A.
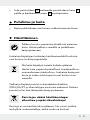
For HG00896A and HG00896B only (see Fig. B):
Note: You will need an electric drill to install the light.
CAUTION! RISK OF INJURY! Refer to the operating
instructions for your electric drill.
CAUTION! Ensure that you do not damage any cables in the
wall.
For HG00896A only: Remove the wall bracket 8
from the back of the product by sliding to the side.
Use the slotted holes of the wall bracket 8 intended for
the mounting screws 6 to mark the holes for drilling.
Now drill the mounting holes.
Insert the dowels 7 into the drilled holes.
Fix the wall bracket
8
using the included mounting screws
6
.
Press the caps 9 on the screws.
For HG00896A only: Fit the light 10 onto the wall
bracket 8. Ensure that the light is correctly seated.
Your light is now ready for use.

11 GB/IE
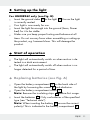
Setting up the light
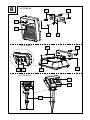
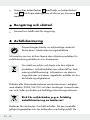
For HG00896C only (see Fig. B):
Insert the ground stake 12 to the light 10 . Ensure the light
is correctly seated.
Your light is now ready for use.
Insert the light far enough into the ground (lawn, flower
bed) for it to be stable.
Make sure you keep proper footing and balance at all
times. Do not use any force when assembling or setting-up
the product, e.g. hammer blows. This will damage the
product.
Start of operation
The light will automatically switch on when motion is de-
tected in a dark environment.
The light will automatically switch off when motion is no
longer detected for a period of time.
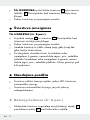
Replacing batteries (see Fig. A)
Open the battery compartment 5 on the back side of
the light by loosening the screws 3 anti-clockwise.
Open the battery compartment cover 1.
Note: Remove the insulating strips 2 before first usage.
Insert the batteries 4. Only use batteries of the specified
type (see “Technical data”).
Note: When inserting the battery 4 ensure the correct
polarity! This is indicated in the battery compartment 5.

12 GB/IE
Close the battery compartment 5 again with the battery
compartment cover 1 and fix the cover by screwing on
the screws 3 clockwise.
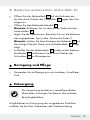
Cleaning and care
Only a dry, lint-free cloth should be used for cleaning.
Disposal
The packaging is made entirely of recyclable mate-
rials, which you may dispose of at local recycling
facilities.
Contact your local refuse disposal authority for more details
of how to dispose of your worn-out product.
To help protect the environment, please dispose of
the product pr operly when it has reached the end
of its useful life and not in the household waste. In-
formation on collection points and their opening
hours can be obtained from your local authority.
Faulty or used batteries must be recycled in accordance with
Directive 2006 / 66 / EC and its amendments. Please return the
batteries and / or the device to the available collection points.
Environmental damage through incorrect
disposal of the batteries!

13 GB/IE
Batteries may not be disposed of with the usual domestic waste.
They may contain toxic heavy metals and are subject to haz-
ardous waste treatment rules and regulations. The chemical
symbols for heavy metals are as follows: Cd = cadmium,
Hg = mercury, Pb = lead. That is why you should dispose of
used batteries at a local collection point.
Warranty
The device has been manufactured to strict quality guidelines
and meticulously examined before delivery. In the event of
product defects you have legal rights against the retailer of
this product. Your legal rights are not limited in any way by
our warranty detailed below.
The warranty for this device is 3 years from the date of
purchase. Should this device show any fault in materials or
manufacture within 3 years from the date of purchase, we will
repair or replace it – at our choice – free of charge to you.
The warranty period begins on the date of purchase. Please
keep the original sales receipt in a safe location. This docu-
ment is required as your proof of purchase. This warranty
becomes void if the device has been damaged or improperly
used or maintained.
The warranty applies to faults in material or manufacture. This
warranty does not cover product parts subject to normal wear,
thus possibly considered consumables (e.g. batteries) or for
damage to fragile parts, e.g. switches, rechargeable batteries
or glass parts.

14 FI
,
Yleistä .........................................................................Sivu 15
Tarkoituksenmukainen käyttö .....................................Sivu 15
Osien kuvaus ...............................................................Sivu 15
Toimituksen sisältö ....................................................... Sivu 16
Tekniset tiedot .............................................................. Sivu 16
Yleiset turvallisuusohjeet ..........................Sivu 17
Paristoja koskevat turvallisuusohjeet ..........................Sivu 18
Valaisimen kiinnittäminen ........................Sivu 19
Valaisimen sijoittaminen ...........................Sivu 20
Käyttöönotto ........................................................Sivu 20
Paristojen vaihtaminen ................................................Sivu 20
Puhdistus ja hoito ............................................. Sivu 21
Hävittäminen .......................................................Sivu 21
Takuu ..........................................................................Sivu 22

15 FI
LED-sensorivalo
Yleistä
Onnittelemme sinua uuden tuotteen hankinnasta. Valitsit erit-
täin korkealaatuisen tuotteen. Käyttöohje on osa tätä tuotetta.
Se sisältää tärkeitä turvallisuusohjeita sekä käyttöä ja hävitystä
koskevia ohjeita. Tutustu ennen tuotteen käyttöä huolellisesti
kaikkiin käyttöja turvallisuusohjeisiin. Käytä tuotetta ainoas-
taan ohjeen mukaan ja siinä mainittuihin tarkoituksiin. Anna
kaikki ohjeet mukaan, jos luovutat tuotteen edelleen.
Tarkoituksenmukainen käyttö
Tuote on tarkoitettu käytettäväksi ainoastaan yksityistalouksissa.
Tuotetta voidaan käyttää sekä sisä- että ulkotiloissa. Tuotetta ei
ole tarkoitettu ammattimaiseen käyttöön, vaan vain käyttöoh-
jeessa mainittuun käyttötarkoitukseen.
Tuote ei sovellu kodin normaaliin huonevalais-
tukseen.
Tuotetta voidaan käyttää alhaisessa enintään -21 °C:n
lämpötilassa.
Osien kuvaus
1 Paristolokeron kansi
2 Eristysliuska
3 Ruuvit
4 Paristot

16 FI
5 Paristolokero
6 Kiinnitysruuvit (vain HG00896A ja HG00896B)
7 Tulpat (Ø 6 mm) (vain HG00896A ja HG00896B)
8 Seinäpidike (vain HG00896A ja HG00896B)
9 Suojukset (vain HG00896A ja HG00896B)
10 Valaisin
11 Anturi
12 Maapiikki (vain HG00896C)
Toimituksen sisältö
1 LED-anturivalaisin
3 AAA-paristoa, 1,5 V (vain HG00896A)
6 AAA-paristoa, 1,5 V (vain HG00896B ja HG00896C)
2 tulppaa (Ø 6 mm) (vain HG00896A ja HG00896B)
2 kiinnitysruuvia (vain HG00896A ja HG00896B)
2 suojusta (vain HG00896A ja HG00896B)
1 maapiikki (vain HG00896C)
1 asennus- ja käyttöohje
Tekniset tiedot
Valonlähde: 3 lediä, maks. 0,06 W per ledi
(vain HG00896A)
6 lediä, maks. 0,06 W per ledi
(vain HG00896B)
6 lediä, maks. 0,06 W per ledi
(vain HG00896C)
(Ledejä ei voi vaihtaa uusiin)
Tunnistusalue
: n. 3 m
Toimintakulma: n. 80°–100°

17 FI
Valaisuaika: n. 45 s
Paristo: 3 x 1,5 V AAA (vain HG00896A)
6 x 1,5 V AAA (vain HG00896B ja
HG00896C)
IP-luokitus: IP54 (roiskevesisuojattu)
Yleiset turvallisuusohjeet
SÄILYTÄ KAIKKI TURVALLISUUSOHJEET JA MUUT OHJEET
TULEVAA TARVETTA VARTEN!
Tuote ei ole lelu.
Laitetta voivat käyttää 8 vuotta täyttäneet lapset sekä henki-
löt, jotka ovat fyysisiltä tai psyykkisiltä kyvyiltään tai aisteil-
taan rajoittuneita tai joilla ei ole kokemusta tai tietoa
laitteen käytöstä, jos he käyttävät laitetta valvonnan alai-
sina tai heitä on opastettu laitteen turvallisessa käytössä ja
he ovat tietoisia laitteeseen liittyvistä vaaroista. Lapset eivät
saa leikkiä laitteella. Lapset eivät saa puhdistaa tai huol-
taa laitetta ilman valvontaa.
Sähköstaattiset purkaukset voivat aiheuttaa toimintahäiri-
öitä. Tällaisten toimintahäiriöiden esiintyessä poista
paristot hetkeksi laitteesta ja aseta ne sitten uudelleen
paikoilleen.
VARO! LOUKKAANTUMISVAARA! Älä käytä
tuotetta, jos havaitset siinä vaurioita.
Älä koskaan peitä LED-anturivalaisinta, kun se on käytössä.
Tuote ei sisällä osia, jotka käyttäjä voisi itse huoltaa. Ledejä
ei voi vaihtaa uusiin.
Valonlähdettä ei voi vaihtaa uuteen.

18 FI
Kun ledit ovat tulleet elinkaarensa päähän, valaisin täytyy
vaihtaa uuteen.
Älä koskaan avaa sähkölaitteita tai laita mitään esineitä
laitteiden sisälle.
Paristoja koskevat
turvallisuusohjeet
HENGENVAARA! Pidä paristot lasten
ulottumattomissa. Pariston nielaisseen henkilön on välittö-
mästi otettava yhteyttä lääkäriin!
RÄJÄHDYSVAARA! Älä koskaan lataa ei-la-
dattavia paristoja uudelleen, älä oikosulje ja/tai
avaa niitä. Se voi johtaa ylikuumenemiseen,
tulipaloon tai räjähdykseen.
Älä koskaan heitä paristoja tuleen tai veteen.
Älä altista paristoja mekaaniselle kuormitukselle.
Muutoin paristot voivat vuotaa
Poista vuotavat paristot välittömästi laitteesta, jotta laite ei
vioitu!
Vältä kosketusta ihoon, silmiin ja limakalvoihin! Huuhtele
paristohapolle altistuneet kohdat välittömästi pelkällä
vedellä ja ota yhteyttä lääkäriin!
Käytä vain samantyyppisiä paristoja. Älä käytä vanhoja
ja uusia paristoja yhdessä!
Poista paristot laitteesta, jos sitä ei käytetä pitkään aikaan.
Muutoin laite saattaa vaurioitua
Käytä vain ohjeessa mainittua paristotyyppiä!
Tarkista oikeanapaisuus, kun asetat paristot sisään! Se on
merkitty paristolokeroon.

19 FI
Puhdista tarvittaessa paristojen ja laitteen kontaktipinnat en-
nen paristojen sisäänasettamista!
Poista loppuun käytetyt paristot heti laitteesta.
Valaisimen kiinnittäminen
Huomautus: Poista eristysliuska 2 ennen ensimmäistä
käyttöä. Katso kappale „Paristojen vaihtaminen“ ja kuva A.
Vain HG00896A ja HG00896B (kuva B):
Huomautus: asennukseen tarvitaan porakone.
HUOMIO! LOUKKAANTUMISVAARA! Tutustu myös
porakoneesi käyttöohjeeseen.
HUOMIO! Varmista, että et vahingoita mitään johtoja
seinässä.
Vain HG00896A: irrota seinäpidike 8 tuotteen
takaosasta asettamalla se sivulle.
Merkitse kiinnitysruuveja 6 varten porattavat reiät
seinäpidikkeessä 8 olevien reikien avulla.
Poraa kiinnitysreiät.
Aseta tulpat 7 porausreikiin.
Kiinnitä seinäpidike 8 kiinnitysruuvien 6 avulla.
Paina suojukset 9 ruuvien päälle.
Vain HG00896A: asenna valaisin 10 seinäpidik-
keeseen 8. Tarkista valaisimen oikea kiinnitys.
Valaisin on nyt käyttövalmis.

20 FI
Valaisimen sijoittaminen
Vain HG00896C (kuva B):
Kiinnitä maapiikki 12 valaisimeen 10 . Tarkista valaisimen
oikea kiinnitys.
Valaisin on nyt käyttövalmis.
Aseta anturivalaisin tarpeeksi syvälle maahan (nurmeen
tai kukkaistutukseen), niin että se pysyy tukevasti pystyssä.
Tarkista, että se on tukevasti pystyasennossa. Älä käytä
liikaa voimaa, kun asennat tai pystytät valaisimen, älä
esimerkiksi lyö sitä vasaralla. Ne vahingoittavat tuotetta.
Käyttöönotto
Valaisin kytkeytyy automaattisesti päälle pimeässä, kun se
tunnistaa liikkeen.
Valaisin sammuu automaattisesti, kun se ei enää tunnista
liikettä.
Paristojen vaihtaminen (kuva A)
Avaa valaisimen takaosassa sijaitseva paristolokero 5
irrottamalla ruuvit 3 vastapäivään kiertäen.
Avaa paristolokeron kansi 1.
Huomautus: Poista eristysliuska 2 ennen ensimmäistä
käyttöä.
Aseta paristot sisään. Käytä vain ohjeessa mainittua
paristotyyppiä (katso „Tekniset tiedot“).
Huomautus: tarkista oikeanapaisuus, kun asetat paris-
tot 4 sisään. Tämä on merkitty paristolokeroon 5.
Seite wird geladen ...
Seite wird geladen ...
Seite wird geladen ...
Seite wird geladen ...
Seite wird geladen ...
Seite wird geladen ...
Seite wird geladen ...
Seite wird geladen ...
Seite wird geladen ...
Seite wird geladen ...
Seite wird geladen ...
Seite wird geladen ...
Seite wird geladen ...
Seite wird geladen ...
Seite wird geladen ...
Seite wird geladen ...
Seite wird geladen ...
Seite wird geladen ...
Seite wird geladen ...
Seite wird geladen ...
Seite wird geladen ...
Seite wird geladen ...
Seite wird geladen ...
Seite wird geladen ...
Seite wird geladen ...
Seite wird geladen ...
Seite wird geladen ...
Seite wird geladen ...
Seite wird geladen ...
Seite wird geladen ...
Seite wird geladen ...
Seite wird geladen ...
Seite wird geladen ...
Seite wird geladen ...
Seite wird geladen ...
Seite wird geladen ...
Seite wird geladen ...
Seite wird geladen ...
Seite wird geladen ...
Seite wird geladen ...
Seite wird geladen ...
Seite wird geladen ...
-
 1
1
-
 2
2
-
 3
3
-
 4
4
-
 5
5
-
 6
6
-
 7
7
-
 8
8
-
 9
9
-
 10
10
-
 11
11
-
 12
12
-
 13
13
-
 14
14
-
 15
15
-
 16
16
-
 17
17
-
 18
18
-
 19
19
-
 20
20
-
 21
21
-
 22
22
-
 23
23
-
 24
24
-
 25
25
-
 26
26
-
 27
27
-
 28
28
-
 29
29
-
 30
30
-
 31
31
-
 32
32
-
 33
33
-
 34
34
-
 35
35
-
 36
36
-
 37
37
-
 38
38
-
 39
39
-
 40
40
-
 41
41
-
 42
42
-
 43
43
-
 44
44
-
 45
45
-
 46
46
-
 47
47
-
 48
48
-
 49
49
-
 50
50
-
 51
51
-
 52
52
-
 53
53
-
 54
54
-
 55
55
-
 56
56
-
 57
57
-
 58
58
-
 59
59
-
 60
60
-
 61
61
-
 62
62


LIVARNO 273999 Bedienungsanleitung
- Kategorie
- Baby Nachtlichter
- Typ
- Bedienungsanleitung
in anderen Sprachen
- polski: LIVARNO 273999 Instrukcja obsługi
- eesti: LIVARNO 273999 Omaniku manuaal
- svenska: LIVARNO 273999 Bruksanvisning
Verwandte Artikel
-
LIVARNO 285414 Bedienungsanleitung
-
-
-
-
-
-
-
-
-
