Allnet Powerline 802.11g Wireless Access Point Benutzerhandbuch
- Kategorie
- PowerLine-Netzwerkadapter
- Typ
- Benutzerhandbuch
Dieses Handbuch eignet sich auch für

1
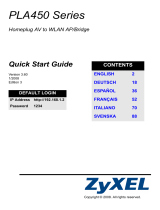
ALL1686 Powerline 802.11g Wireless Access Point
Quick-Start Guide
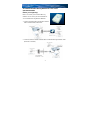
Before your beginning:
Before You Install your Powerline 802.11g
Wireless Access Point, plan the Installation of
Your Powerline 802.11g Wireless Network:
1. Create a Powerline 802.11g Wireless network
with an Ethernet DSL/cable router.
2. Create or extend a wireless network with a Powerline 802.11g Wireless router
(Ethernet or wireless).

2
Configuration your ALL1686 Powerline 802.11g Wireless Access Point
1. Hardware Installation:
Plug the ALL1686 Powerline 802.11g Wireless Access Point into an outlet
2. Connecting a Wireless Device to the Access Point:
Set the wireless device TCP/IP network environment: (for example:)
- IP address: 10.0.0.10
- Subnet Mask: 255.255.255.0.
- SSID: default
- Channel: 11
- WEP: Off
3. set up ALL1686
- open the web browser and type http://10.0.0.3/
- enter user name: admin
- enter password: admin
- click LAN Tab
- set up the IP Address within your subnet (for example: 192.168.1.2)
- set up the Subnet Mask to fit you subnet (for example: 255.255.255.0)
- set up the Gateway (Note: usually same as your router’s IP)

3
Troubleshooting
‧ Verify that your wireless network adapter is configured to connect to the
“default” SSID. For optimal wireless performance, be sure to keep the antenna
free from obstructions.
(Powerline 802.11g Wireless):
‧ The default Powerline network password for the ALL1686 AP is “HomePlug”
How to reset your device to factory defaults.
‧ There is a small hole on the right side of the device.
‧ With the end of a paper clip, press the button inside the unit. The LEDs on the
ALL1686 will flash. Your device is now reset to factory default settings.
Note:
Some wireless adapter has trouble to connect with a Router using "default" as its
SSID. So at that time, please modify your SSID to another one.

1
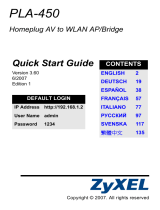
ALL1686 Powerline 802.11g Wireless Access Point
Quick-Start
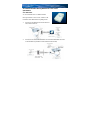
Vor dem Start:
Vor der Installation des ALL1686 Powerline
802.11g Wireless Access Points, sollten Sie die
Installation Ihres Netzwerkes sorgfältig planen:
1. Bauen Sie das Netzwerk mit einem Ethernet
DSL/cable Router auf.
2. Bauen Sie ein neues, oder erweitern sie ein Wireless Netzwerk mit einem
Powerline 802.11g Wireless Router (Ethernet oder WLAN).

2
Konfiguration Ihres ALL1686 Powerline 802.11g Wireless Access Points
4. Hardware Installation
Stecken Sie den ALL1686 Powerline 802.11g Wireless Access Point in eine
normale 230 V Steckdose.
5. Verbindung eines WLAN Gerätes mit dem Access Point
Das WLAN-fähige Gerät für TCP/IP konfigurieren: (Beispiel:)
- IP Adresse: 10.0.0.10
- Subnet Mask: 255.255.255.0.
- SSID: default
- Channel: 11
- WEP: Off
6. Set Up des ALL1686
- Öffnen Sie den Web Browser und schreiben Sie http://10.0.0.3/
- Als User Name verwenden Sie: admin
- Als Password verwenden Sie: admin
- Klicken Sie auf den Reiter LAN
- Wählen Sie eine IP Adresse aus Ihrem Subnetz (z.B.: 192.168.1.2)
- Setzen Sie die Subnetz Maske passend z.B. auf:
255.255.255.0)
- Stellen Sie das Gateway ein (moistens identisch mit der IP-Adresse des
Routers)

3
Fehlersuche / Troubleshooting
‧ Stellen Sie sicher, dass der WLAN Adapter die gleiche “default” SSID
verwendet. Für optimale WLAN Performance muss die Antenne „freies
Feld“ haben .
(Powerline 802.11g Wireless):
‧ Das default Powerline Passwort für den ALL1686 AP ist “HomePlug”
Reset des Adapters auf den Auslieferzustand.
‧ An der rechten Seite des Adapters befindet sich ein kleines Loch.
‧ Mit einer Büroklammer können Sie den Schalter dahinter betätigen.
‧ Die Anzeige-LED am ALL1686 wird aufleuchten. Der Adapter ist nun wieder im
Auslieferzustand.
Note:
Some wireless adapter has trouble to connect with a Router using "default" as its
SSID. So at that time, please modify your SSID to another one.
403-200-0407
-
 1
1
-
 2
2
-
 3
3
-
 4
4
-
 5
5
-
 6
6


Allnet Powerline 802.11g Wireless Access Point Benutzerhandbuch
- Kategorie
- PowerLine-Netzwerkadapter
- Typ
- Benutzerhandbuch
- Dieses Handbuch eignet sich auch für
in anderen Sprachen
Verwandte Artikel
Andere Dokumente
-
 ZyXEL Communications PLA450 v2 Benutzerhandbuch
-
 ZyXEL Communications PLA450 Series Bedienungsanleitung
-
Schwaiger PowerLine PLC541W Benutzerhandbuch
-
Hama 00053177 Bedienungsanleitung
-
Trendnet TPL-110AP Quick Installation Guide
-
Conrad Powerline Adapter PL85D Benutzerhandbuch
-
Trendnet TPL-210AP Benutzerhandbuch
-
 ZyXEL Communications NBG318S Series Bedienungsanleitung
-
Belkin F5D7632EA4A Benutzerhandbuch


