IKEA MHGA2K 202-371-48 Benutzerhandbuch
- Kategorie
- Kochfelder
- Typ
- Benutzerhandbuch

MÖJLIG
GB
DE
DE AT


DE AT
DE AT
ENGLISH 4
DEUTSCH 17
Language, Sprache
Country, Land

Contents
Safety information 4
Safety instructions 5
Product description 7
Daily use 7
Helpful hints and tips 8
Care and cleaning 9
What to do if… 9
Technical data 9
Installation 11
Environment concerns 13
IKEA GUARANTEE 14
Subject to change without notice.
Safety information
Before the installation and use of the appliance, carefully read
the supplied instructions. The manufacturer is not responsible if
an incorrect installation and use causes injuries and damages.
Always keep the instructions with the appliance for future refer-
ence.
Children and vulnerable people safety
Warning! Risk of suffocation, injury or permanent disability.
• This appliance can be used by children aged from 8 years
and above and persons with reduced physical, sensory or
mental capabilities or lack of experience and knowledge if
they are supervised by an adult or a person who is responsi-
ble for their safety.
• Do not let children play with the appliance.
• Keep all packaging away from children.
• Keep children and pets away from the appliance when it op-
erates or when it cools down. Accessible parts are hot.
• Cleaning and user maintenance shall not be made by chil-
dren without supervision.
General Safety
• The appliance and its accessible parts become hot during
use. Do not touch the heating elements.
• Do not operate the appliance by means of an external timer
or separate remote-control system.
ENGLISH 4

• Unattended cooking on a hob with fat or oil can be danger-
ous and may result in fire.
• Never try to extinguish a fire with water, but switch off the
appliance and then cover flame e.g. with a lid or a fire blan-
ket.
• Do not store items on the cooking surfaces.
• Do not use a steam cleaner to clean the appliance.
• Metallic objects such as knives, forks, spoons and lids should
not be placed on the hob surface since they can get hot.
• If the glass ceramic surface is cracked, switch off the appli-
ance to avoid the possibility of electric shock.
Safety instructions
Installation
Warning! Only a qualified person must
install this appliance.
• Remove all the packaging.
• Do not install or use a damaged appli-
ance.
• Obey the installation instruction supplied
with the appliance.
•Always be careful when you move the
appliance because it is heavy. Always
wear safety gloves.
• Seal the cut surfaces with a sealant to
prevent moisture to cause swelling.
• Protect the bottom of the appliance from
steam and moisture.
• Do not install the appliance adjacent to a
door or under a window. This prevents
hot cookware to fall from the appliance
when the door or the window is opened.
• Keep the minimum distance from the oth-
er appliances and units. Refer to the as-
sembly instructions.
• If the appliance is installed above draw-
ers make sure that the space, between
the bottom of the appliance and the up-
per drawer, is sufficient for air circulation.
Refer to the assembly instructions.
• The bottom of the appliance can get hot.
We recommend to install a non-combus-
tile separation panel under the appliance
to prevent access to the bottom.
Electrical connection
Warning! Risk of fire and electrical
shock.
• All electrical connections must be made
by a qualified electrician.
• The appliance must be earthed.
• Before carrying out any operation make
sure that the appliance is disconnected
from the power supply.
• Use the correct electricity mains cable.
• Do not let the electricity mains cable tan-
gle.
• Make sure the mains cable or plug (if ap-
plicable) does not touch the hot appli-
ance or hot cookware, when you connect
the appliance to the near sockets
• Make sure the appliance is installed cor-
rectly. Loose and incorrect electricity
mains cable or plug (if applicable) can
make the terminal become too hot.
• Make sure that a shock protection is in-
stalled.
• Use the strain relief clamp on cable.
ENGLISH 5

• Make sure not to cause damage to the
mains plug (if applicable) or to the mains
cable. Contact the Service or an electri-
cian to change a damaged mains cable.
• The electrical installation must have an
isolation device which lets you disconnect
the appliance from the mains at all poles.
The isolation device must have a contact
opening width of minimum 3 mm.
• Use only correct isolation devices: line
protecting cut-outs, fuses (screw type
fuses removed from the holder), earth
leakage trips and contactors.
Gas connection
• All gas connections should be made by a
qualified person.
• Make sure that there is air circulation
around the appliance.
• The information about the gas supply is
on the rating plate.
• This appliance is not connected to a de-
vice, which evacuates the products of
combustion. Make sure to connect the
appliance according to current installa-
tion regulations. Pay attention to require-
ments regarding adequate ventilation.
Use
Warning! Risk of injury, burns or
electric shock.
• Use this appliance in a household envi-
ronment.
• Do not change the specification of this
appliance.
• Do not let the appliance stay unattended
during operation.
• Do not operate the appliance with wet
hands or when it has contact with water.
• Do not put cutlery or saucepan lids on the
cooking zones. They become hot.
• Set the cooking zone to “off” after use.
• Do not use the appliance as a work sur-
face or as a storage surface.
• If the surface of the appliance is cracked,
disconnect immediately the appliance
from the power supply. This to prevent an
electrical shock.
Warning! Risk of fire or explosion.
• Fats and oil when heated can release
flammable vapours. Keep flames or heat-
ed objects away from fats and oils when
you cook with them.
• The vapours that very hot oil releases can
cause spontaneous combustion.
•Used oil, that can contain food remnants,
can cause fire at a lower temperature
than oil used for the first time.
• Do not put flammable products or items
that are wet with flammable products in,
near or on the appliance.
Warning! Risk of damage to the
appliance.
• Do not keep hot cookware on the control
panel.
• Do not let cookware to boil dry.
• Be careful not to let objects or cookware
fall on the appliance. The surface can be
damaged.
• Do not activate the cooking zones with
empty cookware or without cookware.
• Do not put aluminium foil on the appli-
ance.
• Cookware made of cast iron, aluminium
or with a damaged bottom can cause
scratches on the glass ceramic. Always lift
these objects up when you have to move
them on the cooking surface.
• Provide good ventilation in the room
where the appliance is installed.
• Make sure that the ventilation openings
are not blocked.
• Use only stable cookware with the correct
shape and diameter larger than the di-
mensions of the burners. There is a risk of
overheating and rupture of the glass
plate (if applicable).
• Make sure the flame does not go out
when you quickly turn the knob from the
maximum to the minimum position.
• Make sure pots are centrally positioned
on the rings and do not stick out over
edges of the cooking surface.
• Use only the accessories supplied with
the appliance.
• Do not install a flame diffuser on the
burner.
ENGLISH 6

Care and Cleaning
Warning! Risk of damage to the
appliance.
• Clean regularly the appliance to prevent
the deterioration of the surface material.
• Do not use water spray and steam to
clean the appliance.
• Do not clean the burners in the dishwash-
er.
• Clean the appliance with a moist soft
cloth. Only use neutral detergents. Do not
use abrasive products, abrasive cleaning
pads, solvents or metal objects.
Disposal
Warning! Risk of injury or suffocation.
• Contact your municipal authority for in-
formation on how to discard the appli-
ance correctly.
• Disconnect the appliance from the mains
supply.
• Cut off the mains cable and discard it.
• Flat the external gas pipes.
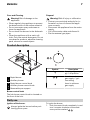
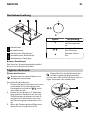
Product description
1 2
5
3
4
1
Rapid burner
2
Auxiliary burner
3
Rapid burner control knob
4
Auxiliary burner control knob
5
Removable pan support
Burner control knob
The hob burner control knob is situated on
the front of the hob .
Symbol Description
there is no gas sup-
ply / off position
there is maximum
gas supply / igni-
tion setting
there is minimum
gas supply
Daily use
Ignition of the burner
Always ignite the burner before posi-
tioning pots or pans.
To ignite the burner:
1. Push the control knob completely in and
turn it counter-clockwise to the maxi-
mum position marked
.
ENGLISH 7

2. Keep the knob pushed for about 5 sec;
this will allow thermocouple to heat up,
and the safety device to switch off, oth-
erwise the gas supply would be inter-
rupted.
3. After the flame is regular, adjust it as
preferred.
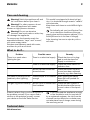
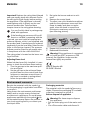
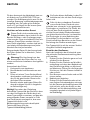
If after a few attempts the burner does
not ignite, check that the crown and its
cap are in correct positions.
1
2
3
1
Burner cap and crown
2
Thermocouple
3
Ignition candle
Warning! Do not keep control knob
pressed for more than 15 seconds.
If the burner does not light after 15 seconds,
release the control knob, turn it into off posi-
tion and wait for at least 1 minute before
trying to light the burner again.
Important! In the absence of electricity You
can ignite the burner without electrical
device; in this case approach the burner
with a flame, push the relevant knob down
and turn it counter-clockwise to maximum
gas release position.
Warning! Maintain extreme caution
while operating with open fire in
kitchen environment. Manufacturer declines
any responsibility in case of misuse of flame.
If the burner accidentally goes out, turn
the control knob to the off position and
wait for at least 1 minute before trying to
light it again.
When switching on the mains, after in-
stallation or a power cut, it is quite nor-
mal for the spark generator to be activated
automatically.
Turning the burners off
To put the flame out, turn the relevant con-
trol knob to the symbol
.
Warning! Always turn the flame down
or switch it off before removing the
pans of the burner.
Helpful hints and tips
Energy savings
• If possible, always place lids on the pans.
• As soon as liquid starts boiling, turn down
the flame to barley keep the liquid sim-
mering.
Use pots and pans with bottom fitting the
size of burner used.
Burner minimum di-
ameter of
pots and pans
maximum di-
ameter of
pots and pans
Rapid 160 mm 260 mm
Burner minimum di-
ameter of
pots and pans
maximum di-
ameter of
pots and pans
Auxili-
ary
80 mm 160 mm
The bottom of the cookware should be as
thick and flat as possible.
ENGLISH 8

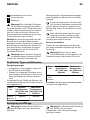
Care and cleaning
Warning! Switch the appliance off and
let it cool down before you clean it.
Warning! For safety reasons, do not
clean the appliance with steam
blasters or high-pressure cleaners.
Warning! Do not use abrasive
cleaners, steel wool pads or acids, they
will damage the appliance.
To remove any food remains wash the
enamelled elements, "caps" and "crowns",
with warm soapy water.
Stainless steel elements wash with water,
and then dry with a soft cloth.
This model is equipped with electrical igni-
tion, it is obtained through ceramic "candle"
with electrode.
Keep them well clean to avoid difficult light-
ning.
Periodically ask your local Service Cen-
tre to check the conditions of the gas
supply pipe and the pressure adjuster, if it is
fitted (this service is not free of charge).
After cleaning, be sure to wipe dry with a
soft cloth.
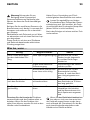
What to do if…
Problem Possible cause Remedy
There is no spark when
lighting the gas
There is no electrical supply Check that the unit is plug-
ged in and the electrical
supply is switched on.
There is no electrical supply Check the house electric in-
stallation fuse.
Burner cap and Crown are
placed uneven
Check the burner cap and
crown have been replaced
correctly, e.g. after cleaning.
The flame is blowing out im-
mediately after lightning
Thermocouple is not heated
enough
After lightning the flame,
keep the knob pushed for
about 5 sec.
The gas ring burns unevenly Burner crown is blocked with
food residues
Check the main injector is
not blocked and the burner
crown is clear of food parti-
cles.
If there is a fault, first try to find a solution to
the problem yourself. If you cannot find a
solution to the problem yourself, contact
your dealer or the After Sales Service.
If you operated the appliance wrongly,
or the installation was not carried out
by a registered engineer, the visit from the
customer service technician or dealer may
not take place free of charge, even during
the warranty period.
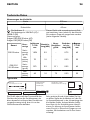
Technical data
Hob dimensions
ENGLISH 9

width 290 mm
depth 520 mm
built in height 45 mm
Class Appliance: 3
Appliance Category: II2H3B/P (AT) /
II2E3B/P (DE)
Appliance gas supply:
Natural gas G20 (2H) 20 mbar (AT)
Natural gas G20 (2E) 20 mbar (DE)
This appliance is designed for use with nat-
ural gas but can be converted for use with
other gas type according to table below.
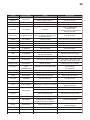
Type of Gas
Burner
type
Injectors
1/100
mm
Nominal
Power kW
nominal
Flow g/h
Reduced
Power kW
by-pass
1/100
mm
G20 20 mbar
Rapid
(large)
120X 2.9 - 0.75 42
Auxiliary
(small)
70 1.0 - 0.33 23
G30/G31
50/50 mbar
Rapid
(large)
073 2.9 211 0.95 42
Auxiliary
(small)
43 1.0 73 0.33 23
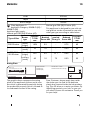
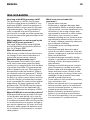
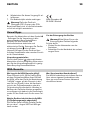
Rating Plate
949738214 H3VF20-G/VI
230 V
~
50 Hz
ZO
0694
DE AT
S.N.
G20 20 mbar = 3.9 kW
G30/G31 50/50 mbar = 284 g/h
MÖJLIG HGA2K
II2H3B/P (AT)
II2E3B/P (DE)
202-371-48
Made In Italy
© Inter IKEA Systems B.V. 1999
21552
PQM
The graphic above represents the rating
plate of the appliance (without serial num-
ber which is generated dynamically during
the production process), which is located at
its underneath surface of the casing.
Dear Customer, please apply here aside
the sticker you can find in the dedicate
plastic bag inserted inside the hob packag-
ing. This will allow us to assist you better, by
identifying precisely your hob, in case you
will need in future our assistance. Thank you
for your help!
ENGLISH 10

Installation
Warning! This appliance must be
installed, connected or repaired only
by a registered competent person to the
relevant gas standard. Use only parts
provided with the product. Use only original
spare parts.
Manufacturer is not responsible for any in-
jury to persons and pets or damage to
property caused by failure to comply fol-
lowing requirements.
Caution! To proceed with the
installation refer to the assembly
instructions.
Warning! Installation process must
follow the laws, ordinances, directives
and standards (electrical safety rules and
regulations, proper recycling in accordance
with the regulations, etc.) in force in the
country of use!
Ensure that the local distribution condi-
tions (nature of the gas and gas pres-
sure) and the adjustment of the appliance
are compatible before proceeding with the
installation.
The parameters of adjustment setting
for this appliance are stated on the
rating plate (refer to the Technical data
chapter).
Warning! The appliance must be
earthed!
Warning! Risk of injury from electrical
current.
• The electrical mains terminal is live.
• Make electrical mains terminal free of
voltage.
• Loose and inappropriate plug and socket
connections can make the terminal over-
heat.
• Have the clamping connections correctly
installed.
• Use strain relief clamp on cable.
Important! You must observe the minimum
distances to other appliances and furniture
cabinets or other units according to
Assembly Instruction.
The minimum distance to be maintained
from the cut out edge to lateral wall must
be 450 mm.
If there is no oven beneath the hob insert a
dividing panel at a minimum distance of 20
mm from the bottom of the hob.
Protect the cut surfaces of the worktop
against moisture using a suitable sealant in-
cluded in the product in fitting bag. The
sealant seals the appliance to the work top
with no gap. Do not use silicon sealant be-
tween the appliance and the worktop.
Avoid installing the appliance next to doors
and under windows as hot cookware may
be knocked off the pan support when doors
and windows are opened.
Gas Connection
Warning! Only a qualified person must
install this appliance.
Warning! This appliance is not
connected to a combustion products
evacuation device.
Installation must comply with current local
regulation.
The connection of the cooktop to the gas
pipe network or gas cylinder must be made
by means of a rigid copper or steel pipe
with fittings complying with local regula-
tions, or by means of a continuous surface
stainless steel hose complying with local
regulations.
If you see any abnormalities do not re-
pair the pipe, contact local After Sales
Service (refer to the Service chapter).
The connection must be installed correctly,
fixed into hob connection pipe. Otherwise it
will cause leakage of gas
ENGLISH 11

Warning! Once the installation is
complete, check the perfect seal of
every pipe fixing. Use soapy water, never
flame.
Electrical connection
The electrical work necessary to install the
appliance must be done by a qualified
electrician or competent person, according
to the current regulations.
Before connecting, check that the nominal
voltage of the appliance stated on the rat-
ing plate, corresponds to the available sup-
ply voltage. Also, check the power rating of
the appliance and ensure that the wire is
suitably sized to suit the appliance power
rating (refer to the Technical data chapter).
The rating plate is located on the lower cas-
ing of the hob.
The appliance is supplied with a connection
cable. This has to be provided with a prop-
er plug, able to support the load marked on
the identification plate (refer to the Techni-
cal data chapter).
The plug has to be fitted in a proper socket.
If connecting the appliance directly to the
electric system, it is necessary that you in-
stall a double pole switch between the ap-
pliance and the electricity supply, with a
minimum gap of 3 mm between the switch
contacts. The double pole has to be of a
type suitable for the required load in com-
pliance with the current rules.
The connection cable has to be placed in
order that, in each part, it cannot reach a
90 °C temperature. The blue neutral cable
must be connected to the terminal block
marked with "N". The brown (or black)
phase cable (fitted in the terminal block
contact marked with "L") must always be
connected to the live phase.
Electrical Requirements
The manufacturer declines any liability if
these safety measures are not observed.
This hob is designed to be connected to a
230 V 50 Hz AC electrical supply.
Before switching on, make sure the electrici-
ty supply voltage is the same as that indica-
ted on the hob rating plate. The rating plate
is located on the bottom of the hob.
The hob is supplied with a 3 core flexible
supply cord.
Upon completion there must be no cut, or
stray strands of wire present and the cord
clamp must be secure over the outer sheath.
Replacement of the connection cable.
Warning! The replacement of electric
cable must be carried out exclusively
by the After Sales Service or by personnel
with similar competencies, in accordance
with the current regulations.
If the connection cable must be replaced,
only a type H05V2V2-F T90 cable must be
used. The cable section must be suitable to
the voltage and the working temperature.
The yellow/green earth wire must be ap-
proximately 2 cm longer than the brown (or
black) phase wire.
Gas setting conversion
This model is designed for use with
natural gas but can be converted for
use with butane or propane gas providing
the correct injectors. The injectors not sup-
plied with the appliance have to be or-
dered from After Sales Service (refer to the
Service chapter).
For data concerning injector replacement,
refer to the chapter Technical data
Warning! Conversion or replacement
can only be performed by a registered
installer.
To replace injectors:
1. Remove pan support.
2. Remove burner cap and crown.
3. With a socket spanner 7 unscrew and
remove the injectors, replace them with
the ones required for the type of gas in
use.
4. Reassemble the parts, following the
same procedure backwards.
ENGLISH 12

Important! Replace the rating label (placed
near gas supply pipe) with relevant one for
the new type of gas supply before sealing
the appliance. If the appliance is already
sealed please stick it directly on the user
manual booklet after Technical data
chapter close to the rating plate drawing.
You can find this label in package sup-
plied with appliance
If the feeding gas pressure will be dif-
ferent or variable, comparing with the
required, you must install an appropriate
pressure adjuster, which is not supplied with
the product and if needed must be ordered
separately from the local After Sales Service
(refer to the Service chapter). The pressure
adjuster must be fitted on gas supply pipe,
in compliance with the rules of the force.
The rating plate is located on the lower cas-
ing of the hob.
Adjusting flame level
When hob has been fully installed, it is nec-
essary to check the minimum flame setting:
1. Turn the gas tap to the maximum posi-
tion and ignite.
2. Set the gas tap to the minimum flame
position then turn the control knob from
minimum to maximum several times. If
the flame is unstable or extinguished,
follow the procedure further.
3. Re-ignite the burner and set to mini-
mum.
4. Remove the control knob.
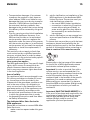
5. To adjust, use a thin bladed screwdriver
and turn the adjustment screw until the
flame is steady and does not extin-
guish, when the knob is turned from
minimum to maximum, and vice versa
(see following picture).
6. Repeat this procedure for all burners.
7. Reassemble the knobs.
Warning! If the appliance is connected
to liquid gas (G31 propane or G30
butane), the regulation screw must be
fastened as tightly as possible.
IKEA of Sweden AB
SE-34381 Älmhult
Environment concerns
Recycle the materials with the symbol .
Put the packaging in applicable containers
to recycle it.
Help protect the environment and human
health and to recycle waste of electrical
and electronic appliances. Do not dispose
appliances marked with the symbol
with
the household waste. Return the product to
your local recycling facility or contact your
municipal office.
Packaging materials
The materials with the symbol
are recy-
clable. Dispose the packaging in a suitable
collection containers to recycle it.
Before disposal of appliance
Warning! Do these steps to dispose
the appliance:
• Pull the mains plug out of the mains sock-
et.
• Cut off the mains cable and discard it.
ENGLISH 13

IKEA GUARANTEE
How long is the IKEA guarantee valid?
This guarantee is valid for five (5) years
from the original date of purchase of Your
appliance at IKEA, unless the appliance is
named LAGAN in which case two (2) years
of guarantee apply. The original sales re-
ceipt is required as proof of purchase. If
service work is carried out under guarantee,
this will not extend the guarantee period for
the appliance,
Which appliances are not covered by the
IKEA five (5) years guarantee?
The range of appliances named LAGAN
and all appliances purchased in IKEA be-
fore 1st of August 2007
Who will execute the service?
IKEA service provider will provide the serv-
ice through its own service operations or
authorized service partner network.
What does this guarantee cover?
The guarantee covers faults of the appli-
ance, which have been caused by faulty
construction or material faults from the date
of purchase from IKEA. This guarantee ap-
plies to domestic use only. The exceptions
are specified under the headline “What is
not covered under this guarantee?” Within
the guarantee period, the costs to remedy
the fault e.g. repairs, parts, labour and trav-
el will be covered, provided that the appli-
ance is accessible for repair without special
expenditure. On these conditions the EU
guidelines (Nr. 99/44/EG) and the respec-
tive local regulations are applicable. Re-
placed parts become the property of IKEA.
What will IKEA do to correct the problem?
IKEA appointed service provider will exam-
ine the product and decide, at its sole dis-
cretion, if it is covered under this guarantee.
If considered covered, IKEA service provider
or its authorized service partner through its
own service operations, will then, at its sole
discretion, either repair the defective prod-
uct or replace it with the same or a compa-
rable product.
What is not covered under this
guarantee?
• Normal wear and tear.
• Deliberate or negligent damage, dam-
age caused by failure to observe operat-
ing instructions, incorrect installation or by
connection to the wrong voltage, dam-
age caused by chemical or electro-chem-
ical reaction, rust, corrosion or water
damage including but not limited to dam-
age caused by excessive lime in the wa-
ter supply, damage caused by abnormal
environmental conditions.
• Consumable parts including batteries
and lamps.
• Non-functional and decorative parts
which do not affect normal use of the ap-
pliance, including any scratches and pos-
sible color differences.
• Accidental damage caused by foreign
objects or substances and cleaning or un-
blocking of filters, drainage systems or
soap drawers.
• Damage to the following parts: ceramic
glass, accessories, crockery and cutlery
baskets, feed and drainage pipes, seals,
lamps and lamp covers, screens, knobs,
casings and parts of casings. Unless such
damages can be proved to have been
caused by production faults.
• Cases where no fault could be found dur-
ing a technician’s visit.
• Repairs not carried out by our appointed
service providers and/or an authorized
service contractual partner or where non-
original parts have been used.
• Repairs caused by installation which is
faulty or not according to specification.
• The use of the appliance in a non-domes-
tic environment i.e. professional use.
ENGLISH 14

• Transportation damages. If a customer
transports the product to their home or
other address, IKEA is not liable for any
damage that may occur during transport.
However, if IKEA delivers the product to
the customer's delivery address, then
damage to the product that occurs during
this delivery will be covered by this guar-
antee.
• Cost for carrying out the initial installation
of the IKEA appliance. However, if an
IKEA service provider or its authorized
service partner repairs or replaces the
appliance under the terms of this guaran-
tee, the service provider or its authorized
service partner will re-install the repaired
appliance or install the replacement, if
necessary.
This restriction do not apply to fault-free
work carried out by a qualified specialist
using our original parts in order to adapt
the appliance to the technical safety specifi-
cations of another EU country.
How country law applies
The IKEA guarantee gives You specific legal
rights, which covers or exceed local de-
mands. However these conditions do not
limit in any way consumer rights described
in the local legislation
Area of validity
For appliances which are purchased in one
EU country and taken to another EU coun-
try, the services will be provided in the
framework of the guarantee conditions nor-
mal in the new country. An obligation to
carry out services in the framework of the
guarantee exists only if the appliance com-
plies and is installed in accordance with:
• the technical specifications of the country
in which the guarantee claim is made;
• the Assembly Instructions and User Man-
ual Safety Information;
The dedicated After Sales Service for
IKEA appliances:
Please do not hesitate to contact IKEA After
Sales Service to:
1. make a service request under this guar-
antee;
2. ask for clarification on installation of the
IKEA appliance in the dedicated IKEA
kitchen furniture. The service won’t pro-
vide clarifications related to:
– the overall IKEA kitchen installation;
– connections to electricity (if machine
comes without plug and cable), to
water and to gas since they have to
be executed by an authorized serv-
ice engineer.
3. ask for clarification on user manual con-
tents and specifications of the IKEA ap-
pliance.
To ensure that we provide you with the best
assistance, please read carefully the As-
sembly Instructions and/or the User Manual
section of this booklet before contacting us.
How to reach us if You need our service
Please refer to the last page of this manual
for the full list of IKEA appointed contacts
and relative national phone numbers.
Important! In order to provide You with a
quicker service, we recommend that You
use the specific phone numbers listed at the
end of this manual. Always refer to the
numbers listed in the booklet of the specific
appliance You need an assistance for.
Before calling us, assure that You have to
hand the IKEA article number (8 digit code)
for the appliance of which you need our
assistance.
Important! SAVE THE SALES RECEIPT! It is
Your proof of purchase and required for the
guarantee to apply. Note that the receipt
reports also the IKEA article name and
number (8 digit code) for each of the
appliances you have purchased.
ENGLISH 15

Do You need extra help?
For any additional questions not related to
After Sales of your appliances, please con-
tact our nearest IKEA store call centre. We
recommend you read the appliance docu-
mentation carefully before contacting us.
ENGLISH 16

Inhalt
Sicherheitsinformationen 17
Sicherheitshinweise 18
Gerätebeschreibung 21
Täglicher Gebrauch 21
Praktische Tipps und Hinweise 22
Reinigung und Pflege 22
Was tun, wenn … 23
Technische Daten 24
Montage 25
Umwelttipps 28
IKEA Garantie 28
Änderungen vorbehalten.
Sicherheitsinformationen
Lesen Sie vor der Montage und dem Gebrauch des Geräts zu-
erst die Gebrauchsanleitung. Der Hersteller übernimmt keine
Verantwortung für Verletzungen und Beschädigungen durch
unsachgemäße Montage. Bewahren Sie die Gebrauchsanlei-
tung griffbereit auf.
Sicherheit von Kindern und schutzbedürftigen Personen
Warnung! Es besteht Erstickungs- und Verletzungsgefahr
sowie die Gefahr einer dauerhaften Behinderung.
• Dieses Gerät kann dann von Kindern ab 8 Jahren, von Per-
sonen mit eingeschränkten körperlichen, sensorischen oder
geistigen Fähigkeiten sowie von Personen ohne bisherige Er-
fahrung im Umgang mit solchen Geräten bedient werden,
wenn sie dabei von einer Person, die für ihre Sicherheit ver-
antwortlich ist, beaufsichtigt werden.
• Kinder dürfen nicht mit dem Gerät spielen.
• Alle Verpackungsmaterialien von Kindern fernhalten.
• Halten Sie Kinder und Haustiere während des Betriebs oder
der Abkühlphase vom Gerät fern. Zugängliche Teile sind
heiß.
• Wartung oder Reinigung des Geräts dürfen nicht von Kin-
dern ohne Aufsicht erfolgen.
DEUTSCH 17

Allgemeine Sicherheit
• Das Gerät und die zugänglichen Geräteteile werden wäh-
rend des Betriebs heiß. Berühren Sie nicht die Heizelemente.
• Schalten Sie das Gerät nicht über eine externe Zeitschaltuhr
oder eine separate Fernsteuerung ein.
• Kochen mit Fett oder Öl auf einem unbeaufsichtigten Koch-
feld ist gefährlich und kann zu einem Brand führen.
• Versuchen Sie nicht einen Brand mit Wasser zu löschen, son-
dern schalten Sie das Gerät aus und bedecken Sie die Flam-
me mit einem Deckel oder einer Feuerlöschdecke.
• Legen Sie keine Gegenstände auf dem Kochfeld ab.
• Benutzen Sie zum Reinigen des Geräts keinen Dampfreiniger.
• Legen Sie keine Metallgegenstände wie Messer, Gabeln,
Löffel oder Topfdeckel auf die Oberfläche des Kochfelds, da
diese heiß werden können.
• Schalten Sie das Gerät sofort ab, wenn Sie Risse auf der
Glaskeramikfläche feststellen. Stromschlaggefahr!
Sicherheitshinweise
Montage
Warnung! Nur eine qualifizierte
Fachkraft darf den elektrischen
Anschluss des Geräts vornehmen.
• Entfernen Sie das gesamte Verpackungs-
material.
• Stellen Sie ein beschädigtes Gerät nicht
auf und benutzen Sie es nicht.
• Halten Sie sich an die mitgelieferte Mon-
tageanleitung.
• Seien Sie beim Umsetzen des Geräts vor-
sichtig, denn es ist schwer. Tragen Sie
stets Sicherheitshandschuhe.
• Dichten Sie die Ausschnittskanten mit ei-
nem Dichtungsmittel ab, um ein Aufquel-
len durch Feuchtigkeit zu verhindern.
• Schützen Sie die Geräteunterseite vor
Dampf und Feuchtigkeit.
• Installieren Sie das Gerät nicht direkt ne-
ben einer Tür oder unter einem Fenster.
So kann heißes Kochgeschirr nicht herun-
terfallen, wenn die Tür oder das Fenster
geöffnet wird.
• Die Mindestabstände zu anderen Gerä-
ten und Küchenmöbeln sind einzuhalten.
Siehe die Montageanleitung.
• Wird das Gerät über Schubladen einge-
baut, achten Sie darauf, dass zwischen
dem Geräteboden und der oberen
Schublade ein ausreichender Abstand für
die Luftzirkulation vorhanden ist. Siehe
die Montageanleitung.
• Der Boden des Geräts kann heiß werden.
Wir empfehlen eine feuerfeste Trennplat-
te unter dem Gerät anzubringen, damit
der Boden nicht zugänglich ist.
Elektrischer Anschluss
Warnung! Brand- und
Stromschlaggefahr.
DEUTSCH 18

• Die elektrischen Anschlüsse müssen von
einem qualifizierten Elektriker ausgeführt
werden.
• Das Gerät muss geerdet sein.
• Vor der Durchführung jeglicher Arbeiten
muss das Gerät von der elektrischen
Stromversorgung getrennt werden.
• Stellen Sie sicher, dass Sie das richtige
Kabel für den elektrischen Netzanschluss
verwenden.
• Achten Sie darauf, dass das Netzkabel
nicht lose hängt oder sich verheddert.
• Stellen Sie beim elektrischen Anschluss
des Gerätes sicher, dass das Netzkabel
oder ggf. der Netzstecker nicht mit dem
heißen Gerät oder heißem Kochgeschirr
in Berührung kommt.
• Achten Sie darauf, dass das Gerät ord-
nungsgemäß montiert wird. Wenn freilie-
gende oder ungeeignete Netzkabel oder
Netzstecker verwendet werden, kann der
Anschluss überhitzen.
• Sorgen Sie dafür, dass ein Berührungs-
schutz installiert wird.
•Kabel zugentlasten.
• Achten Sie darauf, Netzstecker und Netz-
kabel nicht zu beschädigen. Wenden Sie
sich zum Austausch des beschädigten
Netzkabels an den Kundendienst oder
einen Elektriker.
• Die elektrische Installation muss eine
Trenneinrichtung aufweisen, mit der Sie
das Gerät allpolig von der Stromversor-
gung trennen können. Die Trenneinrich-
tung muss mit einer Kontaktöffnungsbrei-
te von mindestens 3 mm ausgeführt sein.
• Verwenden Sie nur geeignete Trennvor-
richtungen: Überlastschalter, Sicherungen
(Schraubsicherungen müssen aus dem
Halter entfernt werden können), Fehler-
stromschutzschalter und Schütze.
Gas-Anschluss
• Die Gasanschlüsse müssen von einer
Fachkraft ausgeführt werden.
• Stellen Sie sicher, dass die Luft um das
Gerät zirkulieren kann.
• Informationen über die Gasversorgung
finden Sie auf dem Typenschild.
• Das Gerät ist nicht an einen Abzug für
Verbrennungsprodukte angeschlossen.
Das Gerät muss gemäß der aktuell gel-
tenden Montagebestimmungen ange-
schlossen werden. Halten Sie die Bestim-
mungen hinsichtlich der Belüftung ein.
Gebrauch
Warnung! Es besteht Verletzungs-,
Verbrennungs- und Stromschlaggefahr.
• Das Gerät ist für die Verwendung im
Haushalt vorgesehen.
• Nehmen Sie keine technischen Änderun-
gen am Gerät vor.
• Lassen Sie das Gerät bei Betrieb nicht
unbeaufsichtigt.
• Bedienen Sie das Gerät nicht mit feuchten
oder nassen Händen oder wenn es mit
Wasser in Kontakt gekommen ist.
• Legen Sie kein Besteck und keine Topfde-
ckel auf die Kochzonen. Sie werden heiß.
• Schalten Sie die Kochzonen nach jedem
Gebrauch aus.
• Benutzen Sie das Gerät nicht als Arbeits-
oder Abstellfläche.
• Hat die Geräteoberfläche einen Sprung,
trennen Sie das Gerät umgehend von der
Spannungsversorgung. Dies dient zur
Vermeidung eines Stromschlags.
Warnung! Es besteht Explosions- und
Brandgefahr.
• Erhitzte Öle und Fette können brennbare
Dämpfe freisetzen. Halten Sie Flammen
und erhitzte Gegenstände beim Kochen
mit Fetten und Ölen von diesen fern.
• Die von sehr heißem Öl freigesetzten
Dämpfe können eine Selbstzündung ver-
ursachen.
• Bereits verwendetes Öl kann Lebensmit-
telreste enthalten und schon bei niedrig-
eren Temperaturen eher einen Brand
verursachen als frisches Öl.
• Platzieren Sie keine entflammbaren Pro-
dukte oder Gegenstände, die mit ent-
flammbaren Produkten benetzt sind, im
Gerät, auf dem Gerät oder in der Nähe
des Geräts.
DEUTSCH 19

Warnung! Das Gerät könnte
beschädigt werden.
• Stellen Sie kein heißes Kochgeschirr auf
das Bedienfeld.
• Lassen Sie das Kochgeschirr nicht leerko-
chen.
• Lassen Sie keine Gegenstände oder
Kochgeschirr auf das Gerät fallen. Die
Oberfläche könnte beschädigt werden.
•Schalten Sie die Kochzonen niemals ein,
wenn sich kein Kochgeschirr darauf befin-
det, oder wenn das Kochgeschirr leer ist.
• Legen Sie keine Alufolie auf das Gerät.
• Kochgeschirr aus Gusseisen oder Alumini-
umguss oder mit beschädigten Böden
kann die Glaskeramikoberfläche verkrat-
zen. Heben Sie das Kochgeschirr stets an,
wenn Sie es auf dem Kochfeld umsetzen
möchten.
• Sorgen Sie für eine ausreichende Belüf-
tung in dem Raum, in dem das Gerät auf-
gestellt ist.
• Die Lüftungsöffnungen dürfen nicht abge-
deckt werden.
• Verwenden Sie nur standfestes Kochge-
schirr mit der richtigen Form und einem
Durchmesser, der größer als der der
Brenner ist. Die Glasplatte (falls vorhan-
den) kann überhitzen und zerspringen.
• Vergewissern Sie sich, dass die Flamme
nicht erlischt, wenn Sie den Einstellknopf
schnell von der höchsten zur niedrigsten
Stufe drehen.
• Stellen Sie das Kochgeschirr mittig auf die
Heizkreise. Es darf nicht über die Ränder
der Kochfläche herausragen.
• Verwenden Sie ausschließlich das mit
dem Gerät gelieferte Zubehör.
• Setzen Sie keinen Wärmeverteiler auf
den Brenner.
Reinigung und Pflege
Warnung! Das Gerät könnte
beschädigt werden.
• Reinigen Sie das Gerät regelmäßig, um
eine Abnutzung des Oberflächenmateri-
als zu verhindern.
• Reinigen Sie das Gerät nicht mit einem
Wasser- oder Dampfstrahl.
• Reinigen Sie die Brenner nicht im Ge-
schirrspüler.
• Reinigen Sie das Gerät mit einem wei-
chen, feuchten Tuch. Verwenden Sie aus-
schließlich Neutralreiniger. Benutzen Sie
keine Scheuermittel, scheuernde Reini-
gungsschwämmchen, Lösungsmittel oder
Metallgegenstände.
Entsorgung
Warnung! Verletzungs- und
Erstickungsgefahr.
• Für Informationen zur ordnungsgemäßen
Entsorgung des Gerätes wenden Sie sich
an die zuständige kommunale Behörde
vor Ort.
• Trennen Sie das Gerät von der Stromver-
sorgung.
• Schneiden Sie das Netzkabel ab, und
entsorgen Sie es.
• Drücken Sie die äußeren Gasrohre flach.
DEUTSCH 20
Seite wird geladen ...
Seite wird geladen ...
Seite wird geladen ...
Seite wird geladen ...
Seite wird geladen ...
Seite wird geladen ...
Seite wird geladen ...
Seite wird geladen ...
Seite wird geladen ...
Seite wird geladen ...
Seite wird geladen ...
Seite wird geladen ...
Seite wird geladen ...
Seite wird geladen ...
Seite wird geladen ...
Seite wird geladen ...
-
 1
1
-
 2
2
-
 3
3
-
 4
4
-
 5
5
-
 6
6
-
 7
7
-
 8
8
-
 9
9
-
 10
10
-
 11
11
-
 12
12
-
 13
13
-
 14
14
-
 15
15
-
 16
16
-
 17
17
-
 18
18
-
 19
19
-
 20
20
-
 21
21
-
 22
22
-
 23
23
-
 24
24
-
 25
25
-
 26
26
-
 27
27
-
 28
28
-
 29
29
-
 30
30
-
 31
31
-
 32
32
-
 33
33
-
 34
34
-
 35
35
-
 36
36


IKEA MHGA2K 202-371-48 Benutzerhandbuch
- Kategorie
- Kochfelder
- Typ
- Benutzerhandbuch
in anderen Sprachen
- English: IKEA MHGA2K 202-371-48 User manual