版本号:S-9607X-V7-2023.02.01
简体中文
Français
Deutsche
Español
italiano
日本語
한국어
快速入门指南
User Manual
• Switch主机回连唤醒
成功连接后, Switch 进入休眠状态时, 按下手柄 【 】 键即可回连并唤醒 Switch 主机。
• 有线连接
在 Switch 主界面下方, 选择 【 】 设置 → 手柄与感应器 → 点击 Pro 手柄的有线连接
选项, 确保该选项状态为 开启 状态。
Type-C 接口
电源键
HOME 键
LED 指示灯
TURBO 连发键
截屏键
01 产品外观
02 系统要求
ZR
R
ZL
L
支持平台: Switch 主机、 PC 电脑、 iPhone 支持系统: Windows 7/ 8/ 10/ 11、 iOS 16+
03 Switch 主机使用
• 无线连接
① 在
Switch
主界面, 点击 【 】 手柄 → 更改握法/顺序;
② 长按手柄【 】电源键 3 秒, 显示当前剩余电量后, 手柄 4 个 LED 灯循环闪烁, 进入
配对状态;
③ 手柄 LED 长亮时配对成功, 此时按 【 】 键返回主界面即可。
感谢您对 PXN 莱仕达的选择和支持,在使用前请仔细阅读本手册。
手柄 更改握法/顺序
简体中文-01
OTG 转换头
* 使用有线连接前, 请确认手柄处于关机或休眠状态。
① 使用 OTG 转换头和 Type-C 数据线连接手柄与 Switch
主机;
② LED 指示灯闪烁, 手柄连接成功。
(注 :Type-C OTG 转换头需自行购买 )
- Switch 主机:
* 使用有线连接前,请确认手柄处于关机或休眠状态。
① 使用 Type-C 数据线连接手柄和 Switch 底座;
② LED 指示灯闪烁,手柄连接成功。
- Switch 底座:
Switch 底座的 USB 端口
* 使用有线连接前, 请确认手柄处于关机或休眠状态。
① 使用 Type-C 数据线连接手柄和 PC 电脑
的USB 接口;
② 电脑提示发现新硬件并完成安装, 连接成
功后手柄 LED2 指示灯闪烁。
• 有线连接
PC
04 电源和唤醒
05 PC 电脑使用
开机
按键操作手柄状态说明 按键说明
唤醒手柄
长按 【 】 电源键 3 秒开机并进入配对状态
可唤醒手柄并进入回连状态
短按手柄 【 A /B /X /Y /L /
R /十字键 / - / + 】 键
唤醒主机
关机
可唤醒主机同时唤醒手柄
进入回连状态
短按可关机并重置手柄设置
手柄关机后可使用唤醒手柄/唤醒
主机功能回连主机
短按手柄 【 】 HOME键
短按 【 】 电源键
简体中文-02
• 避免强烈振动、 不可自行分拆、 改装及修理。
• 避免水或其它液体进入手柄内部, 以免造成损坏。
• 避免存放于潮湿、 高温、 油烟等场所。
• 内有电池, 请勿将手柄掉进火中, 有爆炸危险。
• 如有质量问题或建议请与销售商或售后人员联系。
产品型号
连接方式
工作电源
包装尺寸
本体尺寸
本体重量
使用温度
PXN-9607X
无线/ 有线连接
约 185*138*78 mm
约 153*111*42 mm
10 - 40 ℃
约 210 g
使用湿度 20~80 %
内置 550mAh 锂电
工作电流 5V 20 mA
13 注意事项
简体中文-05
回连状态
首次配对状态
工作状态
30 秒无连接
60 秒无连接
5 分钟无任何操作和移动
5 分钟后自动睡眠
10 分钟后自动睡眠
20 分钟后自动睡眠
关闭睡眠功能
手柄状态说明 进入睡眠状态
在关机状态下按 【 L3+L 】
键后, 此时通过 【十字键
上/下】 调节自动睡眠时间
L
闪一下
闪一下
闪一下
闪一下
12 睡眠功能
• Switch Console Reconnect and Wake-up
After connect successfully, press [ ] button on Controller can wake up and reconnect
the sleeping Switch console.
• Wired Connection
Click [ ] Setting on Switch homepage
→
Controllers and Sensors
→
then click Pro
Controller Wired Connection. Please make sure this option state is ON.
* Before using the wired connection, please make sure the Controller is OFF or in
sleeping state.
- Switch Console:
Type-C Connecting Port
Power Button
HOME
LED
Indicators
TURBO
Screenshot Button
01 Product Overview
02 System Requirement
ZR
R
ZL
L
Support platform: Switch Console/ PC/ iPhone
Supported Systems: Windows 7/ 8/ 10/ 11, iOS 16+
03 Connect with Switch Console
• Wireless Connection
①
Click [ ] Controller → Change Grip/Order on Switch Homepage.
② Long press [ ] Power Button for 3 seconds, the Four LED indicators on the controller
will flash circularly when the remaining battery life displaying and then enter the pairing
state.
③ The LED will remain ON when the pairing is successful. Then press [ ] button to
back to the Homepage.
Thank you for choosing and supporting PXN, please read this manual carefully before
starting to enjoy your gaming experience.
English-06
Function testing is available when use in computer. The specific steps show below:
Open Control Panel → Devices and Printers → Right mouse click Controller icon →
Game Controller Setting, click Properties Testing.
• Testing Function
06 NFC Function
When the controller has any functional disorder, halt or other abnormality, press and hold
the power button for 8 seconds to restore the factory settings.
Buttons can be set for TURBO function: A / B / X / Y / L / R / ZL / ZR
Manual TURBO: the LED indicator will be flashing when long press the setting button.
Auto-TURBO: the LED indicator will flash quickly.
After the first setting, hold press this
setting button can launch TURBO manually
After the second setting, press the function
button can launch TURBO automatically.
Press the button again can be stopped
Turbo function
After the third setting, the TURBO function
will be cleared
Clear all button TURBO function
Clear All TURBO
Setting
Adjustable Rapid
Fire
or
Setting Button
Setting Button
Setting Button
Manual TURBO
Auto-TURBO
Clear TURBO
Setting
Slow Down
Speed Up
R
Long press [ ] and operate the UP/Down
of Right joystick at the same time can adjust
the rapid fire rate.
The rating has 8 times/second,
10 times/second, 12 times/second.
It is 10 times/second in default.
Using Instructions:
When the Controller connected with Switch console by Bluetooth,
if the game support Amiibo function, place the Amiibo above the
[ ] logo can activate the tool.
The Controller has built-in NFC function, supported to use
figures and chips. (Recommend to use genuine Amiibo figures.)
07 TURBO Function
English-08
08 Reset Function
OTG Adapter
① Use Type-C cable and OTG Adapter to connect the
controller and Switch console.
② The connection is successful when LED indicator in the
Controller flashing.
( Note: The Type-C OTG is not included )
* Before using the wired connection, please make sure the
Controller is OFF or in sleeping state.
① Use Type-C cable and OTG Adapter connect the
controller and Switch Dock.
② The connection is successful when LED
indicator in the Controller flashing.
- Switch Dock:
USB Port of Switch Dock
* Before using the wired connection, please make
sure the Controller is OFF or in sleeping state.
① Connect the Controller with PC by USB cable.
② The PC will prompt new hardware and install
automatically, the connection is successful when
LED2 indicator flashing.
• Wired Connection
PC
Power ON
Button OperationCamepad State Function Instruction
Wake-up
Controller
Power ON and enter pairing
Wake up the sleeping controller
and reconnect
Short press [ A / B / X / Y / L
/ R / Cross button / - / + ]
button on Controller
Wake-up
Console
Power OFF
Wake up the sleeping controller and
reconnect
Short press to Power OFF the
Controller and reset the settings
Wake-up function is available to
use to reconnect the console after
Power OFF
Short press [ ] HOME
button on Controller
04 Power ON/OFF and Wake-up
05 Connect with PC
Short press [ ] button
Press [ ] Power button
for 3 seconds
English-07
• Avoid strong vibration, do not disassemble, modify or repair by yourself.
• Prevent water or other liquids from entering the controller to avoid damage.
• Avoid storing in humid, high temperature, oily smoke and other places.
• Built-in battery, please do not throw the controller into fire to avoid explosion.
• If you have any problems or suggestions about the product, please contact the seller
or the after-services.
Model
Connect Type
Working Power
Packaging Size
Product Size
Unit Weight
Usage Temperature
PXN-9607X
Wireless / Wired Connection
About 185*138*78 mm
About 153*111*42 mm
10 - 40
About 210 g
Usage Humidity 2080%
Built-in 550mAh Lithium Battery
Working Current 5V 20 mA
12 Sleeping Function
13 Attentions
English-10
Reconnect State
First Pairing State
Working State
30 seconds without connection
60 seconds without connection
5 mins without any opperations
Auto sleep after
5 minutes
Auto sleep after
10 minutes
Auto sleep after
20 minutes
Turn off
the sleep function
Controller State Enter Sleeping State
Press [ L3+L ] in Power
OFF state, then the auto
sleep time can be adjusted
by operating UP/DOWN
of D-pad.
L
Light up
Light up
Light up
Light up
• Fonction de console du commutateur de réveil
Une fois la connexion établie, appuyez sur le bouton d'accueil [ ] du contrôleur pour
réactiver et reconnecter la console du commutateur de veille.
• Connexion filaire
Sous l'interface principale de Switch, sélectionnez [ ] Settings Handle and Sensor
Cliquez sur l'option de connexion filaire de la poignée Pro pour garantir cette option Le
statut est activé.
* Avant d'utiliser la connexion filaire, veuillez vous assurer que le contrôleur est éteint
ou en état de veille.
- Console de commutation:
Interface de type C
Bouton marche
d'accueil
Indicateurs
LED
Bouton TURBO
Screenshot Button
01 Présentation du produit
02 Exigence du système
ZR
R
ZL
L
Plateformes compatibles: Switch Console/ PC /iPhone
Système de support: Windows 7/ 8/ 10/ 11, iOS 16+
03 Switch Console
• Connexion sans fil
①
Cliquez sur [ ] Controller → Change Grip / Order sur l'écran Switch.
② Appuyez sur le bouton d'alimentation [ ] du contrôleur pendant 3 secondes pour
coupler, 4 voyants LED clignotent de manière ordonnée et entrent dans l'état de
couplage.
③ Connectez-vous avec succès lorsque le voyant LED reste allumé, puis appuyez sur
le bouton Accueil [ ] pour revenir à la page d'accueil.
Merci d'avoir choisi les produits PXN et de votre soutien à notre marque, veuillez lire
attentivement ce manuel avant de commencer à profiter de votre expérience de jeu.
Français-21
L'inspection des fonctions est disponible lors de la connexion à l'ordinateur.
Les étapes spécifiques montrer ci-dessous:
Ouvrez Panneau de configuration → Périphériques et imprimantes → Cliquez avec le
bouton droit de la souris sur l'icône du contrôleur → Paramètres du contrôleur de jeu,
cliquez sur Test des propriétés.
• Inspection du contrôleur sur PC
06 Fonction NFC
En cas de dysfonction, plantage ou toute autre anomalie de la manette, maintenir le
bouton d’alimentation enfoncé pour restaurer des réglages par défaut.
Boutons de réglage pour la fonction TURBO: A / B / X / Y / L / R / ZL / ZR
Sous Manual TURBO : Le voyant LED clignote lorsque vous maintenez le bouton.
de réglage enfoncé. Sous Auto-TURBO : Le voyant LED clignote rapidement.
Après le premier réglage, maintenez
enfoncé ce bouton de réglage pour lancer
TURBO manuellement
Après le deuxième réglage, appuyez sur le
bouton de réglage pour lancer TURBO fonction
automatiquement, appuyez à nouveau sur le
bouton de réglage pour arrêter la fonction
TURBO
Après le troisième réglage, la fonction
TURBO sera effacée
Effacer tout bouton Fonction TURBO
Effacer tous les
paramètres TURBO
Tir rapide réglable
or
Setting Button
Setting Button
Setting Button
Manuel TURBO
Auto-TURBO
Effacer le réglage
TURBO
Slow Down
Speed Up
R
Maintenez enfoncé le bouton [ ] et
L-Joystick UP/Down prenant en charge
pour ajuster cadence de tir rapide,
cote réglable ont 8 fois/seconde,
10 fois/seconde,12 fois/seconde,
la valeur par défaut est 10 fois/seconde
Using Instructions:
Lorsque le contrôleur est connecté à la console Switch par
Bluetooth, si le jeu prend en charge la fonction Amiibo, placez
l'Amiibo au-dessus du logo [ ] pour activer l'outil.
Le contrôleur est intégré à une puce de lecteur NFC, prise en
charge de la lecture Amiibo. (Remarque: recommande d'utiliser
un véritable Amiibo)
07 Fonction TURBO
Français-23
08 Fonction de réinitialisation
Adaptateur
OTG
① Connectez le contrôleur de mise hors tension avec la
console Switch via un câble USB avec OTG de type C.
② Connectez-vous avec succès lorsque le voyant LED
clignote. (Remarques : la tête de conversion OTG de
type C doit être achetée par vous-même)
* Avant d'utiliser la connexion filaire, veuillez vous assurer que
le contrôleur est éteint ou en état de veille.
① Connectez le contrôleur de mise hors tension avec
la station d'accueil Switch via un câble USB.
② Connectez-vous avec succès lorsque
le voyant LED clignote.
- Commutateur Dock:
Port USB de la station
d'accueil Switch
* Avant d'utiliser la connexion filaire, veuillez vous assurer
que le contrôleur est éteint ou en état de veille.
① Connectez le contrôleur au PC via un câble USB.
② Le PC demandera un nouveau matériel et s'installera
automatiquement, se connectera avec succès lorsque le
voyant LED2 clignotera.
• Connexion filaire
PC
Allumer
Fonctionnement des boutons
État du
contrôleur Instruction de fonction
Contrôleur
de réveil
Appuyez sur le bouton d'alimentation
[ ] pendant 3 secondes Allumez et entrez le couplage
Peut réveiller le contrôleur de
sommeil et se reconnecter
Appuyez brièvement sur le bouton
[ A / B / X / Y / L / R / Bouton
directionnel / - / + ] du contrôleur
Console de
réveil
Power OFF
Peut réveiller la console de
commutation de sommeil et se
reconnecter
Appuyez brièvement pour éteindre
le contrôleur et réinitialiser le réglage
Peut utiliser la fonction de contrôleur
/ console de réveil pour se reconnecter
sous l'état du contrôleur OFF
Appuyez brièvement sur le bouton
[ ] HOME du contrôleur
04 Puissance et réveil
05 Utilisation sur PC
Appuyez brièvement sur le
bouton d'alimentation [ ]
Français-22
• Évitez les fortes vibrations, ne démontez pas, ne remontez pas ou ne réparez pas
vous-même.
• Évitez l'eau ou tout autre liquide dans le contrôleur, cela peut affecter les performances
du contrôleur.
• Ne pas conserver dans un endroit humide, à haute température ou suie.
• Tenir à l'écart du feu, la batterie au lithium intégrée présente un risque d'explosion.
• Veuillez vous connecter avec le service après-vente lorsque vous avez une suggestion
ou un problème de fonctionnement.
Produire un modèle
Type de connexion
Puissance de travail
Taille d'emballage
Taille du produit
Unité de poids
Température d'utilisation
PXN-9607X
Connexion sans fil / filaire
Environ 185*138*78 mm
Environ 153*111*42 mm
10 - 40
Environ 210 g
Humidité d'utilisation 2080%
Batterie au lithium intégrée de 550 mAh
Courant de travail 5V 20 mA
12 Mode veille
13 Attentions
Français-25
Reconnecter l'état
Le premier état d'appariement
Working State
30 secondes sans connexion
60 secondes sans connexion
5 minutes sans aucune opération
Mise en veille automatique
après 5 minutes
Mise en veille automatique
après 10 minutes
Mise en veille automatique
après 20 minutes
Désactiver la fonction
de mise en veille
État du contrôleur Entrer en état de veille
Appuyer sur la bouton [ L3+L ]
en état éteint, puis sur le
[ bouton directionnel haut/bas ]
pour régler le temps de mise
en veille automatique
L
Éclat
Éclat
Éclat
Éclat
Français-24
En utilisant une entrée USB 5V standard, le contrôleur sera complètement chargé en
2-3 heures.
Aucune vibration
Faible vibration
Vibration moyenne
Vibration élevée
Éteint
Niveau
Intense
L
① Appuyez sur [ L3 + R ] pour entrer en mode d'étalonnage,
4 voyants LED sur le contrôleur clignotent en alternance.
② Placez le contrôleur sur le bureau Horizon, appuyez sur le bouton [ ] du contrôleur.
③ Relâchez le bouton, le contrôleur se calibrera automatiquement en 3 secondes.
Lorsque le contrôleur se produit un trouble ou un problème de joystick, vous pouvez
utiliser la fonction d'étalonnage pour résoudre le problème.
L
10 Fonction d'étalonnage du contrôleur
État de
fonctionnement
État de la batterieÉtat du contrôleur État de l'indicateur
Batterie faible Éclat
Éclat
Mise en charge
Complètement chargé
Éclat
Éteindre
Mise en charge
Complètement chargé
11 Fonction de charge
Éclat
Éclat
Éclat
Éteint
Éteint
Continuer à
Maintenez enfoncé le bouton [ ] du contrôleur et actionnez le haut / bas du joystick
gauche en même temps pour régler le niveau de vibration, le niveau de vibration par défaut
est moyen lors de la connexion. Le réglage des vibrations a une fonction de mémoire.
09 Vibration réglable
• Switchがスリープから、機能回復操作
Switch本体は接続完了し、本体がスリープ状態に入った時、コントローラー本体の「 」
ボタンを押せば、Switch本体はスリープ状態から、機能回復できます。。
• コード接続
Switchのメイン画面から 、「 」⇒「 コントローラー&センサー 」 ⇒ 「 Proコントローラーの
コード接続 」、順番にタップします。 Switch 本体は電源が ON の状態であることを確保します。
Type-Cポート
電源 ボタン
ホームボタン
LEDイン
ジケータ
TURBO連射ボタン
ス ク リ ー ン ショット ボ タ ン
01 ボ タン介 绍
02 支持システム
ZR
R
ZL
L
支 持 デ バ イ ス : Switch/ PC/ iPhone
支持系统: Windows 7/ 8/ 10/ 11、 iOS 16+
03 Switchに接続の場合
• ワイヤレス
① Switchメイン設置・メーニューから、「 」コントローラーを選択 ⇒ 持ち方/順番を変え
るを選択。
② 本体の「 」ボタンを3秒で長押すとBluetoothはペアリング状態に入ります。本体
のインジケータは4つが点滅します。ペアリングの準備に入ります。
③ LEDインジケータが常亮になるとペアリング成功、「 」ホ ー ム ボ タ ン を 押 せ ば 、画 面
はメイン画 面 に戻ります。
PXN製品をお買い上げいただきまして、誠にありがとうございます。ご使用になる
前に、本取扱説明書をよくお読みください。
日本語-11
コントローラーはPCコントロールパネル ⇒に接続して使用の時、プロコンのボタン機能自動
検査機能を起こします:
デバイスとプリンタ ⇒ マウスの右ボタンでプロコンLOGOをクリックします ⇒ゲームコントロ
ール設置⇒コントローラー属性を選択。
• コントローラーの機能をテスト
06 NFC機能
ハンドルに動作の不安定、フリーズまたはほかの異常が発生した場合、電源ボタンを8秒間
長押しすると、工場出荷時の設定に戻ります。
A / B / X / Y / L / R / ZL / ZR ボタンに設置することができます。
手動で連射機能をクリア:機能ボタンを長押すとインジケータを点滅したら、機能をクリアさ
れます。自動連射状態: LEDインジケータは快速点滅です。
第一回設置すると、このボタンを長押すと
連射機能を起動します
2番目の設定後、ファンクションキーを押し
てバーストを自動的にトリガーし、を押して
バーストを一時停止します
3回目の設定後、ファンクションキーで設定
したバースト機能を解除する
第三回設置すると、連射機能をクリアされ
ます
連射機能のクリア
バ ーストレ ート調 整
或
機 能 ボタン
機 能 ボタン
機 能 ボタン
手動連射
自動連射
連射機能をクリア
減速らす
加速する
R「
」
キー+
「
右 ス テ ィック 上 下
」
を長押し
してバ ーストレ ートを 調 整しますレート は
8回/秒、10回/秒、12回/秒に分割され、
デフォルトは10回/秒です
使用方法:
コントローラー本体はSwitch本体とBluetoothで接続してから、
Amiiboーラーのゲームを支持できるようになり、ゲームのおも
ちゃでコントロNFCエリアから、ゲームキャラクターを起動するこ
とができます。
ゲームコントローラーはNFC反応機能を搭載されてあり、Amiibo
ゲームを支持します。(※正規品Amiiboゲームをお薦め)
07 TURBOワンボタン連射機能
日本語-13
08 リセット 機 能
OTG 接続端子
① コントローラー電源がOFF状態を確認、OTG端子と
Type-C・コードでコントローラーはSwitch本体と
接続します。
② LEDインジケータが点滅し、コントローラーが接続成功。
(※ OTG 変換ヘッドは別に購入する必要です )
- Switch本体:
① コントローラーの電源がOFF状態で、Type-C・コード
でコントローラーをSwitchのベースに接続します。
② LEDインジケータが点滅すると、
接続成功します。
- Switchベース:
SwitcベースのUSB端子
* コード接続する場合、コントローラー本体電源がOFF&スリープ状態であることを確認。
① Type-Cコードで、コントローラー本体はPC
のUSBボードを接続。
② USBコードでコントローラーはPCのUSB
ボートに接続すれば、コントローラー本体の
LED2インジケータを点滅します。
PC
電源ON
操作説明ハ ンドル 状 態 ボタン説 明
プロコン機能
を回復
本体は起動し、ペアリングの準備
状 態 に 入ります
プロコン本体機能を回復、ペアリング
状 態 に 入ります
プロコンの「 A / B / X / Y / L / R / 十
字ボタン / - / + 」ボタンを押します
機能を回復
電源OFF
プロコンはスリープから機能回復で
きます
電源OFFボタンを押せば、コントロー
ラーの電源がOFFになり、機能はリセ
ットされます電源がOFF状態のプロコ
ンは本体機能回復&機能回復の機能
からswitchと再度接続します
プロコンの「 」ボタンを押します
「 」ボタンを押します
04 電源とスリープ機能
05 PCで使用の場合
「 」ボタンを 3 秒で長押します
日本語-12
• コントローラー本体は強烈な振動することやご御自分が解体や改装や修理などすることを
しないようにしてください。
• コントローラーの本体には水と液体ように物はコントローラーの内部に入ることを禁止です
本体は損壊することになります。
• コントローラーを使用されない時、湿気や高温や汚れなどの場所で保存しないでください。
• コントローラー本体には、電池を内蔵されてあるので、コントローラー本体は明火に投入し
ないようにしてください。充電電池が爆発の原因になりますから。
メーカー型番
接続方式
稼働電源
包 装 サイズ
本 体 サイズ
本体重量
使用環境温度
PXN-9607X
ワイヤレス & コード接続
約 185*138*78 mm
約 153*111*42 mm
10 - 40℃
約 210 g
使用環境湿度 20~80%
550mAh内蔵充電電池
額定電流 5V 20 mA
12 スリープ機能
13 ご注意事項
日本語-15
ペ アリング状 態
初めてのペアリング
稼働状態
30 秒接続なし
60 秒接続なし
5 分間操作なし&移動なし
5 プに移行します
分 後 に オートスリー
10 プに移行します
分 後 に オートスリー
20 プに移行します
分 後 に オートスリー
スリープ機能をオ
フにします
コントローラー本体の状態 スリープ状態にはいり
電源オフの状態で「 L3+L 」
ボタンを押した後、「 十字ボ
タン上/下」でオートスリー
プ移行時間を調整します
L
点灯した
点灯した
点灯した
点灯した
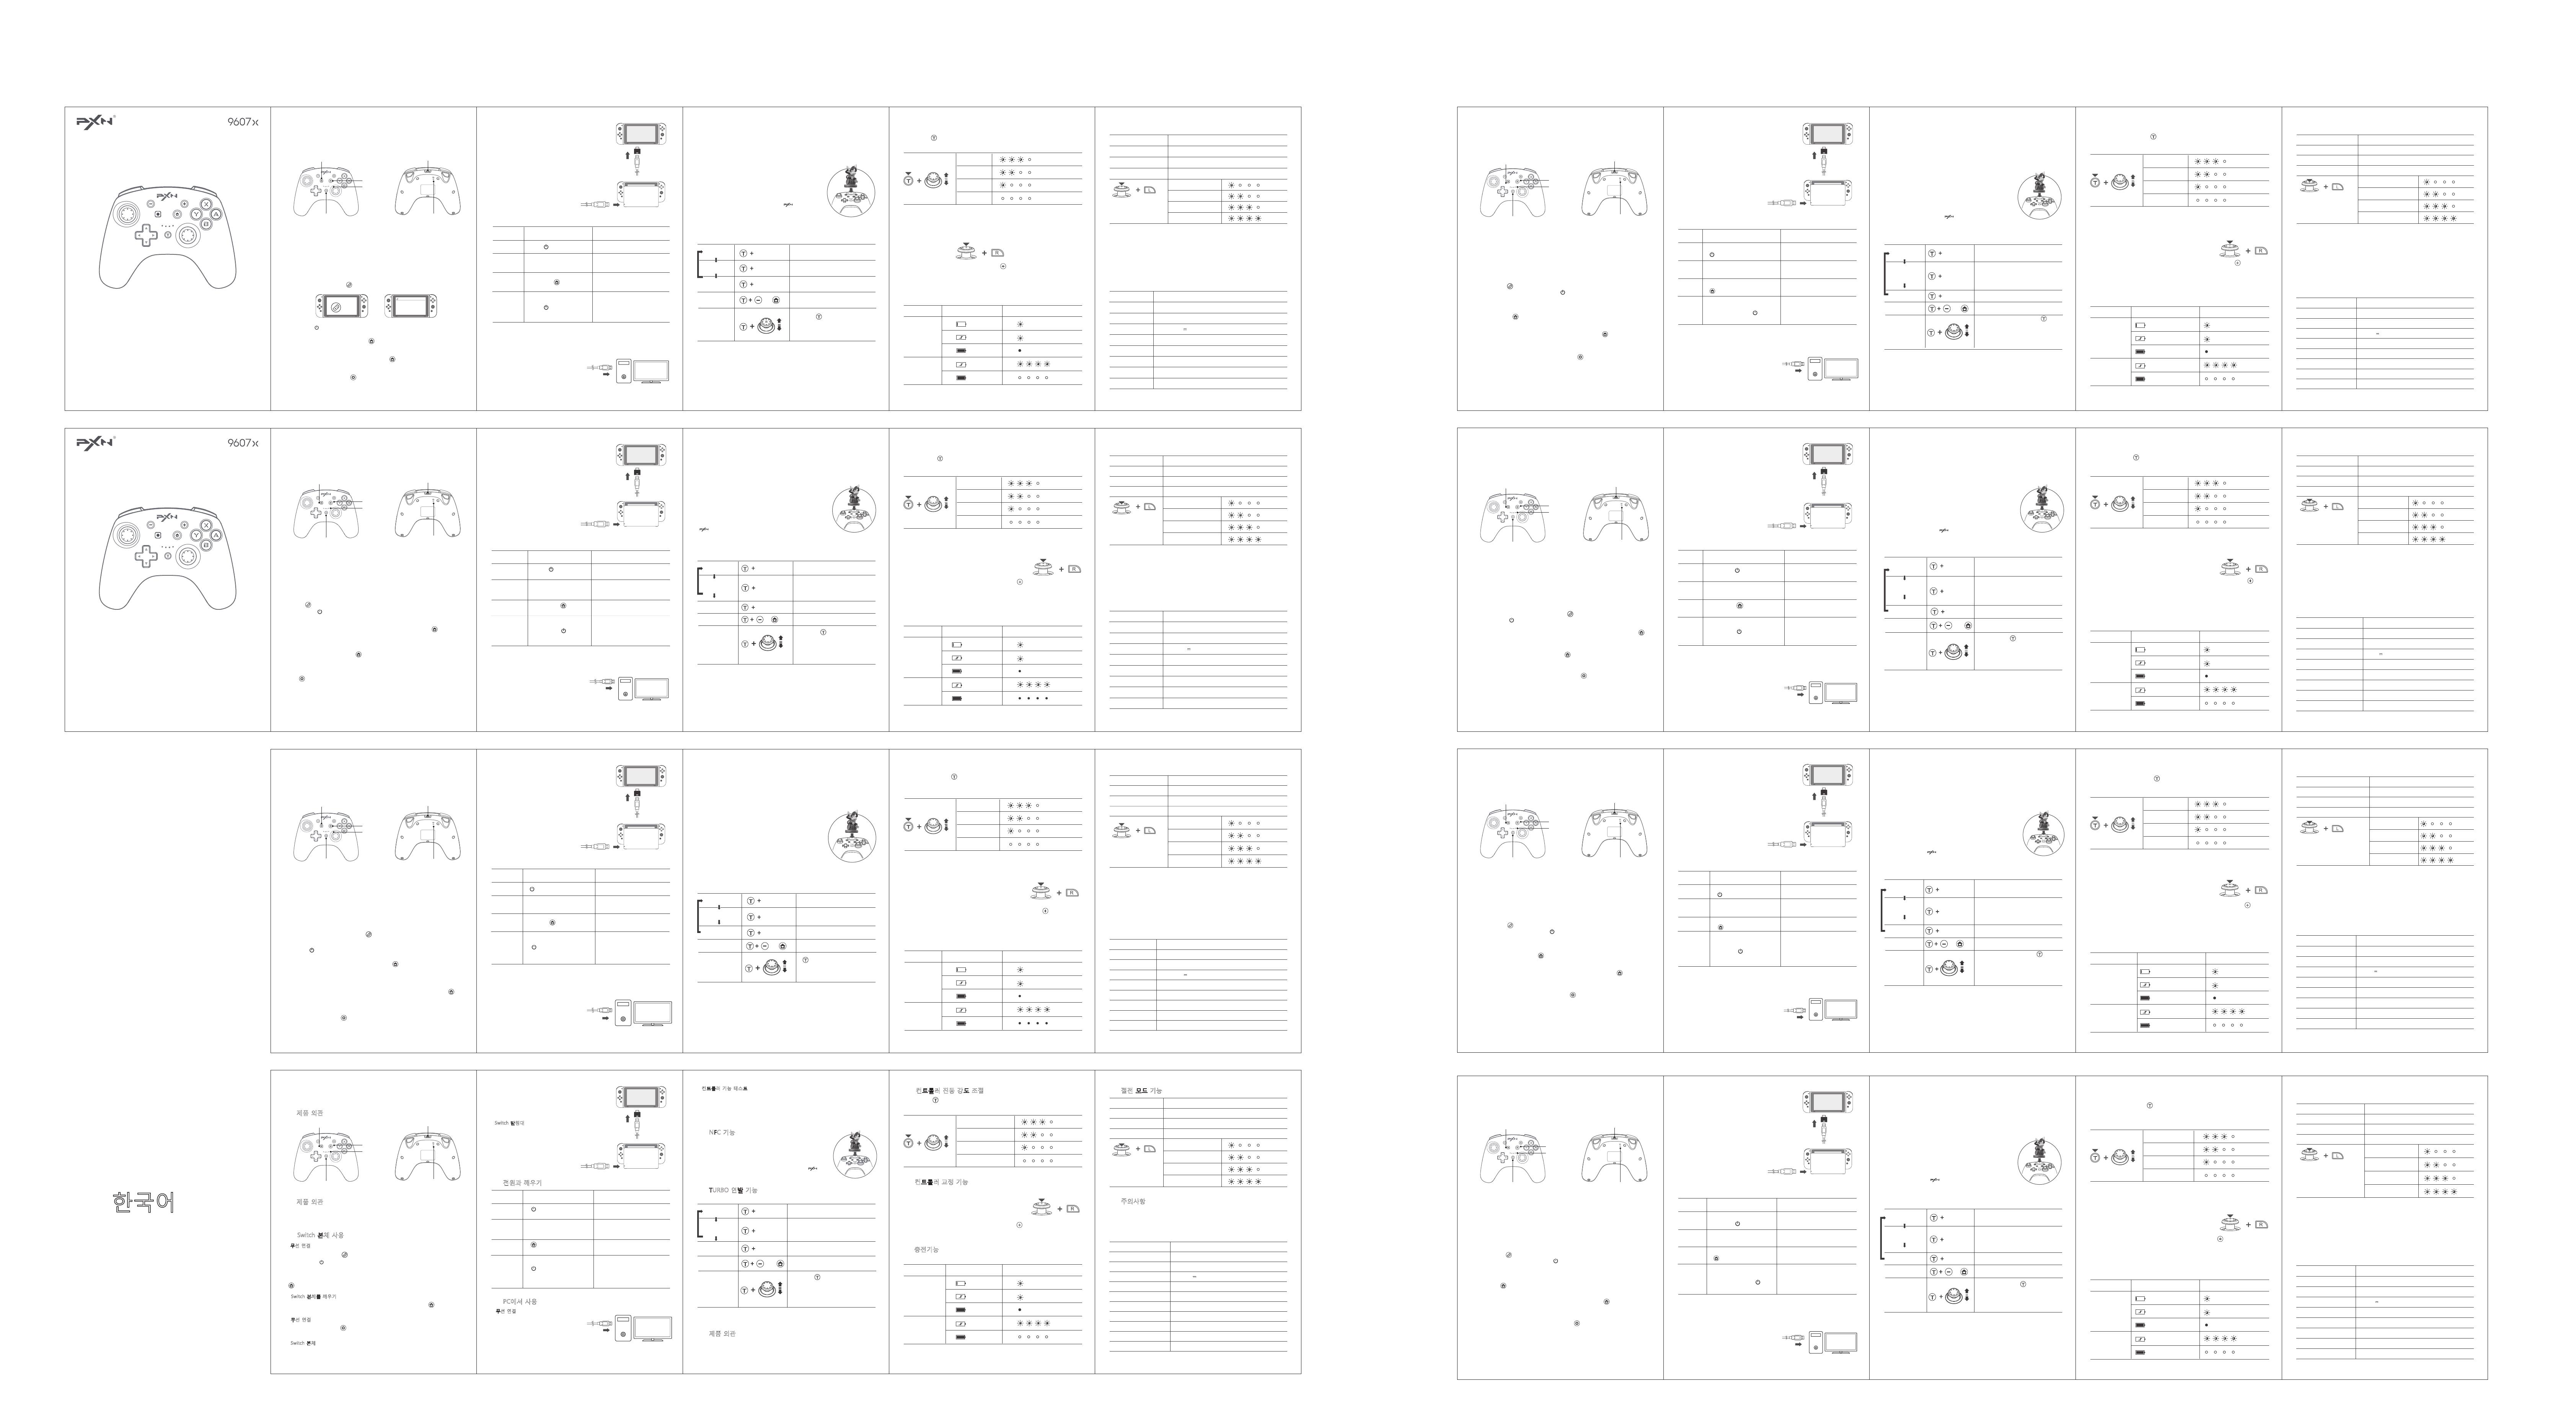
• Switch 본체를 깨우기
컨트롤러가 본체와 연결된 후 Switch가 절전 모드일 때 컨트롤러의 [ ] HOME 버튼을
누르면 Switch 본체를 깨울 수 있습니다.
• 무선 연결
Switch 메인 화면 하단의 [ ] 설정 클릭→ 컨트롤러와 센서를 선택→ Pro 컨트롤러의
유선 연결 옵션을 클릭하여 해당 옵션 상태가 ON인지 확인합니다.
* 유선 연결하기 전에 컨트롤러가 꺼져 있거나 절전모드 상태에 있는지 확인하십시오.
- Switch 본체
Type-C 포트
전원 버튼
HOME 버튼
LED 표시등
TURBO 연발 버튼
스크린샷 버튼
01 제품 외관
02 제품 외관
ZR
R
ZL
L
지원 플랫폼: 닌텐도 Switch, PC, iPhone
지원 운영체계: Windows 7/ 8/ 10/ 11, iOS 16+
03 Switch 본체 사용
• 무선 연결
① Switch 메인 화면에서 [ ] 컨트롤러→잡는 방법/순서 변경.
② 컨트롤러의 [ ] 전원 버튼을 3초간 길게 누르면 현재 배터리 잔량이 표시된 다음
컨트롤러의 4개 LED 표시등이 점멸하면서 페어링 상태로 진입합니다.
③ 컨트롤러의 LED표시등이 켜진 상태면 페어링이 완료됐다는 것을 의미하며 이 때
[ ] HOME 버튼을 눌러 메인 화면으로 돌아가면 됩니다.
PXN제품을 선택해 주시고 저희 브랜드를 지지해 주셔서 감사드립니다. 사용하기 전
본 메뉴얼을 자세히 읽어 주시기 바랍니다.
한국어-16
OTG 어댑터
① OTG 어댑터 및 Type-C 데이터 케이블로 컨트롤러와
Switch 본체를 연결합니다.
② LED 표시등이 점멸하면 컨트롤러 연결이 완료됩니다.
(* 참고: Type-C OTG 어댑터는 별도 구입 필요)
* 유선 연결하기 전에 컨트롤러가 꺼져 있거나 절전모드
상태에 있는지 확인하십시오.
① Type-C 데이터 케이블로 컨트롤러와 Switch 받침대를
연결합니다.
② LED표시등이 점멸하면 컨트롤러
연결이 완료됩니다.
- Switch 받침대:
Switch 받침대의 USB 포트
* 유선 연결하기 전에 컨트롤러가 꺼져 있거나
절전모드 상태에 있는지 확인하십시오.
① Type-C 데이터 케이블로 컨트롤러와 PC의 USB
포트를 연결합니다.
② PC에 새로운 하드웨어를 발견했거나 설치 완료했다는
메시지가 뜨면 컨트롤러의 LED 2번 표시등이 점멸합니다.
• 무선 연결
PC
04 전원과 깨우기
05 PC에서 사용
전원 켜기
버튼 조작
컨트롤러
상태 설명 버튼 설명
컨트롤러
깨우기
[ ] 전원 버튼을 3 초간 길게
누릅니다
전원이 켜지고 페어링 상태에
진입합니다
컨트롤러를 깨우고 재연결 상태로
진입할 수 있습니다
컨트롤러의 [A/ B/ X/ Y/ L/ R/
십자 버튼/ - / + ] 버튼을
짧게 누릅니다
본체 깨우기
전원 끄기
본체를 깨우는 동시에 컨트롤러
깨우기
짧게 누르면 전원을 끄고 컨트롤러
설정을 초기화합니다
컨트롤러가 꺼진 후에도 컨트롤러
깨우기, 본체 깨우기 기능으로
재연결 할 수 있습니다
[ ] HOME 버튼을 짧게
누르십시오
[ ] 전원 버튼을 짧게
누릅니다
한국어-17 한국어-19
전원 규격은 표준 USB 5V이며, 컨트롤러 완충 시간은 약 2~3시간입니다.
모터가 진동하지 않음
모터가 약하게 진동
모터가 중간 정도로 진동
모터가 강하게 진동
끄기
강력단계
L
① 절전 모드에서 [ L3+R ]을 눌러 교정 모드로 진입하면
컨트롤러의 4개 LED 표시등이 2개 조로 나뉘어 번갈아
점멸합니다.
② 이때 컨트롤러를 탁자 수평면에 놓고 컨트롤러의 [ ] 버튼을 누릅니다.
③ 버튼에서 손을 놓으면 3초 내에 센서 교정이 자동 완성됩니다.
버튼이 정상적으로 작동하지 않거나 방향 키가 중립위치로 돌아가지 않을 경우 컨트롤러
교정 기능을 사용할 수 있습니다.
L
10 컨트롤러 교정 기능
배터리 잔량 상태
전력량 상태컨트롤러 상태 설명 표시등 상태
배터리 부족 점멸
점멸
충전 중
완충
점멸
전원 OFF 상태
충전 중
완충
11 충전기능
점멸
점멸
점멸
소등
소등
점등(계속 켜진 상태)
09 컨트롤러 진동 강도 조절
컨트롤러의 [ ] 연발 버튼을 길게 누르면서 [왼쪽 조이스틱 상/하]를 이용하여 진동
세기를 조절합니다. 기본 진동은 중간 단계입니다.
日本語-14
USB電源の額定電圧5V、コントローラー本体が0~100%フルー充電約2~3時間。
振動を閉じ
弱レベルに振動
中レベルに振動
強い振動
オフ
強い
L
① コントローラー本体はスリープ状態で【 L3+R 】を押すと
本体微調整設置に入ります、コントローラーの
4つインジケータLEDは2組に分けられ、点滅状態に入ります。
② この際コントローラー本体は平坦なテーブルの上に置きます、本体の「 」ボタンを押します。
③ ボタンを放します、3 秒後センサーの調整は自動的に完成します。
• コントローラー本体のジャイロ機能が異常、また操作レバーの操作精度が落ちた場合、
コントローラー本体の微調整機能で設置できます。
L
10 コントローラーボタン機能の微調整
電源 ON
電量状態ハ ンドル 状 態 インジケータの状態
低電力 点滅
点滅
充電中
電 力フル ー
点滅
電源OFF
充電中
電 力フル ー
11 充電機能
コントローラー本体の「 」ボタンを押すながら、「 左レバー⇒上/下 」を調整するとモーター
の振動強度を調整されます。振動強度のデフォルトは中レベルです、振動機能の調節すると次
回には自動的に認識します。
09 本体のモーター強度の調整
点灯した
点灯した
点灯した
オフ
オフ
常亮
• Verdrahtete Verbindung
Nach erfolgreicher Verbindung drücken Sie [ ] Home-Taste am Controller kann
aufwachen und Schließen Sie die Sleep-Switch-Konsole wieder an.
• Connexion filaire
Wählen Sie unter der Hauptschnittstelle von Switch [ ] Einstellungen → Griffe und
Sensoren → Klicken Sie auf die Kabelverbindungsoption des Pro-Griffs, um
sicherzustellen, dass die Option aktiviert ist.
* Bevor Sie die drahtgebundene Verbindung verwenden, stellen Sie bitte sicher,
dass die Die Steuerung ist ausgeschaltet oder im Ruhezustand.
- Mit Schalterkonsole verbinden:
Typ-C-Schnittstelle
Ein/Aus-Taste
HOME-Taste
LED-Anzeigen
TURBO-Taste
Schaltfläche Screenshot
01 Produkt-Übersicht
02 System-Anforderung
ZR
R
ZL
L
Kompatible Plattformen: Switch/ PC /iPhone
Unterstützungssystem: Windows 7/ 8/ 10/ 11, iOS 16+
03 Verwendung am Switch
• Drahtlose Verbindung
①
Klicken Sie auf dem Bildschirm Schalter auf [ ] Controller → Griff/Bestellung ändern.
② Drücken Sie [ ] die Einschalttaste des Reglers für 3 Sekunden, um ein Paar zu
bilden, 4 LED-Anzeigen blinken geordnet und den Kopplungsstatus eingeben.
③ Erfolgreiche Verbindung herstellen, wenn die LED-Anzeige AN bleibt, dann [ ]
Home-Taste drücken,um zurückzugehen zur Homepage.
Vielen Dank, dass Sie sich für PXN-Produkte entschieden haben und unsere Marke
unterstützen. Bitte lesen Sie dieses Handbuch sorgfältig durch, bevor Sie beginnen,
Ihr Spielerlebnis zu genießen.
Deutsche-26
Adaptateur
OTG
① Verbinden Sie den ausgeschalteten Controller mit
dem Schalter Konsole über USB-Kabel mit OTG Typ C.
② Verbindung erfolgreich hergestellt, wenn die LED-
Anzeige blinkt. (Bemerkungen: Typ-C OTG Umbaukopf
muss selbst gekauft werden)
* Bevor Sie die drahtgebundene Verbindung verwenden, stellen
Sie bitte sicher, dass die Die Steuerung ist ausgeschaltet oder im Ruhezustand.
① Connect the power-off Controller with
Switch dock by USB cable.
② Connect successfully when LED
indicator flash.
- Mit Switch-Dock verbinden:
USB-Anschluss des
SWITCH Dock
* Bevor Sie die drahtgebundene Verbindung verwenden, stellen Sie bitte sicher, dass die
Die Steuerung ist ausgeschaltet oder im Ruhezustand.
① Verbinden Sie den Controller über ein USB-Kabel
mit dem PC.
② Der PC fragt nach neuer Hardware und installiert sich
automatisch, die Verbindung wird erfolgreich hergestellt wenn die LED2-Anzeige blinkt.
• Verdrahtete Verbindung
PC
AN
einschalten
Anleitung zur Tastenbedienung
Controller-
Status Funktionsanweisung
Aufwachen
Griff
Drücken Sie [ ] Ein/AusTaste für
3 Sekunden Power on and enter pairing
Kann Schlaf-Controller aufwecken
und wieder verbinden
Kurz drücken [ A / B / X / Y / L / R /
Kreuztaste / - / + ] Taste am Controller
Aufwachen
Konsole
Power OFF
Kann den Schlaf wecken
Schaltkonsole und wieder verbinden
Kurzes Drücken kann die Regler
und Rücksetzeinstellung
Kann Wecksteuergerät/Konsole
verwenden Funktion zum
Wiederverbinden unter Controller
Kurz drücken [ ] HOME-Taste
am Controller
04 Macht und Aufwachen
05 Verwendung am PC
Kurz drücken [ ] Ein/Aus-Taste
Deutsche-27
• Vermeiden Sie starke Vibrationen, zerlegen, montieren oder reparieren Sie das Gerät
nicht selbst.
• Vermeiden Sie Wasser oder andere Flüssigkeiten im Regler, sie können die Leistung
des Reglers beeinträchtigen.
• Nicht an feuchten, heißen oder rußigen Orten aufbewahren.
• Halten Sie sich von Feuer fern, die eingebaute Lithiumbatterie ist explosionsgefährdet.
• Bitte wenden Sie sich an den Kundendienst, wenn Sie einen Vorschlag oder eine
Bedienung haben.
Modell erstellen
Verbindungstyp
Arbeitskraft
Verpackungsgröße
Produktgröße
Gewichtseinheit
Verwendungstemperatur
PXN-9607X
Drahtlose / kabelgebundene Verbindung
Ca. 185*138*78 mm
Ca. 153*111*42 mm
10 - 40
Ca. 210 g
Verwendung Luftfeuchtigkeit 2080%
Eingebaute 550mAh Lithiumbatterie
Arbeitsstrom 5V 20 mA
12 Mode veille
13 Anmerkungen
Deutsche-30
Wiederanschluss-Zustand
Der erste Paarungsstaat
Arbeitsstaat
30 Sekunden ohne Verbindung
60 Sekunden ohne Verbindung
5 Minuten ohne jede Operation
Automatischer Schlaf
nach 5 Minuten
Automatischer Schlaf
nach 10 Minuten
Automatischer Schlaf
nach 20 Minuten
Die Schlaf-Funktion
ausschalten
Controller-Status In den Schlafzustand wechseln
Nach Drücken der Taste
[ L3+L ] im ausgeschalteten
Zustand kann die automatische
Einschlafzeit mit der
[ Kreuztaste auf/ab ]
eingestellt werden
L
Aufleuchtet
Aufleuchtet
Aufleuchtet
Aufleuchtet
Deutsche-29
Bei Verwendung eines Standard-USB 5V-Eingangs wird der Controller in 2-3 Stunden
vollständig aufgeladen.
Keine Vibration
Schwache Vibration
Mittlere Schwingung
Hohe Vibration
AUS
Stark
L
① Drücken Sie [ L3+R ], um in den Kalibrierungsmodus zu
gelangen, 4 LED-Anzeigen am Controller blinken abwechselnd.
② Legen Sie den Controller auf das Horizontpult und drücken Sie die Taste [ ] am
Controller.
③ Lassen Sie die Taste los, der Controller kalibriert sich automatisch in 3 Sekunden.
Wenn der Controller eine Störung oder ein Problem mit dem Joystick auftritt, können Sie
die Kalibrierung verwenden Funktion zu beheben.
L
Halten Sie die Taste [ ] am Controller gedrückt und betätigen Sie die Tasten AUF/Ab des
linken Joystick gleichzeitig zur Einstellung des Vibrationsniveaus, Standard-Vibrationsniveau
ist mittel beim Verbinden. Die Vibrationseinstellung hat eine Speicherfunktion.
09 Einstellbare Vibration
10 Regler-Kalibrierungsfunktion
Arbeitsstaat
Zustand der BatterieController-Status Indikator Zustand
Niedriger Batteriestatus flackern
flackern
Aufladen
Vollständig aufgeladen
flackern
Ausschalten
Aufladen
Vollständig aufgeladen
11 Ladefunktion
Aufleuchtet
Aufleuchtet
Aufleuchtet
Aufleuchtet
Éteint
Vollständig aufgeladen
• Función de consola de interruptor de despertador
Después de conectarse correctamente, presione el botón de inicio [ ] en el
controlador para activar y volver a conectar la consola del interruptor de suspensión.
• Conmutación de consola
En la interfaz principal de Switch, seleccione [ ] Configuración → Manijas y sensores
→ Haga clic en la opción de conexión por cable de la manija Pro para asegurarse de
que la opción esté activada.
* Antes de usar la conexión por cable, asegúrese de que el controlador esté
APAGADO o en estado de suspensión.
- Mit Schalterkonsole verbinden:
Interfaz tipo C
Botón de encendido
Botón de inicio
Indicadores
LED
Botón TURBO
Botón de captura de pantalla
01 Descripción del producto
02 Requisitos del sistema
ZR
R
ZL
L
Plataformas compatibles: Switch Console/ PC/ iPhone
Sistema de soporte: Windows 7/ 8/ 10/ 11, iOS 16+
03 Consola del interruptor
• Conexión inalámbrica
①
Haga clic en [ ] Controller → Change Grip / Order en la pantalla Switch.
② Presione el botón de encendido [ ] del controlador durante 3 segundos para
emparejar, 4 indicadores LED parpadean ordenadamente y entran en estado de
emparejamiento.
③ Conéctese correctamente cuando el indicador LED se mantenga encendido, luego
presione el botón de inicio [ ] para volver a la página de inicio.
Gracias por elegir y apoyar nuestro PXN. Lea atentamente este manual de usuario
antes de utilizar el producto.
Español-31
Function inspection is available when connect with computer. The specific steps mostrar
a continuación:
Abra el Panel de contro → Dispositivos e impresoras → Haga clic con el botón derecho
del mouse en el icono Controlador → Configuración del controlador de juego, haga clic
en Propiedades Prueba.
• Inspección del controlador en PC
06 Función NFC
Cuando los mandos no funcionen de forma adecuada, se bloqueen o aparezcan otros
tipos de anomalía, mantenga presionado el botón de energía 8 segundos para restaurar
la configuración de fábrica.
Botones de configuración para la función TURBO: A / B / X / Y / L / R / ZL / ZR
En TURBO manual : el indicador LED parpadea cuando se mantiene presionado el
botón de configuración. En Auto-TURBO : el indicador LED parpadea rápidamente.
Después de la primera configuración,
mantenga presionado este botón de
configuración para iniciar TURBO manualmente
Después de la segunda configuración, presione
el botón Configuración Para iniciar la función
TURBO automáticamente, presione el botón
nuevamente Configuración para detener la
función TURBO
Después del tercer ajuste, la función TURBO
se borrará
Borrar todos los botones de la función TURBO
Borrar todos los
ajustes de TURBO
Fuego rápido
ajustable
o
Botón de ajuste
Botón de ajuste
Botón de ajuste
TURBO manual
Auto-TURBO
Configuración
clara de TURBO
Ralentizarlo
Acelerar
R
Mantenga presionado el botón [ ] y el joystick
L ARRIBA /Abajo /Carga para establecer una
velocidad de disparo rápida, clasificación
ajustable tener 8 veces /segundo, 10 veces /
segundo, 12 veces /segundo, la configuración
predeterminada es 10 veces / segundo
Instrucciones de uso:
Cuando el controlador se conecta con la consola Switch por
Bluetooth, si el juego admite la función Amiibo, coloque el Amiibo
sobre el logotipo de [ ] para activar la herramienta.
El controlador está integrado en un chip lector NFC, compatible con
la lectura de Amiibo. (Nota: se recomienda usar Amiibo genuino)
07 Función TURBO
Español-33
08 Función de reinicio
Adaptador
OTG
① Conecte el controlador de apagado con la consola
Switch mediante un cable USB con OTG Tipo-C.
② Conéctese correctamente cuando el indicador LED
parpadee. (Observaciones: el cabezal de conversión
OTG tipo C debe comprarlo usted mismo)
* Antes de usar la conexión por cable, asegúrese de que el
controlador esté APAGADO o en estado de suspensión.
① Conecte el controlador de apagado con la
base de conmutación mediante un cable USB.
② Conéctese correctamente cuando el
indicador LED parpadee.
- Interruptor de muelle:
Puerto USB de la base
de conmutación
* Antes de usar la conexión por cable, asegúrese de que el
controlador esté APAGADO o en estado de suspensión.
① Conecte el controlador con la PC mediante
un cable USB.
② The PC will prompt new hardware and install automatically,
connect successfully when LED2 indicator flash.
• Conexión por cable
PC
Encendido
Operación de botón
Estado del
controlador Instrucción de función
Controlador de
despertador
Encienda e ingrese el emparejamiento
Puede despertar el controlador de
sueño y volver a conectarse
Presione brevemente el botón
[ A / B / X / Y / L / R / Botón cruz /
- / + ] en el controlador
Consola de
despertador
Apagado
Puede despertar el sueño Cambiar
la consola y volver a conectarse
Pulse brevemente para apagar el
controlador y restablecer la
configuración Puede usar la función de
consola / controlador de activación para
volver a conectarse en el estado de
apagado del controlador
Presione brevemente el botón
[ ] INICIO en el controlador
04 Poder y despertar
05 Utilizando en PC
Presione brevemente el botón de
encendido [ ]
Presione el botón de encendido
[ ] durante 3 segundos
Español-32
• Evite las vibraciones fuertes, no lo desmonte, vuelva a montar ni repare por su cuenta.
Avoid water or other liquid in controller, it may affect the performance of the controller.
• Agua u otro líquido en el controlador, puede afectar el rendimiento del controlador.
• No lo guarde en lugares húmedos, de alta temperatura o con hollín.
• Mantener alejado del fuego, la batería de litio incorporada tiene peligro de explosión.
• Conéctese con el servicio posventa cuando tenga una sugerencia o un problema de
operación.
Producir modelo
Tipo de conexión
Poder de trabajo
Tamaño de empaque
Tamaño del producto
Gewichtseinheit
Unidad de peso
PXN-9607X
Conexión inalámbrica / por cable
Aprox. 185*138*78 mm
Aprox. 153*111*42 mm
10 - 40
Aprox. 210 g
Temperatura de uso 2080%
Batería de litio incorporada de 550 mAh
Corriente de trabajo 5V 20 mA
12 Modo dormir
13 Atenciones
Español-35
Estado de reconexión
El primer estado de emparejamiento
Estado de trabajo
30 segundos sin conexión
60 segundos sin conexión
5 minutos sin operaciones
Suspensión automática
tras 5 minutos
Suspensión automática
tras 10 minutos
Suspensión automática
tras 20 minutos
Desactive la
suspensión
Estado del controlador Entrar en estado durmiente
Ajuste el período de suspensión
automática a través del
[ botón cruz arriba / abajo ] una vez
pulsados los botones [ L3 + L ]
cuando esté estado apagado
L
Destello
Destello
Destello
Destello
• Funzione Wake-up Switch Console
Dopo la connessione con successo, premere il pulsante Home [ ] sul controller per
riattivare e ricollegare la console Switch sleep.
• Connessione via cavo
Sotto l'interfaccia principale di Switch, seleziona [ ] Impostazioni→Maniglie e sensori
→Fai clic sull'opzione di connessione cablata della maniglia Pro per assicurarti che
l'opzione sia attiva.
* Prima di utilizzare la connessione cablata, assicurarsi che il controller sia spento
o in stato di sospensione.
- Switch Console:
Interfaccia di tipo C
Pulsante di alimentazione
Pulsante HOME
Indicatori LED
Pulsante TURBO
Pulsante Screenshot
01 Panoramica del Prodotto
02 Requisito del sistema
ZR
R
ZL
L
Piattaforme compatibili: Switch Console/ PC/ iPhone
Sistema di supporto: Windows 7/ 8/ 10/ 11, iOS 16+
03 Cambia console
• Connessione senza fili
①
Fare clic su [ ] Controller Change Grip / Order nella schermata Switch.
② Premere il pulsante di accensione [ ] del controller per 3 secondi per accoppiare,
4 indicatori LED lampeggiano in modo ordinato ed entrare nello stato di
accoppiamento.
③ Connettiti correttamente quando l'indicatore LED rimane acceso, quindi premi il
tasto Home [ ] per tornare alla home page.
Grazie per aver scelto e supportato il nostro PXN. Si prega di leggere attentamente
questo manuale utente prima di utilizzare il prodotto.
italiano-36
Adattatore
OTG
① Collegare il controller di spegnimento con la console
Switch tramite cavo USB con OTG di tipo C.
② Connessione riuscita quando l'indicatore LED lampeggia.
(Note: la testina di conversione OTG di tipo C deve
essere acquistata da solo)
* Prima di utilizzare la connessione cablata, assicurarsi che il
controller sia spento o in stato di sospensione.
① Collegare il controller di spegnimento con
Switch dock tramite cavo USB.
② Collegarsi correttamente quando
l'indicatore LED lampeggia.
- Cambia Dock:
Porta USB di Switch Dock
* Prima di utilizzare la connessione cablata, assicurarsi che il controller sia spento o in
stato di sospensione.
① Collegare il controller al PC tramite cavo USB.
② Il PC richiederà un nuovo hardware e si installerà
automaticamente, si collegherà correttamente quando
l'indicatore LED2 lampeggia.
• Connessione via cavo
PC
Accensione
Funzionamento dei pulsanti
Stato del
controller Istruzione di funzione
Controller
sveglia
Premere il pulsante di
accensione [ ] per 3 secondi Power on and enter pairing
Può riattivare il controller del sonno
e riconnettersi
Premere brevemente ilpulsante
[ A / B / X / Y / L / R / Tasto a croce
/ - / + ] sul controller
Consolle
sveglia
Ausschalten
Può riattivare la console di
sospensione e riconnettersi
Premere brevemente per spegnere il
controller e ripristinare le impostazioni
È possibile utilizzare la funzione controller
/console di riattivazione per riconnettersi
in stato Controller OFF
Premi brevemente il pulsante
[ ] HOME sul controller
04 Potenza e sveglia
05 Utilizzo su PC
Premere brevemente il
pulsante di accensione [ ]
italiano-37
• Evitare forti vibrazioni, non smontare, rimontare o riparare da soli.
• Evitare l'acqua o altri liquidi nel controller, potrebbero influire sulle prestazioni del
controller.
• Non conservare in luoghi umidi, ad alta temperatura o fuliggine.
• Tenere lontano dal fuoco, la batteria al litio incorporata può esplodere.
• Si prega di connettersi con il servizio post-vendita in caso di suggerimenti o problemi
di funzionamento.
Produci modello
Tipo di connessione
Potenza di lavoro
Dimensioni imballo
Taglia del prodotto
Unità di peso
Temperatura di utilizzo
PXN-9607X
Connessione wireless / cablata
Circa 185*138*78 mm
Circa 153*111*42 mm
10 - 40
Circa 210 g
Umidità di utilizzo 2080%
Batteria al litio incorporata da 550 mAh
Corrente di lavoro 5V 20 mA
12 Modalità sonno
13 Attenzioni
italiano-40
Stato di riconnessione
Il primo stato di accoppiamento
Stato di lavoro
30 segundos sin conexión
60 segundos sin conexión
5 minutos sin operaciones
Sonno automatico
dopo 5 minuti
Sonno automatico
dopo 10 minuti
Sonno automatico
dopo 20 minuti
Disattivare la
funzione di sonno
Stato del controller Entrar en estado durmiente
Dopo aver premuto il pulsante
[ L3+L ] nello stato di spegnimento,
il tempo di sonno automatico può
essere regolato dalla [ direzione
su/giù del tasto a croce ]
in questo momento
L
Flash
Flash
Flash
Flash
在 PC 电脑使用, 可打开电脑游戏控制器进行功能自检, 具体如下:
打开控制面板 → 设备和打印机 → 鼠标右键点击游戏手柄图标 → 游戏控制器设置,
点击属性进行手柄测试。
• 手柄功能测试
06 NFC 功能
当手柄出现功能错乱、 死机或者其它异常时, 长按电源键 8 秒恢复出厂设置。
可设定 TURBO 功能的按键: A /B /X /Y /L /R /ZL /ZR。
手动连发状态: 长按按键时 LED 灯闪烁。
自动连发状态: LED 灯快速闪烁。
第一次设置后长按该功能键时触发连发
第二次设置后按下功能键自动触发连发
再按下暂停连发
第三次设置后取消功能键设置的连发
功能
取消所有功能键设置的连发功能
清除全部连发
连发速率调节
或
功能键
功能键
功能键
手动连发
自动连发
清除连发
减速
加速
使用方法:
当手柄与 Switch 主机使用蓝牙连接后, 如游戏支持 Amiibo
功能, 可使用 Amiibo 手办, 在游戏手柄 【 】 处激活
游戏中对应的道具。
游戏手柄内置 NFC 感应功能, 支持感应 Amiibo 手办以及芯片
(※建议使用正版 Amiibo 手办)
07 TURBO 功能
简体中文-03
08 复位功能
手柄长按【 】键 + 【 右摇杆上/下 】
可调整连发速率, 速率分为 8 次/秒、
10 次/秒 、 12 次/秒, 默认10 次/秒
简体中文-04
电源规格为标准 USB 5V 电压,手柄充满电时间约 2-3 个小时。
马达不振动
马达弱振动
马达中振动
马达强振动
关闭
强档
L
① 休眠状态下按 【 L3+R 】 进入校准模式, 手柄 4 个LED 灯分两组交替闪烁;
② 此时将手柄放置于水平桌面, 按下手柄的 【 】 键;
③ 松开按键后 3 秒钟自动完成传感器校准。
• 当体感功能异常或摇杆出现漂移不归中时, 可使用手柄校准功能。
L
10 手柄校准功能
工作状态
电量状态手柄状态说明 指示灯状态
低电量 闪烁
闪烁
充电中
满电
闪烁
关机状态
充电中
满电
11 充电功能
• 手柄长按 【 】 键的同时使用【 左摇杆上/下 】来调整马达振动档位, 振动默认为中档。
振动调节具有记忆功能。
09 手柄马达强度调节
闪一下
闪一下
闪一下
熄灭
熄灭
长亮
English-09
Using a standard USB 5V input, the controller will be fully charged in 2-3 hours.
No Vibration
Low Vibration
Medium Vibration
High Vibration
OFF
High
L
① In sleeping state, press [ L3+R ] to enter the calibration
mode, the 4 LED indicators on the controller will
flash alternately in 2 groups.
② Place the controller on a horizontal table and press [ ] button.
③ The sensor will automatically complete the calibration after releasing the
button in 3 seconds.
When the Controller occurs disorder or joystick problem, can use calibration function to fix.
L
Hold press the [ ] button on Controller and operate the UP/Down of left joystick
at same time to adjust vibration level, It is in Medium Vibration in default when connect.
Vibration adjustment has memory function.
09 Adjustable Vibration
10 Controller Calibration Function
Working State
Battery StateController State Indicator State
Low Battery Flash
Flash
Charging
Fully Charged
Flash
Power OFF
Charging
Fully Charged
11 Charging Function
Light up
Light up
Light up
OFF
OFF
Keep ON
Die Funktionsprüfung ist verfügbar, wenn eine Verbindung mit dem Computer
hergestellt wird. Die spezifischen Schritte unten zeigen:
Öffnen Sie die Systemsteuerung Geräte und Drucker Rechtsklick auf das
ControllerSymbol Game Controller-Einstellung, klicken Sie auf Eigenschaften testen.
• Controller-Prüfung am PC
06 NFC-Funktion
Wenn der Griff nicht richtig funktioniert, abstirbt oder anderweitig abnormal ist, drücken Sie
die Netztaste 8 Sekunden lang, um die Werkseinstellungen wiederherzustellen.
Einstelltasten für die TURBO-Funktion: A / B / X / Y / L / R / ZL / ZR
Unter Manueller TURBO : Die LED-Anzeige blinkt, wenn Sie die Einstelltaste gedrückt halten.
Unter Auto-TURBO : Die LED-Anzeige blinkt schnell.
Halten Sie diese Einstellungstaste nach
der ersten Einstellung gedrückt, um TURBO
manuell zu starten
Drücken Sie nach der zweiten Einstellung
die Einstellungstaste, um zu starten
TURBO-Funktion automatisch, Taste erneut
drücken Einstellung zum Stoppen der
TURBO-Funktion
Après le troisième réglage, la fonction
TURBO sera effacée
Nach der dritten Einstellung wird die
TURBO-Funktion gelöscht
Alle TURBO
Einstellungen löschen
Schnellfeuer
einstellbar
oder
Einstelltaste
Einstelltaste
Einstelltaste
Manuelle TURBO
Auto-TURBO
TURBO-Einstellung
löschen
Slow Down
Speed Up
R
Halten Sie die [ ]-Taste und den
L-Joystick UP/Down gedrückt /Last, um
schnelle Feuerrate einzustellen, einstellbare
Bewertung haben 8 mal /Sekunde, 10 mal /
Sekunde, 12 mal /Sekunde,
die Standardeinstellung ist 10 mal /Sekunde
Der Controller ist in einem NFC-Lese-Chip eingebaut, der das
Lesen von Amiibo unterstützt. (Hinweis: Wir empfehlen die
Verwendung von echtem Amiibo)
Anweisungen verwenden:
Wenn der Controller mit der Switch-Konsole verbunden ist
durch Bluetooth, falls das Spiel die Amiibo-Funktion unterstützt,
Ort Der Amiibo über dem [ ] kann das Werkzeug aktivieren.
07 TURBO-Funktion
Deutsche-28
08 Reset-Funktion
Español-34
Con una entrada USB estándar de 5 V, el controlador se cargará completamente en
2-3 horas.
Sin vibración
Vibración débil
Vibración media
Alta vibración
Cerrar
Nivel alto
L
① Presione [ L3 + R ] para ingresar al modo de calibración,
4 indicadores LED en el controlador parpadean
alternativamente.
② Coloque el controlador en el escritorio del horizonte, presione el botón [ ] en el
controlador.
③ Suelte el botón, el controlador se calibrará automáticamente en 3 segundos.
Cuando el controlador ocurre un problema de desorden o joystick, puede usar la función
de calibración para solucionarlo.
L
Mantenga presionado el botón [ ] en el controlador y opere ARRIBA / Abajo del joystick
izquierdo al mismo tiempo para ajustar el nivel de vibración, el nivel de vibración
predeterminado es medio cuando se conecta. El ajuste de vibración tiene función de memoria.
09 Vibración ajustable
10 Función de calibración del controlador
Estado de trabajo
Estado de la bateríaEstado del controlador Estado del indicador
Batería baja Destello
Destello
Cargando
Completamente cargado
Destello
Éteindre
Cargando
Completamente cargado
11 Función de carga
Destello
Destello
Destello
Destello
Cerrar
Continuar
L'ispezione delle funzioni è disponibile quando ci si collega al computer. I passaggi
specifici mostra sotto:
Aprire il Pannello di controllo → Dispositivi e stampanti → Fare clic con il pulsante destro
del mouse sull'icona Controller → Impostazioni controller di gioco, fare clic su Proprietà Test.
• Ispezione del controller su PC
06 Función NFC
Quando la maniglia non funziona correttamente, si blocca o ha le altre anomalie, premere
a lungo il pulsante di accensione per 8 secondi per ripristinare le impostazioni di fabbrica.
Pulsanti di impostazione per la funzione TURBO: A / B / X / Y / L / R / ZL / ZR
Sotto TURBO manuale : L'indicatore LED lampeggia quando si tiene premuto il pulsante
di impostazione. Sotto Auto-TURBO : L'indicatore LED lampeggia rapidamente.
Dopo la prima impostazione, tenere premuto
questo pulsante di impostazione per avviare
TURBO manualmente
Dopo la seconda impostazione, premere il pulsante
ImpostazioniPer avviare automaticamente la
funzione TURBO, premere il pulsante. di nuovo
Impostazioni per interrompere la funzione TURBO
Dopo la terza impostazione, la funzione TURBO
verrà cancellata
Cancella tutti i pulsanti funzione TURBO
Cancella tutto
l'impostazione TURBO
Fuoco veloce
regolabile
o
Pulsante di
impostazione
Pulsante di
impostazione
Pulsante di
impostazione
TURBO manuale
Auto-TURBO
Cancella impostazione
TURBO
Ralentizarlo
Velocizza
R
Tenere premuto il tasto [ ] e il joystick L UP /
Down /Ricarica per impostare una velocità di fuoco
rapida, valutazioneregolabile ha 8 volte/secondo,
10 volte/secondo, 12 volte/secondo,
l'impostazione predefinita è 10 volte/secondo
Utilizzando le istruzioni:
Quando il controller è connesso alla console Switch tramite
Bluetooth, se il gioco supporta la funzione Amiibo, posizionare
l'Amiibo sopra il logo [ ] per attivare lo strumento.
Il controller è integrato nel chip del lettore NFC, supporta la lettura
di Amiibo. (Nota: consiglia di utilizzare Amiibo autentico)
07 Funzione TURBO
italiano-38
08 Funzione di ripristino
italiano-39
Utilizzando un ingresso USB 5V standard, il controller sarà completamente carico in
2-3 ore.
Nessuna vibrazione
Debole vibrazioni
Vibrazione media
Vibrazioni elevate
Spento
Forte
L
① Presione [ L3 + R ] para ingresar al modo de calibración,
4 indicadores LED en el controlador parpadean
alternativamente.
② Metti il controller sulla scrivania horizon, premi il pulsante [ ] sul controller.
③ Pulsante di rilascio, il controller si calibrerà automaticamente in 3 secondi.
Quando il controller si verifica un disturbo o un problema con il joystick, è possibile
utilizzare la funzione di calibrazione per risolvere.
L
Tenere premuto il pulsante [ ] sul controller e utilizzare contemporaneamente i pulsanti
SU / Giù del joystick sinistro per regolare il livello di vibrazione, il livello di vibrazione
predefinito è medio quando si effettua la connessione. La regolazione delle vibrazioni ha
la funzione di memoria.
09 Vibrazione regolabile
10 Funzione di calibrazione del controller
Stato di lavoro
Stato della batteriaStato del controller Stato dell'indicatore
Batteria scarica Flash
Flash
Ricarica
Completamente carico
Flash
Éteindre
Ricarica
Completamente carico
11 Funzione di ricarica
Flash
Flash
Flash
Flash
Cerrar
Continua
User Manual
PC에서 사용할 경우 컴퓨터 게임 컨트롤러를 열어 기능을 테스트할 수 있으며, 세부
절차는 다음과같습니다.
제어판→ 장치 및 프린터→ 마우스 오른쪽 버튼으로 게임 컨트롤러 아이콘 클릭→ 게임
컨트롤러를 설정에 들어가 속성을 클릭한 뒤 자체 테스트를 진행합니다.
• 컨트롤러 기능 테스트
06 NFC 기능
컨트롤러가 정상적으로 작동하지 않고 갑자기 작동하지 않을 때 전원 버튼을 8초간 길게
누르면 초기화됩니다.
TURBO 기능을 설정할 수 있는 버튼: A / B / X / Y / L / R / ZL / ZR
수동 연발 상태: 버튼을 길게 누르면 LED 표시등이 점멸합니다.
자동 연결 상태: LED 표시등이 빠르게 점멸합니다.
최초 설정 후 해당 기능 버튼을 길게
누르면 연발이 수동으로 작동됩니다
두 번째 설정 후 기능 버튼을 누르면
자동으로 연발이 작동되며
다시 누르면 연발이 일시 정지됩니다
세 번째 설정 후 기능 버튼 설정의 연발
기능이 취소됩니다
모든 기능 버튼 설정에서 연발 기능을
취소합니다
모든 연발 제거
연발 속도 조절
또는
기능 버튼
기능 버튼
기능 버튼
수동 연발
자동 연발
연발 제거
감속
가속
R
컨트롤러 [ ]연발버튼을 길게 누르는
동시에 [오른쪽 조이스틱 상/하]를 이용해
연발 속도를 조절할 수 있습니다
속도는 초당 8회, 10회, 12회로 나뉘며,
기본속도는 초당 10회입니다
사용 방법:
게임이 Amiibo 기능을 지원하는 경우 컨트롤러와 Switch 본체를
블루투스로 연결한 다음 Amiibo 피규어를 컨트롤러의 -LOGO
부분에 갖다 대어 해당 피규어를 활성화시킬 수 있습니다.
게임 컨트롤러에 NFC센서가 내장되어 있어 Amiibo피규어 및 관련
제품을지원합니다. (※ 정품 Amiibo 피규어 사용 권장)
07 TURBO 연발 기능
한국어-18
08 제품 외관
• 강한 진동을 피하고, 자체 해체, 개조 및 수리해서는 안 됩니다.
• 물 또는 기타 액체가 컨트롤러 내부로 들어가지 않도록 하여 파손을 예방합니다.
• 습하고, 온도가 높고, 기름과 연기가 많은 장소를 피해 보관하십시오.
• 배터리가 내장되어 폭발의 위험이 있으므로 컨트롤러를 불 속에 던지지 마십시오.
• 품질 문제 또는 건의사항은 판매업체 또는 A/S 요원에게 연락하십시오.
제품 모델
연결 방법
작동 전원
포장 치수
본체 크기
본체 무게
사용 온도
PXN-9607X
무선/유선 연결
약 185*138*78 mm
약 153*111*42 mm
10 - 40℃
약 210 g
사용 습도 20~80%
550mAh 리튬전지
무선 송신기 전력
무선 송신기 주파수 범위
<10mW
2402-2480MHz
작동 전류 5V 20 mA
12 절전 모드 기능
13 주의사항
한국어-20
절전 모드로 진입
재연결 상태
최초 페어링 상태
30초간 연결 무
60초간 연결 무
5분간 조작이나 이동이 없음
5분 후 자동 절전 모드
10분 후 자동 절전 모드
20분 후 자동 절전 모드
절전 모드 기능 끄기
컨트롤러 상태 설명 작동 상태
전원 OFF 상태에서
[L3+L] 버튼을 누른 다음
[십자 버튼 상/하]로 자동
절전 모드 시간을
조절합니다
L
점멸
점멸
점멸
점멸

