Sharp XL-B517D(BK) Bedienungsanleitung
- Kategorie
- CD-Spieler
- Typ
- Bedienungsanleitung

XL-B517D
User manual
Micro Component System
Product images are for illustration purposes only. Actual product may vary.
EN FRDE ES IT RUPL NL


EN
Important safety instructions
CAUTION
RISK OF ELECTRIC SHOCK
DO NOT OPEN
Please, read these safety instructions and respect
the following warnings before the appliance is
operated:
The lightning ash with arrowhead symbol, within an
equilateral triangle, is intended to alert the user to the
presence of uninsulated “dangerous voltage” within the
product’s enclosure that may be of su cient magnitude as to
constitute a risk of electric shock to persons.
The exclamation point within an equilateral triangle is
intended to alert the user to the presence of important
operating and maintenance (servicing) instructions in the
literature accompanying the appliance.
This symbol means that the product should be disposed of
in an environmentally friendly manner and not with general
household waste.
AC voltage
DC voltage
Class II equipment
In order to prevent re always
keep candles and other open
ames away from this product.
Warning:
• Always follow basic safety precautions when using this applience,
especially when children are present.
• Children should be supervised to ensure that they do not play with the
appliance.
• Do not damage the power cord, or place any heavy objects on it, do not
strech it or bend it. Also do not use extension cables. Damage to the
power cord may result in re or electric shock.
• If the power supply cord is damaged, it must be replaced by the
manufacturer, a service agent or similarly qualied person.
• Ensure that the unit is plugged into an AC 220-240V 50Hz power outlet.
Using higher voltage may cause the unit to malfunction or even catch
r e .
• If the power plug does not t into your outlet, do not force the plug into
the electrical socket.
• To switch o the unit place it in to standby and unplug it from the mains
power supply.
• Do not disconnect or connect the power cord with wet hands. It may
cause an electric shock.
• Disconnect the power cord if the unit is not used for a long period time.
• Ensure that the mains plug is always easily accessible.
• This product does not contain any parts that are serviceable by the
user. In case of a fault, contact the manufacturer or authorised service
department. Exposing the internal parts inside the device may endanger
your life. The manufacturers guarantee does not extend to faults caused
by repairs carried out by unauthorised third parties.
• Do not use this product immediately after unpacking. Wait until it warms
up to room temperature before using it.
• Ensure this product is used in moderate climates only (not in tropical/
subtropical climates).
• Place product on a at, stable surface that is not subject to vibrations.
• Ensure the product and its parts do not overhang the edge of the
supporting furniture.
• To reduce the risk of fire, electric shock or damage to this product, do
not expose it to direct sunlight, dust, rain and moisture. Never expose it
to dripping or splashing and do not place objects filled with liquids on
or near the product.
• Do not install near any heat sources such as radiators, heat registers,
stoves, or other apparatus (including ampli ers) that produce heat.
• Do not place the product where the humidity is high and ventilation is
poor.
• Ensure a minimum distance of 5 cm around the apparatus for su cient
ventilation. Do not block any ventilation openings on the unit and
ensure they are not covered with items such as newspapers, table-cloths,
curtains, etc.
• NEVER let anyone, especially children, push anything into holes, slots
or any other openings in the unit’s casing as this could result in a fatal
electric shock.
• Storms are dangerous for all electric appliances. If the mains or aerial
wiring is struck by lightning, the appliance might get damaged, even if it
is turned o . You should disconnect all the cables and connectors of the
appliance before a storm.
• Do not move the unit during disc playback. During playback, the disc
rotates at high speed. Do not lift or move the unit during playback, as
doing so may damage the disc or the unit.
• Do not turn up the volume while listening to a section with very low
level inputs or no audio signals. lf you do, the speaker maybe damaged
when a peak level section is suddenly played.
Maintenance
• Unplug the power cable from the power source before cleaning the
appliance.
• Use a soft and clean rag to clean the outside of the unit. Never clean it
with chemicals or detergent.
Batteries
• Observe the correct polarity when inserting the
batteries.
• Do not expose batteries to high temperatures
and do not place them on locations where the
temperature might increase quickly, e.g. near the
re or in the direct sunshine.
• Do not expose batteries to excessive radiant heat,
do not throw them into the re, do not disassemble
them and do not try to recharge un-rechargeable
batteries. They could leak or explode.
• Never use di erent batteries together or mix new and old ones.
• When the Remote Control is not to be used for a long time (more than a
month), remove the battery from the Remote Control to prevent it from
leaking.
• If the batteries leak, wipe away the leakage inside the battery
compartment and replace the batteries with new ones.
• Do not use any batteries other than those speci ed.
Do not ingest battery, chemical burn hazard
• If a battery is swallowed, it can cause severe internal burns in just 2
hours and lead to death. Keep new and used batteries away from
children. If the battery compartment does not close securely, stop
using the product and keep it away from children. If you think batteries
might have been swallowed or placed inside any part of the body, seek
immediate medical attention.
CAUTION
RISK OF ELECTRIC SHOCK
DO NOT OPEN
CAUTION
RISK OF ELECTRIC SHOCK
DO NOT OPEN
EN

Disposal of this equipment and Batteries
• Do not dispose of this product or its batteries as unsorted
municipal waste. Return it to a designated collection point
for the recycling of WEEE in accordance with local law. By
doing so, you will help to conserve resources and protect
the environment.
• Most EU countries regulate the disposal of batteries by
law. Contact your retailer or local authorities for more
information.
• The symbol shown to the right appears on electrical
equipment and batteries (or their packaging) to remind
users of the disposal requirements. If "Hg" or 'Pb' appears
below the symbol, this means that the battery cantains traces of mercury
(Hg) or lead (Pb), respectively.
• Users are requested to use the locally provided return facilities for used
equipment and batteries.
CAUTION:
• Appliances with built in CD player are marked with this caution label
• THIS UNIT IS A CLASS 1 LASER
PRODUCT. THIS UNIT USES A VISIBLE
LASER BEAM WHICH COULD CAUSE
HAZARDOUS RADIATION EXPOSURE IF
DIRECTED. BE SURE TO OPERATE THE
PLAYER CORRECTLY AS INSTRUCTED.WHEN THIS UNIT IS PLUGGED INTO
THE WALL OUTLET, DO NOT PLACE YOUR EYES CLOSE TO THE OPENINGS
TO LOOK INTO THE INSIDE OF THIS UNIT.
• USE OF CONTROLS OR ADJUSTMENTS OR PERFORMANCE OF
PROCEDURES OTHER THAN THOSE SPECIFIED HEREIN MAY RESULT IN
HAZARDOUS RADIATION EXPOSURE.
• DO NOT OPEN COVERS AND DO NOT REPAIR YOURSELF. REFER
SERVICING TO QUALIFIED PERSONNEL.
CE Statement:
• Hereby, Sharp Consumer Electronics Poland sp. z o.o. declares that
this audio device is in compliance with the essential requirements and
other relevant provisions of RED Directive 2014/53/EU. The full text of
the EU declaration of conformity is available by following the link www.
sharpconsumer.eu and then entering download section of your model
and choosing “CE Statements”.
Trademarks:
The Bluetooth® word mark and logos are registered trademarks owned by
Bluetooth SIG,. Inc.
CLASS 1
LASER PRODUCT
4

EN
What is included in the box
1 x Main unit
2 x Speaker
1 x Remote control
2 x AAA battery
1 x User guide
1 x Quick start guide
1 x Power cord
Panels & Controls
Front panel
1
2
5
3 4
12
11
6
7 8
9
10
1. SOURCE: Press to select the modes.
2. PLAY/PAUSE: Press to pause or play the music.
3. PREVIOUS: Press to skip to previous song/
station, press and hold to fast rewind/scan.
4. NEXT: Press to skip to next song/station, press
and hold to fast forward/scan.
5. EJECT: Press to open/close CD drawer (in CD mode)
6. Standby indicator: lit when in standby
7. STANDBY: press to turn on or enter standby
8. Remote Sensor: Point the remote at the sensor within a 7m range.
9. Display Screen: Shows information in relation
to the mode/function being used.
10. VOLUME+/- knob: Turn to adjust the volume level.
11. USB Port: Used to connect a USB ash disk.
12. Audio Input Socket: Used to connect external audio sources.
Rear panel
14
13
15
13. Antenna: To receive the DAB/FM signal.
14. Speaker Terminals: Connect the speakers to the main unit.
15. Power supply: Connect the power lead.
Remote control
1.
1
2
3
9
5
6
7
8
21
23
22
16
10
17
11
18
20
15
12
14
27
19
24
25
30
31
28
4
13
26
29
STANDBY: Press to turn on the unit or enter Standby mode.
2. DAB/FM: Press to select DAB mode, press again to select FM mode.
3. AUX/USB: Press to select AUX mode, press again to select USB mode.
4. MENU: Press to enter or exit Menu.
5. MUTE: Press to mute the sound, press again
or press VOL+ or VOL- to resume.
6. FAST FORWARD: Press to fast forward the
track that is currently playing.
7. PREVIOUS: Press to skip to the previous song/saved station.
8. FAST REWIND: Press to fast-rewind the song that is currently playing.
9. STOP: In CD/USB mode, press to stop playback.
10. BASS +: Press to increase the bass.
11. BASS -: Press to decrease the bass.
12. REPEAT: Press to repeat song in CD mode.
13. RANDOM: Press to play music in a random order.
14. EQ: Press repeatedly to select the sound equaliser pre-set.
15. FREQ: Frequency: in FM mode, press to enter a frequency manually.
16. CD: Press to enter CD mode.
17. BLUETOOTH: Press to enter Bluetooth mode.
18. BLUETOOTH disconect: Press to disconnect
a paired Bluetooth device.
19. INFORMATION: Press repeatedly to cycle through information
displays relating to the audio source/mode. When in the MENU,
press the
button to return the previous MENU level.
20. NEXT: Press to skip to next song/station.
21. PLAY/PAUSE: Start or pause the playback
22. EJECT: Press to open/close CD drawer (in CD mode).
23. VOLUME +: Press to increase volume.
24. TREBLE +: Press to increase the treble.
25. TREBLE -: Press to decrease the treble.
26. VOLUME -: Press to decrease volume.
27. PROGRAM: Press to program the playback order.
28. DIM: Press to select the display brightness level Low/Medium/High.
EN

29. LOUD: Press to increase the level of bass at low volume levels.
30. NUMBER (0-9): Use to select songs, presets or enter frequency.
31. SAVE: Press to save your favourite stations.
Fitting or replacing the remote control batteries
1. To open the battery compartment, push your thumb down on to
the circle on the battery compartment cover and slide it down.
2. Fit two AAA batteries observing polarity +/- as shown. When
replacing the batteries, use only the same type of battery supplied.
3. Re- t the battery cover and clip it in place.
Preparation for use
1.
AUX IN
4
5
6
7
3
AUDIO IN
2
1
Place a speaker on either side of the main unit, preferably at the same
height and with at least 150mm space between each speaker to the
main unit.
Connect the speaker plugs to the rear of the unit. Take care to match
the speaker placed to the LEFT to the LEFT output on the rear of the
unit. Repeat for the RIGHT speaker.
2. Please ensure that the voltage marked on the rating label,
located on the rear panel, is the same as the voltage in your area.
Insert the power lead in to the AC IN socket on the back of the
unit. Plug the other end of the cable in to the wall socket.
3. Press the STANDBY button on the main unit to turn it ON.
Extend the ANTENNA to get the best reception. Press the
button on the unit, or DAB/FM button on the remote
control to enter the DAB/FM mode. To use the radio in
DAB/FM mode, follow the instructions in the FM or DAB
RADIO OPERATION chapter of the User Manual.
4. Press the
button on the unit, or CD button on the remote
control to enter the CD mode. Press the
button to open
the disc drawer and insert a disc. Press the
button again
to close. The CD will begin playing from the rst track.
5. Press the
button on the unit, or AUX button on the
remote control to enter the Aux In (Audio) mode. Connect
your audio device to the AUX IN socket via a 3.5mm aux in
cable. Control playback via your connected audio device.
6. Press the
button on the unit, or button on the remote
control button to enter the Bluetooth mode. Activate the
Bluetooth enabled device and select the “SHARP XL-B517D”.
Select the song you want and press to play.
7. Press the
button on the unit, or USB button on the remote control
to enter the USB mode. Plug the USB device to USB port on the front
panel of the unit, and it will read the USB and play automatically.
BASIC FUNCTIONS
Setting the time/date
1. To set the time/date manually, long press the MENU
button when the unit is in standby. Use the
/ keys
to change the values and press
to con rm.
2. To set the time/date automatically, press the MENU button when the
unit is on. Select the SYSTEM menu and press
to con rm. Select
TIME from the SYSTEM menu and then AUTO UPDATE where you
will be able to select the source of the update. Press MENU to exit.
Switching modes
To switch between the modes: DAB+, FM, CD, Bluetooth, USB and AUX IN,
press SOURCE button on the unit or the corresponding button (DAB/FM,
CD,
, AUX/USB) on the remote control.
Volume control
1. Increase: Rotate the VOLUME control on the main unit
clockwise or press the VOL+ button on the remote.
2. Decrease: Rotate the VOLUME control on the main unit
anti-clockwise or press the VOL- button on the remote.
EQ eff ects
Press the EQ button on the remote repeatedly to cycle through a set of
equaliser presets to adjust the sound. Choose from CLASSIC, ROCK, POP,
JAZZ, DANCE, LIVE and O .
Loudness function
This function will increase the level of bass at low volume levels. Press the
LOUD button on remote to enable the e ect. Press again to disable the
e ect.
Mute function
Press the button at any time to mute the sound output. Press again to
unmute.
Tone controls
To adjust the bass, use the BAS+ or BAS- buttons on the remote control.
To adjust the treble, use the TRE+ or TRE- buttons on the remote control.
Standby mode
Press the STANDBY button on the unit or the remote to put the system
into standby mode. To resume normal operation, press this button again.
NOTE: This unit is designed to enter STANDBY mode automatically, after about
15 minutes (approximately) of inactivity. Press STANDBY button to wake the
unit.
NOTE: When you power on the unit from standby, it will resume in the mode
that was last used.
FM radio operation
1. Press the source button on the unit, or
DAB/FM button on the remote control twice to enter
FM mode. (FM frequency: 87.50-108.00MHz)
2. Press the
/ buttons on remote control to decrease
or increase the frequency in 0.05MHz increments.
6

EN
3. Press and hold the / buttons on remote control
to scan through the frequency range quickly. The
scan will stop once it has found a station.
4. Press and hold the
button to scan through the frequency
range quickly; it will store any stations found automatically.
5. SAVE a station:
You can store up to 30 FM stations in memory.
Press the FREQ button and then, using the number
buttons enter the frequency that you want to store.
Press the SAVE button, it will show "P01" on the display.
Press the
/ button to select the station preset
number you want to save the frequency under.
Press the SAVE button again to con rm.
6. Recall the preset stations:
Press the
/ button to recall your stored stations.
Note:
RDS is aviable on stations that support this service
DAB+ Operations
1. Press the SOURCE button on the unit or the DAB/FM button
on the remote control to switch to the DAB+ mode.
2. The rst time the unit enters DAB mode it will
start scanning for stations automatically.
3. Station tuning - see the Menu Operation section of this User
Manual for guidance on how to navigate the MENU.
Full scan – In MENU select <Full scan>, and press
button to enable full scanning. Alternatively,
press and hold >|| when in DAB mode.
Manual tune - In MENU select <Manual tune> and press
/
button to select station from 5A:174.928MHz to 13F:239.200MHz.
Then press
button to activate the selected station.
4. Store Stations:
It is possible to store up to 30 of your favorite stations. This
will enable you to access your favorites quickly & easily.
To store a preset, you must rst be listening
to the station you would like to save.
Press and hold one of the number buttons 0-9
to store the station under that number.
Alternatively, press SAVE, use
/ to select
the preset number and press SAVE again.
To recall a stored station preset press the
corresponding number on the number keypad.
Menu Operation
Press the MENU button to enter the menu settings.
Use the
/ button to select the menu contents. Press the button
to con rm the selection or to enter the next setting interface. Press the
button to go back to the previous setting interface. Press the MENU button
to exit the menu.
*DAB only
1. Full scan* – Select the <Full scan>, and press
button to enable full scanning.
2. Manual tune* - Select the <Manual tune> and press
/
button to select station from 5A:174.928MHz to 13F:239.200MHz.
Then press
button to activate the selected station.
3. DRC (Dynamic range control)*
This function will analyse the audio signal to reduce loud noises
and amplify more quiet ones. This will enable amore clear and
consistent sound delivery, particularly at lower volumes. Enter the
menu and nd <<DRC>>, use the
/ button to select either
DRC OFF, DRC HIGH or DRC LOW, press the
button to con rm.
4. Station order*
Enter the menu and nd <<Station Order>>, press the
button, then the
/ button to select one of the station ordering
options: << Multiplex >>, << Alphanumeric >>, << Active >>.
NOTE: Station Name with question mark: ?Station Name (e.g ?BBC RADIO 4)
This implies that station is not available due to poor signal or it is not
broadcasting.
Try repositioning antenna.
5. Pruning stored stations*:
If the unit has performed a scan in a di erent location, you may nd
there are some stored stations that no longer receive a signal. The
prune function will automatically remove stations with no signal from
the stored station list.
Enter the <<Main menu>>, press
/ to nd and enter
<<Prune station>>, then select <<Yes>> to prune.
6. TA* (Traffi c Announcement)
Plays local radio live tra c announcements. TA is o by default.
FM only**
7. Scan setting** - Strong station only/All stations
8. Audio setting** - stereo allowed/Forced mono
9. System setting
Time - Time set up
Language - language set up
Factory Reset - To reset the unit to the original settings, enter the
factory reset interface, follow the directions to <Press ENTER to
prune station> and press the
button. Then the unit will restart.
Software upgrade
SW version - Information about the software version of the system.
CD operations
1. Press the source button on the unit, or CD button on the remote
control to enter the CD mode. Press the
button to open the disc
drawer, put a CD in, then press the
button again to close.
2. Press the
button to pause or play the song.
3. Press the
button on remote control to stop playing, press the
button to re-start.
4. Press the
/ button to skip to the previous or next song.
5. Press the
/ button on remote control to fast forward or fast
rewind the playback, press again to resume normal speed.
6. To directly select a speci c song press the corresponding number
buttons 0-9 on remote control.
Example:
If the track number consists of two digits, for example 25, press
button “2“, and then button “5“ to select the 25th track.
You can just press the number 9 - a single digit works.
7. REPEAT button:
While in playing mode, press the
button to set repeat mode.
For CD and CD-R discs, press the
button to repeat playing songs.
Press once to repeat current song. Press again to repeat all tracks.
Press a third time to cancel.
8. Press the
button on the remote control to play the
tracks in a random order. Press again to resume.
9. You can set the disc to play tracks in a programmed order:
Press the
button on remote control to stop playing.
Press the PROGRAM button on remote
control. The screen displays: P01.
Use the number buttons on the remote
or
/ to select the song.
Press the PROG button again to con rm the selection
and the screen will then display P02. Repeat the
process for your second selection and so on...
Press the PROGRAM button on the remote control to con rm.
EN

To begin the programmed order, press the button.
To cancel the program sequence, press the
button twice.
Notes:
MP3 les are supported.
Unsupported le formats are skipped. For example, Word documents
(.doc) or MP3 les with extension .dlf are ignored and not played.
Bluetooth Operation
The Micro system has Bluetooth capability and is able to receive a signal
within a range of 7 metres. To pair the Micro system with a Bluetooth
device:
1. Press the source button
on the unit, or button
on the remote control to enter Bluetooth mode. The
unit will display "Bluetooth Not Connected".
2. Activate your Bluetooth device and select the search mode.
3. Select “SHARP XL-B517D” from the search list and connect.
4. Enter “0000“ for password if prompted.
5. When the devices are connected to each other, a con rmation sound
will be made and the display will show "Bluetooth Connected".
6. You can now playback music from your device. Please
note that the volume on the Bluetooth source device
operates independently to the volume of the unit.
7. To turn o the Bluetooth function: switch to another function
on the Micro system, disable the function on your Bluetooth
source device; or press the
button on the remote control.
Connect other audio devices
Audio (AUX IN) allows your unit quickly and easily to connect to an MP3
player or other external sources.
1. Use a 3.5mm audio cable to connect your external audio
device to the AUX IN
socket on the front panel.
2. Press the source button
on the unit, or AUX/USB button
on the remote control to switch to the AUX IN mode.
3. You may need to operate the external audio
device directly for playback features.
4. Please note that the volume on the Audio source device
operates independently to the volume of the unit.
USB Operation
It is possible to listen to music stored on a USB ash drive via the USB
device interface of the unit.
Connecting a USB ash drive:
1. Switch the unit on and select USB mode by pressing the SOURCE
button or pressing the AUX/USB button on the remote control twice.
2. Connect the USB ash drive to the USB device interface on the front
panel of the unit.
3. The unit will now play songs which are saved on the USB device.
Notes:
MP3 les are supported.
Unsupported le formats are skipped. For example, Word documents
(.doc) or MP3 les with extension .dlf are ignored and not played
Even when the les are in a supported format (MP3), some
may not play or display depending on the compatibility.
In some cases, reading may be as long as 60
seconds, this is not a malfunction.
Depending on the amount of data and media speed, it
may take longer for the unit to read the USB device.
The maximum USB memory size is 32GB.
USB memory device must be formatted in FAT, FAT16 or FAT32
Troubleshooting
No Power
Reason
• Power cable not connected to wall socket
• Power socket is not switched on
Solution
• Make sure the plug is connected
• Switch the power on
No Sound from AUX/Bluetooth input
Reason
• Volume is too low
• AUX/Bluetooth source volume is too low
Solution
• Increase the volume
• Increase the output volume of the AUX/Bluetooth source
Sound is distorted from AUX Input
Reason
• Volume is too high
• AUX source volume is too high
Solution
• Reduce the volume
• Reduce the output volume of the AUX source
Unable to play CD
Reason
• No disc in the tray
• Disc not loaded properly
• Disc is dirty
Solution
• Insert a compatible disc
• Check the disc loaded correctly
• Clean the disc
Static Sound
Reason
• Poor reception
Solution
• Re-locate the antenna
Desired station not found
Reason
• Weak signal
• Station not available in your area
Solution
• Use the manual tune function
• See DAB availability website
Weak or no DAB signal
Reason
• DAB not available in your area
Solution
• See DAB availability website
I can hear a burbling noise on some stations
or
Station Name with question mark: ?Station Name (e.g ?BBC
RADIO 4)
Reason
• Weak DAB signal or DAB station not broadcasting
Solution
• Try re-positioning the aerial
Unit switches off after 15 minutes of inactivity
Reason
• Auto standby mode in operation
Solution
• This unit is designed to enter STANDBY mode automatically after 15
minutes of inactivity. Press the STANDBY button to wake up the unit.
8

EN
Technical speci cation
Model XL-B517D
Radio Signal 87.5 - 108MHz
DAB+ signal 174.928 - 239.200MHz
Power Supply AC 220-240V~ 50Hz
Power Consumption 34 W
Standby Power Consumption <0,5 W
Output Power 2 x 7,5 W (RMS)
Impedance 2 x 8 Ω
Frequency Response 60Hz - 20KHz
Bluetooth
Version V 5.0
Maximum power transmitted <20 dbm
Frequency bands 2402 MHz ~ 2480 MHz
CD player
Disc format CD, CD-R, CD-RW, MP3
Remote Control
Battery Type 2x AAA / 1.5V
235mm
170mm
150mm
223mm
145mm 177mm
1,75kg
KG
1,1kg
KG
EN

DE
Wichtige Sicherheitsanweisungen
VORSICHT
GEFAHR AUF STROMSCHLAG
NICHT ÖFFNEN
Bitte lesen Sie sich diese Sicherheitsanweisungen durch
und beachten Sie, bevor Sie das Gerät in Betrieb nehmen,
auf die folgenden Warnhinweise:
Das Dreieckszeichen mit Blitzsymbol verweist auf nicht
isolierte „gefährliche Spannungen“ im Gerätegehäuse, die so
hoch sein können, dass sie eine Gefahr von Stromschlägen
bilden.
Das Dreieckszeichen mit Ausrufezeichen verweist auf
wichtige Funktions- und Wartungshinweise (Reparatur) in der
dem Gerät beigelegten Bedienungsanleitung.
Dieses Symbol bedeutet, dass das Produkt auf
umweltfreundliche Weise und nicht mit dem gewöhnlichen
Haushaltsmüll entsorgt werden sollte.
Wechselspannung
Gleichspannung
Gerät der KlasseII
Halten Sie Kerzen und off enes
Feuer von diesem Produkt fern,
um einen Brand zu vermeiden.
Warnung:
• Halten Sie sich während der Nutzung dieses Geräts immer an die allgemeinen
Sicherheitshinweise, insbesondere, wenn Kinder in der Nähe sind.
• Kinder sollten beaufsichtigt werden, um sicherzustellen, dass sie nicht mit dem
Gerät spielen.
• Das Stromkabel darf weder beschädigt, noch dürfen schwere Objekte darauf
abgelegt werden, außerdem dürfen Sie es nicht dehnen oder verbiegen.
Verwenden Sie auch keine Verlängerungskabel. Schäden am Stromkabel können
zu einem Feuer oder Stromschlag führen.
• Wenn das Stromversorgungskabel beschädigt ist, muss es vom Hersteller, einem
Servicetechniker oder einer ähnlich quali zierten Person ausgetauscht werden.
• Stellen Sie sicher, dass das Gerät an eine Steckdose mit AC 220-240V 50Hz
angeschlossen wird. Eine höhere Spannung kann zu Fehlfunktionen oder sogar
zu einem Brand führen.
• Wenn der Stecker nicht in die Steckdose passt, dürfen Sie einen nicht passenden
Stecker nicht mit Gewalt in die Steckdose zu drücken.
• Um das Gerät auszuschalten, schalten Sie es in den Stand-by-Modus und ziehen
den Netzstecker aus der Steckdose.
• Vermeiden Sie es, das Stromkabel mit nassen Händen anzuschließen oder zu
trennen. Dies könnte andernfalls zu einem Stromschlag führen.
• Trennen Sie das Stromkabel, wenn das Gerät längere Zeit nicht verwendet wird.
• Stellen Sie sicher, dass der Hauptstecker immer leicht zugänglich ist.
• Dieses Produkt enthält keine Teile, die vom Benutzer gewartet werden können.
Setzen Sie sich im Fall eines Defekts mit dem Hersteller oder der autorisierten
Kundenabteilung in Verbindung. Teile aus dem Inneren des Geräts freizulegen
kann lebensgefährlich sein. Die Garantie der Hersteller gilt nicht für Defekte, die
durch von nicht autorisierte Dritten durchgeführte Reparaturen entstehen.
• Benutzen Sie dieses Produkt nicht direkt nach dem Auspacken. Warten Sie, bis es
sich auf Zimmertemperatur erwärmt hat, ehe sie es einschalten.
• Stellen Sie sicher, dass dieses Produkt ausschließlich in Umgebungen mit mildem
Klima verwendet wird (kein tropisches oder subtropisches Klima).
• Setzen Sie das Produkt auf eine ache, stabile Ober äche, die keinen
Erschütterungen ausgesetzt ist.
• Das Produkt und dessen Teile dürfen nicht über die Kante des tragenden
Möbelstücks hinausragen.
• Um das Risiko eines Feuers, Stromschlags oder Schäden an diesem Produkt
zu reduzieren, sollten Sie es nicht direktem Sonnenlicht, Staub, Regen oder
Feuchtigkeit aussetzen. Setzen Sie es niemals tropfendem oder spritzendem
Wasser aus und positionieren Sie keine mit Flüssigkeiten gefüllten Objekte auf
oder neben dem Produkt.
• Installieren Sie das Produkt nicht in der Nähe von Heizquellen, wie etwa
Heizungen, Heizregister, Öfen oder anderen Apparaten (einschließlich
Verstärker), die Hitze produzieren.
• Platzieren Sie das Gerät nicht an Orten mit hoher Feuchtigkeit und mangelhafter
Belüftung.
• Sorgen Sie für einen Mindestabstand von 5 cm rund um das Gerät, um eine
ausreichende Belüftung sicherzustellen. Sorgen Sie immer dafür, dass die
Belüftungsö nungen des Geräts nicht durch Gegenstände wie z. B. Zeitungen,
Tischdecken, Gardinen usw. blockiert oder verdeckt sind.
• Lassen Sie NIEMALS jemanden, ganz besonders nicht Kinder, etwas in die Löcher,
Spalten oder anderen Ö nungen des Gerätegehäuses stopfen, da dies zu einem
folgenschweren Stromschlag führen kann.
• Gewitter sind für alle elektrischen Geräte gefährlich. Wenn das Strom- oder
Antennenkabel vom Blitz getro en wird, kann das Gerät, auch wenn es
ausgeschaltet ist, beschädigt werden. Bei einem herannahenden Gewitter
sollten Sie alle Kabel und Stecker des Gerätes ausstecken.
• Bewegen Sie das Gerät nicht während der Disc-Wiedergabe. Während der
Wiedergabe rotiert die Disc sehr schnell. Heben Sie das Gerät während der
Wiedergabe nicht an und bewegen Sie das Gerät während der Wiedergabe nicht,
denn dies könnte die Disc oder das Gerät beschädigen.
• Drehen Sie die Lautstärke niemals hoch, während Sie einen sehr leisen Abschnitt
hören oder kein Audiosignal empfangen. Anderenfalls könnte der Lautsprecher
beschädigt werden, wenn plötzlich ein lauter Abschnitt wiedergegeben wird.
Wartung
• Trennen Sie vor dem Reinigen des Geräts das Stromkabel von der Stromquelle.
• Verwenden Sie einen weichen und sauberen Lappen, um die Außen ächen des
Geräts zu reinigen. Verwenden Sie beim Reinigen niemals Chemikalien oder
Reinigungsmittel.
Batterien
• Achten Sie beim Einlegen der Batterien auf die richtige
Polarität.
• Setzen Sie Batterien keinen hohen Temperaturen aus und
legen Sie sie nicht an Stellen ab, wo sich die Temperatur
schnell erhöht, z. B. neben einem Feuer oder in die direkte
Sonneneinstrahlung.
• Setzten Sie Batterien keiner übermäßigen
Strahlungswärme aus, werfen Sie sie nicht ins Feuer oder
bauen sie auseinander und versuchen Sie nicht, nicht
au adbare Batterien aufzuladen. Sie könnten undicht werden oder explodieren.
• Verwenden Sie niemals unterschiedliche Batterien oder vermischen neue mit
alten.
• Wenn Sie die Fernbedienung für längere Zeit nicht verwenden (länger als
einen Monat), sollten Sie die Batterie aus der Fernbedienung nehmen, um ein
Auslaufen zu verhindern.
• Wenn die Batterien auslaufen, wischen Sie die ausgelaufene Flüssigkeit im
Batteriefach weg und ersetzen die Batterien durch neue.
• Verwenden Sie immer nur die angegebenen Batterien.
CAUTION
RISK OF ELECTRIC SHOCK
DO NOT OPEN
CAUTION
RISK OF ELECTRIC SHOCK
DO NOT OPEN
10

Batterie nicht verschlucken, Gefahr von chemischen Verbrennungen
• Wenn eine Batterie verschluckt wird, kann dies zu schweren inneren
Verbrennungen innerhalb von nur 2 Stunden führen und tödlich sein. Bewahren
Sie neue und gebrauchte Batterien für Kinder unzugänglich auf. Wenn das
Batteriefach nicht fest geschlossen werden kann, sollten Sie das Gerät nicht
weiter verwenden und es für Kinder unzugänglich aufbewahren. Wenn Sie
vermuten, dass Batterien verschluckt oder in irgendein Körperteil eingeführt
wurden, müssen Sie sofort medizinische Hilfe in Anspruch nehmen.
Entsorgung dieses Geräts und von Akkus
• Entsorgen Sie dieses Produkt oder dessen Batterien niemals
über den normalen Hausmüll. Geben Sie es entsprechend den
gesetzlichen Regelungen vor Ort bei dem für das Recycling
von WEEE vorgesehenen Sammelpunkt ab. Damit helfen Sie,
Ressourcen einzusparen und die Umwelt zu schützen.
• In den meisten EU-Ländern gelten für die Entsorgung von
Batterien besondere Gesetze und Vorschriften. Weitere
Informationen erhalten Sie von Ihrem Händler oder den örtlichen
Behörden.
• Das auf der rechten Seite abgebildete Symbol ist auf elektrischen
Geräten und Batterien (oder deren Verpackung) abgebildet,
um die Benutzer an die Entsorgungsvorschriften zu erinnern. Wenn unter dem
Symbol „Hg“ oder „Pb“ erscheint, bedeutet dies, dass die Batterie jeweils Spuren
von Quecksilber (Hg) oder Blei (Pb) enthält.
• Nutzer werden darum gebeten, für gebrauchte Geräte und Batterien bestehende
lokale Rückgabeeinrichtungen zu nutzen.
VORSICHT:
• Geräte mit eingebautem CD-Player sind mit diesem Warnetikett gekennzeichnet.
• DIESES GERÄT IST EIN LASERPRODUKT DER
KLASSE 1. DIESES GERÄT NUTZT EINEN
SICHTBAREN LASERSTRAHL, BEI DEM ES
ZUM AUSTRITT GEFÄHRLICHER STRAHLUNG
KOMMEN KANN, WENN ER GERICHTET
WIRD. BETREIBEN SIE DEN PLAYER NUR ORDNUNGSGEMÄSS ENTSPRECHEND
DER ANLEITUNG. WENN DIESES GERÄT IN DIE STECKDOSE EINGESTECKT WIRD,
HALTEN SIE IHRE AUGEN VON DEN ÖFFNUNGEN FERN UND SEHEN SIE NICHT IN
DAS GERÄT.
• EINE NUTZUNG DER STEUERUNG ODER ANPASSUNGEN ODER EINE
DURCHFÜHRUNG VON AKTIONEN AUSSER DENEN, DIE HIER BESCHRIEBEN
WERDEN, KÖNNEN ZUM AUSTRITT GEFÄHRLICHER STRAHLUNG FÜHREN.
• ÖFFNEN SIE DIE ABDECKUNGEN NICHT UND NEHMEN SIE SELBST KEINE
REPARATUREN VOR. LASSEN SIE DAS GERÄT NUR VON FACHPERSONAL
REPARIEREN.
CE-Konformitätserklärung:
• Sharp Consumer Electronics Poland Sp. z o.o. erklärt hiermit, dass dieses
Audiogerät den wesentlichen Anforderungen und weiteren entsprechenden
Vorschriften der RED-Verordnung 2014/53/EU entspricht. Der vollständige
Text der EU-Konformitätserklärung ist unter folgendem Link verfügbar: www.
sharpconsumer.eu, und anschließend ö nen Sie den Download-Abschnitt Ihres
Modells und wählen „CE-Erklärungen”.
Markenzeichen:
Die Bluetooth®-Wortmarke und Bluetooth-Logos sind eingetragene Warenzeichen
von Bluetooth. Inc.
CLASS 1
LASER PRODUCT
DE

DE
Was be ndet sich im Karton
1 x Hauptgerät
2 x Lautsprecher
1 x Fernbedienung
2 x Batterie vom TypAAA
1 x Benutzerhandbuch
1 x Schnellstart-Handbuch
1 x Netzkabel
Panels und Bedienelemente
Vorderseite
1
2
5
3 4
12
11
6
7 8
9
10
1. SOURCE: Modus auswählen.
2. WIEDERGABE/PAUSE: Musik abspielen oder unterbrechen.
3. ZURÜCK: Drücken, um zum vorherigen Titel/Sender zu springen,
und für den schnellen Rückwärtslauf/zum Scannen gedrückt halten.
4. WEITER: Drücken, um zum nächsten Titel/Sender zu springen, und
für den schnellen Vorwärtslauf/zum Scannen gedrückt halten.
5. AUSWERFEN: Drücken, um die CD-Schublade
zu ö nen/schließen (im CD-Modus)
6. Stand-by-Anzeige: Leuchtet im Stand-by
7. STAND-BY: Drücken zum Einschalten oder
zum Schalten in den Stand-by-Modus
8. Fernbedienungssensor: Richten Sie die Fernbedienung
innerhalb eines Bereichs von 7m auf den Sensor.
9. Displayanzeige: Zeigt Informationen über den
verwendeten Modus/die verwendete Funktion.
10. Drehknopf LAUTSTÄRKE +/-: Lautstärke durch Drehen regeln.
11. USB-Anschluss: Verbindung mit dem USB-Flash-Laufwerk.
12. Audio-Eingangsbuchse: Verbindung mit externen Audioquellen.
Rückseite
14
13
15
13. Antenne: Empfang des DAB/FM-Signals.
14. Lautsprecher-Anschlüsse: Verbindung der
Lautsprecher mit dem Hauptgerät.
15. Stromversorgung: Schließen Sie das Netzkabel an.
Fernbedienung
1.
1
2
3
9
5
6
7
8
21
23
22
16
10
17
11
18
20
15
12
14
27
19
24
25
30
31
28
4
13
26
29
STAND-BY: Gerät durch Drücken einschalten oder in den
Stand-by-Modus schalten.
2. DAB/FM: Drücken, um DAB-Modus auszuwählen.
Erneut drücken, um FM-Modus auszuwählen.
3. AUX/USB: Drücken, um AUX-Modus auszuwählen.
Erneut drücken, um USB-Modus auszuwählen.
4. MENÜ: Drücken, um das Menü aufzurufen oder zu verlassen.
5. STUMM: Ton stumm schalten; zum erneuten Einschalten
erneut drücken oder die Tasten VOL+ oder VOL- drücken.
6. SCHNELLER VORLAUF: Derzeit gespielten Titel schnell vorspulen.
7. ZURÜCK: Zurück zum vorherigen Titel/gespeicherten Sender.
8. SCHNELLER RÜCKLAUF: Derzeit gespielten Titel schnell zurückspulen.
9. STOPP: Im CD/USB-Modus drücken, um die Wiedergabe zu beenden.
10. BASS+: Drücken, um den Bass zu verstärken.
11. BASS -: Drücken, um den Bass zu verringern.
12. WIEDERHOLEN: Drücken, um das Lied im CD-Modus zu wiederholen.
13. ZUFÄLLIG: Drücken, um die Musik in zufälliger
Reihenfolge wiederzugeben.
14. EQ: Mehrmals Drücken, um die Voreinstellung
des Equalizers auszuwählen.
15. FREQ: Häu gkeit: Im FM-Modus drücken, um
eine Frequenz manuell einzugeben.
16. CD: Drücken, um in den CD-Modus zu schalten.
17. BLUETOOTH: Zum Wechseln in den BT-Modus (Bluetooth) drücken.
18. BLUETOOTH trennen: Drücken, um die Verbindung zu
einem gekoppelten Bluetooth-Gerät zu trennen.
19. INFORMATIONEN: Mehrmals drücken, um durch die
Informationsdisplays für die Audio-Quelle/den Modus
zu navigieren. Drücken Sie im MENÜ auf die
-Taste,
um zur vorherigen MENÜ-Ebene zurückzukehren.
20. WEITER: Weiter zum nächsten Titel/Sender.
21. WIEDERGABE/PAUSE: Die Wiedergabe starten oder pausieren.
22. AUSWERFEN: Drücken, um die CD-Schublade
zu ö nen/schließen (im CD-Modus).
12

23. LAUTSTÄRKE +: Lautstärke erhöhen.
24. HÖHEN +: Drücken, um die Höhen zu verstärken.
25. HÖHEN -: Drücken, um die Höhen zu verringern.
26. LAUTSTÄRKE -: Lautstärke verringern.
27. PROGRAMM: Wiedergabereihenfolge programmieren.
28. DIM: Auswahl der Display-Helligkeit Dunkel/Mittel/Hell.
29. LOUD: Basslevel bei niedriger Lautstärke erhöhen.
30. ZAHLEN (0-9): Zur Titelauswahl, Voreinstellungen
oder zur Eingabe der Frequenz.
31. SPEICHERN: Drücken, um Ihre Lieblingssender abzuspeichern.
Batterien der Fernbedienung einlegen oder ersetzen
1. Um das Batteriefach zu ö nen, drücken Sie mit dem
Daumen auf den Kreis auf dem Batteriefachdeckel
und schieben ihn abschließend nach unten.
2. Legen Sie, wie angezeigt, zwei AAA-Batterien mit der
richtigen Polarität +/- ein. Verwenden Sie beim Ersetzen der
Batterien nur den gleichen Batterietyp wie mitgeliefert.
3. Setzen Sie die Batterieabdeckung wieder
ein und lassen Sie sie einrasten.
Vorbereitung für die Inbetriebnahme
1.
AUX IN
4
5
6
7
3
AUDIO IN
2
1
Stellen sie die Lautsprecher links und rechts vom Hauptgerät auf,
idealerweise auf gleicher Höhe und mit einem Abstand von jeweils
zumindest 150mm zum Hauptgerät.
Schließen Sie die Lautsprecherstecker an der Rückseite des Geräts an.
Achten Sie darauf, den LINKEN Lautsprecher an der Rückseite des
Geräts am LINKEN Ausgang anzuschließen. Wiederholen Sie dies für
den RECHTEN Lautsprecher.
2. Bitte achten Sie darauf, dass die auf dem Typenschild an der Rückseite
angegebene Spannung jener in Ihrer Region entspricht. Stecken
Sie das Netzkabel auf der Rückseite des Geräts in die AC-IN-Buchse.
Das andere Ende des Kabels stecken Sie in die Wandsteckdose.
3. Drücken Sie am Hauptgerät auf die Taste STAND-BY, um das Gerät
EINZUSCHALTEN.
Ziehen Sie die Antenne aus, um den bestmöglichen Empfang
zu gewährleisten. Drücken Sie am Gerät auf die Taste
oder
auf der Fernbedienung die DAB/FM-Taste, um in den DAB/
FM-Modus zu gelangen. Um das Radio im DAB/FM-Modus
zu verwenden, befolgen Sie die Anleitung im Kapitel „FM-
RADIOBETRIEB (FM RADIO OPERATION)“ des Benutzerhandbuchs.
4. Drücken Sie am Gerät auf die Taste
oder auf der Fernbedienung
die CD-Taste, um in den CD-Modus zu gelangen. Drücken Sie
die Taste
, um das CD-Fach zu ö nen, und legen Sie eine CD
ein. Drücken Sie erneut die Taste
, um das Fach zu schließen.
Die Wiedergabe der CD beginnt mit dem ersten Titel.
5. Drücken Sie am Gerät auf die Taste
oder auf der
Fernbedienung die AUX-Taste, um in den AUX-Modus
(Audio) zu gelangen. Schließen Sie ihr Audiogerät mit einem
3,5-mm-Aux-in-Kabel am AUX-IN-Anschluss an. Steuern Sie
die Wiedergabe über Ihr verbundenes Audiogerät.
6. Drücken Sie am Gerät auf die Taste
oder auf der
Fernbedienung die Taste
, um in den Bluetooth-Modus zu
gelangen. Aktivieren Sie das Bluetooth-Gerät und wählen
Sie „SHARP XL-B517D“. Wählen Sie den Titel aus, den Sie
abspielen möchten, und drücken Sie auf WIEDERGABE.
7. Drücken Sie am Gerät auf die Taste
oder auf der
Fernbedienung die USB-Taste, um in den USB-Modus zu
gelangen. Stecken Sie das USB-Gerät in den USB-Anschluss
an der Vorderseite des Geräts ein und das USB-Gerät wird
automatisch abgelesen und die Wiedergabe gestartet.
GRUNDFUNKTIONEN
Zeit/Datum einstellen
1. Drücken Sie im Standby-Modus auf die MENÜ -Taste, um die Zeit/
das Datum manuell einzustellen. Mit den
/ -Tasten ändern Sie
die Werte und durch Drücken auf
bestätigen Sie Ihre Auswahl.
2. Um die Zeit/das Datum manuell einzustellen, drücken Sie die MENÜ-
Taste, wenn das Gerät eingeschaltet ist. Wählen Sie das SYSTEM-Menü
aus und drücken Sie zum Bestätigen auf
. Wählen Sie im SYSTEM-
Menü ZEIT und anschließend AUTO UPDATE, wo Sie die Quelle des
Updates auswählen können. Drücken Sie zum Verlassen auf MENÜ.
Modus umschalten
Umschalten zwischen den Modi: DAB+, FM, CD, Bluetooth, USB und AUX
IN– drücken Sie die QUELLEN-Taste am Gerät oder die entsprechende
Taste (DAB/FM, CD,
, AUX, USB) auf der Fernbedienung.
Lautstärkeregelung
1. Erhöhen: Drehen Sie die LAUTSTÄRKE-Einstellung
am Hauptgerät im Uhrzeigersinn oder drücken Sie
die Taste VOL+ auf der Fernbedienung.
2. Verringern: Drehen Sie die LAUTSTÄRKE-Einstellung
am Hauptgerät gegen den Uhrzeigersinn oder drücken
Sie die Taste VOL- auf der Fernbedienung.
EQ-Eff ekte
Drücken Sie wiederholt die Taste EQ auf der Fernbedienung, um zwischen
unterschiedlichen Equalizereinstellungen umzuschalten und den Sound
zu verändern. Wählen Sie zwischen CLASSIC, ROCK, POP, JAZZ, DANCE,
LIVE und Aus.
Tonstärkefunktion
Diese Funktion erhöht den Basslevel bei niedriger Lautstärke. Drücken
Sie auf der Fernbedienung die Taste LOUD, um den E ekt zu aktivieren.
Drücken Sie die Taste erneut, um den E ekt zu deaktivieren.
DEDE

DE
Stummschaltfunktion
Drücken Sie jederzeit die Taste , um die Wiedergabe stumm zu schalten.
Drücken Sie die Taste erneut, um die Stummschaltung aufzuheben.
Tonsteuerung
Um den Bass einzustellen, benutzen Sie die Tasten BAS+ oder BAS- auf der
Fernbedienung.
Um die Höhen einzustellen, benutzen Sie die Tasten TRE+ oder TRE- auf
der Fernbedienung.
Stand-by-Modus
Drücken Sie am Gerät oder auf der Fernbedienung die Taste STANDBY, um
das System in den Stand-by-Modus zu versetzen. Um den Normalbetrieb
wiederaufzunehmen, drücken Sie die Taste erneut.
HINWEIS: Dieses Gerät wurde entwickelt, um nach (etwa) 15Minuten
Inaktivität automatisch in den STAND-BY-Modus zu wechseln. Drücken Sie die
Taste STAND-BY, um das Gerät einzuschalten.
HINWEIS: Wenn Sie das Gerät aus dem Stand-by-Modus einschalten, nimmt es
den Betrieb im zuletzt eingestellten Modus auf.
FM-Radiobetrieb
1. Drücken Sie am Gerät auf die Quellen-Taste oder auf
der Fernbedienung die DAB/FM-Taste, um in den FM-Modus
zu gelangen. (FM-Frequenz: 87,50 bis 108,00MHz)
2. Drücken Sie auf der Fernbedienung die Tasten
/ , um die Frequenz
in Schritten von jeweils 0,05MHz zu erhöhen oder zu verringern.
3. Halten Sie die Tasten
/ auf der Fernbedienung gedrückt,
um schnell durch den Frequenzbereich zu scannen. Die
Suche endet, sobald ein Sender gefunden wurde.
4. Halten Sie die Taste
gedrückt, um den Frequenzbereich schnell zu
durchsuchen– dies speichert automatisch alle gefundenen Sender.
5. Einen Sender ABSPEICHERN:
Sie können bis zu 30FM-Sender im Speicher sichern.
Drücken Sie die Taste FREQ (Frequenz) und
geben Sie anschließend mit den Zahlentasten die
Frequenz ein, die Sie abspeichern möchten.
Drücken Sie die Taste SAVE (Speichern) auf
der Anzeige wird „P01“ angezeigt.
Drücken Sie die Taste
/ , um die Senderspeicher-Nummer
auszuwählen, unter der Sie die Frequenz speichern möchten.
Drücken Sie zur Bestätigung erneut die Taste SAVE (Speichern).
6. Aufrufen des voreingestellten Senders:
Drücken Sie die Taste
/ um Ihre
abgespeicherten Sender aufzurufen.
Hinweis:
RDS ist auf Sendern verfügbar, die diesen Dienst unterstützen
DAB+-BETRIEB
1. Drücken Sie am Gerät auf die Taste QUELLEN
oder auf der Fernbedienung die DAB/FM-Taste,
um in den DAB+-Modus zu gelangen.
2. Wenn sich das Gerät zum ersten Mal im DAB-Modus
be ndet, startet es automatisch die Sendersuche.
3. Sender einstellen: Im Abschnitt „Menübetrieb“ dieses
Benutzerhandbuchs nden Sie Hinweise zur Navigation im MENÜ.
Vollständiger Suchlauf: Wählen Sie im MENÜ <Vollständiger
Suchlauf> und drücken Sie anschließend auf die
-Taste, um die vollständige Suche zu aktivieren. Drücken
und halten Sie alternativ im DAB-Modus die Taste >||.
Manuelle Einstellung: Wählen Sie im MENÜ <Manuelle
Einstellung> und drücken Sie die
/ -Taste, um den
Sender zwischen 5A:174.928MHz und 13F:239.200MHz
auszuwählen. Drücken Sie dann die
-Taste, um
den ausgewählten Sender zu aktivieren.
4. Sender speichern:
Sie können bis zu 30Lieblingssender speichern. So können
Sie rasch und einfach auf Ihre Favoriten zugreifen.
Um eine Voreinstellung zu speichern, müssen Sie zunächst
den Sender anhören, den Sie speichern möchten.
Halten Sie eine der Zahlentasten 0-9 gedrückt, um
den Sender unter dieser Nummer zu speichern.
Drücken Sie alternativ auf SPEICHERN, wählen Sie über
/ die
Nummer der Voreinstellung und drücken Sie erneut auf SPEICHERN.
Um eine gespeicherte Sendervoreinstellung aufzurufen, drücken
Sie auf die entsprechende Nummer auf der Zahlentastatur.
Menübetrieb
Drücken Sie die Taste MENU, um in die Menüeinstellungen zu gelangen.
Wählen Sie über die Taste
/ die Menüinhalte aus. Drücken Sie die
Taste
, um die Auswahl zu bestätigen oder zur nächsten Schnittstelle
für die Menüeinstellungen zu gelangen. Drücken Sie die
-Taste, um
zum letzten Einstellungsbildschirm zurückzukehren. Drücken Sie die Taste
MENU, um das Menü zu verlassen.
*Nur DAB
1. Vollständiger Suchlauf*: Wählen Sie <Vollständiger Suchlauf> und
drücken Sie die
-Taste, um die vollständige Suche zu aktivieren.
2. Manuelle Einstellung*: Wählen Sie <Manuelle Einstellung>
aus und drücken Sie die Taste
/ , um einen Sender zwischen
5A:174.928MHz und 13F:239.200MHz auszuwählen. Drücken Sie
dann die
-Taste, um den ausgewählten Sender zu aktivieren.
3. DRC (Dynamic Range Control)*
Diese Funktion analysiert das Audio-Signal, um laute Töne zu
dämpfen und die leisen zu verstärken. Dies ermöglicht eine klarere
und einheitlichere Tonübertragung, insbesondere bei niedrigeren
Lautstärken. Gehen Sie im Menü zur Auswahl <<DRC>>, wählen
Sie mithilfe der
/ -Taste entweder DRC AUS, DRC HOCH
oder DRC NIEDRIG, drücken Sie zum Bestätigen die
-Taste.
4. Reihenfolge der Sender*
Gehen Sie im Menü zur Option <<Reihenfolge der Sender>>,
drücken Sie die
-Taste und anschließend die / -Taste,
um eine der Optionen für die Senderreihenfolge zu wählen:
<< Multiplex >>, << Alphanumerisch >>, << Aktiv >>.
HINWEIS: Stationsname mit Fragezeichen: ?Stationsname (z. B. ?BBC RADIO 4)
Dies bedeutet, dass der Sender aufgrund eines schlechten Signals nicht
verfügbar ist oder nicht sendet.
Versuchen Sie, die Antenne neu zu positionieren.
5. Gespeicherte Sender bereinigen*:
Wenn das Gerät die Suche an einem anderen Standort durchgeführt
hat, nden Sie eventuell einige gespeicherte Sender, die kein Signal
mehr empfangen. Die Bereinigungsfunktion entfernt automatisch
Sender ohne Signal aus der Liste der gespeicherten Sender.
Drücken Sie im <<Hauptmenü>> auf
/ , um die Option
<<Sender bereinigen>> aufzurufen und wählen Sie
anschließend <<Ja>>, um die Bereinigung zu starten.
6. TA* (Verkehrsdurchsagen)
Spielt Live-Verkehrsdurchsagen der lokalen Radiosender
ab. TA ist standardmäßig ausgeschaltet.
Nur FM**
7. Suchlaufeinstellung**: Nur starke Sender/Alle Sender
8. Automatische Einstellung**: Stereo erlaubt/Erzwungenes Mono
9. Systemeinstellung
Zeit: Zeiteinstellung
Sprache: Spracheinstellung
14

Werkseinstellungen zurücksetzen: Um das Gerät auf die
Werkseinstellungen zurückzusetzen, ö nen Sie die Schnittstelle
zum Zurücksetzen der Werkseinstellungen, befolgen Sie die
Anweisungen „EINGABE drücken, um Sender zu bereinigen“
und drücken Sie die Taste
. Dann wird das Gerät neu gestartet.
Software-Upgrade
SW-Version: Informationen über die Softwareversion des Systems.
CD-Betrieb
1. Drücken Sie am Gerät auf die Quellen-Taste oder auf der
Fernbedienung die CD-Taste, um in den CD-Modus zu gelangen.
Drücken Sie die Taste
, um das CD-Fach zu ö nen, legen Sie eine
CD ein und drücken Sie dann erneut die Taste
zum Schließen.
2. Drücken Sie die Taste
, um den Titel
abzuspielen oder zu unterbrechen.
3. Drücken Sie auf der Fernbedienung die Taste
um die Wiedergabe zu
beenden, und drücken Sie die Taste
, um sie wieder zu starten.
4. Drücken Sie die Taste
/ , um zum vorherigen
oder nächsten Titel zu springen.
5. Drücken Sie auf der Fernbedienung die Tasten
/ , um die
Wiedergabe schnell vor- oder zurückzuspulen; drücken Sie
erneut, um zur normalen Geschwindigkeit zurückzukehren.
6. Um einen bestimmten Titel direkt aufzurufen, drücken Sie auf der
Fernbedienung die entsprechenden Zahlentasten 0bis9.
Beispiel:
Ist der Titel zweistellig, beispielsweise 25, drücken Sie die Taste
„2“ und dann die Taste „5“, um den 25.Titel aufzurufen.
Sie können einfach die Nummer 9 drücken.
Eine einzelne Zi er reicht aus.
7. Taste REPEAT:
Im Wiedergabemodus drücken Sie die Taste
, um den Wiederholmodus einzustellen.
Bei CD und CD-R drücken Sie die Taste
, um Titel wiederholt abzuspielen.
Drücken Sie einmal, um den aktuellen Titel zu wiederholen.
Drücken Sie erneut, um alle Titel zu wiederholen.
Drücken Sie ein drittes Mal, um dies zu deaktivieren.
8. Drücken Sie auf der Fernbedienung die Taste
, um die
Titel der CD in einer zufälligen Reihenfolge wiederzugeben.
Drücken Sie die Taste erneut, um dies zu deaktivieren.
9. Sie können die Wiedergabe der CD auch programmieren:
Drücken Sie auf der Fernbedienung die Taste
, um die Wiedergabe zu beenden.
Drücken Sie auf der Fernbedienung die Taste PROGRAM
(Programm). Auf dem Display wird angezeigt: P01.
Verwenden Sie die Nummerntasten auf der Fernbedienung
oder
/ , um den Titel auszuwählen.
Drücken Sie erneut die PROG-Taste, um die Auswahl zu
bestätigen. Am Bildschirm wird dann P02 angezeigt. Wiederholen
Sie dieses Vorgehen für die zweite Auswahl usw...
Drücken Sie zur Bestätigung die Taste PROGRAM
(PROGRAMM) auf der Fernbedienung.
Um die programmierte Reihenfolge zu
starten, drücken Sie die Taste
.
Um die Programmsequenz abzubrechen,
drücken Sie zweimal die Taste
.
Hinweise:
MP3-Dateien werden unterstützt.
Nicht unterstützte Dateiformate werden übersprungen. Word-
Dokumente (.doc) oder MP3-Dateien mit der Endung
.dlf werden ignoriert und nicht abgespielt.
Bluetooth-Betrieb
Diese Mikroanlage ist Bluetooth-fähig und empfängt Signale innerhalb von
7Metern. Die Mikroanlage mit einem Bluetooth-Gerät koppeln:
1. Drücken Sie am Gerät auf die Quellen-Taste
oder auf der
Fernbedienung die
-Taste, um in den Bluetooth-Modus zu
gelangen. Das Display wird „Bluetooth nicht verbunden“ anzeigen.
2. Aktivieren Sie Ihr Bluetooth-Gerät und wählen Sie den Suchmodus.
3. Wählen Sie aus der Suchliste „SHARP XL-B517D“
aus und stellen Sie eine Verbindung her.
4. Geben Sie das Passwort „0000“ ein, wenn
Sie dazu aufgefordert werden.
5. Wenn die Geräte miteinander verbunden sind, ertönt ein
Betätigungston und das Display zeigt „Bluetooth verbunden“ an.
6. Nun können Sie die auf Ihrem Gerät gespeicherte Musik abspielen.
Beachten Sie bitte: Die Lautstärke am Bluetooth-Quellgerät
funktioniert unabhängig von der Lautstärke des Geräts.
7. Um die Bluetooth-Funktion auszuschalten: Wechseln Sie auf
der Mikroanlage zu einer anderen Funktion, deaktivieren
Sie die Funktion auf Ihrem Bluetooth-Quellgerät oder
drücken Sie die Taste
auf der Fernbedienung.
Andere Audiogeräte verbinden
Über „Audio“ (AUX IN) können Sie Ihr Gerät rasch und einfach mit einem
MP3-Player oder anderen externen Quellen verbinden.
1. Schließen Sie Ihr externes Audiogerät mit einem 3,5-mm-
Audiokabel am Anschluss AUX IN
an der Vorderseite an.
2. Drücken Sie am Gerät auf die Quellen-Taste
oder auf der Fernbedienung die AUX/USB-Taste,
um in den AUX-IN-Modus zu gelangen.
3. Es kann sein, dass Sie die Wiedergabe direkt am
externen Audiogerät steuern müssen.
4. Beachten Sie bitte: Die Lautstärke am Audio-Quellgerät
funktioniert unabhängig von der Lautstärke des Geräts.
USB-Betrieb
Sie können auf einem USB-Stick gespeicherte Musik auch über die USB-
Schnittstelle am Gerät hören.
Einen USB-Speicher verbinden:
1. Schalten Sie das Gerät ein und drücken Sie die Taste SOURCE,
um in den USB-Modus zu gelangen, oder drücken Sie
zweimal die AUX/USB-Taste auf der Fernbedienung.
2. Stecken Sie das USB-Gerät in die USB-Geräteschnittstelle an der
Vorderseite des Geräts.
3. Das Gerät spielt nun die auf dem USB-Gerät gespeicherten Titel.
Hinweise:
MP3-Dateien werden unterstützt.
Nicht unterstützte Dateiformate werden übersprungen. Word-
Dokumente (.doc) oder MP3-Dateien mit der Endung
.dlf werden ignoriert und nicht abgespielt.
Auch wenn die Dateien in einem unterstützten Format (MP3)
vorliegen, kann es vorkommen, dass einige abhängig von der
Kompatibilität nicht abgespielt oder angezeigt werden können.
In manchen Fällen kann dies bis zu 60Sekunden
dauern; dies ist jedoch keine Fehlfunktion.
Abhängig von der Datenmenge und Mediengeschwindigkeit
kann es etwas dauern, bis das Gerät das USB-Gerät lesen kann.
Die maximale USB-Speichergröße ist 32GB.
USB-Speichergerät muss in FAT, FAT16 oder FAT32 formatiert sein.
DEDE

DE
Problembehandlung
Kein Strom
Ursache
• Netzkabel nicht in Steckdose
• Steckdose nicht eingeschaltet
Lösung
• Sicherstellen, dass das Netzkabel angesteckt ist
• Steckdose einschalten
Kein Ton bei AUX/Bluetooth-Eingang
Ursache
• Lautstärke zu niedrig
• Lautstärke der AUX/Bluetooth-Quelle zu niedrig
Lösung
• Erhöht die Lautstärke
• Erhöhen Sie die Ausgangslautstärke der AUX/Bluetooth-Quelle
Ton bei AUX-Eingang verzerrt
Ursache
• Lautstärke zu hoch
• Lautstärke der AUX-Quelle zu hoch
Lösung
• Verringern Sie die Lautstärke
• Verringern Sie die Ausgangslautstärke der AUX-Quelle
CD kann nicht abgespielt werden
Ursache
• Keine CD im Fach
• CD nicht korrekt eingelegt
• CD verschmutzt
Lösung
• Legen Sie eine kompatible CD ein
• Überprüfen Sie, dass die CD richtig eingelegt wurde
• Reinigen Sie die CD
Statisches Geräusch
Ursache
• Schlechter Empfang
Lösung
• Stellen Sie die Antenne ein
Gewünschter Sender nicht gefunden
Ursache
• Schwaches Signal
• Sender ist in Ihrem Gebiet nicht verfügbar
Lösung
• Verwenden Sie die manuelle Suchfunktion
• Siehe Website zur Verfügbarkeit von DAB
Schwaches oder kein DAB-Signal
Ursache
• DAB ist in Ihrem Gebiet nicht verfügbar
Lösung
• Siehe Website zur Verfügbarkeit von DAB
Auf manchen Sendern ist ein brummendes Geräusch zu
hören
oder
Stationsname mit Fragezeichen : ?Stationsname
(z. B. ?BBC RADIO 4)
Ursache
• Schwaches DAB-Signal oder DAB-Sender sendet nicht
Lösung
• Versuchen Sie, die Antenne anders einzustellen
Gerät schaltet sich nach 15Minuten Inaktivität aus
Ursache
• Automatischer Stand-by-Modus
Lösung
• Dieses Gerät wurde entwickelt, um nach etwa 15Minuten Inaktivität
automatisch in den STAND-BY-Modus zu wechseln. Drücken Sie die Taste
STAND-BY, um das Gerät einzuschalten.
Technische Daten
Modell XL-B517D
Radiosignal 87.5–108MHz
DAB+-Signal 174.928–239.200MHz
Stromversorgung AC 220-240V~ 50Hz
Stromverbrauch 34 W
Standby Stromverbrauch <0,5 W
Ausgangsstrom 2 x 7,5 W (RMS)
Wechselstromwiderstand 2 x 8 Ω
Frequenzabhängigkeit 60Hz - 20KHz
Bluetooth
Version V 5.0
Maximaler übertragener Strom <20dbm
Frequenzbänder 2.402 MHz ~ 2.480 MHz
CD-Player
Disc-Format CD, CD-R, CD-RW, MP3
Fernbedienung
Batterietyp 2x AAA/1,5V
235mm
170mm
150mm
223mm
145mm 177mm
1,75kg
KG
1,1kg
KG
16

FR
Consignes de sécurité importantes
ATTENTION
RISQUE D’ÉLECTROCUTION
NE PAS OUVRIR
Veuillez lire ces consignes de sécurité et respecter
les avertissements suivants avant que l'appareil ne
soit actionné :
L'éclair contenu dans un triangle équilatéral est un
avertissement à l'attention de l'utilisateur sur la présence,
àl'intérieur du produit, de pièces non isolées soumises à une
«tension dangereuse», su samment élevée pour poser un
risque d'électrocution.
Le point d'exclamation contenu dans un triangle équilatéral
a pour objet d'appeler l'attention de l'utilisateur sur la
présence dans la documentation accompagnant le produit
d'instructions importantes d'utilisation et d'entretien (de
réparation).
Ce symbole signi e que le produit doit être éliminé de
manière écologique et non avec les ordures ménagères.
Tension CA
Tension CC
Équipement de classeII
A n d’éviter un incendie,
maintenir toujours les bougies
et autres ammes nues
éloignées de ce produit.
Avertissement :
• Suivez toujours les précautions basiques de sécurité durant l'utilisation
de cet appareil, particulièrement lorsque des enfants sont présents.
• Surveillez les enfants a n de vous assurer qu'ils ne jouent pas avec
l'appareil.
• N'endommagez pas le cordon d'alimentation, ne placez pas d'objets
lourds dessus, ne l'étirez pas et ne le tordez pas. N'utilisez pas non plus
de rallonge électrique. Un cordon d'alimentation endommagé peut être
source d'incendie ou d'électrocution.
• Si le cordon d'alimentation est endommagé, il doit être remplacé
par le fabricant, un agent du service après-vente ou des personnes
similairement quali ées.
• Assurez-vous que l'appareil est bien branché dans une prise électrique
220-240VCA 50Hz. L'utilisation d'une tension plus élevée peut entraîner
un dysfonctionnement de l'appareil voire un incendie.
• Si la che électrique ne rentre pas dans votre prise murale, ne forcez pas
pour la faire rentrer.
• Pour éteindre l'appareil, mettez-le en veille et débranchez-le de
l'alimentation secteur.
• Ne connectez ou ne déconnectez pas le cordon d'alimentation avec des
mains mouillées. Ceci peut causer une électrocution.
• Déconnectez le cordon d'alimentation si l'appareil n'est pas utilisé
pendant une période prolongée.
• Assurez-vous que la prise principale est toujours facilement accessible.
• Ce produit ne contient aucune pièce réparable par l'utilisateur. En cas de
défaut, contactez le fabricant ou le département de service après-vente
autorisé. L'exposition aux pièces internes situées à l'intérieur de l'appareil
peut mettre votre vie en danger. La garantie du fabricant ne couvre pas
les défauts provoqués par des réparations e ectuées par des tiers non
autorisés.
• N'utilisez pas ce produit directement après déballage. Attendez qu'il se
réchau e à la température ambiante avant de l'utiliser.
• Assurez-vous que ce produit est utilisé dans des climats modérés
uniquement (et non tropicaux ou subtropicaux).
• Placez le produit sur une surface plane et stable sans vibrations.
• Assurez-vous que le produit ou ses pièces ne dépassent pas du bord du
meuble le supportant.
• Pour réduire les risques d'incendie, d'électrocution ou de dommages
à ce produit, veuillez ne pas l'exposer à la lumière directe du soleil,
à la poussière, à la pluie et à l'humidité. Ne l'exposez jamais aux
éclaboussures ou aux gouttes et ne placez pas d'objets remplis d'eau sur
ou à proximité du produit.
• N'installez pas l'appareil à proximité de sources de chaleur telles que
des radiateurs, des chau ages, des cuisinières ou d'autres appareils (y
compris des ampli cateurs) produisant de la chaleur.
• Ne placez pas de produit dans un emplacement à l'humidité élevée et
présentant une mauvaise ventilation.
• Assurez une distance minimum de 5cm autour de l'appareil a n de
garantir une ventilation su sante. N'obstruez pas les ouvertures de
ventilation de l'appareil et veillez à ce qu'elles ne soient pas recouvertes
d'articles tels que journaux, nappes de table, rideaux, etc.
• Ne laissez JAMAIS une personne, et particulièrement un enfant, faire
rentrer un objet dans les trous, fentes ou toute autre ouverture du boîtier
de l'appareil, ceci pouvant causer une électrocution fatale.
• Les orages sont dangereux pour tous les appareils électriques. Si le
secteur ou le câblage aérien est frappé par la foudre, l'appareil peut être
endommagé, même s'il était éteint. Vous devez débrancher tous les
câbles et connecteurs de l'appareil avant un orage.
• Ne déplacez pas l'unité durant la lecture d'un disque. Durant la lecture,
le disque tourne très rapidement. Ne soulevez ou ne de déplacez pas
l'unité durant la lecture, ceci pouvant endommager le disque ou l'unité.
• N'augmentez pas le volume lorsque vous écoutez une section avec de
très faibles niveaux d'entrée ou aucun signal audio. Le haut-parleur
pourrait être endommagé lors de la lecture soudaine d'une section à
signal plus élevé.
Entretien
• Débranchez le câble d'alimentation de la source de courant avant de
nettoyer l'appareil.
• Utilisez un chi on doux et propre pour nettoyer l'extérieur de l'appareil.
Ne nettoyez jamais l'appareil avec des produits chimiques ou détergents.
Piles
• Observez la polarité correcte en insérant les piles.
• N'exposez pas les piles à des températures élevées
et ne les placez pas dans des endroits où la
température pourrait augmenter rapidement, par
exemple près d'un feu, ou directement à la lumière
du soleil.
• N'exposez pas les piles à la chaleur rayonnante
excessive, ne les jetez pas au feu, ne les démontez
pas et n'essayez pas de recharger les piles non
rechargeables. Elles peuvent fuir ou exploser.
• N'utilisez jamais ensemble des piles di érentes ou ne mélangez pas des
piles neuves et des usagées.
• Lorsque la télécommande n'est pas utilisée pendant une période
prolongée (plus d'un mois), retirez la pile de la télécommande pour
éviter tout risque de fuite.
• Si les piles fuient, nettoyez les fuites à l'intérieur du compartiment à piles
et remplacez les piles par des piles neuves.
• N'utilisez pas de piles autres que celles spéci ées.
CAUTION
RISK OF ELECTRIC SHOCK
DO NOT OPEN
CAUTION
RISK OF ELECTRIC SHOCK
DO NOT OPEN
FR

N'ingérez pas la pile, risque de brûlure chimique
• Si une pile est ingérée, elle peut causer de sévères brûlures internes
en moins de 2heures, voire même la mort. Gardez les piles neuves et
usagées hors de la portée des enfants. Si le compartiment de la pile
ne ferme pas bien, arrêtez d'utiliser le produit et gardez-le hors de la
portée des enfants. Si vous pensez que des piles ont pu être avalées
ou placées à l'intérieur d'une partie quelconque du corps, consultez
immédiatement un médecin.
Élimination de cet appareil et des piles
• N'éliminez pas ce produit ou les piles avec les déchets
ménagers non triés. Renvoyez-le à un point de ramassage
et de recyclage de DEEE (déchets d'équipements
électriques et électroniques) selon la législation en
vigueur. Agir ainsi, aide à conserver les ressources et à
protéger l'environnement.
• La plupart des pays de l'Union européenne appliquent une
législation sur l'élimination des piles. Veuillez contacter le
détaillant ou les autorités locales pour plus d'information.
• Le symbole ci-contre apparaît sur les appareils électriques
et les piles (ou leur emballage) pour rappeler aux
utilisateurs les exigences en matière d'élimination. Si «Hg» ou «Pb»
apparaît sous le symbole, ceci indique que la pile contient des traces de
mercure (Hg) ou de plomb (Pb), respectivement.
• Les utilisateurs doivent se rapprocher des centres locaux de collecte
d'équipements et de piles existants.
ATTENTION:
• Les appareils avec lecteur CD intégré sont marqués avec cette étiquette
d'avertissement.
• CE PRODUIT EST CLASSÉ COMME
PRODUIT LASER CLASSE 1. L'UNITÉ
UTILISE UN FAISCEAU LASER VISIBLE
QUI PEUT CAUSER UNE EXPOSITION À
DES RADIATIONS DANGEREUSES SI DIRIGÉ. ASSUREZ-VOUS D'UTILISER
LE LECTEUR CORRECTEMENT COMME INDIQUÉ. LORSQUE CETTE UNITÉ
EST BRANCHÉE À UNE PRISE DE COURANT MURALE, NE PLACEZ PAS VOS
YEUX PRÈS DE L'OUVERTURE POUR REGARDER À L'INTÉRIEUR DE L'UNITÉ.
• L'UTILISATION DE COMMANDES OU DE RÉGLAGES OU L'EXÉCUTION DE
PROCÉDURES AUTRES QUE CELLES STIPULÉES DANS CE DOCUMENT
PEUT EXPOSER L'UTILISATEUR À DES RADIATIONS DANGEREUSES.
• N'OUVREZ PAS L'UNITÉ ET NE LA RÉPAREZ PAS PAR VOUS-MÊME.
CONFIEZ TOUS LES TRAVAUX D'ENTRETIEN À DU PERSONNEL QUALIFIÉ.
Déclaration CE:
• Par la présente, Sharp Consumer Electronics Poland sp. z o.o. déclare
que cet appareil audio est conforme aux exigences essentielles et aux
autres dispositions pertinentes de la directive RED 2014/53/UE. Le texte
complet de la déclaration de conformité de l'UE est disponible en suivant
le lien www.sharpconsumer.eu et en entrant ensuite dans la section de
téléchargement de votre modèle et en choisissant «CE Statements».
Marques déposées
La marque et les logos Bluetooth® sont des marques déposées de
Bluetooth SIG., Inc.
CLASS 1
LASER PRODUCT
18

FR
Ce qui est inclus dans la boîte
1 x unité principale
2 x haut-parleurs
1 x télécommande
2 x piles AA
1 x manuel d'utilisation
1 x guide de démarrage rapide
1 x cordon d'alimentation CA
Panneaux & commandes
Face avant
1
2
5
3 4
12
11
6
7 8
9
10
1. SOURCE: Appuyez pour sélectionner les modes.
2. LECTURE/PAUSE: Appuyez pour mettre en pause ou lire la musique.
3. PRÉCÉDENT: Appuyez sur la touche pour passer à la
chanson/station précédente, maintenez-la enfoncée
pour un rembobinage rapide/rechercher.
4. SUIVANT: Appuyez sur la touche pour passer à la chanson/station
suivante, maintenez-la enfoncée pour une avance rapide/rechercher.
5. ÉJECTER: Appuyez sur la touche pour ouvrir/
fermer le tiroir CD (en mode CD)
6. Indicateur de veille: allumé en mode veille
7. VEILLE: appuyez sur cette touche pour mettre
en marche ou activer la veille
8. Capteur télécommande: Pointez la télécommande
vers le capteur dans un rayon de 7m.
9. Écran: A che des informations en rapport
avec le mode ou la fonction utilisée.
10. Bouton VOLUME+/- : Tournez-le pour régler le volume.
11. Port USB: Permet de connecter une clé USB.
12. Prise d'entrée audio: Permet de connecter
des sources audio externes.
Panneau arrière
14
13
15
13. Antenne: Pour recevoir le signal DAB/FM.
14. Bornes de haut-parleur: Connectez les
haut-parleurs à l'unité principale.
15. Alimentation: Branchez le câble d'alimentation.
Télécommande
1.
1
2
3
9
5
6
7
8
21
23
22
16
10
17
11
18
20
15
12
14
27
19
24
25
30
31
28
4
13
26
29
VEILLE: Appuyez pour allumer l'appareil ou le mettre en veille.
2. DAB/FM: Appuyez pour sélectionner le mode DAB,
appuyez à nouveau pour sélectionner le mode FM.
3. AUX/USB: Appuyez pour sélectionner le mode AUX,
appuyez à nouveau pour sélectionner le mode USB.
4. MENU: Appuyez pour entrer ou sortir du menu.
5. SOURDINE: Appuyez pour couper le son, appuyez à nouveau
pour le rétablir ou appuyez sur les touches VOL+ ou VOL-.
6. AVANCE RAPIDE: Appuyez pour faire une avance
rapide sur la piste en cours de lecture.
7. PRÉCÉDENT: Appuyez pour aller au morceau
ou à la station qui précède/en mémoire.
8. RETOUR RAPIDE: Appuyez pour faire un retour
rapide sur la piste en cours de lecture.
9. STOP: En mode CD/USB, appuyez sur cette
touche pour arrêter la lecture.
10. BASSES+: Appuyez pour augmenter les basses.
11. BASSES-: Appuyez pour réduire les basses.
12. RÉPÉTITION: En mode CD, appuyez sur cette
touche pour répéter la chanson.
13. ALÉATOIRE: Appuyez pour lire la musique en ordre aléatoire.
14. EQ: Appuyez à plusieurs reprises pour
sélectionner l'égaliseur sonore prédé ni.
15. FREQ: Fréquence: en mode FM, appuyez sur cette
touche pour entrer une fréquence manuellement.
16. CD: Appuyez pour entrer en mode CD.
17. BLUETOOTH: Appuyez pour entrer en mode Bluetooth.
18. Déconnexion BLUETOOTH : Appuyez sur cette touche
pour déconnecter un appareil Bluetooth couplé.
FR

19. INFORMATION: Appuyez à plusieurs reprises pour
naviguer entre les écrans d'information relatifs à la source/
au mode audio. Dans le MENU, appuyez sur la touche
pour retourner au niveau de MENU précédent.
20. SUIVANT: Appuyez pour aller au morceau ou à la station qui suit.
21. LECTURE/PAUSE: Démarrez ou mettez en pause la lecture
22. ÉJECTER: Appuyez sur cette touche pour ouvrir/
fermer le tiroir à CD (en mode CD).
23. VOLUME+: Appuyez pour augmenter le volume.
24. AIGU+: Appuyez pour augmenter les aigus.
25. AIGU-: Appuyez pour réduire les aigus.
26. VOLUME -: Appuyez pour réduire le volume.
27. PROGRAMME: Appuyez pour programmer l'ordre de lecture.
28. DIM: Appuyez sur pour sélectionner le niveau de
luminosité de l'écran entre Faible/Moyen/Élevé.
29. LOUD: Appuyez pour augmenter le niveau des graves à faible volume.
30. NUMÉROS (0-9): Utilisez pour sélectionner
des pistes ou entrer une fréquence.
31. ENREGISTRER: Appuyez pour enregistrer vos stations préférées.
Insérer ou remplacer les piles de la télécommande
1. Pour ouvrir le compartiment des piles, appuyez avec
le pouce sur le cercle du couvercle du compartiment
des piles et faites-le glisser vers le bas.
2. Placez deux piles AAA en respectant la polarité +/-,
comme illustré. Lors du remplacement des piles, utilisez
uniquement le même type que les piles fournies.
3. Replacez le couvercle des piles et xez-le.
Préparation avant utilisation
1.
AUX IN
4
5
6
7
3
AUDIO IN
2
1
Placez un haut-parleur de chaque côté de l'unité principale, de
préférence à la même hauteur et avec au moins 150mm d'espace
entre chaque haut-parleur et l'unité principale.
Connectez les prises haut-parleur au dos de l'appareil. Veillez à faire
correspondre le haut-parleur placé sur la GAUCHE à la sortie LEFT au
dos de l'appareil. Le haut-parleur placé à DROITE est relié à la sortie
RIGHT.
2. Assurez-vous que la tension indiquée sur la plaque signalétique,
qui se trouve sur le panneau arrière, est identique à la tension
de votre région. Insérez l'extrémité du cordon d'alimentation
dans la prise AC IN (entrée CA) située à l'arrière de l'appareil.
Branchez l'autre extrémité du cordon dans la prise murale.
3. Appuyez sur la touche VEILLEde l'appareil pour l'allumer.
Déployez l'ANTENNE pour obtenir la meilleure réception possible.
Appuyez sur la touche
sur l'unité ou sur la touche DAB/FM de la
télécommande pour activer le mode DAB/FM. Pour utiliser la radio en
mode DAB/FM, suivez les instructions du chapitre FONCTIONNEMENT
DE LA RADIO FM ou DAB du manuel de l'utilisateur.
4. Appuyez sur la touche
sur l'unité ou sur la touche CD
de la télécommande pour activer le mode CD. Appuyez
sur la touche
pour ouvrir le tiroir du disque et insérez
un disque. Appuyez à nouveau sur
pour le refermer. La
lecture du CD commencera avec la première piste.
5. Appuyez sur la touche
de l'appareil ou sur la touche AUX de
la télécommande pour passer en mode Aux In (Audio). Connectez
votre appareil audio à la prise AUX IN via un câble auxiliaire de
3,5mm. Contrôlez la lecture via votre appareil audio connecté.
6. Appuyez plusieurs fois sur la touche
de l'appareil ou sur la touche
de la télécommande pour sélectionner le mode Bluetooth. Activez
l'appareil compatible Bluetooth et sélectionnez «SHARP XL-B517D».
Sélectionnez la piste de votre choix et appuyez pour la lire.
7. Appuyez sur la touche
sur l'unité ou sur la touche USB de
la télécommande pour activer le mode USB. Branchez l'appareil
USB sur le port USB sur le panneau avant de l'appareil, l'appareil
USB sera lu automatiquement et la lecture commencera.
FONCTIONS DE BASE
Réglage de l'heure/de la date
1. Pour régler manuellement l'heure/la date, appuyez longuement sur la
touche MENU lorsque l'appareil est en veille. Utilisez les touches
/ pour modi er les valeurs, puis appuyez sur pour con rmer.
2. Pour régler automatiquement l'heure/la date, appuyez sur la touche
MENU lorsque l'appareil est allumé. Sélectionnez le menu SYSTEM
et appuyez sur
pour con rmer. Sélectionnez TIME dans le
menu SYSTEM, puis AUTO UPDATE où vous pourrez sélectionner
la source de la mise à jour. Appuyez sur MENU pour quitter.
Changement de mode
Pour basculer entre les modes: DAB, FM, CD, Bluetooth, USB et AUX
IN, appuyez sur la touche SOURCE de l'appareil ou sur la touche
correspondante (DAB/FM, CD,
, AUX, USB) de la télécommande.
Contrôle du volume
1. Augmenter: Tournez la commande VOLUME de l'unité
principale dans le sens des aiguilles d'une montre ou
appuyez sur la touche VOL+ de la télécommande.
2. Réduire: Tournez la commande VOLUME de l'unité
principale dans le sens inverse des aiguilles d'une montre
ou appuyez sur la touche VOL- de la télécommande.
Eff ets EQ
Appuyez plusieurs fois sur la touche EQ pour alterner entre di érents
préréglages d'égaliseur pour modi er le son. Choisissez entre CLASSIC,
ROCK, POP, JAZZ, DANCE, LIVE et O .
Fonction de réglage des basses
Cette fonction augmente le niveau des basses à faible volume. Appuyez
sur la touche LOUD de la télécommande pour activer l'e et. Appuyez à
nouveau pour le désactiver.
20
Seite wird geladen ...
Seite wird geladen ...
Seite wird geladen ...
Seite wird geladen ...
Seite wird geladen ...
Seite wird geladen ...
Seite wird geladen ...
Seite wird geladen ...
Seite wird geladen ...
Seite wird geladen ...
Seite wird geladen ...
Seite wird geladen ...
Seite wird geladen ...
Seite wird geladen ...
Seite wird geladen ...
Seite wird geladen ...
Seite wird geladen ...
Seite wird geladen ...
Seite wird geladen ...
Seite wird geladen ...
Seite wird geladen ...
Seite wird geladen ...
Seite wird geladen ...
Seite wird geladen ...
Seite wird geladen ...
Seite wird geladen ...
Seite wird geladen ...
Seite wird geladen ...
Seite wird geladen ...
Seite wird geladen ...
Seite wird geladen ...
Seite wird geladen ...
Seite wird geladen ...
Seite wird geladen ...
Seite wird geladen ...
Seite wird geladen ...
Seite wird geladen ...
Seite wird geladen ...
Seite wird geladen ...
Seite wird geladen ...
-
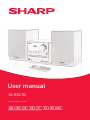 1
1
-
 2
2
-
 3
3
-
 4
4
-
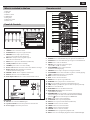 5
5
-
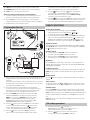 6
6
-
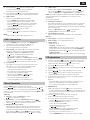 7
7
-
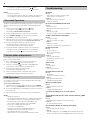 8
8
-
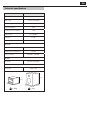 9
9
-
 10
10
-
 11
11
-
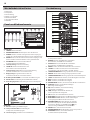 12
12
-
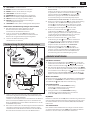 13
13
-
 14
14
-
 15
15
-
 16
16
-
 17
17
-
 18
18
-
 19
19
-
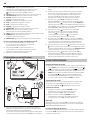 20
20
-
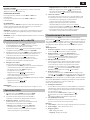 21
21
-
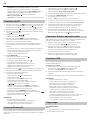 22
22
-
 23
23
-
 24
24
-
 25
25
-
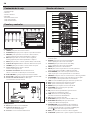 26
26
-
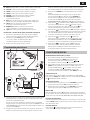 27
27
-
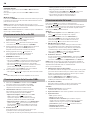 28
28
-
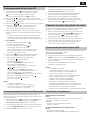 29
29
-
 30
30
-
 31
31
-
 32
32
-
 33
33
-
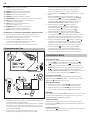 34
34
-
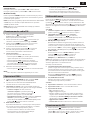 35
35
-
 36
36
-
 37
37
-
 38
38
-
 39
39
-
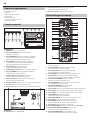 40
40
-
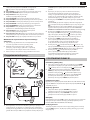 41
41
-
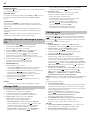 42
42
-
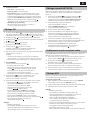 43
43
-
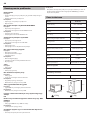 44
44
-
 45
45
-
 46
46
-
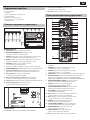 47
47
-
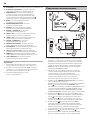 48
48
-
 49
49
-
 50
50
-
 51
51
-
 52
52
-
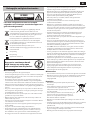 53
53
-
 54
54
-
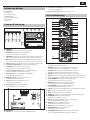 55
55
-
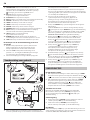 56
56
-
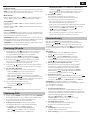 57
57
-
 58
58
-
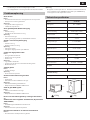 59
59
-
 60
60


Sharp XL-B517D(BK) Bedienungsanleitung
- Kategorie
- CD-Spieler
- Typ
- Bedienungsanleitung
in anderen Sprachen
- English: Sharp XL-B517D(BK) Owner's manual
- français: Sharp XL-B517D(BK) Le manuel du propriétaire
- español: Sharp XL-B517D(BK) El manual del propietario
- italiano: Sharp XL-B517D(BK) Manuale del proprietario
- русский: Sharp XL-B517D(BK) Инструкция по применению
- Nederlands: Sharp XL-B517D(BK) de handleiding
- polski: Sharp XL-B517D(BK) Instrukcja obsługi
Verwandte Artikel
Andere Dokumente
-
Nordmende Transita 320 Bedienungsanleitung
-
Lenco DAR-045BK Benutzerhandbuch
-
Albrecht DR 790 CD, B-WARE (kleine Fehler möglich) Bedienungsanleitung
-
Lenco MC-150 Stereo Bedienungsanleitung
-
Lenco MC-150 Benutzerhandbuch
-
-
Lenco SCD-720SI Bedienungsanleitung
-
Yamaha MCR-N470 Bedienungsanleitung
-
Muse M-1190 BTC Benutzerhandbuch
-