
Aastra Phone 312
Quick Guide
Kurzbedienungsanleitung
Manuel d’utilisation succinct

1
Thank you for choosing an Aastra product. Our product stands for the highest quality demands,
teamed with first-class design.
This Quick Guide will help you using your Aastra Phone 312. The complete User Guide is available on
our website www.aastra.com
and provide answers to all your most important questions (f. x. infor-
mation about ”
Registering a handset“, ”Setting up a SIP server“ or hints for using the ”Tools for
troubleshooting“.
If you should require any additional technical support, or if you would like information about other
Aastra products please contact the person responsible for your system or your retailer first.
We hope that you will enjoy using your Aastra Phone 312.
Welcome to Aastra
English

32
English
Using the phone
• Only connect the connecting cable to the intended sockets.
• Only connect authorized accessories.
• Only use the mains adapter plug supplied (ID no.: 4515303).
• Research has shown that in certain cases portable phones, which are switched on, can influence
medical devices. Therefore when using portable phones within medical facilities, comply with the
regulations of the institution concerned.
• Never
- open the charging point or the handset (except for the battery cover) yourself.
- touch the plug contacts with sharp or metallic objects.
- carry the charging point by the connecting cable.
• Only clean your telephone with a slightly damp cloth.
• Do not use your phone in areas where there is the danger of explosion.
Install and keep the handset and accessories out of the reach of children.
Advice for hearing aid users
Before using the handset, hearing aid users should be aware that the radio signal will engage with
the hearing aid and could cause an unpleasant buzzing noise at sufficient volumes.
Using the phone
Safety instructions
Correct use/declaration of conformity
The Aastra Phone 312 is a handset for calling via SIP in a WLAN.
The CE mark on the product confirms its conformity to the technical guidelines for user safety and
electromagnetic compatibility, valid at the time of issuing the corresponding declaration of confor-
mity according to European directive 99/5/EC.
The declaration of conformity can be viewed online at http://www.aastra.com
Like every cordless phone, this handset uses radio signals which do not always guarantee a connec-
tion establishment in all circumstances. Therefore as a rule you should never rely solely on cordless
phones for essential communication (e.g. medical emergencies).
Electricity supply/power failure/battery
This product requires an AC supply for the use of the charging point. The electricity can only be dis-
connected from the charging point when the mains adapter is taken out of the socket.
If there is a power failure, all saved information (program and user data) is retained without
changes.
Important advice on the battery can be found in the section “Precautions when handling the bat-
tery”.
Safety
The charging point can only be installed and used in a closed building.
Place the charging point on a non-slip mat.
Do not install the charging point and the handset near:
•Water, moisture or damp areas (e.g. bathroom)
• Sources of heat, direct sunlight or unventilated areas
• Devices, which produce strong magnetic fields, electronic devices, fluorescent lamps, computers,
radio devices, televisions or fax/phone devices
• Areas where the device could be covered, or where its ventilation could be obstructed, or where
water could run into it
• Dusty areas, and areas which are subject to vibrations, jolting or extreme temperature fluctua-
tions.
The following advice must be observed without fail when installing, connecting and operating the
phone:
• Position the connecting cable where it will not cause accidents.

54
English
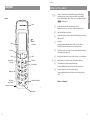
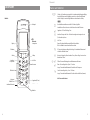
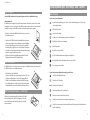
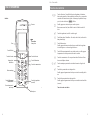
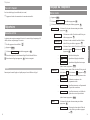
Diagram
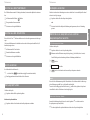
Softkeys – the function of an individual button is depicted in the display
depending on status. If there are only two possibilities, they are divided
between the left and right softkeys. If there are more possibilities, the softkey
will then appear.
From the idle state, this button opens the telephone book.
Within a menu or a list, you can scroll up or down using the arrow keys.
Signal button/R button: Query button.
Speakerphone/hands-free button. Switches the inbuilt loudspeaker on (button
lights up) and off.
Info button:
Pressing the button quickly when in the idle state opens the caller list.
The button flashes if new calls have been received in your absence.
The C button is used to correct entries. Pressing and holding the button in the
idle state turns the handset on/off.
Handset button: Equivalent to “answer” and/or “hang up” on a standard phone.
Number buttons are used for direct entry of call numbers and names.
The pound button is used for entering the pound sign.
Pressing and holding the button in idle state: Switches on the key lock.
The asterisk button is used for entering the asterisk sign.
Pressing and holding the button in idle state: Switches the ringer (buzzer)
on/off.
All buttons are illuminated.
Options
DE
F
r
H
B
C
A
0
…
9
#
*
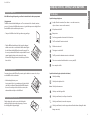
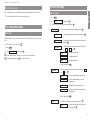
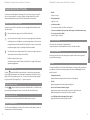
Buttons on the handset
Handset:
Display
Earpiece
Reverse:
Loudspeaker
Softkey
Softkey
Info button
Signal button (R button)
Handset button
Speakerphone/
hands-free
Number pad
Delete key/
ON/OFF button
Microphone
Arrow keys
Connection for headset
USB-Schnittstelle
(für Service und spätere A
Diagram

76
English
Installation
• The battery fluid could damage your sight. If you accidentally get battery fluid in your eyes,
wash them out immediately with clean tap water and then seek medical attention.
• If the battery is used by children, make sure that a responsible adult tells the children about the
precautions and the correct handling instructions, and ensure that the children handle the bat-
tery correctly.
• If battery fluid accidentally gets on your clothes or skin, wash the affected area immediately
with clean tap water. Extended contact with the battery fluid can cause skin irritation.
Precautions during use
• The battery is only designed for use with this handset.
• Only use the charging point supplied to charge the battery.
• New batteries are not charged up. Therefore you must charge the battery before using it for the
first time.
• The use of the battery in a cold environment can shorten the expected battery life of a fully
loaded battery. Charge the battery in a place where the temperature is in the region of 10°C to
35°C. Charging in a place outside of this temperature area can lead to charging time being
longer than normal, or could even lead to failure of the charging process.
• A very limited battery life after full charging indicates that the operational life of the battery has
expired. Replace the battery (complete with the battery compartment cover) with a new one.
• Never wipe the battery with thinners, petroleum ether, alcohol or other liquid products, or with
chemically treated wipes. This can lead to deformation of the battery, and to operational fail-
ure.
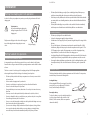
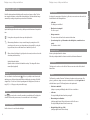
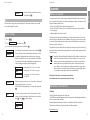
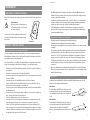
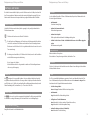
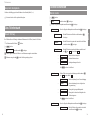
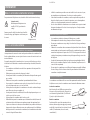
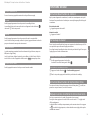
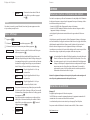
Inserting the battery
The battery is firmly attached to the battery compartment cover of the handset. To start operation,
insert the battery as shown in the following sketch.
Inserting the battery
After inserting the MEM card (see next page), if not already
inserted: Set the cover at a slight angle (1) and click it
down (2) until it is firmly locked into place.
Removing the battery
To release the battery cover, take a suitable pointed object
(e.g. biro) and press it into the hole at the base of the
handset (1). At the same time, lift the cover upwards as
shown in the sketch (2).
1
2
1
2
Installation
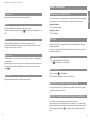
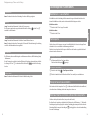
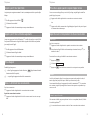
Putting the charging point into operation
In order to be able to put your phone into operation, you need to plug in the mains cable for the
charging point.
Safety instruction
Only use the intended mains adapter plug
with type designation ID no. 4515303 for the
charging point.
Plug the mains cable plug into the socket on the charging sta-
tion, and then plug the mains adapter plug into a mains
socket.
Putting handset into operation
Precautions when handling the battery
It is imperative that you read the safety precautions before you use the battery for the first time.
Ensure that these safety precautions and all other operating instructions remain available for future
reference.
This device contains a Li-Ion battery pack. Not complying with any of the following regulations
when using the battery will lead to the danger of overheating, fire and explosion.
• The battery is firmly attached to the battery compartment cover. Never try to remove the bat-
tery from the cover.
• Never use another charging station for your handset.
• Never try to use the battery to supply power for any device other than this handset.
• Never use or leave the battery near an open flame.
• Never put the battery into a microwave, throw it into a fire or subject it to intense heat in any
other form.
• Never carry or store the battery with electrically conductive articles (necklaces, leads etc.)
• Never try to dismantle the battery, or modify it in any way, and never subject it to strong blows.
• Never submerge the battery in fresh or salt water.
• Never use or store the battery in direct sunlight, in a vehicle parked in the blazing sun or in any
other location where there are high temperatures.
• If you ever notice discharge of liquid, an unusual smell, heat development, coloring, deforma-
tion or any other abnormal condition while you are using, charging or storing the battery,
remove the battery from the handset immediately and keep it away from open flames.
Wall power supply

98
English
Display screen, softkeys and buttons
The display
Symbols in the upper display row:
Quality of the radio connection (four columns – secure radio connection;
only one column – insecure radio connection).
Microphone switched off.
Battery status.
You have programmed and activated a local alarm time.
The “Do not disturb” function is activated.
Call diversion activated.
The ring tone is switched off.
The PIN protection for administrator entries is deactivated.
There is no connection from the handset to an access point (AP).
New entry in the call list.
Symbols in the lower display row (related to the buttons):
Softkey for redialing
Softkey for the telephone book
Menu Softkey for the main menu
Softkey to cancel the keypad lock
Softkey (control buttons) to scroll up or down in lists
Softkey (control buttons) to move the entry cursor
Softkey (control buttons) to set the ringer volume and handset volume (during calls and/or
during connection)
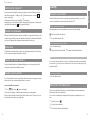
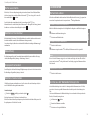
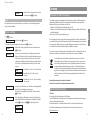
Inserting the MEM card
If the MEM card is supplied separately, you will need to insert this into the battery compartment.
Safety instruction
The MEM card must be handled with great care. The contacts must be free from dust, moisture,
grease etc. Do not store the MEM card in warm areas (e.g. with direct exposure to sunlight). Do not
bend the MEM card, this could destroy the contacts.
• First press the MEM card out of the larger frame using your finger.
• Push the MEM card under the metal clip (gray in the diagram)
with the contact surfaces on the bottom and the slanted edge to
the back. Ensure that the MEM card is inserted far enough. If in
the correct position it will lie flat in the cavity and will be secured
against slipping by the two raised sections in the casing.
Never touch the shiny gold contact. Static discharge can lead to
device defects.
Removing the MEM card
You must only remove the MEM card if you want to give the handset to someone else, or if you
need the MEM card for a new handset.
• After detaching the battery cover:
Insert a pointed object (e.g. an unbent paper clip) into the back
end of the slot in the metal clip and push the MEM card under
this cover. Ensure that you do not touch the contacts, either
underneath the metal clip or on the MEM card.
Attaching/removing the belt clip
Push the adapter clip over the reverse side of the handset
until the clip locks into place in the side openings. To remove
the belt clip, pull the clips apart slightly.
Installation

1110
English
Display screen, softkeys and buttons
Handset button
According to the current status of the phone (e.g. idle state, in conversation or in editor mode) the
handset button has the following functions:
... In idle state:
The dialing tone is established.
... When there is an incoming call:
The call is accepted.
... During a conversation:
The conversation is ended and/or the connection is broken down.
... If you are browsing a list, e.g. of caller numbers or the redialing list etc, or numbers have been
entered:
The call number is dialed.
Loudspeaker button
Activates speakerphone/hands-free function.
When the speakerphone/hands-free function is switched on, this button is illuminated.
Info button (i)
This button can be used to access the caller list. If there are new entries in the caller list, the info
button flashes.
C button
The C button has a number of functions. The function is dependent on the current status of the
phone (e.g. in idle state, during a conversation or in editor mode etc.) and the
length of time for
which the button is pressed. The following functions can be implemented:
... If the device is switched off:
Quick press or pressing and holding the button: The device is switched on.
... In idle state:
Pressing and holding the button: Handset is powering off.
... When entering text or call numbers:
Quickly pressing the button: Deletes the character to the left of the cursor.
Pressing and holding the button: Deletes the entire entry.
... During the display of lists (e.g. call list):
Quickly pressing the button: Deletes the entry.
Softkeys and buttons
Both of the buttons underneath the display and the arrow keys are known as softkeys. The func-
tions assigned to the buttons are shown in the bottom display row. The button function changes
automatically according to the particular operational status of the handset.
Softkey: Arrow keys
Symbols will be displayed above the arrow keys, which represent their functions at that particular
time:
Pressing the arrow key up and/or down opens the telephone book.
When entering call numbers or text you can make changes by moving the cursor. The
arrow keys move the cursor one space along when pressed once quickly. If you keep the
key pressed down, the cursor will continue to move until the key is released.
When a selection list is displayed (e.g. telephone book or menu) move the cursor bar to the
desired entry with the arrow keys.
Handset/loudspeaker/headset:
Adjust the volume to the desired level with the arrow keys. The settings will be shown
numerically and graphically.
Softkey: OK
You can confirm the selected function with . If there is a possibility to switch a function, the
switching process will be carried out using this button. In the display, active settings (ON) will be
designated by a “
✓” at the level of the corresponding term in the display frame; for inactive set-
tings (OFF), a “
—” will appear, or the position will be empty.
Softkey: Back
With you can leave the section of the menu that is currently displayed. The display then
shows the selection in the previous menu, or the current idle state or connection display.
Softkey: Redialing
¤
Enables selections to be made from the redialing list.
Back
OK
Display screen, softkeys and buttons

13
12
English
Basic functions
Switching the handset on/off
Once the battery has been charged for the first time, your handset will be switched on automatically
and is ready for use. You can switch off your handset to maintain the battery life for longer.
Switching off the handset
C
Press and hold the C button.
Switching on the handset
C
Press the C button.
Key lock
Switch the key lock on before carrying the handset in your pocket. This will prevent a call number
being dialed accidentally.
If you receive a call, the key lock will be switched off for the duration of the call. You can accept the
call using the handset button.
Turning the key lock on
#
Press and hold the pound button in the idle state.
The symbol will appear over the left softkey.
Turning the key lock off
D
Press the softkey - > To unlock press #
#
Press the pound key within five seconds to deactivate the lock.
Switching the hands-free function on/off
Pressing the loudspeaker button
H
in the idle state (the handset is then ready to dial) or during a
connection turns the loudspeaker on or off.
Setting the handset volume during a conversation
You are having a conversation (using the handset, loudspeaker or headset).
Volume settings can be carried out using the arrow keys or number keys 1-7. The current setting is
displayed graphically. The altered setting is only temporarily valid for the existing connection. If the
temporary setting is confirmed using , it is valid as the new basic setting for further connec-
tions.
OK
Display screen, softkeys and buttons
Signal button (R)
Quickly pressing the button during a connection: A query is initiated.
#-button
Pressing and holding the button in idle state: Switches the key lock on.
The key lock is switched off again by pressing the softkey and the
#
button within five sec-
onds.
*
-button
Pressing and holding the button in idle state: Switches the buzzer/ringer on or off.
Pressing the button quickly whilst entering text (e.g. names for telephone book entries): Switches
from upper to lower case letters, or vice versa.
Number buttons
The number buttons can be used for the direct entry of call numbers and names, and alpha numer-
ics (vanity numbers).
When entering text, you can use the arrow keys to move the entry position to the beginning or end
of the entry. The C button deletes individual numbers/characters. The procedure can be aborted
using .
Softkey: Menu
Quickly pressing the button in idle state: The handset menu is opened.
Back

1514
English
Calling
Dialing the call number
All calls described in this section that are initiated by pressing the handset button
A
can also be
carried out in the hands-free mode using the loudspeaker button
H
.
Dialing call number with predial
When using predial, you have the opportunity to correct your entries before dialing.
t
Enter the call number in the idle state.
A
Press the handset button to dial.
Dialing call number with direct dialing
A
Press the handset button.
t
Enter the call number and end it with
#
; the number will be dialed immediately.
Note
Please enter the call number quickly, because four seconds after the last number is entered dialing will
be started even if
#
has not been pressed. If numbers have not been entered completely, the wrong
number will be dialed.
To end the conversation:
A
Press the handset button.
Calling from the redialing list
The 10 most recently dialed call numbers are saved in the redialing list. Each new number that is
dialed overwrites the oldest entry in the list.
You can see the call numbers in the redialing list and call up the corresponding details (e.g. call
time).
D
In the idle state, press .
F
Select the desired call number.
A
Press the handset button to dial immediately.
Basic functions
Switching the ringer off
If you do not want to be disturbed (e.g. during a meeting), you can switch off the ringer (only the
ringer via the loudspeaker). To do this, press the
*
button until you hear a noise and
appears on the display.
To turn the ring tone back on, press and hold the
*
button again.
Alternatively, you can also use the menu “Audio > Ringer settings > Ringer device” to deactivate the
entry “Buzzer”, then the symbol will also appear in the display.
Handset not attainable
When the “Do not disturb” function is activated, your handset is no longer attainable. However, calls
are still noted in your call list (as long as the call number is transferred). You will not be disturbed but
you can see calls, giving you the opportunity to return important calls if necessary.
Illumination
The illumination is activated each time a button is pressed and remains switched on for the set time
(can be set in the menu “Display > Illumination > Keypad”).
Change the display contrast
In order to adjust the display to on-site illumination/brightness, you can change the contrast. The
setting can be made in the menu “Display > Contrast”.
Handset secrecy button
If you do not want the person you are on the phone with to hear what you are saying e.g. to another
person in the room, you can momentarily activate the secrecy button.
You are in the middle of a conversation
D
Press . The symbol appears in the display.
The person you are talking to on the phone cannot hear what you are saying anymore.
When you want to talk to the person again, press the left softkey once more. The person you are on
the phone with can hear what you are saying again.
Mute

1716
English
Calling
Accept call waiting
If you receive another call during a connection, you will hear a call waiting signal. You accept the call
as follows.
r
Press the signal button. The active call is put on hold.
or
A
Press the handset button. The waiting call is accepted, the first connection is separated.
Calling another contact during a conversation
Making a query call
You are in the middle of a conversation.
r
Press the signal button – the first conversation is put on hold.
t
Enter the call number with the number buttons and finish it with
#
(or wait 4 sec).
To end the query, and to return to the held connection:
E
Press .
F
Select .
E
Press . You will be reconnected with the person you were originally speaking to.
Note
When entering the call number, if you do not press any buttons for 4 seconds, the number you have
entered up until that point will be dialed. Subsequent dialing is not possible.
If you disconnect the query conversation with the handset button
A
, the held conversation
appears again using a call-back function, as long as the participant has not already hung up.
During the query: Toggle
If the connection is achieved, you can use the signal button
r
to talk to either of the other people
in the conversations as you choose (toggle).
r
The conversation that is currently on hold will be activated, and the other conversation put on
hold.
OK
Disconnect
Options
Calling
Calling from the telephone book
The telephone book can save a maximum of 100 entries, which are automatically placed in alphabeti-
cal order.
F
In the idle state, press the arrow key .
F
Select the desired name
A
Press the handset button to dial immediately.
Calling from the caller list
When you press the info button
B
a list of calls that have not been accepted will be displayed.
You can see the call numbers in the caller list and call up the corresponding details (e.g. call time).
B
Press the info button in the idle state.
F
Select the desired call number.
A
Press the handset button to dial immediately.
Accepting calls
During the call you can…
D
… Reject the call using the softkey (if so, caller hears busy tone).
A
Press the handset button to accept the call.
Putting a conversation on hold
You are in the middle of a conversation.
r
Press the signal button. The conversation is put on hold.
Getting back to a held conversation
r
Press the signal button. You will be reconnected with the person on the other end of the
phone.
Reject

1918
English
Phone settings
Menu: Audio
E
Press .
F
Select and confirm with .
F
Select one of the following menu items and confirm with .
Select one of the following menu items and confirm with .
Select a melody using the arrow keys and confirm using .
Select the desired ringer volume with the arrow keys and con-
firm with .
Select the appropriate entry with the arrow keys and switch
on or off using .
… Ringer via the loudspeaker
… Call with vibration alert
… Call signal in the headset
Leave the menu using .
Select the appropriate entry with the arrow keys and switch on
or off using .
… Acoustic acknowledgement of pressing a key.
… Acoustic acknowledgement of successful
programming.
… Warning signal for low battery capacity
… Warning signal for fluctuation radio signal at
the range limit.
Leave the menu using .
Select one of the following menu items and confirm with .
… Select the desired volume with the arrow keys
and confirm with .
OK
Earpiece
OK
Volume
Back
Range alarm
✓
Battery alarm
✓
Confirm tones
✓
Key click
✓
OK
–
✓
Signal tones
Back
Headset
✓
Vibrator
✓
Buzzer
✓
OK
–
✓
Ringer device
OK
Ringer volume
OK
Melody
OK
Ringer settings
OK
OK
Audio
Menu
Calling / The telephone book
Transferring a call
You are conducting a query conversation and are currently “toggling” between calls (see above):
A
Press the handset button – the conversation will be transferred.
The telephone book
New entry
The telephone book can save 100 entries: Call numbers of up to 32 numbers, names of up to 16 char-
acters.
F
In the idle state, press the arrow key .
E
Press .
F
Select and confirm with .
t
Enter the name and use the arrow key to proceed to enter the call number.
t
Enter the call number and press . The entry will be saved.
OK
OK
New
Options

2120
English
Appendix
Appendix
Advice for disposal
To avoid any negative effects for the environment and public health which could arise from the dis-
posal of electrical and electronic devices, which contain dangerous substances, the directives of the
European Parliament and the Council
• Directive 2002/96/EC “Electrical and Electronic Equipment” and
• Directive 2002/95/EC “Restriction of use of certain hazardous substances in electrical and elec-
tronic equipment”
are legally regulated in all countries of the EU.
The legislation is primarily aimed at avoiding waste of electrical and electronic devices, but is also
aimed at reusing, recycling and other forms of utilization of these types of waste in order to reduce
the amount of waste thrown away and to lower the amount of harmful substances from electrical
and electronic devices in the waste.
The product that you have purchased has been developed according to state of the art technology
with regard to the environment and recycling, and therefore complies with the requirements of the
European directives.
The product is labeled with the symbol displayed here. This symbol means that when the
owner of the product wants to dispose of it, they are obliged to do so in a waste collec-
tion that is separate from the unsorted municipal waste collection. In order to do this,
suitable facilities have been established for the return of old electrical and electronic
devices. Old devices can be brought to these public return points free of charge. Please
find out the location of the return points from the information provided by the authori-
ties responsible from waste disposal in the towns and municipalities.
Warning! Old electrical devices do not belong in household waste.
Please hand them in to the recognized return points free of charge.
Declaration of conformity
CE Marking
This device fulfils the requirements of the EU directive:
1999/5/EC Directive on Radio Equipment and Telecommunications Terminal Equipment and the rec-
iprocal recognition of their conformity.
Conformity with the abovementioned directive is confirmed by the CE mark on the device.
The declaration of conformity can be viewed online at the following address:
http://www.aastra.com
Phone settings
… Select the desired volume with the arrow keys
and confirm with .
Note
If the handset is in energy saving mode (the display is off), the first time a button is pressed it will
not be acknowledged by a “key click”.
Menu: Display
E
Press .
F
Select and confirm using .
F
Select one of the following menu items and confirm with .
Select the desired contrast with the arrow keys and confirm with .
You can set the time for which the illumination should stay on. Please
consider that long illumination times result in increased energy con-
sumption, which will be at the cost of the standby time of the handset.
You can determine the length of display illumination while the device
is in the charging point using the setting “Charging light”.
… Settings range 10 sec to 240 sec in set steps
… Settings range “Off” to 240 sec in set steps
… Settings range 1 sec to 240 sec in set steps,
“On” and “Off”.
Using the arrow keys you can choose one of six motifs as a background
image that will be shown as a screen saver.
Select the desired background image or “No image” and confirm with
.
You can choose between two text sizes for the presentation of menu
contents. Select the desired text size with the arrow keys and confirm
with . Use to end the settings.
…
…
Large font
Small font
✓
Back
OK
Font
OK
Background
Charging light
Keypad
Display
Illumination
OK
Contrast
OK
OK
Display
Menu
OK
Loudspeaker

2322
English
Appendix
Switzerland
France
USA
Canada
Time zone per DHCP
Africa
Asia
Australia
Europe
North America
South America
Time format Date format
Time format
Call diversion Unconditional
Busy
By time
Call number
Alarm Active
Set
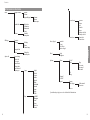
System Network Profiles *
Tools Ping
Traceroute
Site survey *
Roaming info
Info
Syslog
Accounts *
PIN *
Software Version
Update Check now
Settings
Licences
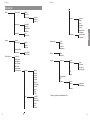
* different system settings are protected by means of the administrator PIN
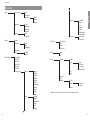
Menu tree
Audio Ringer settings Melody
Ringer volume
Ringer device Buzzer
Vibrator
Headset
Signal tones Key click
Confirm tones
Battery alarm
Range alarm
Volume Earpiece
Loudspeaker
Display Contrast
Illumination Display
Keypad
Charging light
Background
Font Small font
Large font
Phone options Do not disturb
Call wait. off
Auto answer
Auto key lock
Silent charg.
User name *
Country options Language English
Deutsch
Français
Italiano
Español
Dansk
Nederlands
Svenska
Suomi
Norsk
Polski
Country per DHCP
Germany
Switzerland
France
USA
Canada
Time zone per DHCP
Af i

1
Vielen Dank, dass Sie sich für ein Produkt von Aastra-DeTeWe entschieden haben. Unser Produkt
steht für höchste Qualitätsansprüche, gepaart mit hochwertigem Design.
Diese Kurzbedienungsanleitung hilft Ihnen beim ersten Umgang mit dem Aastra Phone 312. Die
komplette Bedienunganleitung finden Sie auf unserer Webseite www.aastra.com
. Alle wichtigen
Fragen zum Betrieb des Telefons werden dort erläutert (z. B. das „Einbuchen des Mobilteils“, wie Sie
den „SIP-Server einrichten“ und die „Werkzeuge zur Fehlersuche“ benutzen können).
Sollten Sie darüber hinaus weitere technische Unterstützung benötigen oder Informationen über
andere Aastra-DeTeWe-Produkte wünschen, wenden Sie sich bitte zunächst an Ihren Systemverant-
wortlichen oder Ihren Händler.
Wir wünschen Ihnen viel Freude mit Ihrem Aastra Phone 312.
Willkommen bei Aastra-DeTeWe
24
Deutsch

2
Umgang mit dem Telefon
Sicherheitshinweise
Bestimmungsgemäße Verwendung / Konformitätserklärung
Das Mobilteil Aastra Phone 312 ist ein Mobilteil zum Telefonieren via SIP in einem WLAN.
Das CE-Zeichen auf dem Produkt bestätigt seine Konformität zu den technischen Richtlinien zur
Benutzersicherheit und elektromagnetischen Verträglichkeit, gültig zum Zeitpunkt der Ausstellung
der entsprechenden Konformitätserklärung nach europäischer Direktive 99/5/EC.
Die Konformitätserklärung ist unter http://www.aastra.com im Internet einzusehen.
Wie jedes schnurlose Telefon verwendet dieses Mobilteil Funksignale, die nicht immer unter allen
Umständen einen Verbindungsaufbau garantieren. Generell sollten Sie daher bei unentbehrlicher
Kommunikation (z. B. medizinische Notfälle) nie ausschließlich auf schnurlose Telefone vertrauen.
Stromversorgung / Netzausfall / Akku
Dieses Produkt benötigt eine Wechselstromversorgung für den Betrieb der Ladestation. Der Strom
ist an der Ladestation nur abzuschalten, indem das Netzteil aus der Steckdose gezogen wird.
Bei Stromausfall bleiben alle Speicherinhalte (Programm- und Anwenderdaten) ohne Änderung
erhalten.
Wichtige Hinweise zum Akku finden Sie im Abschnitt „Vorsichtsmaßregeln bei der Handhabung des
Akkus“.
Sicherheit
Die Ladestation darf nur in einem geschlossenen Gebäude aufgestellt und betrieben werden.
Stellen Sie die Ladestation auf eine rutschfeste Unterlage.
Ladestation und Mobilteil nicht aufstellen in der Nähe von:
• Wasser, Feuchtigkeit oder feuchten Orten (z. B. Bad)
• Hitzequellen, direkter Sonneneinstrahlung oder ungelüfteten Orten
• Geräten, die starke, magnetische Felder erzeugen, Elektrogeräten, Leuchtstofflampen, Compu-
tern, Radiogeräten, Fernsehern oder Telefax- und Telefongeräten
• Orten, an denen das Gerät verdeckt werden kann, seine Lüftung behindert wird, Flüssigkeit hinein
gelangen kann
• staubigen Orten, und Orten, die Schwingungen, Erschütterungen oder extremen Temperatur-
schwankungen ausgesetzt sind.
3
Deutsch
Umgang mit dem Telefon
Beachten Sie beim Aufstellen, Anschließen und Bedienen des Telefons unbedingt die folgenden Hin-
weise:
• Verlegen Sie die Anschlusskabel unfallsicher!
• Schließen Sie die Anschlusskabel nur an die dafür vorgesehenen Dosen an.
• Schließen Sie nur zugelassenes Zubehör an.
• Verwenden Sie nur das mitgelieferte Steckernetzgerät (ID No.: 4515303).
• Die Forschung hat gezeigt, dass in bestimmten Fällen medizinische Geräte durch eingeschaltete
tragbare Telefone beeinflusst werden können. Halten Sie deshalb bei der Verwendung tragbarer
Telefone innerhalb medizinischer Einrichtungen die Bestimmungen der jeweiligen Institute ein.
•Niemals
- die Ladestation oder das Mobilteil (bis auf den Akkufachdeckel) selbst öffnen!
- die Steckkontakte mit spitzen und metallischen Gegenständen berühren!
- die Ladestation am Anschlusskabel tragen!
• Reinigen Sie Ihr Telefon nur mit einem leicht feuchten Tuch.
• Benutzen Sie Ihr Telefon nicht in explosionsgefährdeten Bereichen.
Mobilteil und Zubehör außer Reichweite von kleinen Kindern aufstellen bzw. aufbewahren.
Hinweis für Träger von Hörgeräten
Träger von Hörgeräten sollten vor Nutzung des Mobilteiles beachten, dass Funksignale in Hörgeräte
einkoppeln und bei ausreichender Stärke einen unangenehmen Brummton verursachen können.

4
Mobilteil:
Display
Hörkapsel
Rückseite:
Lautsprecher
Softkey
Softkey
Info-Taste
Signaltaste (R-Taste)
Hörertaste
Lauthören/
Freisprechen
Ziffernblock
Löschtaste/
EIN/AUS-Taste
Mikrofon
Pfeiltasten
Anschluss für Headset
USB-Schnittstelle
(für Service und später
Übersicht
5
Deutsch
Übersicht
Softkeys - die Funktion einer einzelnen Taste wird zustandsabhängig im Display
dargestellt. Bei nur zwei Möglichkeiten verteilen sie sich auf den linken und
rechten Softkey, bei weiteren Möglichkeiten erscheint dann der Softkey
.
Aus dem Ruhezustand heraus wird das Telefonbuch geöffnet.
Innerhalb eines Menüs oder einer Liste blättern Sie mit den Pfeiltasten.
Signaltaste / R-Taste: Rückfrage-Taste.
Lauthören/Freisprechen-Taste. Schaltet den eingebauten Lautsprecher ein
(Taste leuchtet) und aus.
Info-Taste:
Kurzer Tastendruck im Ruhezustand öffnet die Anruferliste.
Die Taste blinkt bei neuen Anrufen in Abwesenheit.
C-Taste zur Korrektur von Eingaben. Ein langer Tastendruck im Ruhezustand
schaltet das Mobilteil ein/aus.
Hörertaste: Entspricht „Hörer abnehmen“ bzw. „Hörer auflegen“ an einem her-
kömmlichen Telefon.
Ziffern-Tasten zur Direkteingabe von Rufnummern und Namen.
Raute-Taste zur Eingabe des „Raute“ - Zeichens.
Langer Tastendruck im Ruhezustand: Einschalten der Tastensperre.
Stern-Taste zur Eingabe des „Stern“ - Zeichens.
Langer Tastendruck im Ruhezustand: Ein-/Ausschalten des Ruftons (Summer).
Alle Tasten sind beleuchtet.
Option
DE
F
r
H
B
C
A
0
…
9
#
*
Tasten am Mobilteil

6
Installation
Ladestation in Betrieb nehmen
Damit Sie Ihr Telefon in Betrieb nehmen können, müssen Sie das Netzkabel für die Ladestation ein-
stecken.
Sicherheitshinweis
Nur das vorgesehene Steckernetzgerät mit
der Typbezeichnung ID No.: 4515303 für die
Ladestation verwenden!
Stecken Sie den Stecker des Netzkabels in die Buchse an der
Ladestation und anschließend das Steckernetzgerät in eine
Netzsteckdose.
Mobilteil in Betrieb nehmen
Vorsichtsmaßregeln bei der Handhabung des Akkus
Lesen Sie unbedingt die Sicherheitsmaßregeln durch, bevor Sie die erstmalige Verwendung des
Akkus durchführen. Bewahren Sie diese Sicherheitsmaßregeln und alle Instruktionen für die Bedie-
nung griffbreit für spätere Nachschlagzwecke auf.
Dieses Gerät enthält einen Li-Ion-Akkupack. Nichteinhaltung einer der folgenden Vorsichtsmaßre-
geln bei der Verwendung des Akkus führt zu Überhitzungs-, Feuer- und Explosionsgefahr.
• Der Akku ist fest mit der Akufachabdeckung verbunden. Versuchen Sie niemals, den Akku dar-
aus zu entfernen.
• Verwenden Sie niemals eine andere Ladestation für Ihr Mobilteil.
• Versuchen Sie niemals die Verwendung des Akkus für die Stromversorgung eines anderen Gerä-
tes als diese Mobilteil.
• Verwenden und belassen Sie den Akku niemals in der Nähe offener Flammen.
• Setzen Sie den Akku niemals in einen Mikrowellenherd ein, werfen Sie ihn nicht in ein Feuer,
und setzen Sie ihn nicht auf andere Weise starker Hitze aus.
• Tragen oder lagern Sie niemals den Akku gemeinsam mit elektrisch leitenden Artikeln (Halsket-
ten, Bleistiftminen usw.)
• Versuchen Sie niemals ein Zerlegen des Akkus, modifizieren Sie diesen niemals auf irgend eine
Weise, und setzen Sie ihn niemals starken Stößen aus.
• Tauchen Sie den Akku niemals in Frisch- oder Salzwasser ein.
• Verwenden oder belassen Sie den Akku niemals in direktem Sonnenlicht, in einem im prallen
Sonnenlicht geparkten Fahrzeug oder an einem anderen Ort mit hohen Temperaturen.
• Sollten Sie jemals Flüssigkeitsaustritt, ungewöhnlichen Geruch, Wärmeentwicklung, Verfär-
bung, Verformung oder eine andere abnormale Bedingung feststellen, während Sie den Akku
verwenden, aufladen oder aufbewahren, entfernen Sie den Akku unverzüglich aus dem Mobil-
teil, und halten Sie ihn entfernt von offenen Flammen.
Steckernetzteil
Deutsch
7
Installation
• Die Akkuflüssigkeit kann Ihr Sehvermögen beschädigen. Sollte jemals Akkuflüssigkeit verse-
hentlich in Ihre Augen gelangen, spülen Sie Ihre Augen sofort mit reinem Leitungswasser, und
wenden Sie sich danach an einen Arzt.
• Falls der Akku von Kindern verwendet werden soll, stellen Sie sicher, dass ein verantwortlicher
Erwachsener die Kinder in die Vorsichtsmaßregeln und richtigen Handhabungsinstruktionen
einführt, und achten Sie darauf, dass die Kinder den Akku richtig handhaben.
• Sollte Akkuflüssigkeit versehentlich auf Ihre Kleidung oder Haut gelangen, spülen Sie die
betroffene Stelle sofort mit reinem Leitungswasser. Längerer Kontakt mit der Akkuflüssigkeit
kann zu Hautentzündung führen.
Vorsichtsmaßregeln während der Verwendung
• Der Akku ist nur für die Verwendung mit diesem Mobilteil ausgelegt.
• Verwenden Sie nur die mitgelieferte Ladestation für das Aufladen.
• Ein neuer Akku ist nicht aufgeladen. Sie müssen ihn daher aufladen, bevor Sie diesen erstmalig
verwenden.
• Die Verwendung eines Akkus in kalter Umgebung kann die von einer vollen Ladung erwartete
Betriebsdauer verkürzen. Laden Sie den Akku an einem Ort auf, an dem die Temperatur im
Bereich von 10° C bis 35° C liegt. Ein Aufladen außerhalb dieses Temperaturbereichs kann zu
längerer als normaler Ladedauer oder sogar zu einem Versagen des Ladevorganges führen.
• Sehr begrenzte Betriebsdauer nach einer vollen Ladung weist darauf hin, dass die Lebensdauer
des Akkus abgelaufen ist. Ersetzen Sie den Akku (komplett mit dem Akkufachdeckel) durch
einen neuen.
• Wischen Sie den Akku niemals mit Verdünner, Waschbenzin, Alkohol oder anderen flüchtigen
Mitteln oder chemisch behandelten Tüchern ab. Anderenfalls kann es zu Verformung des Akkus
und zu Fehlbetrieb kommen.
Akku einsetzen
Der Akku ist fest in den Akkudeckel des Mobilteils eingeklebt. Zur Inbetriebnahme setzen Sie den
Akku ein, wie in der folgenden Skizze dargestellt.
Akku einsetzen
Nach dem Einlegen der MEM-Card (s. nächste Seite), sofern
nicht bereits eingelegt: Setzen Sie den Deckel leicht schräg
an (1) und klappen Sie ihn herunter (2) bis er deutlich ein-
rastet.
Akku entnehmen
Zum Entriegeln des Akkudeckels nehmen Sie einen geeig-
neten spitzen Gegenstand (z. B. Kugelschreiber) und drü-
cken diesen in das Loch im Boden des Mobilteils (1).
Heben Sie, wie skizziert, gleichzeitig den Deckel nach oben
(2).
1
2
1
2

8
MEM-Card einlegen
Sofern die MEM-Card ihrem Gerät separat beiliegt, müssen Sie diese im Akkufach einlegen.
Sicherheitshinweis!
Die MEM-Card muss mit größter Sorgfalt behandelt werden. Die Kontakte müssen frei von Staub,
Feuchtigkeit, Fett usw. sein. Lagern Sie die MEM-Card nicht an warmen Orten (z. B. mit Sonnenbe-
strahlung). Verbiegen Sie die MEM-Card nicht; die Kontakte könnten zerstört werden.
• Drücken Sie zunächst die MEM-Card mit dem Finger aus dem grö-
ßeren Rahmen heraus.
• Schieben Sie die MEM-Card mit den Kontaktflächen nach unten
und der abgeschrägten Kante nach hinten unter die Metallklam-
mer (in der Abbildung grau). Achten Sie darauf, dass die MEM-
Card weit genug eingeschoben ist. In der korrekten Position liegt
sie flach in der Vertiefung und wird durch die beiden Erhebungen
im Gehäuse gegen Verrutschen gesichert .
Berühren Sie niemals die goldglänzenden Kontakte! Statische
Entladungen können zum Gerätedefekt führen.
MEM-Card entnehmen
Die MEM-Card müssen Sie nur herausnehmen, wenn Sie das Mobilteil weitergeben möchten oder
die MEM-Card für ein neues Mobilteil brauchen.
• Nach Abnehmen des Akkudeckels:
Schieben Sie mit Hilfe eines spitzen Gegenstandes wie z. B. einer
aufgebogenen Büroklammer, den Sie in das hintere Ende des
Schlitzes in der Metallklammer einführen, die MEM-Card unter
dieser Abdeckung hervor. Achten Sie darauf, die Kontakte unter
der Metallklammer sowie auf der MEM-Card nicht zu berühren.
Gürtelclip anbringen / entfernen
Schieben Sie den Adapterbügel über die Rückseite des Mobil-
teils bis die Bügel in die seitlichen Öffnungen desselben ein-
rasten. Zum Entfernen des Gürtelclips ziehen Sie die Bügel
leicht auseinander.
Installation
Deutsch
9
Displayanzeigen, Softkeys und Tasten
Das Display
Symbole in der oberen Displayzeile:
Qualität der Funkverbindung (vier Säulen - sichere Funkverbindung; nur eine Säule - unsi-
chere Funkverbindung).
Mikrofon abgeschaltet.
Ladezustand des Akkus.
Sie haben eine lokale Alarmzeit programmiert und aktiviert.
Das Merkmal „Nicht stören“ ist aktiviert.
Rufumleitung aktiv.
Der Rufton ist ausgeschaltet.
Der PIN-Schutz für Administrator-Eingaben ist aufgehoben.
Das Mobilteil hat keine Verbindung zu einem Accesspoint (AP).
Neuer Eintrag in der Anrufliste.
Symbole in der untersten Displayzeile (zugehörig zu den Tasten):
Softkey für die Wahlwiederholung
Softkey für das Telefonbuch
Menü Softkey für das Hauptmenü
Softkey zum Aufheben des Tastenschutzes
Softkey (Steuertasten) zum Blättern in Listen
Softkey (Steuertasten) zum Verschieben des Eingabecursors
Softkey (Steuertasten) zum Verstellen der Rufton- und Hörerlautstärke (bei Anruf bzw. wäh-
rend der Verbindung)

10
Displayanzeigen, Softkeys und Tasten
Softkeys und Tasten
Die beiden Tasten unterhalb des Displays sowie die Pfeiltasten werden als Softkeys bezeichnet. Die
den Tasten zugeordneten Funktionen werden in der untersten Displayzeile angezeigt. Die Tasten-
funktion ändert sich automatisch entsprechend dem jeweiligen Betriebszustand des Mobilteils.
Softkey: Pfeiltasten
Oberhalb der Pfeiltasten werden Ihnen Symbole angezeigt, die die jeweilige Funktionalität der
Pfeiltasten kennzeichnen:
Pfeiltaste nach oben bzw. unten öffnet das Telefonbuch.
Bei der Eingabe von Rufnummern oder Texten können Sie Änderungen durch Verschieben
eines Cursors vornehmen. Die Pfeiltasten verschieben den Cursor bei einmaligem kurzen
Drücken um eine Stelle. Halten Sie die Taste gedrückt wird der Cursor bis zum Loslassen der
Taste weiterbewegt.
Bei Anzeige einer Auswahlliste (z. B. Telefonbuch oder Menü) steuern Sie den Cursorbalken
mit den Pfeiltasten zum gewünschten Eintrag.
Hörer / Lautsprecher / Headset:
Mit den Pfeiltasten stellen Sie die gewünschte Lautstärke ein. Die Einstellung wird nume-
risch sowie grafisch angezeigt.
Softkey: OK
Mit bestätigen Sie die ausgewählte Funktion. Ist bei einer Funktion lediglich eine Umschalt-
möglichkeit vorhanden, wird durch diese Taste umgeschaltet. Im Display werden aktive Einstellun-
gen (EIN) durch ein „
✓“ auf Höhe des jeweiligen Begriffs am Displayrand gekennzeichnet; bei nicht
aktiven Einstellungen (AUS) erscheint dort ein „
—“ bzw. ist diese Stelle leer.
Softkey: Zurück
Mit verlassen Sie jeweils den angezeigten Menüabschnitt. Das Display zeigt anschließend
die Auswahl des vorherigen Menüzweigs oder das aktuelle Ruhe- bzw. Verbindungsdisplay.
Softkey: Wahlwiederholung
¤
Ermöglicht die Auswahl aus der Wahlwiederholliste.
Zurück
OK
11
Deutsch
Displayanzeigen, Tasten und Softkeys
Hörertaste
Je nach aktuellem Zustand des Telefons z. B. Ruhezustand, im Gespräch, im Editiermodus hat die
Hörertaste folgende Funktionen:
... im Ruhezustand:
Es wird eine Leitung belegt.
... während eines kommenden Anrufs:
Der Anruf wird angenommen.
... während eines Gesprächs:
Das Gespräch wird beendet bzw. die Verbindung wird abgebaut.
... befinden Sie sich in Listen z. B. Anruf- oder Wahlwiederholliste usw. oder sind Ziffern eingegeben
worden:
Die Rufnummer wird gewählt.
Lautsprechertaste
Aktiviert Lauthören / Freisprechen.
Wenn Lauthören / Freisprechen eingeschaltet ist, leuchtet diese Taste.
Infotaste (i)
Über diese Taste können Sie die Anruferliste erreichen. Wenn sich neue Einträge in der Anruferliste
befinden, blinkt die Infotaste.
C-Taste
Die C-Taste ist mit Mehrfachfunktionen ausgestattet. Es wird je nach aktuellem Zustand des Tele-
fons z. B. Ruhezustand, im Gespräch, im Editiermodus usw. zwischen
kurzem oder langem Tasten-
druck unterschieden. Folgende Funktionen wurden realisiert:
... ist das Gerät ausgeschaltet:
kurzer
oder langer Tastendruck: Das Gerät wird eingeschaltet.
... im Ruhezustand:
langer
Tastendruck: Das Gerät wird abgeschaltet.
... bei Eingabe von Text oder Rufnummern:
kurzer
Tastendruck: Löscht ein einzelnes Zeichen links vom Cursor,
langer Tastendruck: Löscht den kompletten Eintrag.
... während der Anzeige von Listen (z. B. Anrufliste):
kurzer
Tastendruck: Löscht den Eintrag.

12
Displayanzeigen, Tasten und Softkeys
Signaltaste (R)
Kurzer Tastendruck während einer Verbindung: Es wird eine Rückfrage eingeleitet.
Ta ste
#
Langer Tastendruck im Ruhezustand: Schaltet die Tastensperre ein.
Die Tastensperre wird wieder ausgeschaltet durch Drücken des Softkeys und der Taste
#
innerhalb von fünf Sekunden.
Ta ste
*
Langer Tastendruck im Ruhezustand: Schaltet den Summer/Rufton an bzw. aus.
Kurzer Tastendruck während einer Texteingabe (z. B. Namen für Telefonbucheintrag): Umschaltung
von Groß- auf Kleinbuchstaben bzw. umgekehrt.
Zifferntasten
Die Zifferntasten dienen zur Direkteingabe von Rufnummern und Namen, ABC-Bedruckung (Vanity
- Rufnummern).
Bei der Texteingabe verschieben Sie mit den Pfeiltasten die Eingabeposition zum Anfang oder Ende
des Eintrages. Die Taste
C
löscht einzelne Ziffern/Zeichen. Mit wird die Prozedur abge-
brochen.
Softkey: Menü
Kurzer Tastendruck im Ruhezustand: Das Menü des Mobilteils wird geöffnet.
Zurück
Deutsch
13
Grundlegende Funktionen
Mobilteil ein- / ausschalten
Ihr Mobilteil ist nach der Erstladung des Akkus automatisch eingeschaltet und betriebsbereit. Sie
können Ihr Mobilteil ausschalten, um den Ladezustand des Akkus länger zu erhalten.
Mobilteil ausschalten
C
Drücken Sie die C-Taste - langer Tastendruck.
Mobilteil einschalten
C
Drücken Sie die C-Taste.
Tastensperre
Schalten Sie zuvor die Tastensperre ein, wenn Sie ein Mobilteil in der Tasche mit sich tragen. Damit
verhindern Sie, dass versehentlich eine Rufnummer gewählt wird.
Erhalten Sie einen Anruf, wird die Tastensperre für die Dauer des Anrufes ausgeschaltet. Den Anruf
nehmen Sie mit der Hörertaste an.
Ta stensperre einschalten
#
Im Ruhezustand die Raute-Taste lange drücken.
Über dem linken Softkey wird angezeigt.
Ta stensperre ausschalten
D
Drücken Sie den Softkey -> Zum Entsperren # drücken
#
Drücken Sie innerhalb von fünf Sekunden die Raute-Taste um die Sperre zu deaktivieren.
Freisprechen ein/ausschalten
Ein Tastendruck auf die Lautsprecher-Taste
H
im Ruhezustand (das Mobilteil ist dann wahlbereit)
oder während einer Verbindung schaltet den Lautsprecher ein bzw. aus.
Hörerlautstärke einstellen während des Gesprächs
Sie führen ein Gespräch (mit dem Hörer, Lautsprecher oder Headset).
Das Einstellen der Lautstärke geschieht durch die Pfeiltasten oder die Zifferntasten 1 - 7. Die aktuelle
Einstellung wird grafisch angezeigt. Die veränderte Einstellung gilt nur temporär für die bestehende
Verbindung. Wird die temporäre Einstellung mit bestätigt, gilt diese als neue Grundeinstellung
für weitere Verbindungen.
OK
Seite wird geladen ...
Seite wird geladen ...
Seite wird geladen ...
Seite wird geladen ...
Seite wird geladen ...
Seite wird geladen ...
Seite wird geladen ...
Seite wird geladen ...
Seite wird geladen ...
Seite wird geladen ...
Seite wird geladen ...
Seite wird geladen ...
Seite wird geladen ...
Seite wird geladen ...
Seite wird geladen ...
Seite wird geladen ...
Seite wird geladen ...
Seite wird geladen ...
Seite wird geladen ...
-
 1
1
-
 2
2
-
 3
3
-
 4
4
-
 5
5
-
 6
6
-
 7
7
-
 8
8
-
 9
9
-
 10
10
-
 11
11
-
 12
12
-
 13
13
-
 14
14
-
 15
15
-
 16
16
-
 17
17
-
 18
18
-
 19
19
-
 20
20
-
 21
21
-
 22
22
-
 23
23
-
 24
24
-
 25
25
-
 26
26
-
 27
27
-
 28
28
-
 29
29
-
 30
30
-
 31
31
-
 32
32
-
 33
33
-
 34
34
-
 35
35
-
 36
36
-
 37
37
-
 38
38
-
 39
39


in anderen Sprachen
- English: Aastra PHONE 312
- français: Aastra PHONE 312
Verwandte Artikel
Andere Dokumente
-
AUDIOLINE Polo 883 Bedienungsanleitung
-
SWITEL DF912 Bedienungsanleitung
-
SWITEL DFT1473 Bedienungsanleitung
-
AUDIOLINE TEL 50 SOS Bedienungsanleitung
-
-
-
-
DETEWE OpenPhone 28 Benutzerhandbuch
-
Mitel S850i Referenzhandbuch