
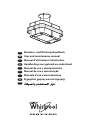
Benutzer- und Wartungshandbuch
User and maintenance manual
Manuel d’utilisation et d’entretien
Handleiding voor gebruik en onderhoud
Manual de uso y mantenimiento
Manual de uso e manutenção
Manuale d’uso e manutenzione
Εγχειρίδιο χρήσης και συντήρησης
AE
GR
I
P
E
NL
F
GB
D


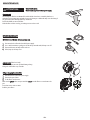
WICHTIGE SICHERHEITSHINWEISE
Diese Hinweise stehen auch auf folgender Website zur Verfügung: www.whirlpool.eu.
IHRE EIGENE SICHERHEIT UND DIE DER ANDEREN IST SEHR WICHTIG.
Diese Anweisungen sowie das Gerät beinhalten wichtige Sicherheitshinweise, die Sie durchlesen und stets beachten sollten.
Dieses Symbol warnt vor möglichen Gefahren für die Sicherheit des Benutzers und anderer Personen.
Alle Warnhinweise beginnen mit diesem Warnsymbol und enthalten einen der folgenden Begrie
Weist auf eine Gefahrensituation hin, die zu schweren Verletzungen führt, wenn sie nicht vermieden wird.
Weist auf eine Gefahrensituation hin, die zu schweren Verletzungen führen kann, wenn sie nicht vermieden wird.
Alle Warnhinweise nennen das mögliche Sicherheitsrisiko und geben an, wie die Gefahr von Verletzungen, Schäden und Stromschlägen durch
bestimmungsfremden Gebrauch des Gerätes vermieden werden kann. Beachten Sie bitte folgende Anweisungen:
• Installation und Wartung müssen von einer Fachkraft gemäß den Herstelleranweisungen und gültigen örtlichen Bestimmungen ausgeführt werden.
Reparieren Sie das Gerät nicht selbst und tauschen Sie keine Teile aus, wenn dies im Benutzerhandbuch nicht ausdrücklich so vorgegeben ist.
• Halten Sie das Gerät von der Stromversorgung getrennt, bis der Einbau durchgeführt wurde.
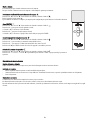
• Das Gerät muss vorschriftsmäßig geerdet werden. Dies ist nicht erforderlich für Dunstabzugshauben der Klasse II, erkennbar am Symbol auf dem
Typenschild.
• Das Netzkabel muss lang genug sein, um das Gerät an das Stromnetz anzuschließen.
• Ziehen Sie nicht am Netzkabel des Geräts, um den Stecker aus der Steckdose zu ziehen.
• Nach der Installation dürfen Strom führende Teile nicht mehr zugänglich sein.
• Berühren Sie das Gerät nicht mit feuchten Händen und benutzen Sie es nicht, wenn Sie barfuß sind.
• Das Gerät darf von Kindern ab 8 Jahren und Personen mit eingeschränkten physischen, sensorischen oder geistigen Fähigkeiten bzw. Mangel an Erfahrung
und Kenntnissen nur unter Aufsicht oder nach ausreichender Einweisung durch eine für ihre Sicherheit verantwortliche Person benutzt werden. Kinder
dürfen nicht mit dem Gerät spielen. Die Reinigung und Bedienung dieses Geräts darf nur dann durch Kinder erfolgen, wenn diese durch Erwachsene
beaufsichtigt werden.
• Reparieren oder ersetzen Sie keine Teile des Geräts, wenn dies nicht ausdrücklich im Benutzerhandbuch empfohlen wird. Defekte Teile dürfen nur gegen
Originalersatzteile ausgetauscht werden. Alle anderen Wartungsarbeiten müssen durch einen Fachmann durchgeführt werden.
• Kinder sind zu überwachen, um sicherzustellen, dass sie nicht mit dem Gerät spielen.
• Achten Sie beim Bohren in eine Wand oder Decke darauf, keine elektrischen Verbindungen und/oder Leitungen zu beschädigen.
• Sämtliche Abluftkanäle müssen ins Freie führen.
• Die angesaugte Luft darf nicht in ein Abluftrohr geleitet werden, in das die Abluft von mit Gas oder anderen Brennstoen betriebenen Geräten abgeleitet
wird, sondern muss einen separaten Abzug haben. Dabei sind alle nationalen Vorschriften zur Abluftableitung einzuhalten.
• Wird die Abzugshaube zusammen mit anderen nicht mit Strom betriebenen Geräten benutzt, darf der Unterdruck im Raum 4 Pa (4 x 10 -5 bar) nicht
überschreiten. Sorgen Sie daher für eine angemessene Raumbelüftung.
• Der Hersteller haftet nicht bei unsachgemäßem Gebrauch oder fehlerhafter Bedienung.
• Konstante Pege und Reinigung gewährleisten den einwandfreien Betrieb und die Leistungstüchtigkeit des Geräts. Alle verschmutzten Flächen sollten
regelmäßig von Ablagerungen gesäubert werden, um Fettansammlungen zu vermeiden. Reinigen oder ersetzen Sie die Filter regelmäßig.
• Bereiten Sie keine ambierten Gerichte unter der Abzugshaube zu. Bei oenen Flammen besteht Brandgefahr.
• Lassen Sie beim Frittieren keine Pfannen unbeaufsichtigt, da das erhitzte Fett Feuer fangen könnte.
• Das Nichtbeachten der Reinigungsvorschriften für die Dunstabzugshaube sowie für das Auswechseln und Reinigen der Filter führt zu Brandgefahr.
• Die Dunstabzugshaube darf nicht ohne Fettlter geönet werden und darf nicht unbeaufsichtigt laufen.
• Die Brennstellen von Gasherden dürfen unter der Dunstabzugshaube nur mit Kochgefäßen darauf benutzt werden.
• Werden mehr als drei Gasbrennstellen auf einmal benutzt, muss die Dunstabzugshaube mindestens auf Stufe 2 gestellt werden. Dadurch wird ein Hitzestau
im Gerät vermieden.
• Vergewissern Sie sich vor dem Berühren der Lampen, dass diese abgekühlt sind.
• Benutzen oder belassen Sie die Haube nicht ohne korrekt montierte Lampen. Andernfalls besteht die Gefahr eines elektrischen Schlags.
• Tragen Sie bei allen Installations- und Instandhaltungsarbeiten Schutzhandschuhe.
• Das Gerät ist nicht für den Betrieb im Freien geeignet.
• Wenn das Kochfeld in Betrieb ist, können die erreichbaren Teile der Dunstabzugshaube heiß werden.
HEBEN SIE DIESE ANLEITUNG ZUM SPÄTEREN NACHSCHLAGEN GUT AUF.
WARNUNG:
GEFAHR:
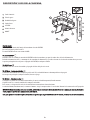
D1

Kontrollieren Sie das Gerät nach dem Auspacken auf eventuelle Transportschäden. Bei Problemen wenden Sie sich bitte an Ihren Händler oder die nächste
Kundendienststelle. Um eventuellen Schäden vorzubeugen, sollten Sie das Gerät erst unmittelbar vor der Installation von der Polystyrolunterlage nehmen.
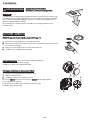
VORBEREITUNG DES EINBAUS
Das ist ein schweres Produkt. Zum Transport und zur Installation der Haube sind zwei oder mehr Personen erforderlich
.
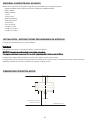
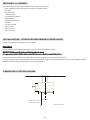
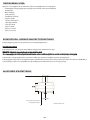
Der Mindestabstand zwischen der Abstelläche der Behälter auf dem Herd und der unteren Kante der Dunstabzugshaube muss bei Elektroherden 50 cm und bei
Gasherden oder kombinierten Elektro-/Gasherden 65 cm betragen. Überprüfen Sie vor der Installation auch die im Handbuch des Kochfeldes angegebenen
Mindestabstände. Schreiben die Installationsanweisungen des Kochfelds einen größeren Abstand vor, ist dieser natürlich zu beachten.
ELEKTRISCHER ANSCHLUS
Die Spannung auf dem Typenschild des Gerätes muss der Spannung des Stromnetzes entsprechen. Diese Information nden Sie im Inneren der Abzugshaube
unter dem Fettlter. Das Netzkabel (Typ H05 VV-F 3 x 0,75 mm) darf nur durch qualiziertes Fachpersonal ersetzt werden. Wenden Sie sich an eine autorisierte
Kundendienststelle. Der Stecker der Dunstabzugshaube (falls vorhanden) muss an eine normgerechte und gut zugängliche Steckdose angeschlossen werden.
Sollte die Abzugshaube nicht mit Stecker versehen sein, sondern direkt mit dem Stromnetz verbunden und die Steckdose unzugänglich sein, müssen Sie einen
normgerechten zweipoligen Schalter verwenden, der eine totale Isolierung vom Stromnetz im Falle von gemäß Klasse 3 auftretenden Überspannungen
gewährleistet und normgerecht verdrahtet ist.
ALLGEMEINE EMPFEHLUNGEN
Vor Inbetriebnahme
Entfernen Sie Kartonteile, Schutzfolien und Klebeetiketten von den Zubehörteilen. Kontrollieren Sie das Gerät auf eventuelle Transportschäden.
Während des Betriebs
Stellen Sie keine Gegenstände auf dem Gerät ab, um Beschädigungen zu vermeiden. Schützen Sie das Gerät vor Witterungseinüssen.
WARNUNG:
Entsorgung von Verpackungsmaterialien
Das Verpackungsmaterial ist zu 100% wiederverwertbar und trägt das Recycling-Symbol . Werfen Sie das Verpackungsmaterial deshalb nicht einfach fort,
sondern entsorgen Sie es auf die von den verantwortlichen Stellen festgelegte Weise.
Entsorgung von Altgeräten
- Dieses Gerät ist gemäß der Europäischen Richtlinie 2012/19/EU für Elektro- und Elektronik-Altgeräte (WEEE) gekennzeichnet.
- Durch eine angemessene Entsorgung des Geräts trägt der Nutzer dazu bei, potenziell schädliche Auswirkungen für Umwelt und Gesundheit zu vermeiden,
die durch eine nachlässige Beseitigung dieses Produkts verursacht würden.
- Das Symbol auf dem Gerät bzw. auf dem beiliegenden Informationsmaterial weist darauf hin, dass dieses Gerät kein normaler Haushaltsabfall ist,
sondern in einer Sammelstelle für Elektro- und Elektronik-Altgeräte entsorgt werden muss.
Entsorgung von Haushaltsgeräte
• Dieses Gerät wurde aus recycelbaren oder wiederverwendbaren Werkstoffen hergestellt. Beachten Sie bei der Entsorgung die örtlichen Verordnungen zur
Abfallbeseitigung. Schneiden Sie das Netzkabel durch, bevor Sie das Gerät verschrotten.
• Genauere Informationen zu Behandlung, Entsorgung und Recycling von elektrischen Haushaltsgeräten erhalten Sie bei Ihrer örtlichen Verwaltungsstelle,
der Müllabfuhr oder dem Händler, bei dem Sie das Gerät gekauft haben.
INSTALLATION
HINWEISE ZUM UMWELTSCHUTZ
Konformitätserklärung
• Dieses Gerät wurde gemäß folgender Richtlinien entworfen, hergestellt und in den Handel eingeführt:
- Sicherheitsanforderungen der “Niederspannungsrichtlinie” 2006/95/CE (die 73/23/CEE und nachfolgende Änderungen ersetzt).
- Ökodesign-Verordnungen (EU) Nr. 65/2014 und 66/2014 gemäß der EU-Norm EN 61591
- Schutzvorschriften der EMV-Richtlinie 2004/108/EG.
Die elektrische Sicherheit des Gerätes ist nur dann gewährleistet, wenn es korrekt an eine funktionstüchtige und den gesetzlichen Bestimmungen
entsprechende Erdung angeschlossen ist.
Energiespartipp
• Schalten Sie die Dunstabzugshaube auf niedrigster Stufe ein, wenn Sie zu kochen beginnen, und lassen Sie sie nach dem Ende des Kochvorgangs noch
einige Minuten laufen.
• Stellen Sie nur bei starker Rauch- oder Dampfentwicklung eine höhere Stufe ein und verwenden Sie die Booster-Funktion(en) nur in Extremsituationen.
• Tauschen Sie den/die Aktivkohlefilter bei Bedarf aus, damit das Gerät unangenehmen Gerüchen effektiv entgegenwirken kann.
• Tauschen Sie den/die Fettfilter bei Bedarf aus, damit das Gerät Fettablagerungen effektiv entgegenwirken kann.
• Eine optimale Wirkung bei minimaler Geräuschentwicklung erzielen Sie mit Abluftkanälen, die den in diesem Handbuch angegebenen Höchstdurchmesser
aufweisen.
D2

Das Gerät funktioniert nicht:
• Prüfen Sie, ob das Stromnetz Strom führt und das Gerät an das Stromnetz angeschlossen ist
• Schalten Sie das Gerät aus und wieder ein, um zu prüfen, ob die Störung immer noch vorliegt.
Zu schwache Absaugleistung:
• Prüfen Sie die Absauggeschwindigkeit und passen Sie diese bei Bedarf an.
• Prüfen Sie, ob die Filter sauber sind
• Prüfen Sie, ob die Belüftungsöffnungen blockiert sind.
Die Beleuchtung funktioniert nicht:
• Kontrollieren Sie die Lampe und tauschen Sie sie bei Bedarf aus
• Prüfen Sie, ob die Lampe korrekt eingesetzt wurde.
Bevor Sie den Kundendienst rufen:
1. Prüfen Sie erst, ob Sie die Störung anhand der Hinweise unter “Störung – was tun?” selbst beheben können.
2. Schalten Sie das Gerät aus und wieder ein, um zu prüfen, ob die Störung immer noch vorliegt.
Falls die Störung danach fortbesteht oder erneut auftritt, kontaktieren Sie bitte den nächstgelegenen Kundendienst.
Geben Sie dabei bitte Folgendes an:
• Eine kurze Beschreibung der Störung
• Den genauen Typ und das Modell des Gerät
• Die Servicenummer (die Zahl nach dem Wort “Service” auf dem Typenschild) im Gerät. Die Servicenummer finden Sie auch im Garantieheft
• Ihre vollständige Anschrif
• Ihre Telefonnummer
Im Reparaturfall wenden Sie sich bitte an eine vom Hersteller autorisierte Kundendienststelle. Nur so ist gewährleistet, dass Originalersatzteile verwendet
werden und die Reparatur fachgerecht durchgeführt wird.
STÖRUNG – WAS TUN?
KUNDENDIENST
- Verwenden Sie keine Dampfreiniger.
- Trennen Sie das Gerät vom Stromnetz.
WICHTIG: Verwenden Sie keine aggressiven Reinigungs- oder Scheuermittel. Falls ein solches Mittel doch mit dem Gerät in Kontakt kommt, reinigen Sie es sofort
mit einem feuchten Tuch.
• Reinigen Sie die Flächen mit einem feuchten Tuch. Entfernen Sie starke Verschmutzungen mit Wasser und ein paar Tropfen Geschirrspülmittel. Reiben Sie
mit einem trockenen Tuch nach.
WICHTIG: Verwenden Sie keine Scheuerschwämme, Topfkratzer und Metallschaber. Diese können die emaillierten Oberächen mit der Zeit beschädigen.
• Verwenden Sie zur Reinigung für das Gerät geeignete Reinigungsmittel und beachten Sie die Herstelleranweisungen.
WICHTIG: Reinigen Sie die Filter mindestens einmal monatlich und entfernen Sie alle Öl- und Fettrückstände.
GEFAHR:
REINIGUNG
D3

D4
- Verwenden Sie Schutzhandschuhe.
- Trennen Sie das Gerät vom Stromnetz.
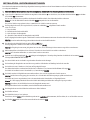
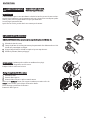
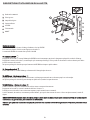
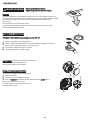
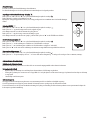
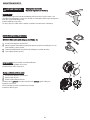
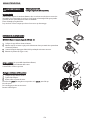
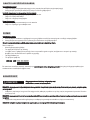
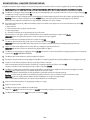
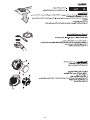
FETTFILTER
Der Metall-Fettfilter hat eine unbegrenzte Lebensdauer und ist ein Mal im Monat von Hand oder im
Geschirrspüler bei niedrigen Temperaturen und im Schnellspülgang zu reinigen. Obwohl der Spülgang
dem Fettfilter einen matten Aspekt verleihen könnte, wird die Filterleistung dadurch keineswegs
beeinträchtigt.
Ziehen Sie den Griff heraus und entnehmen Sie den Filter.
Lassen Sie den gereinigten Filter trocknen und gehen Sie beim Wiedereinbau in umgekehrter Reihenfolge
vor.
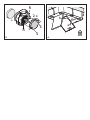
AUSWECHSELN DER HALOGENLAMPEN
WICHTIG: Verwenden Sie ausschließlich Halogenlampen mit max. 20 W - G4.
1. Trennen Sie die Abzugshaube vom Stromnetz.
2. Hebeln Sie mit einem kleinen Schlitzschraubenzieher die drei in der Abbildung bezeichneten Punkte
auf und nehmen Sie die Lampenabdeckung ab.
3. Ziehen Sie die defekte Lampe aus dem Sockel und ersetzen Sie diese durch eine neue.
4. Schließen Sie die Lampenabdeckung wieder (sie rastet ein).
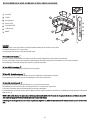
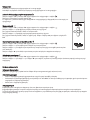
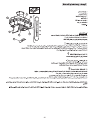
AKTIVKOHLEFILTER
(nur für Modelle mit Umluftbetrieb)
Der Kohlefilter nimmt die Küchendünste auf.
Ersetzen Sie den Aktivkohlefilter alle 4 Monate.
Einbau oder Austausch des Aktivkohlefilters
1. Die Abzugshaube vom Stromnetz abschalten
2. Entfernen Sie die Fettfilter.
3. Bauen Sie die den Motor abdeckenden Filter ein.
Kontrollieren, dass die Stifte R auf dem Rauchabzugsrohr mit den Langlöchern S
übereinstimmen; die Filter drehen, bis sie auf den Stiften einrasten.
Gehen Sie beim Filterausbau in umgekehrter Reihenfolge vor.
Setzen Sie die Fettfilter wieder ein.
HINWEIS:
R
R
R
S
S
S
S
WARTUNG UND PFLEGE

D5
Die Abzugshaube ist für "Umluft" - Betrieb konzipiert.
Ausführung mit Umluft+Filter-Betrieb
Die Luft wird beim Durchgang durch einen Kohlefilter gefiltert und in den Raum zurückgeleitet.
WICHTIG: Vergewissern Sie sich, dass die Luft ungehindert umgewälzt wird.
Hat die Dunstabzugshaube keine/n Kohlefilter, so sind diese zu bestellen und vor der Inbetriebnahme zu montieren
Die Abzugshaube ist fern von stark verschmutzten Bereichen, Fenstern, Türen und Wärmequellen zu installieren
Die Abzugshaube ist mit allen Befestigungselemente ausgestattet, die für die Montage an den meisten Wänden/Decken geeignet sind. Sie sollten aber trotzdem
einen qualifizierten Techniker zu Rate ziehen, um sicherzustellen, dass die Materialien für die spezifische Wand-/Deckenausführung geeignet sind.
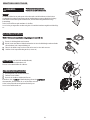
IM LIEFERUMFANG INBEGRIFFENES MATERIAL
INSTALLATION - VOR DER MONTAGE
Nehmen Sie alle Teile aus den Verpackungen. Vergewissern Sie sich, dass alle Teile mitgeliefert wurden.
• Abzugshaube mit Motor, Filter, Schutzgitter Lustauslass und Lampen (installiert)
• Fernbedienung
• Bohrschablone
• 1 Trägerbügel
• 1 Deckel des Trägerbügels
• Bedienungsanleitung
• 1 Schraubenschlüssel L24 X 53
• 1 Kabelklemme
• 3 Dübel 10 x 60 mm
• 3 Schrauben 6 x 70 mm
• 6 Schrauben 2,9 x 9,5 mm
• 5 Schrauben 3,5 x 6,5 mm
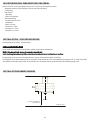
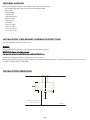
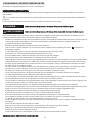
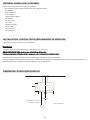
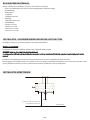
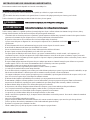
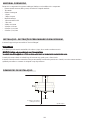
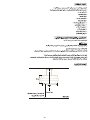
Mittellinie
65 cm (Gas- oder Kombiherde)
50 cm (Elektroherd)
Oberfläche Kochfeld
INSTALLATIONSABMESSUNGEN

D6
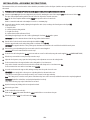
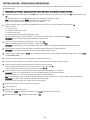
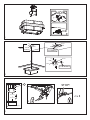
Die nachstehend in nummerierter Reihenfolge aufgezählten Anweisungen beziehen sich auf die mit Nummern versehenen Zeichnungen auf den letzten Seiten
des vorliegenden Handbuchs.
1. Einleitender Hinweis für den Installateur: das obere Schutzgitter des Luftaustritts darf aus Sicherheitsgründen nie entfernt werden.
2. Legen Sie auf der Senkrechten des Kochfeldes die mitgelieferte Bohrschablone Y so an der Decke an, dass die Mitte der Bohrschablone (R1) mit der Mitte
des Kochfelds (R2) übereinstimmt.
Die Seiten der Schablone müssen parallel zu den Kanten des Kochfelds verlaufen. Den elektrischen Anschluss vorbereiten.
Hinweis: die Seite der Bohrschablone mit der Aufschrift "FRONT" entspricht der Seite des Bedienfelds.
Die 3 auf der Schablone angegebenen Löcher ø 10 mm bohren. Die 3 Dübel ø 10x60 mm einsetzen.
3. Den Trägerbügel vorbereiten; die Länge der Kabel L (cm) laut der in Abbildung (3a) aufgeführten Formel einstellen.
L(cm)=X-Y-H+3cm
L = Länge der Kabel
X = Abstand zwischen Decke und Kochfeld
Y = Höhe des Körpers der Abzugshaube
H = Abstand des unteren Rands der Abzugshaube vom Kochfeld
Nach Festlegung der korrekten Länge die 3 Kabel durch Festziehen der Klemmmuttern mit einem Schraubenschlüssel befestigen (3b-3c)
WICHTIG: Den in diesem Handbuch angegebenen Mindestabstand von dem Kochfeld einhalten.
4. Die elektrischen Anschlusskabel durch die mittlere Öffnung (4a) führen.
Den Trägerbügel mit 3 Schrauben ø 6x70 mm an der Decke befestigen ( 4b-4c).
WICHTIG: Der Trägerbügel ist mit einem gelb-grünen Leiter versehen, der an die Erdung des Hausstromnetzes angeschlossen werden muss.
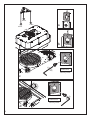
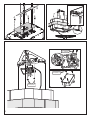
5. Mit dem mitgelieferten Steckschlüssel L24 x 53 die vier Schrauben des oberen Deckels lösen und diesen abnehmen.
WICHTIG: Die 4 Schrauben aufbewahren, sie sind in Schritt 7 wieder zu verwenden
6. Die Haube an den Befestigungsbügeln (6a - 6b) einhängen und endgültig mit 1 Schraube pro Bügel mit dem Steckschlüssel der Ausstattung (6c-6d)
befestigen (OBLIGATORISCHE BEFESTIGUNG)
7. Den oberen Deckel mit den 4 in Punkt 5 ausgeschraubten Schrauben wieder anbringen.
8. Die Ausrichtung der Abzugshaube mit einer Wasserwaage und den Stellschrauben auf dem Bügel an der Decke einstellen.
9. Die Anschlussdose mit 2 Schrauben ø 3,5x6,5 mm am Trägerbügel befestigen
Den elektrischen Anschluss vornehmen und die Kabel mit 2 Schrauben ø 2,9x9,5 mm und der Kabelklemme befestigen (9a).
Den Deckel der Anschlussdose mit 4 Schrauben Ø 2,9 x 9,5 mm anbringen (9a).(9b).
10. Den Deckel zwischen den Tragkabeln einsetzen und kontrollieren, dass sie in die Langlöchern des Deckels einrasten.
WICHTIG: Die Kabel müssen lang genug gelassen werden, dass sie leicht durch die Deckelaussparungen geführt werden können.
Den Deckel mit 3 bereits eingeschraubten (oder noch einzuschraubenden) Gewindestiften am Trägerbügel fixieren.
Hinweis: Die 3 Befestigungsschrauben blockieren den Deckel durch Reibung und dürfen daher nicht ganz festgezogen werden.
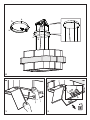
WICHTIG: Kontrollieren, ob die Kohlefilter bereits in der Abzugshaube montiert sind.
Die folgenden Schritte sind nur auszuführen, wenn die Kohlefilter nicht installiert sind.
11. Die Abzugshaube mit einer Hand festhalten und den untere Deckel entfernen.
12. Den Fettfilter entfernen.
13. Die 2 Kohlefilter (einer pro Seite) einbauen.
Kontrollieren, dass die Stifte R auf dem Rauchabzugsrohr mit den Langlöchern S übereinstimmen; die Filter drehen, bis sie auf den Stiften einrasten.
14. Den Fettfilter (14a) wieder einsetzen. Den unteren Deckel wieder schließen (14b).
INSTALLATION - MONTAGEANLEITUNGEN

D7
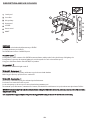
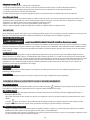
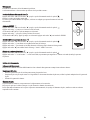
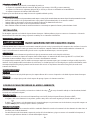
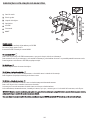
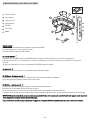
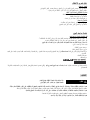
1. Bedienfeld
2. Fettfilter
3. Halogenlampen
4. Unterer Deckel
5. LED-LICHTLEISTEN
6. Fernbedienung
7. ON/OFF
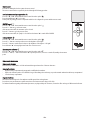
Bedienfeld
Diese Abzugshaube ist mit einer Funktion zur farbigen Raumbeleuchtung mit LED-Lichtleisten ausgestattet.
Die Funktion wird mit der Taste T1 eingeschaltet.
Die Regelung der LED-Lichtleiste erfolgt mit dem RGB-System.
T1. Led-Lichtleisten-Regelung
Die Taste T1 drücken, um die automatische Funktion des Wechsels der Beleuchtungsfarbe der LED-Lichtleiste einzuschalten.
Die Taste erneut drücken, um den automatischen Beleuchtungsablauf abzuschalten und mit kurzen Tastendrücken eine der Farben auszuwählen.
Mit einem längeren Tastendruck wird die LED-Lichtleiste in jedem Fall abgeschaltet.
T2 .Taste ON/OFF - Beleuchtung
Mit Taste T2 wird die Beleuchtung des Kochfelds ein und ausgeschaltet.
T3. Motor AUS - Drehzahlverringerung
Die Taste T3 bei laufender Abzugshaube drücken, um die Motordrehzahl bis zur Abschaltung zu verringern.
Durch einen längeren Tastendruck (bei jeder Geschwindigkeit) wird der Motor abgeschaltet.
T4. Motor EIN - Drehzahlauswahl
Die Abzugshaube verfügt über 3 Drehzahlstufen plus eine 4° zeitgesteuerte Intensivstufe.
Durch Drücken der Taste T4 wird das Gebläse der Abzugshaube mit der 1. Drehzahlstufe eingeschaltet.
Jeder weitere Tastendruck erhöht die Motordrehzahl bis zur Höchstgeschwindigkeit.
Die Höchstdrehzahl, Intensivstufe genannt, wird für 5 Minuten aufrecht erhalten; danach kehrt die Haube zur 3. Drehzahlstufe zurück; während der Intensivstufe
blinkt die Taste T4.
WICHTIG: Während des Kochens der Speisen kann sich bei eingeschaltetem Kochfeld auf der Frontseite der Abzugshaube Kondenswasser bilden. In diesem Fall
nach dem Kochvorgang die Oberfläche der Haube mit einem feuchten Tuch reinigen.
Anmerkung: Um den Energieverbrauch des Produkts zu optimieren, empfehlen wir, IMMER den Betriebsmodus OFF einzustellen (Taste 7), wenn der Motor nicht
läuft.
BESCHREIBUNG UND GEBRAUCH DER ABZUGSHAUBE
5
2
4
3
1
6
7
7

D8
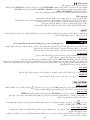
Fernbedienung
Abstimmverfahren Fernbedienung - Abzugshaube
Die Fernbedienung muss vor ihrer ersten Verwendung von der Dunstabzugshaube erkannt werden:
Abstimmung der Fernbedienung auf die Abzugshaube
Die Taste "◄" oder die Taste "►" drücken, bis auf der Fernbedienung das Symbol erscheint
Drücken Sie für 5 Sekunden die mittlere Taste "■".
Damit ist das Abstimmverfahren beendet und die Abzugshaube ist für den Betrieb mit der Fernbedienung konfiguriert.
Regelung des LED - Lichtstreifens
Die Taste "◄" oder die Taste "►" drücken, bis auf der Fernbedienung das Symbol erscheint
Die Taste "+" drücken, um vom aktuellen auf den folgenden Status überzugehen;
ist der aktuelle Status AUS, Automatikbetrieb wählen
Die Taste "-" drücken, um vom aktuellen zum vorangehenden Status zurückzukehren;
ist der aktuelle Status OFF, "purple" anwählen. Die Taste "■" drücken, um die LED-Lichtleiste abzuschalten
EIN/AUS Beleuchtung des Kochfelds:
Die Taste "◄" oder die Taste "►" drücken, bis auf der Fernbedienung das Symbol erscheint
Die Taste "+" drücken, um die Beleuchtung einzuschalten und/oder die Lichtstärke zu erhöhen.
Die Taste "-" drücken, um die Beleuchtung abzuschalten und/oder die Lichtstärke bis auf "luce soft" zu verringern.
Die Taste "■" drücken, um die Beleuchtung aus- oder einzuschalten.
Auswahl der Abluftleistung:
Die Taste "◄" oder die Taste "►" drücken, bis auf der Fernbedienung das Symbol erscheint
Die Taste "+" oder die Taste "-" oder die Taste "■" drücken, um die Abluftleistung zu erhöhen oder zu verringern oder
abzuschalten (Standby).
Pflege der Fernbedienung
Reinigung der Fernbedienung:
Die Fernbedienung mit einem weichen Tuch und einem milden Reinigungsmittel ohne Scheuermittel reinigen
Austausch der Batterie:
• Das Batteriefach mit einem kleinen Schlitzschraubenzieher aufhebeln.
• Die leere Batterie durch eine neue 12 V - Batterie des Typs MN21/23 ersetzen. Beim Einsetzen auf die richtige im Batteriefach angegebenen Polarität
achten!
• Das Batteriefach schließen.
Entsorgung der Batterien
Beachten Sie für die Entsorgung die nationalen Bestimmungen und Vorschriften.
Die Batterien nicht in den normalen Haushaltsmüll werfen. Die Batterien müssen sicher entsorgt werden.
Wenden Sie sich für Informationen zum Umweltschutz, zur Wiederverwertung und zur Entsorgung der Batterien an die zuständigen Stellen für getrennte
Abfallsammlung.

GB9
IMPORTANT SAFETY INSTRUCTIONS
These instructions shall also be available on website: www.whirlpool.eu.
YOUR SAFETY AND THAT OF OTHERS IS HIGHLY IMPORTANT.
This manual and the appliance itself provide important safety warnings, to be read and observed at all times.
This is the attention symbol, pertaining to safety, which alerts users to potential risks to themselves and others.
All safety warnings are preceded by the attention symbol and the following terms:
indicates a hazardous situation which, if not avoided, will cause serious injury.
indicates a hazardous situation which, if not avoided, could cause serious injury.
All safety warnings specify the potential danger/warning to which they refer and indicate how to reduce the risk of injury, damage and electrical shock resulting
from incorrect use of the appliance. Comply with the following instructions:
• Installation or maintenance must be carried out by a specialized technician, in compliance with the manufacturer’s instructions and local safety regulations.
Do not repair or replace any part of the appliance unless specifically requested in the user manual.
• The appliance must be disconnected from the power supply before carrying out any installation work.
• Earthing of the appliance is compulsory. (Not necessary for class II hoods identified by the symbol on the specifications label).
• The power supply cable must be long enough to permit connecting the appliance to the mains socket outlet.
• Do not pull the power supply cable in order to unplug the appliance.
• The electrical components must no longer be accessible to the user after installation.
• Do not touch the appliance with any wet part of the body and do not operate it when barefoot.
• This appliance may be used by children older than 8 years of age and by persons with reduced physical, sensory or mental capacities or with inadequate
experience and knowledge only if they are supervised or if they have been taught how to use the appliance in conditions of safety and if they are aware of
the dangers involved. Children must not play with the appliance. Cleaning and maintenance must not be carried out by children, unless they are supervised
by adults.
• Do not repair or replace any part of the appliance unless specifically indicated in the manual. Defective parts must be replaced using genuine parts. All
other maintenance services must be carried out by a specialized technician.
• Children must be supervised to ensure they do not play with the appliance.
• When drilling through a wall or the ceiling, pay attention not to damage electric connections and/or pipes.
• The ventilation ducts must always discharge to the outside.
• Exhaust air must not be vented through a flue used for removal of fumes produced by appliances burning gas or other fuels, but must have a separate
outlet. All national regulations governing extraction of fumes must be observed.
• If the hood is used together with other appliances operating on gas or other fuels, the negative pressure in the room must not exceed 4 Pa (4 x 10⁻⁵ bar).
For this reason, make sure the room is adequately ventilated.
• The Manufacturer declines any liability for improper use or incorrect setting of the controls.
• Regular cleaning and maintenance is essential to correct functioning and good performance of the appliance. Frequently clean all encrustations from dirty
surfaces to prevent the accumulation of grease. Regularly clean or replace the filters.
• Never ame cook food (ambé) under the appliance. Using free ames might cause re.
• Do not leave frying pans unattended when frying, as the frying oil may catch re.
• Failure to observe the instructions for cleaning the hood and replacing the filters may result in a fire.
• The fume extractor hood must never be opened without the grease filters installed and it should be kept under constant supervision.
• Gas appliances must be used under the extractor hood only with pans resting.
• When using more than three gas cooking points, the hood should be operating at power level 2 or greater. This will eliminate heat congestion in the
appliance.
• Before touching the bulbs, first ensure that they are cold.
• Do not use or leave the hood without its lamps correctly installed - risk of electric shock.
• Wear work gloves for all installation and maintenance operations.
• The product is not suitable for outdoor use.
• When the hob is in use, accessible parts of the hood may become hot.
KEEP THIS BOOKLET FOR FUTURE CONSULTATION.
WARNING:
DANGER:

GB10
After unpacking the appliance, check for any transport damage. In the event of problems, contact the dealer or your nearest After-sales Service. To prevent any
damage, only remove the appliance from its polystyrene foam packaging at the time of installation.
PREPARING FOR INSTALLATION
this is a heavy product; the hood should only be lifted and installed by two or more people.
The minimum distance between the support of the cooking pans on top of the cooker and the bottom of the hood must not be less than 50 cm for electric
cookers and 65 cm for gas or mixed cookers. Before installation also check the minimum distances stated in the manual of the cooker.
If the installation instructions for the cooker specify a greater distance between cooker and hood, this distance must be observed.
ELECTRICAL CONNECTION
Make sure the power voltage specified on the appliance rating plate is the same as the mains voltage.
This information may be found on the inside of the hood, under the grease filter.
Power cable replacement (type H05 VV-F 3 x 0,75 mm) must be carried out by a qualified electrician. Contact an authorized service centre.
If the hood is fitted with an electric plug, connect the plug to a socket complying with current regulations, located in an accessible place after installation. If no
plug is fitted (direct wiring to the mains), or if the socket is not located in an accessible place, install a standardised double pole power switch that will enable
complete isolation from the mains in case of category III overvoltage conditions, in accordance with installation rules.
GENERAL RECOMMENDATIONS
Before use
Remove cardboard protection pieces, protective film and adhesive labels from accessories. Check the appliance for any transport damage.
During use
To avoid any damage do not place any weights on the appliance. Do not expose the appliance to atmospheric agents.
WARNING:
Disposal of packing
The packing material is 100% recyclable and is marked with the recycle symbol . The various parts of the packing must therefore be disposed of responsibly
and in full compliance with local authority regulations governing waste disposal.
Scrapping the product
- This appliance is marked in compliance with European Directive 2012/19/EU, Waste Electrical and Electronic Equipment (WEEE).
- By ensuring this product is disposed of correctly, you will help prevent potential negative consequences for the environment and human health, which
could otherwise be caused by inappropriate waste handling of this product.
- The symbol on the product or on the accompanying documentation indicates that it should not be treated as domestic waste but must be taken to an
appropriate collection centre for the recycling of electrical and electronic equipment.
Scrapping of household appliances
• This appliance is manufactured with recyclable or reusable materials. Dispose of it in accordance with local waste disposal regulations. Before scrapping, cut
off the power supply cable.
• For further information on the treatment, recovery and recycling of household electrical appliances, contact your competent local authority, the collection
service for household waste or the store where you purchased the appliance.
INSTALLATION
SAFEGUARDING THE ENVIRONMENT
Declaration of conformity
• This appliance has been designed, manufactured and marketed in compliance with:
- safety objectives of the “Low Voltage” Directive 2006/95/EC (which replaces 73/23/EEC and subsequent amendments);
- the ecodesign requirements of european regulations n. 65/2014, and n. 66/2014 in conformity to the european standard EN 61591
- the protection requirements of Directive “EMC” 2004/108/EC.
Electrical safety of the appliance can only be guaranteed if it is correctly connected to an approved earthing system.
Energy saving tips
• Switch ON the hood at minimum speed when you start cooking and kept it running for few minutes after cooking is finished.
• Increase the speed only in case of large amount of smoke and vapour and use boost speed(s) only in extreme situations.
• Replace the charcoal filter(s) when necessary to maintain a good odour reduction efficiency.
• Clean the grease filter(s) when necessary to maintain a good grease filter efficiency.
• Use the maximum diameter of the ducting system indicated in this manual to optimize efficiency and minimize noise.

The appliance does not work:
• Check for the presence of mains electrical power and if the appliance is connected to the electrical supply;
• Turn off the appliance and restart it to see if the fault persists.
The hood's suction level is not sufficient:
• Check the suction speed and adjust as necessary;
• Check that the filters are clean;
• Check the air vents for any obstructions.
The light does not work;
• Check the light bulb and replace if necessary;
• Check that the light bulb has been correctly fitted.
Before calling the After-Sales Service:
1. See if you can solve the problem yourself with the help of the suggestions given in the "Troubleshooting guide".
2. Switch the appliance off and back on again it to see if the fault persists.
If after the above checks the fault still occurs, get in touch with the nearest After-Sales Service.
Always specify:
• A brief description of the fault;
• The exact type and model of the appliance;
• The service number (number after the word "Service" on the rating plate), located on the inside of the appliance. The service number is also indicated on
the guarantee booklet;
• Your full address;
• Your telephone number.
If any repairs are required, please contact an authorised After-sales Service (to guarantee that original spare parts will be used and repairs carried out correctly).
TROUBLESHOOTING GUIDE
AFTER-SALES SERVICE
- Never use steam cleaning equipment.
- Disconnect the appliance from the power supply.
IMPORTANT: do not use corrosive or abrasive detergents. If any of these products accidentally comes into contact with the appliance, clean immediately with a
damp cloth.
• Clean the surfaces with a damp cloth. If it is very dirty, add a few drops of washing up detergent to the water. Finish off with a dry cloth.
IMPORTANT: do not use abrasive sponges or metallic scrapers or scourers. Over time, these can ruin the enamel surface.
• Use detergents specifically designed for cleaning the appliance and follow the manufacturer instructions.
IMPORTANT: clean the filters at least monthly to remove any oil or grease residuals.
WARNING
CLEANING
GB11

GB12
- use protective gloves.
- disconnect the appliance from the power supply.
GREASE FILTERS
The metal grease filter has an unlimited life and should be cleaned once a month by hand or in a
dishwasher at low temperature and with a short cycle. Cleaning in a dishwasher may cause discoloring of
the grease filter, but its filtering efficiency is unaffected.
Pull out the handle to remove the filter.
Wash the filter and leave it to dry, proceeding in reverse order to refit.
REPLACING HALOGEN LAMPS
IMPORTANT: Use 20W MAX - G4 halogen lamps only.
1. Disconnect the hood from the household power supply.
2. Use a small screwdriver to gently prise (at the three points indicated) the lamp cover off.
3. Remove the burnt-out lamp and fit a new one.
4. Refit (snap-on) the lamp cover.
CARBON FILTER
(filter hoods only)
It retains the unpleasant odors produced during cooking.
Change the carbon filter every 4 months
Fitting or changing the carbon filter
1. Disconnect the hood from the power supply.
2. Remove the grease filters.
3. Fit the filters over the motor.
Make sure the pins R on the conveyor match the slots S , turn the filters to secure them to the
pins.
Proceed in reverse order to remove.
Refit the grease filters.
ATTENTION:
R
R
R
S
S
S
S
MAINTENANCE

GB13
The hood is designed for installation in "Filter version".
Filter Version
Air is filtered through the carbon filter/s and recycled into the surrounding environment.
IMPORTANT: Check that air recirculation is ensured.
If the hood does not have the carbon filter/s, order one/them and fit before use.
Install the hood away from very dirty areas, windows, doors and heat sources.
The hood comes with all the materials necessary for installation on the majority walls/ceilings. However, a qualified technician must ensure that the materials
are suitable according to the type of wall/ceiling.
MATERIAL SUPPLIED
INSTALLATION - PRELIMINARY ASSEMBLY INSTRUCTIONS
Remove all the components from the packets. Check that all the components are included.
• Hood assembled with motor, filters, air outlet protection and lamps installed
• Remote control
• Assembly template
• 1 Support bracket
• 1 Support bracket cover
• Instruction manual
• 1 Wrench L24 X 53
• 1 Cable clamp
• 3 Plugs 10 X 60 mm
• 3 Screws 6 X 70 mm
• 6 Screws 2.9 X 9.5 mm
• 5 Screws 3.5 X 6.5 mm
center line
65 cm (gas or combi cookers)
50 cm (electric cookers)
hob surface
INSTALLATION DIMENSIONS

GB14
The instructions below, to be carried out in the order in which they are numbered, refer to the figures (with the same step numbers) given on the last pages of
this manual.
1. Preliminary note for the installer: For safety reasons the upper air outlet protection grille must never be removed.
2. Place the template Y (supplied) on the ceiling directly above the hob, matching the center of the template (R1) with the center of the hob (R2).
The sides of the template must be parallel to the sides of the hob. Prepare the electrical connection.
Note: The side of the template with the wording "FRONT" corresponds to the hood controls side.
Make 3 ø 10mm holes indicated on the template. Insert the 3 ø 10x60mm plugs.
3. Prepare the support bracket, suitably adjusting the length of the cables L(cm) according to the formula given in the figure (3a).
L(cm)=X-Y-H+3cm
L= length of cables
X = distance between ceiling and hob
Y = height of hood body
H =distance between hob and bottom of hood
After finding the right length, secure the 3 cables, tightening the 3 lock nuts (3b-3c) with a spanner.
IMPORTANT: Respect the minimum distance from the rings, indicated in this manual.
4. Run the cables for the electrical connection through the middle hole (4a).
Place the support bracket on the ceiling, fixing it with 3 ø 6x70mm screws (4b-4c).
IMPORTANT: The support bracket has a wire (yellow/green) which must be connected to the earth of the household electrical system.
5. Remove the top cover by undoing the four screws with an L24 X 53 wrench supplied.
IMPORTANT: The 4 screws removed will be reused in step 7
6. Fix the hood to the hooking brackets (6a-6b) and secure with one screw for each bracket, using the wrench supplied (6c-6d) (COMPULSORY FIXING)
7. Refit the top cover with the 4 screws previously removed in step 5.
8. Adjust the hood position, using a spirit level and operating on the adjustment screws near the ceiling bracket.
9. Fix the connection box to the support bracket on the ceiling with 2 ø 3.5x6.5mm screws
Carry out the electrical connection and secure the cables with the cable clamp and 2 ø 2.9x9.5mm screws (9a).
Fix the connection box cover with 4 ø 2.9x9.5mm screws (9a).(9b).
10. Insert the cover between the support cables, making sure they enter the special slots on the cover.
IMPORTANT: Leave enough cable so that it passes easily through the slot obtained on the cover.
Secure the cover with 3 grub screws already screwed (or to be screwed) on the support bracket.
Note: The 3 fixing screws secure the cover by virtue of the friction they exert on the cover itself, and therefore must not be completely tightened.
IMPORTANT: Check if the carbon filters are already fitted inside the hood body.
Carry out the following steps only if carbon filters are not fitted.
11. Open the bottom panel, holding the hood steady with one hand.
12. Remove the grease filter.
13. Fit the 2 carbon filters (one each side).
Make sure the pins R on the manifold match the slots S, turn the filters to secure them to the pins.
14. Refit the grease filters (14a). Close the bottom panel (14b).
INSTALLATION - ASSEMBLY INSTRUCTIONS

GB15
1. Control panel
2. Grease filter
3. Halogen lamps
4. Bottom panel
5. LEDSTRIP
6. Remote control
7. ON/OFF
Control panel
This hood has a colored ambient light function using a LEDSTRIP.
To activate this function, press button T1.
The LEDSTRIP control consists of an RGB LED system.
T1. LEDSTRIP control
Pressing button T1 enables activation of the LEDSTRIP in automatic function, which provides for the cyclical change of the lighting color.
Pressing button T1 again stops the automatic lighting cycle, and the required color can be select with short presses.
A long press of the button switches off the LEDSTRIP, in any condition.
T2. Lights ON/OFF
Use button T2 to switch the hob light on and off.
T3. Motor OFF - Decrease speed
Press button T3, with the hood operating, and the motor speed is decreased until shutdown.
With a long press (from any speed) the motor is switched off.
T4. Motor ON – Speed selection
The hood is has 3 incremental speeds, plus a 4th timed speed called intensive.
Press button T4 to activate the hood fan at speed 1.
At each subsequent press, the motor speed is increased until reaching maximum speed.
The maximum speed, called intensive, is maintained for 5 minutes, after which the hood will return to 3rd speed; in this intensive phase button T4 flashes
IMPORTANT: Condensation may form on the front of the hood when cooking food with the hob switched on. In this case, clean the surface of the hood with a
damp cloth after cooking.
Note: to optimise the energy consumption of the product we suggest ALWAYS setting the mode to OFF (7) if the motor is not running.
DESCRIPTION AND USE OF HOOD
5
2
4
3
1
6
7
7

GB16
Remote control
Procedure for making the hood recognize the remote control
The remote control must be recognized by the hood through the following procedure:
Hood and remote control pairing procedure
Press the "◄" or "►" button until the remote control shows the symbol
Press the middle button "■" for 5 seconds.
At this point, the pairing procedure is completed and the hood is configured to operate with the remote control.
LEDSTRIP control
Press the "◄" or "►" button until the remote control shows the symbol
Press the "+" button to go to the next status;
if the current status is OFF, the automatic cycle is selected
Press the "-" button to go to the previous status;
if the current status is OFF, the "purple" is selected Press the button "■" to switch off the RGB LED
Hob light ON/OFF:
Press the "◄" or "►" button until the remote control shows the symbol
Press the "+" button to switch on and/or increase the brightness of the lights.
Press the "-" button to switch off and/or decrease the brightness of the lights to "soft light".
Press the button "■" to change light status from off to on and vice versa.
Extraction power selection:
Press the "◄" or "►" button until the remote control shows the symbol
Press the "+" button, "-" button or the button "■" respectively to increase, decrease or switch off (standby) the extraction
power.
Remote control maintenance
Remote control cleaning:
Clean the remote control with a soft cloth and neutral detergent solution free of abrasive substances
Replacing the battery:
• Open the battery compartment by prising with a small flathead screwdriver.
• Replace the old battery with a new 12V MN21/23 type. When fitting the new battery, respect the terminals indicated in the battery compartment!
• Close the battery compartment.
Disposal of batteries
The batteries must be disposed of in compliance with all national laws and regulations.
Do not throw away used batteries together normal waste. The batteries must be disposed of safely.
For further information regarding environmental protection, recycling and disposal of batteries, contact the offices in charge of differentiated collection.

CONSIGNES DE SÉCURITÉ IMPORTANTES
Ces instructions sont également disponibles sur le site web: www.whirlpool.eu.
ACCORDEZ TOUJOURS LA PRIORITÉ À LA SÉCURITÉ.
D’importants messages relatifs à la sécurité gurent dans le présent manuel et sur l’appareil. Nous vous invitons à les lire attentivement et à les observer en
toute circonstance.
Ceci est le symbole de précaution sécuritaire. Il met en garde l’utilisateur et toute autre personne contre les risques potentiels dérivant de l’utilisation de
cet appareil.
Tous les avertissements concernant la sécurité sont précédés par le symbole de précaution et les termes suivants:
indique une situation dangereuse qui, si elle n’est pas évitée, provoque des blessures graves.
indique une situation dangereuse qui, si elle n’est pas évitée, est susceptible de provoquer des blessures graves.
Tous les avertissements précisent le risque/danger auquel il est fait référence et indiquent comment réduire le risque de blessures, de dommages et de choc
électrique résultant d’une utilisation incorrecte de l’appareil. Conformez-vous aux instructions suivantes:
• L’installation ou la maintenance doit être réalisée par un technicien spécialisé, conformément aux instructions du fabricant et dans le respect des normes de
sécurité en vigueur dans le pays d’installation. Ne procédez à aucune réparation ni aucun remplacement de pièce sur l’appareil autres que ceux
spéciquement exigés dans le manuel d’utilisation.
• Débranchez l’appareil de l’alimentation électrique avant de procéder à l’installation.
• La mise à la terre de l’appareil est obligatoire. (Pas nécessaire pour les hottes aspirantes de classe II identiées par le symbole sur l’étiquette des
caractéristiques techniques.)
• Le cordon d’alimentation doit être assez long pour permettre le branchement de l’appareil sur la prise secteur.
• Ne tirez jamais sur le cordon d’alimentation pour débrancher l’appareil de la prise secteur.
• Une fois l’installation terminée, l’utilisateur ne devra plus pouvoir accéder aux composants électriques.
• Évitez de toucher l’appareil avec les mains mouillées et ne l’utilisez pas lorsque vous êtes pieds nus.
• Cet appareil peut être utilisé par des enfants âgés de 8 ans minimum ainsi que par des personnes aux capacités physiques, sensorielles ou mentales réduites
ou manquant d’expérience et de connaissances, à condition d’être surveillés ou instruits sur l’utilisation de l’appareil en toute sécurité et d’être conscients
des dangers encourus pendant l’utilisation. Les enfants ne doivent pas jouer avec l’appareil. Le nettoyage et la maintenance ne doivent pas être conés à
des enfants, sauf s‘ils sont surveillés par un adulte.
• Pour toute réparation ou tout remplacement de pièces, procédez uniquement aux opérations spéciées dans le manuel. Les pièces défectueuses doivent
être remplacées par des pièces authentiques. Toutes les autres opérations d’entretien sont du ressort exclusif d’un technicien spécialisé.
• Pour éviter que les enfants ne jouent avec l’appareil, ne les laissez pas sans surveillance à proximité de ce dernier.
• Lorsque vous devez percer dans un mur ou le plafond, prenez garde de ne pas endommager les raccordements électriques et/ou la tuyauterie.
• Les conduits d’évacuation doivent toujours acheminer les vapeurs/fumées vers l’extérieur.
• L’air évacué ne doit pas être acheminé via un conduit servant à l’évacuation des fumées d’appareils à gaz ou autres combustibles, mais doit être dirigé vers
une sortie indépendante. Respectez toutes les réglementations nationales relatives à l’évacuation des fumées.
Si la hotte est utilisée en même temps que des appareils alimentés au gaz ou autres combustibles, la dépression dans la pièce ne doit pas dépasser 4Pa (4 x
10-5 bars). Pour cette raison, veillez à vous assurer que la pièce est correctement ventilée.
• Le fabricant décline toute responsabilité en cas de dommages résultant d’une utilisation impropre ou d’un réglage erroné des commandes.
• Un entretien et un nettoyage réguliers sont une garantie de bon fonctionnement et de bon rendement de l’appareil. Nettoyez régulièrement tous les dépôts
présents sur les surfaces sales pour éviter que les graisses ne s’accumulent. Enlevez et nettoyez ou remplacez fréquemment les ltres.
• Ne ambez jamais des aliments sous l’appareil. Des ammes nues risqueraient de provoquer un incendie.
• Ne laissez pas de poêles à frire sans surveillance lors de la cuisson, car l’huile de friture peut s’enammer.
• Un non-respect des instructions de nettoyage de la hotte et de remplacement des ltres peut être à l’origine d’un incendie.
• La hotte aspirante ne doit jamais être ouverte sans que les ltres à graisse soient installés et elle doit être sous surveillance constante.
• Les appareils à gaz doivent être utilisés sous la hotte uniquement avec les casseroles posées dessus.
• Lorsque vous utilisez trois points de cuisson au gaz, la hotte doit fonctionner au niveau de puissance 2 ou plus. Ceci éliminera l’accumulation de chaleur
dans l’appareil.
• Assurez-vous que les ampoules sont froides avant de les toucher.
• N’utilisez pas ou ne laissez pas la hotte sans ampoules correctement montées, an d’éviter les risques de choc électrique.
• Munissez-vous de gants de travail avant d’eectuer toute opération d’installation et d’entretien.
• Cet appareil n’est pas conçu pour une utilisation à l’extérieur.
• Lorsque la table de cuisson est en cours d’utilisation, les parties accessibles de la hotte peuvent devenir très chaudes.
CONSERVEZ LE PRÉSENT LIVRET POUR TOUTE CONSULTATION FUTURE.
AVERTISSEMENT:
DANGER:
F17

Après le déballage de l’appareil, vériez qu’il n’a pas été endommagé pendant le transport. En cas de problème, contactez le revendeur ou le service après-vente.
Pour éviter tout endommagement, attendez le moment de l’installation pour extraire l’appareil de son emballage en polystyrène.
PRÉPARATION EN VUE DE L’INSTALLATION
en raison de son poids élevé, la hotte doit être soulevée et installée par deux personnes au moins.
La distance minimum entre le support des ustensiles de cuisson placés sur la cuisinière et la partie inférieure de la hotte ne doit pas être inférieure à 50cm pour
les cuisinières électriques et 65cm pour les cuisinières au gaz ou mixtes. Avant de procéder à l’installation, vériez également les distances minimum spéciées
dans le manuel de la cuisinière. Si les instructions d’installation de la cuisinière spécient une distance supérieure entre la cuisinière et la hotte, cette distance
doit être observée.
RACCORDEMENT ÉLECTRIQU
Vériez que la tension électrique spéciée sur la plaque signalétique de l’appareil correspond à la tension de secteur. Cette information gure sur la partie
intérieure de la hotte, sous le ltre à graisses. Le remplacement du câble électrique (type H05 VV-F 3 x 0,75 mm) doit être eectué par un électricien qualié.
Contactez un centre d’entretien agréé. Si la hotte est équipée d’une che électrique, branchez cette che sur une prise conforme aux réglementations en vigueur
et située à un emplacement accessible après l’installation. En l’absence de che (câblage direct sur le réseau électrique) ou si la prise n’est pas située à un
emplacement accessible, installez un interrupteur bipolaire normalisé permettant une coupure complète du réseau électrique en cas de surtension de
catégorieIII, conformément aux réglementations sur le câblage.
RECOMMANDATIONS GÉNÉRALES
Avant utilisation
Retirez les protections en carton, les lms transparents et les étiquettes autocollantes présentes sur les accessoires. Vériez que l’appareil n’a pas été
endommagé pendant le transport.
Durant l’utilisation
Pour éviter tout endommagement, ne placez aucun poids sur l’appareil. Évitez d’exposer l’appareil aux agents atmosphériques.
AVERTISSEMENT:
Mise au rebut de l’emballage
Les matériaux d’emballage sont entièrement recyclables et portent le symbole de recyclage . L’emballage doit par conséquent être mis au rebut de façon
responsable et en conformité avec les réglementations locales en vigueur en matière d’élimination des déchets.
Mise au rebut de l’appareil
- Cet appareil porte le symbole du recyclage conformément à la Directive Européenne 2012/19/EU relative aux Déchets d’Équipements Électriques et
Électroniques (DEEE ou WEEE).
- En procédant correctement à la mise au rebut de cet appareil, vous contribuerez à éviter des conséquences nuisibles pour l’environnement et la santé de
l’homme.
- Le symbole apposé sur le produit ou sur la documentation qui l’accompagne indique que cet appareil ne doit pas être traité comme une ordure
ménagère mais doit être remis à un centre de collecte spécialisé dans le recyclage des appareils électriques et électroniques.
Mise au rebut des appareils ménagers usagé
• Cet appareil est fabriqué à partir de matériaux recyclables ou réutilisables. Mettez-le au rebut en vous conformant aux prescriptions locales en matière
d’élimination des déchets. Avant de mettre votre appareil au rebut, coupez le cordon d’alimentation.
• Pour toute information sur le traitement, la récupération et le recyclage des appareils électroménagers, contactez le service municipal compétent, le service
de collecte des déchets ménagers ou le revendeur de l’appareil.
MONTAGE
CONSEILS POUR LA PROTECTION DE L’ENVIRONNEMENT
Déclaration de conformité
• Cet appareil a été conçu, fabriqué et commercialisé en conformité avec:
- les objectifs sécurité de la directive «Basse Tension» 2006/95/CE (en remplacement de la directive 73/23/CEE et amendements ultérieurs);
- les exigences d’écodesign des réglementations européennes 65/2014 et 66/2014, conformément à la norme européenne EN 61591
- les exigences de protection de la directive “CEM” 2004/108/EC.
La sécurité électrique de l’appareil est garantie uniquement lorsqu’il est correctement raccordé à une installation de mise à la terre approuvée.
Astuces d’économies d’énergi
•
Mettez la hotte en marche à la vitesse minimum quand vous commencez à faire cuire et laissez-la en marche pendant quelques minutes après la fin de la cuisson.
• Augmentez la vitesse uniquement en présence de grandes quantités de fumées et de vapeurs et réservez la ou les vitesses d’appoint aux cas extrêmes.
• Remplacez le ou les filtres de charbon si nécessaire pour maximiser la réduction des odeurs.
• Remplacez le ou les filtres à graisse si nécessaire pour maximiser la capture des graisses.
• Utilisez le diamètre maximum de canalisation indiqué dans ce manuel pour optimiser l’efficacité et minimiser le bruit.
F18
Seite wird geladen ...
Seite wird geladen ...
Seite wird geladen ...
Seite wird geladen ...
Seite wird geladen ...
Seite wird geladen ...
Seite wird geladen ...
Seite wird geladen ...
Seite wird geladen ...
Seite wird geladen ...
Seite wird geladen ...
Seite wird geladen ...
Seite wird geladen ...
Seite wird geladen ...
Seite wird geladen ...
Seite wird geladen ...
Seite wird geladen ...
Seite wird geladen ...
Seite wird geladen ...
Seite wird geladen ...
Seite wird geladen ...
Seite wird geladen ...
Seite wird geladen ...
Seite wird geladen ...
Seite wird geladen ...
Seite wird geladen ...
Seite wird geladen ...
Seite wird geladen ...
Seite wird geladen ...
Seite wird geladen ...
Seite wird geladen ...
Seite wird geladen ...
Seite wird geladen ...
Seite wird geladen ...
Seite wird geladen ...
Seite wird geladen ...
Seite wird geladen ...
Seite wird geladen ...
Seite wird geladen ...
Seite wird geladen ...
Seite wird geladen ...
Seite wird geladen ...
Seite wird geladen ...
Seite wird geladen ...
Seite wird geladen ...
Seite wird geladen ...
Seite wird geladen ...
Seite wird geladen ...
Seite wird geladen ...
Seite wird geladen ...
Seite wird geladen ...
Seite wird geladen ...
Seite wird geladen ...
Seite wird geladen ...
Seite wird geladen ...
Seite wird geladen ...
Seite wird geladen ...
Seite wird geladen ...
Seite wird geladen ...
Seite wird geladen ...
Seite wird geladen ...
Seite wird geladen ...
-
 1
1
-
 2
2
-
 3
3
-
 4
4
-
 5
5
-
 6
6
-
 7
7
-
 8
8
-
 9
9
-
 10
10
-
 11
11
-
 12
12
-
 13
13
-
 14
14
-
 15
15
-
 16
16
-
 17
17
-
 18
18
-
 19
19
-
 20
20
-
 21
21
-
 22
22
-
 23
23
-
 24
24
-
 25
25
-
 26
26
-
 27
27
-
 28
28
-
 29
29
-
 30
30
-
 31
31
-
 32
32
-
 33
33
-
 34
34
-
 35
35
-
 36
36
-
 37
37
-
 38
38
-
 39
39
-
 40
40
-
 41
41
-
 42
42
-
 43
43
-
 44
44
-
 45
45
-
 46
46
-
 47
47
-
 48
48
-
 49
49
-
 50
50
-
 51
51
-
 52
52
-
 53
53
-
 54
54
-
 55
55
-
 56
56
-
 57
57
-
 58
58
-
 59
59
-
 60
60
-
 61
61
-
 62
62
-
 63
63
-
 64
64
-
 65
65
-
 66
66
-
 67
67
-
 68
68
-
 69
69
-
 70
70
-
 71
71
-
 72
72
-
 73
73
-
 74
74
-
 75
75
-
 76
76
-
 77
77
-
 78
78
-
 79
79
-
 80
80
-
 81
81
-
 82
82


in anderen Sprachen
- English: Whirlpool AKR 458/1 AL User guide
- français: Whirlpool AKR 458/1 AL Mode d'emploi
- español: Whirlpool AKR 458/1 AL Guía del usuario
- italiano: Whirlpool AKR 458/1 AL Guida utente
- Nederlands: Whirlpool AKR 458/1 AL Gebruikershandleiding
- português: Whirlpool AKR 458/1 AL Guia de usuario