AEG ITE42600KB Benutzerhandbuch
- Kategorie
- Kochfelder
- Typ
- Benutzerhandbuch


CONTENTS
1. SAFETY INFORMATION.............................................................................................2
2. SAFETY INSTRUCTIONS.............................................................................................4
3. INSTALLATION............................................................................................................7
4. PRODUCT DESCRIPTION.........................................................................................10
5. DAILY USE..................................................................................................................11
6. HINTS AND TIPS........................................................................................................13
7. CARE AND CLEANING.............................................................................................16
8. TROUBLESHOOTING............................................................................................... 17
9. TECHNICAL DATA.................................................................................................... 18
FOR PERFECT RESULTS
Thank you for choosing this AEG product. We have created it to give you
impeccable performance for many years, with innovative technologies that help
make life simpler - features you might not find on ordinary appliances. Please
spend a few minutes reading to get the very best from it.
Visit our website for:
Get usage advice, brochures, trouble shooter, service information:
www.aeg.com/webselfservice
Register your product for better service:
www.registeraeg.com
Buy Accessories, Consumables and Original spare parts for your appliance:
www.aeg.com/shop
CUSTOMER CARE AND SERVICE
Always use original spare parts.
When contacting our Authorised Service Centre, ensure that you have the
following data available: Model, PNC, Serial Number.
The information can be found on the rating plate.
Warning / Caution-Safety information
General information and tips
Environmental information
Subject to change without notice.
1.
SAFETY INFORMATION
Before the installation and use of the appliance,
carefully read the supplied instructions. The
manufacturer is not responsible for any injuries or
damage that are the result of incorrect installation or
usage. Always keep the instructions in a safe and
accessible location for future reference.
www.aeg.com
2

1.1 Children and vulnerable people safety
• This appliance can be used by children aged from 8
years and above and persons with reduced physical,
sensory or mental capabilities or lack of experience
and knowledge if they have been given supervision or
instruction concerning the use of the appliance in a
safe way and understand the hazards involved.
• Children between 3 and 8 years of age and persons
with very extensive and complex disabilities shall be
kept away from the appliance unless continuously
supervised.
• Children of less than 3 years of age should be kept
away from the appliance unless continuously
supervised.
• Do not let children play with the appliance.
• Keep all packaging away from children and dispose of
it appropriately.
• Keep children and pets away from the appliance when
it operates or when it cools down. Accessible parts
may become hot during use.
• If the appliance has a child safety device, it should be
activated.
• Children shall not carry out cleaning and user
maintenance of the appliance without supervision.
1.2
General Safety
•
WARNING: The appliance and its accessible parts
become hot during use. Care should be taken to
avoid touching heating elements.
• WARNING: Unattended cooking on a hob with fat or
oil can be dangerous and may result in fire.
• NEVER try to extinguish a fire with water, but switch
off the appliance and then cover flame e.g. with a lid
or a fire blanket.
• CAUTION: The appliance must not be supplied
through an external switching device, such as a timer,
ENGLISH
3

or connected to a circuit that is regularly switched on
and off by a utility.
• CAUTION: The cooking process has to be supervised.
A short term cooking process has to be supervised
continuously.
• WARNING: Danger of fire: Do not store items on the
cooking surfaces.
• Metallic objects such as knives, forks, spoons and lids
should not be placed on the hob surface since they
can get hot.
• Do not use the appliance before installing it in the
built-in structure.
• Do not use a steam cleaner to clean the appliance.
• After use, switch off the hob element by its control
and do not rely on the pan detector.
• If the glass ceramic surface / glass surface is cracked,
switch off the appliance and unplug it from the mains.
In case the appliance is connected to the mains
directly using junction box, remove the fuse to
disconnect the appliance from power supply. In either
case contact the Authorised Service Centre.
• If the supply cord is damaged, it must be replaced by
the manufacturer, an authorized Service or similarly
qualified persons in order to avoid a hazard.
• WARNING: Use only hob guards designed by the
manufacturer of the cooking appliance or indicated by
the manufacturer of the appliance in the instructions
for use as suitable or hob guards incorporated in the
appliance. The use of inappropriate guards can cause
accidents.
2.
SAFETY INSTRUCTIONS
2.1 Installation
WARNING!
Only a qualified person must
install this appliance.
WARNING!
Risk of injury or damage to
the appliance.
• Remove all the packaging.
• Do not install or use a damaged
appliance.
www.aeg.com4

• Follow the installation instructions
supplied with the appliance.
• Keep the minimum distance from
other appliances and units.
• Always take care when moving the
appliance as it is heavy. Always use
safety gloves and enclosed footwear.
• Seal the cut surfaces with a sealant to
prevent moisture to cause swelling.
• Protect the bottom of the appliance
from steam and moisture.
• Do not install the appliance adjacent
to a door or under a window. This
prevents hot cookware falling from
the appliance when the door or the
window is opened.
• If the appliance is installed above
drawers make sure that the space,
between the bottom of the appliance
and the upper drawer, is sufficient for
air circulation.
• The bottom of the appliance can get
hot. Make sure to install a separation
panel made from plywood, kitchen
carcass material or other non-
flammable materials under the
appliance to prevent access to the
bottom.
• The separation panel has to cover the
area under the hob completely.
• Make sure that the ventilation space
of 2 mm, between the worktop and
the front of the below unit, is free.
The warranty does not cover damages
caused by the lack of an adequate
ventilation space.
2.2 Electrical Connection
WARNING!
Risk of fire and electric
shock.
• All electrical connections should be
made by a qualified electrician.
• The appliance must be earthed.
• Before carrying out any operation
make sure that the appliance is
disconnected from the power supply.
• Make sure that the parameters on the
rating plate are compatible with the
electrical ratings of the mains power
supply.
• Make sure the appliance is installed
correctly. Loose and incorrect
electricity mains cable or plug (if
applicable) can make the terminal
become too hot.
• Use the correct electricity mains
cable.
• Do not let the electricity mains cable
tangle.
• Make sure that a shock protection is
installed.
• Use the strain relief clamp on the
cable.
• Make sure the mains cable or plug (if
applicable) does not touch the hot
appliance or hot cookware, when you
connect the appliance to the near
sockets.
• Do not use multi-plug adapters and
extension cables.
• Make sure not to cause damage to
the mains plug (if applicable) or to the
mains cable. Contact our Authorised
Service Centre or an electrician to
change a damaged mains cable.
• The shock protection of live and
insulated parts must be fastened in
such a way that it cannot be removed
without tools.
• Connect the mains plug to the mains
socket only at the end of the
installation. Make sure that there is
access to the mains plug after the
installation.
• If the mains socket is loose, do not
connect the mains plug.
• Do not pull the mains cable to
disconnect the appliance. Always pull
the mains plug.
• Use only correct isolation devices: line
protecting cut-outs, fuses (screw type
fuses removed from the holder), earth
leakage trips and contactors.
• The electrical installation must have
an isolation device which lets you
disconnect the appliance from the
mains at all poles. The isolation
device must have a contact opening
width of minimum 3 mm.
2.3 Use
WARNING!
Risk of injury, burns and
electric shock.
• Remove all the packaging, labelling
and protective film (if applicable)
before first use.
ENGLISH
5

• This appliance is for household use
only.
• Do not change the specification of
this appliance.
• Make sure that the ventilation
openings are not blocked.
• Do not let the appliance stay
unattended during operation.
• Set the cooking zone to “off” after
each use.
• Do not rely on the pan detector.
• Do not put cutlery or saucepan lids on
the cooking zones. They can become
hot.
• Do not operate the appliance with
wet hands or when it has contact with
water.
• Do not use the appliance as a work
surface or as a storage surface.
• If the surface of the appliance is
cracked, disconnect immediately the
appliance from the power supply. This
to prevent an electrical shock.
• Users with a pacemaker must keep a
distance of minimum 30 cm from the
induction cooking zones when the
appliance is in operation.
• When you place food into hot oil, it
may splash.
WARNING!
Risk of fire and explosion
• Fats and oil when heated can release
flammable vapours. Keep flames or
heated objects away from fats and oils
when you cook with them.
• The vapours that very hot oil releases
can cause spontaneous combustion.
• Used oil, that can contain food
remnants, can cause fire at a lower
temperature than oil used for the first
time.
• Do not put flammable products or
items that are wet with flammable
products in, near or on the appliance.
WARNING!
Risk of damage to the
appliance.
• Do not keep hot cookware on the
control panel.
• Do not put a hot pan cover on the
glass surface of the hob.
• Do not let cookware boil dry.
• Be careful not to let objects or
cookware fall on the appliance. The
surface can be damaged.
• Do not activate the cooking zones
with empty cookware or without
cookware.
• Do not put aluminium foil on the
appliance.
• Cookware made of cast iron,
aluminium or with a damaged bottom
can cause scratches on the glass /
glass ceramic. Always lift these
objects up when you have to move
them on the cooking surface.
• This appliance is for cooking
purposes only. It must not be used for
other purposes, for example room
heating.
2.4 Care and cleaning
• Clean the appliance regularly to
prevent the deterioration of the
surface material.
• Deactivate the appliance and let it
cool down before you clean it.
• Disconnect the appliance from the
electrical supply before maintenance.
• Do not use water spray and steam to
clean the appliance.
• Clean the appliance with a moist soft
cloth. Use only neutral detergents. Do
not use abrasive products, abrasive
cleaning pads, solvents or metal
objects.
2.5 Service
• To repair the appliance contact the
Authorised Service Centre.
• Use original spare parts only.
2.6 Disposal
WARNING!
Risk of injury or suffocation.
• Contact your municipal authority for
information on how to discard the
appliance correctly.
• Disconnect the appliance from the
mains supply.
• Cut off the mains electrical cable
close to the appliance and dispose of
it.
www.aeg.com
6

3. INSTALLATION
WARNING!
Refer to Safety chapters.
3.1 Before the installation
Before you install the appliance, write
down the information bellow from the
rating plate. The rating plate is on the
bottom of the appliance.
Serial number ...........................
3.2 Built-in appliance
Only use the built-in appliances after you
assemble the appliance into correct
built-in units and work surfaces that align
to the standards.
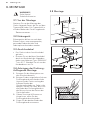
3.3 Connection cable
• The appliance is supplied with a
connection cable.
• To replace the damaged mains cable
use the following (or higher) mains
cable type: H05V2V2-F T min 90°C.
Speak to your local Service Centre.
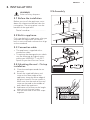
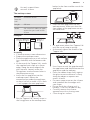
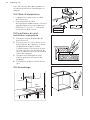
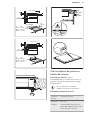
3.4 Attaching the seal - On-top
installation
1. Clean the worktop around the cut
out area.
2. Attach the supplied 2x6mm seal
stripe to the lower edge of the
appliance, along the outer edge of
the glass ceramic. Do not stretch it.
Make sure that the ends of the seal
stripe are located in the middle of
one side of the appliance.
3. Add some millimetres to the length
when you cut the seal stripe.
4. Join the two ends of the seal stripe
together.
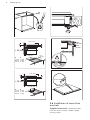
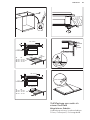
3.5 Assembly
min.
50mm
min.
500mm
min.
2mm
360
520
ENGLISH 7

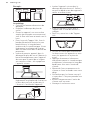
min. 2 mm
A
B
A
12 mm
28 mm
38 mm
B
57 mm
41 mm
31 mm
min
30 mm
min. 500 mm
< 20 mm
> 20 mm
min. 2 mm
A
B
A
12 mm
28 mm
38 mm
B
57 mm
41 mm
31 mm
min. 500 mm
min.
12 mm
min.
2 mm
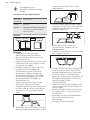
3.6 Installation of more than
one hob
Supplied accessories: connection bar,
heat-resistant silicone, rubber shape,
sealing stripe.
www.aeg.com
8

Use only a special heat-
resistant silicone.
The worktop cutout
Distance
from the
wall
minimum 50 mm
Length 490 mm
Width the sum of all widths of appli-
ances that you install minus
20 mm
Example:
360 mm
520 mm
490 mm
360 mm
+ - =
20 mm 700 mm
Assembly
• Calculate correct cutout dimensions.
• Prepare the worktop cutout.
• Place the appliances on a soft surface
(e.g. a blanket) with the bottom side
up.
• In the case of the Teppan Yaki, attach
the supplied seal stripe to its lower
edge, along the outer edge of the
glass ceramic. Loosely screw the
fixing plates into the correct holes in
the protection casing.
• Insert the first appliance into the
worktop cutout. Mount the
connection bar under the appliance
so that a half of its width is still visible
- it will support the next appliance.
• For the Teppan Yaki, loosely screw in
the fixing plates to the worktop from
below (at the front and the rear of the
appliance).
• Insert the next appliance into the
worktop cutout. Make sure that the
front edges of the appliances are on
the same level.
• Fix appliances other than Teppan Yaki
with the use of snap-in springs.
• At the end, tighten the screws of the
Teppan Yaki.
• Use silicone to seal the gaps between
the appliances and those between the
appliances and the worktop.
• Press the rubber shape firmly against
the glass ceramic and move it slowly
along the edges to squeeze out
excess silicone.
• Put some soapy water on the silicone
and smoothen out the edges with
your finger.
• Do not touch the silicone until it
hardens, it can last for about a day.
• Carefully remove the silicone
squeeze-out with a shaving razor.
• Clean the glass surface.
ENGLISH
9

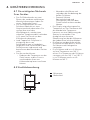
4. PRODUCT DESCRIPTION
4.1 The most important
features of your appliance
• The roasting surface is comprised of
two zones, front and rear. For more
information, refer to "Technical data".
• The roasting surface consists of 2
layers of stainless steel with a layer of
aluminium between them. It has a
high thermal capacity, which prevents
temperatures from quickly decreasing
(e.g. when you prepare meat directly
from the refrigerator).
• Each TeppanYaki roasting surface is
unique because it is handmade by
grinding specialists. Differences in the
grinding patterns are normal and do
not affect the operation of the
appliance.
• The groove around the edge:
– Decreases the temperature
around the appliance, which
enables you to install it in
different types of kitchen
worktops.
– Absorbs the heat and prevents
the expansion of the heated
roasting surface.
– Collects small food remains and
liquids which you can easily
remove after cooking.
• The display shows the temperature
setting. The thermostat keeps the
necessary temperature constant, to
prevent food from overheating. This
allows for low-fat cooking that keeps
the nutritional values of the food.
• The food is heated directly on the
roasting surface, with or without oil.
You can also use cookware.
• The roasting surface heats up to the
temperature of 180 °C in
approximately 4 minutes. The
temperature of the roasting surface
decreases from 180 °C to 100 °C in
approximately 25 minutes, and to 60
°C in approximately 60 minutes.
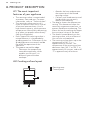
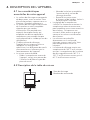
4.2 Cooking surface layout
2
1
1
1
Roasting zone
2
Control panel
www.aeg.com10

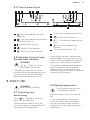
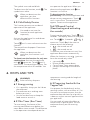
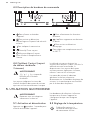
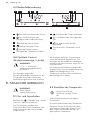
4.3 Control panel layout
1 2 4 5 63 97
10
8
1
To activate and deactivate the
appliance.
2
To activate and deactivate Lock or
Child Safety Device.
3
To show the active zone.
4
CountUp Timer indicator.
5
Count Down Timer indicator.
6
To show the temperature and time.
7
To select Timer functions.
8
/ To increase or decrease the
time.
9
To activate and deactivate
Cleaning.
10
To set a temperature 0 - 220.
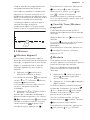
4.4 OptiHeat Control (3 step
Residual heat indicator)
WARNING!
/ / There is a risk of
burns from residual heat.
The indicators show the level of the
residual heat for the cooking zones you
are currently using. When the hob is
deactivated, the indicators are still
visible. When the hob is cold enough,
they disappear. The indicators may also
come on for the neighbouring cooking
zones even if you are not using them.
The induction cooking zones produce
the heat necessary for the cooking
process directly in the bottom of the
cookware. The glass ceramic is heated by
the heat of the cookware.
5. DAILY USE
WARNING!
Refer to Safety chapters.
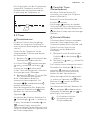
5.1 Activating and
deactivating
Touch for 1 second to activate or
deactivate the appliance.
The control bars come on after you
activate the appliance and go off after
you deactivate the appliance.
5.2 Setting temperature
Always preheat the roasting
surface before cooking.
Each roasting zone has it own control
bar.
To set or change the temperature:
Touch the control bar at the correct
value or move your finger along the
control bar until you reach the correct
temperature.
ENGLISH 11

The display blinks until the roasting zone
reaches the set temperature. Then a
signal sounds and the display shows the
temperature.
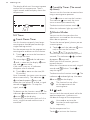
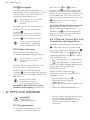
5.3 Timer
Count Down Timer
Use this function to specify how long a
roasting zone should operate during a
single cooking session.
Set the temperature for the appropriate
roasting zone and then set the function.
1. Touch to activate the function or
change the time.
The timer digits and the indicators
and come on the display. turns
red, and turns white.
If the timer is not set, all indicators
disappear after 4 seconds.
2. Touch
or to set the time (00 -
99 minutes).
After 3 seconds, the timer starts to count
down automatically. The indicators ,
, and disappear. stays red.
When the time comes to an end, a signal
sounds and blinks. To stop the
signal, touch
.
To deactivate the function: touch . The
indicators
and come on. Use or
to set on the display.
Alternatively, set the heat level to 0. As a
result, a signal sounds and the timer is
cancelled.
CountUp Timer (The count
up timer)
You can use this function to monitor how
long a roasting zone operates.
Touch twice to activate the function.
The indicator turns red, the timer
starts to count up automatically.
To deactivate the function: touch .
When the indicators light up, touch .
Minute Minder
You can use this function when the
appliance is activated but the roasting
zones do not operate.
To see the control panel, place a pot on
a roasting zone.
1.
Touch
, until the indicator turns
red, to activate the function.
2. Touch or to set the time.
The function starts automatically after 4
seconds. The indicators , , and
disappear. stays red.
When you set the function, you can
remove the pot.
When the time comes to an end, a signal
sounds and flashes. Touch to
stop the signal.
To deactivate the function: touch . The
indicators and light up. Use or
to set on the display.
The function has no effect
on the operation of the
roasting zone.
5.4 Lock
You can lock the control panel while the
appliance operates. It prevents an
accidental change of the temperature.
You need to activate the
function for each appliance
separately.
Set the temperature first.
Touch to activate the function.
www.aeg.com
12

The symbol turns red and blinks.
To deactivate the function, touch . The
symbol turns white.
When you deactivate the
appliance, you also
deactivate this function.
5.5 Child Safety Device
This function prevents an accidental
operation of the appliance.
You need to activate the
function for each appliance
separately.
Activate the appliance first and do not
set any temperature.
Touch until it turns red to activate the
function.
The control bars disappear. Deactivate
the appliance.
When you deactivate the
appliance, the function is still
active.
To deactivate the function for only one
cooking time: Activate the appliance
with . comes on. Touch until it
turns white. The control bars appear. Set
the temperature within 50 seconds. You
can operate the appliance. When you
deactivate the appliance with the
function is still active.
To deactivate the function
permanently: Activate the appliance and
do not set any temperature. Touch
until it turns white. The control bars
appear. Deactivate the appliance.
5.6 OffSound Control
(Deactivating and activating
the sounds)
Deactivate the appliance. Touch for 3
seconds. The display comes on and goes
out. Touch for 3 seconds. or
comes on. Touch of the timer to
choose one of the following:
• - the sounds are off
• - the sounds are on
To confirm your selection wait until the
appliance deactivates automatically.
When the function is set to
you can
hear the sounds only when:
• you touch
• Minute Minder comes down
• Count Down Timer comes down
• you put something on the control
panel.
6.
HINTS AND TIPS
WARNING!
Refer to Safety chapters.
6.1 Energy saving
• If it is possible, always put the lids on
the cookware.
• Put cookware on a cooking zone
before you start it.
• Use the residual heat to keep the
food warm or to melt it.
6.2 Öko Timer (Eco Timer)
To save energy, the heater of the
roasting zone deactivates before the
count down timer sounds. The difference
in the operation time depends on the
temperature setting and the length of
the roasting.
6.3 Preparing food with the
TeppanYaki
You prepare the food directly on the
roasting surface, with or without oil / fat.
You can also use pots or pans, but the
cookware does not heat up as quickly as
it does on a glass-ceramic appliance or a
gas appliance.
You can cook or keep side dishes or
sauces warm in pots or pans. Put the
cookware directly on the roasting
surface.
ENGLISH
13

The manufacturer does not recommend
boiling large quantities of water on the
roasting surface (e.g. for spaghetti).
The noises are normal and
do not indicate any
malfunction.
Do not put cookware in the middle of
the roasting surface, to avoid uneven
heating. Frying at the conjunction of the
zones can cause uneven browning (e.g.
with pancakes).
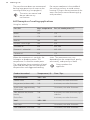
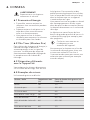
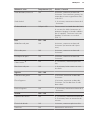
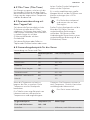
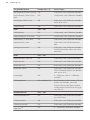
6.4 Examples of cooking applications
Using fats and oils
Fat / Oil Max. temperature
(°C)
Fat / oil smoke point (°C)
Butter 130 175
Pork fat 170 185 - 205
Beef fat 180 205
Olive oil - extra virgin 180 210
Sunflower oil 200 225 - 245
Peanut oil - refined oil 200 225 - 230
Coconut oil 200 175
When the temperature is too high, the
fat begins to produce smoke. This
temperature is called the smoke point.
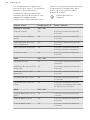
The table below shows examples of food
types and provides you with the optimal
temperatures and suggested cooking
times. The parameters may vary
depending on the temperature, quality,
consistency, and quantity of food.
Always preheat the
appliance.
Food to be cooked Temperature (°C) Time / Tips
Fish and shellfish 140 – 160
Salmon fillets 160 8 minutes, turn after 4 minutes.
King prawns (without shell) 140 6 minutes, turn after 3 minutes.
Shark steaks, approximately
2.5 cm thick
160 10 minutes, turn after 5 minutes.
Sole, Müllerin Art (fried in
butter)
140 8 minutes, turn after 4 minutes, light
side first.
Plaice filets 140 6 minutes, turn after 3 minutes.
Veal 140 – 180
Veal chop 180 10 minutes, turn after 5 minutes.
Veal medallions, 4 cm thick 160 10 minutes, turn after 5 minutes.
www.aeg.com14

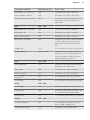
Food to be cooked Temperature (°C) Time / Tips
Veal steaks, 3 - 4 cm thick 160 6 minutes, turn after 3 minutes.
Veal escalopes, natural 180 5 minutes, turn after 2,5 minutes.
Veal fricasee in cream sauce 180 6 minutes, turn after 3 minutes. The
meat strips must not be stuck to
each other.
Beef 160 – 180
Beef steak bleu - very raw 180 2 minutes, turn after 1 minute.
Beef steak raw 180 6 minutes, turn after 3 minutes.
Beef steak medium 180 8 minutes, turn after 2 minutes.
Beef steak - well done 180 8 minutes, turn after 4 minutes. With-
out fatty substances, the roasting
time increases by approximately
20%.
Hamburger 160 6 - 8 minutes, turn after 3 - 4 minutes.
Châteaubriand 160 then 100 Sauté the meat in oil on all sides
(turn only when the meat does not
stick to the pan). Finish off on one
side for 10 minutes (100 °C).
Pork 160 – 180
Pork medallions 160 8 minutes, turn after 4 minutes (de-
pending on the thickness).
Pork steaks 180 8 minutes, turn after 4 minutes.
Pork escalopes 160 6 minutes, turn after 3 minutes.
Spare ribs
1)
160 8 - 10 minutes, turn several times.
Pork skewer 160 6 - 8 minutes, sauté well on all sides.
Lamb 160 – 180
Lamb chops 180 10 minutes, turn after 5 minutes.
Filet of lamb 160 10 minutes, turn after 5 minutes. The
filet must be fried on both sides.
Lamb steaks 160 6 - 8 minutes, turn after 3 - 4 minutes.
Poultry 140 – 160
Chicken supreme 140 8 - 10 minutes, turn after 4 - 5 mi-
nutes, under a cooking lid.
Turkey breast strips 160 6 minutes, turn several times.
ENGLISH 15

Food to be cooked Temperature (°C) Time / Tips
Sausages 160 Turn as needed.
Fried egg 140 Turn as needed.
Crepes / Omelettes 140 - 160 Turn as needed.
Fruits 140 - 160 Turn as needed.
Vegetables 140 - 160 10 - 20 minutes, turn several times.
Vegetables 140 - 160 10 - 15 minutes, under a cooking lid
(turn halfway through).
Frying precooked rice 140 - 160 10 - 15 minutes, turn several times.
Frying precooked noodles 140 - 160 15 - 20 minutes, turn halfway
through.
1)
Precook them first.
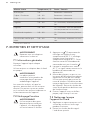
7. CARE AND CLEANING
WARNING!
Refer to Safety chapters.
7.1 General information
Clean the appliance after each use.
Always use cookware with a clean base.
WARNING!
Sharp objects and abrasive
cleaning agents will damage
the appliance.
Wooden utensils, e.g. spatulas, are
perfectly safe to work with. Small
scratches or stains on the surface have
no effect on how the appliance operates.
7.2 Cleaning function
WARNING!
Always use protective gloves
while cleaning the
appliance, to protect your
hands against the heat.
1. Touch . Each roasting zone is set
to 80°C. The display blinks until the
temperature reaches 80°C. The
function locks the control panel, but
not
.
2. When the temperature reaches 80°C,
an acoustic signal sounds, and the
control panel becomes unlocked.
3. Put ice cubes one by one on the
roasting zones (you can also use cold
water). Use a spatula to remove food
remains. Remember to clean the
groove around the appliance too.
Remove limestone or white protein
residue using citric acid.
4. Dry the appliance with a clean cloth.
7.3 Cleaning when the
appliance is cold
1. Apply a cleaning agent to the
roasting surface and let it set for 5
minutes.
2. Remove the roasting residue with a
spatula.
3. Clean the appliance with a moist
cloth.
4. Dry the appliance with a clean cloth.
5. When the appliance is dry, rub the
roasting surface with some cooking
oil.
www.aeg.com
16

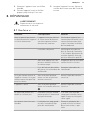
8. TROUBLESHOOTING
WARNING!
Refer to Safety chapters.
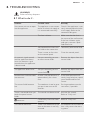
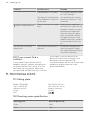
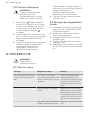
8.1 What to do if...
Problem Possible cause Remedy
You cannot activate or oper-
ate the appliance.
The appliance is not connec-
ted to an electrical supply or
it is connected incorrectly.
Check if the appliance is cor-
rectly connected to the elec-
trical supply. Refer to the
connection diagram.
The fuse is blown. Make sure that the fuse is
the cause of the malfunction.
If the fuse is blown again
and again, contact a quali-
fied electrician.
You touched 2 or more sen-
sor fields at the same time.
Touch only one sensor field.
There is water or fat stains
on the control panel.
Clean the control panel.
An acoustic signal sounds
and the appliance deacti-
vates. An acoustic signal
sounds when the appliance
is deactivated.
You put something on one
or more sensor fields.
Remove the object from the
sensor fields.
The appliance deactivates. You put something on the
sensor field .
Remove the object from the
sensor field.
Residual heat indicator does
not come on.
A zone is not hot because it
operated only for a short
time
If the zone operated suffi-
ciently long to be hot, speak
to an Authorised Service
Centre.
The sensor fields become
hot.
The cookware is too large or
you put it too near to the
controls.
Put large cookware on the
rear zones, if possible.
There is no sound when you
touch the panel sensor
fields.
The sounds are deactivated. Activate the sounds.
Refer to "Daily use".
comes on.
Child Safety Device or Lock
operate.
Refer to "Daily use".
The control bar blinks. There is no cookware on the
zone or the zone is not fully
covered.
Put cookware on the zone so
that it fully covers the roast-
ing zone.
ENGLISH 17

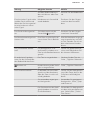
Problem Possible cause Remedy
The cookware is unsuitable. Use suitable cookware. Refer
to "Hints and tips".
The diameter of the bottom
of the cookware is too small
for the zone.
Use cookware with correct
dimensions. Refer to "Tech-
nical data".
and a number come on.
There is an error in the appli-
ance.
Deactivate the appliance
and activate it again after 30
seconds. If comes on again,
disconnect the appliance
from the electrical supply.
After 30 seconds, connect
the appliance again. If the
problem continues, speak to
an Authorised Service Cen-
tre
You can hear a constant
beep noise.
The electrical connection is
incorrect.
Disconnect the appliance
from the electrical supply.
Ask a qualified electrician to
check the installation.
8.2 If you cannot find a
solution...
If you cannot find a solution to the
problem yourself, contact your dealer or
an Authorised Service Centre. Give the
data from the rating plate. Make sure,
you operated the hob correctly. If not the
servicing by a service technician or
dealer will not be free of charge, also
during the warranty period. The
instructions about the Service Centre and
conditions of guarantee are in the
guarantee booklet.
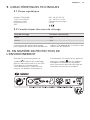
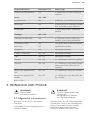
9. TECHNICAL DATA
9.1 Rating plate
Model ITE42600KB PNC 949 597 551 00
Typ 61 A2A 80 AD 220 - 240 V 50 - 60 Hz
Induction 2.8 kW Made in Germany
Ser.Nr. ................. 2.8 kW
AEG
9.2 Roasting zones specification
Roasting zone Nominal power [W]
Front 1400
Rear 1400
www.aeg.com18

The power of the roasting zones can be
different in some small range from the
data in the table. It changes with the
material and dimensions of the
cookware.
10. ENVIRONMENTAL CONCERNS
Recycle materials with the symbol .
Put the packaging in relevant containers
to recycle it. Help protect the
environment and human health by
recycling waste of electrical and
electronic appliances. Do not dispose of
appliances marked with the symbol
with the household waste. Return the
product to your local recycling facility or
contact your municipal office.
ENGLISH 19

TABLE DES MATIÈRES
1. INFORMATIONS DE SÉCURITÉ...............................................................................20
2. CONSIGNES DE SÉCURITÉ......................................................................................23
3. INSTALLATION..........................................................................................................25
4. DESCRIPTION DE L'APPAREIL.................................................................................29
5. UTILISATION QUOTIDIENNE.................................................................................. 30
6. CONSEILS.................................................................................................................. 33
7. ENTRETIEN ET NETTOYAGE...................................................................................36
8. DÉPANNAGE.............................................................................................................37
9. CARACTÉRISTIQUES TECHNIQUES....................................................................... 39
POUR DES RÉSULTATS PARFAITS
Merci d'avoir choisi ce produit AEG. Nous l'avons conçu pour qu'il vous offre des
performances irréprochables pour longtemps, en intégrant des technologies
innovantes qui vous simplifient la vie grâce à des caractéristiques que vous ne
trouverez pas forcément sur des appareils ordinaires. Veuillez prendre quelques
instants pour lire cette notice afin d'utiliser au mieux votre appareil.
Visitez notre site Internet pour :
Obtenir des conseils d'utilisation, des brochures, de l'aide, des informations :
www.aeg.com/webselfservice
Enregistrez votre produit pour obtenir un meilleur service :
www.registeraeg.com
Acheter des accessoires, consommables et pièces de rechange d'origine pour
votre appareil :
www.aeg.com/shop
SERVICE APRÈS-VENTE
Utilisez toujours des pièces d'origine.
Avant de contacter le service après-vente, assurez-vous de disposer des
informations suivantes : Modèle, PNC, numéro de série.
Vous trouverez ces informations sur la plaque signalétique.
Avertissement/Consignes de sécurité
Informations générales et conseils
Informations en matière de protection de l'environnement
Sous réserve de modifications.
1.
INFORMATIONS DE SÉCURITÉ
Avant d'installer et d'utiliser cet appareil, lisez
soigneusement les instructions fournies. Le fabricant ne
pourra être tenu pour responsable des blessures et
dégâts résultant d'une mauvaise installation ou
www.aeg.com
20
Seite wird geladen ...
Seite wird geladen ...
Seite wird geladen ...
Seite wird geladen ...
Seite wird geladen ...
Seite wird geladen ...
Seite wird geladen ...
Seite wird geladen ...
Seite wird geladen ...
Seite wird geladen ...
Seite wird geladen ...
Seite wird geladen ...
Seite wird geladen ...
Seite wird geladen ...
Seite wird geladen ...
Seite wird geladen ...
Seite wird geladen ...
Seite wird geladen ...
Seite wird geladen ...
Seite wird geladen ...
Seite wird geladen ...
Seite wird geladen ...
Seite wird geladen ...
Seite wird geladen ...
Seite wird geladen ...
Seite wird geladen ...
Seite wird geladen ...
Seite wird geladen ...
Seite wird geladen ...
Seite wird geladen ...
Seite wird geladen ...
Seite wird geladen ...
Seite wird geladen ...
Seite wird geladen ...
Seite wird geladen ...
Seite wird geladen ...
Seite wird geladen ...
Seite wird geladen ...
Seite wird geladen ...
Seite wird geladen ...
-
 1
1
-
 2
2
-
 3
3
-
 4
4
-
 5
5
-
 6
6
-
 7
7
-
 8
8
-
 9
9
-
 10
10
-
 11
11
-
 12
12
-
 13
13
-
 14
14
-
 15
15
-
 16
16
-
 17
17
-
 18
18
-
 19
19
-
 20
20
-
 21
21
-
 22
22
-
 23
23
-
 24
24
-
 25
25
-
 26
26
-
 27
27
-
 28
28
-
 29
29
-
 30
30
-
 31
31
-
 32
32
-
 33
33
-
 34
34
-
 35
35
-
 36
36
-
 37
37
-
 38
38
-
 39
39
-
 40
40
-
 41
41
-
 42
42
-
 43
43
-
 44
44
-
 45
45
-
 46
46
-
 47
47
-
 48
48
-
 49
49
-
 50
50
-
 51
51
-
 52
52
-
 53
53
-
 54
54
-
 55
55
-
 56
56
-
 57
57
-
 58
58
-
 59
59
-
 60
60


AEG ITE42600KB Benutzerhandbuch
- Kategorie
- Kochfelder
- Typ
- Benutzerhandbuch
in anderen Sprachen
- English: AEG ITE42600KB User manual
- français: AEG ITE42600KB Manuel utilisateur
Verwandte Artikel
Andere Dokumente
-
Aeg-Electrolux HC652600EB Benutzerhandbuch
-
-
-
Electrolux EQT4520BOG Benutzerhandbuch
-
-
-
Elta Table Top Grill Benutzerhandbuch
-