DELTA-SPORT QK-3045 Instructions For Use Manual
- Typ
- Instructions For Use Manual

GB Instructions and Safety Notice Page 10
HU Használati és biztonsági tudnivalók 22. Oldal
SI Navodila za uporabo in varnostni napotki Strani 34
CZ Pokyny k používání a bezpečnostní upozornění Stránky 46
SK Pokyny na obsluhu a bezpečnostné pokyny Stranu 58
DE/AT/CH Gebrauchs- und Sicherheitshinweise Seite 70
Before reading, fold out the illustration page and get to know all of the functions of your unit.
Elolvasás előtt hajtsa ki az oldalt az ábrákkal és ezt követően ismerkedjen meg a készülék valamennyi
funkciójával.
Preden začnete brati, odprite stran s slikami in se seznanite z vsemi funkcijami naprave.
Před čtením si nejdříve vyklopte stránku s obrázky a seznamte se se všemi funkcemi přístroje.
Skôr než začnete návod čítať, si ho otvorte na strane s obrázkami a oboznámte sa so všetkými
funkciami prístroja.
Klappen Sie vor dem Lesen die Seite mit den Abbildungen aus und machen Sie sich anschließend mit
allen Funktionen des Artikels vertraut.
QUADROCOPTER
Instructions for use
QUADROCOPTER
Használati útmutató
KVADROKOPTER
Navodilo za uporabo
KVADROKOPTÉRA
Návod k obsluze
QUADROCOPTER
Návod na obsluhu
QUADROCOPTER
Gebrauchsanweisung
QUADROCOPTER
IAN 284749IAN 284749
DELTA-SPORT HANDELSKONTOR GMBH
Wragekamp 6 • DE-22397 Hamburg
GERMANY
05/2017
Delta-Sport-Nr.: QK-3045


7
Scope of delivery (figure A) ............................ 10
Quadrocopter (figure B) ......................... 10
Remote control (figure C / D) ................. 10
Technical data ....................................................10
Correct use ......................................................... 11
Symbols used .................................................... 11
Safety notes ................................................ 11 -13
Warning notes for the batteries/
storage battery! ................................ 13 -14
Foreseeable misuse ....................................14
Inserting the batteries into the remote control
(figure D) ............................................................14
Removing the storage battery (figure E) ..........15
Charging the storage battery (figure F) ........... 15
Inserting the storage battery .............................15
Low voltage warning ........................................ 15
Setting the camera (figure G) .......................... 15
Transferring data (figure H) ............................. 15
Suitable flying environment .............................. 16
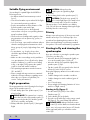
Flight preparation ............................................. 16
Privacy ............................................................... 16
Starting to fly and steering
the quadrocopter ................................................16
Starting to fly (figure J) .................... 16 - 17
Steering the quadrocopter ....................... 17
Setting the speed (figure O) ................... 18
360° rollover (figure P) ...........................18
Calibration .................................................18
Recording data (figure U) ........................ 18 - 19
Rotor guard ....................................................... 19
Cleaning, repair, and storage ......................... 19
Changing the rotor blades (figure I) .......19
Notes on disposal ............................................ 19
Disposal measures for the batteries/
storage battery................................................... 20
Notes on the guarantee and
service handling ................................................20
Possible faults .................................................... 21
Szállítási tartalom (A ábra) ............................. 22
Quadrocopter (B ábra) ........................... 22
Távirányító (C / D ábra) ......................... 22
Műszaki adatok ................................................ 22
Rendeltetésszerű használat ............................. 23
Alkalmazott jelek .............................................. 23
Biztonsági előírások ................................. 23 - 25
Elemek/akkumulátor
figyelmeztető előírásai! .....................25 - 26
Rendeltetéssel ellentétes használat ..........26
Elemek berakása a távirányítóba (D ábra) .... 26
Akkumulátor eltávolítása (E ábra) ................... 27
Akkumulátor töltése (F ábra) ........................... 27
Akkumulátor berakása ..................................... 27
Alacsony feszültségre figyelmeztetés ............. 27
Kamera beállítása (G ábra) ............................ 27
Adatok átvitele (H ábra) .................................. 27
Alkalmas repülési környezet ............................ 28
A repülés előkészítése .......................................28
Magánszféra .....................................................28
Repülés indítása és a quadrocopter
irányítása .....................................................28 - 29
Repülés indítása (J ábra) ......................... 29
Quadrocopter irányítása .................29 - 30
Sebesség beállítása (O ábra) ................. 30
360°-fokos átfordulás (P ábra) ............... 30
Kalibrálás ...................................................30
Adatok felvétele (U ábra) ................................ 31
Rotorvédő .......................................................... 31
Tisztítás, javítás, tárolás .....................................31
Rotorlapátok cseréje (I ábra) .................. 31
Hulladékkezelési előírások .............................. 32
Engedélyezett elemek/ akkumulátorok ............32
A garanciával és a szerviz lebonyolításával
kapcsolatos útmutató ........................................ 32
Lehetséges hibák .............................................. 33
Contents/Tartalomjegyzék

8
Obseg dobave (slika A) .....................................34
Kvadrokopter (slika B) ..............................34
Daljinski upravljalnik (slika C / D) ..........34
Tehnični podatki ......................................... 34 - 35
Predvidena uporaba ........................................ 35
Uporabljeni simboli .......................................... 35
Opozorila glede baterij/
akumulatorskih baterij! ............................. 37
Predvidljiva zloraba .................................. 38
Vstavljanje baterij v daljinski upravljalnik
(slika D) .............................................................. 38
Odstranitev akumulatorske baterije (slika E) . . 39
Polnjenje akumulatorske baterije (slika F) ...... 39
Vstavljanje akumulatorske baterije ................. 39
Opozorilo glede podnapetosti ........................39
Nastavitev kamere (slika G) ............................ 39
Prenos podatkov (slika H) ........................ 39 - 40
Primerna okolica za letenje ............................. 40
Priprava na letenje ........................................... 40
Zasebnost .......................................................... 40
Začetek letenja in krmiljenje
kvadrokopterja ............................................40 - 41
Začetek letenja (slika J) ........................... 41
Krmiljenje kvadrokopterja ................41 - 42
Nastavitev hitrosti (slika O) ...................... 42
360-stopinjski luping (sl. P) ..................... 42
Umerjanje ..................................................42
Zajemanje podatkov (slika U) ................. 42 - 43
Zaščita rotorjev ................................................. 43
Čiščenje, popravilo in shranjevanje ................ 43
Zamenjava listov rotorja (slika I) ............ 43
Odstranjevanje ......................................... 43 - 44
Ukrepi za odstranjevanje baterij/
akumulatorske baterije .......................................44
Napotki za garancijo in izvajanje servisne
storitve ................................................................ 44
Možne napake ................................................. 46
Rozsah dodávky (obr. A) ................................. 46
Kvadrokoptéra (obr. B) ........................... 46
Dálkové ovládání (obr. C / D) ............... 46
Technické údaje ................................................ 46
Použití v souladu s určením .............................. 47
Použité symboly ................................................ 47
Bezpečnostní pokyny ............................... 47 - 49
Varovná upozornění pro baterie /
akumulátor! .............................................. 49
Předvídatelné nesprávné použití ............. 50
Vkládání baterií do dálkového
ovládání (obr. D) ............................................... 50
Vyjmutí akumulátoru (obr. E) ........................... 51
Nabíjení akumulátoru (obr. F) ......................... 51
Vložení akumulátoru ......................................... 51
Varování před podpětím .................................. 51
Nastavení kamery (obr. G) ............................. 51
Přenos dat (obr. H) ............................................51
Vhodné letové prostředí .......................... 51 - 52
Příprava na let ................................................... 52
Sféra soukromí ................................................. 52
Start letu a řízení kvadrokoptéry ...................... 52
Start letu (obr. J) ........................................52
Řízení kvadrokoptéry ............................... 53
Nastavení rychlosti (obr. O) ................... 54
Přemet 360° (obr. P) .............................. 54
Kalibrování ................................................54
Záznam dat (obr. U) ........................................ 54
Kryt rotoru ......................................................... 54
Čištění, opravy a skladování ............................54
Výměna listů rotoru (obr. I) ......................55
Pokyny pro likvidaci ......................................... 55
Opatření k likvidaci baterií /akumulátorů ....... 55
Pokyny k záruce a průběhu služby ..................56
Možné chyby ......................................................57
Kazalo/Obsah

9
Rozsah dodávky (obr. A) ................................. 58
Kvadrokoptéra (obr. B) ........................... 58
Diaľkový ovládač (obr. C / D) ............... 58
Technické údaje ................................................ 58
Určené použitie ................................................ 59
Použité symboly ................................................ 59
Bezpečnostné pokyny ..................... 59 - 62
Predpokladané zneužitie ......................... 62
Vloženie batérií do diaľkového
ovládača (obr. D) ............................................. 63
Vybratie akumulátora (obr. E) ......................... 63
Nabíjanie akumulátora (obr. F) ...................... 63
Vloženie akumulátora ...................................... 63
Výstraha pri nízkom napätí .............................. 63
Nastavenie kamery (obr. G) ........................... 63
Prenos dát (obr. H) ........................................... 64
Vhodné letové prostredie ................................. 64
Príprava letu ...................................................... 64
Súkromie ............................................................ 64
Začiatok letu a ovládanie kvadrokoptéry ........65
Začiatok letu (obr. J) ................................ 65
Ovládanie kvadrokoptéry ........................65
Nastavenie rýchlosti (obr. O) ................. 66
Premet o 360 ° (obr. P) .......................... 66
Kalibrácia ......................................... 66 - 67
Zaznamenanie dát (obr. U) ............................. 67
Chránič rotora ................................................... 67
Čistenie, oprava a skladovanie ....................... 67
Výmena rotorových listov (obr. I) ........... 67
Pokyny na likvidáciu ......................................... 68
Opatrenia na likvidáciu batérií/
akumulátora ........................................................68
Pokyny k záruke a priebehu servisu ............... 68
Možné poruchy ................................................ 69
Lieferumfang (Abb. A) ...................................... 70
Quadrocopter (Abb. B) ........................... 70
Fernsteuerung (Abb. C / D) .................... 70
Technische Daten .............................................. 70
Bestimmungsgemäße Verwendung ................. 71
Sicherheitshinweise ................................... 71 - 73
Warnhinweise Batterie/Akku! ......... 73 - 74
Vorhersehbarer Missbrauch ...................... 74
Batterie in die Fernsteuerung
einsetzen (Abb. D) ............................................ 75
Akku entfernen (Abb. E) ................................... 75
Akku laden (Abb. F) ......................................... 75
Akku einsetzen .................................................. 76
Unterspannungs-Warnung ................................76
Kamera einstellen (Abb. G) ............................. 76
Daten übertragen (Abb. H) ............................. 76
Geeignete Flugumgebung ............................... 76
Flugvorbereitung ....................................... 76 - 77
Privatsphäre ....................................................... 77
Flug starten und Quadrocopter steuern ...........77
Flug starten ............................................... 77
Quadrocopter steuern ......................77 - 79
Geschwindigkeit einstellen
(Abb. O) ................................................... 79
360°-Überschlag (Abb. P) ......................79
Kalibrierung ...............................................79
Daten aufnehmen (Abb. U) ............................. 79
Rotorschutz ........................................................ 80
Reinigung, Reparatur und Lagerung ............... 80
Rotorblätter austauschen (Abb. I) ...........80
Hinweise zur Entsorgung ................................. 80
Entsorgungsmaßnahmen Batterien/Akku .........81
Hinweise zur Garantie und
Serviceabwicklung ........................................... 81
Mögliche Fehler ................................................ 82
Obsah/Inhaltsverzeichnis

10
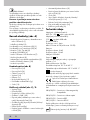
• Light (2k)
• Direction (fine tuning forwards/backwards/
left/right) (2l -2o)
• Record photo/video (2p)
• Battery compartment cover (2q)
• Battery compartment (2r)
Technical data
Energy supply for controls (battery):
4,5V (3x 1.5V) LR6 AA batteries
Energy supply for drive (storage battery):
3.7V Li-Polymer 850 mAh
Range: approx. 50m
Flying time: approx. 6 - 8 min
Micro-SD card: 4 GB (up to a maximum of
32 GB)
Camera:
Image resolution: 2 MP
Video resolution: 1.2 MP
USB charging cable:
Input: 5V 1A
Do not use a power supply unit with an output
current of more than1A
Radio frequency: 2.4 GHz
Operating temperature: 10°C to 45°C
Optimum storage temperature: 10°C to 25°C
= Protection Class II
This product may only be connected to appliances
of Protection Class II that carry this symbol.
Delta-Sport Handelskontor GmbH
hereby declares that this product con-
forms to the following fundamental requirements
and the other relevant conditions:
2014/30/EU – EMC Directive
2014/35/EU – LVD / Low Voltage Directive
2014/53/EU – Radio Equipment Directive (RED)
2011/65/EU – RoHS Directive
Full conformity declarations are available at
http://www.conformity.delta-sport.com/
Date of manufacture (month/year):
05/2017
Congratulations!
You have purchased a high quality product. Get
to know the product before using it for the first
time.
Read and carefully follow these instruc-
tions for use.
Only use the product as described and for the
prescribed areas of use.
Keep these instructions in a safe place. Pass all the
documentation to the third party if you transfer the
product to them.
Scope of delivery (figure A)
1 x Quadrocopter (with camera, storage battery,
and micro-SD card) (1)
1 x Remote control (2)
2 x Replacement rotor blades (marked A/B) (3)
2 x Replacement rotor blades (marked A/B) (4)
3 x Batteries (AA 1.5 V) (5)
1 x USB charger (6)
1 x Micro-SD card USB stick (7)
1 x Philips screwdriver (8)
1 x Storage battery (in the battery holder) (9)
1 x Micro-SD card (in the camera) (10)
1 x Instructions for use
Quadrocopter (figure B)
• Rotor blade A (1a)
• Rotor blade B (1b)
• Rotor guard (1c)
• On and off switch (1d)
• Camera (1e)
• Quadrocopter feet (1f)
• Battery holder (1g)
• Light (1h)
Remote control (figure C / D)
• On-off switch (2a)
• Control lamp (2b)
• Speed selection switch (2c)
• 360-degree turn (2d)
• Throttle lever (steer up/down/left/right) (2e)
• Joystick (forwards/backwards/left to the side/
right to the side) (2f)
• Non-head mode (2g)
• Rotation (fine tuning for right turn) (2h)
• Automatic return (2i)
• Rotation (fine tuning for left turn) (2j)
GB

11GB
Correct use
This product is designed as a toy for children from
14 years of age and only for use in the private,
domestic sector. This product may only be used in
suitable weather conditions and permitted areas.
For more detailed information, please see the
sections ‘safety notes’, ‘foreseeable misuse’, and
‘suitable flying environment’.
Symbols used
WARNING:
This signal word signifies a danger
with a moderate degree of risk that
can result in death or serious injury if
not avoided.
CAUTION:
This signal word signifies a danger
with a low degree of risk that can
result in slight or moderate injury if not
avoided.
PLEASE NOTE:
Further information for use of this
device!
Safety notes
WARNING: Not suitable for children
under the age of 14.
• Before initial use: read the user information
together with your child.
WARNING: The packaging/mounting
material is not a constituent part of the
product and must be removed for safety reasons
before the product is used.
• Please check whether the quadrocopter is
assembled in accordance with the instructions
for use.
• If you do not have adequate knowledge about
handling remote-controlled quadrocopters then
please consult an experienced model aircraft
operator or a model-building club.
WARNING: There is a risk of eye
injuries. Do not use the product close to
your face in order to avoid injury to your eyes.
• Make sure the weather conditions are suitable.
The product may not get wet.
• Check that the rotors are fixed correctly and
securely in place before each use.
• Do not operate the quadrocopter if it is dama-
ged.
• Do not undertake any conversions or modifica-
tions on the quadrocopter.
• Before each use please check that the quad-
rocopter and remote control function safely.
Check for visible damage such as defective
connections or damaged cables. All the moving
parts must function smoothly but must not
display any play in the bearing.
• Arrange for any damaged cables or connec-
tions to be exchanged by authorised specialist
personnel or the customer service department.
• Always switch the remote control on first.
Please ensure that the throttle is set to the lowest
position (motors off/throttle all the way back)
when you switch the remote control on! Only
then may the storage battery on the model be
connected and the quadrocopter switched on.
Otherwise the product may display unfore-
seeable reactions and the rotors could start
unintentionally!
• When the rotors are moving please ensure that
neither objects nor body parts are within the
turning or intake area of the rotors. Keep your
hands, face, hair, and loose clothing away from
the rotors. Do not touch moving parts.
• Disconnect the storage battery from the quad-
rocopter while carrying out maintenance and
cleaning work.
• Do not take any risks while operating the
quadrocopter! Your own safety and that of
your surroundings depend on your responsible
handling of the quadrocopter.
• Check the surroundings for causes of accidents,
for example candles, glass, or other potential
hazards such as domestic/farm animals or
children and move them out of the way. Keep a
distance of at least 5m.

12
• For indoor use an area of 6 x 4m must be
available. If this space is not available then the
quadrocopter may only be used outdoors.
For outdoor operation the product must be
flown within sight and at a maximum height of
100m. Keep a minimum distance of 5m.
• Do not fly the quadrocopter in areas where the
temperature can change rapidly, e.g. over a
fire or over areas of water.
• Select a suitable location (open area) to ope-
rate the quadrocopter. Avoid flying over and
keep at least 100m to the side of the following
areas: groups of people, sites of accidents,
disaster zones and other places where the
authorities and security organisations are
working, as well as above mobile facilities and
the troops of the German army in the course of
registered manoeuvres and exercises, conser-
vation areas, residential plots, industrial plants,
correctional facilities, psychiatric units, military
facilities and organisations, energy production
and distribution facilities, and facilities in which
activities are carried out that require permits
of protection level 4 in accordance with the
German Ordinance on Safety and Health
Protection at Workplaces Involving Biological
Agents unless the operator of the facility has
given express permission, hospitals, federal
highways, federal waterways, railway installati-
ons, and constitutional organs of where federal
or state authorities or diplomatic or consular
representatives as well as international organi-
sations within the meaning of international law
are headquartered as well as the properties of
the police and other security authorities.
Avoid flying over and keep at least 1.5km to
the side of the following areas: airports, control
zones for airfields, state or military buildings.
Local no-fly zones must be checked before
each flight.
• The areas for use of the drone are laid out
from laypersons to trained / instructed users.
Users with visual and/or hearing impediments
may only operate the quadrocopter without
limitations if accompanied by a supervisor(s).
Response capability must not be impeded
(tiredness or the influence of alcohol or medica-
tions could lead to incorrect reactions).
No further skills are required (e.g. training,
etc.). There are no limitations for persons of
different sexes or who are right or left-handed.
• Never fly the quadrocopter directly towards
persons, animals, or yourself.
• The motor, electronics, and storage battery can
heat up when operating the quadrocopter. For
this reason please take a break of 5-10 minutes
before you charge the storage battery again
or start again with any replacement storage
battery you may have.
• Incorrect operation can cause serious damage
to persons and property!
You must therefore ensure a sufficiently safe
distance from persons, animals, and objects
during flights.
• Always leave the remote control on while the
quadrocopter is in operation. Always discon-
nect the storage battery plug connection from
the quadrocopter plug connection first after lan-
ding. Only then should you switch the remote
control off.
• In the event of a defect or malfunction the
cause of the fault must be resolved before
starting the quadrocopter again.
• Do not subject the quadrocopter or the remote
control to direct sunlight or high heat over long
periods of time.
• The electronic gyro sensors could be damaged
or mistuned in the event of a serious crash
(for example from a great height). You must
therefore always check that it is fully functioning
before the next flight!
• Reduce the throttle to zero immediately
following a crash. Turning rotors could be da-
maged if they come into contact with obstacles
or the ground. They must be inspected for any
cracks or breakage before flying again!
• Pay attention to the light signals on the low
voltage indicator in order to prevent damage to
the quadrocopter from a crash caused by low
voltage or deep discharge (see the section ‘low
voltage warning’).
• Model aircraft and helicopters flown outdoors
need to be insured in some countries. Please
ask your private liability insurer and ensure that
your quadrocopter is included in this insurance.
GB

13
• Always respect the privacy of other persons
and animals around you. Do not film people
close up without first obtaining their permission.
Also please note that filming is not always per-
mitted everywhere. Follow the valid statutory
regulations.
Warning notes for the batteries/
storage battery!
GENERAL WARNING NOTES
• Always keep the batteries out of the reach of
children.
• Cleaning and user maintenance may not be
carried out by children without supervision.
• Clean the battery and device contacts with a
clean, dry cloth as needed.
• Do not subject the batteries to extreme condi-
tions (e.g. radiators or direct sunlight).
• Handle a damaged or leaking battery with
great care and dispose of it immediately in
accordance with regulations. Wear gloves.
• If you come into contact with battery acid then
wash the relevant area with soap and water.
If battery acid gets in your eyes then rinse with
water and immediately seek medical treatment!
• Batteries must not be swallowed! If this happens
please seek medical treatment immediately!
• Never throw the batteries or the storage battery
into the fire or place them on hot surfaces (e.g.
radiators or oven). Never open the casing or the
foil or short-circuit the contacts. There is a risk of
fire or explosion.
• Avoid outer mechanical effects (e.g. blows,
pointed objects, or crushing). There is a risk of
fire or explosion!
• Do not expose the batteries or the storage batte-
ries to temperatures under 10°C or over 45°C.
ADDITIONAL WARNING NOTES
FOR BATTERIES (REMOTE CONTROL)
• Only use batteries from the same manufacturer
and of the same type.
• Remove the batteries if they are empty or if you
are not going to use the product for a prolon-
ged period.
• New and used batteries may not be used
together.
• Exchange all the batteries at the same time.
• Non-rechargeable batteries may not be char-
ged.
• Warning: Batteries may not be charged or
reactivated by other means, dismantled, thrown
in the fire, or short-circuited. There is a risk of
fire or explosion!
• Pay attention to correct polarity (+/-) when
inserting the batteries.
• Dispose of used batteries in an order manner at
local authority collection points or at a retailer.
ADDITIONAL WARNING NOTES
FOR THE STORAGE BATTERIES
(QUADROCOPTER)
• Never charge storage batteries unattended.
• Rechargeable batteries may only be recharged
under adult supervision.
• Rechargeable batteries must be removed from
the product before they are charged.
• Never charge the storage battery immediately
after use. Always allow the storage battery to
cool down first (at least 5-10 minutes).
• The storage battery cannot be charged with
standard chargers because of the special sto-
rage battery plug connector.
• Only use the included USB charger cable to
charge the storage battery.
• Only charge intact and undamaged storage
batteries. If the outer insulation on the storage
battery becomes damaged or the storage
battery is deformed or swollen it must never be
charged. In this case there is an acute risk of fire
or explosion!
• As both the USB charger cable and the storage
battery heat up during the charging process,
please ensure sufficient ventilation. Never cover
the USB charger cable and the storage battery!
• Disconnect the storage battery from the USB
charger cable when it is completely charged.
• Never charge the storage battery while it is still
mounted on the quadrocopter, it could catch fire
and destroy it.
• Never charge and store storage batteries close
to large sources of heat or open fires as this
could result in a fire or explosion.
• Do not leave a storage battery unattended
during charging and pay attention to possible
overheating of the storage battery.
GB

14
• Never charge a storage battery if it is swollen
from overheating, fall, or being overcharged.
• Never charge a storage battery that is punc-
tured or damaged. Check the storage battery
very carefully for such damage following a fall.
If the storage battery is damaged then dispose
of it in accordance with the local regulations.
• If the storage battery burns while charging then
extinguish this kind of storage battery with a lot
of water.
• The USB charger cable may only be operated in
dry, enclosed indoor spaces. The USB charger
cable and storage battery may not become
damp or wet.
• Never short-circuit the terminals on the storage
battery. There is a risk of fire or explosion.
• Never transport storage batteries in trouser
pockets or bags. Look out for sharp or angular
objects that could damage your storage battery.
• If the storage battery is subjected to a heavy
blow, then store it for the next 30 minutes in a
very safe place (e.g. a metal box). Observe
whether the storage battery swells or overheats.
• Never try to manipulate, modify, or repair a
storage battery.
• Disconnect the storage battery from the
electronics on the quadrocopter after the flight.
Do not leave the storage battery connected to
the electronics when you are not using it (e.g.
during transportation or storage). Otherwise the
storage battery may become deep discharged.
This would destroy it and make it unusable!
There is also a risk of malfunction from disruptive
charges. The rotors may start unintentionally and
cause damage or injury.
• Never damage the outer case of the storage
battery. Do not cut through the foil cover. Do not
puncture the storage battery with sharp objects.
There is a risk of fire or explosion!
• Dispose of worn-out batteries properly at local
government collection points or at appropriate
retail outlets.
Foreseeable misuse
Please pay attention to avoidable misuse related
to the following points:
• Do not operate the product in unsuitable wea-
ther or environmental conditions (e.g. if it starts
raining or snowing, there is fog or at night).
• Do not operate the product in spaces that are
too small (6 x 4m) or when there are objects,
persons, or animals within a radius of 5m.
• Never fly over no-fly zones, prohibited areas,
or public facilities, and also observe side
distances (also see ‘safety notes’).
• Do not invade other people’s privacy (e.g. with
the camera functions).
• Do not give the product to persons under the
age of 14.
• Avoid attaching loads or making any modifica-
tions.
• Do not operate the product if parts are missing
or defect (e.g. following a collision or fall).
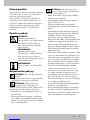
Inserting the batteries into the
remote control (figure D)
CAUTION! PLEASE PAY ATTENTION
TO THE FOLLOWING INSTRUC-
TIONS IN ORDER TO AVOID
MECHANICAL AND ELECTRICAL DAMAGE.
Insert the included batteries (5) into the battery
compartment (2r) of the remote control (2).
Inserting the batteries
1. Release the screw on the battery compartment
(2q) on the underside of the remote control
using a Philips screwdriver (8) and remove the
cover (2q).
2. Carefully insert three LR6 1.5V batteries (5)
into the battery compartment (2r). The batteries
must be entirely inside the battery compart-
ment.
CAUTION: Please pay attention to the
positive and negative poles on the
batteries (5) as shown on the underside of the
battery compartment (2r).
3. Screw the cover on the underside (2q) tightly
back in place.
Changing the batteries
CAUTION! Please pay attention to
the following instructions in order
to avoid mechanical and electrical
damage.
Change the batteries (5) as described for battery
insertion if the batteries stop working. Remove the
batteries (5) from the product before inserting the
new batteries (5).
GB

15
Removing the storage battery
(figure E)
Open the cover on the storage battery compart-
ment (1j) and remove the storage battery (9).
PLEASE NOTE: If the storage battery
connector plug (9a) (9b) is connected to the
quadrocopter (1), then you must release this from
the quadrocopter (1) before removing the storage
battery (9) .
Charging the storage battery
(figure F)
1. Remove the storage battery (9) from the
storage battery compartment (1i) on the qua-
drocopter (1).
WARNING: Never charge the storage
battery (9) while it is still mounted on the
quadrocopter (1), it could catch fire and destroy it.
Do not remove the outer case from the storage
battery (9). This serves to protect the storage
battery (9).
2. Connect the end of the cable (6a) on the USB
charger cable (6) to the storage battery plug
connector (9a) on the storage battery (9).
3. The charge control lamp on the USB charger
cable (6) switches on.
4. Insert the other end of the cable (6b) on the
USB charging cable (6) into a USB port on an
active computer or a charging station with USB
port.
5. The charge control lamp on the end of the
cable (6b) switches off.
PLEASE NOTE: The charging time is
approx. 90 - 100 minutes.
6. The charge control lamp switches on as soon
as the storage battery (9) is charged.
7. After charging disconnect the storage battery
plug connection (9a) from the end of the cable
(6a) on the USB charger cable (6) and pull
the end of the cable (6b) of the USB charging
cable (6) from the USB port.
8. Insert the storage battery (9) correctly into the
storage battery compartment (1i) (see ‘starting
to fly’).
Inserting the storage battery
1. Open the cover (1j) on the storage battery
compartment (1i) and insert the storage battery
(9).
2. Connect the storage battery plug connections
(9a) (9b) to the quadrocopter (1)
3. Close the storage battery compartment (1i)
completely.
Low voltage warning
The lights (1h) begin to flash when the storage
battery (9) is almost empty. Land the quadro-
copter (1) as soon as you notice this.
Setting the camera (figure G)
The camera (1e) is secured under the quadrocopter
(1). Turn the wheel on the camera up or down in
order to move the position of the camera lens.
PLEASE NOTE: The camera (1e) features
a small status LED. In order to provide gre-
ater visibility, camera functions are also displayed
via the LED’s on the Quadrocopter (1).
Transferring data (figure H)
The recorded photos and films are saved on the
micro-SD card (10). Proceed as follows in order to
transfer the data on a computer to a device with
an USB port (for example a television):
1. The micro-SD card (10) is in the camera (1e).
Press on the micro-SD card (10) and remove it
from the camera (1e).
2. Push the micro-SD card (10) all the way into the
micro-SD card USB stick (7) as shown in figure H.
PLEASE NOTE: Make sure that the
micro-SD card (10) is inserted correctly.
It must disappear completely into the micro-SD
card USB stick (7).
3. Insert the micro-SD card USB stick (7) into the
USB port of a computer.
4. The computer recognises the micro-SD card
USB stick (7) and you can copy the data onto
the computer.
GB

16
Suitable flying environment
Surroundings for optimal flight should fulfil the
following criteria:
• An almost wind-still environment up to wind
force 3.
• Check local weather reports ahead of the flight
for current and upcoming conditions.
• People must maintain a safety distance of 5m
from the quadrocopter at the start.
• Observe obstacles prior to the flight and
remove them or keep a corresponding distance
away from them (>5m).
• Observe the surroundings with regard to chan-
ging situations such as passers by, cyclists, or
traffic/vehicles.
• Look for a large, open, and broad area without
obstacles and pay particular attention to buil-
dings, groups of people, high-voltage lines, and
trees.
• For aerobatics, e.g. loop the loops, there
should be approximately 10m space in all
directions.
• Make sure the surroundings are dry and there
is no precipitations. Do not fly in bad or damp
weather conditions (e.g. while snow is falling,
in fog, or at night). Only operate the quadro-
copter in clear and settled conditions.
• The operating temperature must be between
10° and 45°C.
• Please comply with any restrictions contained
within the relevant ordinance regarding areas
where the use of drones is forbidden (see
section “Safety information”).
Flight preparation
Please pay attention to the following before begin-
ning to fly the quadrocopter (1):
1. To start always place the quadrocopter (1) on
a level surface.
PLEASE NOTE: The camera lens is equiva-
lent to the front side of the quadrocopters (1).
2. Always move the throttle (2e) and the joystick
(2f) slowly, carefully, and gently.
3. Always watch the quadrocopter (1) during the
flight!
CAUTION: Always keep the
quadrocopter in sight during flight
operations!
4. Do not hang loads on the quadrocopter (1).
CAUTION: Check the rotor guard (1c)
before each flight (figure B) to make sure it
is secured correctly and is in perfect condition.
Otherwise there is a risk that the rotor blades
(1a), (1b) will become damaged during the flight
and may therefore cause injury.
Privacy
Always respect the privacy of other persons and
animals around you. Do not film people close
up without first obtaining their permission. Also
please note that filming is not always permitted
everywhere. Follow the valid statutory regulations.
Starting to fly and steering the
quadrocopter
Here are a few tips on steering the quadrocopter
(1) before you start to fly:
• Move the throttle (2e) downwards slightly as
soon as the quadrocopter (1) lifts off.
• Move the throttle (2e) upwards slightly if the
quadrocopter (1) dips.
• Tap the joystick (2f) very gently in the desired
direction in order to fly in a curve.
During the flight pay attention foreseeable misuse
through:
• Sudden changes in the weather conditions
• Sudden changes in wind conditions (gusts of
wind)
• Loss of visual range
• Direct sunlight (overheating, limitation of vision
with loss of flight control).
Starting to fly (figure J)
1. Use the switch (1d) (OFF) to turn off the
Quadrocopter (1).
2. Set the throttle (2e) to the back.
3. Press the on-off switch (2a) on the remote control
(2) (figure J). The control lamp (2b) will flash.
PLEASE NOTE: Always switch the remote
control (2) on first. Make sure that the throttle
(2e) is set to its lowest position (motors off / throttle
all the way back) when you switch the remote
control (2)!
GB

17
Only then can the storage battery (9) on the
model be connected.
Otherwise the product may react in unforeseen
ways and the rotors (1a), (1b) could start uninten-
tionally!
4. Insert the voltage regulating cable (9b) into the
correct quadrocopter plug connection.
5. Connect the storage battery plug connector
(9a) to the quadrocopter plug connector.
6. Set the on-off switch (1d) to ON (figure J).
The control lamps (1h) on the quadrocopter
(1) light and a signal tone is sounded on the
remote control (2).
7. Push the throttle (2e) all the way forwards and
then all the way backwards.
PLEASE NOTE: This process produces a
contact between the quadrocopter (1) and
the remote control (2). If the throttle (2e) is not first
moved forwards and then backwards the quadro-
copter (1) remains locked and cannot be flown.
Signal tones will sound from the remote control
(2). The control lamps (1h) on the quadrocopter
(1) will light constantly. The quadrocopter (1) is
now ready to fly.
Steering the quadrocopter
You have different steering options:
• Upwards/downwards (throttle)
(figure K)
Moving the throttle (2e) forwards increases the
speed of the rotors (1a), (1b). The quadro-
copter (1) begins to rise. Moving the throttle
(2e) backwards reduces the speed of the rotors
(1a), (1b). The quadrocopter (1) begins to
descend.
• Turn left/right (yaw) (figure L)
Moving the throttle (2e) to the left or right turns
the quadrocopter (1) around its vertical axis,
i.e. the quadrocopter (1) rotates to the left or
right. The further you move the throttle (2e) the
faster it rotates.
• Move forwards or backwards (pitch)
(figure M)
Moving the right joystick (2f) forwards or
backward makes the quadrocopter (1) fly
backwards or forwards. The further you steer
the joystick (2f) in the corresponding direction
the faster the quadrocopter will fly (1).
• Hovering left or right (Roll) (figure N)
If you want to perform a movement to the
left or right without turning the quadrocopter
(1), i.e. hover to the side, then move the right
joystick (2f) to the left or right. The further you
steer the joystick (2f), the faster the sideways
movement will be.
• Turning (yaw trimming) (figure Q)
If you want to turn the quadrocopter (1) around
its own axis without moving the joystick (2f)
then this can be corrected using yaw trimming.
If the quadrocopter (1) is turning clockwise
then press the yaw trim button to the left (2j)
and if anti-clockwise then press the trim button
to the right (2h). This is how you counter
unwanted yaw movements by trimming in the
opposite direction.
• Direction (roll and pitch trimming)
(figure R)
If there is forwards and backwards movement
even though you are not using the joystick (2f)
then you can correct this with pitch trimming.
If the quadrocopter (1) is flying forwards then
press the pitch trim button (2n) backwards
and vice versa (2l). You are countering the
unwanted movement with the trim setting. If
the quadrocopter (1) is moving sideways of its
own accord then you can correct this using roll
trimming. If the quadrocopter (1) is hovering
sideways to the left then press the trim button
(2m) to the right and vice versa (2o). You are
thus countering the unwanted movement.
• Automatic return to the pilot (figure S)
Press the button (2i) if you want the quadro-
copter to reverse its route.
PLEASE NOTE: The reverse route may
change because of the quadrocopter
turning.
• Light (figure T)
Press the button (2k) to turn the light on and off.
GB

18
• Non-head mode
This is a flying aid that always makes the
quadrocopter (1) fly in the instructed direction
as soon as it is activated and it is recommen-
ded for pilots with little flying experience. For
example the quadrocopter (1) always flies right
from the pilot’s point of view if you press the
button (2g) on the non-head mode and steer to
the right with the joystick (2f) – whether or not
the front of the quadrocopter (1) (camera lens)
is pointing backwards, to the left, forwards, or
to the right. If this mode is de-activated then the
quadrocopter (1) flies in the direction in which
the front (camera lens) is pointing (even if the
quadrocopter (1) has changed direction).
PLEASE NOTE: The remote control (2)
and the quadrocopter (1) must be aligned
exactly the same way when the non-head mode is
activated! Only activate the non-head mode in the
given position or the controls may not be carried
out correctly.
1. In order to activate the non-head mode place
the quadrocopter (1) and the remote control
(2) behind one another and press the button
(2g) on the remote control (2). The lights will
flash for as long as the mode is active.
2. Press the button (2g) again in order to de-acti-
vate the mode. The lights will be on constantly
again.
Setting the speed (figure O)
You can set the flight speeds on the remote control
(2) by repeatedly pressing the button (2c). The
basic setting is speed 1 of a total of 3 speeds
Speed 1 (beeps once)
For first attempts and little flying experience.
Speed 2 (beeps twice)
For pilots with initial flying experience.
Speed 3 (beeps three times)
For very experienced pilots.
PLEASE NOTE: If the remote control is
switched off and on again then the quadro-
copter (1) will be back at speed 1.
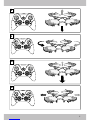
360° rollover (figure P)
1. Steer the quadrocopter (1) to a height of
approx. 4m.
2. Keep it hovering and push the button (2d).
A signal tone will sound.
3. Move the joystick (2f) in a flying direction of
the rollover.
4. The quadrocopter (1) will perform a 360°
rollover.
After the rollover the quadrocopter (1) is in nor-
mal flying mode and you can repeat the rollover.
To do this repeat steps 1-4.
Press the button again if you decide not to
perform a rollover but have already pressed the
button.
CAUTION: You need sufficient height in
order to perform a 360° rollover (at least
10 m).
Calibration
It is possible that the quadrocopter may fly in an
uncontrolled manner and needs to be calibrated.
Proceed as follows:
1. Switch the quadrocopter (1) on and place it on
a level, horizontal surface.
2. Switch the remote control (2) on and simultane-
ously push the throttle (2e) backwards and to
the left and the joystick (2f) backwards and to
the right. The control lamps (1h) on the quadro-
copter (1) will flash for approx. 3 seconds.
As soon as the control lamps (1h) light
constantly the calibration is complete and the
quadrocopter is ready to fly.
PLEASE NOTE: Repeat the calibration if
the quadrocopter still flies in one direction
in an uncontrolled manner.
Recording data (figure U)
You can record images or videos with the camera.
PLEASE NOTE: Remove the protective film
from the lens prior to initial use.
Photo
1. Press once on the OK button (2p).
2. A signal tone will sound and the LED lights (1h)
on the quadrocopter (1) will go off briefly. The
camera (1e) has taken a photo.
Video
1. Hold the OK button (2p) down for approx.
3 seconds.
GB

19
2. A signal tone will sound and the LED lights (1h)
on the quadrocopter (1) will flash. The camera
is now filming (1e).
3. Press the OK button in order to stop recording
with the camera (1e). A signal tone will sound
as confirmation and the LED lights on the qua-
drocopter (1) will be on constantly.
End the flight
Switch the quadrocopter (1) off correctly after it
has landed safety.
1. Switch the on-off button (1d) to OFF.
2. Switch the on-off button (2a) on the remote
control (2) off.
3. Remove the storage battery (9) (see ‘removing
the storage battery’).
Rotor guard
The rotor guards (1c) serve to prevent injuries
(e.g. cuts, injury to skin or eyes) and for protection
against or during collisions. They are fixed in
place. If a rotor guard becomes loose please re-
tighten the screws and check the functioning and
correct position of the rotor guards (1c).
WARNING: Never operate the
quadrocopter (1) without the rotor guard
(1c)! Do not remove the rotor guard (1c)
arbitrarily to avoid putting yourself and/or other
persons or animals at risk!
Cleaning, repair, and storage
CAUTION: The on-off switch (1d) on
the quadrocopter must be OFF
prior to any work and the storage
battery (9) must be removed.
The quadrocopter (1) must always be kept dry
and must be freed of any soiling such as wool
threads, hairs, dust, etc. after every flight.
Use a dry cloth to clean the product and avoid
contact of the electronics, storage battery, and
motors with water.
Store the quadrocopter (1) in a dry and dust-free
place without direct sunlight. The optimum storage
temperature is between 10°C and 25°C.
Disconnect the storage battery plug connection
(9a/9b) from the charger cable (6) when not
in use. Remove the batteries (5) from the remote
control.
Changing the rotor blades (figure I)
Change the rotor blades (3), (4) as soon as they
are damaged
PLEASE NOTE:
There are two different types of rotor blades
(3), (4). The rotor blades (3) are right-turning
and the rotor blades (4) are left-turning. They are
shown here with a grey background for clarity.
Both types have markings on the undersides
(A and B) and these must be noted when chan-
ging blades and must correspond to the markings
on the quadrocopter (1).
WARNING: If the rotor blades (3), (4)
are damaged there is a risk that materials
will come loose during use and will damage or
represent a hazard to the surroundings.
To change a rotor blade (3), (4) proceed as
follows:
1. Use a Philips screwdriver (8) to release and
remove the screw on the rotor blade (3), (4)
that you wish to change.
2. Pull the broken rotor blade off (3), (4) from the
quadrocopter (1).
3. Place the new rotor blade (3), (4) into the
position of the broken rotor blade (3), (4).
4. Screw the new rotor blade (3), (4) onto the
quadrocopter (1) with the screw.
CAUTION: Always place the rotor
blades marked A on the rotor
blades marked A. Place the rotor blades
marked B on the rotor arms marked B.
Notes on disposal
Dispose of the product and the packaging materi-
als in accordance with the current local regulati-
ons. Packaging materials such as foil bags must
be kept away from children. Keep the packaging
material out of the reach of children.
Devices that are marked with this symbol
should not be disposed of in domestic waste.
You are obliged to dispose of this kind of
used electrical and electronic devices separately.
Please ask your local authority about options for
regulated disposal. Remove the batteries/storage
battery from the product prior to disposal.
GB

20
Disposal measures for the bat-
teries/storage battery
Please note: Batteries/storage batteries
are hazardous waste and may not, by law,
be disposed of with domestic waste. You
can deposit used batteries/storage batteries at
local authority collection points or your retailer
free of charge. Special collection containers are
available there.
Notes on the guarantee and
service handling
The product was produced with great care and
under constant supervision. You receive a three-
year warranty for this product from the date of
purchase. Please retain your receipt.
The warranty applies only to material and work-
manship and does not apply to misuse or impro-
per handling. Your statutory rights, especially the
warranty rights, are not affected by this warranty.
With regard to complaints, please contact the
following service hotline or contact us by e-mail.
Our service employees will advise as to the subse-
quent procedure as quickly as possible.
We will be personally available to discuss the
situation with you.
Any repairs under the warranty, statutory gua-
rantees or through goodwill do not extend the
warranty period. This also applies to replaced
and repaired parts. Repairs after the warranty are
subject to a charge.
IAN: 284749
Service Great Britain
Tel.: 0871 5000 720
(£ 0.10/Min.)
GB

21GB
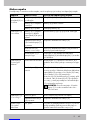
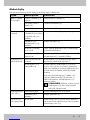
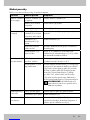
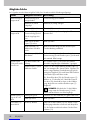
Possible faults
Possible faults, their causes and the resolution are described in the following.
Fault Possible cause Resolution
Remote control (2)
is not responding.
Remote control (2) is
switched off.
Switch remote control (2) on.
Batteries (5) are inserted
incorrectly.
Insert batteries (5) correctly.
Batteries (5) are empty. Change batteries (5).
Quadrocopter (1)
is not responding.
The batteries (5) in the
remote control (2) have
been inserted incorrectly
or are empty.
Check the batteries (5) and change them if
necessary.
Storage battery (9) in
the quadrocopter (1) is
empty.
Charge the storage battery (9).
Control lamps (1h) are
not flashing or not on.
Connect the remote control plug connector (9a) to
the quadrocopter plug connection.
Quadrocopter (1) out of
range.
Make sure that the distance between the remote
control (2) and the quadrocopter (1) is not more
than 50 m.
Quadrocopter (1)
is uncontrollable.
Wind or draught is too
strong.
The quadrocopter (1) is only suitable for almost
wind-still conditions up to wind force 3.
Quadrocopter (1) needs
calibrating.
Switch the quadrocopter (1) on and place it on a
level, smooth surface. Switch the remote control (2)
on and simultaneously push the throttle backwards
and to the left and the joystick (2f) backwards and
to the right.
The control lamps (1h) on the quadrocopter (1) will
flash for approx. 3 seconds. As soon as the control
lamps (1h) are lit constantly the calibration is com-
plete and the quadrocopter (1) is ready to fly.
PLEASE NOTE: Repeat the calibration if the
quadrocopter (1) continues to fly uncontrolla-
bly in one direction.
Quadrocopter
(1) is not flying
upwards.
Not enough throttle. Push the throttle (2e) all the way forwards.
Storage battery (9) is
empty.
Charge the storage battery (9).
Rotor guard (1c) is
not secure
Collision, crash If a rotor guard (1c) becomes loose then please
tighten the screws again and check the functioning
and correct position of the rotor guard (1c).

22
• rotáció (jobbra forgatás finomhangolása) (2h)
• automata visszatérés (2i)
• rotáció (balra forgatás finomhangolása) (2j)
• lámpa (2k)
• irány (előre/vissza/balra/jobbra) (2l -2o)
• fotó/videó felvétel (2p)
• tetőt (2q)
• elemtartó rekeszébe (2r)
Műszaki adatok
Távirányító energiaellátása (elem):
4,5 V (3 x 1,5 V) AA típusú elem, LR6
Hajtás energiaellátása (akkumulátor):
3,7V Li-polimer 850 mAh
Hatósugár: kb. 50 m
Repülési idő: kb. 6-8 perc
Micro-SD kártya: 4 GB (max. 32 GB)
Kamera:
Fotófelbontás: 2 MP
Videófelbontás: 1,2 MP
USB töltőkábel:
Bemenet 5V 1 A
Ne használjon >1 A kimenő áramú tápegységet
Rádiófrekvencia: 2,4 GHz
Üzemi hőmérséklet: 10°C-45°C
Optimális tárolási hőmérséklet: 10°C-25°C
= védelmi osztály: II
A termék csak II. védelmi osztályú olyan kés-
zülékekre csatlakoztatható, amelyeken megtalál-
ható ez a jel.
A Delta-Sport Handelskontor GmbH kije
lenti, hogy a termék megfelel az alábbi
általános követelményeknek és az egyéb vonatko-
zó rendelkezéseknek:
2014/30/EU – Elektromágneses összeférhetőségi
irányelv
2014/35/EU – LVD/alacsony feszültségi irányelv
2014/53/EU – RRED irányelv
2011/65/EU – ROHS irányelv
A teljes megfelelőségi nyilatkozat a következő
címen kapható meg: http://www.conformity.delta-
sport.com/
Gyártási dátum (év/hónap): 2017/05
Szeretettel gratulálunk!
Vásárlásával kiváló minőségű terméket választott.
Üzembe helyezése előtt tanulmányozza át a
terméket.
Figyelmesen olvassa el és kövesse ehhez
az alábbi használati útmutatót.
Csak az ismertetés szerint és a megadott alkalma-
zási területeken használja a terméket.
Gondosan őrizze meg az útmutatót. Továbba-
dásakor mellékelje hozzá az összes dokumentu-
mot.
Szállítási tartalom
(A ábra)
1 x quadrocopter (kamerával, akkumulátorral és
Micro-SD kártyával) (1)
1 x távirányító (2)
2 x tartalék rotor (elnevezés: A/B) (3)
2 x tartalék rotor (elnevezés: A/B) (4)
3 x elem (1,5 V, AA típus) (5)
1 x USB töltőkábel (6)
1 x Micro-SD kártyák pendrive (7)
1 x keresztnyílású csavarhúzó (8)
1 x akkumulátor (a rekeszben) (9)
1 x Micro-SD kártya (a kamerában) (10)
1 x használati útmutató
Quadrocopter (B ábra)
• rotorlapát A (1a)
• rotorlapát B (1b)
• rotorvédő (1c)
• be-/kikapcsoló (1d)
• kamera (1e)
• quadrocopter lábak (1f)
• akkumulátor tartórekesz (1g)
• lámpa (1h)
• tetejét (1i)
Távirányító (C / D ábra)
• be-/kikapcsoló (2a)
• ellenőrző lámpa (2b)
• sebességválasztó kapcsoló (2c)
• 360 fokos forgató (2d)
• Gázkar (Vezérlés felfelé/ lefelé/ jobbra/balra
(2e)
• irányító kar (előre/vissza/balra oldalra/
jobbra oldalra) (2f)
• non-head mód (2g)
HU
Seite wird geladen ...
Seite wird geladen ...
Seite wird geladen ...
Seite wird geladen ...
Seite wird geladen ...
Seite wird geladen ...
Seite wird geladen ...
Seite wird geladen ...
Seite wird geladen ...
Seite wird geladen ...
Seite wird geladen ...
Seite wird geladen ...
Seite wird geladen ...
Seite wird geladen ...
Seite wird geladen ...
Seite wird geladen ...
Seite wird geladen ...
Seite wird geladen ...
Seite wird geladen ...
Seite wird geladen ...
Seite wird geladen ...
Seite wird geladen ...
Seite wird geladen ...
Seite wird geladen ...
Seite wird geladen ...
Seite wird geladen ...
Seite wird geladen ...
Seite wird geladen ...
Seite wird geladen ...
Seite wird geladen ...
Seite wird geladen ...
Seite wird geladen ...
Seite wird geladen ...
Seite wird geladen ...
Seite wird geladen ...
Seite wird geladen ...
Seite wird geladen ...
Seite wird geladen ...
Seite wird geladen ...
Seite wird geladen ...
Seite wird geladen ...
Seite wird geladen ...
Seite wird geladen ...
Seite wird geladen ...
Seite wird geladen ...
Seite wird geladen ...
Seite wird geladen ...
Seite wird geladen ...
Seite wird geladen ...
Seite wird geladen ...
Seite wird geladen ...
Seite wird geladen ...
Seite wird geladen ...
Seite wird geladen ...
Seite wird geladen ...
Seite wird geladen ...
Seite wird geladen ...
Seite wird geladen ...
Seite wird geladen ...
Seite wird geladen ...
-
 1
1
-
 2
2
-
 3
3
-
 4
4
-
 5
5
-
 6
6
-
 7
7
-
 8
8
-
 9
9
-
 10
10
-
 11
11
-
 12
12
-
 13
13
-
 14
14
-
 15
15
-
 16
16
-
 17
17
-
 18
18
-
 19
19
-
 20
20
-
 21
21
-
 22
22
-
 23
23
-
 24
24
-
 25
25
-
 26
26
-
 27
27
-
 28
28
-
 29
29
-
 30
30
-
 31
31
-
 32
32
-
 33
33
-
 34
34
-
 35
35
-
 36
36
-
 37
37
-
 38
38
-
 39
39
-
 40
40
-
 41
41
-
 42
42
-
 43
43
-
 44
44
-
 45
45
-
 46
46
-
 47
47
-
 48
48
-
 49
49
-
 50
50
-
 51
51
-
 52
52
-
 53
53
-
 54
54
-
 55
55
-
 56
56
-
 57
57
-
 58
58
-
 59
59
-
 60
60
-
 61
61
-
 62
62
-
 63
63
-
 64
64
-
 65
65
-
 66
66
-
 67
67
-
 68
68
-
 69
69
-
 70
70
-
 71
71
-
 72
72
-
 73
73
-
 74
74
-
 75
75
-
 76
76
-
 77
77
-
 78
78
-
 79
79
-
 80
80


DELTA-SPORT QK-3045 Instructions For Use Manual
- Typ
- Instructions For Use Manual
in anderen Sprachen
- slovenčina: DELTA-SPORT QK-3045
Verwandte Artikel
Andere Dokumente
-
Kompernass QC 360 A1 Operating Instructions Manual
-
 Reely 1719347 Bedienungsanleitung
-
 Reely 1998713 Bedienungsanleitung
-
Revell RAYVORE Benutzerhandbuch
-
-
XciteRC 15008000 Bedienungsanleitung
-
 Reely 1642420 Bedienungsanleitung
-
Reely 2250245 Benutzerhandbuch
-
LRP H4 Gravit Micro Benutzerhandbuch
-
 Reely Sky Roller Operating Instructions Manual


