Lenco CR-16 Bedienungsanleitung
- Kategorie
- Wecker
- Typ
- Bedienungsanleitung
Dieses Handbuch ist auch geeignet für

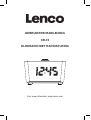
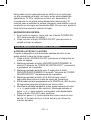
USER’S MANUAL
CR-16
CLOCK RADIO WITH AUTOMATIC TIME
CONTROL
For more information: www.lenco.com

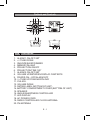
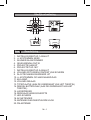
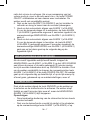
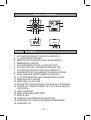
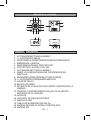
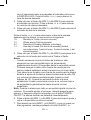
Outlook and Controls
Item Description
1. ALARM 1 ON-OFF SET
2. << TUNE DOWN
3. SNOOZE/SLEEP/DIMMER
4. MEMORY/M+/NAP
5. PROJECTION ON/OFF
6. PROJECTION TIME 180°
7. ALARM 2 ON-OFF SET
8. VOLUME UP/BETWEEN DISPLAY CONTENTS
9. POWER ON – OFF/ALARM OFF
10. >> TUNE UP/YEAR-MONTH-DAY
11. CLK.ADJ.
12. VOLUME DOWN
13. RATING LABEL (BOTTOM OF UNIT)
14. BATTERY COMPARTMENT COVER (BOTTOM OF UNIT)
15. SPEAKER
16. ANGLE/SHARPNESS CONTROLLER
17. LED DISPLAY
18. AC POWER CORD
19. RADIO CONTROLLED CLOCK ANTENNA
20. FM ANTENNA
E - 1

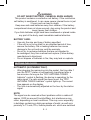
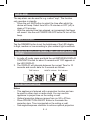
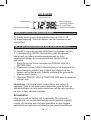
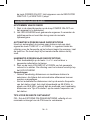
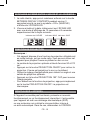
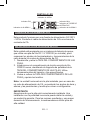
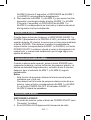
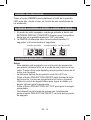
LED DISPLAY
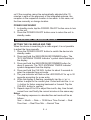
POWER CONNECTION
This product operates on AC230V~ 50Hz power supply. Plug the
AC power cord into a household outlet AC source.
INSTALLING/REPLACING THE BACK-UP BATTERY
This unit is equipped with a battery back-up system, requiring one
DC3V CR2032 lithium battery (not included) to maintain the time/
calendar settings and radio presets during AC power outage.
1. Unscrew and remove the BATTERY COMPARTMENT
COVER.
2. Install one fresh CR2032 lithium battery into the battery
compartment following the polarity diagram on the BATTERY
COMPARTMENTCOVER.Useonlythespeciedsizeand
type of battery.
3. Replace the BATTERY COMPARTMENT COVER and tighten
its screw.
Note: The unit will operate without a battery installed but your time
& alarm setting and radio presets will be lost and will have to be
reset in the event of power interruption or failure.
IMPORTANT:
Be sure that the battery is installed correctly. Wrong polarity may
damage the unit and void the warranty. For best performance and
longer operating time, we recommend the use of a good quality
battery.
MHz Indicator
RCC ANTENNA
TOWER Indicator
ALARM 2 Indicator
PM Indicator
ALARM 1 Indicator
TIME Indicator
E - 2

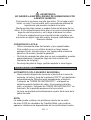
WARNING
DO NOT INGEST BATTERY, CHEMICAL BURN HAZARD
This product contains a coin/button cell battery. If the coin/button
cell battery is swallowed, it can cause severe internal burns in just
2 hours and can lead to death.
Keep new and used batteries away from children. If the battery
compartment does not close securely, stop using the product and
keep it away from children.
If you think batteries might have been swallowed or placed inside
any part of the body, seek immediate medical attention.
BATTERY CARE:
- Useonlythesizeandtypeofbatteryspecied.
- If the unit is not to be used for an extended period of time,
remove the battery. Old or leaking batteries can cause
damage to the unit and may void the warranty.
- Do not try to recharge batteries that are not intended to
be recharged; they can overheat and rupture (Follow battery
manufacturer’s directions).
- Donotdisposeofbatteriesinre;theymayleakorexplode.
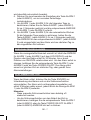
SETTING THE CLOCK
AUTOMATIC (IN STANDBY ONLY)
- After plugging the mains plug into the socket, the time date f
rom the DCF77 station is automatically transferred after a
few minutes. As long as the “RCC ANTENNA TOWER
Indicator”symbolisashing,thedeviceissearchingforthe
radio signal. If a radio signal has been found, the “RCC
ANTENNA TOWER Indicator” symbol lights up. The correct
time appears on the display.
- The time is automatically adjusted on the hour by the station
signal.
NOTE:
The signal can be received without problems within a radius off
approx. 2000 km around Frankfurt/Main, but interference may
occur, depending on local conditions. This may occur especially
in buildings containing a high percentage of metal, as well as in
proximity to TV sets, PCs, mobile phones etc. which are switched
E - 3

on! If the reception cannot be automatically adjusted after 10
minutes in spite of the alignment of the integrated antenna, the
reception in the respective location is too weak. In this case, set
the time manually or change location.
POWER ON/STANDBY
1. In standby mode, tap the POWER ON-OFF button once to turn
on the unit.
2. Press the POWER ON-OFF button once to return the unit to
standby mode.
CALENDAR AND TIME MANUAL SETTING
SETTING THE CALENDAR AND TIME
When the device is searching for a radio signal, it is not possible
to adjust the time manually.
1. Press the POWER ON-OFF button to switch the device into
standby mode.
2. Press and hold the SNOOZE/SLEEP/DIMMER button. The
“RCCANTENNATOWERIndicator”symbolstartsashingin
the display.
3. Press and hold the SNOOZE/SLEEP/DIMMER button for
about 2 seconds. The “RCC ANTENNA TOWER Indicator”
symbol disappears from the display.
4. Press and hold the CLK.ADJ. button for about 2 seconds to
enter the calendar/time set mode.
5. TheyearindicatorwillashontheLEDDISPLAYforupto30
seconds prompting for a new entry.
6. Whilethedisplayisashing,repeatedlytapthe<<or>>
button to adjust to the correct year. Press and hold the << or
>> button for faster scanning backward or forward. Tap the
CLK.ADJ.buttontoconrm.
7. Repeat steps #2 to #3 to adjust the month, day, time format,
currenthourandnallythecurrentminutesinthesameway.
Notes:
- The display sequence in calendar/time set mode will be as
follows:
Year→Month→Date→12/24HourTimeFormat→Real
TimeHour→RealTimeMin→NormalTime
E - 4

- To check the year while the current time is displayed, tap the
YEAR-MONTH-DAY button once. The LED DISPLAY will
change to the year display for 5 seconds and then revert to the
current time automatically.
- To check the date while the current time is displayed, tap the
YEAR-MONTH-DAY button twice. The LED DISPLAY will
change to the date display for 5 seconds and then revert to the
current time automatically.
- During the time set, if no button is being pressed within 10
seconds, the current display time will be automatically stored.
- Make sure the hour is set so that the PM indicator is displayed
correctly for afternoon/night times.
ALARM SETTING
SETTING THE ALARMS (ALARM 1 and ALARM 2)
You can select either a Beeper Alarm or the FM Radio as the
alarm source. Be sure to observe the PM indicator when setting
the alarm to make sure the alarm time is set correctly for AM or
PM. If the PM Indicator is ‘On’, the alarm time will be afternoon/
night time. The setting sequence for ALARM 1 is as follows:
NormalTime→AL1Hour→AL1Minute→AL1Weekday→AL1
Beeper→AL1Radio→AL1nalradiovolume→NormalTime
1. In standby mode, tap the ALARM 1 (or ALARM 2) button to
show the preset alarm time.
2. Press and hold the ALARM 1 (or ALARM 2) button again for
about 2 seconds until the Hour Indicator on the LED DISPLAY
ashes.Pressthe<<or>>buttontoobtainthedesiredAlarm
Hour.
3. Tap the ALARM 1 (or ALARM 2) button again to advance
to the Minute Indicator. Press the << or >> button to obtain the
desired Alarm Minutes.
4. Tap the ALARM 1 (or ALARM 2) button again to advance to
the Weekday Indicator.
Press the << or >> button to select the desired Alarm Weekday
mode as follows:
1-5 : Monday to Friday
1-7 : Whole week
E - 5

6-7 : Saturday & Sunday
1-1 : One day of week (you need to further select 1 for
Monday, 2 for Tuesday and so on)
5. Tap the ALARM 1 (or ALARM 2) button again to advance to
select the Alarm source between Beeper or Radio.
Notes:
- When the Beeper alarm begins, it will sound at a lower
beeping rate and gradually increase to the normal rate within
30 seconds.
- If you want to choose the radio as the alarm source, you need
tosettheradiotoyourdesiredradiostationinradiomoderst.
- After selecting the Radio as the alarm source during alarm
setting, you need to select FM radio and the preset alarm
volume level (up to maximum level 15). When the radio is
turned ‘On’ at the preset alarm time, the radio will begin to
sound at a low volume and gradually increases to the preset
volume level.
Note: it is not possible to adjust the volume level during the radio
alarm. If volume adjustment is needed, you must turn ‘Off’ the
radiorst,andthenturnit‘On’againusingthePOWERON-OFF
button. The alarm will also be stopped immediately.
6. PresstheALARM1(orALARM2)buttontonishsettingand
exit to normal time display.
7. To disable ALARM 1 (or ALARM 2) from automatically
sounding on the upcoming days, press and hold the ALARM
1 (or ALARM 2) button for about 2 seconds, the corresponding
ALARM 1 (or ALARM 2) INDICATOR will go off.
8. To resume ALARM 1 (or ALARM 2) from automatically
sounding on the upcoming days, press and hold the ALARM
1 (or ALARM 2) button for about 2 seconds, the corresponding
ALARM 1 (or ALARM 2) INDICATOR will turn on and the alarm
will sound the following day at the set time.
TURNING OFF THE ALARM
When the preset alarm time is reached, the ALARM 1 (or ALARM
2)INDICATORwillashontheLEDDISPLAYandthebeeper
alarm or radio will sound for 30 minutes unless interrupted
by pressing SNOOZE. To stop the alarm immediately, tap the
corresponding ALARM 1 (or ALARM 2) button or POWER ON-
E - 6

OFF button. The alarm will ring again at the same alarm time
on the following day, or when set to go off based on your Alarm
settings.
SNOOZE FUNCTION
When the alarm source is sounding, press the SNOOZE button to
suspend the alarm and activate the snooze function. The Alarm
will temporarily stop and sound again 9 minutes later but the
ALARM1(orALARM2)indicatorwillkeepashing.
Notes:
- This manual snooze operation can be repeated again and
again.
- To turn off the snooze function before it ends, tap the
corresponding ALARM 1 (or ALARM 2) button or the POWER
ON-OFF button. The ALARM 1 (or ALARM 2) INDICATOR will
stopashing.
LISTENING TO THE RADIO
RADIO TUNING
1. In standby mode, tap the POWER ON-OFF button to turn the
unit “On”.
2. The LED DISPLAY will show the radio frequency for about 5
seconds and then revert to normal time display.
AUTOMATIC SEARCH FOR RADIO STATIONS
To automatically search for stations with strong signals, press and
hold the TUNE UP >> or DOWN << button until the frequency
readout on the display begins to scan. Release the button. The
tunerwillstopontherststrongstationitnds.
MANUAL SEARCH FOR RADIO STATIONS
1. Tap the << or >> button repeatedly to choose your desired
radio station.
2. Tap the VOLUME UP or DOWN button to set the desired
volume level. The volume level reading will appear in the LED
DISPLAY.
Notes:
- Use manual tuning to select weaker stations that might be
E - 7

skipped during automatic tuning.
- If the automatic tuning does not stop on the exact frequency
of the station, for example, it stops on 88.9 MHz instead of
88.8MHz,usethemanualtuningmethodto“netune”tothe
exact frequency of the desired station.
HINTS FOR BEST RECEPTION
FM - To insure maximum FM tuner reception, unwrap and fully
extend the EXTERNAL FM WIRE ANTENNA for best FM radio
reception.
TO SET/RECALL RADIO STATION PRESETS
1. Press the << or >> button to select the desired radio station.
2. Press and hold the MEMORY button, the next available preset
memorynumberwillashontheLEDdisplay.(Note:“P01”
willashinthedisplayifyouareprogrammingpresetsforthe
rsttime.)
3. Press the << or >> button to change to the desired preset
number P01 thru P10.
4. Repeat steps #1 thru #3 to preset up to 10 FM stations.
5. To recall one of the preset stations already programmed,
tap the M+ button repeatedly until you reach the desired
preset number/radio station.
SLEEP TIMER OPERATION
The sleep timer allows you to turn the unit off after a designated
time has elapsed.
1. While listening to the radio, tap the SLEEP button and sleep
time ‘90’ (minutes) appears in the LED DISPLAY.
2. Repeatedly tap the SLEEP button to select a sleep timer of
90, 60, 30 or 15 minutes. Wait for about 10 seconds after your
selectionfortheunittoconrmtheselection,theunitwillplay
for the selected length of time then turn itself ‘Off’
automatically.
3. To cancel the sleep timer, repeatedly tap the SLEEP button
until you see the current time in the LED DISPLAY after last
sleep timer option (15 minutes).
4. To turn the unit ‘Off’ before the selected sleep time, press the
POWER ON-OFF button at any time.
E - 8

NAP ALARM
The nap alarm can be used for e.g. a short “nap”. The function
only operates in standby.
- Press the unit NAP button to select the time after which the
device will beep. Select from 90 to 10 minutes or OFF (off) in
steps of 10 minutes.
- After the selected time has elapsed, an increasingly fast beep
will sound. Use the unit POWER ON-OFF button to turn off the
beep.
DIMMER CONTROL
Tap the DIMMER button to set the brightness of the LED display
to high, medium or low according to your ambient light conditions.
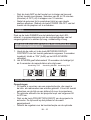
ALTERNATE DISPLAY BETWEEN TIME AND MONTH-DATE
DISPLAY
1. In radio off mode, press and hold the unit BETWEEN DISPLAY
CONTENTS button for about 3 seconds until “ON” appears in
the LED DISPLAY.
2. The DISPLAY will alternate between the current Time for 10
seconds and month- date for 5 seconds as follows:
PROJECTION FUNCTION
Notes:
- This appliance is featured with a projection function and can
be used in either clock or radio mode. You can use this
appliance to project time on the ceiling or wall.
- Optimal projection distance ranges from ca. 90 to 270cm.
- Press PROJECTION ON/OFF button to illuminate the
projection lens. Time is projected on the ceiling or wall.
- Use angle/sharpness controller to achieve optimal projection
TIME Indicator MONTH Indicator DAY Indicator
E - 9

sharpness and angle.
- PressPROJECTION180ºFLIPbuttontoiptheprojected
image.
- To deactivate projection function, simply press PROJECTION
ON/OFF button. The projection lens goes off.
RESETTING THE UNIT
If the system does not respond or exhibits erratic or intermittent
operation, you may have experienced an electrostatic discharge
(ESD) or a power surge that triggered the internal microcontroller
to shut down automatically. If this occurs, disconnect the AC
POWER CORD from the wall and remove the backup battery from
the compartment. Wait at least 3 minutes, and reinsert the battery
for the back-up, and reattach the AC Cord to the wall. The unit
is now reset, so you will need to setup the unit time and alarms
again.
SPECIFICATIONS
Frequency : FM 87.5 – 108 MHz
Batterybackup: 1x3VCR2032atlithiumbattery(not
included)
Power source : AC 230V ~ 50Hz, 5W
Projectiondistance:≤approx.90to270cm
E - 10

Warning
1. Nonakedamesources,suchaslightedcandles,shouldbe
placed on the apparatus.
2. Do not place the product in closed bookcases or racks without
proper ventilation.
3. The mains plug is used as the disconnect device, the
disconnect device shall remain readily operable.
4. The ventilation should not be impeded by covering the
ventilation openings with items, such as newspapers, table-
cloths, curtains, etc.
5. It shall not be exposed to dripping or splashing and that no
objectslledwithliquids,suchasvases,shallbeplacedon
the apparatus.
6. Do not connect FM antenna to outside antenna.
7. The unit should not be exposed to direct sunlight, very high
or low temperature, moisture, vibrations or placed in dusty
environment.
8. Do not use abrasive, benzene, thinner or other solvents
to clean the surface of the unit. To clean, wipe it will mild non-
abrasive detergent solution and clean soft cloth.
9. Never attempt to insert wires, pins or other such objects into
the vents or opening of the unit.
10. Batteries shall not be exposed to excessive heat such as
sunshine,reorthelike.
11. Attention should be drawn to the environmental aspects of
battery disposal.
12. Do not dispose this product into usual household garbage
at the end of its lifecycle; hand it over to a collection center for
recycling the electrical and electronic appliances. By recycling,
some of the materials can be reused. You are making an
important contribution to protect our environment. Please
inquire your community administration for the authorized
disposal center.
13. This device is not intended for use by people (including
children) with physical, sensory or mental disabilities, or a lack
of experience and knowledge, unless they’re under
supervision or have received instructions about the correct use
of the device by the person who is responsible for their safety.
E - 11

CAUTION
Danger of explosion if battery is incorrectly replaced
Replace only with the same or equivalent type
E - 12

Guarantee
Lenco offers service and warranty in accordance with the
European law, which means that in case of repairs (both during
and after the warranty period) you should contact your local
dealer.
Important note: It is not possible to send products that need
repairs to Lenco directly.
Importantnote:Ifthisunitisopenedoraccessedbyanon-ofcial
service center in any way, the warranty expires.
This device is not suitable for professional use. In case of
professional use, all warranty obligations of the manufacturer will
be voided.
Disclaimer
Updates to Firmware and/or hardware components are made
regularly.Thereforesomeoftheinstruction,specicationsand
pictures in this documentation may differ slightly from your
particular situation. All items described in this guide for illustration
purposes only and may not apply to particular situation. No legal
right or entitlements may be obtained from the description made in
this manual.
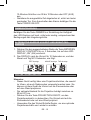
Disposal of the Old Device
This symbol indicates that the relevant electrical product
or battery should not be disposed of as general household
waste in Europe. To ensure the correct waste treatment of
the product and battery, please dispose them in accordance to
any applicable local laws of requirement for disposal of electrical
equipment or batteries. In so doing, you will help to conserve
natural resources and improve standards of environmental
protection in treatment and disposal of electrical waste (Waste
Electrical and Electronic Equipment Directive).
E - 13

Service
For more information and helpdesk support, please visit
www.lenco.com
Lenco Benelux BV, Thermiekstraat 1a, 6361 HB Nuth, The
Netherlands.
E - 14

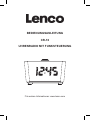
GEBRUIKERSHANDLEIDING
CR-16
KLOKRADIO MET RADIOSTURING
Voor meer informatie: www.lenco.com

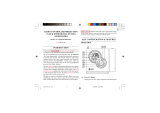
Uiterlijk en bediening
Item Omschrijving
1. INSTELLEN WEKTIJD 1 AAN-UIT
2. << AFSTEMMEN NEER
3. SLUIMER/SLAAP/DIMMER
4. GEHEUGEN/M+/DUTJE
5. PROJECTIE AAN/UIT
6. PROJECTIETIJD 180°
7. INSTELLEN WEKTIJD 2 AAN-UIT
8. VOLUME OP/TUSSEN CONTENT VAN SCHERM
9. IN-/UITSCHAKELEN/WEKKER UIT
10. >> AFSTEMMEN OP/JAAR-MAAND-DAG
11. KLK.AANP.
12. VOLUME OMLAAG
13. TYPEPLAATJE (AAN DE ONDERKANT VAN HET TOESTEL)
14. DEKSEL BATTERIJVAK (AAN DE ONDERKANT VAN HET
TOESTEL)
15. LUIDSPREKER
16. REGELAAR HOEK/SCHERPTE
17. LED-SCHERM
18. AC-NETSNOER
19. ANTENNE RADIOGESTUURDE KLOK
20. FM-ANTENNE
NL - 1

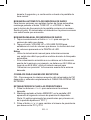
LED-SCHERM
AANSLUITING STROOMVOORZIENING
Dit toestel werkt op een stroomvoorziening van 230 V~ 50
Hz wisselspanning. Steek de stekker van het netsnoer in een
stopcontact.
HET PLAATSEN/VERVANGEN VAN DE BACK-UP ACCU
Dit toestel is uitgerust met een batterijback-upsysteem, dat één
3 V gelijkspanning CR2032 lithiumbatterij (niet inbegrepen)
nodig heeft om tijdens stroomonderbrekingen de tijds-/
kalenderinstellingen en voorkeuzestations van de radio te
behouden.
1. Draai de schroef los en verwijder het DEKSEL VAN HET
BATTERIJVAK.
2. Plaats een nieuwe CR2032 lithiumbatterij in het batterijvak en
houd hierbij de polariteit aan volgens het diagram op het
deksel van het batterijvak. Gebruik uitsluitend de genoemde
maat en soort batterij.
3. Plaats het DEKSEL VAN HET BATTERIJVAK weer en draai de
schroef vast.
Opmerking: Het toestel werkt zonder dat er een batterij is
geplaatst, maar in het geval van stroomuitval gaan de tijds- en
alarminstellingen en de voorkeuzestations van de radio verloren,
en moet u deze opnieuw instellen.
BELANGRIJK:
Zorg ervoor dat de batterij juist is geplaatst. De verkeerde
polariteit kan het toestel beschadigen en de garantie ongeldig
maken. Wij bevelen voor de beste prestaties en een langere
bedrijfsduur het gebruik van batterijen van goede kwaliteit aan.
MHz-aanduiding
Aanduiding TOREN
RCC ANTENNE
Aanduiding WEKKER 2
PM-aanduiding
Aanduiding WEKKER 1
Aanduiding TIJD
NL - 2

WAARSCHUWING
BATTERIJ NIET INSLIKKEN, RISICO OP CHEMISCHE
BRANDWONDEN
Dit product bevat een knoopcelbatterij. Als deze knoopcelbatterij
wordt ingeslikt, kan dit binnen slechts 2 uur tot ernstige interne
brandwonden en fataal letsel leiden.
Houd nieuwe en gebruikte batterijen buiten bereik van kinderen.
Als de batterijhouder niet goed kan worden gesloten, dient u het
product niet meer te gebruiken en buiten bereik van kinderen te
houden.
Als u denkt dat batterijen zijn ingeslikt of binnenin een willekeurig
lichaamsdeel terecht zijn gekomen, dient u onmiddellijk medische
hulp te zoeken.
ZORG VOOR DE BATTERIJ:
- Gebruik uitsluitend de genoemde maat en soort batterij.
- Als het toestel gedurende langere tijd niet wordt gebruikt,
verwijder dan de batterij. Oude of lekkende batterijen kunnen
schade aan het toestel veroorzaken en de garantie ongeldig
maken.
- Probeer niet om de batterij te herladen; hij is hier niet
voor bestemd; hij kan oververhitten en scheuren (volgen de
aanwijzingen van de fabrikant van de batterij).
- Gooi de batterij niet in vuur; de batterij kan lek raken of
exploderen.
HET INSTELLEN VAN DE KLOK
AUTOMATISCH (UITSLUITEND IN STAND-BY)
- Nadat de stekker in het stopcontact wordt gestoken worden
automatisch na enkele minuten de tijdsgegevens van het
DCF77-station overgedragen. Zolang het symbool “Aanduiding
TOREN RCC ANTENNE” knippert, zoekt het toestel naar
het radiosignaal. Als er een radiosignaal is gevonden, blijft het
symbool “Aanduiding TOREN RCC ANTENNE” branden. De
juist tijd verschijnt op het scherm.
- De tijd wordt op het hele uur automatisch door het signaal van
het station aangepast.
NL - 3

OPMERKING:
Het signaal kan zonder problemen worden ontvangen binnen
een straal van ongeveer 2.000 km rondom Frankfurt am Main,
maar er kan zich, afhankelijk van lokale omstandigheden,
interferentie voordoen. Dit kan zich zowel voordoen in gebouwen
die een hoog percentage metaal bevatten, als in de buurt van
ingeschakelde TV-toestellen, PC’s, mobiele telefoon enz.! Als de
ontvangst, ondanks het uitlijnen van de geïntegreerde antenne,
na 10 minuten niet automatisch kan worden aangepast, dan is de
ontvangst in die bepaalde locatie te zwak. Stel in dit geval de tijd
handmatig in of verander de locatie.
INSCHAKELEN/STAND-BY
1. Druk in de stand-bymodus eenmaal op de toets POWER ON-
OFF om het toestel in te schakelen.
2. Druk eenmaal op de toets POWER ON-OFF om het toestel
weer in de stand-bymodus te zetten.
HANDMATIG INSTELLEN KALENDER EN TIJD
HET INSTELLEN VAN DE KALENDER EN DE TIJD
Als het toestel naar een radiosignaal zoekt, is het niet mogelijk om
de tijd handmatig aan te passen.
1. Druk op de knop POWER ON-OFF om het toestel in de stand-
by modus te zetten.
2. Houd de toets SNOOZE/SLEEP/DIMMER ingedrukt. Het
symbool “Aanduiding TOREN RCC ANTENNE” op het scherm
begint te knipperen.
3. Houd de toets SNOOZE/SLEEP/DIMMER gedurende
ongeveer 2 seconden ingedrukt. Het symbool “Aanduiding
TOREN RCC ANTENNE” verdwijnt van het scherm.
4. Houd de toets CLK.ADJ. gedurende ongeveer 2 seconden
ingedrukt om naar de instellingenmodus voor de kalender en
de tijd te gaan.
5. De jaaraanduiding op het LED-SCHERM knippert maximaal 30
seconden om een nieuwe waarde in te kunnen voeren.
6. Druk terwijl het scherm knippert herhaaldelijk op de toets
<< of >> om het juiste jaar in te stellen. Houd de toets << of >>
ingedrukt om sneller vooruit of achteruit te gaan. Druk op de
toets CLK.ADJ. om de invoer te bevestigen.
NL - 4
Seite laden ...
Seite laden ...
Seite laden ...
Seite laden ...
Seite laden ...
Seite laden ...
Seite laden ...
Seite laden ...
Seite laden ...
Seite laden ...
Seite laden ...
Seite laden ...
Seite laden ...
Seite laden ...
Seite laden ...
Seite laden ...
Seite laden ...
Seite laden ...
Seite laden ...
Seite laden ...
Seite laden ...
Seite laden ...
Seite laden ...
Seite laden ...
Seite laden ...
Seite laden ...
Seite laden ...
Seite laden ...
Seite laden ...
Seite laden ...
Seite laden ...
Seite laden ...
Seite laden ...
Seite laden ...
Seite laden ...
Seite laden ...
Seite laden ...
Seite laden ...
Seite laden ...
Seite laden ...
Seite laden ...
Seite laden ...
Seite laden ...
Seite laden ...
Seite laden ...
Seite laden ...
Seite laden ...
Seite laden ...
Seite laden ...
Seite laden ...
Seite laden ...
Seite laden ...
Seite laden ...
Seite laden ...
Seite laden ...
-
 1
1
-
 2
2
-
 3
3
-
 4
4
-
 5
5
-
 6
6
-
 7
7
-
 8
8
-
 9
9
-
 10
10
-
 11
11
-
 12
12
-
 13
13
-
 14
14
-
 15
15
-
 16
16
-
 17
17
-
 18
18
-
 19
19
-
 20
20
-
 21
21
-
 22
22
-
 23
23
-
 24
24
-
 25
25
-
 26
26
-
 27
27
-
 28
28
-
 29
29
-
 30
30
-
 31
31
-
 32
32
-
 33
33
-
 34
34
-
 35
35
-
 36
36
-
 37
37
-
 38
38
-
 39
39
-
 40
40
-
 41
41
-
 42
42
-
 43
43
-
 44
44
-
 45
45
-
 46
46
-
 47
47
-
 48
48
-
 49
49
-
 50
50
-
 51
51
-
 52
52
-
 53
53
-
 54
54
-
 55
55
-
 56
56
-
 57
57
-
 58
58
-
 59
59
-
 60
60
-
 61
61
-
 62
62
-
 63
63
-
 64
64
-
 65
65
-
 66
66
-
 67
67
-
 68
68
-
 69
69
-
 70
70
-
 71
71
-
 72
72
-
 73
73
-
 74
74
-
 75
75


Lenco CR-16 Bedienungsanleitung
- Kategorie
- Wecker
- Typ
- Bedienungsanleitung
- Dieses Handbuch ist auch geeignet für
in anderen Sprachen
- English: Lenco CR-16 Owner's manual
- français: Lenco CR-16 Le manuel du propriétaire
- español: Lenco CR-16 El manual del propietario
- Nederlands: Lenco CR-16 de handleiding
Verwandte Papiere
Sonstige Unterlagen
-
 Oregon Scientific RRM968P/RRM968PU Benutzerhandbuch
-
Smartwares CL-1496 Bedienungsanleitung
-
AEG MRC 4121 Bedienungsanleitung
-
Denver CRP-618 Benutzerhandbuch
-
AudioSonic CL-1489 Bedienungsanleitung
-
Tokai TC-155 Benutzerhandbuch
-
Denver CRL-310 Benutzerhandbuch
-
Bresser TemeoTrend P Bedienungsanleitung
-
-
Ices ICR-240 Bedienungsanleitung
