AVENLI FP13-21-CZ Benutzerhandbuch
- Kategorie
- Oberirdisches Poolzubehör
- Typ
- Benutzerhandbuch

FP13-21-CZ
User Manual - Uživatelský manuál -Užívateľský manuál -
Használati utasítás - Benutzerhandbuch

2
English
3 – 13
Czech
14 – 24
Slovak
25 – 36
Hungarian
37 – 48
German
49 – 60

3
The product user manual contains the product functions, instructions for use and
operating procedure. Read the user manual carefully to get the best experience and
avoid unnecessary damage. Keep this manual for future reference. If you have any
questions or comments about the equipment, please contact the customer service line.
✉ www.alza.co.uk/kontakt
✆ +44 (0)203 514 4411
Importer Alza.cz a.s. , Jankovcova 1522/53, Holešovice, 170 00 Prague 7, www.alza.cz

4
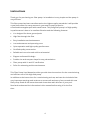
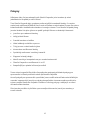
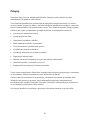
Instructions
Thank you for purchasing our filter pump. Its installation is very simple and the pump is
very efficient.
This filter pump has been manufactured to the highest quality standards. It will provide
crystal clear water for many seasons in your new Prompt-Set pool or
round/oval/rectangular pool with metal frame. This Jilong filter pump is of high quality.
Its performance is due to its excellent filtration and the following features:
• It is designed for above ground pools
• High flow through the filter
• Easy installation and maintenance
• Low maintenance and operating costs
• Quiet operation and high-quality performance
• Certified quality construction
• Reliable anti-corrosion and reinforced material
• Elegant and beautiful design
• Smaller size and compact shape for easy winterization
• Filter pump with UL and GS certification
• Safer for swimming and the environment
This Filter Pump User Manual provides you with clear instructions for the commissioning
and efficient use of this high-end pump.
In addition to the instructions for commissioning and use, we have also included a few
very important warnings and cautions to ensure safe and worry-free use and this new
filter pump. Read all the instructions and share them with all users of your pool.
Read and understand the information in this manual before using it for the first
time.

5
Safety instructions
Please read and understand the following important points before use:
WARNING: Avoid possible electric shock - do not attempt to connect the power cord
with wet hands or when standing in water.
WARNING: Avoid possible electric shock - connect the power cord to a grounded
electrical outlet that is protected by a ground fault circuit interrupter (RCD).
WARNING: Avoid possible electric shock - never use a damaged or frayed power cord.
WARNING: This filter is not intended for use by children. Installation and operation
should only be performed by an adult.
WARNING: Do not insert the power cord into the ground. Position the power cord so that it
cannot be damaged by lawn mowers, lawn trimmers or other equipment.
WARNING: Do not connect extension power cords to this product.
WARNING: Before each use of the pump, check that all clamps are tightened and all
hoses are properly connected.
WARNING: Do not use this filter pump to vacuum the pool.
WARNING: This filter pump is intended for use with seasonal pools only. It must not be
used with permanently installed pools. Improper use will result in overheating, motor
burn and damage.
WARNING: To prevent the filter pump motor from overheating, ensure that water flows
through the pump. When this equipment is in operation, never leave it without water.
WARNING: Remaining air will cause overdriving and damage to the filter pump.
Carefully turn the bleeder valve 1-2 turns to bleed any remaining air from the filter
pump and filter housing.
WARNING: This device may be used by children 8 years of age and older and persons
with limited physical, emotional, mental or other skills and knowledge if they are
supervised or trained to use the device safely and understand the potential hazards of
its use. Children must not play with this appliance. Cleaning and user maintenance must
not be carried out by unsupervised children.
WARNING: If the power cord is damaged, it cannot be replaced and the equipment
must be disposed of.
WARNING: It is forbidden to use the pump when persons are in the water.

6
WARNING: This pump must be powered by a current protector with a rated residual
operating current not exceeding 30 mA.
WARNING: Maximum total immersion of 0.9 m (for pumps with a power input
exceeding 50 W)
WARNING: The pump must be installed at least 2 m from the pool and the plug must be
located 3.5 m from the pool. (French market only)
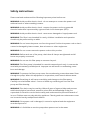
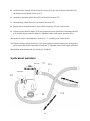
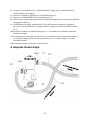
WARNING: The pump must be secured to the ground or base with two Φ5 bolts or
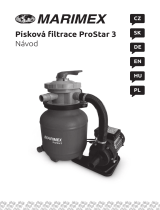
screws to prevent accidental dropping (see following figure).
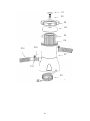
P1
P2
P3
P4
P5
P6
P7
P9
P10
P12
P11

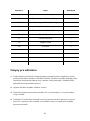
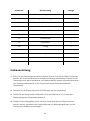
7
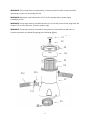
Item no.
Description
Quantity
P1
Vent cover
1
P2
Vent cover gasket
1
P3
Filter chamber cover nut
1
P4
Filter chamber cover
1
P5
Rubber seal of the filter chamber
1
P6
Filter cartridges
1
P7
Filtration chamber
1
P9
Power cable
1
P10
O-ring
2
P11
Hose clamp
4
P12
Connecting hose
2
P13
Filter sieve
2
P14
Connector
2
Installation instructions
1. Before installing the filter pump, first build the pool and fill it with water according to
the detailed pool installation instructions. Start the filter pump only after the pool
water has reached its maximum level. Low water pressure in the pump can cause
noisy motor operation.
2. Remove the filter pump and hoses from the packaging.
3. Place the filter pump at least 0.2 m and no more than 1.0 m below the pool
water level.
4. Note: This filter pump must be mounted on a solid and level surface. There are
mounting holes at the bottom of the pump for attaching the pump with screws.

8
5. Insert the filter cartridge (P6) into the filter chamber (P7) so that the filter cartridge
(P6) is inside the filter chamber (P7).
6. Fit the filter housing O-ring (P5) onto the filter chamber (P7).
7. Fit the filter housing cover (P3) onto the filter chamber (P7).
8. Then hand tighten the filter chamber cover nut (P3) clockwise.
9. Connect one filter hose (P12) to the inlet port of the filter pump (above) and to the
bottom connection of the pool hose. Secure the hose with hose clamps (P11).
10. Carefully turn the vent valve (P1) 1-2 turns counterclockwise.
11. Connect the second filter hose (P12) to the upper pool hose connection and to the
outlet port (bottom) of the filter pump (see page 7). Secure the hose with hose
clamps.
12. The sound pressure level is less than 82 dB (A).
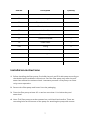
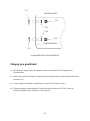
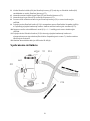
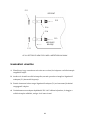
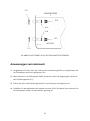
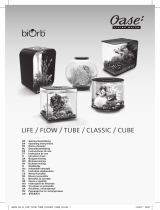
Installation illustration
P11
P11
P12
P12
P9
EXIT
ENTER

9
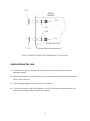
THE ILLUSTRATION DOES NOT CORRESPOND TO THE SCALE
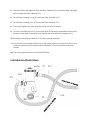
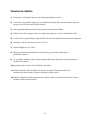
Instructions for use
1. Check that the pool is already filled with water and place the filter pump in a
suitable location.
2. When water flows into the filter pump, its pressure pushes the sucked air through
the air vent valve (P1).
3. Then carefully tighten the vent valve (P1) clockwise.
4. Connect the power cord of the adapter to a 230 V AC mains socket and leave the
filter pump running until the water has cleared.
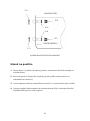
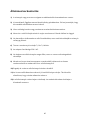
P11
P11
P13
P13
P14
P14
WATER
HUNGER
INSIDE THE POOL

10
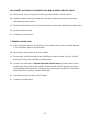
General maintenance
1) Disconnect power to the motor before working on the pump or motor.
2) Depending on consumption, keep some spare parts on hand. We strongly
recommend having two spare filter cartridges on hand.
3) No lubrication or regular mechanical maintenance is required.
4) Wash the outside of the filter with water and mild detergent. Then rinse with a hose.
5) Do not use solvents to clean the filter, which may damage the plastic parts of the pump.
6) Keep the pH level in the pool between 7.0 and 7.4.
7) The voltage of the adapter is AC 230 V.
8) Do not place the filter pump in tall grass, as this could cause the engine to
overheat.
9) After draining all water from the pool, disconnect all pool hoses from the pool and
filter pump.
10) Drain the water from all parts of the filter pump.
11) Store all filter components in a dry and well-ventilated place. Check that all
components are dry before storing.
12) You can store the filter pump in a dry place. You can use the original box to store it
for the next season.

11
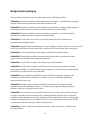
Cleaning and replacement
1. Disconnect the power cable of the 230 V adapter from the power socket.
2. Loosen the nut of the filter chamber cover (P3) by turning it counterclockwise.
Place in a safe place.
3. Clean the used filter cartridge (P6) or replace if necessary.
4. Check the inside of the filter chamber (P7).
5. If there is dirt or sediment in the bottom of the cabinet, rinse it out with a bucket of
water or a garden hose.
6. Put the filter chamber cover nut (P3) in place and tighten clockwise on the filter
housing.
7. Connect the power cord to the adapter.
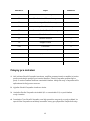
Troubleshooting
THE PUMP IS NOT WORKING:
A. Check for blown fuses, disconnected circuit breakers or interrupted wiring.
B. Check the engine. If the engine is overheating or overloaded, switch it off. Allow
the engine to cool down.
C. Consult an expert.

12
THE MOTOR IS RUNNING BUT THE PUMP IS NOT PUMPING WATER OR THE FLOW IS
TOO SLOW:
A. Check that the suction or drain hose in the pool wall is not blocked.
B. Tighten the hose clamps, check for damaged hoses, check the water level in the pool.
C. Clean the filter cartridge more often. The filter cartridge can be easily cleaned, for
example with a garden hose.
D. Replace the filter cartridge.
E. Consult an expert.
THE PUMP IS LEAKING WATER
A. When the pump is switched off, check that the pool water level is at least 5 cm above
the lower edge of the skimmer mouth.
B. Check that no water is leaking from the suction hose.
C. Check that the filter cartridge is not dirty and that it does not need to be cleaned. The
filter cartridge can be easily cleaned, for example with a garden hose.
D. Consult an expert. The filter pump is not cleaning the pool A) Adjust the chlorine
content and pH level. B) Clean or replace the filter cartridge. The filter cartridge can
be easily cleaned, for example with a garden hose. C) Check the cartridge for leaks.
Replace a damaged cartridge. D) Leave the pump running longer.
E. Remove debris from the screen in the pool wall.
F. Consult an expert.

13
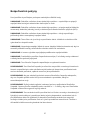
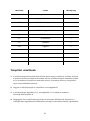
Warranty conditions
A new product purchased from Alza.cz is covered by a 2-year warranty. In case of need
for repair or other service within the warranty period, please contact the seller of the
product directly, it is necessary to present the original proof of purchase with the date of
purchase.
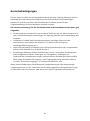
The following shall be deemed to be a breach of warranty for which the claim
cannot be accepted:
• Using the product for a purpose other than that for which the product is intended or
failing to follow the instructions for maintenance, operation and servicing of the
product.
• Damage to the product due to natural disaster, unauthorized person or mechanical
fault of the buyer (e.g. during transportation, cleaning by improper means, etc.).
• natural wear and aging of consumables or components during use (e.g. batteries,
etc.).
• The action of adverse external influences such as solar and other radiation or
electromagnetic fields, liquid ingress, object ingress, mains surges, electrostatic
discharge (including lightning), faulty supply or input voltage and the improper
polarity of this voltage, chemical processes, e.g. used power supplies, etc.
• If anyone has made alterations, modifications, design changes or adaptations to
change or extend the product's functions from the design purchased or use non-
original parts.

14
Uživatelská příručka k výrobku obsahuje funkce výrobku, návod k použití a postup
obsluhy. Přečtěte si pozorně uživatelskou příručku, abyste získali co nejlepší zkušenosti a
předešli zbytečným škodám. Tuto příručku si uschovejte pro budoucí použití. Máte-li
jakékoli dotazy nebo připomínky k zařízení, obraťte se na zákaznickou linku.
✉ www.alza.cz/kontakt
✆ +420 225 340 111
Dovozce Alza.cz a.s. , Jankovcova 1522/53, Holešovice, 170 00 Praha 7, www.alza.cz

15
Pokyny
Děkujeme Vám, že jste zakoupili naše filtrační čerpadlo. Jeho instalace je velmi
jednoduchá a čerpadlo je velmi účinné.
Toto filtrační čerpadlo bylo vyrobeno podle nejvyšších standardů kvality. Po mnoho
sezón bude zajišťovat křišťálově čistou vodu ve vašem novém bazénu Prompt-Set nebo v
kulaté/oválném/ obdélníkovém bazénu s kovovým rámem. Toto filtrační čerpadlo Jilong
je velmi kvalitní. Na jeho výkonu se podílí vynikající filtrace a následující vlastnosti:
• Je určeno pro nadzemní bazény
• Velký průtok filtrem
• Snadná instalace a údržba
• Nízké náklady na údržbu a provoz
• Tichý provoz a velmi kvalitní výkon
• Konstrukce certifikované kvality
• Spolehlivý antikorozní a zesílený materiál
• Elegantní a hezký design
• Menší rozměry a kompaktní tvar pro snadné zazimování
• Filtrační čerpadlo s certifikacemi UL a GS
• Bezpečnější pro plavání a životní prostředí
Tento návod na použití filtračního čerpadla vám poskytuje přehledné pokyny pro
zprovoznění a účinné používání tohoto špičkového čerpadla.
Kromě pokynů pro zprovoznění a používání jsme rovněž zahrnuli řadu velmi důležitých
varování a upozornění, která jsou zárukou bezpečného a bezstarostného používání a
tohoto nového filtračního čerpadla. Přečtěte si všechny pokyny a sdílejte je se všemi
uživateli vašeho bazénu.
Před prvním použitím si přečtěte a porozumějte informacím, které jsou uvedeny v
tomto návodu.

16
Bezpečnostní pokyny
Před použitím si přečtěte a porozumějte následujícím důležitým bodům:
VAROVÁNÍ: Zabraňte možnému zásahu elektrickým proudem – nepokoušejte se připojit
napájecí kabel mokrýma rukama, nebo když stojíte ve vodě.
VAROVÁNÍ: Zabraňte možnému zásahu elektrickým proudem – napájecí kabel připojte k
uzemněné elektrické zásuvce, která je chráněná zemnicím jističem (RCD).
VAROVÁNÍ: Zabraňte možnému zásahu elektrickým proudem – v žádném případě
nepoužívejte poškozený nebo roztřepený napájecí kabel.
VAROVÁNÍ: Toto filtrační není určeno k používání dětmi. Montáž a obsluhu smí
provádět pouze dospělá osoba.
VAROVÁNÍ: Napájecí kabel nepokládejte do země. Napájecí kabel umístěte tak, aby nemohlo
dojít k jeho poškození travními sekačkami, zastřihovači trávníku nebo jiným vybavením.
VAROVÁNÍ: K tomuto produktu nepřipojujte prodlužovací napájecí kabely.
VAROVÁNÍ: Před každým použitím čerpadla zkontrolujte, zda jsou utažené všechny
spony a zda jsou všechny hadice správně připojené.
VAROVÁNÍ: Toto filtrační čerpadlo nepoužívejte k vysávání bazénu.
VAROVÁNÍ: Toto filtrační čerpadlo je určeno pro použití pouze se sezónními bazény.
Nesmí být používáno s trvale nainstalovanými bazény. Při nevhodném používání dojde k
přehřívání, ke spálení motoru a k poškození.
VAROVÁNÍ: Aby se zabránilo přehřívání motoru filtračního čerpadla, zajistěte, aby
čerpadlem protékala voda. Když je toto zařízení v provozu, v žádném případě jej
neponechávejte bez vody.
VAROVÁNÍ: Zbývající vzduch způsobí přetáčení a poškození filtračního čerpadla.
Opatrně otočte odvzdušňovací ventil o 1–2 otáčky, aby se vypustil veškerý zbývající
vzduch z filtračního čerpadla a skříně filtru.
VAROVÁNÍ: Toto zařízení mohou používat děti od 8 let a osoby s omezenými fyzickými,
citovými a mentálními schopnostmi nebo s nedostatečnými zkušenostmi a znalostmi,
jestliže jsou pod dohledem nebo byly zaučeny zařízení bezpečně používat a porozuměly
možným nebezpečím při jeho používání. Děti si s tímto spotřebičem nesmí hrát. Čištění
a uživatelskou údržbu nesmí provádět děti bez dozoru.
VAROVÁNÍ: Dojde-li k poškození napájecího kabelu, nelze jej vyměnit a zařízení musí
být zlikvidováno.

17
VAROVÁNÍ: Je zakázáno používat čerpadlo, když se ve vodě nacházejí osoby.
VAROVÁNÍ: Toto čerpadlo musí být napájeno prostřednictvím proudového chrániče,
jehož jmenovitý zbytkový provozní proud nepřesahuje 30 mA.
VAROVÁNÍ: Maximální celkový ponor 0,9 m (u čerpadel, jejichž příkon přesahuje 50 W)
VAROVÁNÍ: Čerpadlo musí být nainstalováno alespoň 2 m od bazénu a zástrčka se musí
nacházet 3,5 m od bazénu. (Pouze pro francouzský trh)
VAROVÁNÍ: Čerpadlo musí být připevněno k zemi nebo k podstavci dvěma Φ5 svorníky
nebo šrouby, aby se zabránilo náhodnému pádu (viz následující obrázek).
P1
P2
P3
P4
P5
P6
P7
P9
P10
P12
P11

18
Položka č.
Popis
Množství
P1
Odvzdušňovací kryt
1
P2
Těsnění odvzdušňovacího krytu
1
P3
Matice krytu filtrační komory
1
P4
Kryt filtrační komory
1
P5
Gumové těsnění filtrační komory
1
P6
Filtrační kartuše
1
P7
Filtrační komora
1
P9
Napájecí kabel
1
P10
O-kroužek
2
P11
Hadicová spona
4
P12
Připojovací hadice
2
P13
Filtrační síto
2
P14
Konektor
2
Pokyny pro instalaci
1. Než začnete filtrační čerpadlo instalovat, nejdříve postavte bazén a naplňte jej vodou
podle podrobných pokynů pro instalaci bazénu. Filtrační čerpadlo spusťte teprve
poté, co voda v bazénu dosáhne maximální hladinu. Nízký tlak vody v čerpadle může
způsobovat hlučný provoz motoru.
2. Vyjměte filtrační čerpadlo a hadice z obalu.
3. Umístěte filtrační čerpadlo minimálně 0,2 m a maximálně 1,0 m pod hladinu
vody v bazénu.
4. Poznámka: Toto filtrační čerpadlo musí být upevněno na pevný a rovný podklad. Ve
spodní části čerpadla se nacházejí montážní otvory pro připevnění čerpadla šrouby.

19
5. Vložte filtrační kartuši (P6) do filtrační komory (P7) tak, aby se filtrační kartuše (P6)
nacházela uvnitř filtrační komory (P7).
6. Nasaďte O-kroužek skříně filtru (P5) na filtrační komoru (P7).
7. Nasaďte kryt skříně filtru (P3) na filtrační komoru (P7).
8. Potom rukou utáhněte matici krytu filtrační komory (P3) po směru hodin.
9. Připojte jednu filtrační hadici (P12) ke vstupnímu portu filtračního čerpadla (nahoře)
a ke spodní přípojce hadice bazénu. Zajistěte hadici hadicovými sponami (P11).
10. Opatrně otočte odvzdušňovací ventil (P1) o 1–2 otáčky proti směru hodin.
11. Připojte druhou filtrační hadici (P12) k horní přípojce hadice bazénu a k výstupnímu
portu (dole) filtračního čerpadla (viz stránka 7). Zajistěte hadici hadicovými sponami.
12. Hladina akustického tlaku je menší než 82 dB (A).
Vyobrazení instalace
P11
P11
P12
P12
P9
VÝSTUP
VSTUP

20
VYOBRAZENÍ NEODPOVÍDÁ MĚŘÍTKU
Pokyny pro používání
1. Zkontrolujte, zda je bazén již naplněn vodou, a umístěte filtrační čerpadlo na
vhodné místo.
2. Když voda proudí do filtrační čerpadla, její tlak vytlačí nasátý vzduch odvzdušňovacím
ventilem (P1).
3. Potom opatrně utáhněte odvzdušňovací ventil (P1) po směru hodin.
4. Připojte napájecí kabel adaptéru k elektrické síťové zásuvce AC 230 V a nechte
filtrační čerpadlo běžet, dokud se voda nevyčistí.
P11
P11
P13
P13
P14
P14
HLADINA VODY
UVNITŘ BAZÉNU
Seite laden ...
Seite laden ...
Seite laden ...
Seite laden ...
Seite laden ...
Seite laden ...
Seite laden ...
Seite laden ...
Seite laden ...
Seite laden ...
Seite laden ...
Seite laden ...
Seite laden ...
Seite laden ...
Seite laden ...
Seite laden ...
Seite laden ...
Seite laden ...
Seite laden ...
Seite laden ...
Seite laden ...
Seite laden ...
Seite laden ...
Seite laden ...
Seite laden ...
Seite laden ...
Seite laden ...
Seite laden ...
Seite laden ...
Seite laden ...
Seite laden ...
Seite laden ...
Seite laden ...
Seite laden ...
Seite laden ...
Seite laden ...
Seite laden ...
Seite laden ...
Seite laden ...
Seite laden ...
-
 1
1
-
 2
2
-
 3
3
-
 4
4
-
 5
5
-
 6
6
-
 7
7
-
 8
8
-
 9
9
-
 10
10
-
 11
11
-
 12
12
-
 13
13
-
 14
14
-
 15
15
-
 16
16
-
 17
17
-
 18
18
-
 19
19
-
 20
20
-
 21
21
-
 22
22
-
 23
23
-
 24
24
-
 25
25
-
 26
26
-
 27
27
-
 28
28
-
 29
29
-
 30
30
-
 31
31
-
 32
32
-
 33
33
-
 34
34
-
 35
35
-
 36
36
-
 37
37
-
 38
38
-
 39
39
-
 40
40
-
 41
41
-
 42
42
-
 43
43
-
 44
44
-
 45
45
-
 46
46
-
 47
47
-
 48
48
-
 49
49
-
 50
50
-
 51
51
-
 52
52
-
 53
53
-
 54
54
-
 55
55
-
 56
56
-
 57
57
-
 58
58
-
 59
59
-
 60
60


AVENLI FP13-21-CZ Benutzerhandbuch
- Kategorie
- Oberirdisches Poolzubehör
- Typ
- Benutzerhandbuch
in anderen Sprachen
- slovenčina: AVENLI FP13-21-CZ Používateľská príručka
Verwandte Papiere

Sonstige Unterlagen
-
Scheppach PSFA26 Benutzerhandbuch
-
Steinbach Speed Clean Classic 310 Benutzerhandbuch
-
M-PETS M-PETS Altan Drinking Fountain Benutzerhandbuch
-
 MARIMEX ProStar 3 Bedienungsanleitung
-
-
-
EHEIM 600 Bedienungsanleitung
-
Gre 90230 Benutzerhandbuch
-
Sera KOI Professional 24000 Information For Use
-
 biOrb Biorb Tube Bedienungsanleitung

