
THE NEXT GENERATION OF HEARING PROTECTION™

Table of Contents
ENGLISH (EN)
Fitting � � � � � � � � � � � � � � � � � � � � � � � � � � � � � � � 3
Location of Controls � � � � � � � � � � � � � � � � � � � 4
Charging the Earbuds � � � � � � � � � � � � � � � � � 5
Charging the Case � � � � � � � � � � � � � � � � � � � � 6
Power On/O � � � � � � � � � � � � � � � � � � � � � � � � 7
Bluetooth Pairing � � � � � � � � � � � � � � � � � � � � � 8
Music Controls � � � � � � � � � � � � � � � � � � � � � � � 9
Phone Calls � � � � � � � � � � � � � � � � � � � � � � � � � 10
Factory Reset � � � � � � � � � � � � � � � � � � � � � � � � 11
Legalities � � � � � � � � � � � � � � � � � � � � � � � � � � � 12
DANISH (DA)
Tilpasning� � � � � � � � � � � � � � � � � � � � � � � � � � � 17
Placering af Betjeningselementer � � � � � � 18
Opladning af Ørepropper � � � � � � � � � � � � � 19
Opladning af Etui � � � � � � � � � � � � � � � � � � � � 20
Tænd/Sluk � � � � � � � � � � � � � � � � � � � � � � � � � � 21
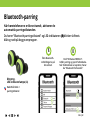
Bluetooth-Parring � � � � � � � � � � � � � � � � � � � � 22
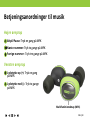
Betjeningsanordninger til Musik � � � � � � � 23
Telefonopkald � � � � � � � � � � � � � � � � � � � � � � � 24
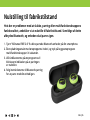
Nulstilling til Fabrikstilstand � � � � � � � � � � � 25
Lovligheder � � � � � � � � � � � � � � � � � � � � � � � � � 26
DEUTSCH (DE)
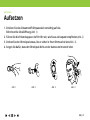
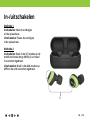
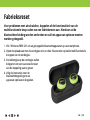
Aufsetzen � � � � � � � � � � � � � � � � � � � � � � � � � � � 31
Position der Bedienelemente � � � � � � � � � � 32
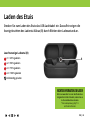
Laden der Ohrhörer � � � � � � � � � � � � � � � � � � 33
Laden des Etuis � � � � � � � � � � � � � � � � � � � � � � 34
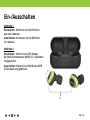
Ein-/Ausschalten � � � � � � � � � � � � � � � � � � � � � 35
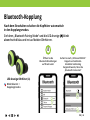
Bluetooth-Kopplung � � � � � � � � � � � � � � � � � � 36
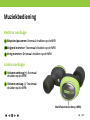
Musiksteuerungen � � � � � � � � � � � � � � � � � � � 37
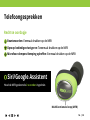
Anrufe � � � � � � � � � � � � � � � � � � � � � � � � � � � � � 38
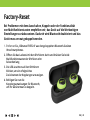
Factory-Reset � � � � � � � � � � � � � � � � � � � � � � � � 39
Gesetzmäßigkeiten � � � � � � � � � � � � � � � � � � � 40
ESPAÑOL (ES)
Colocación � � � � � � � � � � � � � � � � � � � � � � � � � � 45
Ubicación de los Controles � � � � � � � � � � � � 46
Carga de los Auriculares � � � � � � � � � � � � � � 47
Carga del Estuche � � � � � � � � � � � � � � � � � � � � 48
Encendido/Apagado � � � � � � � � � � � � � � � � � � 49
Emparejamiento Bluetooth � � � � � � � � � � � � 50
Controles de Música � � � � � � � � � � � � � � � � � 51
Llamadas Telefónicas � � � � � � � � � � � � � � � � � 52
Restablecimiento de Fábrica � � � � � � � � � � � 53
Legalidades � � � � � � � � � � � � � � � � � � � � � � � � � 54
SUOMI (FI)
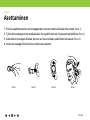
Asettaminen � � � � � � � � � � � � � � � � � � � � � � � � 59
Painikkeiden Sijainti � � � � � � � � � � � � � � � � � � 60
Korvanappien Lataaminen � � � � � � � � � � � � 61
Kotelon Lataaminen � � � � � � � � � � � � � � � � � � 62
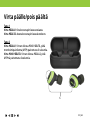
Virta Päälle/Pois Päältä � � � � � � � � � � � � � � � 63
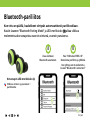
Bluetooth-Pariliitos � � � � � � � � � � � � � � � � � � � 64
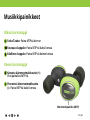
Musiikkipainikkeet � � � � � � � � � � � � � � � � � � � 65
Puhelujen Soittaminen � � � � � � � � � � � � � � � 66
Tehdasasetusten Palauttaminen � � � � � � � 67
Laillisuudet � � � � � � � � � � � � � � � � � � � � � � � � � 68
FRANÇAIS (FR)
Ajustement � � � � � � � � � � � � � � � � � � � � � � � � � 73
Emplacement des Commandes � � � � � � � � 74
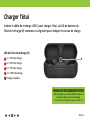
Charger les écouteurs � � � � � � � � � � � � � � � � 75
Charger l’Étui � � � � � � � � � � � � � � � � � � � � � � � � 76
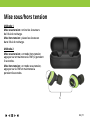
Mise Sous/Hors Tension � � � � � � � � � � � � � � 77
Couplage Bluetooth � � � � � � � � � � � � � � � � � � 78
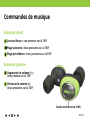
Commandes de Musique � � � � � � � � � � � � � 79
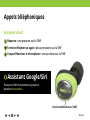
Appels Téléphoniques � � � � � � � � � � � � � � � � 80
Réinitialisation � � � � � � � � � � � � � � � � � � � � � � � 81
Légalités � � � � � � � � � � � � � � � � � � � � � � � � � � � � 82
ITALIANO (IT)
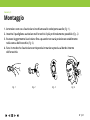
Montaggio � � � � � � � � � � � � � � � � � � � � � � � � � � 87
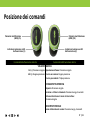
Posizione dei Comandi � � � � � � � � � � � � � � � 88
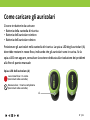
Come Caricare gli Auricolari � � � � � � � � � � � 89
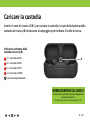
Caricare la Custodia � � � � � � � � � � � � � � � � � � 90
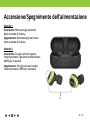
Accensione/Spegnimento � � � � � � � � � � � � � 91
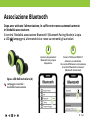
Associazione Bluetooth � � � � � � � � � � � � � � � 92
Controlli della Musica � � � � � � � � � � � � � � � � 93
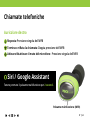
Chiamate Telefoniche � � � � � � � � � � � � � � � � 94
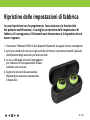
Ripristino di Fabbrica � � � � � � � � � � � � � � � � � 95
Legalità � � � � � � � � � � � � � � � � � � � � � � � � � � � � � 96
NEDERLANDS (NL)
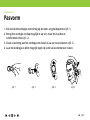
Pasvorm � � � � � � � � � � � � � � � � � � � � � � � � � � � 101
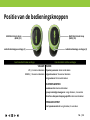
Positie van de Bedieningsknoppen � � � � 102
De oordopjes Opladen � � � � � � � � � � � � � � 103
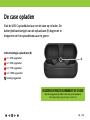
De case Opladen � � � � � � � � � � � � � � � � � � � � 104
In-/Uitschakelen � � � � � � � � � � � � � � � � � � � � 105
Bluetoothkoppeling � � � � � � � � � � � � � � � � � 106
Muziekbediening � � � � � � � � � � � � � � � � � � � 107
Telefoongesprekken � � � � � � � � � � � � � � � � 108
Fabrieksreset � � � � � � � � � � � � � � � � � � � � � � � 109
Wettigheid � � � � � � � � � � � � � � � � � � � � � � � � � 110
NORSK (NO)
Tilpasning� � � � � � � � � � � � � � � � � � � � � � � � � � 115
Betjeningsenhetenes Plassering � � � � � � 116
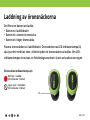
Lading av Øreproppene � � � � � � � � � � � � � � 117
Lading av Etuiet� � � � � � � � � � � � � � � � � � � � � 118
Slå På/Av � � � � � � � � � � � � � � � � � � � � � � � � � � 119
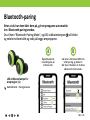
Bluetooth-Paring � � � � � � � � � � � � � � � � � � � 120
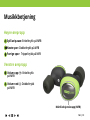
Musikkbetjening � � � � � � � � � � � � � � � � � � � � 121
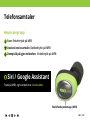
Telefonsamtaler � � � � � � � � � � � � � � � � � � � � 122
Tilbakestilling til Fabrikkinnstillinger � � � 123
Lovligheter � � � � � � � � � � � � � � � � � � � � � � � � � 124
SVENSKA (SV)
Passform � � � � � � � � � � � � � � � � � � � � � � � � � � 129
Reglagens Placering � � � � � � � � � � � � � � � � � 130
Laddning av Öronsnäckorna � � � � � � � � � � 131
Laddning av Fodralet � � � � � � � � � � � � � � � � 132
Ström På/Av � � � � � � � � � � � � � � � � � � � � � � � � 133
Parkoppling Bluetooth � � � � � � � � � � � � � � � 134
Musikkontroller � � � � � � � � � � � � � � � � � � � � � 135
Telefonsamtal � � � � � � � � � � � � � � � � � � � � � � 136
Fabriksåterställning � � � � � � � � � � � � � � � � � 137
Lagligheter � � � � � � � � � � � � � � � � � � � � � � � � � 138
AA TABLE OF CONTENTS
ENGLISH (EN)
DANISH (DA)
DEUTSCH (DE)
ESPAÑOL (ES)
SUOMI (FI)
FRANÇAIS (FR)
ITALIANO (IT)
NEDERLANDS (NL)
NORSK (NO)
SVENSKA (SV)

EN | 3
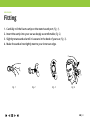
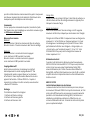
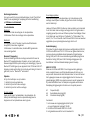
Fitting
ENGLISH (EN)
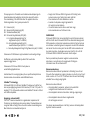
1. Carefully roll the foam eartip on the stem/sound port (Fig. 1).
2. Insert the eartip into your ear as deeply as comfortable (Fig. 2).
3. Slightly rotate earbud until it is secure in the bowl of your ear (Fig. 3).
4. Make the earbud rest tightly next to your inner ear edge.
Fig. 1 Fig. 2 Fig. 3 Fig. 4

EN | 4
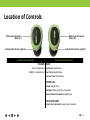
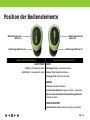
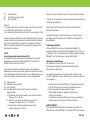
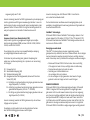
Location of Controls
Left Earbud Functionality Right Earbud Functionality
VOLUME MUSIC
UP (+): Single Press Play/Pause: Single Press
DOWN (-): Double Press Next Track: Double Press
Previous Track: Triple Press
PHONE CALL
Answer: Single Press
End/Reject Call: Long Press, 2 Seconds
Mute/Unmute Microphone: Single Press
VOICE ASSISTANT
Initiate Voice Assistant: Long Press, 2 Seconds
Multi-Function Button
(MFB) (1L)
Multi-Function Button
(MFB) (1R)
Earbud LED Indicator Light (2) Earbud LED Indicator Light (2)

EN | 5
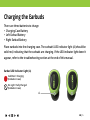
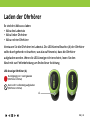
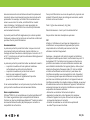
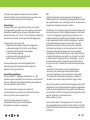
Charging the Earbuds
There are three batteries to charge:
• Charging Case Battery
• Left Earbud Battery
• Right Earbud Battery
Place earbuds into the charging case. The earbuds’ LED indicator light (A) should be
solid red, indicating that the earbuds are charging. If the LED indicator light doesn’t
appear, refer to the troubleshooting section at the end of this manual.
Earbud LED Indicator Light (A)
Solid Red = Charging
(Earbuds in case)
No Light = Fully Charged
(Earbuds in case)
A

EN | 6
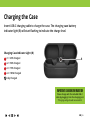
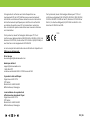
Charging the Case
Insert USB-C charging cable to charge the case. The charging case battery
indicator light (B) will start ashing to indicate the charge level.
IMPORTANT CHARGING INFORMATION
Please charge with the included USB-C
cable by plugging it into the charging port.
*Charging voltage should not exceed 5V.
B
Charging Case Indicator Light (B)
x1 = 25% Charged
x2 = 50% Charged
x3 = 75% Charged
x4 = 100% Charged
Fully Charged

EN | 7
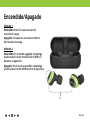
Power On/O
Method 1
Power ON: Remove earbuds from charging case.
Power OFF: Place earbuds into the charging case.
Method 2
Power ON: In OFF mode, press and hold the
multi-function button (MFB) (C) for 3 seconds.
Power OFF: In ON mode, press and hold MFB
for 6 seconds.
C

EN | 8
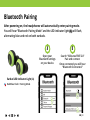
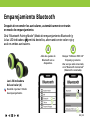
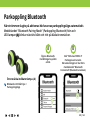
Bluetooth Pairing
Open your
Bluetooth settings
on your device.
AB
Search “ISOtunes FREE 2.0”
Pair and connect.
Once connected you will hear
“Bluetooth Connected.”
After powering on, the headphones will automatically enter pairing mode.
You will hear “Bluetooth Pairing Mode” and the LED indicator light (A)(A) will ash,
alternating blue and red on both earbuds.
Earbud LED Indicator Light (A)
Red/Blue Flash = Pairing Mode

EN | 9
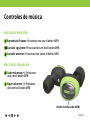
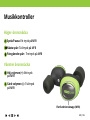
Music Controls
Play/Pause: Single press of the MFB
Next Track: Double press of the MFB
Previous Track: Triple press of the MFB
Volume Up (+): Single press
of the MFB
Volume Down (-): Double press
of the MFB
Right Earbud
Left Earbud
Multi-Function Button (MFB)

EN | 10
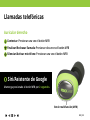
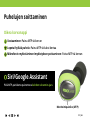
Phone Calls
Siri / Google Assistant
Press and hold MFB for 2 seconds.
Answer: Single press of the MFB
End/Reject Call: Double press of the MFB
Mute/Unmute Microphone: Single press of the MFB
Right Earbud
Multi-Function Button (MFB)

EN | 11
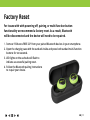
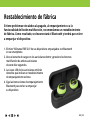
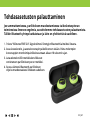
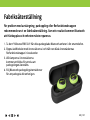
Factory Reset
For issues with with powering o, pairing, or multi-function button
functionality we recommend a factory reset. As a result, Bluetooth
will be disconnected and the device will need to be repaired.
1. Remove “ISOtunes FREE 2.0” from your paired Bluetooth devices in your smartphone.
2. Open the charging case with the earbuds inside and press both earbud multi-function
buttons for ten seconds.
3. LED lights on the earbuds will ash to
indicate a successful pairing reset.
4. Follow the Bluetooth pairing instructions
to re-pair your device.

EN | 12
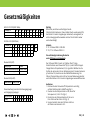
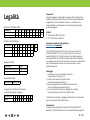
Legalities
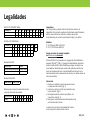
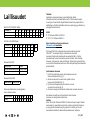
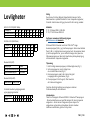
ANSI S3�19-1974 Table (NRR Table)
EN 352-2:2020 Table (SNR Table)
A1: Frequency, Hz 125 250 500 1000 2000 3150 4000 6300 8000 NRR
A2: Grand Mean Attenuation, dB 30.1 29.0 37.2 36.9 35.8 36.2 36.6 42.7 45.6 25
A3: Standard Deviation, dB 3.7 3.5 4.2 4.1 3.9 4.6 5.4 5.2 4.2
B1: Frequency, Hz 63 125 250 500 1000 2000 4000 8000
B2: mF (dB) 26.3 31.2 29.7 33.7 35.1 33.5 32.6 44.3
B3: sf (dB) 4.4 4.8 4.0 6.4 6.7 3.5 3.7 4.0
B4: ADVf 21.9 26.4 25.7 27.3 28.4 30.0 28.9 40.3
SNR
31
APVf=MF-SF (dB)H = 30 dB M = 29 dB L = 27 dB
Bluetooth® (HFP)
Bluetooth® (A2DP)
Relationship between sound output level and input signal level
Criterion input signal: -17.7 dBFS
Sound output level at maximum input signal: 85.3 dB(A) at -14 dBFS
Usage time for maximum input signal: 3.7 h at -14 dBFS
Maximum sound level: 80.0 db(A) at -10 dBFS
Input signal level [dBFS] -54 -49 -44 -39 -34 -29 -24 -19 -14
SPL [dB(A)] 70.2 75.2 80.2 82.2 82.3 82.3 82.6 83.0 85.3
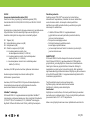
Important
Please read, understand, and follow all safety information�
This hearing protector is specically designed for use in noisy
environments, provided it is properly used and the protector
remains clean and undamaged�
Models
IT-72 : ISOtunes FREE 2�0 EN 352
IT-73, IT-74 : ISOtunes FREE 2�0
Full manual can be found at ISOtunes.com/manuals.
The ISOtunes FREE 2�0 comes with 3 sets of TRILOGY™ Short foam
eartips (S,M,L), and 3 sets of double ange silicone eartips (S,M,L).
Choose the size that ts best in your ear canal. Remember, the
snugger the t, the better the noise reduction. The silicone eartips
are not tested for noise attenuation and should not be used in
noisy environments�
Fitting
1� Carefully roll the foam eartip on the stem/sound port (Fig. 1)�
2� Insert the eartip into your ear as deeply as comfortable (Fig. 2).
3� Slightly rotate earbud until it is secure in the
bowl of your ear (Fig. 3).
4� Make the earbud rest tightly next to your inner ear edge�
Improper or careless insertion of the eartip into the ear could
cause damage to the inner ear�
Introduction
Thank you for purchasing ISOtunes® FREE 2�0 Bluetooth® earbuds�
These earbuds have been specically designed for use in noisy
environments – allowing you to block out much of the surrounding

EN | 13
noise so that you can listen to your music or talk on the phone with
less interruption�
Controls
For an overview of product controls, see the Quick Start Guide
included in the packaging or reference the Online Manual at
ISOtunes.com/manuals
Power On/O
Method 1
Power ON: Remove earbuds from charging case�
Power OFF: Place earbuds into charging case�
Method 2
Power ON: In OFF mode, press and hold multi-function button
(MFB) for 3 seconds�
Power OFF: In ON mode, press and hold MFB for 6 seconds�
Bluetooth® Pairing
After powering on, the earbuds will automatically enter Bluetooth®
Pairing Mode. Look for quick red and blue ashes from the earbud
as a conrmation. Open the Bluetooth® settings on your device�
Search for “ISOtunes FREE 2�0”� Pair and connect� You will hear
“Bluetooth® Connected” once connected�
Charging
There are three batteries to charge:
1� Charging Case Battery
2� Left Earbud Battery
3� Right Earbud Battery
Charging the Case
Insert USB type C charging cable into the charging case� The
charging case battery indicator light will start ashing to indicate
charge level�
Charging the Earbuds
Place earbuds into the charging case� The earbuds’ red indicator
light should be solid red, indicating that the earbuds are charging�
Only charge your ISOtunes FREE 2�0 with a Maximum 5 Volt
charger� Using a charger higher than 5 Volts could be dangerous
and may damage your ISOtunes product� Be especially careful with
“quick charge” or “turbo charge” chargers, which often supply 9, 12,
or 15 Volts� Your ISOtunes FREE 2�0 cannot be charged at voltage
levels above 5 volts.
Noise Attenuation
This product has been tested to the European Safety Standard
EN 352-2:2020 and the ANSI S3�19-1974 standard for a hearing
protector, with a Single Number Rating (SNR) of 31 dB and a Noise
Reduction Rating (NRR) of 25 dB� Full testing details are available in
the Noise Attenuation section of this booklet�
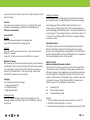
ANSI S3.19-1974
American National Standards Institute
The level of noise entering a person’s ear, when ISOtunes® FREE
2�0 earbuds are worn as directed, is closely approximated by the
dierence between the A-weighted environmental noise level and
the Noise Reduction Rating (NRR). Improper t of this device will
reduce its eectiveness in attenuating noise. Consult the enclosed
instructions for proper tting. ISOtunes FREE 2.0 should not be
used if a proper t is not achieved or maintained.
A1: Frequency (Hz)
A2: Mean Attenuation (dB)
A3: Standard Deviation (dB)
Example:
1� The surrounding noise level measured at the ear is 100 dB�
2� The NRR of ISOtunes® FREE 2�0 is 25 dB�
3� The noise level entering the ear is approximately equal to 75 dB�

EN | 14
Please note that the NRR is based on the attenuation of continuous
noise and may not be an accurate indicator of the protection
attainable against impulsive noise, such as gunre.
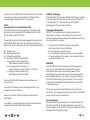
EN 352
European Comm. for Standardization (CEN)
The product has been tested and approved in accordance with
personal protective equipment (PPE) standards: EN 352-2:2020,
EN 352-9:2020, and EN 352-10:2020�
The earplugs are provided with level-dependent attenuation and
safety-related audio input Check correct operation before use� If
distortion or failure is detected, refer to the troubleshooting advice�
B4: Frequency (Hz)
B5: Mean Attenuation (dB)
B6: Standard Deviation (dB)
B7: Assumed Protection Value (APV) (dB
H = Hearing protection estimation for
high frequency sounds (f ≥ 2000Hz)
M = Hearing protection estimation for
medium frequency sounds (500 Hz < f < 2000Hz)
L = Hearing protection estimation for
low frequency sounds (f ≤ 500Hz)
Please note that the SNR is based on the continuous wear
of the product�
The output of the audio circuit of the hearing protector may
exceed the exposure limit level
Please note, ISOtunes FREE 2�0 provides an entertainment
audio facility�
The audibility of warning signals at a specic workplace may be
impaired while using the entertainment facility�
SafeMax™ Technology
ISOtunes® FREE 2�0 incorporates SafeMax™ Technology, therefore
its volume output has been limited to 85 decibels (IT-73 & IT-74),
or 79 decibels (IT-72) � ISOtunes® devices with SafeMax™
Technology are OSHA and ANSI compliant�
Cleaning and Maintenance
TRILOGY™ foam eartips should be regularly inspected for
deterioration, cracking, or other damage� The eartips can be
cleaned in between uses with a damp cloth and water� Over time,
the eartips should be replaced�
• Clean your ISOtunes FREE 2�0 by gently wiping them
with a clean, damp cloth with mild soap�
• Do not immerse the earbuds in water�
• Do not use abrasive cleaning solvents to clean the earbuds�
• If the earbuds get wet from sweat or rain, please discontinue
use and allow them to dry�
WARNINGS
ISOtunes® FREE 2�0 does an excellent job of blocking outside
noise� As such, ISOtunes® FREE 2�0 should NOT be used in
environments where users need to be fully aware of their
surroundings for personal safety reasons� For example, do NOT
use them while driving a car or riding a motorcycle� Similarly, do
NOT use them when riding a bicycle outside� The user is solely
responsible for ensuring that ISOtunes® FREE 2�0 is used ONLY
in safe environments�
This product may be adversely aected by certain chemical
substances, such as bug spray and sunscreen� Further information
may be sought from the manufacturer�
Recommendations
The wearer should ensure the product is properly cleaned and
dry before and after use� Storage should be in a clean and dry
location between -20 °C and 50 °C� The battery should not be fully
discharged before long term storage�

EN | 15
The wearer should ensure that:
• The hearing protector is tted, adjusted, and maintained
in accordance with the manufacturer’s instructions�
• The hearing protector is worn at all times
in noisy surroundings�
• The hearing protector is regularly inspected
for serviceability�
If these recommendations are not adhered to, the protection
aorded by the hearing protector will be severely impaired.
Additional Notes
ISOtunes® FREE 2�0 is compliant with Bluetooth® V5�2� We do not
guarantee compatibility of all functions on every Bluetooth®-
enabled device� Please check your device’s user manual for
compatibility and functionality�
Weight: 9 g (both earbuds), 32 g (case)
Date of Obsolescence: 3 years from purchase date� Not to be used
in Explosive Atmospheres�
For additional information or questions about ISOtunes® products
or spares and accessories, please contact our support team�
FCC
Caution: The user is cautioned that changes or modications not
expressly approved by the party responsible for compliance could
void the users’ authority to operate the equipment�
Note: This equipment has been tested and found to comply with
the limits for a Class B digital device, pursuant to part 15 of the FCC
Rules� These limits are designed to provide reasonable protection
against harmful interference in a residential installation� This
equipment generates, uses and can radiate radio frequency energy
and, if not installed and used in accordance with the instructions,
may cause harmful interference to radio communications�
However, there is no guarantee that interference will not occur
in a particular installation� If this equipment does cause harmful
interference to radio or television reception, which can be
determined by turning the equipment o and on, the user is
encouraged to try to correct the interference by one or more of the
following measures:
• Reorient or relocate the receiving antenna
• Increase the separation between the equipment and receiver�
• Connect the equipment into an outlet on a circuit dierent
from that to which the receiver is connected�
• Consult the dealer or an experienced radio/TV technician
for help�
This equipment complies with FCC‘s RF radiation exposure limits
set forth for an uncontrolled environment� End users must follow
the specic operating instructions for satisfying RF exposure
compliance� This transmitter must not be co-located or operating in
conjunction with any other antenna or transmitter�
Hereby, Haven Technologies declares that the IT-72 complies with
Regulation (EN)2016/425 and EN 352-2:2020, Directive 2012/19/
EU, Directive 2011/65/EU & (EU)2015/863, and Radio Equipment
Directive 2014/53/EU�
The full text of the declaration of conformity is available at:
ISOtunes.co.uk/manuals.
UK & Europe
uk-eurosupport@isotunesaudio�com
North America
support@isotunesaudio�com
1-844-396-3737
Monday-Friday 9-5 ET
This product has been certied by:
Notifed Body 1974
PZT GmbH
Bismarckstr� 264B

EN | 16
D-26389 Wilhelmshaven, Germany
The monitoring of this product is carried out
according to Module C2 by:
Notifed Body 1974
PZT GmbH
Bismarckstr� 264B
D-26389 Wilhelmshaven, Germany
Hereby, Haven Technologies declares that the IT-72 complies
with Regulation (EU) 2016/425, EN 352-2:2020, EN 352-9:2020,
and EN 352-10:2020 on PPE, Directive 2011/65/EU on RoHS-2,
Delegated Directive (EU) 2015/863 on RoHS-3, and Directive
2014/53/EU on RED�
1974

DA | 17
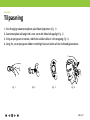
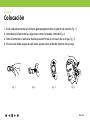
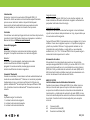
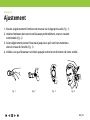
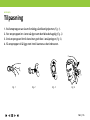
Tilpasning
DANSK (DA)
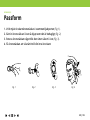
1. Rul forsigtigt skumørestykket på stilken/lydporten (Fig. 1).
2. Sæt ørestykket så langt ind i øret, som det føles behageligt (Fig. 2).
3. Drej øreproppen en smule, indtil den sidder sikkert i din øregang (Fig. 3).
4. Sørg for, at øreproppen sidder ordentligt fast ved siden af den indvendige ørekant.
Fig. 1 Fig. 2 Fig. 3 Fig. 4

DA | 18
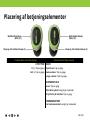
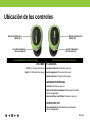
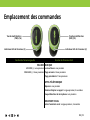
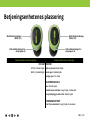
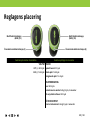
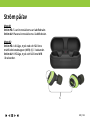
Placering af betjeningselementer
Funktionalitet af venstre øreprop Funktionalitet af højre øreprop
LYDSTYRKE MUSIK
OP (+): Tryk en gang Afspil/Pause: Tryk en gang
NED (-): Tryk to gange Næste nummer: Tryk to gange
Forrige nummer: Tryk tre gange
TELEFONOPKALD
Besvar: Tryk en gang
Afslut/Afvis opkald: Langt tryk, 2 sekunder
Slå lyd fra/til på mikrofon: Tryk en gang
STEMMEASSISTENT
Start stemmeassistent: Langt tryk, 2 sekunder
Multifunktionsknap
(MFK) (1L)
Multifunktionsknap
(MFK) (1R)
Øreprop, LED-indikatorlampe (2) Øreprop, LED-indikatorlampe (2)

DA | 19
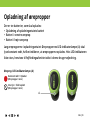
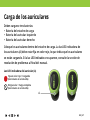
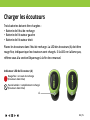
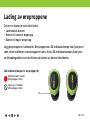
Opladning af ørepropper
Der er tre batterier, som skal oplades:
• Opladning af opladningsetuiets batteri
• Batteri i venstre øreprop
• Batteri i højre øreprop
Læg ørepropperne i opladningsetuiet. Øreproppernes LED-indikatorlampe (A) skal
lyse konstant rødt, hvilket indikerer, at ørepropperne oplades. Hvis LED-indikatoren
ikke vises, henvises til fejlndingsafsnittet sidst i denne brugervejledning.
Øreprop, LED-indikatorlampe (A)
Konstant rødt = Oplader
(Ørepropper i etui)
Intet lys = fuldt opladt
(Ørepropper i etui)
A

DA | 20
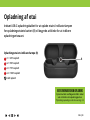
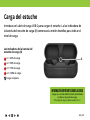
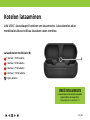
Opladning af etui
Indsæt USB-C-opladningskablet for at oplade etuiet. Indikatorlampen
for opladningsetuiets batteri (B) vil begynde at blinke for at indikere
opladningsniveauet.
VIGTIG INFORMATION OM OPLADNING
Oplad med det medfølgende USB-C-kabel
ved at tilslutte det opladningsporten.
*Opladningsspændingen må ikke overstige 5 V.
B
Opladningsetuiets indikatorlampe (B)
x1 = 25 % opladt
x2 = 50 % opladt
x3 = 75 % opladt
x4 = 100 % opladt
Fuldt opladt
Seite wird geladen ...
Seite wird geladen ...
Seite wird geladen ...
Seite wird geladen ...
Seite wird geladen ...
Seite wird geladen ...
Seite wird geladen ...
Seite wird geladen ...
Seite wird geladen ...
Seite wird geladen ...
Seite wird geladen ...
Seite wird geladen ...
Seite wird geladen ...
Seite wird geladen ...
Seite wird geladen ...
Seite wird geladen ...
Seite wird geladen ...
Seite wird geladen ...
Seite wird geladen ...
Seite wird geladen ...
Seite wird geladen ...
Seite wird geladen ...
Seite wird geladen ...
Seite wird geladen ...
Seite wird geladen ...
Seite wird geladen ...
Seite wird geladen ...
Seite wird geladen ...
Seite wird geladen ...
Seite wird geladen ...
Seite wird geladen ...
Seite wird geladen ...
Seite wird geladen ...
Seite wird geladen ...
Seite wird geladen ...
Seite wird geladen ...
Seite wird geladen ...
Seite wird geladen ...
Seite wird geladen ...
Seite wird geladen ...
Seite wird geladen ...
Seite wird geladen ...
Seite wird geladen ...
Seite wird geladen ...
Seite wird geladen ...
Seite wird geladen ...
Seite wird geladen ...
Seite wird geladen ...
Seite wird geladen ...
Seite wird geladen ...
Seite wird geladen ...
Seite wird geladen ...
Seite wird geladen ...
Seite wird geladen ...
Seite wird geladen ...
Seite wird geladen ...
Seite wird geladen ...
Seite wird geladen ...
Seite wird geladen ...
Seite wird geladen ...
Seite wird geladen ...
Seite wird geladen ...
Seite wird geladen ...
Seite wird geladen ...
Seite wird geladen ...
Seite wird geladen ...
Seite wird geladen ...
Seite wird geladen ...
Seite wird geladen ...
Seite wird geladen ...
Seite wird geladen ...
Seite wird geladen ...
Seite wird geladen ...
Seite wird geladen ...
Seite wird geladen ...
Seite wird geladen ...
Seite wird geladen ...
Seite wird geladen ...
Seite wird geladen ...
Seite wird geladen ...
Seite wird geladen ...
Seite wird geladen ...
Seite wird geladen ...
Seite wird geladen ...
Seite wird geladen ...
Seite wird geladen ...
Seite wird geladen ...
Seite wird geladen ...
Seite wird geladen ...
Seite wird geladen ...
Seite wird geladen ...
Seite wird geladen ...
Seite wird geladen ...
Seite wird geladen ...
Seite wird geladen ...
Seite wird geladen ...
Seite wird geladen ...
Seite wird geladen ...
Seite wird geladen ...
Seite wird geladen ...
Seite wird geladen ...
Seite wird geladen ...
Seite wird geladen ...
Seite wird geladen ...
Seite wird geladen ...
Seite wird geladen ...
Seite wird geladen ...
Seite wird geladen ...
Seite wird geladen ...
Seite wird geladen ...
Seite wird geladen ...
Seite wird geladen ...
Seite wird geladen ...
Seite wird geladen ...
Seite wird geladen ...
Seite wird geladen ...
Seite wird geladen ...
Seite wird geladen ...
Seite wird geladen ...
Seite wird geladen ...
Seite wird geladen ...
Seite wird geladen ...
-
 1
1
-
 2
2
-
 3
3
-
 4
4
-
 5
5
-
 6
6
-
 7
7
-
 8
8
-
 9
9
-
 10
10
-
 11
11
-
 12
12
-
 13
13
-
 14
14
-
 15
15
-
 16
16
-
 17
17
-
 18
18
-
 19
19
-
 20
20
-
 21
21
-
 22
22
-
 23
23
-
 24
24
-
 25
25
-
 26
26
-
 27
27
-
 28
28
-
 29
29
-
 30
30
-
 31
31
-
 32
32
-
 33
33
-
 34
34
-
 35
35
-
 36
36
-
 37
37
-
 38
38
-
 39
39
-
 40
40
-
 41
41
-
 42
42
-
 43
43
-
 44
44
-
 45
45
-
 46
46
-
 47
47
-
 48
48
-
 49
49
-
 50
50
-
 51
51
-
 52
52
-
 53
53
-
 54
54
-
 55
55
-
 56
56
-
 57
57
-
 58
58
-
 59
59
-
 60
60
-
 61
61
-
 62
62
-
 63
63
-
 64
64
-
 65
65
-
 66
66
-
 67
67
-
 68
68
-
 69
69
-
 70
70
-
 71
71
-
 72
72
-
 73
73
-
 74
74
-
 75
75
-
 76
76
-
 77
77
-
 78
78
-
 79
79
-
 80
80
-
 81
81
-
 82
82
-
 83
83
-
 84
84
-
 85
85
-
 86
86
-
 87
87
-
 88
88
-
 89
89
-
 90
90
-
 91
91
-
 92
92
-
 93
93
-
 94
94
-
 95
95
-
 96
96
-
 97
97
-
 98
98
-
 99
99
-
 100
100
-
 101
101
-
 102
102
-
 103
103
-
 104
104
-
 105
105
-
 106
106
-
 107
107
-
 108
108
-
 109
109
-
 110
110
-
 111
111
-
 112
112
-
 113
113
-
 114
114
-
 115
115
-
 116
116
-
 117
117
-
 118
118
-
 119
119
-
 120
120
-
 121
121
-
 122
122
-
 123
123
-
 124
124
-
 125
125
-
 126
126
-
 127
127
-
 128
128
-
 129
129
-
 130
130
-
 131
131
-
 132
132
-
 133
133
-
 134
134
-
 135
135
-
 136
136
-
 137
137
-
 138
138
-
 139
139
-
 140
140
-
 141
141
-
 142
142


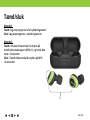
ISOtunes IT-74 Bedienungsanleitung
- Typ
- Bedienungsanleitung
- Dieses Handbuch eignet sich auch für
in anderen Sprachen
- français: ISOtunes IT-74 Le manuel du propriétaire
- español: ISOtunes IT-74 El manual del propietario
- Nederlands: ISOtunes IT-74 de handleiding
- dansk: ISOtunes IT-74 Brugervejledning
- eesti: ISOtunes IT-74 Omaniku manuaal
- svenska: ISOtunes IT-74 Bruksanvisning
Verwandte Artikel


Andere Dokumente
-
P. Lindberg 9068525 Bedienungsanleitung
-
-
AUSounds AU-Lens Benutzerhandbuch
-
 ISO Tunes Xtra 2.0 Earplug Headphone Benutzerhandbuch
-
Ledwood Bluetooth Stereo Headset Benutzerhandbuch
-
Ledwood 602509 Benutzerhandbuch
-
MIXX StreamBuds Blend 3 Benutzerhandbuch
-
MIXX HTG01 Benutzerhandbuch
-
MIXX StreamBuds Blend 2 Benutzerhandbuch
-
Yamaha TW-ES5A Benutzerhandbuch
