Hama 00052491 Bedienungsanleitung
- Kategorie
- Mäuse
- Typ
- Bedienungsanleitung

w ww.hama.com
H ama GmbH & Co KG
Postfach 80
86651 Monheim/Germany
Tel. +49 (0)9091/502-0
Fax +49 (0)9091/502-274
www.hama.com
00052491-01.07
00052491bda.indd Abs1:2
00052491bda.indd Abs1:2
10.04.2007 14:31:41 Uhr
10.04.2007 14:31:41 Uhr

Muster
3
Wireless Optical Presenter
Mouse M920
00052491
00052491bda.indd Abs1:3
00052491bda.indd Abs1:3
10.04.2007 14:31:42 Uhr
10.04.2007 14:31:42 Uhr

2
l
Benutzerhandbuch
Press
slide out
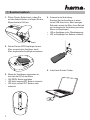
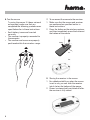
1. Öffnen Sie das Batteriefach, indem Sie
auf den Knopf drücken, und legen Sie die
Mignonbatterie (AA) ein.
2. Ziehen Sie den USB-Empfänger heraus.
Maus ausgeschaltet: Empfänger steckt
Maus eingeschaltet: Empfänger entnommen
3. Wenn der Empfänger entnommen ist,
leuchtet die LED an der Maus.
• LED GRÜN: Batterie geladen
•
LED blinkt langsam ROT: Batterie schwach
• LED blinkt schnell ROT: Batterie sehr
schwach
4. Automatische Verbindung.
Stecken Sie den Empfänger in einen
freien USB-Anschluss. Nach wenigen
Sekunden nimmt die Maus ihren Betrieb
auf (automatische Verbindung zwischen
Maus und Empfänger)
•
LED an Empfänger grün: Mausbewegung
•
LED an Empfänger rot: Batterie schwach
5. Installieren Sie den Treiber.
00052491bda.indd Abs2:2
00052491bda.indd Abs2:2
10.04.2007 14:31:42 Uhr
10.04.2007 14:31:42 Uhr

3
Press
7-1.
7-2.
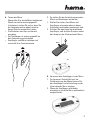
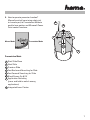
6. Testen der Maus
Überprüfen Sie, ob die Maus funktioniert.
Wenn sie nicht erwartungsgemäß
funktioniert, stellen Sie sicher, dass Sie
die folgenden weiter oben beschrie-
benen Schritte ausgeführt haben:
• Die Batterien sind neu und korrekt
eingelegt
• Der Empfänger ist ordnungsgemäß an
den Computer angeschlossen
• Empfänger und Maus befi nden sich
innerhalb ihrer Funkreichweite.
7. So stellen Sie die Verbindung zwischen
Maus und Empfänger wieder her
1. Stellen Sie sicher, dass Maus und
Empfänger wie weiter oben in dieser
Anleitung beschrieben positioniert sind.
2. Drücken Sie den Knopf am drahtlosen
Empfänger, und drücken Sie dann sofort
den Knopf an der Unterseite der Maus.
8. Verstauen des Empfängers in der Maus
1. Zur besseren Portabilität bzw. bei
Nichtbenutzung der Maus können Sie
den Empfänger in die Vertiefung an der
Unterseite der Maus stecken.
2. Wenn der Empfänger vollständig
eingelegt ist, wird die Maus automatisch
ausgeschaltet.
00052491bda.indd Abs2:3
00052491bda.indd Abs2:3
10.04.2007 14:31:43 Uhr
10.04.2007 14:31:43 Uhr

4
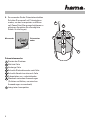
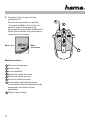
9.
So verwenden Sie die Präsentationsfunktion
Schalten Sie manuell auf Präsentations-
modus, um den Laserpointer und Mirco-
soft PowerPoint-Steuerungsfunktionen zu
aktivieren (beachten Sie die mögliche
Gefahr für die Augen).
Mausmodus Präsentations
modus
Präsentationsmodus
Starten der Diashow
Nächste Folie
Vorherige Folie
Schnelle Rückwärtssuche nach Folie
Schnelle Vorwärtssuche nach Folie
Präsentation aus- und einblenden
Wechseln zwischen Anwendungen
(Drücken und Halten, um zwischen
Anwendungen zu wechseln)
Integrierter Laserpointer
1
2
3
4
5
6
7
8
1
7
2
4
3
6
5
8
1
7
2
4
3
6
5
8
00052491bda.indd Abs2:4
00052491bda.indd Abs2:4
10.04.2007 14:31:43 Uhr
10.04.2007 14:31:43 Uhr

5
g
User guide
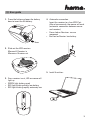
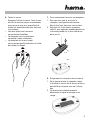
1. Press the button and open the battery
door to insert the AA battery.
2. Slide out the USB receiver.
Mouse off: Receiver in
Mouse on: Receiver out
3. Once receiver is out, LED on mouse will
light up.
• GREEN light: battery good
• RED light blinking slowly: low battery
• RED light blinking rapidly: extremely low
4. Automatic connection.
Insert the receiver to a free USB-Port.
After a few seconds, the mouse will work
(automatic connection between mouse
and receiver)
• Green Led on Receiver: mouse
movement
• Red Led on Receier: low battery
5. Install the driver.
Press
slide out
00052491bda.indd Abs2:5
00052491bda.indd Abs2:5
10.04.2007 14:31:44 Uhr
10.04.2007 14:31:44 Uhr

6
l
Bedienungsanleitung DSL Modem
6. Test the mouse
Try using the mouse. If it does not work
as expected, make sure that you
completed the following procedures as
specifi ed earlier in these instructions:
• Each battery is new and inserted
correctly
• The receiver is properly connected to
the computer
• The receiver and mouse are properly
positioned within their wireless range.
7. To reconnect the mouse to the receiver
1. Make sure that the mouse and receiver
are positioned as specifi ed earlier in
these instructions.
2. Press the button on the wireless reciever,
and then immediately press the button on
the bottom of the mouse.
8. Storing the receiver in the mouse
1. For added portability or when the mouse
is not in use, you can slide the receiver
into it slot on the bottom of the mouse.
2. Power is automatically switched off after
the receiver is fully stored.
Press
7-1.
7-2.
00052491bda.indd Abs2:6
00052491bda.indd Abs2:6
10.04.2007 14:31:44 Uhr
10.04.2007 14:31:44 Uhr

7
9. How to operate presenter function?
Manually switch (consiering safety risk
to human eyes) to Presentation Mode to
enable laser pointer and Mircosoft Power
Point control functions.
Presentation Mode
Start Slide Show
Next Slide
Previous Slide
Fast Backward Searching for Slide
Fast Forward Searching for Slide
Black Screen On & Off
Application Switching
(press and hold to switch among
applications)
Integrated Laser Pointer
1
2
3
4
5
6
7
8
Mouse Mode Presentation Mode
1
7
2
4
3
6
5
8
1
7
2
4
3
6
5
8
00052491bda.indd Abs2:7
00052491bda.indd Abs2:7
10.04.2007 14:31:44 Uhr
10.04.2007 14:31:44 Uhr

8
l
Bedienungsanleitung DSL Modem
f
Manuel d’utilisation
Press
slide out
1. Appuyez sur le bouton et ouvrez le
couvercle du compartiment à piles afi n
d‘insérer les piles LR6 / AA.
2. Extrayez le récepteur USB en le faisant
glisser.
Souris hors tension : récepteur installé
Souris sous tension : récepteur retiré
3. La DEL de la souris s‘allume dès que le
récepteur est retiré.
•
Témoin VERT allumé : piles bien chargées
• Le témoin ROUGE clignote lentement :
piles faibles
• Le témoin ROUGE clignote rapidement :
piles extrêmement faibles
4. Connexion automatique :
Insérez le récepteur dans un port USB
libre. La souris est prête à fonctionner
quelques secondes plus tard (connexion
automatique entre la souris et le
récepteur)
• DEL verte du récepteur allumée :
mouvement de la souris
• DEL rouge du récepteur allumée :
piles faibles
5. Installez le pilote.
00052491bda.indd Abs2:8
00052491bda.indd Abs2:8
10.04.2007 14:31:45 Uhr
10.04.2007 14:31:45 Uhr

9
Press
7-1.
7-2.
6. Testez la souris
Essayez d‘utiliser la souris. Dans le cas
où elle ne fonctionne par normalement,
assurez-vous que vous avez effectué
toutes les opérations décrites dans ces
instructions :
• Les deux piles sont neuves et
correctement installées
• Le récepteur est correctement
connecté à votre ordinateur
• Le récepteur et la souris sont
correctement positionnés dans la limite
de portée du réseau.
7.
Pour reconnecter la souris au récepteur :
1. Assurez-vous que la souris et le
récepteur sont positionnés comme
décrit plus haut dans ces instructions.
2. Appuyez sur la touche du récepteur
sans fi l, puis appuyez immédiatement sur
la touche placée sur la face inférieure
de la souris.
8. Rangement du récepteur dans la souris
1. Vous pouvez placer le récepteur dans
le fond de la souris afi n d‘en accroître sa
portabilité ou lorsque vous ne l‘utilisez
pas.
2. La tension est automatiquement
désactivée lorsque le récepteur est
rangé.
00052491bda.indd Abs2:9
00052491bda.indd Abs2:9
10.04.2007 14:31:45 Uhr
10.04.2007 14:31:45 Uhr

10
1
2
3
4
5
6
7
8
1
7
2
4
3
6
5
8
1
7
2
4
3
6
5
8
9. Comment utiliser la souris lors de
présentations ?
Poussez le commutateur en position
„Presentation Mode” afi n d‘utiliser le
pointeur laser et les fonctions de
commande de présentation de Microsoft
Power Point et veillez à ne pas diriger le
rayon laser vers les yeux.
Mode souris Mode
présentation
Mode présentation
Démarrer le diaporama
Ecran suivant
Ecran prédédent
Recherche rapide en arrière
Recherche rapide en avant
Ecran noir et désactivation
Commutation application (appuyez
et maintenez la touche enfoncée afi n de
commander les fonctions d‘une
application)
Pointeur laser intégré
00052491bda.indd Abs2:10
00052491bda.indd Abs2:10
10.04.2007 14:31:45 Uhr
10.04.2007 14:31:45 Uhr
-
 1
1
-
 2
2
-
 3
3
-
 4
4
-
 5
5
-
 6
6
-
 7
7
-
 8
8
-
 9
9
-
 10
10
-
 11
11


Hama 00052491 Bedienungsanleitung
- Kategorie
- Mäuse
- Typ
- Bedienungsanleitung
in anderen Sprachen
- English: Hama 00052491 Owner's manual
- français: Hama 00052491 Le manuel du propriétaire