Lenco 9000-0046-3113 Benutzerhandbuch
- Kategorie
- Radios
- Typ
- Benutzerhandbuch
Dieses Handbuch eignet sich auch für

1
Model
DAR-015
USER MANUAL
Stereo DAB+, FM radio with bluetooth
HANDLEIDING
Stereo DAB+, FM-radio met Bluetooth
BEDIENUNGSANLEITUNG
DAB+ / FM-Stereo-Radio mit Bluetooth
MODE D’EMPLOI
Radio FM DAB+ stéréo avec Bluetooth
MANUAL DEL USUARIO
Radio FM, DAB+ estéreo con Bluetooth

2
Index:
English ...................................................................................................... Error! Bookmark not defined.
Nederlands .......................................................................................................................................... 133
Deutsch ................................................................................................................................................. 24
Français ................................................................................................................................................. 35
Español .................................................................................................................................................. 46

3
CAUTION:
Usage of controls or adjustments or performance of procedures other than those specified herein
may resulte in hazardous radiation exposure.
This unit should not be adjusted or repaired by anyone except qualified service personnel.
PRECAUTIONS BEFORE USE
KEEP THESE INSTRUCTIONS IN MIND:
1. Do not use this device near water.
2. Clean only with a slightly damp cloth.
3. Do not cover or block any ventilation openings. When placing the device on a shelf, leave 5 cm
(2”) free space around the whole device.
4. Install in accordance with the supplied user manual.
5. Don’t step on or pinch the power adaptor. Be very careful, particularly near the plugs and the
cable’s exit point. Do not place heavy items on the power adaptor, which may damage it. Keep
the entire device out of children’s reach! When playing with the power cable, they can
seriously injure themselves.
6. Unplug this device during lightning storms or when unused for a long period.
7. Keep the device away from heat sources such as radiators, heaters, stoves, candles and other
heat-generating products.
8. Avoid using the device near strong magnetic fields.
9. Electrostatic discharge can disturb normal usage of this device. If so, simply reset and restart
the device following the instruction manual. During file transmission, please handle with care
and operate in a static-free environment.
10. Warning! Never insert an object into the product through the vents or openings. High voltage
flows through the product and inserting an object can cause electric shock and/or short circuit
internal parts. For the same reason, do not spill water or liquid on the product.
11. Do not use in wet or moist areas such as bathrooms, steamy kitchens or near swimming pools.
12. Do not use this device when condensation may occur.
13. Although this device is manufactured with the utmost care and checked several times before
leaving the factory, it is still possible that problems may occur, as with all electrical appliances.
If you notice smoke, an excessive build-up of heat or any other unexpected phenomena, you
should disconnect the plug from the main power socket immediately.
14. This device must be well ventilated at all time!
15. This device must operate on a power source as specified on the specification label. If you are
not sure of the type of power supply used in your home, consult your dealer or local power
company.
16. The socket outlet must be installed near the equipment and must be easily accessible.
17. Do not overload ac outlets or extension cords. Overloading can cause fire or electric shock.
18. Devices with class 1 construction should be connected to a main socket outlet with a protective
earthed connection.
19. Devices with class 2 construction do not require a earthed connection.
20. Keep away from rodents. Rodents enjoy biting on power cords.
21. Always hold the plug when pulling it out of the main supply socket. Do not pull the power cord.
This can cause a short circuit.

4
22. Avoid placing the device on any surfaces that may be subject to vibrations or shocks.
23. To protect the device during a thunderstorm, unplug the ac power adaptor.
24. When the device is not in use for long periods, unplug the ac power adaptor for safety reasons.
25. To clean the device, use a soft dry cloth. Do not use solvents or petrol based fluids. To remove
severe stains, you may use a damp cloth with dilute detergent.
26. The supplier is not responsible for damage or lost data caused by malfunction, misuse,
modification of the device or battery replacement.
27. Do not interrupt the connection when the device is formatting or transferring files. Otherwise,
data may be corrupted or lost.
28. The usb memory stick should be plugged into the unit directly. Don’t use an usb extension
cable because it can cause interference resulting in failing of data.
29. The apparatus shall not be exposed to dripping or splashing and make sure that no objects
filled with liquids, such as vases, are placed on or near the apparatus.
30. To completely disconnect the power input, the mains plug of the apparatus shall be
disconnected from the mains, as the disconnect device is the mains plug of apparatus.
31. The mains plug of the apparatus should not be obstructed or should be easily accessed during
intended use.
32. Battery shall not be exposed to excessive heat such as sunshine, fire or the like.
33. Minimum distance of 10cm around the apparatus is needed for sufficient ventilations.
34. The ventilation should not be impeded by covering the ventilation openings with items such as
newspapers, table-cloths, curtains etc.
35. No naked flame sources such as lighted candles should be placed on the apparatus.
36. Attention should be drawn to the environmental aspects of battery disposal.
37. The apparatus can only be used in moderate extremely cold or climates warm environments
should be avoided.
38. The rating label has been marked on the bottom panel of the apparatus.
39. This device is not intended for use by people (including children) with physical, sensory or
mental disabilities, or a lack of experience and knowledge, unless they’re under supervision or
have received instructions about the correct use of the device by the person who is responsible
for their safety.
40. This product is intended for household use only and not for commercial or industrial use.
41. Make sure the unit is adjusted to a stable position. Damage caused by using this product in an
unstable position or by failure to follow any other warning or precaution contained within this
user manual will not be covered by warranty.
42. Never remove the casing of this apparatus.
43. Never place this apparatus on other electrical equipment.
44. Do not use or store this product in a place where it is subject to direct sunlight, heat, excessive
dust or vibration.
45. Do not clean this product with water or other liquids.
46. Do not block or cover the slots and holes in the product.
47. Do not push foreign objects into the slots or holes in the product.
48. Do not allow children access to plastic bags.

5
49. Please check that the voltage on the type plate of your appliance corresponds with your house
electricity supply (type plate is located on the back of the unit).
50. Protect the power cord from being walked on or pinched, particularly at plugs, convenience
receptacles, and the point where they exit from the apparatus.
51. Only use attachments/accessories specified by the manufacturer.
52. Refer all servicing to qualified service personnel. Servicing is required when the apparatus has
been damaged in any way, such as the power supply cord or the plug, when liquid has been
spilled or objects have fallen into the apparatus, when the apparatus has been exposed to rain
or moisture, does not operate normally, or has been dropped.
53. Do not use a damaged power cord or plug or a loose outlet. Doing so may result in fire or
electric shock.
Warning: prolonged exposure to loud sounds from personal music players may lead to temporary or
permanent hearing loss.
INSTALLATION
• Unpack all parts and remove protective material.
• Do not connect the unit to the mains before checking the mains voltage and before all other
connections have been made.
• Do not cover any vents and make sure that there is a space of several centimeters around
the unit for ventilation.

6
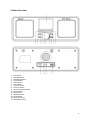
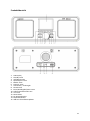
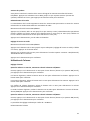
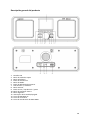
Product Overview
1. LCD Display
2. Standby Button
3. Info/Menu Button
4. Preset Button
5. Mode Button
6. Scan Button
7. Vol+/Vol- Knob
8. Previous Button
9. Enter/Play/Pause Button
10. Snooze Button
11. Next Button
12. ON/OFF Switch
13. DC IN Socket
14. Earphone Socket
15. SW Update Socket

7
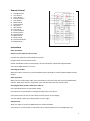
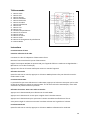
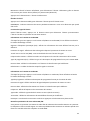
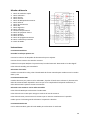
Remote Control
1. Standby button
2. Vol+ button
3. Alarm button
4. Previous button
5. Scan button
6. Mute button
7. Preset button
8. OK button
9. Next button
10. Vol- button
11. Preset numbers
12. Snooze button
13. Stereo button
14. Menu button
15. Sleep button
16. Preset shift button
17. Mode button
Instructions
Basic operations
Switch on your radio for the first time
Connect the radio with Power Adaptor provided.
Plug the other end into power socket.
Switch the ON/OFF switch to ON position, the unit will display “Welcome to digital Radio”.
Press the Standby button to turn on.
Selecting the modes
When the radio is turned on, press the Mode button repeatedly to switch between DAB+ and FM
modes.
DAB+ operation
When you first select DAB+ radio, press Scan button it will search for and store all available DAB+
stations. Once Auto search is completed, your radio will select the first station tuned.
Selecting between stations. With your radio on:
Press the Mode button to select DAB+ mode.
Press the Prev or Next button to navigate through the list of stations.
Press Enter button to tune to the station currently shown on the display.
You may adjust volume by turning Volume to left or right.
FM operation
With your radio on, press the Mode button to select FM mode.
Press the Prev or Next button to manually tune to specific frequencies by 0.05MHz per step.

8
The radio also includes the scan feature of FM, allowing you to automatically tune to FM stations.
Press the Scan button to automatically search for the next available radio station. When a station is
found it will be automatically played.
You can search for stations in the opposite direction by pressing and holding the Scan button.
Storing stations as presets
Radio can store 10 stations as presets in both DAB+ and FM mode. To store a preset:
Tune to the station you like, press and hold the Preset button, then using the Prev or Next button to
select desired preset number. Then, press and hold the preset button for 2 seconds, display indicate
Preset Store< xx: (Empty)>, now select with Prev or Next button the desired preset for store.
Press the Enter button to store the station. The message “Preset xx stored” will appear on the
display.
Playing stations saved as presets
To play a preset station:
Select the band (DAB+ or FM) of the station by pressing the Mode button.
Press the Preset button to recall the preset station, then using the Prev or Next button to browse
through your presets and press the Enter button to confirm.
Setting the time automatically
When you first turn on the radio it will automatically synchronize to the local time while searching
for DAB+ stations. If the time hasn’t set itself try to change the location of the device for a better
signal.
System Settings
With the unit on, press and hold the Info/Menu button. This will open the “Set Menu”.
Press the Prev or Next button to select your desired Sub-option.
Setting the Time/Date
Press and hold Info/Menu button, the <Time/Date> will be shown on screen, press Enter button to
enter time setting mode.
The hours will flash. Press the Prev or Next button to set the hour. Press the Enter button to confirm.
Repeat the last two steps to set the minutes, year, month and date.
System Version
You can check the software version number by pressing and holding the Info/Menu button. Press
the Prev or Next button until <System Version> is shown on the screen, press the Enter button to
confirm.
Resetting the radio
Resetting the radio will delete all the tuned DAB+ stations and all the preset memory stations in FM
and DAB+ modes. To reset the radio:
Press and hold the Info/Menu button.

9
Press the Prev or Next button until <Factory reset> is shown on screen, press the Enter button and
<Yes> or <No> is shown on the screen. Use Prev or Next button to select <Yes>.
Press the Enter button and radio will be reset.
Sleep setting
Press and hold the Info/Menu button.
Press the Prev or Next button until <Sleep Set> is shown on screen, press the Enter button.
Press the Prev or Next button to select either OFF-120-90-60-45-30-15-5 minutes.
Press the Enter button to confirm.
Using the alarm
Alarm Setting
With radio on, press and hold the Info/Menu button.
Then press the Prev or Next button to choose Alarm 1 to ON position, press Enter button to confirm.
The hours will flash, use the Prev or Next button to select hour. Press Enter button to confirm.
The mins will flash, use the Prev or Next button to select the minutes. Press Enter button to confirm.
The Volume digit will flash, use the Prev or Next button select the Volume. Press Enter button to
confirm.
The mode of Alarm will flash, use the Prev or Next button select the Alarm source: Alarm/DAB/FM.
Press Enter button to confirm.
With radio on, press and hold the Info/Menu button.
Then press the Prev or Next button to choose Alarm 2 to ON position, press Enter button to confirm.
The setting procedure is the same as the “ALARM1”.
Deactivate the alarm
Press and hold the Info/Menu button, then select the alarm you wish to turn off using the Prev or
Next button to choose the Alarm to OFF position.
Press Enter button. The alarm will be deactivated.
Turning off the alarm
Press the Standby button to turn off the alarm when the alarm is sounding.
NOTE: The alarm will keep ringing for 60 minutes if you do not turn it off when it is sounding.
Snooze Function
When the alarm is sounding, press the Snooze button to turn off the alarm temporarily. The alarm
will be delayed for 9 mins and then come on again.
Station information on DAB mode
Every time you press the Info/Menu button in the DAB mode, the display will cycle through the
following display modes:

10
Dynamic Label Segment (DLS): Displays scrolling text information supplied by the broadcaster.
Signal Strength: Displays a signal bar with the current station strength.
Bit Error Rate (BER): Provides details of the signal error rate.
Channel Frequency: Displays the station’s transmission channel number and frequency.
Program Type (PTY): Shows the type and description of the program provided by the DAB station.
Time&Date: Displays the time and date information provided by the broadcaster.
Bit Rate: The date rate of which the signal is being transmitted.
Station information on FM mode
Every time you press the Info/Menu button in the FM mode, the display will cycle through the
following display modes:
Program type: Displays description of the program provided by the radio station.
Signal Strength: Displays a signal bar with the current station strength.
Time and Date: Displays the time and date information provided by the broadcaster.
Frequency: Displays the station’s transmission frequency.
Audio Type: Displays the audio type of the current station (Stereo or Mono).
Radio Text: Displays scrolling test information supplied by the broadcaster.
Note: To switch between mono and stereo by pressing the Enter button repeatedly.
Retuning your DAB+/FM Radio
You can retune your radio stations to store new stations or tune to a new region. Your preset stations
will remain stored when you perform a full scan retune. In DAB mode:
Press the Scan button to perform a full scan.
Progress will be indicated on the display.
When tuning is complete, the radio will play the first listed station or return to the last station played.
Using the Headphones
You can listen to your DAB/FM radio using headphones, just plug the 3.5mm jack into the back of your
device in the headphone jack. Control the volume by using the Volume knob.
Bluetooth
To choose your mode, press through your choices using the ‘Mode’ button. The choices will be
displayed on the front screen.
Turn on Bluetooth on your phone and ‘Lenco DAR-015’ will appear. Click on this to connect. When the
unit makes a short sound, it has successfully connected.
To choose music you will need to choose the album or playlist from your phone, but once selected you
can then use the Prev or Next button to select previous or next tracks.

11
To pause the music playback, please press play/pause button; to resume music playback, press
play/pause button again.
The operational range between the unit and a Bluetooth device is approximately 10 meters, without
any objects in the way.
FAQs
Problem
Solution
No Power
Check that the system is connected to a working mains outlet.
Check that the DC power adaptor is properly connected to the DC in on the
radio.
No sound
Check that the volume control is not at minimum setting.
Poor reception
Adjust the location of the antenna for best signal reception.
Function disturbed
If none of the above solution work, try switching off and unplugging your Radio.
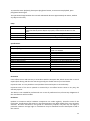
Specifications
Power supply
AC 100-240V
Frequency Ranges
FM 87.5-108MHz
DAB 174-240MHz
Output connector
3.5mm earphone socket
Aerial
Telescopic antenna
Output power
2 x 5W
Max. Power consumption
18W
Power supply adaptor(For EU only)
Adaptor Manufacturer
Dongguan Yuan Shuai Electronic Co., Ltd
Input
AC 100-240V~50/60Hz, 0.65A Max
Output
DC 9V/2A
Adaptor Model Number
YeS04S-0900200VH
Use only original AC adaptor
Use only the power supply listed on the user instructions
Guarantee
Lenco offers service and warranty in accordance with the European law, which means that in case of
repairs (both during and after the warranty period) you should contact your local dealer.
Important note: It is not possible to send products that need repairs to Lenco directly.
Important note: If this unit is opened or accessed by a non-official service center in any way, the
warranty expires.
This device is not suitable for professional use. In case of professional use, all warranty obligations of
the manufacturer will be voided.
Disclaimer
Updates to Firmware and/or hardware components are made regularly. Therefore some of the
instruction, specifications and pictures in this documentation may differ slightly from your particular
situation. All items described in this guide for illustration purposes only and may not apply to
particular situation. No legal right or entitlements may be obtained from the description made in
this manual.

12
Disposal of the Old Device
This symbol indicates that the relevant electrical product or battery should not be
disposed of as general household waste in Europe. To ensure the correct waste
treatment of the product and battery, please dispose them in accordance to any
applicable local laws of requirement for disposal of electrical equipment or
batteries. In so doing, you will help to conserve natural resources and improve
standards of environmental protection in treatment and disposal of electrical
waste (Waste Electrical and Electronic Equipment Directive).
Service
For more information and helpdesk support, please visit www.lenco.com
Lenco Benelux BV, Thermiekstraat 1a, 6361 HB, Nuth, The Netherlands.

13
Nederlands
DAR-015
LET OP!
Het gebruik van bediening of instellingen of het uitvoeren van procedures anders dan zoals zij hierin
staan beschreven, kan leiden tot blootstelling aan gevaarlijke straling.
Dit apparaat mag alleen worden afgesteld of gerepareerd door gekwalificeerd onderhoudspersoneel.
VOORZORGSMAATREGELEN
1. Niet gebruiken in de buurt van water.
2. Alleen schoonmaken met een licht bevochtigde doek.
3. Blokkeer de ventilatieopeningen niet. Houd ten minste 5 cm (2”) ruimte vrij rond het gehele
apparaat als het op een plank wordt geplaatst.
4. Installeer in overeenstemming met de meegeleverde handleiding.
5. Bescherm het netsnoer, zorg ervoor dat er niet op gestapt wordt en dat het niet geplet
wordt, vooral bij de stekker en het punt waar de kabel het apparaat verlaat. Plaats geen
zware voorwerpen, die het netsnoer kunnen beschadigen, op het netsnoer. Houd het gehele
apparaat buiten bereik van kinderen! Zij kunnen zichzelf ernstig verwonden wanneer ze met
het netsnoer spelen.
6. Haal de stekker uit het stopcontact tijdens onweer of bij lange perioden van niet-gebruik.
7. Houd het apparaat uit de buurt van warmtebronnen zoals radiatoren, kachels, fornuizen,
kaarsen en andere producten die warmte genereren.
8. Gebruik het apparaat niet in de buurt van sterke magnetische velden.
9. De normale werking van het product kan worden verstoord door elektrostatische ontlading.
Als dit het geval is, reset het apparaat en start het opnieuw op volgens de instructies in de
handleiding. Ga tijdens het overdragen van bestanden voorzichtig te werk en gebruik het
apparaat in een statisch-vrije omgeving.
10. Waarschuwing! Steek nooit voorwerpen door de ventilatieopeningen in het product. Er
stromen hoge spanningen in het product en een voorwerp in het product steken kan leiden
tot elektrische schokken en/of kortsluiting door dezelfde reden, mors geen water of
vloeistoffen op het product.
11. Gebruik het product niet in natte of vochtige omgevingen, zoals badkamers, stomige
keukens of in de buurt van zwembaden.
12. Gebruik het apparaat niet als er condens kan ontstaan.
13. Dit product is geproduceerd volgens alle geldende veiligheidsnormen. De volgende
veiligheidstips moeten de gebruikers beschermen tegen onzorgvuldig gebruik en de gevaren
die verbonden zijn met een dergelijk gebruik.
14. Hoewel het apparaat zorgvuldig vervaardigd is en uitvoerig is gecontroleerd alvorens het de
fabriek verlaat, geldt net als bij alle elektrische apparaten dat het mogelijk is dat er zich een
probleem ontwikkelt. Als u rook, een te grote ophoping van warmte of andere onverwachte
verschijnselen opmerkt, dan moet u direct de stekker uit het stopcontact halen.
15. Zorg ervoor dat het apparaat voldoende wordt geventileerd!
Het apparaat moet worden aangesloten op een voedingsbron die overeenkomt met de
informatie op het de specificatielabel. Als u niet zeker bent van het type stroomvoorziening
in uw huis, neem dan contact op met uw dealer of het plaatselijke elektriciteitsbedrijf.

14
16. Het stopcontact moet geïnstalleerd zijn in de buurt van het apparaat en eenvoudig
bereikbaar zijn.
17. Overbelast stopcontacten of verlengsnoeren niet, dit kan leiden tot brand of elektrische
schokken.
18. Klasse 1-apparaten moet worden aangesloten op een stopcontact met een geaarde
aansluiting.
19. Apparaten met een klasse ii adapter hebben geen geaarde aansluiting nodig.
20. Uit de buurt van knaagdieren houden. Knaagdieren vinden het leuk om in snoeren te bijten.
21. Trek altijd aan de stekker wanneer u de stekker uit het stopcontact haalt. Trek niet aan het
netsnoer, dit kan kortsluiting veroorzaken.
22. Plaats het apparaat niet op oppervlakken die kunnen worden onderworpen aan trillingen of
schokken.
23. Haal tijdens onweer de stekker uit het stopcontact om het apparaat te beschermen.
24. Haal de stekker voor veiligheidsredenen uit het stopcontact als het apparaat lang niet wordt
gebruikt.
25. Gebruik een zachte droge doek om dit apparaat te reinigen. Gebruik geen oplosmiddelen of
vloeistoffen op basis van benzine. U kunt een vochtige doek met verdund afwasmiddel
gebruiken voor hardnekkige vlekken.
26. Lenco is niet verantwoordelijk voor schade of het verlies van gegevens door storingen,
verkeerd gebruik of wijzigingen aan het apparaat.
27. Verbreek de verbinding niet wanneer het apparaat wordt geformatteerd of tijdens de
overdracht van bestanden. Als u dit toch doet, dan kunnen gegevens beschadigd raken of
verloren gaan.
28. Het apparaat mag niet worden blootgesteld aan druppelend of opspattend water en er
mogen geen voorwerpen gevuld met vloeistoffen, zoals vazen, op of in de buurt van het
apparaat worden geplaatst.
29. Om de stroom volledig af te sluiten, moet de stekker van hetm apparaat uit het stopcontact
worden gehaald. De stekker is in feite de schakelaarvoorziening van het apparaat.
30. De stekker van het apparaat mag niet worden geblokkeerd of moet gemakkelijk bereikbaar
zijn als het apparaat in bedrijf is.
31. Batterijen mogen niet aan overmatige hitte, zoals zonlicht, open vuur e.d., worden
blootgesteld.
32. Zorg voor een afstand van tenminste 10 cm rondom het apparaat voor voldoende ventilatie.
33. De ventilatie mag niet worden gehinderd door het bedekken van de ventilatieopeningen met
voorwerpen zoals kranten, tafelkleden, gordijnen etc.
34. Er mag geen open vuur, zoals brandende kaarsen, op het apparaat worden geplaatst.
35. Aandacht voor het milieu is nodig bij het verwijderen van de batterijen.
36. Gebruik het apparaat alleen in een gematigd klimaat; extreem koude en warme omgevingen
moeten worden vermeden
37. Het typeplaatje vindt u aan de onderkant van het apparaat.

15
38. Dit apparaat is niet bedoeld voor gebruik door personen (inclusief kinderen) met
verminderde lichamelijke, zintuiglijke of geestelijke vermogens, of gebrek aan ervaring en
kennis, tenzij zij onder toezicht staan of instructies over het gebruik van het apparaat
hebben ontvangen door een persoon die verantwoordelijk is voor hun veiligheid.
39. Dit product is alleen voor huishoudelijk gebruik bedoeld en niet voor commercieel of
industrieel gebruik.
40. Verzeker u ervan dat het apparaat in een stabiele positie staat opgesteld. Schade,
veroorzaakt door het gebruik van dit product in een onstabiele positie, of door het niet
naleven van waarschuwingen of voorzorgsmaatregelen genoemd in deze handleiding, valt
niet onder de garantie.
41. Verwijder nooit de behuizing van dit apparaat.
42. Plaats dit apparaat nooit op een ander elektrisch apparaat.
43. Dit product niet gebruiken of opslaan op plaatsen waar het wordt blootgesteld aan direct
zonlicht, hitte, buitensporig veel stof of trillingen.
44. Reinig dit product niet met water of andere vloeistoffen.
45. Bedek of blokkeer de gleuven en de gaten in het product niet.
46. Stop geen vreemde voorwerpen in de gleuven of gaten van het product.
47. Geef kinderen geen gelegenheid in aanraking met plastic zakken te komen.
48. Controleer of de spanning op het specificatieplaatje van uw apparaat overeenkomt met het
lichtnet in uw huis (specificatieplaatje is te vinden op de achterzijde van het apparaat).
49. Zorg ervoor dat niemand op de voedingskabel kan gaan staan of dat de kabel kan worden
ingedrukt, voornamelijk bij stekkers, stopcontacten en het punt waar kabels uit het apparaat
komen.
50. Gebruik uitsluitend uitbreidingen/accessoires gespecificeerd door de fabrikant.
51. Laat alle reparaties over aan gekwalificeerd onderhoudspersoneel. Reparatie is vereist
wanneer het apparaat op enige wijze beschadigd is geraakt, bijvoorbeeld een beschadigde
voedingskabel of stekker, vloeistof of voorwerpen zijn in het apparaat terechtgekomen, het
apparaat is blootgesteld aan regen of vocht, het apparaat werkt abnormaal of is gevallen.
52. Gebruik nooit een beschadigde voedingskabel of stekker of een los stopcontact. Dit vormt
namelijk een risico op brand of elektrische schokken.
53. Usb-sticks moeten rechtstreeks in het apparaat worden gestoken. Gebruik geen usb-
verlengkabels omdat dit kan leiden tot het verlies van gegevens en storingen.
Waarschuwing: langdurige blootstelling aan harde geluiden van persoonlijke muziekspelers kan
leiden tot tijdelijk of permanent gehoorverlies.
INSTALLATIE
• Neem alle onderdelen uit de verpakking en verwijder de beschermende materialen.
• Controleer het voltage van uw elektriciteit voor u het apparaat op stroom aansluit en zorg dat
alle andere verbindingen eerst gedaan zijn.
• Laat de ventilatiegaten vrij en zorg voor een ruimte van een aantal centimeters rondom het
apparaat voor goede ventilatie.

16
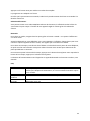
Productoverzicht
1. LCD-Scherm
2. Stand-by-toets
3. Info/Menu-toets
4. Voorkeuzetoets
5. Modus-toets
6. Scantoets
7. Vol+/Vol- toets
8. Vorige-toets
9. Enter/Start/Pauzetoets
10. Sluimertoets
11. Volgende-toets
12. Aan/uit-schakelaar
13. DC IN Aansluiting
14. Aansluiting oortelefoon
15. SW Update Aansluiting

17
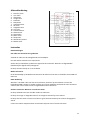
Afstandsbediening
1. Stand-by-toets
2. Vol+ toets
3. Alarmtoets
4. Vorige-toets
5. Scantoets
6. Demptoets
7. Voorkeuzetoets
8. OK-toets
9. Volgende-toets
10. Vol- toets
11. Presetnummers
12. Sluimertoets
13. Stereotoets
14. Menu-toets
15. Slaap-toets
16. Wisseltoets presets
17. Modus-toets
Instructies
Basishandelingen
Uw radio voor de eerste keer gebruiken
Verbind uw radio met de meegeleverde stroomadapter.
Doe het andere uiteinde in uw stopcontact.
Zet de Aan/uit-schakelaar op ON en het apparaat zal het bericht “Welcome to digital Radio”
(Welkom bij de digitale radio) weergeven.
Druk op de toets Standy om in te schakelen.
Modus selecteren
Druk herhaaldelijk op de Mode-toets wanneer de radio aan staat om te schakelen tussen DAB+ en
FM modi.
DAB+ bediening
Wanneer u de DAB+ radio voor het eerst selecteert, druk kan op de Scantoets om naar alle
beschikbare DAB+ stations te zoeken en deze op te slaan. Nadat de automatische scan eenmaal is
voltooid, dan zal uw radio het eerste afgestemde station selecteren.
Stations selecteren. Wanneer uw radio aan staat:
Druk op de Mode-toets om de DAB+ modus te selecteren.
Druk op de Vorige- of Volgende-toets om te navigeren door de lijst met stations.
Druk op de Enter-toets om naar het station te gaan die momenteel op het scherm weergegeven
wordt.
U kunt het volume aanpassen door de Volume-knop naar links of rechts te draaien.

18
FM-bediening
Druk wanneer uw radio aan staat op de Mode-toets om de FM modus te selecteren.
Druk op de Vorige- of Volgende-toets om handmatig een specifieke frequentie te kiezen met
0,05MHz per keer.
De radio heeft ook een scanfunctie voor FM, waardoor u automatisch naar FM stations kunt
zoeken.
Druk op de Scantoets om automatisch naar het volgende beschikbare radiostation te zoeken.
Wanneer een station gevonden wordt, dan zal deze automatisch afgespeeld worden.
U kunt naar stations in de tegenovergestelde richting zoeken, door de Scantoets ingedrukt te
houden.
Stations als voorkeuzes opslaan
De radio kan 10 stations als voorkeuzes opslaan in zowel DAB+ als FM modus. Om een voorkeuze op
te slaan:
Ga naar het station dat u wilt opslaan, houdt de Preset-toets ingedrukt en gebruik de Vorige- of
Volgende-toets om het gewenste voorkeuzenummer te selecteren. Houd vervolgens de toets Preset
2 seconden ingedrukt en de display zal “Preset Store< xx: (leeg)>” (preset opslaan) weergeven.
Gebruik nu de toets Vorige of Volgende om de gewenste geheugenplek te selecteren waar u het
station wilt opslaan.
Druk op de Entertoets om het station op te slaan. De melding “Preset xx stored” (Preset xx
opgeslagen) zal op de display verschijnen.
Voorkeuzestations afspelen
Om een voorkeuzestation af te spelen:
Selecteer de bandbreedte (DAB+ of FM) van het station, door op de Mode-toets te drukken.
Druk op de Preset-toets om de opgeslagen stations naar voren te halen, gebruik vervolgens de
Vorige- of Volgende-toets om door uw voorkeuzes te bladeren en druk op de Enter-toets om uw
keuze te bevestigen.
De tijd automatisch instellen
Wanneer u de radio voor de eerste keer aanzet, zal hij automatisch synchroniseren met de lokale tijd
tijdens het zoeken naar DAB+ stations. Probeer de locatie van het apparaat te veranderen als de tijd
niet vanzelf ingesteld is, zodat u een beter signaal krijgt.
Systeeminstellingen
Met het apparaat ingeschakeld, houd de toets Info/Menu ingedrukt. Dit zal het “Instellingsmenu”
openen.
Druk op de Vorige- of Volgende-toets om uw gewenste Sub-optie te selecteren.
Instellen van tijd/datum
Houd de Info/Menu-toets ingedrukt, de <Time/Date> (Tijd/Datum) zal weergegeven worden op het
scherm en druk vervolgens op de Enter-toets om te beginnen met het aanpassen van de
tijdinstellingen.
De uren zullen knipperen. Druk op de Vorige- of Volgende-toets om de uren in te stellen. Druk op de
knop Enter om te bevestigen.

19
Herhaal de laatste twee stappen om de minuten, het jaar, de maand en de datum in te stellen.
Systeemversie
U kunt het versienummer van de software controleren door de toets Info/Menu ingedrukt te
houden. Druk op de toets Vorige of Volgende totdat de systeemversie op het scherm verschijnt en
druk ter bevestiging op de Entertoets.
De radio opnieuw instellen
De radio opnieuw instellen zal alle opgeslagen DAB+ stations en alle opgeslagen FM en DAB+
voorkeuzestations verwijderen. Om de radio opnieuw in te stellen:
Houd de INFO/MENU-toets ingedrukt.
Druk op de Vorige- of Volgende-toets totdat <Factory reset> (Fabrieksreset) op het scherm verschijnt,
druk op de Enter-toets en <Yes> (Ja) of <No> (NEE) verschijnt op het scherm. Gebruik de Vorige- of
Volgende-toets om <Yes> (Ja) te selecteren.
Druk op de Entertoets en de radio zal worden gereset.
Slaapstandinstelling
Houd de INFO/MENU-toets ingedrukt.
Druk op de Vorige- of Volgende-toets totdat <Sleep Set> (Slaapstand instellen) op het scherm
verschijnt en druk vervolgens op de Enter-toets.
Druk op de Vorige- of Volgende-toets om te kiezen uit OFF-120-90-60-45-30-15-5 minuten.
Druk op de knop Enter om te bevestigen.
Het alarm gebruiken
Alarminstelling
Houd de Info/Menu-toets ingedrukt terwijl de radio aan staat.
Druk vervolgens op de Vorige- of Volgende-toets om Alarm 1 op ON (AAN) te zetten en druk op de
knop Enter om uw keuze te bevestigen.
De uren zullen knipperen, gebruik de Vorige- of Volgende-toets om de uren te selecteren. Druk op
de knop Enter om te bevestigen.
De minuten zullen knipperen, gebruik de Vorige- of Volgende-toets om de minuten te selecteren.
Druk op de knop Enter om te bevestigen.
Het Volume-nummer zal knipperen, gebruik de Vorige- of Volgende-toets om het volume te
selecteren. Druk op de knop Enter om te bevestigen.
De alarmmodus zal knipperen en u kunt met de toets Vorige of Volgende de alarmbron kiezen:
Alarm/DAB/FM. Druk op de knop Enter om te bevestigen.
Houd de Info/Menu-toets ingedrukt terwijl de radio aan staat.
Druk vervolgens op de Vorige- of Volgende-toets om Alarm 2 op ON (AAN) te zetten en druk op de
knop Enter om uw keuze te bevestigen.
Deze instellingsprocedure is hetzelfde als die voor “ALARM1”.

20
Het alarm deactiveren
Houd de Info/Menu-toets ingedrukt en selecteer vervolgens het alarm dat u wilt deactiveren,
waarbij u de Vorige- of Volgende-toets gebruikt om het Alarm op OFF (UIT) te zetten.
Druk op de Entertoets. Het alarm zal worden gedeactiveerd.
Het uitschakelen van het alarm
Druk op de Stand-by-toets om het alarm uit te schakelen wanneer deze afgaat.
OPMERKING: Het alarm zal 60 minuten lang blijven klinken als u het alarm niet zelf uitschakelt.
Sluimerfunctie
Druk op de Snooze-toets wanneer het alarm afgaat om deze tijdelijk uit te schakelen. Het alarm zal
9 minuten uitgesteld worden en vervolgens weer afgaan.
Zenderinformatie in de DAB-modus
Elke keer wanneer u op de Info/Menu-toets drukt in de DAB modus, zal het scherm door de
volgende schermmodi bladeren:
Dynamische berichtenindeling (DLS): Toont schuivende tekstinformatie die door de zender wordt
verstrekt.
Signaalsterkte: Geeft een signaalbalk aan met de signaalsterkte van het huidige radiostation.
Bitfoutenkans (BER): Geeft informatie over signaalfouten.
Kanaalfrequentie: Geeft het nummer en de frequentie van het transmissiekanaal weer.
Soort programma (PTY): Geeft het type en de beschrijving weer van het programma op de
DAB-zender.
Tijd en datum: Geeft de tijd en datum weer die door de zender wordt gegeven.
Bitsnelheid: De datasnelheid waar het signaal mee verstuurd wordt.
Zenderinformatie in de FM-modus
Elke keer wanneer u op de Info/Menu-toets drukt in de FM modus, zal het scherm door de volgende
schermmodi bladeren:
Soort programma: Geeft een omschrijving weer over het programma van het radiostation.
Signaalsterkte: Geeft een signaalbalk aan met de signaalsterkte van het huidige radiostation.
Tijd en datum: Geeft de tijd en datum weer die door de zender wordt gegeven.
Frequentie: Geeft de zendfrequentie van de zender weer.
Soort audio: Geeft de soort audio van het huidige radiostation weer (Stereo of Mono).
Radiotekst: Toont schuivende tekstinformatie die door de zender wordt verstrekt.
Opmerking: U kunt schakelen tussen mono en stereo door herhaaldelijk op de Enter-toets te drukken.
Seite wird geladen ...
Seite wird geladen ...
Seite wird geladen ...
Seite wird geladen ...
Seite wird geladen ...
Seite wird geladen ...
Seite wird geladen ...
Seite wird geladen ...
Seite wird geladen ...
Seite wird geladen ...
Seite wird geladen ...
Seite wird geladen ...
Seite wird geladen ...
Seite wird geladen ...
Seite wird geladen ...
Seite wird geladen ...
Seite wird geladen ...
Seite wird geladen ...
Seite wird geladen ...
Seite wird geladen ...
Seite wird geladen ...
Seite wird geladen ...
Seite wird geladen ...
Seite wird geladen ...
Seite wird geladen ...
Seite wird geladen ...
Seite wird geladen ...
Seite wird geladen ...
Seite wird geladen ...
Seite wird geladen ...
Seite wird geladen ...
Seite wird geladen ...
Seite wird geladen ...
Seite wird geladen ...
-
 1
1
-
 2
2
-
 3
3
-
 4
4
-
 5
5
-
 6
6
-
 7
7
-
 8
8
-
 9
9
-
 10
10
-
 11
11
-
 12
12
-
 13
13
-
 14
14
-
 15
15
-
 16
16
-
 17
17
-
 18
18
-
 19
19
-
 20
20
-
 21
21
-
 22
22
-
 23
23
-
 24
24
-
 25
25
-
 26
26
-
 27
27
-
 28
28
-
 29
29
-
 30
30
-
 31
31
-
 32
32
-
 33
33
-
 34
34
-
 35
35
-
 36
36
-
 37
37
-
 38
38
-
 39
39
-
 40
40
-
 41
41
-
 42
42
-
 43
43
-
 44
44
-
 45
45
-
 46
46
-
 47
47
-
 48
48
-
 49
49
-
 50
50
-
 51
51
-
 52
52
-
 53
53
-
 54
54


Lenco 9000-0046-3113 Benutzerhandbuch
- Kategorie
- Radios
- Typ
- Benutzerhandbuch
- Dieses Handbuch eignet sich auch für
in anderen Sprachen
- English: Lenco 9000-0046-3113 User manual
- français: Lenco 9000-0046-3113 Manuel utilisateur
- español: Lenco 9000-0046-3113 Manual de usuario
- Nederlands: Lenco 9000-0046-3113 Handleiding
Verwandte Artikel
-
Lenco CR-630 Bedienungsanleitung
-
Lenco DAR-010WH Bedienungsanleitung
-
Lenco CR-605BK Bedienungsanleitung
-
Lenco PDR-020WH Bedienungsanleitung
-
Lenco PDR-030 Bedienungsanleitung
-
-
Lenco MC-020 Bedienungsanleitung
-
-
-