PURE TWILIGHT Bedienungsanleitung
- Kategorie
- Radios
- Typ
- Bedienungsanleitung

Owner’s manual
Bedienungsanleitung
Manuel de l’utilisateur
Manuale dell’utente
Brugsvejledning
Manual de instrucciones
GB
FR
DE
IT
DK
ES

2
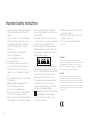
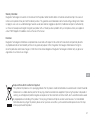
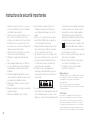
Important safety instructions
Trademarks
Twilight, PURE, PURE sounds, the PURE logo, Imagination
Technologies, and the Imagination Technologies logo are trademarks
or registered trademarks of Imagination Technologies Limited.
iPhone and iPod are trademarks of Apple Inc., registered in the U.S.
and other countries. iPad is a trademark of Apple Inc.
Copyright
Copyright © 2010 Imagination Technologies Limited. All rights
reserved. No part of this publication may be copied or distributed,
transmitted, transcribed, stored in a retrieval system, or translated
into any human or computer language, in any form or by any means,
electronic, mechanical, magnetic, manual or otherwise, or disclosed
to third parties without the express written permission of Imagination
Technologies Limited.
1. Read these instructions – All the safety and operating
instructions should be read before this product is
operated.
2. Keep these instructions – The safety and operating
instructions should be retained for future reference.
3. Heed all warnings – All warnings on the appliance
and in the operating instructions should be
adhered to.
4. Follow all instructions – All operating and use
instructions should be followed.
5. Do not use this apparatus near water.
6. Clean only with dry cloth.
7. Do not block any ventilation openings. Install in
accordance with the manufacturer’s instructions.
8. Do not install near any heat sources such as
radiators, stoves, or other apparatus that produce
heat.
9. Only use attachments and accessories specified by
the manufacturer.
10. Unplug the apparatus during lightning storms or
when unused for long periods of time.
11. Do not use the mains adapter outdoors.
12. Be aware of volume levels when using headphones,
excessive volume can damage your hearing.
13. Caution — Glass parts can shatter. Contact PURE at
http://support.pure.com if your product is damaged.
14. Cease use immediately if apparatus exhibits any
signs of mechanical damage, excessive temperature,
swelling or splitting.
15. To reduce the risk of electric shock, do not remove
cover (or back) as there are no user-serviceable parts
inside. Refer servicing to qualified personnel.
16. Servicing is required when the apparatus has been
damaged in any way, such as power supply cord or
plug is damaged, or the apparatus does not operate
normally, or has been dropped.
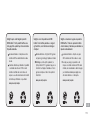
17. The lightning flash with arrowhead symbol within an
equilateral triangle is intended to alert the user to the
presence of non-insulated “dangerous voltage” within
the product’s enclosure that may be of sufficient
magnitude to constitute a risk of electric shock.
The exclamation point within an equilateral triangle
is intended to alert the user to the presence of
important operating and maintenance instructions in
the literature accompanying the appliance.
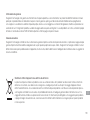
18. This equipment is a Class II or double insulated
electrical appliance. It has been designed
in such a way that it does not require a safety
connection to electrical earth.
19. Children should be supervised to ensure they do
not play with the appliance.
20. Caution: Hot internal components. Do not operate
without glass diffuser fitted.
21. Do not look directly at LED lights if diffuser is
removed.

3
GB
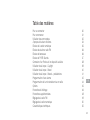
Rear Connectors 4
Getting started 5
Using the controls 6
About the icon bar 8
Listening to digital radio 9
Listening to FM radio 10
Listening to Lullabies 10
Listening to PURE Sounds 11
Connecting an iPod or auxiliary device 12
Using the Lamp - Daylight 13
Using the Lamp - Moods 14
Using the Lamp - Moods - Colour chooser 15
Options 19
Time settings 19
Display settings 20
Additional settings 22
FM radio settings 23
Digital radio settings 24
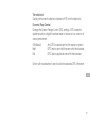
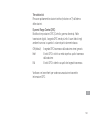
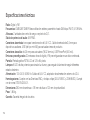
Technical Specifications 26
Contents

4
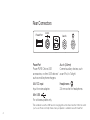
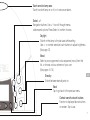
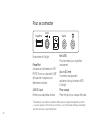
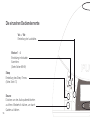
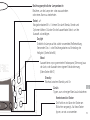
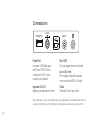
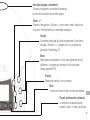
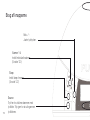
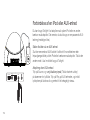
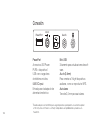
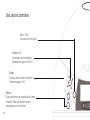
Rear Connectors
PowerPort
Power PURE Choice USB
accessories, or other USB devices*
such as mobile phone chargers.
Mini USB
For software updates only.
Aux In (3.5mm)
Connect auxiliary devices, such
as an iPod, to Twilight.
Headphones
3.5 mm socket for headphones.
5.5V DC input
Input for mains adapter.
*
Not suitable for use with a USB hub or for charging items which draw more than 500mA of current
(such as an iPhone 4 or iPad). Please check your product is suitable for use with PowerPort.
PowerPort
Aux In
5.5V DC

5
GB
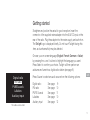
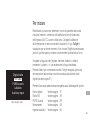
Straighten and position the aerial for good reception. Insert the
connector of the supplied mains adapter into the 5.5V DC input on the
rear of the radio. Plug the adapter into the mains supply and switch on.
The Twilight logo is displayed briefly.
Do not touch Twilight during this
time, as touch sensitivity may be affected.
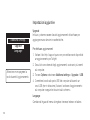
Choose your on-screen language (English, French, German or Italian)
by pressing the + and - buttons to highlight the language you want.
Press Select to confirm your choice. Twilight will then perform an
autotune and tune into a digital radio station (see page 9).
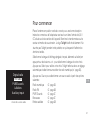
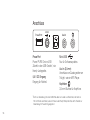
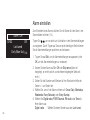
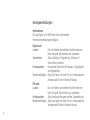
Press Source to select an audio source from the following options:
Digital radio See page 9
FM radio See page 10
PURE Sounds See page 11
Lullabies See page 10
Auxiliary input See page 12
Getting started
Digital radio
FM radio
PURE Sounds
Lullabies
Auxiliary input
The audio source screen

6
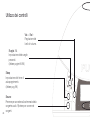
Source
Sleep
vol -
vol +
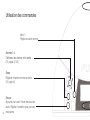
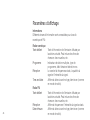
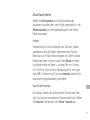
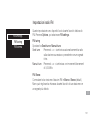
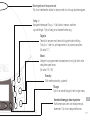
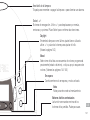
Using the controls
Alarms 1-4
Set individual alarms.
(See pages 16-17)
Vol + / -
Adjust the volume level.
Sleep
Set sleep timer.
(See page 18)
Source
Press to enter the audio source screen.
Repeat to scroll through sources.

7
GB
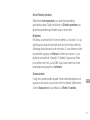
select
+
Mood
Daylight
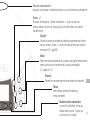
Select, +/–
Navigation buttons. Use +/- to scroll through menus,
stations and options. Press Select to confirm choices.
Daylight
Switch on the lamp to the last used white setting.
Use +/- or context-sensitive touch buttons to adjust brightness.
(See page 13)
Mood
Select a pre-programmed colour sequence (mood) from the
list, or choose a colour scheme of your own.
(See pages 14-15)
Standby
Switch between standby and on.
Back
Tap to go back to the previous menu.
Context-sensitive touch buttons
Function is displayed above buttons
on-screen. Tap to use.
Touch-sensitive lamp area
Touch to switch lamp on or off, or to snooze an alarm.

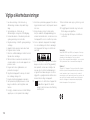
8
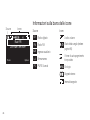
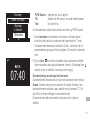
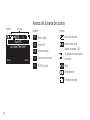
FM
Signal strength
Stereo signal
Clock
Sleep timer is set
Alarm status (see page 17)
Volume level
About the icon bar
Buzz FM
OKPresets Options
Live from The Hive!
FM radio
Lullabies
PURE Sounds
Lul
PS
Auxiliary input
AUX
Source Icons
Source Icons
DR
Digital radio

9
GB
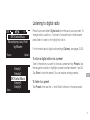
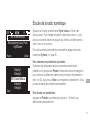
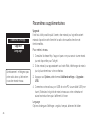
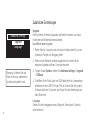
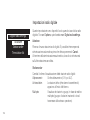
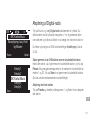
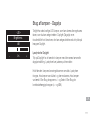
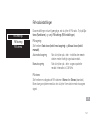
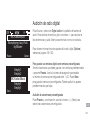
Listening to digital radio
Press Source and select Digital radio from the audio source screen. To
change station, use the +/- buttons to browse the list of stations and
press Select to tune to the highlighted station.
For information about digital radio settings (
Options), see pages 24-25.
To store a digital station as a preset
Tune to the station you want to store as a preset and tap Presets. Use
the navigation buttons to highlight a preset number between 1 and 30.
Tap Store to store the preset. (You can replace existing presets.)
To listen to a preset
Tap Presets, then use the +/- and Select buttons to choose a preset.
BBC Radio 6Music
Now playing: Juicy Fruit
by Mtume
Presets Options
DR
BBC Radio 6Music
OK
Store
Empty 1
Empty 2
Empty 4
Empty 5

10
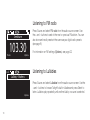
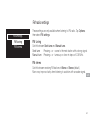
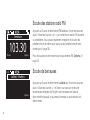
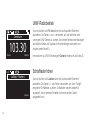
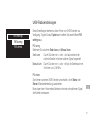
Listening to Lullabies
Listening to FM radio
Press Source and select FM radio from the audio source screen. Use
the + and – buttons to seek to the next or previous FM station. You can
also store and recall presets in the same way as digital radio presets
(see page 9).
For information on FM settings (
Options), see page 23.
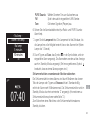
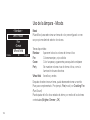
Press Source and select
Lullabies from the audio source screen. Use the
+ and – buttons to browse Twilight’s built-in lullabies and press Select to
listen. Lullabies play repeatedly until another lullaby or source is selected.
103.30
Seek tune
OKPresets Options
Lullaby – Brahms
OK
Options
Lul

11
GB
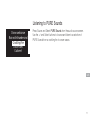
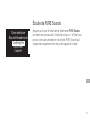
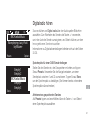
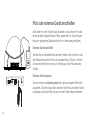
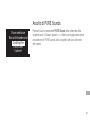
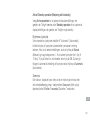
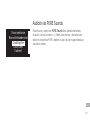
Listening to PURE Sounds
Press Source and Select PURE Sounds from the audio source screen.
Use the +/- and Select buttons to browse and listen to a selection of
PURE Sounds from a crackling fire to ocean waves.
Crackling Fire
OK
Ocean ambiance
Rain with thunder and
Church bell
Cockerel

12
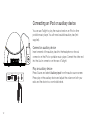
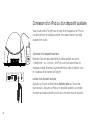
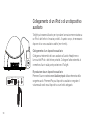
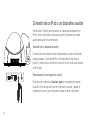
You can use Twilight to play the music stored on an iPod
or other
portable music player. You will need a suitable auxiliary lead (not
supplied).
Connect an auxiliary device
Insert one end of the auxiliary lead into the headphone or line out
connector on the iPod or portable music player. Connect the other end
into the Aux In connector on the rear of Twilight.
Play an auxiliary device
Press Source and select Auxiliary input from the audio source screen.
Press play on the auxiliary device and adjust the volume on both your
radio and the device to a comfortable level.
Connecting an iPod or auxiliary device
PowerPort
Aux In
5.5V DC

13
GB
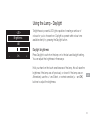
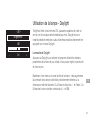
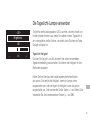
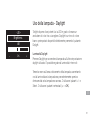
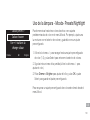
Using the Lamp - Daylight
Twilight has six powerful LED lights capable of creating a rainbow of
colours for you to choose from. Daylight is a preset white colour tone
available directly by pressing the Daylight button.
Daylight brightness
Press Daylight to switch on the lamp on to the last used daylight setting.
You can adjust the brightness in three ways:
Hold your hand on the touch sensitive area of the lamp, this will raise the
brightness if the lamp was off previously, or lower it if the lamp was on.
Alternatively, use the +/- and Select, or context-sensitive (+, - and OK)
buttons to adjust the brightness.
Brightness
60
–20 –
– OK +

14
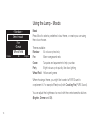
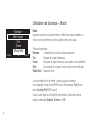
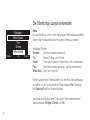
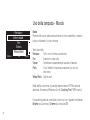
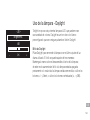
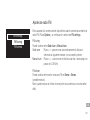
Using the Lamp - Moods
Mood
Press Mood to select a predefined colour theme, or create your own using
the colour chooser.
Themes available:
Rainbow All colours cycle slowly
Fire Warm oranges and reds
Ocean Turquoise and aquamarine to help you relax
Party Bright colours cycle quickly, like disco lighting
Wheat Field Yellows and greens
When choosing a theme, you might like to select a PURE Sound to
complement it. For example,
Fire (mood) with Crackling Fire (PURE Sound).
You can adjust the brightness of a mood with the context-sensitive buttons
(Brighter, Dimmer and OK).
Select mood
– Rainbow –
Dimmer
Brighter
OK
Wheat eld
Fire
Ocean

15
GB
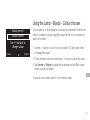
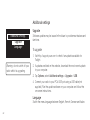
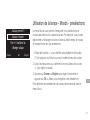
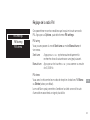
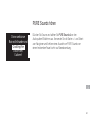
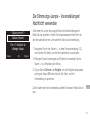
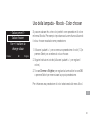
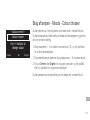
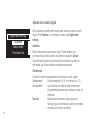
Using the Lamp - Moods - Colour chooser
You can save up to three favourite colours as colour presets in the Moods
menu. For example, set up a nightlight using the the colour chooser and
save it as a preset.
1. Use the +/- buttons to scroll to a colour preset (1-3) and press Select
to change that preset
2. Follow the instructions on-screen (use +/- buttons to adjust the colour).
3. Tap
Dimmer or Brighter to adjust the brightness and tap OK or press
Select to store your preset.
To recall a colour preset, select it from the Mood menu.
Colour chooser
– Colour preset 1 –
Dimmer
Brighter
OK
Use +/- buttons to
change colour

16
Alarm 1 On
Edit
07:00 DR
Last tuned
Daily (Mon-Sun)
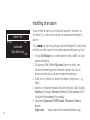
To set an alarm press the button for the alarm you want to set (1-4).
You will see a summary of the current settings for that alarm.
Tap to move forward and backwards through alarm settings.Tap
Save at any point to save alarm settings and exit
1. Tap
Edit to adjust the alarm settings (or OK to exit alarm setup).
2. Switch the alarm
On, Off or to Skip once (Alarm is set, but will not
sound the next time it is scheduled. For example, if you do not need
to wake up at the same time the next day).
3. Adjust the hours and minutes for your alarm time using the +/- and
Select buttons.
4. Select how often the alarm will sound: Once, Daily, Weekdays,
Weekends, Every Saturday or Every Sunday.
5. Choose either Digital radio, PURE Sounds, FM radio or Tone for
your alarm:
Digital radio Select a station or Last tuned.
Setting an alarm

17
GB
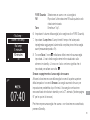
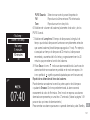
PURE Sounds Select a sound to wake up to.
FM Plays the last FM station tuned to.
Tone Sounds a beeping tone.
6. Set the alarm volume (radio and PURE Sounds alarms only).
7. Set the Lamp time. Lamp time is the length of time the lamp will take
to reach full brightness before the alarm sounds (from No lamp to
1 hour). For example, setting a lamp time of 30 minutes means the
lamp will switch on and slowly get brighter in the 30 minutes before
the alarm sounds.
8. Tap
Save, the icon in the icon bar indicates a set alarm. Alarm
time(s) are also displayed on-screen in standby. An outlined icon
means it is set to skip once.
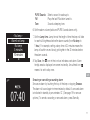
Snoozing or cancelling a sounding alarm
Snooze an alarm by touching the top of the lamp or tapping Snooze.
The alarm will sound again in nine minutes by default. A snoozed alarm
is indicated in standby by an animated ‘Z’. (See page 19 for snooze
options.) To cancel a sounding or snoozed alarm, press Standby.
Alarm1 set lamp
– No lamp –
OK
10 minutes
No lamp
5 minutes
z
z
z
07:40
OK

18
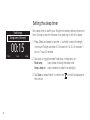
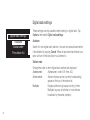
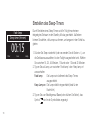
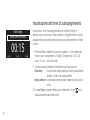
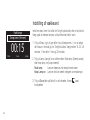
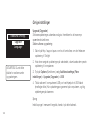
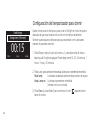
Set a sleep timer to switch your Twilight into standby after a set period of
time. Choose to also dim the lamp for a great way to drift off to sleep.
1. Press Sleep and repeat (or use the +/- buttons) to select the length
of time until Twilight switches off. Choose from 15, 30, 45 minutes, 1
hour or 1 hour 30 minutes.
2. Tap Lamp to toggle between Fade lamp or Keep lamp on:
Fade lamp Lamp fades off during the sleep timer
Keep Lamp on Lamp remains on (ideal for a nightlight).
3. Tap
Save (or press Select) to confirm, the icon will be displayed in
the icon bar
Setting the sleep timer
00:15
Sleep timer (hh:mm)
OKClear Save Lamp
Fade lamp

19
GB
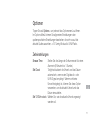
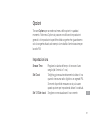
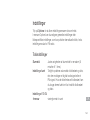
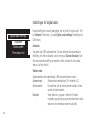
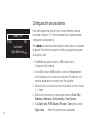
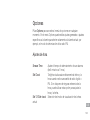
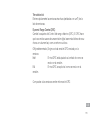
Tap Options to enter the options menu at any time. In the Options menu
you can edit general settings, or source specific settings that will only
affect the current source, for example, the tuning mode for FM radio.
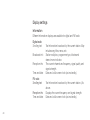
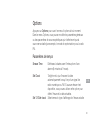
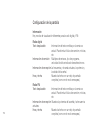
Time settings
Snooze Time Adjust the length of time an alarm snoozes for
(from 5 minutes to 1 hour).
Set Clock Twilight updates the time and date automatically
when it receives a digital or FM radio signal. If no
time is available you can use this option to set the
current time and date.
Set 12/24hr clock Choose how to display the current time.
Options

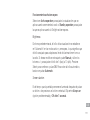
20
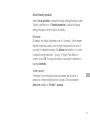
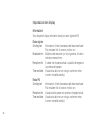
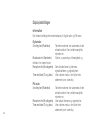
Information
Different information displays are available for digital and FM radio:
Digital radio
Scrolling text Text information broadcast by the current station. May
include song titles, news, etc.
Broadcast info Station multiplex, programme type, bitrate and
stereo/mono indicator.
Reception info The current channel and frequency, signal quality and
signal strength.
Time and date Date and a full-screen clock (as in standby).
FM radio
Scrolling text Text information broadcast by the current station. (As
above.
Reception info Displays the current frequency and signal strength.
Time and date Date and a full-screen clock (as in standby).
Display settings
Seite wird geladen ...
Seite wird geladen ...
Seite wird geladen ...
Seite wird geladen ...
Seite wird geladen ...
Seite wird geladen ...
Seite wird geladen ...
Seite wird geladen ...
Seite wird geladen ...
Seite wird geladen ...
Seite wird geladen ...
Seite wird geladen ...
Seite wird geladen ...
Seite wird geladen ...
Seite wird geladen ...
Seite wird geladen ...
Seite wird geladen ...
Seite wird geladen ...
Seite wird geladen ...
Seite wird geladen ...
Seite wird geladen ...
Seite wird geladen ...
Seite wird geladen ...
Seite wird geladen ...
Seite wird geladen ...
Seite wird geladen ...
Seite wird geladen ...
Seite wird geladen ...
Seite wird geladen ...
Seite wird geladen ...
Seite wird geladen ...
Seite wird geladen ...
Seite wird geladen ...
Seite wird geladen ...
Seite wird geladen ...
Seite wird geladen ...
Seite wird geladen ...
Seite wird geladen ...
Seite wird geladen ...
Seite wird geladen ...
Seite wird geladen ...
Seite wird geladen ...
Seite wird geladen ...
Seite wird geladen ...
Seite wird geladen ...
Seite wird geladen ...
Seite wird geladen ...
Seite wird geladen ...
Seite wird geladen ...
Seite wird geladen ...
Seite wird geladen ...
Seite wird geladen ...
Seite wird geladen ...
Seite wird geladen ...
Seite wird geladen ...
Seite wird geladen ...
Seite wird geladen ...
Seite wird geladen ...
Seite wird geladen ...
Seite wird geladen ...
Seite wird geladen ...
Seite wird geladen ...
Seite wird geladen ...
Seite wird geladen ...
Seite wird geladen ...
Seite wird geladen ...
Seite wird geladen ...
Seite wird geladen ...
Seite wird geladen ...
Seite wird geladen ...
Seite wird geladen ...
Seite wird geladen ...
Seite wird geladen ...
Seite wird geladen ...
Seite wird geladen ...
Seite wird geladen ...
Seite wird geladen ...
Seite wird geladen ...
Seite wird geladen ...
Seite wird geladen ...
Seite wird geladen ...
Seite wird geladen ...
Seite wird geladen ...
Seite wird geladen ...
Seite wird geladen ...
Seite wird geladen ...
Seite wird geladen ...
Seite wird geladen ...
Seite wird geladen ...
Seite wird geladen ...
Seite wird geladen ...
Seite wird geladen ...
Seite wird geladen ...
Seite wird geladen ...
Seite wird geladen ...
Seite wird geladen ...
Seite wird geladen ...
Seite wird geladen ...
Seite wird geladen ...
Seite wird geladen ...
Seite wird geladen ...
Seite wird geladen ...
Seite wird geladen ...
Seite wird geladen ...
Seite wird geladen ...
Seite wird geladen ...
Seite wird geladen ...
Seite wird geladen ...
Seite wird geladen ...
Seite wird geladen ...
Seite wird geladen ...
Seite wird geladen ...
Seite wird geladen ...
Seite wird geladen ...
Seite wird geladen ...
Seite wird geladen ...
Seite wird geladen ...
Seite wird geladen ...
Seite wird geladen ...
Seite wird geladen ...
Seite wird geladen ...
Seite wird geladen ...
Seite wird geladen ...
Seite wird geladen ...
Seite wird geladen ...
Seite wird geladen ...
Seite wird geladen ...
Seite wird geladen ...
Seite wird geladen ...
Seite wird geladen ...
Seite wird geladen ...
Seite wird geladen ...
Seite wird geladen ...
Seite wird geladen ...
Seite wird geladen ...
Seite wird geladen ...
Seite wird geladen ...
Seite wird geladen ...
Seite wird geladen ...
Seite wird geladen ...
-
 1
1
-
 2
2
-
 3
3
-
 4
4
-
 5
5
-
 6
6
-
 7
7
-
 8
8
-
 9
9
-
 10
10
-
 11
11
-
 12
12
-
 13
13
-
 14
14
-
 15
15
-
 16
16
-
 17
17
-
 18
18
-
 19
19
-
 20
20
-
 21
21
-
 22
22
-
 23
23
-
 24
24
-
 25
25
-
 26
26
-
 27
27
-
 28
28
-
 29
29
-
 30
30
-
 31
31
-
 32
32
-
 33
33
-
 34
34
-
 35
35
-
 36
36
-
 37
37
-
 38
38
-
 39
39
-
 40
40
-
 41
41
-
 42
42
-
 43
43
-
 44
44
-
 45
45
-
 46
46
-
 47
47
-
 48
48
-
 49
49
-
 50
50
-
 51
51
-
 52
52
-
 53
53
-
 54
54
-
 55
55
-
 56
56
-
 57
57
-
 58
58
-
 59
59
-
 60
60
-
 61
61
-
 62
62
-
 63
63
-
 64
64
-
 65
65
-
 66
66
-
 67
67
-
 68
68
-
 69
69
-
 70
70
-
 71
71
-
 72
72
-
 73
73
-
 74
74
-
 75
75
-
 76
76
-
 77
77
-
 78
78
-
 79
79
-
 80
80
-
 81
81
-
 82
82
-
 83
83
-
 84
84
-
 85
85
-
 86
86
-
 87
87
-
 88
88
-
 89
89
-
 90
90
-
 91
91
-
 92
92
-
 93
93
-
 94
94
-
 95
95
-
 96
96
-
 97
97
-
 98
98
-
 99
99
-
 100
100
-
 101
101
-
 102
102
-
 103
103
-
 104
104
-
 105
105
-
 106
106
-
 107
107
-
 108
108
-
 109
109
-
 110
110
-
 111
111
-
 112
112
-
 113
113
-
 114
114
-
 115
115
-
 116
116
-
 117
117
-
 118
118
-
 119
119
-
 120
120
-
 121
121
-
 122
122
-
 123
123
-
 124
124
-
 125
125
-
 126
126
-
 127
127
-
 128
128
-
 129
129
-
 130
130
-
 131
131
-
 132
132
-
 133
133
-
 134
134
-
 135
135
-
 136
136
-
 137
137
-
 138
138
-
 139
139
-
 140
140
-
 141
141
-
 142
142
-
 143
143
-
 144
144
-
 145
145
-
 146
146
-
 147
147
-
 148
148
-
 149
149
-
 150
150
-
 151
151
-
 152
152
-
 153
153
-
 154
154
-
 155
155
-
 156
156
-
 157
157
-
 158
158
-
 159
159
-
 160
160


PURE TWILIGHT Bedienungsanleitung
- Kategorie
- Radios
- Typ
- Bedienungsanleitung
in anderen Sprachen
- English: PURE TWILIGHT Owner's manual
- français: PURE TWILIGHT Le manuel du propriétaire
- español: PURE TWILIGHT El manual del propietario
- italiano: PURE TWILIGHT Manuale del proprietario
- dansk: PURE TWILIGHT Brugervejledning
Verwandte Artikel
-
PURE 1852598 Siesta Rise Radio Alarm Clock FM Bluetooth Benutzerhandbuch
-
PURE SIESTA Bedienungsanleitung
-
-
-
-
PURE SIESTA iDock Bedienungsanleitung
-
PURE Evoke D4 Benutzerhandbuch
-
PURE PURE EVOKE-1S Bedienungsanleitung
-
PURE Siesta Rise Bedienungsanleitung
-
PURE Evoke Mio Bedienungsanleitung
Andere Dokumente
-
Boston Acoustics AM/FM Radio Tuner Bedienungsanleitung
-
Boston Acoustics Horizon Solo XT Benutzerhandbuch
-
Tangent Alio FM/CD Benutzerhandbuch
-
-
-
Contour i1 Air Bedienungsanleitung
-
TaoTronics TT-DL1012 Bedienungsanleitung
-
Listen SC Amp Benutzerhandbuch
-
 LDR Tono PC 2000 plus black Bedienungsanleitung
