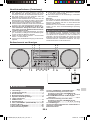
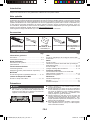
Sharp XL-BB20D Bedienungsanleitung
- Kategorie
- CD-Spieler
- Typ
- Bedienungsanleitung
Dieses Handbuch eignet sich auch für

XL-BB20D
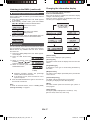
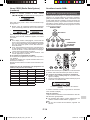
BEDIENUNGSANLEITUNG
MANUAL DE MANEJO
MANUALE DI ISTRUZIONI
MODE D’EMPLOI
INSTRUKCJA OBSŁUGI
OPERATION MANUAL
MODEL
MODELL
MODELO
MODELLO
MODÈLE
MODEL
MIKRO KOMPONENTEN SYSTEM
MICRO SISTEMA
MICRO-CHAÎNE
MICROSISTEMA
MIKROWIEŻA
MICRO COMPONENT SYSTEM
XL-DAB703H_OM_FRONT.indd 1 2015-01-29 20:00:02
DEUTSCH
ESPANOL
POLSKI
FRANÇAIS
ITALIANO
ENGLISH
Please refer to pages EN-1 to EN-22.
Siehe Seiten DE-1 bis DE-22.
Se reporter aux pages ES-1 à ES-22.
Leggere le pagine IT-1 a IT-22.
Prosimy przeczytać strony od PL-1 do PL-22.
FR-1 à FR-22.
Se reporter aux pages
XL-BB20D_OM_EN_DE_ES_FR_IT_PL.indb 1 2018-01-25 10:09:47

EN-1
ENGLISH
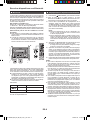
Special Notes
● Hereby, Sharp declares that the radio equipment type XL-BB20D is in compliance with Directive 2014/53/EU.
The full text of the EU declaration of conformity is available at the following internet address: http://www.sharp.eu/av/
documents-of-conformity
● When the ON/STANDBY button is set at STANDBY position, mains voltage is still present inside the unit.
When the ON/STANDBY button is set at STANDBY position, the unit may be brought into operation by the timer mode
or remote control.
Warning:
This unit contains no user serviceable parts. Never remove covers unless qualied to do so. This unit contains
dangerous voltages, always remove mains plug from the socket before any service operation and when not in use for
a long period.
● Audio-visual material may consist of copyrighted works which must not be recorded without the authority of the owner
of the copyright. Please refer to relevant law in your country.
● Warning:
To prevent re or shock hazard, do not expose this appliance to dripping or splashing. No objects lled with liquids,
such as vases, shall be placed on the apparatus.
● This product is classied as a CLASS 1 LASER PRODUCT.
● CAUTION
This product contains a lower power laser device. To ensure continued safety do not remove any cover or attempt to
gain access to the inside of the product. Refer all servicing to qualied personnel.
● Norway (NO): Use of this radio equipment is not allowed in the geographical area within a radius of 20 km from the
centre of Ny-Alesund, Svalbard.
The Bluetooth® word mark and logos are registered trademarks owned by the Bluetooth SIG, Inc. and any use of
such marks by SHARP is under license. Other trademarks and trade names are those of their respective owners.
This radio is future-ready because it contains DAB, FM and DAB+ which is a future technology standard being
adopted across Europe.
Note for users in the United Kingdom:
Recording and playback of any material may require consent, which SHARP is unable to give. Please refer particularly
to the provisions of the Copyright Act 1956, the Dramatic and Musical Performers Protection Act 1958, the Performers
Protection Acts 1963 and 1972 and to any subsequent statutory enactments and orders.
Do not turn the volume on to full at switch on. Listen to music at moderate levels. Excessive sound pressure from
earphones and headphones can cause hearing loss.
XL-BB20D_OM_EN_DE_ES_FR_IT_PL.indb 1 2018-01-25 10:09:47

EN-2
EN
Attention: Your
product is
marked with
this symbol.
It means that
used electrical
and electronic
products should
not be mixed
with gen
-
eral household
waste. There
is a separate
collection sys-
tem for these
products.
A. Information on Disposal for Users (private households)
1. In the European Union
Attention: If you want to dispose of this equipment, please do not use the ordinary dustbin!
Used electrical and electronic equipment must be treated separately and in accordance with legislation that
requires proper treatment, recovery and recycling of used electrical and electronic equipment.
Following the implementation by member states, private households within the EU states may return their
used electrical and electronic equipment to designated collection facilities free of charge*.
In some countries* your local retailer may also take back your old product free of charge if you purchase
a similar new one.
*) Please contact your local authority for further details.
If your used electrical or electronic equipment has batteries or accumulators, please dispose of these
separately beforehand according to local requirements.
By disposing of this product correctly you will help ensure that the waste undergoes the necessary
treatment, recovery and recycling and thus prevent potential negative effects on the environment and
human health which could otherwise arise due to inappropriate waste handling.
2. In other Countries outside the EU
If you wish to discard this product, please contact your local authorities and ask for the correct method of
disposal.
For Switzerland: Used electrical or electronic equipment can be returned free of charge to the dealer,
even if you don’t purchase a new product. Further collection facilities are listed on the homepage of
www.swico.ch or www.sens.ch.
B. Information on Disposal for Business Users
1. In the European Union
If the product is used for business purposes and you want to discard it:
Please contact your SHARP dealer who will inform you about the take-back of the product. You might be
charged for the costs arising from take-back and recycling. Small products (and small amounts) might be
taken back by your local collection facilities.
For Spain: Please contact the established collection system or your local authority for take-back of your
used products.
2. In other Countries outside the EU
If you wish to discard of this product, please contact your local authorities and ask for the correct method
of disposal.
Information on Battery Disposal
The battery supplied with this product contains traces of Lead.
For EU: The crossed-out wheeled bin implies that used batteries should not be put to the general household
waste! There is a separate collection system for used batteries, to allow proper treatment and recycling in
accordance with legislation. Please contact your local authority for details on the collection and recycling
schemes.
For Switzerland: The used battery is to be returned to the selling point.
For other non-EU countries: Please contact your local authority for correct method of disposal of the used
battery.
Information on Proper Disposal
XL-BB20D_OM_EN_DE_ES_FR_IT_PL.indb 2 2018-01-25 10:09:48

EN-3
Introduction
Thank you for purchasing this SHARP product. To obtain the best performance from this product, please read this manual
carefully. It will guide you in operating your SHARP product.
Special Note
Supply of this product does not convey a license nor imply any right to distribute content created with this product in
revenue-generating broadcast systems (terrestrial, satellite, cable and/or other distribution channels), revenue-generating
streaming applications (via Internet, intranets and/or other networks), other revenue-generating content distribution sys-
tems (pay-audio or audio-on-demand applications and the like) or on revenue-generating physical media (compact discs,
digital versatile discs, semiconductor chips, hard drives, memory cards and the like). An independent license for such use
is required. For details, please visit http://mp3licensing.com
MPEG Layer-3 audio coding technology licensed from Fraunhofer IIS and Thomson.
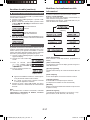
Accessories
The following accessories are included.
Remote control x 1
(RRMCGA414AWSA )
FM/DAB aerial x 1 “AAA” size battery
(UM/SUM4, R3, HP-16
or similar) x 2
AC power lead x1 AC power lead x 1
(for the United Kingdom
and Ireland)
Page
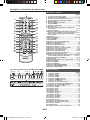
General Information
Precautions................................................................. 3 - 4
Controls and indicators ............................................... 4 - 5
Preparation for Use
System connections ........................................................ 6
Remote control ................................................................ 7
Basic Operation
General control ................................................................ 7
Setting the clock (Remote control only) ........................... 8
Bluetooth
®
Listening to Bluetooth enabled devices .................... 9 - 10
CD or MP3 disc Playback
Listening to a CD or MP3 disc ................................ 11 - 12
Page
USB
Listening to USB mass storage device/MP3 player....... 13
Radio
Listening to the radio ..................................................... 14
Using the Radio Data System (RDS) ..................... 15 - 16
Listening to the DAB+ ............................................. 16 - 17
Changing the information display ........................... 17 - 18
Advanced Features
Timer and sleep operation (Remote control only) .. 18 - 19
Enhancing your system ................................................. 20
References
Troubleshooting chart ............................................. 20 - 21
Maintenance .................................................................. 21
Specications ................................................................ 22
CONTENTS
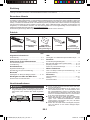
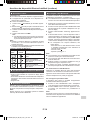
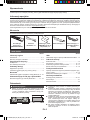
Precautions
■ General
● Please ensure that the equipment is positioned in a
well ventilated area and ensure that there is a free
space along the sides, top, front and back of the equip-
ment as below.
15 cm
15 cm
15 cm
● Use the unit on a rm, level surface free from vibration.
● Place the unit at least 30 cm away from any CRT TV
to avoid colour variations across the TV screen. If the
variations persist, move the unit further away from the
TV. LCD TV is not prone to such variation.
● Keep the unit away from direct sunlight, strong mag-
netic elds, excessive dust, humidity and electronic /
electrical equipment (home computers, facsimiles, etc.)
which generate electrical noise.
● Do not expose the unit to moisture, to temperatures
higher than 60°C (140°F) or to extremely low tempera-
tures.
XL-BB20D_OM_EN_DE_ES_FR_IT_PL.indb 3 2018-01-25 10:09:48

EN-4
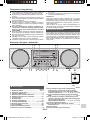
EN
Precautions (Continued)
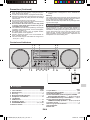
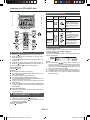
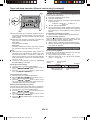
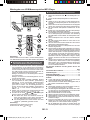
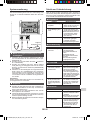
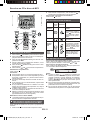
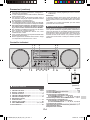
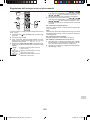
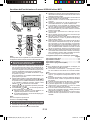
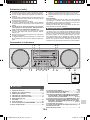
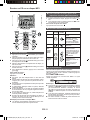
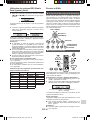
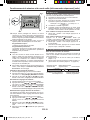
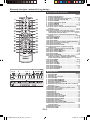
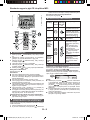
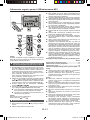
■ Front panel
Page
1. Timer Indicator ................................................. 18, 19
2. Remote Sensor ........................................................ 7
3. Disc Tray ..................................................................11
4. Bluetooth Standby Indicator................................... 6
5. Headphone Link Indicator..................................... 10
6. Left Speaker
7. USB Terminal ......................................................... 13
8. Headphone Socket ................................................ 20
9. ON/STANDBY Button ................................7, 9, 11, 21
10. Audio In Socket...................................................... 20
Page
11. Input Button ....................................................... 7, 20
12. Bluetooth Pairing Button ...................................... 10
13. CD/USB Stop Button ..............................................11
14. Tuner Preset Down, Auto Tuning Down, CD/USB/
Bluetooth Skip Down Button .......... 8, 10, 11, 13, 14, 16
15. Disc/USB/Bluetooth Play or Pause Button ........ 10, 11
16. Tuner Preset Up, Auto Tuning Up, CD/
USB/Bluetooth Skip Up Button ....... 8, 10, 11, 13, 14, 16
17. Volume Control ........................................................ 7
18. Disc Tray Open/Close Button ................................11
19. Right Speaker
20. Duct Port
1
11 13 15
23
45
87
17 186 19 20
12 14 1610
B503
9
Controls and indicators
● If the unit does not work properly, unplug and plug it in
again. Then turn on the unit.
● In case of an electrical storm, unplug the unit for safety.
● Hold the AC power plug by the head when removing it
from the wall socket, as pulling the lead can damage
internal wires.
● Do not place anything on top of the unit.
● The AC power plug is used as a disconnect device and
shall always remain readily operable.
● Do not remove the outer cover, as this may result
in electric shock. Refer internal service to your lo-
cal SHARP service facility.
● The ventilation should not be impeded by covering the
ventilation openings with items, such as newspapers,
tablecloths, curtains, etc.
● No naked ame sources, such as lighted candles,
should be placed on the apparatus.
● Attention should be drawn to the environmental as-
pects of battery disposal.
● This unit should only be used within the range of 5°C
- 35°C (41°F - 95°F).
● The apparatus is designed for use in moderate cli-
mates.
Warning:
The voltage used must be the same as that specied on this
unit. Using a higher voltage is dangerous and may result in
a re or other type of accident causing damage.
SHARP will not be held responsible for any damage result-
ing from such usage.
■ Volume control
The sound level at a given volume setting depends on
speaker efciency, location and various other factors. It is
advisable to avoid exposure to high volume levels, which
occurs while turning the unit on with the volume control
setting up high, or while continually listening at high vol-
umes. Excessive sound pressure from earphones and
headphones can cause hearing loss.
(Rear view)
XL-BB20D_OM_EN_DE_ES_FR_IT_PL.indb 4 2018-01-25 10:09:49

EN-5
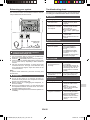
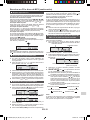
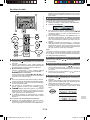
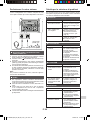
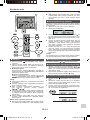
Controls and indicators (continued)
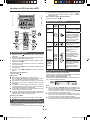
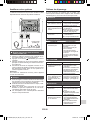
■ Remote control
Page
1. Remote Control Transmitter ....................................... 7
2. On/Standby Button .......................................7, 9, 11, 21
3. Bluetooth Play / Pause Button ................................. 10
4. USB Play / Pause Button .......................................... 13
5. Pairing Button ............................................................ 10
6. CD/USB Stop Button ..................................................11
7. Dimmer Button ............................................................ 7
8. Display Button ..................................................... 12, 13
9. Clock Button ................................................................ 8
10. Tuner Preset Up Button ...................................... 14, 18
11. Folder Button ....................................................... 12, 13
12. Tuning Down, Skip Down, Fast Reverse, Time Down
Button ................................................................8, 10, 11
13. Tuner Preset Down Button ................................. 14, 18
14. Eco Button ................................................................... 6
15. Memory Button .............................................. 12, 14, 18
16. Treble Button ............................................................... 7
17. Bass Button ................................................................. 7
18. Sound (Default) Button ............................................... 7
19. Headphone Link Button ............................................ 10
20. RDS ASPM Button ..................................................... 15
21. DAB Scan Button ...................................................... 16
22. Open/Close Button .................................................7, 11
23. CD Play / Pause Button ..........................................7, 11
24. Tuner [DAB] Button ............................................... 7, 14
25. Audio/Line (Input) Button ..................................... 6, 20
26. Timer Button ........................................................ 18, 19
27. Sleep Button .............................................................. 19
28. Play Mode Button .................................................11, 12
29. Tuning Up, Skip Up, Fast Forward, Time Up
Button ................................................................8, 10, 11
30. Enter Button ........................................................... 8, 10
31. Mute Button ................................................................. 7
32. Clear Button ......................................................... 12, 14
33. Volume Up Button ....................................................... 7
34. Volume Down Button .................................................. 7
35. RDS PTY Button .................................................. 15, 16
36. RDS Display Button .................................................. 15
37. DAB Display Button .................................................. 17
38. DAB Enter Button ...................................................... 17
■ Display
Page
1. USB Indicator ............................................................. 13
2. CD Indicator ................................................................11
3. DAB+ Indicator .......................................................... 16
4. MP3 Indicator ............................................................. 12
5. RDM (Random) Indicator ...........................................11
6. MEM (Memory) Indicator ........................................... 12
7. Repeat Indicator ........................................................ 12
8. Play/Pause Indicator ..................................................11
9. Tuning FM / Bluetooth status Indicator ............... 9, 14
10. FM Stereo Mode Indicator ........................................ 14
11. Stereo Station Indicator ............................................ 14
12. RDS Indicator ............................................................. 15
13. PTY Indicator ............................................................. 15
14. TP Indicator ................................................................ 15
15. TA Indicator ................................................................ 15
16. Muting Indicator .......................................................... 7
17. Title Indicator ............................................................. 12
18. Artist Indicator ........................................................... 12
19. Folder Indicator ......................................................... 12
20. Album Indicator ......................................................... 12
21. File Indicator .............................................................. 12
22. Track Indicator ........................................................... 12
23. Daily Timer Indicator ................................................. 18
24. Once Timer Indicator................................................. 18
25. Disc Indicator ............................................................. 12
26. Total Indicator ............................................................ 12
27. Sleep Indicator ........................................................... 19
1 34 5
6 7
8
9 1110 12 13
14
26 27252422 23212017 1918
15
16
2
1
2
3
4
5
6
7
8
9
10
11
12
13
14
15
16
17
19
20
18
21
22
23
24
25
26
30
27
28
29
31
32
33
34
35
36
37
38
XL-BB20D_OM_EN_DE_ES_FR_IT_PL.indb 5 2018-01-25 10:09:49

EN-6
EN
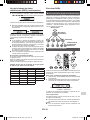
B503
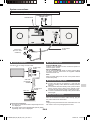
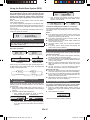
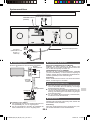
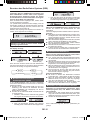
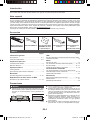
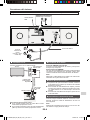
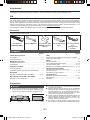
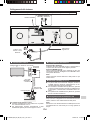
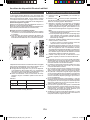
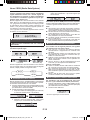
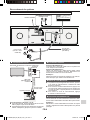
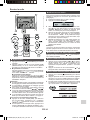
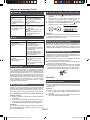
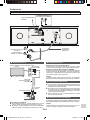
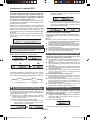
■ Line In connection
Connect to the TV using an audio cable.
Main unit
To LINE input
sockets
Audio signal
Audio cable
(commercially
available)
To audio output
sockets
TV
To select Line In function:
● On main unit: Press INPUT button repeatedly until Line
In is displayed.
● On remote control: Press AUDIO/LINE (INPUT) button
repeatedly until Line In is displayed.
■ Aerial connection
Supplied FM/DAB aerial:
Connect to the FM/DAB 75 ohms socket and position it
where reception is best.
External FM/DAB aerial:
Use an external FM/DAB aerial (75 ohms coaxial cable)
for better reception. Disconnect the supplied FM/DAB
aerial wire before use.
Note:
Keep the aerial away from the unit or AC power lead to
avoid noise pickup.
■ Bluetooth standby mode
● The rst time the unit is plugged in, it will enter the
Bluetooth standby mode. Bluetooth standby indicator
lights up.
● To cancel the Bluetooth standby mode, press the ECO
button (remote control) during power standby mode.
The unit will enter the low power consumption mode.
● To return to the Bluetooth standby mode, press the
ECO
button again.
■ AC power connection
After all connections have been made correctly, plug the
AC power lead into the wall socket.
Note:
Unplug the AC power lead from the wall socket if the unit
will not be in use for a prolonged period of time.
Make sure to unplug the AC power lead before making any connections.
System connections
FM/DAB aerial
Installing the supplied
FM/DAB aerial
Wall socket
(AC 100 - 240 V
~ 50/60 Hz)
To AC INPUT
socket
XL-BB20D_OM_EN_DE_ES_FR_IT_PL.indb 6 2018-01-25 10:09:50

EN-7
General control (continued)
■ Volume auto fade-in
If you turn off and on the main unit with the volume set to
27 or higher, the volume starts at 15 and fades in to the
last set level.
■ Volume control
Turn the volume knob towards VOL +/– (main unit) or
press VOL +/– (remote control) to increase or decrease
the volume.
■ Muting
To mute the volume, press the button (remote control).
Press again to restore the volume.
■ Direct key power on function
When you press any of the following buttons, the unit turns on.
● CD / , USB / , BLUETOOTH / , AUDIO/LINE
(INPUT), TUNER [DAB]: Selected function is activated.
● / (main unit): The unit turns on and playback of the last
function will start (CD, USB, BLUETOOTH, AUDIO IN,
LINE IN, TUNER, DAB)
● (OPEN/CLOSE) (on main unit/remote control): Disc
tray opens and the last selected function is activated.
■ Auto power off function
The main unit will enter the standby mode after approxi-
mately 15 minutes of inactivity during:
Audio In/Line In: No detection of input signal.
CD: In the stop mode or no disc.
USB: In the stop mode or no media.
Bluetooth: - No connection after approximately 15 minutes.
- In the pause or stop mode and no incoming sig-
nal from device after approximately 15 minutes.
■ Bass or Treble control
1
Press the BASS or TREBLE button to select “Bass” or
“Treble” respectively.
2 Within 5 seconds, press the VOL (+ or –) button to adjust the
bass or treble.
- 5 ↔ - 4
........
↔ + 4 ↔ + 5
- 5
↔
- 4
........
↔ +
4
↔ +
5
Press SOUND (DEFAULT) button to return sound to
default settings. “SOUND DEFAULT” appears on the
display.
Sound default settings : Bass = 0, Treble = 0
■ Function
Press the INPUT button (main unit) repeatedly to select
desired function.
CD FM MONOFM STEREO
USBAUDIO INLINE INBLUETOOTH
DAB
Note:
The backup function will protect the memorised function
mode for a few hours should there be a power failure or
the AC power lead becomes disconnected.
Remote control
■ Battery installation
1 Open the battery cover.
2 Insert the batteries according to the terminal indicated in
the battery compartment. When inserting or removing the
batteries, push them towards the (–) battery terminals.
3 Close the cover.
Caution:
● Replace all old batteries with new ones at the same
time.
● Do not mix old and new batteries.
● Remove the batteries if the unit will not be used for a
long period of time. This will prevent potential damage
due to battery leakage.
● Do not use rechargeable batteries (nickel-cadmium
battery, etc.).
● Installing the batteries incorrectly may cause the unit
to malfunction.
● Batteries (battery pack or batteries installed) shall not
be exposed to excessive heat such as sunshine, re
or the like.
Notes concerning use:
● Replace the batteries if the operating distance is re-
duced or if the operation becomes erratic. Purchase 2
“AAA” size batteries (UM/SUM4, R3, HP-16 or similar).
● Periodically clean the transmitter on the remote control
and the sensor on the unit with a soft cloth.
● Exposing the sensor on the unit to strong light may in-
terfere with operation. Change the lighting or the direc-
tion of the unit.
● Keep the remote control away from moisture, heat,
shock, and vibrations.
■ Test of the remote control
The remote control can be used within the range shown below:
Remote sensor
0.2 m - 6 m
General control
■ To turn the power on
Press the (ON/STANDBY) button to turn the power on or
off.
■ Display brightness control
Press the DIMMER button (remote control).
Dimmer 1
Dimmer 2
Dimmer off
(Display is dim).
(Display is bright).
(Display gets dimmer).
XL-BB20D_OM_EN_DE_ES_FR_IT_PL.indb 7 2018-01-25 10:09:51

EN-8
EN
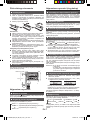
In this example, the clock is set for the 24-hour (0:00 - 23:59)
display.
1 Press the
(ON/STANDBY)
button to turn the power
on.
2 Press the CLOCK button.
3 Within 10 seconds, press the ENTER button. To adjust
the day, press the or button and then
press the ENTER button.
4 Press the or button to select 24-hour or
12-hour display and then press the ENTER button.
The 24-hour display will appear.
(0:00 - 23:59)
The 12-hour display will appear.
(AM 12:00 - PM 11:59)
The 12-hour display will appear.
(AM 0:00 - PM 11:59)
5 To adjust the hour, press the or button
and then press the ENTER button. Press the
or
button once to advance the time by 1 hour. Hold
it down to advance continuously.
6 To adjust the minutes, press the or but-
ton and then press the ENTER button. Press the
or
button once to advance the time by 1 minute.
Hold it down to advance the time by 5 minutes interval.
To conrm the time display:
Press the CLOCK button. The time display will appear for
about 10 seconds.
Note:
When power supply is restored after unit is plugged in again
or after a power failure, reset the clock.
To readjust the clock:
Perform “Setting the clock” from step 1.
To change the 24-hour or 12-hour display:
1 Clear all the programmed contents. [Refer to “Factory
reset, clearing all memory” on page 21 for details.]
2 Perform “Setting the clock” from step 1 onwards.
Setting the clock (Remote control only)
XL-BB20D_OM_EN_DE_ES_FR_IT_PL.indb 8 2018-01-25 10:09:52

EN-9
■ Bluetooth
Bluetooth wireless technology is a short-range radio technology
that enables wireless communication between various types of
digital devices, such as mobile phone or computer. It operates
within a range of about 10 meters without the hassle of having
to use cables to connect these devices.
This unit supports the following:
Communication System: Bluetooth Specication version 2.1
Bluetooth + Enhanced Data Rate (EDR).
Support Prole : A2DP (Advanced Audio Distribution Prole)
and AVRCP (Audio/Video Remote Control Prole)
Notes when using unit with a mobile phone
● This unit cannot be used to talk over the telephone even
when there is a Bluetooth connection made to a mobile
phone.
● Please refer to the operating manual supplied with the mobile
phone for details on operation of your mobile phone while
transmitting the sound using a Bluetooth connection.
Bluetooth devices need to be initially paired rst before
they can exchange data. This unit can memorise up to a
maximum of 20 devices. Once paired, it is not necessary to
pair them again unless:
● pairing is made with more than 20 devices. Pairing can
only be made one device at a time. If subsequent de-
vice is paired, the oldest device paired will be deleted
and replaced with the new one.
● this unit is reset. All pairing information is deleted when
unit is reset.
Indicators:
Indicator Condition Bluetooth status
Lights up Connected
No indication Unconnected
However, the indication status is not displayed during
Bluetooth standby mode.
■ Pairing with Bluetooth source devices
1 Press the
(ON/STANDBY)
button to turn the power on.
2 Press the button on the main unit or BLUETOOTH
button on the remote control to select Bluetooth function.
“BLUETOOTH” appears on the display.
3 Perform pairing procedure on the source device to detect
this unit. “XL-BB20D SHARP” will appear in the detected
devices list (if available) in the source device. (Refer the
source device operating manual for details).
Notes:
● Place the devices to be paired within 1 meter of each
other when pairing.
● Some source devices are unable to display lists of de-
tected devices. To pair this unit with the source device,
refer to the source device operating manual for details.
4 Select “XL-BB20D SHARP” from the source list. If Pass-
code* is required, enter “0000”.
* Passcode may be called PIN Code, Passkey, PIN num-
ber or Password.
5 “Connected” appears on the display once the unit is suc-
cessfully paired with the source device. (Pairing information
is now memorised in the unit.) Some audio source devices
may connect with the unit automatically after pairing is com-
pleted, otherwise follow the instructions in the source device
operating manual to start connection.
6 Press the play button on main unit, remote control or source
device to start Bluetooth streaming playback.
Notes:
● If a device such as microwave oven, wireless LAN card, Blue-
tooth device or any other device that uses the same 2.4 GHz
frequency is placed near the system some sound interruption
may be heard.
● The transmission distance of the wireless signal between the de-
vice and the main unit is about 10 m, but may vary depending on
your operating environment.
● If a steel concrete or metallic wall is between the device and the
main unit, the system may not operate at all, because the wire-
less signal cannot penetrate metal.
● If this unit or the source device is turned off before Bluetooth con-
nection is completed, pairing will not be completed and the pair-
ing information will not be memorised. Repeat step 1 onwards to
start pairing again.
● To pair with other devices, repeat steps 1 - 5 for each device. This
unit can memorise up to a maximum of 20 devices. If subsequent
device is paired, the oldest device paired will be deleted.
● Once a device is ousted or deleted from the pairing list, the pair-
ing information for the device is also deleted. To listen to the
sound from the device again, it needs to be re-paired. Perform
steps 1 - 5 to pair the device again.
● XL-BB20D does not support Bluetooth prole AVRCP 1.4, hence
there will be no volume synchronisation even if your Bluetooth
device supports such prole.
Listening to Bluetooth enabled devices
XL-BB20D_OM_EN_DE_ES_FR_IT_PL.indb 9 2018-01-25 10:09:52

EN-10
EN
■ Listening to the sound
Check that:
● The source device Bluetooth functionality is ON.
● Pairing of this unit and the source device is completed.
● Unit is in connected mode.
1 Press the (ON/STANDBY) button to turn the power on.
2 Press the button on the main unit or BLUETOOTH button
on the remote control to select Bluetooth function.
3 Start the Bluetooth connection from the Bluetooth audio source
device.
4 Press the BLUETOOTH / button.
Notes:
● If the source device has an extra bass function or equalizer
function, set them to off to avoid sound distortion.
Notes:
● Make the Bluetooth connection again if the source device is not
turned on, or its Bluetooth functionality is off or is in sleep mode.
● The volume of this unit may not be controlled as intended de-
pending on the device.
Bluetooth operation buttons
Main unit Remote
control
Operation
Press the button to play or
pause.
Press the button to skip to next
track.
Press and hold to fast forward.
Press the button to skip to
previous track.
Press and hold to fast reverse.
■ To disconnect the Bluetooth device
Perform any of the followings.
– Press PAIRING button until “Disconnected” appears on the display.
– Disconnect or turn off the Bluetooth connection on the audio source
device. Refer the operating manual supplied with the device.
– Turn off this unit.
■ Auto power on
During Bluetooth standby mode, the unit will automatically
power on when the Bluetooth connection is set up between
the main unit and your device.
Note:
This function is not applicable during Bluetooth standby
mode off.
■ Link to Bluetooth headphone
You can connect a set of Bluetooth headphones to this unit.
Before making the connection, check that:
● The Bluetooth headphone to be connected is in pairing
mode and within range.
1 Select a desired function to listen to, except for Blue-
tooth function.
2 Press and hold the HEADPHONE LINK button on the
remote control until “Headphone Link” appears on the
display.
3 Press ENTER button. “Searching” appears on the dis-
play.
4 After nish searching, the nearby devices’ names will
be shown on the display. Press or to select the
desired device and then press ENTER button. “Con-
nected” appears on the display and Headphone Link
LED (green) lights up.
● If your device does not appear on the list, do the
following:
- Make sure the Bluetooth headphone is still in
pairing mode. Refer to the manual supplied with
it.
- Press
button.
- Repeat steps 2 - 4.
Notes:
● Connection to Bluetooth headphone is valid in all
function except Bluetooth.
● Bluetooth headphone connection will be terminated in
Bluetooth function.
● When connected with Headphone Link, speaker
output is muted.
● Volume can be controlled on both main unit and the
connected Bluetooth headphone separately.
To disconnect the Bluetooth headphone:
Turn off the Bluetooth mode on the connected Bluetooth
headphone. Refer to the manual supplied with it.
“Disconnected” appears and Headphone Link LED (green)
lights off.
To re-link with the previous headphone device:
The device must be in pairing mode and within range.
1 Press the HEADPHONE LINK button. “Headphone
Link” will be blinking depending on the last connection.
2 Within 5 seconds press the ENTER button. “Linking”
will be displayed. “Connected” appears if re-link pro-
cess is successful.
Note:
If “Not found” appears, repeat from step 1. Make sure that
the device to be connected is within range and in pairing
mode.
Listening to Bluetooth enabled devices (continued)
XL-BB20D_OM_EN_DE_ES_FR_IT_PL.indb 10 2018-01-25 10:09:52

EN-11
■ Disc playback
1
Press the
(ON/STANDBY)
button to turn the power on.
2 Press the INPUT button repeatedly on the main unit to
select CD function.
3 Press the (OPEN/CLOSE) button to open the disc com-
partment.
4 Place the disc on the disc compartment, label side up.
5 Press the (OPEN/CLOSE) button to close the disc tray.
6 Press the / (CD / ) button to start playback.
To stop playback:
Press the
button.
Caution:
● Do not place two discs in one-disc-tray.
● Do not play discs of special shapes (heart, octagon, etc). It
may cause malfunction.
● Do not push the disc tray while it is moving.
● If the power fails wait until the power is restored.
● If TV or radio interference occurs during CD operation, move
the unit away from the TV or radio.
● If using an 8 cm disc, ensure that it is placed in the centre
of the disc tray.
● Due to the structure of the disc information, it takes longer
to read an MP3 disc than a normal CD (approximately 20
to 90 seconds).
Note for CD or MP3 disc:
● Rewritable multi-session discs with unnished writing,
can still be played.
■ To resume playback after stopping (re-
sume play) (MP3 only)
You can resume playback from the track playback is stopped.
1 While a disc is playing, press the button once.
2 To resume play, press the CD / button. Playback resumes
from the track you stopped.
To cancel the resume playback:
Press the
button twice.
■ Various disc functions
Function Main
unit
Remote
control
Operation
Play
Press in the stop mode.
Pause Press in the playback
mode. Press the
/
button to resume play-
back from the paused
point.
Stop
Press in the playback
mode.
Track
up/down
Press in the playback or
stop mode.
If you press the button
in the stop mode, press
the / button to start
the desired track.
Fast
forward/
reverse
Press and hold down in
the playback mode.
Release the button to
resume playback.
■ Random play
To random play all tracks:
Press PLAY MODE button on the remote control repeatedly until
“Random” appears. Press the / (CD / ) button.
To cancel random play:
Press the PLAY MODE button again until “Normal” appears. “RDM”
indicator will disappear.
Notes:
● If you press the
button during random play,
you can move to the track selected next by the random
operation. However, the button does not allow
you to move to the previous track. The beginning of the
track being played will be located.
● In random play, the unit will select and play tracks au-
tomatically. (You cannot select the order of the tracks.)
● In folder mode on, only tracks in selected folder will be
played randomly.
Listening to a CD or MP3 disc
XL-BB20D_OM_EN_DE_ES_FR_IT_PL.indb 11 2018-01-25 10:09:53

EN-12
EN
Listening to a CD or MP3 disc (continued)
■ Repeat play
Repeat play can play one track, all tracks or a programmed se-
quence continuously.
To repeat one track:
Select desired track using the or
button.
Press the PLAY MODE button repeatedly until “Repeat One” ap-
pears. Press the / (CD / ) button.
To repeat all tracks:
Press the PLAY MODE button repeatedly until “Repeat All” ap-
pears. Press the / (CD / ) button.
To repeat desired tracks:
Perform steps 1 - 5 in “Programmed play” section on this page
and then press the PLAY MODE button repeatedly until “Memory
Repeat” appears.
To repeat one folder:
While in Folder mode on (MP3), press PRESET ( or ) to se-
lect desired folder. Press PLAY MODE button repeatedly until
“Repeat Folder” appears. Press the / (CD / ) button.
To cancel repeat play:
Press the PLAY MODE button repeatedly until “Normal” appears
and “ ” disappears.
Caution:
After performing repeat play, be sure to press the
button.
Otherwise, the disc will play continuously.
■ Programmed play (CD)
1
While in the stop mode, press the MEMORY button
on the remote control to enter the programming save
mode.
2 Press the or button to select the de-
sired track.
Selected track number
3 Press the MEMORY button to save the track number.
4 Repeat steps 2 - 3 for other tracks. Up to 32 tracks can be
programmed. If you want to check the programmed tracks,
during stop mode, press the MEMORY button repeatedly.
To clear the programmed tracks, press the CLEAR button.
5 Press the / (CD / ) button to start playback.
■ Programmed play (MP3)
1
While in the stop mode, press the MEMORY button to
enter the programming save mode.
2 Press the PRESET ( or ) button on the remote con-
trol to select the desired folder.
Then press the or button (remote con-
trol) to select the desired tracks.
3 Press the MEMORY button to save the folder and track
number.
4 Repeat steps 2 – 3 for other folder/tracks. Up to 32
tracks can be programmed.
5 Press the / (CD / ) button to start playback.
To cancel the programmed play mode:
During programmed stop mode, press the
button. The
display will show “Memory Clear” and all the programmed
contents will be cleared.
Adding tracks to the programme:
If a programme has been previously stored, the “MEM”
indicator will be displayed. During stop mode, press the
MEMORY button once. Within 10 seconds, press and hold
the MEMORY button again. Then follow steps 2 - 3 to add
tracks.
Notes:
● When the disc compartment is opened, the pro-
gramme is automatically cancelled.
● If you press the
(ON/STANDBY)
button to enter the
standby mode or change the function from CD to an-
other, the programmed selections will be cleared.
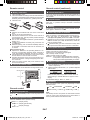
■ Procedure to playback MP3 disc with
folder mode on
To play back CD-R/RW.
1 In CD function, load an MP3 disc. Press the FOLDER
button and disc info will be displayed.
MP3 indicator
Total number of les
TOTAL indicator
Total number of folder
2 Press the PRESET ( or ) button to select desired
playback folder. (Folder mode on)
FOLDER
indicator
FOLDER number First track number in
the folder
3 Select desired le to be played back by pressing the
or button.
4 Press the / (CD / ) button. Playback will start and
le name will be displayed.
● Title, Artist and Album name are displayed if they
are recorded on the disc.
● In case of playback with the folder mode on, press
the PRESET (
or ) button, and the folder can
be selected even though it is in playback/pause
mode. It will continue playback/pause mode in the
1st track of the selected folder.
● Display content can be changed by pressing the
DISPLAY button.
Title displayCounter display
Album display
Folder displayFile name display
Artist display
Note:
If “Not Supported” is displayed, it means “Not supported
playback le” is selected.
XL-BB20D_OM_EN_DE_ES_FR_IT_PL.indb 12 2018-01-25 10:09:54

EN-13
Listening to USB mass storage device/MP3 player
USB
Note:
This product is not compatible with MTP and AAC le sys-
tems from USB mass storage device or MP3 player.
■ To play back USB/MP3 player with folder
mode on / off
1
Press the INPUT button (main unit) repeatedly to se-
lect USB function. Connect the USB memory device
that has MP3 format les on the unit. When the USB
memory is connected to the main unit, the device infor-
mation will be displayed.
To playback with folder mode on, follow step 2 below.
To playback with folder mode off, skip to step 3 below.
2 Press the FOLDER button, and press the PRESET
( or ) button to select desired playback folder. To start
playback, go to step 4. To change the playback folder,
press the PRESET ( or ) button to select another folder.
3 Select desired le to be played back by pressing the
or button.
4 Press the / (USB / ) button. Playback will start and
the le name will be displayed.
● Title, Artist and Album name are displayed if they
are recorded in the USB memory device.
● Display content can be changed by pressing the
DISPLAY button.
Note:
To pause playback:
Press the
/ (USB / ) button.
■ To remove USB memory device
1
Press the button twice to stop playback.
2 Disconnect USB memory device from the USB terminal.
Notes:
● SHARP will not be held liable for the loss of data while the
USB memory device is connected to the audio system.
● Files compressed in MP3 format can be played back
when connected to the USB terminal.
● This USB memory’s format supports FAT 16 or FAT 32.
● SHARP cannot guarantee that all USB memory de-
vices will work on this audio system.
● USB cable is not recommended for use in this audio
system to connect to USB memory device. Use of the
USB cable will affect the performance of this audio
system.
● This USB memory cannot be operated via USB hub.
● The USB terminal in this unit is not intended for a PC
connection.
● External HDD-storage cannot be played back via USB
terminal.
● If the data inside the USB memory is large, it may take
longer time for the data to be read.
● This product can play MP3 les. It will automatically
detect the le type being played. If unplayable le is
played on this product, “Not Supported” is indicated
and the le will be automatically skipped. This will take
a few seconds. If abnormal indications appear on the
display due to the unspecied le, turn off the unit and
then turn it on again.
● This product relates to USB mass storage devices
and MP3 players. It may however face some irregu-
larities due to various unforeseen reasons from some
devices. Should this happen, turn off the unit and then
turn it on again.
The following functions are the same as CD operations:
Page
Various disc functions .................................................11
Random play .................................................................11
Repeat play .................................................................. 12
Programmed play (MP3) ............................................. 12
Notes:
● If USB memory device is not connected, “USB No Me-
dia” will be shown on the display.
● Fast forward/reverse is invalid when playing back a
variable bitrate le.
Notes:
● This unit only supports “MPEG-1 Audio Layer-3” for-
mat. (Sampling Frequency is 32, 44.1, 48kHz)
● Playback order for MP3 les may differ depending on
the writing software used during le download.
● Bitrate which is supported by MP3 is 32~320 kbps.
● Files without MP3 format cannot be played back.
● Playlists are not supported on this unit.
● This unit can display Folder Name or File Name up to
32 characters.
● Total number of folders read is 999 including folder
with non-playable le. However, the display shows
only folder with MP3 les.
● The display playback time may not be displayed cor-
rectly when playing back a variable bitrate le.
XL-BB20D_OM_EN_DE_ES_FR_IT_PL.indb 13 2018-01-25 10:09:55

EN-14
EN
Listening to the radio
■ Tuning
1
Press the (ON/STANDBY) button to turn the power
on.
2 Press the TUNER [DAB] button (remote control) or
INPUT button (main unit) repeatedly to select FM
Stereo or FM Mono.
3 ● Manual tuning:
Press the TUNING (
or ) button (remote
control) repeatedly to tune in to the desired station.
● Auto tuning:
Press and hold the TUNING ( or ) button.
Scanning will start automatically and the tuner will stop at
the rst receivable broadcast station.
Notes:
● When radio interference occurs, auto scan tuning may
stop automatically at that point.
● Auto scan tuning will skip weak signal stations.
● To stop the auto tuning, press the TUNING
(
or ) button again.
● When an RDS (Radio Data System) station is tuned
in, the frequency will be displayed rst, and then the
RDS indicator will light up. Finally, the station name
will appear.
● Full auto tuning can be achieved for RDS stations
“ASPM”, see page 15.
To receive an FM stereo transmission:
● Press the TUNER [DAB] button to select stereo mode.
“ST” indicator will be displayed. “
” and “ ” will ap-
pear when an FM broadcast is in stereo.
● If the FM reception is weak, press the TUNER [DAB]
button to extinguish the “ST” indicator. The reception
changes to monaural, and the sound becomes clearer.
■ Memorising a station
You can store 30 FM stations in memory and recall them
at the push of a button. (Preset tuning)
1 Perform steps 2 - 3 in “Tuning”.
2 Press the MEMORY button.
3 Within 30 seconds, press the PRESET ( or ) button
to select the preset channel number. Store the stations
in memory, in order, starting with preset channel 1.
4 Within 30 seconds, press the MEMORY button to store
that station in memory. If the “MEM” and preset num-
ber indicators disappear before the station is memo-
rised, repeat the operation from step 2.
5 Repeat steps 1 - 4 to set other stations, or to change
a preset station. When a new station is stored in the
memory, the station previously memorised for that pre-
set channel number will be erased.
Note:
The backup function protects the memorised stations for a
few hours should there be a power failure or the AC power
lead become disconnected.
■ To recall a memorised station
Press the PRESET ( or ) button to select the desired
station.
■ To scan the preset stations
1
Press and hold the PRESET ( or ) button until the
preset number ashes. The programmed stations will
be tuned in sequentially, for 5 seconds each.
2 Press the PRESET ( or ) button again when the
desired station is located.
■ To erase entire preset memory
1
Press the
(ON/STANDBY)
button to turn the power on.
2 Press the INPUT button (main unit) repeatedly or
TUNER [DAB] button (remote control) to select Tuner
or DAB function.
3 In Tuner or DAB function, press and hold the CLEAR
button (remote control) until “Tuner Clear” or “DAB
Clear” appears.
XL-BB20D_OM_EN_DE_ES_FR_IT_PL.indb 14 2018-01-25 10:09:56

EN-15
Using the Radio Data System (RDS)
RDS is a broadcasting service which a growing num-
ber of FM stations provide. These FM stations send
additional signals along with their regular programme
signals. They send their station names, and informa-
tion about the type of programme such as sport, mu-
sic, etc.
When tuned to an RDS station, “RDS” and the station
name will be displayed.
“TP” (Trafc Programme) will appear on the display when
the received broadcast carries trafc information, and “TA”
(Trafc Announcement) will appear while a trafc informa-
tion is on air.“
“PTYI” (Dynamic PTY Indicator) will appear while the Dy-
namic PTY station is received.
■ Information provided by RDS
You can control the RDS by using the buttons on
the remote control only.
Each time the RDS DISP button is pressed, the display
will switch as follows:
Station name (PS) Programme type (PTY)
Radio text (RT)Frequency
When tuning in to a station other than an RDS station or to
an RDS station which sends weak signal, the display will
change in the following order:
NO PS NO PTY
FM 98.80 MHz
NO RT
■ Using the Auto Station Programme
Memory (ASPM)
While in the ASPM operation mode, the tuner will auto-
matically search for new RDS stations. Up to 30 stations
can be stored.
1 Press the TUNER [DAB] button (remote control) or
INPUT button (main unit) repeatedly to select TUNER
function.
2 Press and hold the RDS ASPM button.
1 After “ASPM” has ashed for about 4 seconds,
scanning will start (87.50 - 108.00 MHz).
2 When an RDS station is found, “RDS” will appear
for a short time and the station will be stored in
memory.
3 After scanning, the number of stations stored in
memory will be displayed, and then “END” will ap-
pear for a few seconds.
To stop the ASPM operation before it is complete:
Press the RDS ASPM button while it is scanning for stations.
The stations which are already stored in memory will be
kept there.
Notes:
● If 30 stations have already been stored in memory, the
scan will be aborted. If you want to redo the ASPM
operation, erase the preset memory.
● If no station have been stored in memory, “END” will
appear for about 4 seconds.
● If the RDS signals are very weak, station names may
not be stored in memory.
● The same station name can be stored in different
channels.
● In a certain area or during certain time periods, the
station names may be different.
■ Notes for RDS operation
If any of the following events occur, it does not mean
that the unit is faulty:
● “PS”, “No PS” and a station name appear alternately,
and the unit does not operate properly.
● If a particular station is not broadcasting properly or a
station is conducting tests, the RDS reception function
may not work properly.
● When you receive an RDS station whose signal is too
weak, information like the station name may not be
displayed.
● “No PS”, “No PTY” or “No RT” will ash for about 5
seconds, and then the frequency will be displayed.
Notes for radio text:
● The rst 14 characters of the radio text will appear for
4 seconds and then they will scroll across the display.
● If you tune in to an RDS station which is not broadcast-
ing any radio text, “No RT” will be displayed when you
switch to the radio text position.
● While radio text data is received or when the text con-
tents change, “RT” will be displayed.
■ To recall stations in memory
To specify programmed types (news, sports, trafc
programme, etc..) and select stations (PTY search):
1 Press the TUNER [DAB] button (remote control) or
INPUT button (main unit) repeatedly to select TUNER
function.
2 Press the RDS PTY button.
“SELECT” will appear for about 6 seconds.
XL-BB20D_OM_EN_DE_ES_FR_IT_PL.indb 15 2018-01-25 10:09:57

EN-16
EN
Using the Radio Data System (RDS)
(continued)
3 Within 6 seconds, press the TUNING
( or )
button to select the programme type.
Each time the button is pressed, the programme type will
appear.
4 While the selected programme type is ashing (within
6 seconds), press the RDS PTY button again.
After the selected programme type has been lit for 2 sec-
onds, “SEARCH” will appear, and the search operation
will start.
Notes:
● If the display has stopped ashing, start again from
step 2. If the unit nds a desired programme type, the
corresponding channel number will lit for about 8 sec-
onds, and then the station name will remain lit.
● If you want to listen to the same programme type of
another station, press the RDS PTY button while the
channel number or station name is ashing. The unit
will look for the next station.
● If no station can be found, “Not Found” will appear for
4 seconds.
If you select the trafc programme:
If you select the trafc programme (TP) in step 3, “TP”
will appear.
(This does not mean that you can listen to the trafc infor-
mation at that time.)
When the trafc information is broadcast, “TA” will appear.
PTY (Programme Type) codes, TP (Trafc Programme)
and TA (Trafc Announcement)
NEWS POP M SOCIAL FOLK M
AFFAIRS ROCK M RELIGION DOCUMENT
INFO EASY M PHONE IN TEST
SPORT LIGHT M TRAVEL ALARM
EDUCATE CLASSICS LEISURE NONE
DRAMA OTHER M JAZZ TP
CULTURE WEATHER COUNTRY TA
SCIENCE FINANCE NATION M
VARIED CHILDREN OLDIES
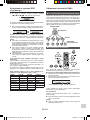
Listening to the DAB+
■ About DAB+ (Digital Audio Broadcasting)
Digital Audio Broadcasting is a digital transmission system
where audio signals are converted to digital signals for
broadcasting. DAB+ is broadcast as a group of data called
multiplex (ensemble) which may contain one or more sta-
tions (services). Each station contains a primary service
and there may be one or more secondary services. This
allows several programmes or services to be transmitted
on a single frequency.
DAB + SIGNAL
MULTIPLEX
(ENSEMBLE)
SERVICES
SERVICES
COMPONENTS
(STATIONS)
■ Auto Scan
When turned on for the rst time, the unit scans radio sta-
tions automatically to create a station list.
To perform the Auto Scan again:
1 Press the TUNER [DAB] button until “DAB” appears
on the display.
2 Press DAB SCAN button on the remote control for
more than 3 seconds. Scanning begins.
+
The scanning progressThe number of received
station
The number of stations found and the scanning process
are shown on the display.
After the scan:
The rst station on the list will be selected and you will
hear it through the speakers.
● To listen to other stations, see “Selecting a station in
the station list” on page 17.
Notes:
● If no station is found, “No Service” appears.
XL-BB20D_OM_EN_DE_ES_FR_IT_PL.indb 16 2018-01-25 10:09:57

EN-17
Listening to the DAB+ (continued)
■ Selecting a station in the station list
Once a DAB+ station is received, you can select stations
in the station list.
1 Press the TUNER [DAB] button until “DAB” appears
on the display.
2 While receiving a DAB+ station, press the TUNING
( or ) to select the desired station.
Name of the current
station
The name of the station
being selected
3 Within 10 seconds, press the DAB ENTER button on
the remote control to tune into the desired station.
■ Manual tune
You can manually store stations which Auto Scan cannot
nd. If reception is poor, you can adjust the sensitivity.
Manual tune is only available after Auto Scan. Perform
Auto Scan rst.
1 Press the TUNER [DAB] button until “DAB” appears
on the display.
2 Press the DAB SCAN button
once.
3 Within 10 seconds, press the
TUNING ( or ) to
select the DAB+ frequency.
4 Within 10 seconds, press the
DAB ENTER button.
(G: Good,
B: Bad)
● Reception sensitivity appears. The percentage
number indicate the current level.
● If the level is too low, move the aerial or unit to
improve reception.
5 Press the DAB ENTER button again to store the sta-
tion and exit manual tune.
Note:
To erase all scanned stations, refer to “Factory reset,
clearing all memory” on page 21.
Changing the information display
You can switch DAB+ display information.
Press the DAB DISP button.
Each time the button is pressed, the information display
changes in the following order.
When “No Service” appears, the DAB DISP button does
not allow you to change the display.
[Station Name]
[Signal quality]
[Mode]
[Channel/Frequency]
[Scrolling text]
[Programme type]
[Multiplex name]
[Station Name]
Station name is displayed. (set by default)
[Scrolling text]
Information scrolls across the display when sent from the
station.
[Programme type]
A description of the type of content being broadcast by
the station.
[Multiplex name]
The name of the multiplex (ensemble) which provides the
current service.
[Channel/Frequency]
The DAB+ channel and frequency for the station.
(Frequency is displayed to two decimal places)
[Mode]
The data transfer speed and channel type (stereo or
mono) appear.
[Signal quality]
The signal quality is displayed as a number (0 - 100).
[85-100: Good, 70-84: Fair, 0-69: Poor]
XL-BB20D_OM_EN_DE_ES_FR_IT_PL.indb 17 2018-01-25 10:09:58

EN-18
EN
Changing the information display
(continued)
■ Memorising a station
You can store 30 DAB stations in memory and recall them
at the push of a button. (Preset tuning)
1 Tune to the desired DAB station.
2 Press the MEMORY button.
3 Within 30 seconds, press the PRESET ( or ) button
to select the preset channel number. Store the stations
in memory, in order, starting with preset channel 1.
4 Within 30 seconds, press the MEMORY button to store
that station in memory. If the “MEM” and preset num-
ber indicators disappear before the station is memo-
rised, repeat the operation from step 2.
5 Repeat steps 1 - 4 to set other stations, or to change
a preset station. When a new station is stored in the
memory, the station previously memorised for that pre-
set channel number will be erased.
Note
To erase entire preset memory, refer “To erase entire
preset memory” on page 14.
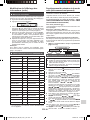
■ DAB Frequency table (BAND III)
Frequency Label Frequency Label
174.928 MHz 5A 208.064 MHz 9D
176.640 MHz 5B 209.936 MHz 10A
178.352 MHz 5C 211.648 MHz 10B
180.064 MHz 5D 213.360 MHz 10C
181.936 MHz 6A 215.072 MHz 10D
183.648 MHz 6B 216.928 MHz 11A
185.360 MHz 6C 218.640 MHz 11B
187.072 MHz 6D 220.352 MHz 11C
188.928 MHz 7A 222.064 MHz 11D
190.640 MHz 7B 223.936 MHz 12A
192.352 MHz 7C 225.648 MHz 12B
194.064 MHz 7D 227.360 MHz 12C
195.936 MHz 8A 229.072 MHz 12D
197.648 MHz 8B 230.784 MHz 13A
199.360 MHz 8C 232.496 MHz 13B
201.072 MHz 8D 234.208 MHz 13C
202.928 MHz 9A 235.776 MHz 13D
204.640 MHz 9B 237.488 MHz 13E
206.352 MHz 9C 239.200 MHz 13F
* Frequencies are displayed to two decimal places on
this unit.
Timer and sleep operation (Remote
control only)
Timer playback:
The unit turns on and plays the desired source (CD,
TUNER, DAB, USB, LINE IN, AUDIO IN) at a preset time.
This unit has 2 types of timer: ONCE TIMER and DAILY
TIMER.
Once timer (“
” indicator):
Once timer play works for one time only at a preset time.
Daily timer (“DAILY” indicator):
Daily timer play works at the same preset time every day
that we set. For example, set the timer as a wake-up call
every morning.
Using the once timer and daily timer in combination:
For example, use the once timer to listen to a radio
programme, and use the daily timer to wake up.
1 Set the daily and once timer (pages 18 - 19).
1 minute or more
Daily timer Once timer
Stop StartStart Stop
■ Timer playback
Before setting timer:
● Check that the clock is set to the correct time (refer to
page 8). If it is not set, you cannot use the timer function.
● For timer playback: Plug in USB or load discs to be
played.
1 Press the
(ON/STANDBY)
button to turn the power on.
2 Press the TIMER button.
3 Press the or button to select “Once” or
“Daily”, and press the ENTER button.
4 Press the or button to select “Timer
Set”, and press the ENTER button.
5 To select the timer playback source (CD, TUNER,
DAB, USB, LINE IN, AUDIO IN), press the or
button. Press the ENTER button.
When you select the tuner or DAB, select a station
by pressing the
or button, and then
press the ENTER button. If a station has not been
programmed, “No Preset” will be displayed and timer
setting will be cancelled. To memorise a station, refer
‘Memorising a station’ on page 14 or 18.
6 To adjust the day, press the or button
and then press the ENTER button.
7 Press the or button to adjust the hour,
and then press the ENTER button.
8 To adjust the minutes, press the or
button and then press the ENTER button.
9 Set the time to nish as in steps 7 and 8 above.
10 To adjust the volume, press the or but-
ton and then press the ENTER button.
11 Press the
(ON/STANDBY)
button to enter the power
standby mode. “TIMER” indicator lights up.
XL-BB20D_OM_EN_DE_ES_FR_IT_PL.indb 18 2018-01-25 10:09:59

EN-19
Timer and sleep operation (Remote control only) (continued)
12 When the preset time is reached, playback will start.
The volume will increase gradually until it reaches the
preset volume. The timer indicator will blink during
timer playback.
13 When the timer end time is reached, the system will
enter the power standby mode automatically.
Once timer:
The timer will be cancelled.
Daily timer:
The timer operates at the same time every selected
day. Cancel the daily timer when it is not in use.
Notes:
● When performing timer playback using another unit
connected to the USB terminal or AUDIO IN or LINE
IN socket, select “USB” or “AUDIO IN” or “LINE IN” in
step 5. This unit will turn on or enter the power standby
mode automatically. However, the connected unit will
not turn on or off.
● To stop the timer playback, follow step “Cancelling
the timer setting” of this page.
Checking the timer setting:
1 Turn the power on. Press the TIMER button.
2 Press the or button to select “Once” or
“Daily”, and press the ENTER button.
3 Press the or button to select “Timer
Call”, and press the ENTER button.
Cancelling the timer setting:
1 Turn the power on. Press the TIMER button.
2 Press the or button to select “Once” or
“Daily”, and press the ENTER button.
3 Press the or button to select “Timer
Off”, and press the ENTER button. Timer will be can-
celled (the setting will not be cancelled).
Reusing the memorised timer setting:
The timer setting will be memorised once it is entered. To
reuse the same setting, perform the following operations.
1 Turn the power on. Press the TIMER button.
2 Press the or button to select “Once” or
“Daily”, and press the ENTER button.
3 Press the or button to select “Timer
On” , and press the ENTER button.
4 Press the
(ON/STANDBY)
button to enter the power
standby mode.
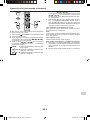
■ Sleep operation
The radio, disc, USB, Audio In, Line In, and Bluetooth can
all be turned off automatically.
1 Play back the desired sound source.
2 Press the SLEEP button.
3 Within 5 seconds, press the SLEEP button repeatedly
to select the time.
“Sleep 90”
“Sleep 80” ... “Sleep 10”
“Sleep Off”
4 “SLEEP” indicator will appear.
5 The unit will enter the power standby mode automati-
cally after the preset time has elapsed. The volume will
be turned down 1 minute before the sleep operation
nishes.
To conrm the remaining sleep time:
1 While “SLEEP” is indicated, press the SLEEP button.
To cancel the sleep operation:
Press the
(ON/STANDBY)
button while “SLEEP” is indi-
cated. To cancel the sleep operation without setting the
unit to the standby mode, proceed as follows.
1 While “SLEEP” is indicated, press the SLEEP button.
2 Within 5 seconds, press the SLEEP button repeatedly
until “Sleep Off” appears.
■ To use timer and sleep operation together
Sleep and timer playback:
For example, you can fall asleep listening to the radio and
wake up to CD the next morning.
1 Set the sleep time (see above, steps 1 - 5).
2 While the sleep timer is set, set the timer playback
(steps 2 - 10, page 18).
Sleep timer
setting
Timer playback
setting
Desired time
1-90 minutes
Sleep operation will
automatically stop
Timer playback start
time
End time
XL-BB20D_OM_EN_DE_ES_FR_IT_PL.indb 19 2018-01-25 10:10:00
Seite wird geladen ...
Seite wird geladen ...
Seite wird geladen ...
Seite wird geladen ...
Seite wird geladen ...
Seite wird geladen ...
Seite wird geladen ...
Seite wird geladen ...
Seite wird geladen ...
Seite wird geladen ...
Seite wird geladen ...
Seite wird geladen ...
Seite wird geladen ...
Seite wird geladen ...
Seite wird geladen ...
Seite wird geladen ...
Seite wird geladen ...
Seite wird geladen ...
Seite wird geladen ...
Seite wird geladen ...
Seite wird geladen ...
Seite wird geladen ...
Seite wird geladen ...
Seite wird geladen ...
Seite wird geladen ...
Seite wird geladen ...
Seite wird geladen ...
Seite wird geladen ...
Seite wird geladen ...
Seite wird geladen ...
Seite wird geladen ...
Seite wird geladen ...
Seite wird geladen ...
Seite wird geladen ...
Seite wird geladen ...
Seite wird geladen ...
Seite wird geladen ...
Seite wird geladen ...
Seite wird geladen ...
Seite wird geladen ...
Seite wird geladen ...
Seite wird geladen ...
Seite wird geladen ...
Seite wird geladen ...
Seite wird geladen ...
Seite wird geladen ...
Seite wird geladen ...
Seite wird geladen ...
Seite wird geladen ...
Seite wird geladen ...
Seite wird geladen ...
Seite wird geladen ...
Seite wird geladen ...
Seite wird geladen ...
Seite wird geladen ...
Seite wird geladen ...
Seite wird geladen ...
Seite wird geladen ...
Seite wird geladen ...
Seite wird geladen ...
Seite wird geladen ...
Seite wird geladen ...
Seite wird geladen ...
Seite wird geladen ...
Seite wird geladen ...
Seite wird geladen ...
Seite wird geladen ...
Seite wird geladen ...
Seite wird geladen ...
Seite wird geladen ...
Seite wird geladen ...
Seite wird geladen ...
Seite wird geladen ...
Seite wird geladen ...
Seite wird geladen ...
Seite wird geladen ...
Seite wird geladen ...
Seite wird geladen ...
Seite wird geladen ...
Seite wird geladen ...
Seite wird geladen ...
Seite wird geladen ...
Seite wird geladen ...
Seite wird geladen ...
Seite wird geladen ...
Seite wird geladen ...
Seite wird geladen ...
Seite wird geladen ...
Seite wird geladen ...
Seite wird geladen ...
Seite wird geladen ...
Seite wird geladen ...
Seite wird geladen ...
Seite wird geladen ...
Seite wird geladen ...
Seite wird geladen ...
Seite wird geladen ...
Seite wird geladen ...
Seite wird geladen ...
Seite wird geladen ...
Seite wird geladen ...
Seite wird geladen ...
Seite wird geladen ...
Seite wird geladen ...
Seite wird geladen ...
Seite wird geladen ...
Seite wird geladen ...
Seite wird geladen ...
Seite wird geladen ...
Seite wird geladen ...
Seite wird geladen ...
Seite wird geladen ...
Seite wird geladen ...
Seite wird geladen ...
Seite wird geladen ...
Seite wird geladen ...
-
 1
1
-
 2
2
-
 3
3
-
 4
4
-
 5
5
-
 6
6
-
 7
7
-
 8
8
-
 9
9
-
 10
10
-
 11
11
-
 12
12
-
 13
13
-
 14
14
-
 15
15
-
 16
16
-
 17
17
-
 18
18
-
 19
19
-
 20
20
-
 21
21
-
 22
22
-
 23
23
-
 24
24
-
 25
25
-
 26
26
-
 27
27
-
 28
28
-
 29
29
-
 30
30
-
 31
31
-
 32
32
-
 33
33
-
 34
34
-
 35
35
-
 36
36
-
 37
37
-
 38
38
-
 39
39
-
 40
40
-
 41
41
-
 42
42
-
 43
43
-
 44
44
-
 45
45
-
 46
46
-
 47
47
-
 48
48
-
 49
49
-
 50
50
-
 51
51
-
 52
52
-
 53
53
-
 54
54
-
 55
55
-
 56
56
-
 57
57
-
 58
58
-
 59
59
-
 60
60
-
 61
61
-
 62
62
-
 63
63
-
 64
64
-
 65
65
-
 66
66
-
 67
67
-
 68
68
-
 69
69
-
 70
70
-
 71
71
-
 72
72
-
 73
73
-
 74
74
-
 75
75
-
 76
76
-
 77
77
-
 78
78
-
 79
79
-
 80
80
-
 81
81
-
 82
82
-
 83
83
-
 84
84
-
 85
85
-
 86
86
-
 87
87
-
 88
88
-
 89
89
-
 90
90
-
 91
91
-
 92
92
-
 93
93
-
 94
94
-
 95
95
-
 96
96
-
 97
97
-
 98
98
-
 99
99
-
 100
100
-
 101
101
-
 102
102
-
 103
103
-
 104
104
-
 105
105
-
 106
106
-
 107
107
-
 108
108
-
 109
109
-
 110
110
-
 111
111
-
 112
112
-
 113
113
-
 114
114
-
 115
115
-
 116
116
-
 117
117
-
 118
118
-
 119
119
-
 120
120
-
 121
121
-
 122
122
-
 123
123
-
 124
124
-
 125
125
-
 126
126
-
 127
127
-
 128
128
-
 129
129
-
 130
130
-
 131
131
-
 132
132
-
 133
133
-
 134
134
-
 135
135
-
 136
136


Sharp XL-BB20D Bedienungsanleitung
- Kategorie
- CD-Spieler
- Typ
- Bedienungsanleitung
- Dieses Handbuch eignet sich auch für
in anderen Sprachen
- English: Sharp XL-BB20D Owner's manual
- français: Sharp XL-BB20D Le manuel du propriétaire
- español: Sharp XL-BB20D El manual del propietario
- italiano: Sharp XL-BB20D Manuale del proprietario
- polski: Sharp XL-BB20D Instrukcja obsługi
Verwandte Artikel
Andere Dokumente
-
Yamaha MCR-N470 Bedienungsanleitung
-
Yamaha R-N803 Bedienungsanleitung
-
Muse Micro-chaîne M785 DAB Bedienungsanleitung
-
Yamaha R-N303 Bedienungsanleitung
-
Albrecht DR 790 CD, B-WARE (kleine Fehler möglich) Bedienungsanleitung
-
ONKYO CS-265DAB Benutzerhandbuch
-
JVC KD-DB52 Bedienungsanleitung
-
Yamaha R-S202D Bedienungsanleitung
-
AEG MC 4469 DAB+ Bedienungsanleitung
-