
Bead RuptorTM 96
Well Plate Homogenizer
en User Manual
fr Manuel d’utilisation
it Manuale d’uso
es Manual del usuario
de Benutzerhandbuch

This page left blank intentionally

Data herein has been veried and validated. It is believed adequate for the intended use of the instrument.
If the instrument or procedures are used for purposes over and above the capabilities specied herein,
conrmation of the validity and suitability should be obtained; otherwise OMNI International, a PerkinElmer
company does not guarantee results and assumes no obligation or liability. This publication is not a license
to operate under, or a recommendation to infringe upon, any process patents.
This product is warranted to be free from defects in material and workmanship for a period of ONE YEAR
from the date of delivery. OMNI International, a PerkinElmer company will repair or replace and return free
of charge any part which is returned to its factory within said period, transportation prepaid by user, and
which is found upon inspection to have been defective in materials or workmanship. This warranty does
not include normal wear from use; it does not apply to any instrument or parts which have been altered by
anyone other than an employee of OMNI International, a PerkinElmer company nor to any instrument which
has been damaged through accident, negligence, failure to follow operating instructions, the use of electric
currents or circuits other than those specied on the plate axed to the instrument, misuse, or abuse.
OMNI International, a PerkinElmer company reserves the right to change, alter, modify, or improve any of its
instruments without any obligation whatever to make corresponding changes to any instrument previously
sold or shipped.
THE FORGOING OBLIGATION IS IN LIEU OF ALL OBLIGATIONS AND LIABILITIES INCLUDING NEGLIGENCE AND ALL
WARRANTIES OF MERCHANTABILITY OR OTHERWISE, EXPRESSED OR IMPLIED IN FACT OR BY LAW, AND STATE OUR ENTIRE
AND EXCLUSIVE LIABILITY AND BUYERS EXCLUSIVE REMEDY FOR ANY CLAIM OF DAMAGES IN CONNECTION WITH THE
SALE OR FURNISHING OF GOODS OR PARTS, THEIR DESIGN, SUITABILITY FOR USE, INSTALLATION, OR OPERATION. OMNI
International, a PerkinElmer company WILL IN NO EVENT BE LIABLE FOR ANY SPECIAL OR CONSEQUENTIAL DAMAGES
WHATSOEVER, AND THEIR LIABILITY UNDER NO CIRCUMSTANCES WILL EXCEED THE CONTRACT PRICE FOR THE GOODS FOR
WHICH LIABILITY IS CLAIMED.
This product has been engineered for safety; however, basic safety precautions and common sense must
always be demonstrated when using any electrical product.
- DO NOT attempt to modify any part of this product.
- DO NOT allow the machine to be submerged in any liquid.
- DO NOT use in any setting other than an indoor laboratory.
- DO NOT plug power cord into an incorrect outlet or subject it to an incorrect voltage.
- Use this product only for its intended purpose.
- DO NOT use attachments not recommended by the manufacturer.
- DO NOT operate the product if it is damaged in any way.
- Keep this product away from heated surfaces.
- DO NOT modify the plug or cord that is provided. If the plug will not t the outlet, have the proper outlet
installed by a qualied electrician.
- DO NOT operate the product with the safety ground disconnected.
WARNING: The processing chamber of the Bead RuptorTM 96 homogenizer is enclosed by a strong
covering lid. Starting of the machine is possible only with the lid closed. If the lid is open, message “LID”
appears on the display, when the START/STOP key is pressed. When message “LID” appears on display,
the lid must be closed and the error message cleared by pressing the START/STOP key. The instrument
can then be started by pressing the START/STOP key again. If the lid is opened during operation, the
machine stops rapidly and message “Er3” appears on display. When message “Er3” appears on display,
the machine cannot be restarted by pressing the START/STOP key. The main POWER switch must be
turned to OFF and then ON again, to clear the message before instrument operation can proceed.
MILLING JAR FILL REQUIREMENTS
WARNING: The sample quantity must not be less than 25% of the milling jar capacity. The milling balls
may otherwise damage the milling jars. The milling jars and milling balls must be the same material.
Otherwise the milling jar could be damaged.
WARNING: The instrument must be balanced prior to operation. Do not operate the instrument with
only one milling jar or one well plate adapter installed in a single milling jar holder. Both milling jar
holders must have either a milling jar (lled with equivalent mass) or well plate adapters. If not balanced
damage to the lid is possible.
For research use only. Not for use in diagnostic procedures.

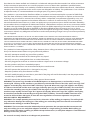
Overview
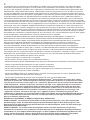
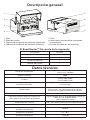
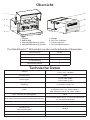
The Bead RuptorTM 96 Homogenizer consists of the following:
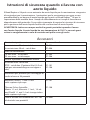
Technical Data
1. Lid
2. Control Panel
3. Milling Jar holder (left)
4. Milling Jar holder (right)
5. Lid
6. On/O Switch
7. Fuse Compartment
8. Power Cord Port
1.
2.
3.
4.
5.
6.
7.
8.
Description Quantity
Bead RuptorTM 96 Homogenizer Assembly 1
Milling Wrench 2
Power Cord 1
Spare Fuse 1
User Manual 1
Power supply 230V ± 10% - 50/60Hz
115V ± 10% - 50/60Hz
Rated power 200W
Fuses 2 x 2AT 250V (230V)
2 x 5AT 250V (115V)
Vibrational frequency
regulation
Digital, from 3 to 30 Hz (180 - 1800 min-1),
in 0.1 Hz steps
Timer
5 sec - 99 min, timer HOLD function,
in 1 sec steps (below 10 min),
or 10 sec steps (above 10 min)
Max. volume of milling cups 50 ml
Max Well Plate Capacity per milling jar holder
1 X 2 ml deep well plate, 2 X 1 mL deep well plate,
3 X standard well plate, 96 1 x 1.1 or 1.4 ml 2D
barcoded storage tubes.
Dimensions W x D x H 385 x 420 x 240 mm (465 mm with hood open)
Weight 42 kg
Noise emission
(without milling balls) 70 dB(A)
Ambient temperature 5°C - 40°C
Atmospheric humidity < 85% RH

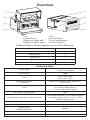
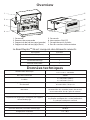
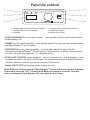
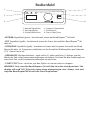
Control Panel
1. Run signal light
2. Time signal light
3. Display Screen
4. Frequency signal light
5. Control Knob
6. Start/Stop button
1.
2.
3.
4.
5.
6.
RUN
START
STOP
TIME FREQ
• RUN Signal light (green) - lit when the Bead RuptorTM 96 Homogenizer is running.
• TIME Signal light (yellow) - lit when the Bead RuptorTM 96 Homogenizer timer
selection is active.
• FREQUENCY Signal light (yellow) - lit when the Bead RuptorTM 96 Homogenizer
frequency selection is active. Frequency is dened as number of wave cycles per
second (1/s). Measured in Hz.
• CONTROL KNOB (rotate / push) - rotate right (+) Or left (-) to change the Time
or Frequency setting values. Push the Control Knob to switch between Time and
Frequency settings.
• START/STOP button - press to start or stop the cycle.
WARNING: Only start the Bead RuptorTM 96 Homogenizer with the lid in the closed
position. The display will read “LID” if the lid is open when attempting to start.
Always start and stop the Bead RuptorTM 96 with the Start/Stop button.

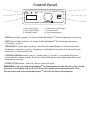
A A
B B
C C
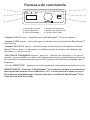
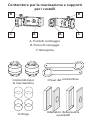
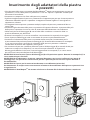
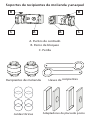
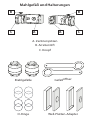
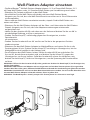
A. Centering Points
B. Locking Pin
C. Knob
Milling Jars
O-Rings
Jar Wrenches
96 Well Plate And 2D Barcode 96 Well
Storage Tube Adapters
Milling Jar and Rack Holders

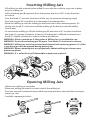
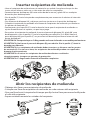
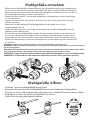
Inserting Milling Jars
Opening Milling Jars
• Fill milling jar with material to be milled. Ensure the two-white o-rings are in place
prior to sealing jars.
• Lift the locking pin (B) upwards from the groove and turn it 90° in any direction
to unlock.
• Turn the knob (C) counter clockwise all the way to maximize clamping range.
• Turn locking pin 90° and allow it to reengage in locked position.
• Place the milling jar into the milling jar arm and seat it into centering points (A).
• Gently turn knob (C) clockwise until the milling jar ts rmly inside the holder,
free of play.
• To remove the milling jar, lift the locking pin (B) and turn it 90° to unlock and turn
the knob (C) counter clockwise to loosen. If locking pin is dicult to release turn
knob (C) slightly clockwise to release locking pin tension.
WARNING: Always include an O-Ring when a Milling Jar is assembled to run.
WARNING: Do not force locking pin (B) open. Turn knob (C) clockwise to release.
WARNING: Milling jars must be inserted and aligned with centering points (A). If this
is not done jars may be ejected during processing.
WARNING: When removing hot or cryogenically cooled milling jars always wear
protective gloves.
WARNING: It is unlawful to mill ammable or explosive material.
• Obtain two milling jar wrenches
• Place one milling jar wrench on each end of the milling jar
• Turn one wrench counterclockwise while securing the other wrench from moving to
loosen jar seal.
• Carefully separate jar halves.

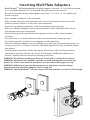
Inserting Well Plate Adapters
• Bead RuptorTM 96 Homogenizer well plate adapters can hold 1 X 2 mL deep well plate,
2 X 1 mL deep well plates or 3 X standard well plates per processing arm.
• 96 well 2D barcode storage tube adapters can hold 1 x 1.1 ml or 1 x 1.4 ml plates per
processing arm.
• Place samples and beads in the well plate.
• Fully seal the well plate with well plate mat. Care must be taken to ensure the well
plate is properly sealed. A silicon mat is recommended.
• If processing multiple well plates, stack the well plates bottom to top.
• Place the well plate adapters on the top and bottom of the well plate stack. Ensure
the adapter extensions are aligned.
• Lift the locking pin (B) upwards from the groove and turn it 90° in any direction
to unlock.
• Turn the knob (C ) counter clockwise all the way to maximize clamping range.
• Turn locking pin 90° and allow it to reengage in locked position.
• Place the well plate adapter into the milling jar arm and seat it into centering points (A).
Gently turn knob (C ) clockwise until the well plate adapter ts rmly inside the holder,
free of play.
• To remove the well plates, lift the locking pin (B) and turn it 90° to unlock and turn
the knob (C) counter clockwise to loosen. If locking pin is dicult to release, turn
knob (C) slightly clockwise to release locking pin tension.
WARNING: Do not force locking pin (B) open. Turn knob (C ) clockwise to release.
WARNING: Well plates and adapters must be inserted and aligned with centering
points (A). If this is not done the well plates may be ejected during processing.
WARNING: Milling arms must be balanced prior to operation. You must always
operate with two well plate adapters. One in each arm.
WARNING: The Bead RuptorTM 96 only accepts SPS format plates less than 49.25 mm high.

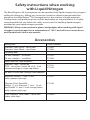
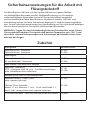
Safety instructions when working
with Liquid Nitrogen
Accessories
The Bead RuptorTM 96 Homogenizer can be operated with liquid nitrogen for cyrogenic
milling of milling jars. Milling jars can be pre-cooled in a liquid nitrogen bath then
placed on the Bead RuptorTM 96 Homogenizer for dissociation of tough materials.
Cooling times and processing times will be dependent on target material. It is highly
recommended that you follow the safety instructions for handling liquid nitrogen
provided by your liquid nitrogen provider.
WARNING: Always wear protective gloves and googles when working with liquid
nitrogen. Liquid nitrogen has a temperature of -196°C and will cause severe burns
and frostbite with skin or eye contact.
Milling Jars Order Number
Stainless Steel 25 mL - set of two
Stainless Steel 50 mL - set of two
27-004
27-006
Grinding Balls
10 mm stainless - set of ten
25 mm stainless - set of ve
27-203
27-206
Well Plate and Tube Adapters
Stainless Steel - set of two
PTFE - set of two. (Holds 48 x 0.5 - 2 mL
microcentrifuge or screw cap tubes)
27-101
27-106
96 Well 2D Barcode Storage Tube Adapters
Micronic/FluidX 1.1 and 1.4 mL
with septum style caps.
Thermo Fisher Scientic
Matrix 1.1 m L, Micronic 1.1 mL , 1.4 mL
and FluidX 1.1 and 1.4 mL storage tubes
with septum style caps.
27-107
27-108
2 mL Stainless Steel Tubes - set of two
tubes with slugs
19-6001

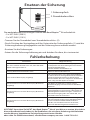
Replacing the Fuse
Troubleshooting
Troubleshooting
Error Possible Solution
Power Switch is not illuminated
when the Bead Ruptor 96 is on.
1. Check the power supply
2. Check fuses and replace if necessary
3. Call for service
Display screen is not working Call for service
“LID” appears on display
Indicates that the hood is open when the start button
was pressed. Close hood and clear message by pressing
the Start/Stop button. Press Start/Stop to begin cycle.
Message “Er1” appears on
display screen
Motor has over heated. Turn power o and allow motor
to cool down.
Message “Er2” appears on
display screen
The Bead Ruptor 96 is unable to reach the set vibrational
frequency. Check Milling Jars for obstructions. Switch
Power OFF and ON to clear error message.
Message “Er3” appears on
display screen
Hood was opened during operation. The power must be
turned OFF and then ON to clear error message before
operation can continue.
DO NOT: attempt to service the Bead Ruptor 96 in a manner other than
those discussed in this manual. For any issue that is unsuccessfully correct-
ed using this guide, please contact your authorized dealer or call
Omni International at 1-800-776-4431.
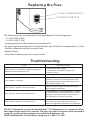
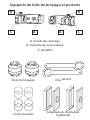
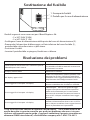
Replacing the Fuse
The following fuses are required for the Bead Ruptor 96:
• 2 x 2AT 250V (230V)
• 2 x 5AT 250V (115V)
• Unplug power cord from the power cord port (2).
• By pressing the locking device on the bottom side of the fuse compartment (1), fuse
holder is released and you can pull it out.
• Replace fuses.
• Insert fuse holder and push it, until it locks.
1. Fuse Compartment
2. Power Cord Port
The following fuses are required for the Bead RuptorTM 96 Homogenizer:
• 2 x 2AT 250V (230V)
• 2 x 5AT 250V (115V)
• Unplug power cord from the power cord port (2).
• By pressing the locking device on the bottom side of the fuse compartment (1), fuse
holder is released and you can pull it out.
• Replace fuses.
• Insert fuse holder and push it, until it locks.
DO NOT: attempt to service the Bead RuptorTM 96 Homogenizer in a manner other
than those discussed in this manual. For any issue that is unsuccessfully corrected
using this guide, please contact your authorized dealer or call
OMNI International, a PerkinElmer company at 1-800-776-4431.
Error Possible Solution
Power Switch is not illuminated when the Bead
RuptorTM 96 Homogenizer is on.
1. Check the power supply
2. Check fuses and replace if necessary
3. Call for service
Display screen is not working Call for service
“LID” appears on display
Indicates that the lid is open when the start
button was pressed. Close lid and clear mes-
sage by pressing the Start/Stop button. Press
Start/Stop to begin cycle.
Message “Er1” appears on display screen Motor has over heated. Turn power o and
allow motor to cool down.
Message “Er2” appears on display screen
The Bead RuptorTM 96 Homogenizer is unable
to reach the set vibrational frequency. Check
Milling Jars for obstructions. Switch Power
OFF and ON to clear error message.
Message “Er3” appears on display screen
Lid was opened during operation. The power
must be turned OFF and then ON to clear
error message before operation can continue.

fr
Les données dans la présente ont été vériées et validées Nous estimons qu’elles sont adéquates pour
l’utilisation prévue de l’instrument. Si l’instrument ou les procédures sont utilisées à des ns au-delà et
au-dessus des capacités spéciées dans la présente, la conrmation de la validité et de la pertinence doit
être obtenue ; sinon OMNI International, a PerkinElmer company ne garantira pas les résultats et n’assum-
era aucune obligation ni responsabilité. Cette publication ne constitue pas une licence d’utilisation, ni une
recommandation de violer des brevets de procédés. Ce produit est garanti exempt de défauts de matériaux
et de fabrication pendant une période d’UN AN à compter de la date de livraison. OMNI International, a
PerkinElmer company réparera ou remplacera et retournera gratuitement toute pièce qui est retournée à
son usine pendant ladite période, le transport ayant été payé par l’utilisateur, et dont les défauts de matéri-
aux et de fabrication ont été constaté par une inspection. Cette garantie ne couvre pas l’usure normale résul-
tant de l’utilisation du produit ; elle ne s’applique pas aux instruments ni aux pièces qui ont été modiés par
quiconque autre qu’un employé d’OMNI International, a PerkinElmer company, ni à tout instrument qui a
été endommagé par accident, négligence, non-respect des consignes d’utilisation, l’utilisation de courants
électriques ou de circuits autres que ceux indiqués sur la plaque apposée sur l’instrument, par une mauvaise
utilisation ou un abus. OMNI International, a PerkinElmer company se réserve le droit de changer, d’altérer,
de modier ou d’améliorer n’importe lequel de ses instruments sans aucune obligation que ce soit à apport-
er des modications correspondantes à tout instrument vendu ou expédié.
LA PRÉSENTE OBLIGATION REMPLACE TOUTE AUTRE OBLIGATION ET RESPONSABILITÉ, Y COMPRIS LA
NÉGLIGENCE ET TOUTE AUTRE GARANTIE DE QUALITÉ MARCHANDE OU AUTREMENT, EXPRESSE OU
IMPLICITE EN FAIT OU EN DROIT, ET AFFIRME NOTRE ENTIÈRE ET EXCLUSIVE RESPONSABILITÉ ET LE RECOURS
EXCLUSIF DES ACHETEURS POUR TOUTE DEMANDE DE DOMMAGES DANS LE CADRE DE LA VENTE OU
FOURNITURE DE BIENS OU DE PIÈCES, LEUR CONCEPTION, PERTINENCE POUR UTILISATION, INSTALLATION
OU FONCTIONNEMENT. OMNNI INTERNATIONAL NE SERA EN AUCUN CAS RESPONSABLE DE DOMMAGES
PARTICULIERS OU INDIRECTS QUELS QU’ILS SOIENT, ET SA RESPONSABILITÉ EN AUCUN CAS NE DÉPASSERA LE PRIX
PRÉVU DANS LE CONTRAT POUR LES PRODUITS POUR LESQUELS LA RESPONSABILITÉ EST REVENDIQUÉE.
Ce produit a été mis au point en tenant compte de la sécurité de l’opérateur ; toutefois, toujours suivre des
précautions de sécurité de base et faire preuve de bon sens lors de l’utilisation de produits électriques.
– NE PAS essayer de modier des pièces de ce produit.
– NE PAS submerger la machine dans un liquide.
– NE PAS utiliser d’autres milieux qu’un laboratoire intérieur.
– NE PAS brancher le cordon d’alimentation dans une prise inadéquate ni le soumettre à une tension incorrecte.
– Utiliser ce produit uniquement pour l’usage auquel il est destiné.
– NE PAS utiliser des accessoires non recommandés par le fabricant.
– NE PAS faire fonctionner le produit s’il a subi un dommage d’une manière ou d’une autre.
– Tenir le produit à l’écart de surfaces chauées.
– NE PAS modier la che ou le cordon fournis. Si la che ne correspond pas à la prise, demander à un
électricien qualié d’installer une prise adéquate.
– NE PAS faire fonctionner le produit avec le dispositif de mise à la terre débranché.
AVERTISSEMENT : La chambre de traitement du Bead RuptorTM 96 est fermée au moyen d’un solide
couvercle la recouvrant. Le démarrage de la machine est possible seulement si le couvercle est fermé.
Si le couvercle est ouvert, le message « LID » (couvercle) apparaîtra à l’écran, lorsque la touche START/
STOP (Commencer / Arrêter) est pressée. Lorsque le message « LID » apparaît à l’écran, le couvercle
doit être fermé et le message d’erreur eacé en appuyant sur la touche START/STOP. On peut alors
démarrer l’instrument en appuyant à nouveau sur la touche START/STOP. Si le couvercle est ouvert
au cours du fonctionnement de la machine, la machine s’arrêtera rapidement et le message « Er3
» apparaîtra à l’écran. Lorsque le message « Er3 » apparaît à l’écran, la machine ne peut pas être
redémarrée en appuyant sur la touche START/STOP. L’interrupteur principal d’ALIMENTATION doit être
mis sur la position OFF et ensuite à nouveau sur ON pour eacer le message avant que l’instrument
puisse se remettre à fonctionner.
EXIGENCES CONCERNANT LE REMPLISSAGE DU BOL DE BROYAGE
AVERTISSEMENT : La quantité de l’échantillon ne doit pas être inférieure à 25 % de la capacité du
bol de broyage. Sinon, les billes de broyage risquent d’endommager les bols de broyage. Les bols
de broyage et les billes de broyage doivent être faits du même matériau. Sinon, les bols de broyage
pourraient être endommagés.
AVERTISSSEMENT : L’instrument doit être équilibré avant de le faire fonctionner. Ne pas faire
fonctionner l’instrument avec seulement un bol de broyage ou un adaptateur de plaque multipuits
installé dans un seul support de bol de broyage. Les deux supports de bol de broyage doivent avoir
chacun un bol de broyage (chacun rempli de masse équivalente) ou des adaptateurs de plaque
multipuits. Si l’instrument n’est pas équilibré, le couvercle risque d’être endommagé.

Overview
Le Bead RuptorTM 96 est composé des éléments suivants :
Données techniques
1. Couvercle
2. Panneau de commande
3. Support de bol de broyage (gauche)
4. Support de bol de broyage (droit)
5. Couvercle
6. Interrupteur ON/OFF
7. Compartiment à fusibles
8. Port du cordon d’alimentation
1.
2.
3.
4.
5.
6.
7.
8.
Description Quantité
Ensemble Bead RuptorTM 96 1
Cordon d’alimentation 1
Fusible de rechange 1
Manuel d’utilisation 1
Alimentation électrique 230 V ± 10 % - 50/60 Hz
115 V ± 10 % - 50/60 Hz
Puissance nominale 200 W
Fusibles 2 x 2 AT 250 V (230 V)
2 x 5 AT 250 V (115 V)
Réglage de la fréquence
de vibration
Numérique, de 3 à 30 Hz (180 - 1800 min-1),
en intervalles s de 0,1 Hz
Minuterie
5 s – 99 min, fonction EN ATTENTE de la minuterie,
en intervalles d’1 seconde (moins de 10 min)
ou en intervalles de 10 s (plus de 10 min)
Volume max. des bols de broyage 50 ml
Capacité max de plaques multipuits par support
de bol de broyage
1 x plaque multipuits de 2 ml de profondeur,
2 x plaques multipuits de 1 ml de profondeur,
3 x plaques multipuits standard
Dimensions La x P x H 385 x 420 x 240 mm (465 mm avec couvercle ouvert)
Poids 42 kg
Émission de bruit (sans billes de broyage) 70 dB(A)
Température ambiante 5°C - 40°C
Humidité atmosphérique < 85% RH

Panneau de commande
1. Voyant de marche
2. Voyant de durée
3. Écran d’achage
4. Voyant de fréquence
5. Bouton de commande
6. Touche Start/Stop
1.
2.
3.
4.
5.
6.
RUN
START
STOP
TIME FREQ
• Voyant MARCHE (vert) – allumé lorsque le Bead RuptorTM 96 est en marche.
• Voyant DURÉE (jaune) – allumé lorsque la sélection de la minuterie du Bead RuptorTM
96 est active.
• Voyant FRÉQUENCE (jaune) – allumé lorsque la sélection de la fréquence du Bead
RuptorTM 96 est active. La fréquence est dénie comme le nombre d’oscillations par
seconde (1/s). Mesuré en Hz.
• BOUTON DE COMMANDE (tourner / pousser) – tourner vers la droite (+) Ou vers la
gauche (-) pour modier les valeurs de réglage de la durée ou de la fréquence. Pousser
sur le bouton de commande pour passer des réglages de la durée aux réglages de la
fréquence.
• Touche START/STOP – appuyer sur cette touche pour commencer ou arrêter le cycle.
AVERTISSEMENT : Démarrer le Bead RuptorTM 96 seulement lorsque le couvercle est
dans la position fermée. L’écran achera « LID » si le couvercle est ouvert au cours
d’une tentative de démarrage. Toujours démarrer et arrêter le Bead RuptorTM 96 à
l’aide de la touche Start/Stop.

A A
B B
C C
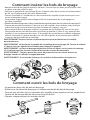
A. Points de centrage
B. Goupille de verrouillage
C. Molette
Bols de broyage
Joints toriques
Clés de bol
Adaptateurs de plaque
multipuits
Supports de bols de broyage et portoirs

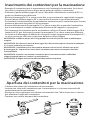
Comment insérer les bols de broyage
Comment ouvrir les bols de broyage
• Remplir le bol de broyage de matières à broyer. S’assurer que les deux joints toriques sont
en place avant de sceller les bols.
• Soulever la goupille de verrouillage (B) vers le haut à partir de la rainure, et la faire pivoter
de 90° ans n’importe quel sens pour déverrouiller.
• Tourner la molette (C) à fond dans le sens contraire des aiguilles d’une montre pour max
imiser la plage de serrage.
• Faire pivoter la goupille de verrouillage de 90° et lui permettre de se réengager en
position verrouillée.
• Mettre le bol de broyage dans le bras de bol de broyage et le placer dans les points de centrage (A).
• Tourner doucement la molette (C) dans le sens des aiguilles d’une montre jusqu’à ce que
le bol de broyage soit fermement ajusté à l’intérieur du support, sans jeu.
• Pour enlever le bol de broyage, soulever la goupille de verrouillage (B) vers le haut et la
faire pivoter de 90° pour déverrouiller et tourner la molette (C) dans le sens contraire des
aiguilles d’une montre pour desserrer. Si la goupille de verrouillage est dicile à dégager,
tourner la molette (C) légèrement dans le sens des aiguilles d’une montre pour relâcher
la tension de la goupille de verrouillage.
AVERTISSEMENT: toujours inclure un joint torique lorsqu’un pot de fraise est assemblé
pour fonctionner.
AVERTISSEMENT : Ne pas forcer la goupille de verrouillage pour la dégager (B). Tourner la molette
(C) dans le sens des aiguilles d’une montre pour dégager la goupille.
AVERTISSEMENT : Les bols de broyage doivent être insérés et alignés sur les points de centrage
(A). Si cela n’est pas fait, les bols risquent d’être éjectés au cours du traitement.
AVERTISSEMENT : Toujours porter des gants de protection lors du retrait de bols de
broyage chauds ou refroidis cryogéniquement.
AVERTISSEMENT : Il est interdit de broyer des matières inammables ou explosives.
• Se procurer deux clés de bols de broyage
• Placer une clé de bol de broyage sur chaque extrémité du bol de broyage
• Tourner une clé dans le sens contraire des aiguilles d’une montre tout en empêchant
l’autre clé de bouger an de desserrer le joint du bol.
• Séparer soigneusement les moitiés du bol.

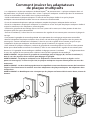
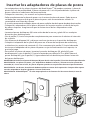
Comment insérer les adaptateurs
de plaque multipuits
• Les adaptateurs de plaque multipuits du Bead RuptorTM 96 peuvent tenir 1 x plaque multipuits de 2 ml
d e profondeur, 2 x plaques mul ipuits de 1 ml ou 3 x plaques multipuits standard par bras de traitement.
• Placer les échantillons et les billes dans la plaque multipuits.
• Sceller entièrement la plaque multipuits à l’aide de mat de plaque. Veiller à ce que la plaque
multipuits soit correctement scellée. Un mat en silicone est recommandé.
• En cas de traitement de plusieurs plaques multipuits, empiler les plaques multipuits de bas en haut.
• Placer les adaptateurs de plaques multipuits au sommet et au bas de la pile de plaques multipuits. Veiller à
ce que les extensions des adaptateurs soient alignées.
• Soulever la goupille de verrouillage (B) vers le haut à partir de la rainure, et la faire pivoter de 90° dans
n’importe quel sens pour déverrouiller.
• Tourner la molette (C) à fond dans le sens contraire des aiguilles d’une montre pour maximiser la plage de
serrage.
• Faire pivoter la goupille de verrouillage de 90° et lui permettre de se réengager en position verrouillée.
• Mettre l’adaptateur de plaque multipuits dans le bras de bol de broyage et le placer dans les points de
centrage (A). Tourner doucement la molette (C) dans le sens des aiguilles d’une montre jusqu’à ce que
l’adaptateur de plaque multipuits soit fermement ajusté à l’intérieur du support, sans jeu.
• Pour enlever les plaques multipuits, soulever la goupille de verrouillage (B) vers le haut et la faire pivoter
de 90° pour déverrouiller et tourner la molette (C) dans le sens contraire des aiguilles d’une montre pour
desserrer. Si la goupille de verrouillage est dicile à dégager, tourner la molette (C) légèrement dans
le sens des aiguilles d’une montre pour relâcher la tension de la goupille de verrouillage.
AVERTISSEMENT : Ne pas forcer la goupille de verrouillage pour la dégager (B). Tourner la molette (C)
dans le sens des aiguilles d’une montre pour dégager la goupille.
AVERTISSEMENT : Les plaques multipuits et les adaptateurs doivent être insérés et alignés sur les
points de centrage (A). Si cela n’est pas fait, les plaques multipuits risquent d’être éjectées au cours du
traitement.
AVERTISSEMENT : Les bras de broyage doivent être équilibrés avant tout fonctionnement de la machine.
Toujours faire fonctionner la machine avec deux adaptateurs de plaque multipuits. Un adaptateur dans
chaque bras.
AVERTISSEMENT: Le Bead RuptorTM 96 n’accepte que les plaques au format SPS de moins de 49,25 mm de
hauteur.

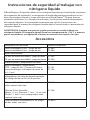
Consignes de sécurité lorsqu’on travaille avec
de l’azote liquide
Accessoires
Le Bead RuptoTM 96 peut être utilisé avec de l’azote liquide pour le broyage
cryogénique des bols de broyage. Les bols de broyage peuvent être prérefroidis dans
un bain d’azoteliquide et placés ensuite dans le Bead RuptorTM 96 pour la dissociation
de matières tenaces.
Les durées de refroidissement et de traitement dépendront de la matière cible. Lors de
toute manipulation d’azote liquide, il est vivement recommandé de suivre les
consignes de sécurité fournies par le fournisseur d’azote liquide.
AVERTISSEMENT : Toujours porter des gants de protection et des lunettes
de sécurité au cours de travaux avec de l’azote liquide. L’azote liquide a une
température de -196°C et provoquera des brûlures et des gelures graves en cas de
contact avec la peau ou les yeux.
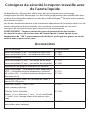
Bols de broyage Order Number
Acier inoxydable 25 ml – ensemble de deux bols
Acier inoxydable 50 ml – ensemble de deux bols
27-004
27-006
Billes de broyage
Acier inoxydable 10 mm – ensemble de dix billes
Acier inoxydable 25 mm – ensemble de cinq billes
27-203
27-206
Adaptateurs de plaques multipuits et de tubes
Acier inoxydable – Ensemble de deux adaptateurs
PTFE – ensemble de deux adaptateurs (contient
48 x tubes [0,5 - 2 ml]de microcentrifugation ou à
bouchon vissé).
27-101
27-106
Adaptateurs pour tubes de stockage de codes à
barres 2D à 96 puits
Micronic/FluidX 1.1 and 1.4 mL
with septum style caps.
Thermo Fisher Scientic
Matrix 1.1 m L, Micronic 1.1 mL , 1.4 mL and FluidX
1.1 and 1.4 mL storage tubes with septum style
caps.
27-107
27-108
Tubes en acier inoxydable de 2 ml - ensemble de
deux tubes avec tampons
19-6001

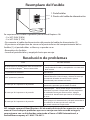
Comment remplacer les fusibles
Dépannage
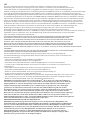
Troubleshooting
Error Possible Solution
Power Switch is not illuminated
when the Bead Ruptor 96 is on.
1. Check the power supply
2. Check fuses and replace if necessary
3. Call for service
Display screen is not working Call for service
“LID” appears on display
Indicates that the hood is open when the start button
was pressed. Close hood and clear message by pressing
the Start/Stop button. Press Start/Stop to begin cycle.
Message “Er1” appears on
display screen
Motor has over heated. Turn power o and allow motor
to cool down.
Message “Er2” appears on
display screen
The Bead Ruptor 96 is unable to reach the set vibrational
frequency. Check Milling Jars for obstructions. Switch
Power OFF and ON to clear error message.
Message “Er3” appears on
display screen
Hood was opened during operation. The power must be
turned OFF and then ON to clear error message before
operation can continue.
DO NOT: attempt to service the Bead Ruptor 96 in a manner other than
those discussed in this manual. For any issue that is unsuccessfully correct-
ed using this guide, please contact your authorized dealer or call
Omni International at 1-800-776-4431.
Replacing the Fuse
The following fuses are required for the Bead Ruptor 96:
• 2 x 2AT 250V (230V)
• 2 x 5AT 250V (115V)
• Unplug power cord from the power cord port (2).
• By pressing the locking device on the bottom side of the fuse compartment (1), fuse
holder is released and you can pull it out.
• Replace fuses.
• Insert fuse holder and push it, until it locks.
1. Fuse Compartment
2. Power Cord Port
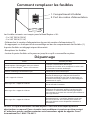
Les fusibles suivants sont requis pour le Bead RuptorTM 96 :
• 2 x 2 AT 250 V (230 V)
• 2 x 5 AT 250 V (115 V)
• Débrancher le cordon d’alimentation du port du cordon d’alimentation (2).
• En appuyant sur le dispositif de verrouillage au bas du compartiment des fusibles (1),
le porte-fusibles est dégagé et peut être retiré.
• Remplacer les fusibles.
• Insérer le porte-fusibles et le pousser jusqu’à ce qu’il se verrouille en place.
NE PAS : essayer d’entretenir le Bead RuptorTM 96 d’une autre façon que celle
décrite dans ce manuel. Pour résoudre tout problème n’ayant pas pu être corrigé
à l’aide de ce guide, veuillez contacter votre revendeur agréé ou appeler Omni
International au 1-800-776-4431.
Erreur Solution possible
L’interrupteur d’alimentation n’est pas éclairé
lorsque le Bead RuptorTM 96 est sous tension.
1. Vérier l’alimentation électrique
2. Vérier les fusibles et les remplacer si nécessaire
3. Contacter le service technique
L’écran d’achage ne fonctionne pas Contacter le service technique
« LID » apparaît à l’écran
Indique que le couvercle était ouvert lorsque la
touche de démarrage a été pressée Fermer le
couvercle et eacer le message en appuyant sur
la touche Start/Stop. Appuyer sur Start/Stop pour
commencer le cycle.
Message « Er1 » apparaît à l’écran Le moteur a surchaué. Mettre hors tension et
laisser refroidir le moteur.
Message « Er2 » apparaît à l’écran
Le Bead RuptorTM 96 est incapable d’atteindre la
fréquence de vibration. Vérier la présence d’ob-
structions au niveau de bols de broyage. Mettre
hors tension et ensuite sous tension pour eacer le
message d’erreur.
Message « Er3 » apparaît à l’écran
Le couvercle a été ouvert au cours du
fonctionnement. La machine doit être mise hors
tension et ensuite sous tension pour eacer le
message d’erreur avant de pouvoir continuer à
fonctionner.
1. Compartiment à fusibles
2. Port du cordon d’alimentation

it
I dati nel presente documento sono stati vericati e validati. Si ritengono adeguati per l’uso previsto dello
strumento. Se lo strumento o le procedure vengono utilizzati per scopi che vanno al di là delle funzionalità
specicate nel presente documento, deve essere ottenuta la conferma della validità e dell’idoneità;
altrimenti OMNI International, a PerkinElmer company non garantisce i risultati e non si assume alcun
obbligo o responsabilità. Questa pubblicazione non è una licenza per operare ai sensi di, né una raccoman-
dazione di violare, qualsiasi brevetto di processo. Questo prodotto è garantito esente da vizi di origine e
fabbricazione per un periodo di UN ANNO dalla data di consegna. OMNI International, a PerkinElmer com-
pany riparerà o sostituirà e restituirà gratuitamente qualsiasi componente che viene rimandato in fabbrica
entro detto periodo, con trasporto prepagato dall’utente, e che a seguito di ispezione è stato rilevato viziato
dall’origine o nella fabbricazione. Questa garanzia non include la normale usura d’uso; non si applica a qual-
siasi strumento o componente che sia stato modicato da un soggetto diverso da un dipendente di OMNI
International, a PerkinElmer company né a qualsiasi strumento che sia stato danneggiato a causa
di incidente, negligenza, inosservanza delle istruzioni d’uso, dell’uso di correnti elettriche o circuiti diversi
da quelli indicati sulla targhetta applicata allo strumento, uso improprio o abuso. OMNI International, a
PerkinElmer company si riserva il diritto di cambiare, alterare, modicare o migliorare qualsiasi suo strumen-
to senza alcun obbligo di apportare le modiche corrispondenti a qualsiasi strumento precedentemente
venduto o spedito.
L’OBBLIGO CHE PRECEDE È A TITOLO SOSTITUTIVO IN VIA DEGLI OBBLIGHI E DELLE RESPONSABILITÀ,
INCLUSA LA NEGLIGENZA E TUTTE LE GARANZIE DI COMMERCIABILITÀ O ALTRE, ESPRESSE O IMPLICITE, DI
FATTO O DI DIRITTO E INDICA LA NOSTRA INTERA ED ESCLUSIVA RESPONSABILITÀ E IL MEZZO DI TUTELA
PER GLI ACQUIRENTI PER QUALSIASI RIVENDICAZIONE DI DANNI AD ES IN RELAZIONE ALLA VENDITA O
ALLA FORNITURA DI BENI O PARTI, LA LORO PROGETTAZIONE, L’IDONEITÀ ALL’USO, L’INSTALLAZIONE O
IL FUNZIONAMENTO. OMNI International, a PerkinElmer company NON SARÀ IN ALCUN CASO RITENUTA RESPONSABILE PER
QUALSIVOGLIA DANNO SPECIFICO O CONSEQUENZIALE, E LA SUA RESPONSABILITÀ IN NESSUN CASO SUPERERÀ IL PREZZO
CONTRATTUALE PER LE MERCI PER CUI LA RESPONSABILITÀ VIENE RIVENDICATA. Questo prodotto è stato progettato per la
sicurezza; tuttavia, le precauzioni di sicurezza di base e il buon senso devono sempre essere adottati quando si utilizzano
prodotti elettrici.
– NON cercare di modicare qualsiasi parte di questo prodotto.
– NON immergere la macchina in alcun liquido.
– NON utilizzare in ubicazioni diverse da un laboratorio interno.
– NON inserire il cavo di alimentazione in una presa non corretta né sottoporlo a una tensione non corretta.
– Utilizzare questo prodotto solo per lo scopo previsto.
– NON usare accessori non consigliati dal produttore.
– NON utilizzare il prodotto se è danneggiato in qualsiasi modo.
– Tenere il prodotto lontano da superci calde.
– NON modicare la spina o il cavo fornito. Se non si adatta alla presa a disposizione, fare installare la presa
appropriata da un elettricista qualicato.
– NON utilizzare il prodotto con la messa a terra di sicurezza disconnessa.
AVVERTENZA: La camera di lavorazione del Bead RuptorTM 96 è chiusa da un coperchio resistente.
L’avvio della macchina è possibile solo con il coperchio chiuso. Se il coperchio è aperto, il messaggio
“LID” appare sul display, quando viene premuto il tasto START/STOP. Quando sul display viene
visualizzato il messaggio “LID”, il coperchio deve essere chiuso e il messaggio di errore cancellato
premendo il tasto START/STOP. Lo strumento può quindi essere avviato premendo nuovamente
il tasto START/STOP. Se il coperchio viene aperto durante il funzionamento, la macchina si ferma
rapidamente e sul display appare il messaggio “Er3”. Quando sul display viene visualizzato il
messaggio “Er3”, la macchina non può essere riavviata premendo il tasto START/STOP. L’interruttore di
alimentazione principale deve essere spostato su OFF e poi ancora una volta su ON, per cancellare il
messaggio prima che lo strumento possa riavviarsi.
REQUISITI DI RIEMPIMENTO DEL CONTENITORE DI MACINAZIONE
AVVERTENZA: La quantità del campione non deve essere inferiore al 25% della capacità del
contenitore di macinazione. Le sfere di macinazione altrimenti potrebbero danneggiare i contenitori
per la macinazione. I contenitori e le sfere per la macinazione devono essere dello stesso materiale. In
caso contrario il contenitore per la macinazione potrebbe danneggiarsi.
AVVERTENZA: Lo strumento deve essere bilanciato prima del funzionamento. Non azionare lo strumento
con un solo contenitore per la macinazione o un adattatore per la piastra a pozzetti installato in un solo
supporto del contenitore per la macinazione. Entrambi i supporti del contenitore per la macinazione
devono avere un contenitore per la macinazione (riempito con una massa equivalente) o degli adattatori
per la piastra a pozzetti. Se non è bilanciato possono vericarsi danni al coperchio.

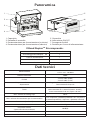
Panoramica
Il Bead RuptorTM 96 comprende:
Dati tecnici
1. Coperchio
2. Pannello di controllo
3. Portacontenitore per la macinazione (a sinistra)
4. Portacontenitore per la macinazione (a destra)
5. Coperchio
6. Interruttore ON/OFF
7. Scomparto fusibili
8. Portello per il cavo di alimentazione
1.
2.
3.
4.
5.
6.
7.
8.
Descrizione Quantità
Assemblaggio Bead RuptorTM 96 1
Cavo di alimentazione 1
Fusibile di ricambio 1
Manuale utente 1
Alimentazione 230V ± 10% - 50/60Hz
115V ± 10% - 50/60Hz
Potenza nominale 200W
Fusibili 2 x 2AT 250V (230V)
2 x 5AT 250V (115V)
Frequenza vibrazionale
disposizione
Digitale, da 3 a 30 Hz (180 - 1800 min-1),
con incrementi di 0,1 Hz
Timer
5 sec - 99 min., timer con funzione HOLD,
con incrementi di 1 secondo (sotto i 10 min.),
o con incrementi di 10 sec (sopra i 10 min.)
Max. volume of milling cups 50 ml
Max. volume dei contenitori per la macinazione 1 x 2 ml piastra a pozzetti profondi, 2 X 1 mL piastra
a pozzetti profondi, 3 X piastra a pozzetti standard
Dimensioni [L x P x A] 385 x 420 x 240 mm (465 mm con coperchio aperto)
Peso 42 kg
Emissione sonora
(senza sfere di macinazione) 70 dB(A)
Temperatura ambientale 5°C - 40°C
Umidità atmosferica < 85% RH
Seite wird geladen ...
Seite wird geladen ...
Seite wird geladen ...
Seite wird geladen ...
Seite wird geladen ...
Seite wird geladen ...
Seite wird geladen ...
Seite wird geladen ...
Seite wird geladen ...
Seite wird geladen ...
Seite wird geladen ...
Seite wird geladen ...
Seite wird geladen ...
Seite wird geladen ...
Seite wird geladen ...
Seite wird geladen ...
Seite wird geladen ...
Seite wird geladen ...
Seite wird geladen ...
Seite wird geladen ...
Seite wird geladen ...
Seite wird geladen ...
Seite wird geladen ...
Seite wird geladen ...
-
 1
1
-
 2
2
-
 3
3
-
 4
4
-
 5
5
-
 6
6
-
 7
7
-
 8
8
-
 9
9
-
 10
10
-
 11
11
-
 12
12
-
 13
13
-
 14
14
-
 15
15
-
 16
16
-
 17
17
-
 18
18
-
 19
19
-
 20
20
-
 21
21
-
 22
22
-
 23
23
-
 24
24
-
 25
25
-
 26
26
-
 27
27
-
 28
28
-
 29
29
-
 30
30
-
 31
31
-
 32
32
-
 33
33
-
 34
34
-
 35
35
-
 36
36
-
 37
37
-
 38
38
-
 39
39
-
 40
40
-
 41
41
-
 42
42
-
 43
43
-
 44
44


in anderen Sprachen
- English: Omni Bead Ruptor 96 User manual
- français: Omni Bead Ruptor 96 Manuel utilisateur
- español: Omni Bead Ruptor 96 Manual de usuario
- italiano: Omni Bead Ruptor 96 Manuale utente
Verwandte Artikel
Andere Dokumente
-
 Thermo Fisher Scientific Fluoroskan, Fluoroskan FL, and Luminoskan Plate Readers Benutzerhandbuch
-
Tescoma 659560 Bedienungsanleitung
-
Bodum BISTRO 11348 Benutzerhandbuch
-
la Pavoni Tritasassi Bedienungsanleitung
-
 Rex-royal S200 CST Benutzerhandbuch
-
 Thermo Fisher Scientific Thermo Benutzerhandbuch
-
Aeg-Electrolux CG6600 (WEST) Benutzerhandbuch
-
Kenwood KM280RD Benutzerhandbuch
-
Alpina SF-1012 Bedienungsanleitung
-
Caso Design B300 VacuServe Bedienungsanleitung


