ELNA 202-258-007 Bedienungsanleitung
- Kategorie
- Nähmaschinen
- Typ
- Bedienungsanleitung

Elna International Corp. SA / 28.04.2022
FLOWER STITCH ATTACHMENT
Ref: 202-258-007
Machine settings:
Stitch: Zigzag stitch or tricot stitch
Stitch width: Not more than 5
Thread tension: 1 - 2
Presser foot pressure adjusting lever: 3
Feed dog: Dropped
Sewing speed: Slow to medium
1.
2.
3.
4.
5.
6.
7.
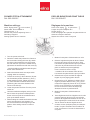
Turn the power switch off .
Raise the needle and presser foot. Remove
the foot holder. Raising the lever (A), attach
the fl ower stitch attachment to the presser
bar with the lever (A) over the needle clamp
(B).Secure the attachment with the screw (E).
* Set the bobbin thread before attaching the
fl ower stitch attachment.
Select the desired stitch and adjust stitch
(zigzag) width as necessary.
Loosen the screw (F). Move the disc (D) and
set the desired position between (-) and (+)
to the setting mark (G). Tighten the screw
(F). Place the fabric under the attachment
positioning the area to be stitched in the
center of the disc (D).
Lower the presser foot lifter. Turn the power
switch on.
Hold the needle thread lightly with your left
hand. Press the up/down needle position
button twice and pull the needle thread to
pick up the bobbin thread.
While holding the needle and bobbin threads,
sew a few stitches to lock threads. Cut
the excess threads at the beginning of the
pattern. Start sewing at slow to medium
speed.
PIED-DE-BICHE POUR POINT FLEUR
Réf: 202-258-007
Réglages de la machine:
Point: Point zigzag ou point tricot
Largeur du point: Pas plus de 5
Tension du fi l: 1 - 2
Levier de réglage de la pression du pied-de-biche: 3
Griff e de transport: Abaissée
Vitesse de couture: Lente à moyenne
1.
2.
3.
4.
5.
6.
7.
Mettez l’interrupteur d’alimentation sur arrêt.
Relevez l’aiguille et le pied-de-biche. Retirez
le porte-pied. Avec le levier (A) relevé, fi xez
l’accessoire du pied-de-biche pour point fl eur
à la barre du pied-de-biche avec le levier
placé au-dessus du pince aiguille (B).
Fixez l’accessoire avec la vis (E).
* Installez le fi l de la canette avant de fi xer
l’accessoire du pied-de-biche pour point fl eur.
Sélectionnez le point souhaité et réglez la
largeur du point (zigzag) selon besoin.
Desserrez la vis (F). Déplacez le disque (D) et
réglez la position désirée entre (-) et (+) sur la
marque de réglage (G). Serrez la vis (F). Placez
le tissu sous l’accessoire en positionnant
la zone à coudre au centre du disque (D).
Abaissez le levier du pied-de-biche.
Mettez l’interrupteur d’alimentation sur
marche.
Tenez légèrement le fi l de l’aiguille avec la main
gauche. Appuyez deux fois sur la touche de
position de l’aiguille haute/basse et tirez sur le
fi l de l’aiguille pour extraire le fi l de la canette.
Tout en tenant les fi ls de l’aiguille et de la
canette, cousez quelques points pour bloquer
les fi ls. Coupez l’excédent de fi l au début du
motif. Commencez à coudre à vitesse lente à
moyenne.

Elna International Corp. SA / 28.04.2022
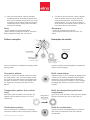
F
G
D
.
(1) Point de tricot
(1) Tricot Stitch
Placez le repère (-) sur
le repère de réglage
Set the (-) mark to
the setting mark
Alignez le repère (+) sur la
marque de réglage
Set the (+) mark to
the setting mark
(2) Point zigzag
(2) Zigzag stitch
Transposition par
trois crans
Transposition by
three notches
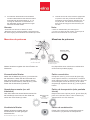
Pattern samples
Further variations are available by changing stitch
(zigzag) width.
Concentric pattern:
Set the (+) mark to the setting mark (G) and sew
the outer pattern. Then raise the needle, loosen
the screw (F) and slide the disc (D) together with
the fabric to set the (-) mark to the setting mark
(G). Tighten the screw (F) and sew the inner
pattern.
Transposition pattern (tricot stitch
only):
After sewing the fi rst pattern, turn the disc (D)
together with the fabric by three, six or nine
notches (C).
Combination pattern:
Further variations are available by combining
concentric patterns and/or transposition patterns.
Note:
* Use a stabilizer for light weight fabric.
* When sewing a large piece of fabric, assist the
fabric feeding smoothly with your hands.
8. After you fi nish sewing, raise the needle to
its highest position and raise the presser foot
lifter. Cut the threads, leaving about 15 cm (6”)
of threads. Pull the bobbin thread to bring the
needle thread to the wrong side of the fabric
and knot the threads.
Remarque :
* Utilisez un entoilage pour tissu fi n.
* Accompagnez doucement le tissu avec vos
mains.
8. Une fois la couture terminée, relevez l’aiguille
dans sa position la plus haute et relevez le
levier du pied-de-biche. Coupez les fi ls en
laissant environ 15 cm (6”) de fi ls. Tirez le fi l
de la canette pour amener le fi l de l’aiguille sur
l’envers du tissu et nouez les fi ls.
Exemples de motifs
D’autres variantes sont disponibles en modifi ant la
largeur du point (zigzag).
Motif concentrique:
Alignez le repère (+) sur la marque de réglage (G) et
cousez le motif externe. Relevez ensuite l’aiguille,
desserrez la vis (F) et faites glisser le disque (D)
avec le tissu pour placer le repère (-) sur la marque
de réglage (G). Serrez la vis (F) et cousez le motif
intérieur.
Motif de transposition (point tricot
uniquement):
Après avoir cousu le premier motif, tournez le disque
(D) avec le tissu de trois, six ou neuf crans (C).
Motif de combinaison:
D’autres variantes sont disponibles en combinant
des motifs concentriques et/ou des motifs de
transposition.

Elna International Corp. SA / 28.04.2022
SO VERWENDEN SIE DIE
BLÜTENSTICKEINRICHTUNG
Art.-Nr.: 202-258-007
Maschineneinstellungen:
Stich: Zick-Zack oder Trikotstich
Stichbreite: Nicht mehr als 5
Fadenspannung: 1-2
Nähfu druck: 3
Transporteur: versenkt
Nähgeschwindigkeit: langsam bis mittelschnell
1.
2.
3.
4.
5.
6.
7.
Schalten Sie die Maschine aus.
Heben Sie Nadel und Füßchen. Entfernen
Sie den Fußchenhalter. Bringen Sie die
Blütenstickerinrichtung an der Nadelstangen
an. Heben Sie dabei den Hebel (A) auf die
Nadelhalteschraube (B). Befestigen Sie
die Einrichtung mit Schraube (E). * Legen
Sie die Unterfadenspule ein, bevor Sie die
Blütenstickeinrichtung anbringen.
Wählen Sie den gewünschten Stich und stellen Sie
die korrekte Stichbreite ein.
Lösen Sie Schraube (F). Bewegen Sie Scheibe
(D) und wählen Sie die Position zwischen (-)
und (+) gegenüber der Markierung (G). Ziehen
Sie Schraube (F) an. Legen Sie den Stoff unter
die Stickeinrichtung. Platzieren Sie dabei die zu
bestickende Stoff stelle in der Mitte der Scheibe (D).
Senken Sie den Nähfußhebel.
Schalten Sie die Maschine ein.
Halten Sie den Nadelfaden locker mit der linken
Hand. Drücken Sie die Nadeltaste oben/unten
zweimal und ziehen Sie am Nadelfaden, um den
Unterfaden auf die Stoff oberseite zu bringen.
Halten Sie Ober- und Unterfaden fest und nähen
Sie einige Stiche zum Befestigen. Schneiden
Sie die beiden Fadenenden ab. Starten Sie
den Nähvorgang mit langsamer oder mittlerer
Geschwindigkeit.
CÓMO UTILIZAR EL ACCESORIO
PARA PUNTADA DE FLOR
Ref: 202-258-007
Ajustes de la máquina:
Puntada: Puntada de zigzag o zigzag triple
Anchura de la puntada: No más de 5
Tensión del hilo: 1–2
Palanca de ajuste de presión del prensatelas: 3
Transportador: Con caída
Velocidad de costura: Lenta a media
1.
2.
3.
4.
5.
6.
7.
Suba la aguja y el prensatelas. Retire el soporte
del prensatelas.
Levante la palanca (A) y coloque el accesorio
para puntada de fl or en la barra prensatelas con
la palanca sobre la abrazadera de la aguja (B).
Fije el accesorio con el tornillo (E). * Coloque el
hilo de la canilla antes de instalar el accesorio
para puntada de fl or.
Seleccione la puntada deseada y ajuste la
anchura de la puntada (zigzag) según sea
necesario.
Afl oje el tornillo (F). Mueva el disco (D) y ajuste
la posición deseada entre (-) y (+) a la marca de
ajuste (G). Apriete el tornillo (F). Coloque la tela
debajo del accesorio colocando la zona que
se va a coser en el centro del disco (D). Baje el
elevador del prensatelas.
Encienda el interruptor de alimentación.
Sujete ligeramente el hilo de la aguja con la
mano izquierda. Pulse el botón de posición de
ascenso/descenso de la aguja dos veces y tire
del hilo de la aguja para recoger el hilo de la
canilla.
Mientras sujeta los hilos de la aguja y de la
canilla, cosa unas puntadas para bloquear los
hilos. Corte los hilos sobrantes al principio del
patrón. Comience a coser a velocidad de lenta a
media.

Elna International Corp. SA / 28.04.2022
F
G
D
(1) Puntada tricote
(1) Trikotstich
Coloque la marca (-)
a la marca de ajuste
Stellen Sie die
Markierung G auf (-)
Coloque la marca (+) en
la marca de ajuste
Stellen Sie die
Markierung G auf (+)
(2) Puntada de zigzag
(2) Zig-Zag-Stitch
Transposición con
tres muescas
Drehung um drei
Raster
.
Weitere Variationen ergeben sich durch Ändern der
Stichbreite.
Konzentrische Muster
Stellen Sie die Markierung G auf (+) und nähen Sie
den Außenkreis. Heben Sie dann die Nadel und
lösen Sie Schraube (F) und verschieben Sie die
Scheibe D mit dem Stoff so, dass (G) auf (-) steht.
Ziehen Sie die Schraube (F) wieder an.
Verschobene muster (nur mit
trikotstich)
Nach dem Nähen des ersten Musters drehen Sie
die Scheibe (D) zusammen mit dem Stoff drei,
sechs oder neun Raster (C) weiter.
Kombinierte Muster
Weitere Variationen ergeben Sie aus
Kombinationen der oben gezeigten
Mustertechnike.
Hinweis:
* Verwenden Sie bei feinen Stoff en ein Vlies.
* Besticken Sie ein größeres Stoff teil, unterstützen Sie
den Stickvorgang durch Mitführen des Stoff es per Hand.
8. Am Ende der Stickerei heben Sie die Nadel
und den Füßchenhebel in die höchste Position.
Schneiden Sie die beiden Fäden ca. 15 - 16
cm lang ab. Ziehen Sie am Unterfaden um
den Oberfaden auf die Unterseite zu bringen.
Verknoten Sie beide Fäden.
Muestras de patrones
Hay disponibles otras variaciones cambiando la
anchura de la puntada (zigzag).
Patrón concéntrico
Coloque la marca (+) en la marca de ajuste (G) y
cosa el patrón exterior. A continuación, levante la
aguja, afl oje el tornillo (F) y deslice el disco (D) junto
con la tela para colocar la marca (-) en la marca
de ajuste (G). Apriete el tornillo (F) y cosa el patrón
interno.
Patrón de transposicón (solo puntada
tricote)
Después de coser el primer patrón, gire el disco (D)
junto con la tela tres, seis o nueve muescas (C).
Transposición con tres muescas.
Patrón de combinación
Existen más variaciones combinando patrones
concéntricos y/o patrones de transposición.
Nota:
* Utilice un estabilizador para telas ligeras.
* Al coser una pieza de tela grande, ayude a que la
tela avance suavemente con las manos.
8. Cuando termine de coser, levante la aguja hasta
su posición más alta y levante el elevador del
prensatelas. Corte las hebras, dejando unos 15
cm (6”) de hilo. Tire del hilo de la canilla para
llevar el hilo de la aguja al revés de la tela y ate
los hilos.
Muestras de patrones
-
 1
1
-
 2
2
-
 3
3
-
 4
4


ELNA 202-258-007 Bedienungsanleitung
- Kategorie
- Nähmaschinen
- Typ
- Bedienungsanleitung
in anderen Sprachen
- English: ELNA 202-258-007 Operating instructions
- français: ELNA 202-258-007 Mode d'emploi
- español: ELNA 202-258-007 Instrucciones de operación
Verwandte Artikel
Andere Dokumente
-
Alfa Network 2622 Instruction book
-
-
BOMANN NM 6063 CB Bedienungsanleitung
-
SINGER EXCEL 2662 Bedienungsanleitung
-
Brother LZ2-B855E Benutzerhandbuch
-
-
-
-
Hema 80.06.0018 Benutzerhandbuch
-