
Elna International Corp. SA / 17.03.2022
CONVERTIBLE FREE MOTION
QUILTING FOOT SET
Ref: 202-001-014
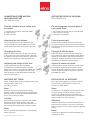
This set includes a foot holder and
three feet:
1. Closed-toe foot (shown with foot holder)
2. Open-toe foot
3. Clear view foot
Attaching the foot holder:
Remove the foot holder and attach the free
motion quilting foot holder. Make sure that the
needle enters the center of the hole in the foot.
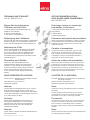
Changing the foot:
Raise the presser bar and turn the round nut (A)
to bring the foot to the lowest position. Remove
the setscrew (B) and remove the foot. Attach the
desired foot and secure it with the setscrew.
Adjusting the height of the foot:
Lower the presser bar. (On embroidery
machines, turn the hand wheel to bring the
presser bar to the lowest position). Adjust the
height of the foot by turning the round nut (A)
until the bottom of the foot barely touches the
top of the quilt layers.
MACHINE SETTINGS:
Stitch: Straight Stitch (Center needle position only)
Thread tension: Auto or 2-5
Feed dog: Lowered
Note:
The clear view foot can be used for zigzag
stitches. Sew at medium speed while guiding the
quilt layers with your hands. Move the quilt layers
3 mm (1/8”) or less per stitch.
Caution:
Do not select any pattern other than the straight
stitch with center needle position when the
closed-toe foot or open-toe foot is attached. Do
not turn the hand wheel when the foot is raised.
Note:
Use the optional Bobbin Holder for Free Quilting
with this foot set.
SET DE PIED POUR LE QUILTING
Réf: 202-001-014
Ce set comprend un porte pied et
trois pieds Quilt :
1. Pied à fourche fermée (fi xé sur le porte pied)
2. Pied à fourche ouverte
3. Pied avec vue dégagée
Fixez le porte pied:
Retirez le porte pied standard et fi xez le porte
pied pour le Quilting. Assurez-vous que l’aiguille
soit bien placée. Elle doit entrer au centre du trou
du pied fi xé.
Changer la tête de pied :
Relevez le pied et tournez l’écrou arrondi (A)
pour ramener le pied à sa position la plus basse.
Retirez la vis de fi xation (B) ainsi que la tête de
pied fi xée. Installez le pied de votre choix, puis
stabilisez-le à l’aide de la vis de fi xation.
Ajuster la hauteur du pied :
Relevez le levier presse étoff e (tournez le volant
pour amener le pied dans sa position la plus
basse). Ajustez la hauteur du pied en tournant
l’écrou arrondi (A) jusqu’à ce que la surface du
pied effl eure le tissu.
REGLAGE DE LA MACHINE:
Point: point droit (aiguille en position centrale)
Tension du fi l: Automatique ou entre 2 et 5
Pression du pied: Basse
Note:
Le pied avec vue dégagée peut être utilisé avec
un point zigzag. Coudre à vitesse moyenne
lorsque vous guidez plusieurs épaisseurs de
tissus. Entraînez les épaisseurs sur une distance
maximum de 3 mm (1/8”) par point.
Attention:
Utilisez uniquement la couture droite lorsque le
pied à fourche fermée ou à fourche ouverte est
utilisé. Ne pas tourner le volant lorsque le pied est
baissé.
Note:
Combinez ce pied avec la bobine spéciale pour
Quilting main libre.

Elna International Corp. SA / 17.03.2022
FREIHAND-QUILTFUSS-SET
Art.-Nr.: 202-001-014
Dieses Set beinhaltet einen
Fußhalter und drei Füße:
1. Geschlossener Freihandquiltfuß (auf der
Abbildung mit Fußhalter)
2. Off ener Freihandquiltfuß
3. Zick-Zack-Freihandquiltfuß
Befestigung des Fußhalters:
Entfernen Sie den Standard-Fußhalter und befestigen
Sie den Fußhalter zum Freihandquilten. Stellen Sie
sicher, dass die Nadelposition mittig eingestellt ist.
Wechseln der Füße:
Heben Sie den Nähfuß und drehen Sie die Mutter
(A), um den Fußhalter in die niedrigste Position
zu bringen. Entfernen Sie die Feststellschraube
(B) und entfernen Sie den Fuß. Befestigen Sie
anschließend den gewünschten Fuß wieder mit der
Feststellschraube.
Einstellung der Fußhöhe:
Senken Sie den Nähfuß. (Bei Näh-Stick-
Kombimaschinen drehen Sie zusätzlich das
Handrad, um den Nähfuß auf die niedrigste
Position einzustellen.) Stellen Sie die Höhe des
Fußes durch Drehen der Gewindemutter (A)
so ein, dass der Fuß das Nähgut gerade eben
berührt.
MASCHINENEINSTELLUNGEN:
Stichprogramm: Geradstich (ausschließlich mittlere
Nadelposition)
Fadenspannung: Auto oder 2-5
Diff erential: Niedriger
Hinweis:
Der Zick-Zack-Freihandquiltfuß kann auch mit dem
Zickzackstich verwendet werden. Nähen Sie mit
mittlerer Geschwindigkeit und führen Sie das Nähgut
mit der Hand. Bewegen Sie die Quiltlagen etwa 3 mm
(1/8”) oder weniger pro Stich.
Achtung:
Stellen Sie ausschließlich den Geradstich mit
der mittleren Nadelposition ein, wenn Sie den
geschlossenen oder off enen Freihandquiltfuß
benutzen. Drehen Sie nicht das Handrad bei
angehobenem Nähfuß.
Hinweis:
Nutzen Sie den optional erhältlichen Spulenhalter für
das Freihandquilten.
SET DE PRENSATELAS PARA
ACOLCHADO LIBRE CONVERTIBLE
Ref: 202-001-014
Este juego incluye un soporte de
prensatelas y tres bases:
1. Base cerrada (mostrado con soporte del
prensatelas)
2. Base abierta
3. Base transparente
Colocación del soporte del prensatelas:
Retire el soporte del prensatelas y coloque el soporte
del prensatelas para acolchado de movimiento libre.
Asegúrese de que la aguja entra en el centro del
orifi cio de la base.
Cambiar el prensatelas:
Levante la barra del prensatelas y gire la rueda
(A) para llevar el prensatelas a la posición más
baja. Retire el tornillo de ajuste (B) y extraiga el
prensatelas. Coloque el prensatelas deseado y
asegúrelo con el tornillo de ajuste.
Ajuste de la altura del prensatelas:
Baje la barra del prensatelas. (En las máquinas de
bordado, gire la rueda manual para llevar la barra
prensatelas a la posición más baja). Ajuste la altura
del prensatelas girando la rueda (A) hasta que la
parte inferior del prensatelas apenas toque la parte
superior de las capas de acolchado.
AJUSTES DE LA MÁQUINA:
Puntada: Puntada recta (solamente en la posición
de aguja al centro)
Tensión del hilo: Automático o 2-5
Dientes de arrastre: Descendidos
Nota:
Puede usar la base transparente para las puntadas
de zigzag.
Cosa a velocidad media mientras guía las capas
de acolchado con las manos. Mueva las capas de
acolchado 3 mm (1/8”) o menos por puntada.
Precaución:
No seleccione ningún patrón que no sea la puntada
recta con la posición de aguja al centro cuando la
base cerrada o la base abierta estén colocadas.
No gire la rueda manual cuando el prensatelas esté
elevado.
Nota:
Utilice la caja de bobina opcional para acolchado libre
con este juego de prensatelas.
-
 1
1
-
 2
2


in anderen Sprachen
- English: ELNA 202-001-014 Operating instructions
- français: ELNA 202-001-014 Mode d'emploi
- español: ELNA 202-001-014 Instrucciones de operación