Parkside PHSHE 900 A1 Benutzerhandbuch
- Kategorie
- Power Heckenscheren
- Typ
- Benutzerhandbuch

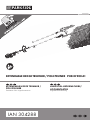
EXTENDABLE HEDGE TRIMMER / POLE PRUNER PHSHE 900 A1
LANGSTIEL-HECKENSCHERE/
HOCHENTASTER
Originalbetriebsanleitung
EXTENDABLE HEDGE TRIMMER /
POLE PRUNER
Translation of the original instructions
IAN 304288

Before reading, unfold the page containing the illustrations and familiarise yourself with all functions
of the device.
Klappen Sie vor dem Lesen die Seite mit den Abbildungen aus und machen Sie sich anschließend mit
allen Funktionen des Gerätes vertraut.
GB / IE / NI Translation of the original instructions Page 5
DE / AT / CH Originalbetriebsanleitung Seite 26

3
A
B
1
2
3
4
5
6 6
8
8
9 9
10
11
36
38
37
12
13
14
15
16
17
17
18
2019
7
7
2
3
4
5
21
22

4

5
NIIEGB
Content
Introduction .................................5
Intended Use ................................6
General Description ......................6
Extent of delivery .............................6
Overview ........................................6
Safety features ................................. 7
Function Description .........................7
Technical Data .............................. 7
Notes on Safety ...........................8
Symbols in the manual ......................8
Symbols on the Equipment ................8
General Notes on Safety ...................9
General safety instructions
for power tools ................................9
Hedge trimmer safety warnings .......12
Safety information for chainsaws .....13
Kickback causes and how to avoid
them .............................................14
Assembly ...................................14
Mounting the tubular shaft ...............15
Mounting the round handle .............15
Mounting the saw chain ..................15
Operating the Hedge Trimmer ....15
Chain lubrication ...........................16
Swivelling Out the Blade Beam ............. 16
Pivoting the pole-mounted pruner .....16
Attach the shoulder strap ................16
Sliding the carrying eye ..................17
Switching On and Off ....................17
Introduction
Congratulations on the purchase of your
new device. With it, you have chosen a
high quality product.
During production, this equipment has been
inspection. The functionality of your equip-
ment is therefore guaranteed. It cannot be
ruled out that residual quantities of lubri-
Translation of the original
EC declaration of conformity ......50
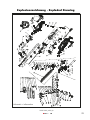
Exploded Drawing .....................53
Working with the Electric Hedge
Trimmer ........................................17
Working with
the pole-mounted pruner .................18
Putting down the device ..................18
Swivelling the Arm .........................18
Cutting techniques using
the hedge trimmer .......................... 18
Cutting techniques using the pole-
mounted pruner .............................19
Working Safely ..........................20
Maintenance/Cleaning ...............20
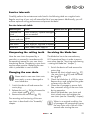
Service intervals.............................21
Sharpening the cutting teeth ............21
Changing the saw chain .................21
Servicing the blade bar ..................21
Turning the blade bar .....................22
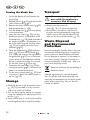
Storage ...................................... 22
Transport ...................................22
Waste Disposal and
Environmental Protection ..........22
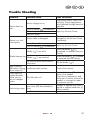
Trouble Shooting ........................23
Guarantee .................................24
Repair Service ............................25
Service-Center ............................25
Importer ....................................25
Spare Parts/Accessories .............25
cants will remain on or in the equipment in
isolated cases. This is not a fault or defect
and it represents no cause for concern.
The operating instructions constitute
part of this product. They contain
important information on safety, use and
disposal.

6
GB
IE
NI
Before using the product, familiarise your-
self with all of the operating and safety
instructions. Use the product only as de-
Keep this manual safely and in the event
that the product is passed on, hand over
all documents to the third party.
Intended Use
This device is intended only for cutting and
trimming hedges, bushes and ornamental
shrubs in residential applications.
This device is not intended for commercial
use. Any other use that is not expressly
permitted in these instructions may result in
damage to the device and pose a serious
hazard to the user.
The equipment is designed for use by
adults. Adolescents over the age of 16
may use the device only under supervision.
Local regulations may specify an age limit
for the user. Do not use the hedge trimmer
in the rain or on wet hedges.
The operator or user is responsible for ac-
cidents or damage to other people or their
property.
The manufacturer is not liable for damages
operation.
The blade bar must be checked
regularly for wear and reground. A
blunt blade bar causes the device
to overload. Any damage that re-
sults is not covered by the warranty.
General Description
The illustration of the principal
functioning parts can be found on
the front and back foldout pages.
Extent of delivery
- Motor unit
- Hedge trimmer attachment
with protective cover
- Pole-mounted pruner attachment
- Blade bar, chain, protective cover
- Shoulder strap
- Round handle
- Mounting key
- Oil bottle
- Assembly materials
- Allen key (4 mm)
- Instruction manual
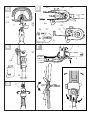
Overview
A
1 Safety blade
2 Gearbox
3 Safety lever
4 Stop lever
5 Handle for adjusting
the blade beam
6 Front tubular shaft
7 Safety button
8 Pivotal centre
9 Tubular shaft on the appliance
housing
10 Round handle, front handle
11 Safety slide
12 Deadman switch
13 On/off switch (not visible)
14 Mains cable
15 Cable strain relief
16 Shoulder strap
17 Eye (for shoulder strap)
18 Protective cover, blade bar
19 Protective cover, saw chain
20 Saw chain
21 Mounting key
22 Oil bottle

7
NIIEGB
C
23 Counter-holder
24 Washer (pivotal centre
round handle)
25 Pivotal centre (round handle)
26 Nut, chain wheel cover
27 Chain wheel cover
28 Blade bar
29 Chain sprocket
30 Bar bolt
31 Chain tensioning screw
32 Oil tank
33 MIN marking, oil tank
34 Oil tank cover
35 Spiked bumpers
A
36 Soft grip
37 Screw, carrying eye
38 Allen key
Safety features
A
12 Safety switch
The switch lock must be unlocked
in order to switch on the device.
13 On/Off switch
The device switches off immediate-
ly once the on/off switch is relea-
sed.
16 Shoulder strap
Ensures the load is evenly spread
across the shoulders, back, hips
and thighs.
35 Spiked bumpers
These increase stability when
performing vertical cuts and also
make sawing easier.
Function Description
The device is powered by an electric mo-
tor. The device features protective insula-
tion and does not require earthing.
The device is equipped with a hedge
trimmer attachment (with blade and saw
chain) and a pole-mounted pruning attach-
ment (with blade bar and saw chain).
The device can only be operated whilst the
safety switch is pressed to protect the user.
Please note the following descriptions for
the function of the operating components.
Technical Data
Extendable hedge trimmer /
pole pruner .......................PHSHE 900 A1
Input voltage
rating ......................230-240 V~, 50 Hz
Input power ................................ 900 W
Safety class .....................................
II
Degree of protection ........................IPX0
Weight (operationally ready)
Pole-mounted pruner ......approx. 4.9 kg
Hedge trimmer ..............approx. 5.4 kg
Vibration (a
h
) on
handle ........... 3.649 m/s
2
;
K=1.5 m/s
2
round handle .. 4.676 m/s
2
;
K=1.5 m/s
2
Hedge trimmer
Cutting length ........................ 410 mm
Max. recommended
branch thickness ...................... 15 mm
Idle speed ..........................1000 min
-1
Cuts/min .................................. 2000
Sound pressure level
(L
pA
) .................86.3 dB(A); K
pA
=3 dB
Sound power level (L
WA
)
measured . 100.9 dB(A), K
WA
= 1.97 dB
guaranteed ......................103 dB(A)
Pole-mounted pruner
Blade bar ....Oregon 10" 100SDEA041
Chain ................Oregon 10" 91P040X
Chain speed ......................max. 6 m/s

8
GB
IE
NI
Oil tank volume ....................... 120 ml
Sound pressure level
(L
pA
) ................87.1 dB(A); K
pA
= 3 dB
Sound power level (L
WA
)
measured . 101.5 dB(A), K
WA
= 2.38 dB
guaranteed ......................104 dB(A)
Noise and vibration values have been
determined according to the standards and
regulations mentioned in the declaration of
conformity.
The stated vibration emission value was
measured in accordance with a standard
testing procedure and may be used to com-
pare one power tool to another.
The stated vibration emission value may
also be used for a preliminary exposure
assessment.
Warning: The vibration emission value
may differ during actual use of the power
tool from the stated value depending on the
manner in which the power tool is used.
Safety precautions aimed at protecting the
user should be based on estimated expo-
sure under actual usage conditions (all parts
of the operating cycle are to be considered,
including, for example, times during which
the power tool is turned off and times when
the tool is turned on but is running idle).
Notes on Safety
This section describes the basic safety rules
when working with the device.
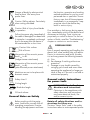
Symbols in the manual
Warning symbols with in-
formation on damage and
injury prevention.
Hazard symbol with infor-
mation on the prevention of
personal injury caused by
electric shock.
Instruction symbols with information
on preventing damage.
Wear cut-resistant gloves.
Always remove the mains plug be-
fore working on the appliance.
Help symbols with information on
improving tool handling.
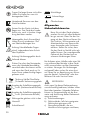
Symbols on the Equipment
Caution!
Read through the instruction manual
carefully.
Wear personal protective equip-
ment. Basically, wear protective
goggles or, even better, face protec-
tion, ear protection, safety helmet,
cut-protection working clothes.
Wear cut-resistant gloves.
Wear cut-resistant work clothing.
Wear anti-slip safety shoes.
Do not leave long hair uncovered.
Keep hair away from moving parts.
Keep the equipment away from
nearby people.
Do not use the hedge trimmer in the
rain or on wet hedges.

9
NIIEGB
Danger of death by electrocution!
Keep at least 10m away from
power lines.
Caution! Falling objects. Particularly
when cutting overhead.
Caution! Risk of injury from blades
in operation.
Pull out the power plug immediately if
the cable is damaged, has been bad-
ly twisted or is completely cut through
and in the event that the device is
left unattended for a short time.
Caution! Hot surface.
Risk of burns.
Information of the acoustic power
level L
WA
in dB.
(hedge trimmer attachment)
Information of the acoustic power
level L
WA
in dB.
(pole-mounted pruner attachment)
Machines are not to be place with
domestic waste.
Safety class II
410 mm
Cutting length
10" / 254 mm
Blade bar length
vol.: 120 ml
Oil tank volume
General Notes on Safety
Before working with the equip-
ment, familiarise yourself with all
operating components. Practice
handling the equipment and have
the function, operation and working
methods explained to you by an ex-
perienced user or specialist. Ensure
that you can shut off the equipment
immediately in an emergency. Inap-
propriate use of the device may
result in serious injury.
If an accident or fault occurs during opera-
tion, immediately switch off the device and
disconnect at the plug. Treat injuries ap-
propriately or consult a doctor. For the cor-
rection of faults, read the “Troubleshooting”
chapter or contact our service centre.
RESIDUAL RISKS
Even if properly operating and handling this
electric tool, some residual risks will remain.
Due to its construction and build, this elec-
tric tool may present the following hazards:
a) Cuts
b) Ear damage if working without ear
protection.
c) Damage to your health caused by
swinging your hands and arms when
operating the appliance for longer pe-
riods of time or if the unit is not held or
maintained properly.
General safety instructions
for power tools
WARNING! Read all safety
directions and instructions.
Omissions in the compliance with
safety directions and instructions
and/or severe injuries.
Retain all safety directions and in-
structions for future use.
The term “Power Tools” used in the safety
instructions refers to mains-operated power

10
GB
IE
NI
tools (with power cord) and to battery-op-
erated power tools (without power cord).
Work area safety
• Keep work area clean and well
lit. Cluttered or dark areas invite ac-
cidents.
• Do not operate power tools in
explosive atmospheres, such as
Iiquids, gases or dust. Power tools
create sparks which may ignite the
dust or fumes.
• Keep children and bystanders
away while operating a power
tool. Distractions can cause you to
lose control.
Electrical safety
Caution: This is how to avoid ac-
cidents and injuries by an electric
shock:
• Power tool plugs must match
the outlet. Never modify the
plug in any way. Do not use
any adapter plugs with earthed
(grounded) power tools. Unmodi-
reduce risk of electric shock
• Avoid body contact with
earthed or grounded surfaces,
such as pipes, radiators, ranges
and refrigerators. There is an in-
creased risk of electric shock if your
body is earthed or grounded.
• Do not expose power tools to
rain or wet conditions. Water
entering a power tool will increase the
risk of electric shock.
• Do not abuse the cord. Never
use the cord for carrying, pull-
ing or unplugging the power
tool. Keep cord away from
heat, oil, sharp edges or mov-
ing parts. Damaged or entangled
cords increase the risk of electric
shock.
• When operating a power tool
outdoors, use an extension cord
suitable for outdoor use. Use of a
cord suitable for outdoor use reduces
the risk of electric shock.
• If operating a power tool in a
damp location is unavoidable,
use a residual current device
(RCD) protected supply. Use of an
RCD reduces the risk of electric shock.
• Where possible, connect the equip-
ment only to a plug socket with a leak-
age-current-operated circuit breaker
(Residual Current Device), with a rated
current of not more than 30 mA.
• If the power cable for this equipment is
damaged, it must be replaced by the
manufacturer, a customer service agent
-
son in order to prevent hazards.
Personal safety
Caution: This is how to avoid acci-
dents and injuries:
• Stay alert, watch what you are
doing and use common sense
when operating a power tool.
Do not use a power tool while
-
ence of drugs, alcohol or medi-
cation. A moment of inattention white
operating power tools may result in
serious personal injury.
• Use personal protective equip-
ment. Always wear eye protec-
tion. Protective equipment such as

11
NIIEGB
dust mask, non-skid safety shoes, hard
hat, or hearing protection used for
appropriate conditions will reduce per-
sonal injuries.
• Prevent unintentional starting.
Ensure the switch is in the off-po-
sition before connecting to power
source and/or battery pack,
picking up or carrying the tool.
the switch or energising power tools that
have the switch on invites accidents.
• Remove any adjusting key or
wrench before turning the pow-
er tool on. A wrench or a key left at-
tached to a rotating part of the power
tool may result in personal injury.
• Do not overreach. Keep proper
footing and balance at all times.
This enables better control of the pow-
er tool in unexpected situations.
• Dress properly. Do not wear
loose clothing or jewellery.
Keep your hair, clothing and
gloves away from moving
parts. Loose clothes, jewellery or long
hair can be caught in moving parts.
• Hold the power tool by insulated grip-
ping surfaces only, because the cutter
blade may contact hidden wiring or its
own cord.
Power tool use and care
• Do not force the power tool. Use
the correct power tool for your
application. The correct power tool
will do the job better and safer at the
rate for which it was designed.
• Do not use the power tool if the
switch does not turn it on and
off. Any power tool that cannot be
controlled with the switch is dangerous
and must be repaired.
• Disconnect the plug from the
power source and/or the bat-
tery pack from the power tool
before making any adjust
-ments, changing accessories, or
storing power tools. Such preven-
tive safety measures reduce the risk of
starting the power tool accidentaIly.
• Store idle power tools out of the
reach of children and do not al-
low persons unfamiliar with the
power tool or these instructions
to operate the power tool. Power
tools are dangerous in the hands of
untrained users.
• Maintain power tools. Check
for misalignment or binding
of moving parts, breakage of
parts and any other condition
that may affect the power tool’s
operation. If damaged, have
the power tool repaired before
use. Many accidents are caused by
poorly maintained power tools.
• Keep cutting tools sharp and
clean. Properly maintained cutting
tools with sharp cutting edges are less
Iikely to bind and are easier to control.
• Use the power tool, accessories
and tool bits etc. in accordance
with these instructions, taking
into account the working condi-
tions and the work to be per-
formed. Use of the power tool for op-
erations different from those intended
could result in a hazardous situation.
• Carefully inspect the area to be cut
and remove all wires or other foreign
bodies.
• Carefully inspect the surface to be cut,
and remove all wires and other foreign
bodies.
• Check the appliance before each use
for obvious defects such as loose, worn

12
GB
IE
NI
or damaged parts. Check the appli-
if it is dropped.
Service
• Have your power tool serviced
-
ing only identical replacement
parts. This will ensure that the safety
of the power tool is maintained.
Hedge trimmer safety
warnings
Preparation
• THIS HEDGE TRIMMER CAN CAUSE
SERIOUS INJURIES! Read the instruc-
tions carefully regarding the correct
handling, preparation and mainte-
nance, for starting and stopping the
hedge trimmer. Familiarise with all con-
trols and the proper use of the hedge
trimmer.
• Caution! Notice overhead power lines.
• Use of the hedge trimmer should be
avoided when people, especially child-
ren, are nearby.
• If the cutting unit contacts a foreign
body or if the operating noises increa-
se or the hedge trimmer vibrates with
unusually high force, turn off the motor
and let the hedge trimmer come to a
standstill. Pull the mains plug and take
the following measures:
- check for damages;
- check for loose parts and fasten all
loose parts;
- replace damaged parts with equiva-
lent parts or have them repaired.
Operation
• Switch the appliance off and remove
the mains plug, before:
- cleaning or removing a blockage;
- inspection, servicing or work on the
hedge trimmer;
- adjusting the working position of the
cutting unit;
- leaving the hedge trimmer unattended.
• Always ensure that the hedge trimmer
is properly placed in one of the indica-
ted working positions before the motor
is started.
• Do not use the hedge trimmer with a de-
fective or strongly worn-out cutting unit.
motor is free from deposits and leaves.
• Always ensure that all handles and safety
devices are mounted when you use the
hedge trimmer. Never try to use an incom-
plete hedge trimmer or a hedge trimmer
• Always use both hands when the
hedge trimmer is equipped with two
handles.
• Always familiarise with your surroun-
dings and pay attention to potential
dangers that you cannot hear because
of the noise the hedge trimmer makes.
• Keep cable away from cutting area.
During operation the cable may be
hidden in shrubs and can be acciden-
tally cut by the blade.
• Keep all parts of the body away from
the cutter blade. Do not remove cut
material or hold material to be cut
when blades are moving. Make sure
the switch is off when clearing jammed
material. A moment of inattention
while operating the hedge trimmer
may result in serious personal injury.
• Children must never use the hedge
trimmer.
Maintenance and storage
• If the hedge trimmer is taken out of
operation for purposes of maintenance,

13
NIIEGB
inspection or storage, turn off the motor,
pull the mains plug and make sure that
all rotating parts have come to a stand-
still, and let the machine cool down
before you check or adjust it, etc.
• Carry the hedge trimmer by the handle
with the cutter blade stopped. When
transporting or storing the hedge trim-
Proper handling of the hedge trimmer
will reduce possible personal injury
from the cutter blades.
Safety information for
chainsaws
• When in operation, keep all
body parts away from the saw
chain. Before you start the saw,
ensure that the saw chain is not
touching anything. When using a
chainsaw, losing concentration for just
a moment can lead to clothing or body
parts being caught up in the saw chain.
• Always hold the chainsaw with
your right hand on the rear
handle and left hand on the
front handle. Holding the chainsaw
the other way around increases the risk
of injuries and is not permitted.
• Wear protective goggles and
hearing protection. Further pro-
tective equipment for the head,
hands, legs and feet is required.
Appropriate protective clothing redu-
material and accidental contact with
the saw chain.
• Do not use the chainsaw to
work on trees. Operating a chain-
saw on a tree poses the risk of injury.
and only use the chainsaw if
the ground beneath you is solid,
secure and even. Slippery ground
or unstable surfaces such as on a lad-
der can lead to loss of balance or loss
of control over the chainsaw.
• If working on a branch under
tension, be aware that it will
spring back. Once the tension in
branch may hit the user and/or control
over the chainsaw may be lost.
• Be particularly careful when
cutting brushwood and young
trees. The thin material may become
caught in the saw chain and hit you or
cause you to lose balance.
• Carry the chainsaw by the front
handle when it is switched off
with the saw chain pointing
away from your body. Always
place the protective cover onto
the chainsaw when transport-
ing or storing it. Careful handling
of the chainsaw reduces the probabili-
ty of accidentally coming into contact
with the running saw chain.
• Observe the instructions for lu-
brication, chain tensioning and
replacing accessories. An impro-
perly tensioned or lubricated chain
may rip apart or increase the risk of
kickback.
• Keep handles dry, clean and
free from oil and grease. Greasy,
oily handles are slippery and lead to
loss of control.
• Only saw wood. Do not use the
chainsaw for unintended ap-
plications - example: do not use
the chainsaw to saw through
plastic, masonry or construction
materials not made from wood.
Use of the chainsaw for unintended
applications can lead to hazardous
situations.

14
GB
IE
NI
Kickback causes and how to
avoid them
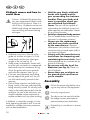
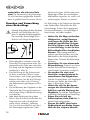
Caution - kickbacks! Be aware that
you may experience kickback while
working with the device. There is a
risk of injury. Kickbacks can be avo-
ided through taking the appropriate
care and using the correct sawing
technique.
b
a
Bild 1
• Kickbacks may occur if the tip of the
guide rail touches an object, or if the
wood bends and the saw chain gets
caught in the cut (see Fig. b).
• Under some circumstances, contact with
tip of the rails can lead to an unexpected
backwards reaction movement during
which the guide rails move upwards
and strike the operator (see Fig. a).
• If the saw chain becomes stuck along
the top edge of the guide rail, the rail
can kick back heavily towards to the
operator.
• Each of these reactions can lead to you
losing control of the saw and potentially
being seriously injured. Do not rely exclu-
sively on the safety devices built into the
chainsaw. As user of the chainsaw, you
should undertake various measures to
enable accident- and injury-free working.
A kickback is caused by wrongly or incor-
rectly operating the electric tool. It can be
avoided by suitable cautionary measures,
such as described below:
-
gers surrounding the chainsaw
handles. Place your body and
arms in a position where you
can withstand the kickback
forces. The user will be capable of
withstanding the kickback forces if sui-
table measures are undertaken. Never
let go of the chainsaw.
• Avoid an abnormal body posture.
This will enable better control over the
chainsaw in unforeseen situations.
• Always use the replacement
by the manufacturer. Incorrect
replacement rails and saw chains can
cause the chain to break apart and/or
may lead to kickback.
• Comply with the manufacturer’s
instructions for sharpening and
maintaining the saw chain. Depth
limiters placed too low increase the po-
tential for kickbacks.
• Do not saw with the tip of the
blade bar (see Fig. b). There is a
risk of kickback.
• Ensure there are no objects on
the ground which could cause
you to stumble.
Assembly
Pull out the power plug before carry-
ing out any work on the equipment.
Use only original parts.
The device can be used with either
the hedge trimmer attachment or
pole-mounted pruner attachment.
Dismantling is carried out in reverse
order.

15
NIIEGB
B
Mounting the tubular
shaft
Loosen the star wheel (8). Slide the front
tubular shaft (6) onto the tubular shaft on
the device housing (9) with a gentle rotating
movement. The retaining knob (7) will then
lock into place. Fix the tubular elements into
place using the rotary knob (8).
Only tighten the rotary knob
(8) by hand! The use of maxi-
mum manual force will damage the
tubular shaft.
C
Mounting the round
handle
Place the round handle (10) onto the tubular
shaft of the device housing (9). Fold on the
counter-holder (23) of the round handle and
screw it on together with the large washer
(24) and the rotary knob (25).
Mounting the saw chain
Pay attention to the correct rotation
direction of the saw chain. This is
indicated on the chain wheel cover
(27) and above the bar bolt (30).
Tension the saw chain in accor-
1. Place the device on a level surface.
2. Remove the chain wheel cover (27) by
loosening the nut (26) with the moun-
ting key (21).
3. Insert the saw chain (20) into the blade
bar groove. To assemble, hold the bla-
de bar (28) tilted upwards at an angle
of approx. 45 degrees in order to be
able to guide the saw chain (20) more
easily onto the chain sprocket (29).
4. Place the blade bar (28) and saw
chain (20) onto the rail bolts (30).
When the nose on the right below the
guide bolt (30) sits in the lower round
recess on the blade bar, the blade bar
is placed correctly. It is normal for the
saw chain (20) to sag.
5. Pre-tension the saw chain (20) by tur-
ning the screw (31) to tension the chain
in a clockwise direction.
6. Put the chain wheel cover (27) back in
position. Tighten the chain wheel cover
nut (26).
Caution! The pole-mounted pruner
can be prone to leaks.
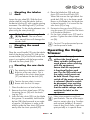
Operating the Hedge
Trimmer
Do not use the equipment
without the hand guard.
Wear suitable clothing and
work gloves when working
with the equipment.
Ensure that the equipment
is functional before each
use. The On/Off switch and
the safety switch must not
be held closed. They must
switch off the motor when on
is released. Should a switch
be damaged, stop working
with the equipment. Ensure
that the mains voltage value
matches the label on the
equipment.
Note noise protection and local
-
ment on certain days (e.g. Sundays
and national holidays), at certain
times of day (lunch times, night time
quiet periods) or in special areas

16
GB
IE
NI
(e.g. health resorts, clinics etc.) is
restricted or forbidden.
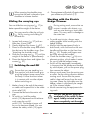
Chain lubrication
The blade bar and saw chain must
never be operated without oil. If the
pole-mounted pruner is used with too
little oil, the cutting performance and
lifespan of the saw chain will decrease
as the saw chain will become blunt
more quickly. You can identify when
there is too little oil if smoke develops
or the blade bar changes colour.
the motor starts working.
Filling with chain oil:
• Check the oil level indicator on the oil
tank (
32) regularly and top-up the oil
if the minimum mark „MIN“ (
33) is
reached on the oil level indicator. The oil
tank holds about 120 ml of oil.
• Use bio-oil containing additives to redu-
ce friction and wear. You can order this
from our service centre.
Alternatively, use chain lubricating oil with
a low proportion of adhesion additives.
• Empty the oil tank if it will not be used
for a prolonged period of time (6-8
weeks).
1. Unscrew the oil tank cap (34) and
pour the chain oil into the tank.
2. Wipe away any spilt oil and clo-
se the oil tank cap (34).
Always turn off the device and
let the motor cool down before
-
Swivelling Out the Blade
Beam
1. Hold the safety blade beam (
A
1) on
the handle to adjust the blade beam (5).
2. Unlock the safety lever (3) and keep it
pressed.
3. By simultaneously exerting pressure on
the lock lever (4), you will loosen the
A
1).
4. The safety blade beam (
A
1) can now
be swivelled out. Use the stop stages
and allow the stop lever (4) to click
back in. You can choose 9 stop stages.
5. Then, release the safety lever (3) again
and ensure that it latches back into its
initial position.
Pivoting the pole-
mounted pruner
1. Unlock the safety lever (3) and keep it
pressed.
2. By simultaneously exerting pressure on
the lock lever (4) you can loosen the
3. You can now pivot out the cutting unit
(
A
1). Use the ratchet steps and al-
low the lock lever (4) to click back into
place. There are 3 possible positions.
4. Then, release the safety lever (3) again
and ensure that it latches back into its
initial position.
Attach the shoulder strap
Attach the shoulder strap spring clip (
A
16)
to the carrying eyelet (
A
17) on the tubular
shank of the device. Set the strap length
such that the spring clip on the shoulder
strap is roughly at the height of your hip.
You can vary the strap length using the
buckle on the shoulder strap.

17
NIIEGB
When wearing the shoulder strap,
ensure that the pad is placed on your
shoulders to increase comfort.
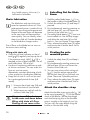
Sliding the carrying eye
You can slide the carrying eye (
A
17) to
better spread the weight of the device.
You may need to slide the soft grip
(
A
36) by turning and sliding to
achieve this.
1. Loosen both screws (
A
37) with an
Allen key (4 mm) (38).
2. Gently retighten the screws (
A
37).
3. Place on the shoulder strap and attach
the device to the shoulder strap. (See
“Attaching the shoulder strap”)
4. Slide the carrying eye (
A
17) until the
weight of the device is spread evenly.
5. Place the device down and tighten the
screws (
A
37).
A
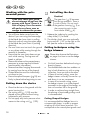
Switching On and Off
Ensure that you are standing in a
-
ping the hedge trimmer away from
the body. Ensure that the trimmer
is in contact with no other objects
before switching on.
1. Make a loop in the end of the extensi-
on cable and suspend this in the cable
strain relief (15)
2.
Connect the device to the mains volt-
age.
3. To switch on, hold the safety
switch (12) depressed and simultane-
ously press the on/off
switch (13). The hedge trimmer will
be run at maximum speed. You can
release the safety switch (12) again.
4. The equipment will switch off again when
you release on/off switch (13).
Working with the Electric
Hedge Trimmer
During cutting work, ensure that no
contact is made with objects, e.g.
such as wire fencing or main plant
stems. This may result in damage to
the cutter bar.
• To avoid eye injuries, always wear
safety goggles while working with the
hedge trimmer.
both hands, with one hand on the rear
handle and the other on the front han-
dle (
A
• Check the shoulder strap (
A
16) on a
pleasant position, which makes it easier
for you to hold the hedge trimmer.
• Switch off the equipment immediately
in the event that the blades are blocked
by solid objects, pull out the power plug
then remove the object.
• Always work away from the mains pow-
er outlet. Set the cutting direction before
starting work. Ensure that the power
cable is kept well away from the work-
ing area. Never lay the cable over the
hedge, where it could easily be caught
up in the trimmer blades.
• Avoid overstraining the equipment dur-
ing work.
Pull out the power plug im-
mediately if the cable is dam-
aged, badly twisted or has
been completely cut through.

18
GB
IE
NI
Working with the pole-
mounted pruner
If the saw chain gets stuck,
do not attempt to pull out the
pruner with force. There is a
risk of injury. Turn the motor
off and use a lever arm or
wedge to release the pruner.
• You will have better control over the
device if you saw using the lower edge
of the blade bar (saw chain in pulling
direction) and not using the upper edge
of the blade bar (saw chain in pushing
direction).
• The saw chain must not touch the ground
or any object while sawing through the
material or thereafter.
• Ensure that the saw chain does not get
stuck while sawing. The log must not
break or splinter.
• Please also observe the precautionary
measures to protect against kickback
(see the safety information).
• Remove branches hanging downwards
by sawing from the top of the branch.
• Twisted branches must be individually
cut down to size.
• Ensure the spiked bumpers (
35) are
Putting down the device
• Place the device on the ground with the
• The cutting unit (
A
1/20) must be
placed on the ground without being
subjected to any pressure.
• Do not apply any static pressure what-
soever to the cutting unit (
A
1/20).
Swivelling the Arm
Caution!
The gear box (
A
2) becomes
hot during operation. There is
a risk of burns. Do not touch
the gearbox housing (
A
2) or
the connecting point to the
front tubular shaft (
A
6).
1. Release the indexing by pushing the
safety slide (11) forward.
2. The tubular shank can now optionally
be turned 45° / 90° to the right or the
left (see the scale on the device).
Cutting techniques using the
hedge trimmer
Please also observe the illustrations
on page 4 on how to use the hedge
trimmer.
• Cut thick branches beforehand using a
branch clippers.
• The double-sided cutter bar enables cut-
ting in both directions or, with a swing-
ing action, from one side to the other.
• In case of vertical cutting, move the
hedge trimmer uniformly forward or up
and down in an arc movement.
• In case of horizontal cutting, move
the hedge trimmer in a sickle-shaped
movement to the edge of the hedge, so
that cut branches fall to the ground.
• In order to achieve long straight lines,
the placing of tensioned guiding cords
is recommended.
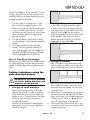
Cutting Shaped Hedges:
It is recommended that hedges be cut in
a trapezoidal shape, in order to prevent
stripping off of the lower branches. This
corresponds to the natural plant growth and

19
NIIEGB
allows the hedge to thrive optimally. During
cutting, only the new annual growths are
reduced and thus a dense branching and
a good screen will develop.
this, move the hedge trimmer in the
direction of growth from bottom to top.
If you cut down from the top, the thin-
ner branches will move out, which may
result in some areas having sparse
growth or holes.
2. Cut the top edge, according to taste,
shape
3. Trim young plants to the required
shape. The main growth should re-
main undamaged until the hedge has
reached the planned height. All other
shoots are lopped off to half size.
Care of Free-Growing Hedges:
Free-growing hedges are not shaped when
cut, although they must be regularly main-
tained so the hedge does not become too
high.
Cutting techniques using the
pole-mounted pruner
Be aware of the risk of kickback
as well as falling branches and
branches on the ground.
• Sawing off small branches:
Place the locating surface of the saw
against the branch in order to prevent
jerky movements of the saw when you
begin to cut it. Guide the saw with light
pressure from the top to the bottom
through the branch.
Watch out for premature breakage of
the branch if you have misjudged the
size and weight.
• Sawing off larger branches:
In the case of larger branches, select
sawing process is controlled. To do this,
saw an incision (a) into the bottom
third of the branch (with the upper side
of the blade). Then saw from top to
underside of the blade) (b).
• Sawing in sections:
Saw off large or long branches in sec-
tions so that you have control over the
place where the branch section lands.
• Saw the lower branches of the tree off
branches that have been cut off to fall
to the ground.
• After the cut is completed, the weight of
the saw increases abruptly for the ope-
rator, as the saw is no longer supported
on the branch. There is a danger that
you will lose control of the device.
• You should only pull the saw out of the
cut with the saw chain running in order
to avoid jamming.

20
GB
IE
NI
• Do not saw with the tip of the cutting
equipment.
• Do not saw the bulge at the base of the
branch because this will prevent the tree
from healing.
Working Safely
• Do not use the high pruning saw when
standing on a ladder or in an unsafe
position.
• Do not be tempted to make unconsid-
ered cuts. Doing so may endanger
both yourself and others.
• Children must be supervised to ensure
that they do not play with the equip-
ment.
• Long use of the equipment can result in
vibration-related circulatory disorders
in the hands. However, the length of
use can be extended by using suitable
gloves or taking regular breaks. Note
that a personal tendency for poor cir-
culation, low outdoor temperatures, or
high gripping forces during work will
reduce the length of use.
-
ing angle of max. 60°
in order to
ensure that you work safely with the
device.
• Always stand on the slope above or to
the side of the branch to be sawn.
• Hold the device as close as possible
to your body. This will ensure the best
balance.
Maintenance/
Cleaning
Repair and servicing work not
described in this manual should
always be carried by our Service
Centre. Use only original parts.
Pull out the power plug before carry-
ing out any work on the equipment.
Wear gloves while handling the
blades.
Carry out the following maintenance and
cleaning work regularly. This will guaran-
tee a long and reliable service life.
• Before each use, check the hedge trim-
mer for obvious defects such as loose,
worn or damaged parts. Check the se-
cure seating of the bolts in the cutter bar.
• Do not use the unit if the blades are
blunt or worn. This will overstress the
motor and gearbox of the machine.
• Check coverings and safety devices for
damage and correct seating. Replace
these where necessary.
• Keep the ventilation slots and motor
housing of the device clean. Use a
damp cloth or a brush to do this. Do
not wash down the equipment with wa-
ter, or submerge it in water.
• Do not use any cleaning agents or
solvents. These could cause irreparable
damage to the equipment. Chemical
substances can attack the plastic parts
of the equipment.
• Clean the cutter bar carefully after
each use.
Wipe it off with an
oily cloth or spray it
with a metal protec-
tive spray.
• Keep the hedge trim-
mer dry and covered with the blade
protection supplied and out of reach of
children.
• The gears is maintenance free
Seite laden ...
Seite laden ...
Seite laden ...
Seite laden ...
Seite laden ...
Seite laden ...
Seite laden ...
Seite laden ...
Seite laden ...
Seite laden ...
Seite laden ...
Seite laden ...
Seite laden ...
Seite laden ...
Seite laden ...
Seite laden ...
Seite laden ...
Seite laden ...
Seite laden ...
Seite laden ...
Seite laden ...
Seite laden ...
Seite laden ...
Seite laden ...
Seite laden ...
Seite laden ...
Seite laden ...
Seite laden ...
Seite laden ...
Seite laden ...
Seite laden ...
Seite laden ...
Seite laden ...
Seite laden ...
Seite laden ...
Seite laden ...
-
 1
1
-
 2
2
-
 3
3
-
 4
4
-
 5
5
-
 6
6
-
 7
7
-
 8
8
-
 9
9
-
 10
10
-
 11
11
-
 12
12
-
 13
13
-
 14
14
-
 15
15
-
 16
16
-
 17
17
-
 18
18
-
 19
19
-
 20
20
-
 21
21
-
 22
22
-
 23
23
-
 24
24
-
 25
25
-
 26
26
-
 27
27
-
 28
28
-
 29
29
-
 30
30
-
 31
31
-
 32
32
-
 33
33
-
 34
34
-
 35
35
-
 36
36
-
 37
37
-
 38
38
-
 39
39
-
 40
40
-
 41
41
-
 42
42
-
 43
43
-
 44
44
-
 45
45
-
 46
46
-
 47
47
-
 48
48
-
 49
49
-
 50
50
-
 51
51
-
 52
52
-
 53
53
-
 54
54
-
 55
55
-
 56
56


Parkside PHSHE 900 A1 Benutzerhandbuch
- Kategorie
- Power Heckenscheren
- Typ
- Benutzerhandbuch
in anderen Sprachen
- English: Parkside PHSHE 900 A1 User manual
Verwandte Papiere
-
Parkside PKGA 40-Li A1 Translation Of The Original Instructions
-
Parkside PHSHE 900 B2 Translation Of The Original Instructions
-
-
-
-
-
-
-
Parkside PKSA 20-Li A1 Translation Of The Original Instructions
-
Parkside 315116 Operating And Safety Instructions Manual
Sonstige Unterlagen
-
McCulloch CS 370 Bedienungsanleitung
-
Dolmar ET120C Bedienungsanleitung
-
Einhell Blue BG-EC 620 T Bedienungsanleitung
-
Black and Decker PH5551 Bedienungsanleitung
-
Black and Decker GKC1817L H1 Bedienungsanleitung
-
Anova PC750 Bedienungsanleitung
-
FLORABEST FKS 2200 B1 Bedienungsanleitung
-
BLACK+DECKER BCASK61D Benutzerhandbuch
-
BLACK+DECKER PS7525 T1 Bedienungsanleitung
-
OKAY KSE 2300-40 R6002/1018 Okay Landi Bedienungsanleitung