Audyssey Audio Dock Air Schnellstartanleitung
- Typ
- Schnellstartanleitung


TOUR
THE
LOWER
EAST
SIDE
2
TOP
FRONT
3.5
mm
Headphone
Jack
0
'-------.-+-
@
r-----ft--+
AirPlay
LED
•
Power
LED
---+-*-+
Volume
Con
IrOI
/\UDYSSE
Y
AirPlay
Pair
Bu
Auxiliary
Input
Power
Cable
PI
BACK
IN
THE
BOX
0
@
Lower
East
Side
Audio
Dock
Air
P
ower
Supply*
Netzte
il'
Fuente
de
al
i
me
nt
aci6n
elec
tr
i
ca
'
Aliment
at
i
on
el
ectrique'
Al
i
men
ta
tore
'
~;mi
•
3
.5
mm
Audio
Cable
3,5-
mm
-
Au
dio
kabe
l
Cab
le
de
au
dio
de
3,5
mm
Cable
au
dio
3,5 mm
Cava
a
ud
io 3,5
mm
3
.5
mm
:;f-
7''
--r:;f-T
- :
::r
J[.,
'N
ote:
220
V
wor
ld
ve
rs
ion
inc
lu
des
UK
and Eu
ropea
n e
le
ct
r
ic
al pl
ug
s
'H
in
we
is:
Kabel
der
220
-V-
AusfOh
rung
si
nd
mit E
urost
ec
k
er
und
Ste
ck
er
fU
r
Gro
Bb
ri
ta
n
ni
en
ve
r
se
h
en
'
Nota
:
Ia
v
ers
ion i
nt
e
rn
acional
de
220
V
incl
u
ye
e
nchufes
electric
os
para
el
Re
i
no
Unido
y E
uro
pa.
'
Re
marque: Ia
vers
i
on
internat
i
onale
de
220
V
corn
pre
nd
des
fich
es
el
ect
ri
ques
adaptees
pour
le
Royau
m
e-U
ni et !'Eu
rope
'No
ta
: Ia
ve
rsion
e i
nte
rnaz
iona
le
a
220
V
compre
n
de
pr
ese
elettr
ic
he
perUKe
per
il r
est
o
de
ii
'Eu
ropa
"
;1:22
0 V
7-
Jlr
f-:';
\-:/
3
/{L
~
~~
~
.t~:
t
i·
HrPJ
~t
O)
~
~
:17?~1:/'a-;:J::tl
(
L,
'
;l:9
3

STEP
1
PLUG IN SPEAKER
Plug
in
your
Lower
East
Side
Audio
Dock
Air
to
a
power
outlet
and
wait
for
the
Power
LED
to
turn
solid
green.
Steck8'1
S1
e d
en
N
etzstec
ker
des
L
autsprecrer
s
in
eine
Steck
dose
und
w
arten
Sie.
his cie
Be
tr
1
ebs
-L
ED
grun
auf
l
eucr
,te
t.
Conecta
el a
lt
avoz
a a t
oma
de c
or
nente
y
esp
era a q
ue
el L
ED
de
ence
nd
i
do
es
te
de
color
v
erd
e f
ij
o.
13
rancr,em
e
nt
. r
accor
d
ez
le
haut
-p
ar
l
eu
r au
se
cteur
ei
pa
t
ie
ntez
JUS
qu
'a
ce
que
le
voya
nt c'a
li
me
11
t
at
ion
passe
au
ve
rt f
ix
e
Col
l
egare
il
d
iffu
so
re a
li
a
presa
di
ali
me
ntaz
1
one
e
at
ten
dere
c
he
I
LED
di
ac
ce~
s
i
o
n
e
rim
anga
acces
o
in
verde
fisso
A
7
·;;
/1
A
i:::."-IJ
-
0)~51!
J\'17-:/'~::J
/-to/
1--
tc:~LJL,di-
,
Powe
r
L
EDt.H~~0).
8
:k
H<::t;>:.@g;~
1
i¥-t:i
g;9,
STEP2
SET
UP
AIRPLAY
Check
before
proceeding
4
~
To
enjoy
AirPlay®
wireless
audio,
you
must
have
the
following:
-
iTunes®
10
.1
(Mac
and
PC)
or
later
;
OR
iP
od
touc
h®
(2nd,
3rd,
and
4th gener
at
ion),
iPhone
®
4,
iPhone
3GS,
iPad
®
2,
and
iPad
with
iOS
4
.2
or
la
t
er.
~
Download
the
latest
software
updates
for
iTunes
or
your
iOS
device
to
ensure
you
can
best
enjoy
AirPlay.
~
Have
your
Wi-Fi
network
name
(SSID)
and
password
available.
Vorbereitungen
~
Fiir AirPiay-Drahtlos-Audio benOtigen Sie Folgendes:
-ilu
nes
10
.1
(Mac
und
PC)
oder
htiher
OD
ERein
i
Pad,
i
Pad
2,
iP
h
one
3GS
, iP
hone
4, iP
od
touch
(2 . 3.
un
d 4.
Ge
ne
r
at
i
on
) mit
i
OS
4.2
ode
r
hOher
.
- E
in
gut
fu
nkt
ioni
eren
d
es
Heim
11
e
tzwe
rk
mit Wi
-F
i.
&f
Laden Sie die neusten Softwareupdates
fO
r iTunes
bzw
. fOr
lh
r iOS-Gerat herunt
er
, um AirPlay
bestmiigllch nutzen zu kiinnen.
&f
Oesweiteren beniitigen Sle
lh
ren Wi-FI Netzwerknamen
(SSIO
), sowie das dazugehiirlge
Passwort.
Comprobar antes
de
seguir
&1'
Para poder
disfruta
r del sistema de audio sin cables AirPlay, debes disponer de
lo
sigu
lent
e:
-
ilunes
10
.1
{M
ac
y
PC)
o
su
pe
r
io
r: 0 un i
Pad
, i
Pad
2, iP
hJne
3GS
, i
Ph
ooe
4, i
Pod
touc
h
(2.
1,
3.
1
y 4.
1
gene
r
ac
io
nes
}
con
iOS 4.2 a
supe
rior.
-
Una
red
do
mest
i
ca
con
Wi
-F
i
q
ue
f
unc
ione
co
r
rectamen
te
E1
Oescargate las Ultimas actualizaciones de software para iTunes o para
tu
dispositive
iOS
para
garantizar el funcionamiento
optimo
de AirPlay.
&f
Ten
a mano el nombre (SSID) y Ia contraseila
de
tu
red Wi-Fi.
Verifiez avant
de
poursuivre
&1'
Pour
proflt
er du systeme audio sans
Ill
AirPlay, vous devez disposer des elements suivants :
- i
Tunes
10.
1
{Ma
c
et
PC
)
ou
vers
ion
superieu
re; OU
un i
Pad
, i
Pad
2,
iP
hon
e
3GS
, i
Pho1e
4,
iPod
tou
ch
{2e
.
3e
et
4e
ge
n
era
ho
ns
)
avec
iOS
4.2
ou
vers
i
on
supfrie
ur
e
- Un
reseau
f
am
i
li
al
ope
r
atio
nne
l
a~ec
Wi-FL
&f
Tehlchargez les mises
a
jour
logicielles
les plus rece
nt
es pour iTunes ou votre
iOS
afin
d'optlmlser
AirPlay.
&f
Veillez
a
avoir
votre nom de reseau
WI
-Fi
(SSIO
)
et
votre mot de passe
a
portee de main.
Controllare prima di proseguire
E;f
Per
l'ascolto
wi
reless de
ll
'audlo AirPlay, sono necessari
i
componenti seguenti:
- i
Tunes
10.1
{Mace
P
C)
o
vers
ion
e
successiva
; OP
PURE
i
Pad
, iP
ad
2, i
Phone
3GS
, !
Phone
4,
i
Pod
Tou
ch
(2
', 3' e
4
1
generaz
ioo
e)
co
n
i
OS
4.2
o ver
sione
s
uc
cessiva
.
-
Una
re
te
loc
ate
op
e
ra
nteco
nWi-
F
i.
Q1
Scaricare
gil
agglornamenti
software
dl
iTunes o del
dispositlvo
iOS
per assicurare Ia
masslma
compatibilltil
con AirPlay.
Qj
Annotare
il
nome della rete WI-FI (SSID) e Ia password.
:!l:i
<:
ll!
Ci\!ii<:Ol
ill
l-
Z <tc
<!'
l-'
1')21
AirPiay'71'
'\'L--
A:t
-7'
.,-:t~S
i*!
l.-#l-'
tete
(
1
<: 1
~
.
1;CFIJ'ti>
II!C'9
:
-i
;
lf
es
':J ,
1o'crJ
~-
~:
:
~t.:~;:f'
tl
.L
):.~O)J
\-:/
3 / ;
:Jao,
i ·
~
1
:<
::
~
-:
e
JGS,
r·.7
-e
·1,
P.~
!o
.;:;
(
~
?.
,
3,4t!Ht)
CS.!!
?
;J::
tdd:
't-
tHXIII!Olll-:.>
.3
:--
•.
- N
F;t-
-J
....
.t
•
;~
l-
'7
-
'/
t~I
!
J
~o
&f
iTun
esll:td
~
i
OS
7'
i\1'
A
O)IU
1i
ll!i'.l7
~
?:<7'~1
1'
?/a
-
F
9.QC:
I:T-
·,
A
i
r
P
iay
~jlil!iO)iJ::~C'<I5i*!
l.-#l-'
tctCIJ-
ll:9
•.
&1'
Wi-Fi~-
·y
~
'7-
?:!5
(
SS
ID
)
/:
i{
A
'7-
~
-
~f
i
JJll
T-
·
;!'.Q
J;-j
j<:
l.-
7:(
tc
<!'
l,'
•
5

AirPlay
Setup
from
Mac,
PC,
iPod
touch,
iPhone
or
iPad
D
fJ
6
• PAIR
{j)
AUX
~PWR
Press
and
hold
the
PAIR
button
on
the
back
of
your
Audio
Dock
Air
until
the
AirPlay
LED
flashes
green
rapidly.
Hal
l
en
S
re
dre
Pi\lrl
-To
ste
au
f
de
r ii
uckse
r
te
des
Acd
ro
Jock
/\11
gedru
c
k:
,
bi
s d•e
grun
e
AWay
-
LE
D
sc
hn
e11
b
lrn
kt
'v
1art
e
r·,
p
ui
s
a·d8
el
bot
-
=:n
PI'IR
(empirejar)
si
tuadJ
e
~
Ia
parte
posterr
or
de
tu A
udr
o Do
ck
A
rr
r1a
st
a
ou
e eii_
ED
ve
rde
Ce
·
"irPi
ay
parpadec
de
raprdc
,\opuyez
le
b
OL
; t
o
~
Pi\
IR
a
l
'ar
r
ie
re
de
vo
tre
Audro Jock
Air
et
ma
rn
te
nez
-le ent
once
1u
s
qu'a
ce
que :e
;oyant
vert d'-
"'
i'Piay
me
t'
e
~
clrg
n
oter
r
ap
i
de
rne
nt
T
en
e
re
pre
mu
to
rl
tas
to PAIR
sui
ret
ro
del
l'
-"ud
ro
Dock
;
\,
r
tir,o
a q
uardo
LED
Arr~
ay
non
l
amp
e
gg
ia v
el
o
cem
ent
e
Ai
rF'Iay
LrDt.HiiH30):Jf:-':f-l
'
J:'i;5/tl<::ld:
;;s;5::c,
1
_
C:
S
I\U
•
dio
D
eck
/WO)~rnJI
<::;Js
;;sPAIR;f5/:z:t
ljl
l-
1'17':5::9,
Wait
for
the
green
AirPlay
LED
to
flash
slowly.
This
tells
you
the
AirPlay
setup
network
has
been
created
and
you
may
proceed.
VY
ar
ten Sie, bis dre grr
in
e L
ED
d
ann
iangs
am
olr
riKt.
Das l
angsam
e
B
!
in
~e
n
zeigt an,
dass
das
·"'
·'r
Piay
N
et
z
we
rk
er
ste
lli
wu
rde
und
Sre
tortfa
hr
en
koner
Es
per
a a
que
er L
tD
verd
e
parpad
ee
de
forma
,
erna
.
Estc
te
indrca
q
ue
Ia r
ed
de
A
rr
P
ia
y se
ha
creado
y
qu
e pue
des
con
t,n
rJ
ar
Atte
n
dez
que
.e
voyart
vert
c!
'
gro
:e pl
us
lw:
tem
e"t
vo
·
Js
savez
que
le r
eseau
d'Ai
r
?lay
a
st
e
et
vou
s p
ouve
z
alors
A.ttendere
che 'I L
ED
ve
r
de
!a
rr1
cegg
i
le
n
tamen
te,
co
nd
iz
ro
ne c
he
in
di
ca c
he
Ia re
te
.
"'i
rP
i
ay
8
st
ata
cr
e
ata
ed
e
poss
rb
il
e
oros
egurre
*'i80)
L
ED1J'I1l--:J<
1
Jc.silt9;;s:5::<:1':¥-ts:5::9o
<:ncA
ir
Pi
aJ
i,
Y
r-
r;-'/
tJ'~liiJ'lX,~ntd:k!L~c:id:
1
),
::TI<=iit<:C:b'c~:5::9o
•
0
/\UDYSSEY
J_
-
••••••••••••••••••••••••••••••••••
...
mmtP'''·-
D
o~
~~~~~d
-.:::::-
.,.
0
~~~~~~!~f
"d
~··>
Network
Status:
Connected
(T
urnAirP~;,
off
)
O
firewire
''*
II
~
~
Not
Con
n
.,md
g
Network Na
meQii!i@iM
44
• •
II'OCI
-T"
tu;<tU
1>
LJ
Join Other Ne
twork
...
Create Netwo
rk
...
Choose
a
Network
...
I
G£iD I r ""'"'"""'"""''"'
Iii~
0
1
On
your
Mac,
PC,
iPod
touch,
iPhone
or
iPad,
open
your
Wi-Fi
network settings
and
select
the
network
called
"LES_AudioDock_Air
_
Setup".
Offnen
Sre
die
VV
i Fi-
Net?wcrkeins
t
ellungen
au
t l
hre
m
Mac.
f'C,
r
PorJ
touch
,
i
~
'hone
oder
:
Pad
u
nd
N
ah
l
en
S
'e
das
Ne~zwe
rk
mrt
der
llezei
chnung
JE.S
_
AudicDcck
Aic
Setuo
f:n
tu
Mac
,
PC,
iPo
o touch,
iPh
one o
rP
ad, a
br
e Ia
con
fr
g
ur
ac
ron
de
tu red Wr-Fi
y
sel
ecc
ion
a Ia r
ed
con el
n
ornbre
"LE
S_
Aud
io
Do
ck_A
.i
r_Selup"
Sur
vmr
e
Mac
,
F)
C,
rP
od
to
uch
, iPhone
or;
rPad
,
ouvrez
vcs
pa
r
ame
tr
es
de
res
eau N,
-Fr
et
se
r
ec
:
ro
nn
ez
re
r
eseau
" LES_Auor
oD
o
ck
_A
,r
_
Se
tup " .
S
uMa
c,
PC,
iPod
Touc
h,
iPr
•one
o i
Pad
, a
prrre
:e r
mpcs'azion
dr
rete
F:
s
el
e
zr
ona
rs
:a
re
te
di
'
lom
e
"L
E
S_Jl
,:Jd'o
Do
cK
_
Ai•
_
Set
up
"
Mac
, P
C,
iP
od
touc
h, rPhone,
iP
adci
;L
VY
i
F
i~
·
:;
r-
'7
-'/~9:J:E~00l'
T,
"LES_
.
A
.
ud
i
oDoc
~
_ A
ir_
S
etup"
c
l
'-3
~·y
f-CJ-'/iSHHRL-:5::9o
000
~'l
+
~j
h
'
t
-
tp
~:/~/1~9
~2
~.1
~
6s~_
~
L~11~o
------------------
-c
~l
II
/\UDYSSEY
LOWER EAST SIDE AUDIO DOCK AIR
WIRELESS
SETIINGS
Open
your
web
browser
and
type
http:/1192.168.1.11
0
in
the
address
bar.
O
ff
nen
Sie
lhrer
Webbrowser
u~d
geben
.S
ie
http//192.168."
110
i1
di
e
Ad
r
ess
l
er
st
e
err
Ab
re tu
nav
e
gador
web
y
escr
ib
e
http
I /1
92
168
.1 11 0
en
Ia
b
arra
de
dr
rec
cio
n
es
.
O
uvrez
v
otre
:
ravrg2teu
r
Neb
et
t
ape
z
li
tlp//192.
168
.
~
.
11
0
dans
:a
barre
·
d'adresses
Apr
r
re
il
browser
web e
drg'tar
e h
tt
o:!/192
.1
68
.1
1
10
ne
l
la
ba
~ r
a
deg
!i
rn
drr
rzzr
•:)I
:::1'7''7'7':1"~00~\
7'
f''
j___,
.::Z
I
\-i<::nt
tp
:/
/192 1
68.
1 11
02::/\tJ
L-:5::9o
7

-MMtffi'''·-,.•·•••••••••••••••••••••••••••••••
D
m
D
8
/\UDYSSEY
LOWER EAST SIDE AUDIO DOCK AIR
WIRELESS SETTINGS
*H
Hi
~
LE
S
Aud
io
D
oc
k A
ir
Name:
I
LES_
Aud
io
D
oc
k Air
xxxxxx
I
:I
j
:l
....g
Wireless
Ne
t
work:
I
Select Network
ADVANCED SETTINGS
[+!
=·
~
Customize
your
Audio
Dock
Air's
name
on
your
network
by
clicking
"Change
Settings,"
typing
in
a
new
name,
and
clicking
the
Apply
button
(optional).
Op
tio
n
aler
Sch
r
itt:
Gebe
n
Sie
l
hren
eigenen
Nam
en
fU
r
das
Aud
io
Dock
Air
im
i\etzwerk
ein
u
nd
k
l1
c
ken
Sie
auf
die
Scha
ltfl
ache
"Apply"
(Ubernehmen)
Pe
rso
n
ali
za
el
nombre
de
tu
altavoz
Audio
Dock
Air
en
tu
re
d y
haz
clic
en
el
bot6
n
Aplicar
(opcional).
Perso
nnalis
ez
le
no
m
de
votre
ha
u
l-
par
le
ur
Au
dio
Dock
Ai
r s
ur
vo
t
re
reseau
et
cli
qu
ez
sur
le bou
to
n
App
li
que
r (
fa
cu
lta
tif).
Persona
lizza
re il
no
me
del
d
iff
usore
Audio
Doc
k A
ir
sui
Ia
rete
e
fare
clic
sui
pu
l
sante
Appl
i
ca
(faco
l
tat
1
vo)
c:-~mm.:?-
·
;;
~'7-?i<::Aud
i
o
D
ock
Air::Zt:-!:J-:ts
~MWCAppl
y
;j;'-)1
:;;~?
')
·;;?l~9i:t/~:3
/),
Choose
your
home
Wi-Fi
network
from
the
drop
down
list.
If
you
have
a
password,
type
it
carefully.
Wahlen
Sie
l
hr
Wi
Fi-He
imne
t
zwerk
aus
der
Dropdown
-
List
e
Geben
Sie
lhr
Passwort
ein,
sofern
eines
fest
gelegt
wu
rde
.
Escoge
Ia
red
Wi-F1
de
tu
casa
de
Ia
lista
desplegable.
Si
tienes
con
tr
aseiia,
escribela.
D
ans
Ia
li
sle
derou
lante.
cho
isi
ssez
votre
rese
au
W
i-
F1
fa
rn
il
ial.
S1
vous
d1
sposez
d
'un
mo
t de
passe.
t
apez
-le
en
f
aisa
nt a
tten
tio
n de
ne
pas
vous
!
rompe
r.
Sceglie
re
Ia
r
ete
Wi-Fi
loc
ale
dall'elenco
a d
iscesa.
Se
richiede
Ia
password,
digitarla
correttamente.
r:
o ·;;/9"o:J:;;
1
J::Z
~
b'G,
c:-~mmw
i
Fi
.:?-
·;;
~
'7-?~iKIRL£9,
1
1::-z
'7-
r:·~<bti'ti:imtJE-g-,
JEL<
A.1JLT<tc~Vo
Click
Join.
Your
LES
Audio
Dock
Air
will
connect
to
your
Wi-Fi
network.
Kl
icken
Sie
auf
.Joi
n"
Da
s
LES
Au
d
io
Dock
Air
stellt
eine
Ve
rbi
ndun
g
_zum
Wi
-
Fi
Netzwerk
her
Haz
clic
en
Co
n
ecta
r.
Tu
L
ES
Au
dio
Dock
Air
se
co
n
ec
tar
a a tu
red
Wi-F
i
Cliquez
sur
J
oindr
e.
Vot
re
LES
Au
di
o
Dock
Air
se
connectera
a
vo
tr
e
re
sea
u
Wi-
Fi.
Fare
cl
ic
su
Connet
ti.
II
L
ES
Aud
io
Do
ck
Air
si
conn
et
t
era
al
ia
re
te Wi
Fi.
Join
~7
1
h7l£9,
c:-~mmL
ES
A
ud
io
Dockb'Wi-Fi;?,
·;;
~
'7-?i<::W
®\:~:h£9,
D
D
@min
Within
four
minutes
the
Power
LED
changes
from
flashing
green
to
solid
green
and
the
AirPlay
LED
changes
from
a
slow
flashing
orange
to
a
solid
green.
lnnerha
lb
ei
ner
Ze
itspa
n
ne
vo
n
zwe
i
Minu
ten
blinkt
die Ai
rPlay-
L
ED
da
nn
z
ue
rs
t
grl1
n,
ansch
l
ieBend
ora~ge
und
zum
Schl
uss
leuc
htet
s1e
da
ue
rh
af
t
grl1n
En
d
os
mi
nutos.
el
LED
del
AirPlay
cambi
a
ra
de
verde
pa
rpadeante
a
naranja
parpadeante
y,
despues,
a
verde
fiJO
.
Au
bo
ut
de
quat
re
min
u
tes,
le
voy
an
t d
'a
lirnentatio
n
passera
du
vert
clignotan
t
a
vert
fixe
et
le
voyant
AirPlay
passera
de
l'o
range
cl,gnotant
a
vert
fix
e.
Nell'a
rco
di
due
minu
ti
il
LED
Ai
rP
lay
passe
ra
da
verde
larn
pe
ggiante
ad
arancio
ne
la
rnpeg
gi
ante
a
verde
f1
sso
.
257
1-;,:J};](c:,
AirPlay
LED
b'~~m.sUftb'Gi'
t__,
:;;~~m.sC~,
~~(7)
.S\*Ti<:~b')
:3:9,
0
tl
When
the
AirPlay
LED
is
solid
green,
you
have
successfully
set
up
AirPlay
on
your
Wi-Fi
network.
Durch
das
da
uerha
fte
Gr
l1n
wird
angeze
igt,
dass
AirPlay
erfolgreich
im
Wi-Fi-Netzwe
rk
eingenchtet
wu
rd
e.
Cu
and
o
el
LED
del
AirP
lay
es
te
ve
rde
fijo,
el A
ir
P;
ay
es
t
ara
cone
ct
ado
cor
r
ecta
me
nt
e a
tu
red
Wi-F
i
Ouand
le
voyant
AirP
la
y
est
vert
fixe,
vous
savez
que
vous
avez
configure
AirPlay
sur
vot
re r
eseau
Wi-Fi.
II
LED
AirPlay
acceso
in
ver
de
fisso
1nd
i
ca
che
A1rP
i
ay
e
sta
to
co
n
fi
gurato
cor
r
ettament
e s
ulla
re
te
Wi-Fi.
AirPlay
LED
b'~~C7).S\:kJi<::1J::hi;J:',
AlrP
ia
y
b'c:-~ffl(l)Wi-Fi;?-
·;;
f--
'7-?i<:-t
•;;
~
?
·;;
/~:htct\'!l~c
1J:')£9,
9

-
·
m;an
,
,,,-~---··························
II!]
•
n
If
the
AirPlay
LED
continues
to
flash
or
if
you
typed
the
wrong
Wi-Fi
network
password
in
step
6,
press
and
hold
the
PAIR
button
and
start
over
(Step
1
on
page
6).
Falls
die
AirPlay-
L
ED
fortdauernd
bltnkt
oder
Sie
tn
Schritt
6
ein
falsches
Wi
-
Fi-Netzwerk-Passwort
einge
g
eben
haben,
mussen
Sie
d
ie
PAIR
Taste
gedruckt
halt
en
und
die
Ei
nrichtung
von
vorn
begtnnen.
Si
el
LED
d
el
AirPlay
sig
ue
pa
rp
adea
nd
o o si
has
escr
it
o mal Ia
co
n
trasena
de Ia r
ed
Wi
Ft
en el p
aso
6,
man
t
en
p
ulsado
el
bo
t
6n
PA
IR y
vuelve
a
empez
a
r.
Si
le
voyan
t
Ai
r
Pl
ay
con
t
inue
de c
lt
gnoter
ou
si
vo
us
vous
etes
trompe
en
t
apa
nt
le
mo
t
de
passe
du
r
ese
au
Wi-F
t a l
'e
t
ape
6,
a
pp
uyez
su
r le b
ou
t
on
PAIR
, main
tenez-
le en
fo
n
ce
et
recomme
n
cez
Se
il
L
ED
AirPlay
conttnua
a
lamp
e
ggiare
oppure
se
Ia
password
tmmessa
per
Ia
rete
Wi-Ft
non
era
corretta
al
passo
6,
t
enere
p
remuto
il
tasto
PAIR
e
ripete·e
l'tnt
e
ra
p
roce
d
ura.
A
ir
Pl
ay
LED
tJ'
,
t?rJL®'Ht~~iif'/Z
-T·y/6-c'
Wi
Fi
;:t-.
·y f-'7 -
'/0)J
\;;z
'7-
1'
'
1f~-::>T
J\
1J
Ltct~
ii,
PAIR
;f'9/1f¥Jl
L
'f
~
fT,
<t-5-JJ[fot)l§[L
T<tt<:r:l'o
A
For
additional
help,
visit
www.audyssey.com/support.
10
Um
wettere
Unters\Utzung
zu
erhal
t
en,
besuchen
Si
e
www.audyssey
.
com/support.
Vi
sita
www
. a
udyssey.
c
om
/s
uppo
rt
pa
ra
cons
ul
ta
r m
as
recursos
de
as
i
stencia
Po
ur d
es
resso
ur
ces
et
de I'
a
id
e
sup
p
leme
n
tat
re
s,
vts
tte
z ww
w.audyssey.com/s
up
po
rt.
Vtsita
re
www.audyssey.com/su
p
port
per
al
tre
ilsorse
di
asststenza.
f-0)1-iliO)'f
;:!{-
f-
tJ'c:::·!J?;',!!I'Id:~iikt.
www
.aud
yssey
co
m
/s
up
po
rt
:a:
c:::·~
<
tt<:r:
l
'o
)
)
')
)
STEP3
PLAY
Music
Over
AirPlay
from
iTunes
Using
a
Mac
or
PC
with
iTunes:
~·>)
Be
sure
your
Mac
or
PC
is
connected
to
the
same
home
Wi-F
i
network
as
your
LES
Audio
Dock
Atr.
2.
Open
iT
u
nes
on
your
co
mp
ute
r
3.
With
tn
iTunes
open
"P
r
efe
r
ences."
select
t
he
"
Devtces
"
tab
and
activate
the
fo
ll
owt
ng op
tion:
"Allow
tTunes
cont
rol
fr
om
re
mote
speakers
" Cl
iCk
OK.
4.
Look
fo
r t
he
~
AtrPiay
icon
in
the
bot
t
om
right
corner
of
the
\T
unes
wtndow
5. C
li
ck
th
e
~
A
ir
Pl
ay
icon
an
d
choose
LES
_
Aud
i
oDock
_
Air
_
xxx
xx
x (
or
yo
ur cu
sto
m
nam
e) from the l
ist
of
s
pe
ak
e
rs.
C
li
ck
"M
ultip
le
Speakers
•
to
selec
t ad
::Jitlona
l Ai
rP
la
y
speake
r
s.
If
you
r LES
Au
d
io
Do
ck
A
ir
is
n
ot
a
vaila
bl
e,
restart
i
Tunes
and
ve
rtfy th
at
you
r L
ES
Au
d
io
D
ock
A
ir
is
on
6.
Press
pl
ay
Verwendung
eines
Mac
oder
PC
mit
iTunes:
Stellen
Sie
siche
r.
dass
aer
Mac
oder
PC
und
das
L
ES
Aud
ta
Dock
Air
etne
Veroindung
zu
m
selben
Wt
-Fi-He
i
mnetzwerk
tte
r
gestellt
haben
2 St
ar
t
en
Sie
tTunes
au
f dem
Co
m
pu
ter
3
In
iT
unes
wahlen
Ste
.Bearbe
t
ten"
>
.E
i
nstellungen"
und
dann
dte
R
eg
i
sterka
r
te
.
Gerate"
Ak
t
tvieren
Sie
dann
f
olgende
Op
ti
on
,tTunes
-Audt
os
teu
erung
von
e
ntt
ernten
L
autsp
r
echern
aus
zulassen"
Kl
tcken
Ste
au
f
OK
.
4.
Suchen
Sie
nach
dem
~
in
der
un
t
eren
rechte
n
Ecke
des
tTunes-Fenste
rs
5
Klicken
Ste
auf
das
~
und
wahlen
Sie
.LES
_
AudioD:Jck
_
Atr
_
xxxxxx
·
(bzw
den
von
Ihnen
gegebenen
Namen)
aus
der
Uste
der
L
auisp
r
echer
Klicken
Ste
auf
.tvlehrere
Lautsp
r
echer.
..
·,
um
wettere
AirPiay-Lautsprecher
auszuwahlen.
Wenn
das LES
Audto
Dock
Atr
nicht
verfugbar
ist.
st
arten
Sie
1Tunes
neu
und
stellen
sicher
,
dass
das
LES
Audio
Dock
Ai
r
eingeschalte
t
ist.
6
Klicken
Sie
auf
dte
Wtedergabe
Schaltllache
11

Con
un
Mac
o
un
PC
con
iTunes:
1
Comprueba
que
tu
Mac
o
tu
PC
es
te
conectado
a Ia m1s
ma
red
domest
ic
a W1
-F1
que
el
LES
Audio
Dock
Air
2.
Ab
re
iT
unes
en
lu
or
de
na
d
01
3
Den
tr
o de
iT
u
nes,
ab
re
'Prefe
r
encias
·.
seleCCiona
Ia
pestana
·o,
spositivos
· y
ac
l
iva
Ia s
tg
u
ten
te opci6n:
'Pe
r
mitir
el
contro
l
de
1Tunes
desde
a
ltavo
ces
r
emotos
·
Haz
cl
ic
en
OK
4
Busc
a
el
[4,1
en
Ia
es
q
uina
tn
f
erior
der
echa
de
Ia
ventana
de
iT
unes
5
Haz
cli
c
en
el
[4,1
y
el1ge
L
ES
_
Au
d
toDock
_
Air
_
xxxxxx
(o
tu
nomb
re
persona
liza
do)
de
Ia ltsta
de
al
t
avoces
Haz
cl
tc
en
'Aitavoces
multtples
.
..
·
para
se
l
eCCton
ar
los
altavoces
AirPlay
ad
tc
t
on
al
es
.
St
tu
LES
Audio
Dock
A11
no
es
ta
d
is
ponib
le.
retnicia
tTunes
y ve
nftca
que
el
LES
Audio
Dock
Atr
este
act
tv
ado
6.
Puis
a
el
baton
de
re
prod
ucci6
n.
Utilisation
d
1
un
Mac
ou
d
1
un
PC
avec
iTunes
:
1
Assu
r
ez-vo
us
que
vo
tr
e
Mac
ou
PC
es
t
rel
ie
au
meme
r
eseau
W
t-F
i
fam
il
ia
l
que
le
LES
Audto
D
oc
k A
ir.
2.
Ouvrez
iT
unes
sur
vot
re
or
d
ina
teu
r.
3.
Dans
1
Tunes,
ouvrez
·P
refer
ences
•,
selec
tionnez
l'ong
let
•
Ap
p
are
1
ls
•,
et
cochez
I'
opt
ion s
ui
vante
•
Per
mettr
e
le
cont
r
61e
d
'iTu
nes
a
parti
r
de
haut
-pa
r
leurs
di
stants
•
Cliquez
su
r
OK
4.
Recherchez
[4,1
dan
s
l'ang
le
inler
i
eur
dr
oit
de
Ia
fenetre
iTunes
5.
Cltquez
su
r
[4,1
et
c
ho
i
sissez
L
ES
_
Aud
i
oDock
_A
ir
_
xxxxxx
(o
u
le
nom
personnal
ise
que
vo
us
avez
tn
dtq
ue)
dans
Ia
lis
te
des
ha
ut-
parleurs
.
Cliquez
sur
• P
lusi
eurs
haut
-
par
leurs
•
pour
selectionner
des
haut-parleurs
AirPlay
supplementaires.
Si
votre
LES
Audio
Dock
Air
n'est
pas
disponible,
redemarrez
iTunes
et
ve
r
ifie
z
que
votre
LES
l>ud
io
Dock
Air
est
active
6 A
pp
uyez
sur L
ecture
Uso
di
un
Mac
o
PC
con
iTunes:
Ver
if
icare
c
he
II
Mac
o
PC
sta
connesso
alia
stessa
rete
Wi-Fi
locale
del
L
ES
Audto
Dock
All
2
Apme
iT
unes
sui
com
p
uter.
3
In
1
Tu
nes,
scegl
1e
re
'
Pre
f
erenze
',
selez
i
ona
re
Ia
scheda
'Dispositivi'
e att
iv
are
l'opz
i
one
seguente:
'
Permetti
il
contra
lt
o re
mo
to
di
tT
un
es
da
altoparlant
i
remoti'
e
fare
clic
su
OK.
lndtvtd
u
are
[4,1
n
ell'angolo
in
bas
so
a
dest
ra
del
la
finestra
dt
iTune
s
5
Fare
c
ltc
[4,1
e
sceg
lter
e
LES
_
Aud
to
Dock
_
Air
_
xxxxxx
(oil no
me
asseg
nat
o)
da
ll
'e
le
nco
Fare
cltc
su
'A
ttn
diffusor
i
...
·
per
selezionare
alt
ri
dtffusori
A11Piay
Se
il
LES
Audio
Dock
Air
non
e
disponibile,
navv
t
are
iTunes
e
verificar
e
che
il
LES
Audio
Dock
Air
sta
acceso
6.
Prem
ere
Riproduc
i
Mac9:tcl<tPCc·iTunes~-l£.1'-1:
I
c:·fle.EIJo:JMac~td<J:PCHES
Air
Dockc15JL:Wi
-F'*-L..;f--·;; c'7-71<:1i/ii'iL
c<tc;!l•o
2.
:::J/~~-?c·
iT
unes<rflll~~To
3.
i
Tu
nesc'iill:i'E'HIJ~.
'7'1
\-(
7.'5
:1{rilHRL CLJTo:J;t:1S'3
/{r~)i))l<:
L~'T
'
1)
'E-
c
7.
~-:i:J
-
IJ'SiT
un
eso:J;t-7'--r
;t:::J
/ c
CJ-
lv{r~'FOJT.Q'OK{r{r?
1
)
·
yJL~To
4.
iTunes?--r/ 1''7o:JETI<:
[4,1
?1':::J/IJ'l!<iT';!tl~'To
5.
A
ir
Piay?1':::J
/{r-7
1
)
·y
-7
L
c.
7.~-:IJ-0)
1
)
7. c iJ'SL
ES
_
Aud
i
oDock
_Air_
xxxxxx
(~td<l:iill:/'E;f,){r)lHRL~'To
'Multip
le
Speakers
...
'{r-7
1
h-7
L
c.
81JO)
[4,1
7.
~-:i:J-{r~boc·~~'To
L
ES
Audio
Dock
AIIIJ'l!<iT';!tl:IJ:l
·~
15'.
iTunes
{fjlj:~!i!JL
CLES
Audt
o
Doc
k
Alro:J
111:5~1J'J..
-::>cl
•.Q<:c{rlli!~L
c
<tc';!l
'o
6.
Play{rjfjlL~'To
12
Music
over
AirPlay
from
your
iPod
touch,
iPhone
or
iPad
Using
an
iOS
device:
Be
sure
your
iOS
dev
ice
is
co
nn
ec
t
ed
to
t
he
sa
me
home
Wi
-
Fi
network
as
you
r
LES
A
ud1o
Dock
Ai
r.
2.
O
pen
1Pod
or
you
r
mus
1c
app.
3.
Loo
k f
or
th
e
[4,1
Ai
r
Pl
ay
bu
tt
on
at
the
lowe
r
ri
ght
corne
r
of
the
app
.
4.
Tap
on
th
e
[4,1
A
irP
lay
i
con
and
c
hoose
LES
_
Aud10Dock
_A
1r_
xxxxxx
(o
r
you
r
custom
name)
f
rom
the
li
st
of
speakers
If
your
LES
Audio
Dock
Air
is
not
availab
le,
restart
your
iOS
de
v1ce
and
venfy
that
your
LES
Audio
Dock
Air
is
powe
re
d
on.
5.
Press
play
Verwendung
eines
iOS-Gerats:
Stelle
n S1e
s1cher.
dass
das
i
DS-Gera
t
und
das
LE
S
Au
di
o D
oc
k
Air
ei
ne
Verb1n
d
ung
zu
m
se
l
ben
Wi-Fi-He
im
ne
t
zwe
r
~
hergestel
lt
ha
b
en.
2
Oflnen
Sie
iPod
oder
lhre
Musik
-
App.
Su
chen
Sie
nac
h
dem
Ai
rP
l
ay
-S
ymbol
[4,1
in
der
un
te
r
en
r
echte
n Ecke
de
r
App
Tippen
s,e
au
f
das
Ai
rP
la
y-Symbol
[4,1
u1d
wahlen
Sie
JES
_
AudioDock
_
A,r
_
xxxxxx'
(
bzw
den
von
Ih
ne
n
angegebenen
Namen)
au
s der
Liste
der
Lau
ts
prec
her.
Wenn
das
LES
Audio
Dock
Air
mcht
verfUgbar
i
st,
sta
r
ten
Sie
das
iOS
Gera
t
neu
und
stellen
sicher,
dass
das
LE
S A
ud1o
Dock
A r e
in
ge
sc
ha
lt
et
is
I.
5.
T1poen
Ste
auf
die
Wiedergabe-Scha
l
tflache
Con
un
dispositivo
iDS:
Comprueba
q
ue
tu
d
ispositivo
1
0S
este
conec
ta
do
a
Ia
misma
r
ed
domestica
Wi
-
Fi
que
el
LES
Audio
Dock
Ai
r
Ab
re
el
iP
od
o
tu
ap
li
caci6n
de
musi
ca
3
Busc
a el
boton
de
[4,1
en
Ia
esquma
tn
fenor
der
ech
a
de
Ia
aplica
ct6
n.
Toea
el
tco
no
de
[4,1
y
el
i
ge
LES_
AudioDock
_
Air
_
xxxxxx
(o
tu
nomb
re
perso
nal
i
zado)
de
Ia
11sta
de
altavoces.
Si
tu
LES
Audto
Dock
Air
no
es
ta
dispo
nib
le,
re
in
ic
ia tu
disp
os
i
tivo
tO
S y
veriftca
que
el
LES
Au
dio
Dock
Ai
r
este
encend1do
5.
Pu
l
sa
el
bot6n
de
repr
oducci6n
13

Utilisation
d'un
iOS
:
1 A
ss
ure
z.vo
us
que
votre
i
OS
es
t r
el
ie
au
m
eme
reseau
W
r
~
~
i
fa
mi
lial
qu
e
le
L
fS
.~
u
d
i
o
Dock Ai
r.
2 Ouvrez I
';P
od
OJ
votre
a
pp
li
cat.o
n
mus
i
ca
ie
3 R
ec'1
erc
t1ez .e
oo
u
:on
~
dans
i'angle
.nle
11ev
oro
1t
de
l
'app
l
ic
a
tio
·J
4
7
ap
o
te
z s
ur
i'r
c6
ne
~
et
c
ho1srss
ez LFS_Au
dloD
oc
k_i\ir_x
xxx
xx (ou le
no
m per
son
na
li
se
q
ue
v
ous
avez i
nd
tq
ue)
da
ns
Ia
l
is:
e
des
hau
t
~
pa
r
!
eu
r
s
Si votm
LES
At.
d
o D
ec
k A
tr
n'
es
t 'as oi
sp
oni
ble, rede
ma
r
rez
vot
re
.OS
et
ve
r
ifi
ez
que
votre
c
ES
Au
ri
io
wac
k A1r
es
!
a!lurr
e.
S.
App
uyez
sur
Lectu
re
Uso
di
un
dispositivo
iOS:
1
Ve
ri
fi
ca
re
che
t1
.j,
spcsitiJo
iCS s
ia
co
nnesso
a
Ia st
es
sa
·c:e
w,~
F
lccz,le
j
el
LES
:
,ud
'o
Dec
o A1
r.
2
Ap·
i
re
l
'a
pp
li
caz
i
one
m
usrc
a!
e
su
l
l'iP
od
3
ln
d
iv
i
duare
il
pu
ts
am
e
~
ne
ll
'a
ng
o
lo
in
ba
sso
a o
est
ra de
ll'
apphcazione
.
4 To
cc
are
l'
ico
na
~
e
sceg
li
e
re
L
E
S_
Au
d
i
oD
oc~
_
At
r
_
x
xxxxx
(o 11
~ome
as
s
egnat
o)
da
ll'ele
nco.
Se
il
I ES
.~ud
i
o
Dock
A.i
r
~one
d
is
po
n
1b
ile, n
avv1are
il
di
sp
os
i
ti
vo
i
OS
e
veri
fi
care
cl
1e
il
LES
Audio Do
ck
Air
sr
a
acce
so
:)
.
Pr
e
rre
re Ripr
odu
ci
iOS7J\1'7-~ffffl:
1
.::·ffllJO)
iO
ST!\-17-oHES
/\
rr
Doc
kC::fi5JL;:Wr
~
F
r
;t;-
L
::
h
c'7-
71
<=
m
li'CL
-c<tc'<!c'o
2.
iPodll'td<l:f'O)f
jjjO)
T'!
\-1
;:z
l''iH
l§
7/
'J
~llllt'll'9o
3.
7/
'
)0)
:t.J
"f(
C:
~
iJ'
:)I
/(7-{:J/)/:HI<Jj'i";!t1;;1'9o
4.
~
7
1':J/
~:$1·y/L
-r_
7.1::"
-tJ-0)
1
)
7-
cf.J'
SLES
_
Audl
oD
oc
k_A,r_
xxxxxx
(ll"td
<l:
~:<E~J~i
l
HR L
:l"
9
o
'-
E
S
A
u:J
io
Do
ck Ai
rt.H!<;J;
<!tltV:!Jll<5,
iO
ST'i\1'7-
~i!l~JIJL
lLES A
ud
io Do
ck
AlrO)
~o
~b'.A
-::>ll'0
L:
C::H1i:&t<L
l"<te'<!l'o
5.
P;ay~
!'I'
L
ll'9o
Music
over
Auxiliary
Cable
Q
PAIR
~
AUX
~PWR
Connect
the
LES
Audio
Dock
Air
to
any
audio
device
with
the
3.5
mm
audio
cable
(included).
Sch
li
eBen
Sie
das
L
ES
Aud
io
Doc
k
Air
mrt dem
3,5
~
mM
-
Aud
i
okabe
l
(im
Li
eferumfang
en
th
alt
en
) an etn Au
diog
erat an
Conecta
el L
ES
Aud
to
Do
ck
Air
a cu
ai
quier
dr
spo
siiiv
o
de
audio con
el
cab
le
de
a
ud
io
de 3,5
mm
(in
clui
do)
Br
anchez
le
LES
Audro
Dock
Air a
un dr
sp
osit
rf aud
io
au
moye
n
d'
un
ca
bl
e a
ud
io de 3,5
mm
(r
n
cl
u
s)
Co
!l
ega
re
il
LES
Audio
D
ock
Air a
un
di
spos
itrvo
aud
io
con
il
ca
va
aud
io
da
3,5
rnm
f
ornit
o
L
ES
Aud
io
Dock
AH
~
3
5
mm
i'"-7-1:1'"7
<::1'Jl>(f1~1ci'"-7
-1
:1'"7'
'
1
l-17.tc.Ji&cL;t'tc
14
listen
with
Headphones
0
Ill
@ /
Listen
to
your
LES
Audio
Dock
Air
with
headphones
by
plugging
in
headphones
to
the
3.5
mm
headphone
jack
on
the
front
of
the
speaker.
r
br
en
S.e
sic
r die M
us
,k mrttels
Ko
o'h6r
er1
rjber
dc:s
A
ud
io
D
oc
~
Air an. ind
em
Sie d
en
K
oo
fhorer
an
dre
3.~
-
mm
~
Kopf
hbrerbuc
hse
an
der Vcrde
·s
cite
des
L
auts
pr
ec
hers ans
ch
li
eBe
n
C:
s
cu
cha
;u Aud
io
J
ock
con
l
os
aur
rcu
are
s
cor
,ect
ando
lcs
a;
c
one
ct
or
de a
uncu
l
a-es
de
3.
5
mm
sit
~
ad
c
en Ia pa
rt
e
del
ant
era
e
el
a
l;av
oz.
Ecc
u
tez
Ia
musi
que
s
ur
vo
tre
Au
oto
Doc
k Air au
moyen
o'un casque que v
ocs
a
ur
ez
pr
ea
lab
iem
eni
b
~
a nc'18
2.
Ia
so
rt
ie
c
as
que 3,5 mm s
ur
ta f
ace
av
a
nt
du
h
aut~
p
a
ri
e
ur
Per
a
sc
ol\are ia mu
si
ca
dal
l'
Audto
Dock
Air
c
on
le
cuffi
e, in
ser
ir
e
to
sorn
01to
delle
cuffie
ne
ll
a pre
sa
app
osila
da
3,5
mm
dava
nt
i
al
d
if
fusore
L
ES
A
ud
,o Jo
ck
'~f
A.
;;
I"
;t;/c'llii!G
<:.
l
d:,
/' ·
;;
I"
'
it;
/'if
7-
t:"
-
/:J-lErnH<=ilS-8
3
5
mr
A.
·;;
f'
';t;/'/
-v
·;;
-7
t
c.~
L
)2-d};t'to
15

STEP4
ADJUST
THE
VOLUME
Turn
the
volume
wheel
clockwise
to
turn
up
the
volume
and
counter-clockwise
to
turn
down
the
volume.
Push
the
volume
wheel
to
mute
your
LES
Audio
Dock
Air
(the
Power
LED
light
will
turn
red
when
muted).
You
can
also
control
your
LES
Audio
Dock
Air's
volume
with
your
AirPlay
connected
iTunes,
iPod
touch,
iPhone
or
iPad.
Dre
h
en
S
ie
de
n
Lauts
ta
rkereglw
1m
Uh
rZ81g
er
sin
n
Jrr
d1e l_a
ct
sta
rke
zu
e~r
1
6
hen
,
od
er
ertgeg
en
de
m
Uhr
ze
,g
er
s
rn,
um
sie zu
ve
r'i
nge
rn.
Druc
ke
r S;e
de
n
Reg
ie
r
um
das
LE.S
Audio
Dock
Air
stummz
u
sc
h
a!
ten
(d
arau
f
h;n
l
euchte
t
die
L
ED
ro
t).
S,e
kb
n
nen
01e
Laotstarke
d
es
LES
Audio
D
ock
A,r
auc
h
ube
r i
lun
es
, ;
Pod
Touc
h,
iP
hone
oder
iP
aa
ei
ns
te
ll
en
, w
e:
n
ei
r1
e A
ir
?,
ay
-
Ve'b
l
ndung
be
st
e
h;
.
Gira Ia r
ue
da de
vol
um
en
ha
cia Ia
de
rech
a
pa
ra s
ub1r
el
volum
en y
hac
ia Ia ;
zq
u;e
rd
a
pa
ra b
a1
arlo.
Pu
l
sa
el
bot6n
para
si.
enc
i
ar
tu
LES
AJdio
Llock
Air
(el
L
ED
se
vue
;ve
rO
JO
cuan
do
esta
si
le
ncia
d
o)
T
arr
,
b'cn
pue
des
co
r,tr
olar
el
vo
!
urre
n
oel
"ES A
u01o
Jo
ck
con
tu
.A
r;P
iay
cor
,e
ct
a
do
a i
Tunes
, :P
od
Touch
,
i
Ph
o1e
o
iPad
Tourne
z
Ia
mol
ette
du
vo
lum
e
ve
rs Ia
dro
;
te
(da
ns le
se
ns
ho
ra;
re)
po
ur
au
gme
nt
er
ie
volume
et
ve
rs
Ia
gauc
he (
dans
le
sens
ar
ti-
no
ra
ir
e)
po
ur
d;m;r
,uer le
voiurr
,
e.
?o
csse
z le
bouto
n
pour
m
ettre
vo~
rE
LES
Aud,o
Dock
Air e
r'
, m
ode
sil
encieJ
x
(re
vo
yant
I
crT
,neux
devren'
ro
uge
quand
l'
appa'e
ll
est
en
mode
Sllenciecx:
VO'
JS
po
uv
cz
ac
ss c
ornm2
nd
er le vol
urre
ju
LES
Au
dio
D
oc
k
av
ec
vo
'
re
f\.
ir
Pi
ay
co
nne
cte
a
IT
Jne
s
su
r
vo
t
re
;P
od
T
ouch
,
iP
ho
ne
ou
;
Pad
Ruot
are
II
se
le
tt
ore
serm
O'a
no
pe
r a
lz
are
vo
l
ume
,
ruot
ar:o s
er:
so
c;
n
Lorar;c
per
abbassar
lc
~remere
il t
2s
to
p
er
Sll
en
z
iare
I
LES
Au
or
o
Cock
Ai
r
(11
LEJ Sl ac
ce1der
a
,r
·c
sso
q
c;a
nd
o
''
au
di
e e
di
sa'
;.
vato)
t
a
nch
e
poss
ib
i!e
co
nt
ro
!!
are
il
vo
l
ume
de
l
LE
S
Au
d;o
D
oc
~
Air
da
;
Tun
es,
;Pod
Touch.
iP
hone
o ;P
ad
see
co
n
nesso
ad
Ai
rPla
y
*-1-
Jv'1r
Bey
H1JrP:ifc:
@J
9
e:gl[t:J'*z
<
tJ:>
J.
&
Bey
~t@J>J
fc:@J9
t §
1lb''
J\
<!'<1J:
>J
:3:9,
if
'-7
/'1rJE!I9
C:
.
LE
S
Audio
Llo
ck
A
i
rO)g~i:J'ii!J§<!':h:J:9(;i!lgcpij:
1
_
E
D
7-1
1--
b'~J'1o
l
c:~tJ'J:3:9)o
LE
S
Aud
ro
Oock
O)g~{f
i
P
od
T
ouch
,
;Ph
one
,
;P
adJimA
rr
Piay
ciJ6l!i1[9
~L.(:'t
cz:3:9,
16
STEPS
EXTRAS
Multiroom
Music
,>)
1
f~i
[JJ
<<·
lljlL)
Add
multiple
AirPlay-enabled
speakers
in
your
home
for
a
wireless
integrated
home
audio
experience.
Just
select
which
speakers
you
want
enabled
and
you
have
multi
room
music
with
the
click
of
a
mouse.
S;
e
kbnnen
eine
dra
h
tlose
Musikw
ie
de
rg
abe
im
g
anzen
Wohn
be
re
;
ch
ge
ni
eB
e
n,
in
dem
Sie
mehrere
AirP
iay
-fahi
ge
L
autsprech
er
in v
ersc
hi
edene
n
Z1mme
rn
aufste
ll
en
Aktivie
ren Sie ei
nfach
die
gewunsc
h
ten
La
utspr
e
che
r,
um s;
ch
pe
r
Maus
k
li
ck
Mus
i' in
me
hreren
Zimme
rn
an
zu
hb
re
n
Aliade
al
ta
voces
multi
pl
es
con
e
ctados
a
Ai
rP
lay
en
tu
casa
para
d;sfruta
r
dE
un
a
expe
rien
cia
de
aud;o
mteg
r
ada
s
;n
cables
.
So
lo
t;
enes
que
se
l
ecc
io
nar
q
ue
a
!t
avoces
quie
res
a
ct
i
var
pa
ra
pode
r
d1
sf
ru
tar
de
musica
e
11
var
ia
s
habitaciones
con
un
solo
clic
de
l r
aton.
Ra
jout
ez
ch
ez
vo
us
p
lu
s;
eu
rs
h
au
t-p
arl
eu
rs
compatibles
Ai
rP
la
y
pour
une
expe
r;en
ce
audio
i
ntegree
sans
fil.
II
suffit
de
se
le
ct
io
n
ne
r l
es
hau
t-
parleus
qu
e
vous
sou
ha
itez
activer
et
vous
pouv
ez
ecouter
de Ia
musique
dans
pl
us
i
eurs
pi
eces
par
un
s
;m
ple
c!>c
de
sour
is
E
possibile
ag;]iung
e
re
al
tri
d;ffusori
compatibil
1
con
AirP
l
ay
per
creare
un
ambi
e
nte
aud;o
t
cta
l
mente
wi
re
l
ess
t
suffic
:ent
e
se
l
czionare
di
ffu
sor
i
da
abi
l
it
a
re
pe
r
creare
un
'
espe
ri
e
nza
m
us
icale
mu
ltr
sa
la
con
il
se
mp
li
ce
c
li
c
de
l m
ouse
:)
~~O)A
ir
PiayJ;:tr,L:;;:z
t'-t.J
-'1r1@<<=Jo0)'7
-1
l"
v
::Zm!U:O;t,
-
L,;;t-
T-f
;;t@i
.§blc:ili
1JDc
z:3:9
,
f'lj"'f.J
ic:
L/c
l
'::Z
t'-t.J-'1rM~L~~~::z'1r?~~?9~~~--c.W~O)$Mcg•'1r~~cz:J:~
17

Apple
Remote
App
,,
~
Download
Apple's
free
Remote
app
from
the
App
Store
and
control
your
iTunes
library
and
AirPlay
speakers
wirelessly
from
your
iPod
touch,
iPhone
and
iPad.
Play,
pause,
skip,
shuffle
or
repeat
from
the
palm
of
your
hand.
La
d
en
S:e
die
kosten
i
os
e
Re
m
ote
App
vor
A
ppl
e
au
s
dem
App
St
or
e
he
r
un
tcr u
nd
bedie
n
en
Sie dr
ahtl
os
l
hre
iTun
es
Meo
iath
ek
und
.1\
:rP
'
ay
L
autsp
r
ec
r,
er iJ
ber
:Jas
i"o
d
to
uch,
1
Pn
o
ne
und
Pa
d.
St
eu
er
n Sie
Wicd
ergaJe,
PaLse
.
vollst
andi
ge,
L
ula
lls
wi
edergabe
oder
Wrederh
otun
g
ein
fac
ll mit
dem
Ge
ral in
lh
r
er
Hil
nd.
De
s
carg
a
le
gr
at
1s
Ia
api
r
cacr:J
n
r~emoie
de
Ap
p
ic
en
.1\p
p
Sior
e y
co
n;
ro
la
lu
o
ib
ltolcca
de
i
tu
nes
y
IJs
al
ta
v
oces
Ar
l'
l
ay
s1
n
cables
desde
tu
r
Pod
tou
ch,
if'lt
onr.
'i
rP
ad
. H
cp
ro
duc
c,
pausa
.
sa
lt
a, r
epite
o
cscucha
Je
forma
a
leatoria
tu
mu
s1
cc
desdc
Ia
palma de lu m
ana
lelech
ar
ge
z une
apo
li
cat
iJn
cf
ist
a
nte
gr
atu
te d
'/,pplc
d
couis
!'
Ap
p
le
S'oce
ct
com
:n
ande
z
vorre
brb
lr
o
lhe
quc iTu
nc
s
e:
les haul·
p
ar
l
eurs
Ai
rPl
ay
sur
le
ro
seau
sa
ns
1'1
dc
p
uis
vo;·e r
F'o
d I
auer
.
iPh
onc
et
1
P2J.
Vo
us po
uv
e1
liincer, in!
er
ro
m
pre
, sa
ute
r.
r
nett
re
en l
ec
t
ure
ale
ato
ire ou r
ep
eter
d
es
morceau
x
:nus
r
ca
ux d
ep
uis
le
crc
ux
de
Ia
:na
rn.
S
ca
ri
ca
re
l'ap
p
lr
caz
i
cn
e
gratu
it
a
Ap
ple
Re
mo1c
oai
i'App
S
to
re
per
controi
la
re
Ia
l
tbrc:ia
iT
unes e r
diffu
se-
r A
:rPiay
1n man.c
ra
wire
l
ess
da
un
rPod
T
ouch
, iPh
one
o i
Pad
T
utt
e
le
opera
zroni
(Ripr
o
du
cr. P
ausa,
S
hu
ffle
,
Ripet
i)
sono
a
oo
r
iat
a di m
ana
.
.1\p
p
Store
b'.:,App
le
O)!f!\t~Re
mo
t
e
/'
/
1
)
:{!:-)1"'7/
D -
n
...
"[,
i
Tu
n
es
51'
7'5
1
)
t->
AirP
ay'A
1:::'
-:!:1
-:{!:
' iPod
touch
,
iP
ho
ne,
rP
ad
b'
S'7-1"\"l---'Ai!ld
'F
c
·~:f9
,
jjj:
1:,
-
tey
{¥11::
,
'A:'f,;;-:1'
,
~-~>
·;;7
Jk
1
)
1:::'
-
~
:{f=J"O)LJ'SIJ'
SHi
5'Sl''
:t!l:fFC"z:f9o
Online
Streaming
Music
[EJ®
Don't
be
limited
by
your
iTunes
library.
Stream
Pandora®,
Spotify®
or
any
of
your
favorite
internet
radio
stations
from
their
apps
on
your
iPod
Touch,
iPhone
or
iPad
to
your
Lower
East
Side
Audio
Dock
Air.
Nu
tzen
S1e
nebe
n der iTunes-
Med
i
ath
ek weit
ere
S
lr
ea
M'
ng
-
Angebo
te.
ca
de1
Sre
z.
3. Jie
Ap
ps
vo
n
Pa
n
oora
®,
Sr
oti
'y oder
lhren
bevo
r
zug
ten ln
terne
t
·Rad
i
osende
rn
auf
lhr i
Pod
touch,
iPh
one
oder
iPad,
um
d
ie
W1ede
rg
ab
e u
be
r
da
s
LES
f,udi
o
Joc
k A
ir
zu
ermbg
li
chen
No
te
conlorm
es
so
lo
co
n tu b
ibliole
ca
de
iTu
nes
.
Tamb
ien
pod
ra
s re
pr
od
ucir Pa
ndora®,
Sp
oti
fy
o
cu
a
lq
ui
er
a
de
t
us
em
i
soras
de
radi
o
por
lr
'te
r
net
f
av
or
i:
as
gra
ci
as
a
su
s
ap
lr
cacior-
es
en
tu
;Pod
To
uc
h,
r
Phon
e o
i?ad,
y e
sc
x rta'as
co
n
el
L
~S
.1\Jdio
D
ock
A
IL
Ne
vous
co
nte
ntez
pas
de
v
ot
re bibli
ot
n
eq
ce r
Tun
es
. tcou
tez
er
co
n
:i
n'c
es
pr
o
gramr
,as
de
P
and
or
a®
, S
po
:ily
ou
n
'1
mp
cr
te
laque
ll
e
de
vos
s
tatio
ns
de
rad
io
Intern
et
preferee
s sur
votr
e LES Audio
Duck
Ar
r,
a
pa
rt
1r de I'
app
licat
ion
cor
res
po
n
dante
ins
ta
llee
s
ur
vo
tre iP
od
Ta
uer.
,
iP
hone
ou
,Pa
cJ
Non l
im
i
tarti
al
ia
tua lib
reri
a i
Tu
nes.
Con
il
LES
Aud
io
Dock
A
ir
puo1 ascol
tare
in st
ream
ing P
an
dor
a®
,
Spo
t
ify
e
le
tue
em
i
tten
ti
radiolonic
he
pret
erite
SJ
Intern
et
u;i
izz
ando
rel
a:
iv
e aop
li
ca
zioni
su
rP
od
To
u
ch
,
iPh
cre
o i''
ad
iT
u
nes
7
1'
7'
7 ')
:{ffflli1JI
J~
N'
<::
c''f
1
J
!ll
<
tc<!l
',
i
Po
d Tou
ch
,
iPhon
e, iPad0)7-:f'1
)
b'S,
Pandora®
,
Spotrly
:ftd.J:
S'l
<U
<=
A'
)
0)
-1/3
-:r,
·;;
~
7'/:t
Jlj].A
~
1
) -
::
/7
':{!:
,
L
t:
S
.
~,ud
io
Dock
Ai
r
cd3
11lezl
'1c
tOt:f9
,
18
HELP
If
you
need
help
with
your
Lower
East
Side
Audio
Dock
Ai
r,
please
visit
Ask
Audyssey
at
http://ask.audyssey.com.
You
can
also
download
the
full
product
manual
and
reach
our
support
team
at
www.audyssey.co
m/
support.
We~n
Sie
Unters
t
ut
zung fur
lhr
..
Aud
yssey
Lowe
r E
ast
Si
de
A
ud1
0 D
ock
Ai
r"
b
enb
tl
gen
,
bes
uchen
Sie
bi
tt
e d1e
Se
i
te
,A
sk Au
ayssey
"
unter
h
tt
p
//
ask.
auoyssey
.
corn
S;e kbr
111
er auch cas f'
ro
dc
kt
handbuc
h
he
ru
me
r!aden.
U
ns
er S
uppo
r
tte
arn
erre
rchen Sie
unter
www
.aud
y
sse
y.
c
orn
/su
pport.
Si n
ecesi
ta
s
ayuda
co
r
tu
Lowe
r
:=
as
t
Siae
Au
dic
Dock
Ai
:
de
A
ud
y
sse
y, v
isi
ta
As
k
AJd
y
sse
y en
h
ttp
:/
/as
k.
au
dysse
y.
co
m. lambien
pod:as
d
escarga
r el
11
an
ua
l
comp
le
to
de
l pr
odu
cto
y
po
ner
te
en
co
n
tact
o
co
n
nuest:o
eq
ui
po
de
as
i
ste
n
c1
a e
r1
w
ww.
ac
dy
ssey
.
cor
./
suppo
r
t.
Si
v
ous
ave
z
be
so
;n d
'a
i
:Je
a
vec
vo
tre
AJ
o
ysse
y Lo
we
r last Si
de
AJ
diO
Dock Arr, al
'e
z a
Ia
page
ht
tp
/ /
as
k.
au
d
yssey
.
com
et
cliqu
ez
su
r Ask Aud
yssey
Vo
us
pcu
vez
au
ss
,
te
l
ec
h
arg
er !'int
eg
ra'i
te
ou ma
nue
l du pr
od
uit
et
vou
s
adres
ser
a
r
1o
tre
serv1ce d'
assistance
s
u1
www.audy
ss
e
y.com/suppo
r:
Per
ass
ist
en7
a
con
f
\u
d
ysse
y
Lowe
r Ea
st
S
ide
Aud
io
Dock
Air, v
isi
t
are
Ask
Auaysse
y a
ll
'ind
ir
i
zzo
h
ttp
Ji
ask
.a
udysse
y.cJ
rr
, da cui
8
anc'le
poss
ibile scaric
we
il
n
arua
!e
corn
ple
io
del pro
dotl
o e
c
o
m
atta~e
il tearr
del
l'
assis
te
nza
(
www
.
aud
ysse
y.
com
/s
upp
o
rt
).
ArHJ
ys
sey
Lower
[ast
Sr
de
1\
ud
io D
oc
k AirO)A.J
v
/iJ'£,
~1;):~
~,
http
/ /
as
k aud
ys
se
y
co
rn
b' S
Ask
Au
d
ysse
y:{f
L:
'
~
<
t<'.Zl
'o
~£
"<
=
~?11/
i't~
J\&
0)5/''J
/
D
-
f''t->www
.au
dyss
ey
.
com/suppo
rt
l'+t
# -
1-
=f-
b.f
L:d3Fo%
'~
b'\t
"'tct<'.<
<::
c'b
c'~*
9
,
19

FCC:
This
device
complies
with
Part
15
of
the
FCC
Rules.
Operation
is
subject
to
the
following
two
conditions:
(1)
this
device
may
not
cause
harmful
interference,
and
(2)
this
device
must
accept
any
interference
received,
including
interference
that
may
cause
undesired
operation.
The
manufacturer
is
not
responsible
for
any
radio
or
TV
interference
caused
by
unauthorized
modifications
to
this
equipment.
Such
modifications
could
void
the
user
's
authority
to
operate
the
equipment.
The
antenna
used
for
this
transmitter
must
be
installed
to
provide
a
separation
distance
of
at
least
20
em
from
all
persons
and
must
not
be
co-located
or
operated
in
conjunction
with
any
other
antenna
or
transmitter.
IC:
This
device
complies
with
Industry
Canada
license-exempt
RSS
standard(s):Operation
is
subject
to
the
following
two
conditions
:
(1)
this
device
may
not
cause
interference,
and
(2)
this
device
must
accept
any
interference,
including
interference
that
may
cause
undesired
operation
of
the
device.
Le
present
appareil
est
conforme
aux
CNR
d'lndustrie
Canada
applicables
aux
appareils
radio
exempts
de
licence
.
L'exploitation
est
autorisee
aux
deux
conditions
suivantes
:
(1)
l'appareil
ne
doit
pas
produire
de
brouillage,
et
(2)
l'utilisateur
de
l'appareil
doit
accepter
tout
brouillage
radioelectrique
subi,
meme
si
le
brouillage
est
susceptible
d'en
compromettre
le
fonctionnement.
CE:
Hereby,
Audyssey
Laboratories
Inc,
declares
that
this
Audio
Dock
Air
is
in
compliance
with
the
essential
requirements
and
other
relevant
provisions
of
Directive
1999/5/EC.
©2011
Audyssey
Laboratories,
Inc.
All
rights
reserved.
"Audyssey"
is
a
registered
trademark
of
Audyssey
Laboratories,
Inc.
U.S.
and
foreign
patents
pending.
AirPlay,
the
AirPlay
logo,
iPhone,
iPod
touch,
iPad
and
iTunes
are
trademarks
of
Apple
Inc.,
registered
in
the
U.S.
and
other
countries.
PANDORA
®
is
a
registered
trademark
of
Pandora
Media
Inc.
Spotify®
is
trademarks
of
Spotify
Sweden
AB,
registered
in
the
U.S.
and
other
countries.
AC-LESAD-QSG-0
REV
A 1
0


OUR PRODUCTS
SOUTH
OF
MARKET AUDIO DOCK
Unbelievable
sound.
You'll
want
to
crank
up
the
volume
and
enjoy
its crystal
clear
bass!
Does
it
all. Sync,
charge
& wirelessly
stream
music. It's a
speakerphone
too.
LOWER EAST SIDE MEDIA SPEAKERS
Super
Smart.
Equipped
with Audyssey
Smart
Speakern.r
technology
for
flawless
sound
and
rich bass.
Plays well
with
others. Its digital optical
or
analog
inputs
connect
to
everything.
Available
at
audyssey.comjstore
and
many
other fine retailers.
As
Featured in:
lllrl.\'twftork~$
GIZMODO
engadget" MAXIM
POPSCI-
e
... C·CRD 2011·21<evl\l


Audyssey
Warranty
and
Safety Information
LIMITED
WARRANTY-
UNITED
STATES,
MEXICO
& CANADA
This
product
has
been
designed
and
manufactured
to
the
high-
est
quality
standards.
This
Limited
Warranty
on
your
Audyssey
product
purchased
in
the
United
States,
Canada,
or
Mexico
is
valid
for
a
period
of
one
year
from
the
date
of
purchase
.
What
is
Covered
Except
as
specified
below
,
this
Limited
Warranty
covers
all
parts
defective
in
material
or
workmanship
during
the
warranty
period.
What
We
Will
Do
If
during
the
warranty
period
your
Audyssey
product
is
found
to
be
defective,
Audyssey
will,
at
our
sole
option,
repair
or
replace
it
with
a new,
used
or
equivalent
product,
within
a
reasonable
period
of
time,
without
charge
for
parts
or
labor.
Other Warranties
THIS LIMITED WARRANTY
IS
IN
LIEU
OF
ALL
OTHER
EXPRESS
WARRANTIES, WRITTEN
OR
ORAL.
ALL
IMPLIED
WARRANTIES,
INCLUDING BUT NOT
LIMITED
TO ANY WARRAN1Y
OF
MER-
CHANTABILI1Y
OR
FITNESS
FOR
PARTICULAR
PURPOSE,
ARE
LIMITED TO ONE
YEAR.
Some
states
do
not
allow
limitations
on
how
long
an
implied
warranty
lasts,
so
the
above
limitation
may
not
apply
to
you.
Limitation
of
Liability
OUR
LIABILITY
IS
LIMITED TO THE
REPAIR
OR
REPLACEMENT,
AT
OUR OPTION,
OF
ANY
DEFECTIVE
PRODUCT AND
SHALL
IN NO
EVENT INCLUDE INCIDENTAL
OR
CONSEQUENTIAL
DAMAGES.
Some
states
do
not
allow
the
exclusion
of
incidental
or
conse-
quential
damages,
so
the
above
exclusion
may
not
apply
to
you.
How
to Make a Claim
Contact
Audyssey
Laboratories, Inc.
at
WW\V.audyssey.com/

support. If
it
is found necessary to return
the
product for repair,
you will
be
given a return authorization
number
and
specific
return
and
shipping instructions which will include
but
may
not
be
limited to properly packing
the
product
in
the original carton
for shipping. Cartons
not
bearing a return authorization
number
will be refused.
To
validate your warranty you will
need
to
produce
the
original sales receipt from
an
authorized Audyssey
dealer/retailer.
Other Exclusions:
This Limited Warranty is only valid for
the
original owner. It
is
noo
-transferable.
This Limited Warranty is void
if
the
label bearing
the
serial
number
has
been
removed or defaced,
or
if
the
product is
not
purchased from
an
authorized Audyssey dealer.
We
will
not
pay for shipping or transportation charges,
nor
any
other
costs.
This Limited Warranty does
not
cover damages
that
result
from:
improper
or unreasonable use;
incorrect installation, connection or packing;
removal, transportation
and
installation
of
products;
any
use
other
than
correct
use
,
as
described
in
the
user
manual;
negligence, modifications, unauthorized tampering, al-
terations or
use
of
parts
that
are
not
made
or
authorized
by Audyssey;
faulty
or
unsuitable ancillary equipment;
accidents, power surges, act
of
nature, abuse, misuse,
neglect, excess moisture, insects, lighting, water, fire,
heat, war, public disturbances
or
any
other
cause
beyond
the
reasonable control of Audyssey
and
its
authorized dealers; or
repairs
or
modifications
made
by
an
unauthorized
person.
Other Rights
This Limited Warranty gives you speciflc
le
g:
1l
r
ig
hts,
zmd
yo
u
may
also have
other
rights which va
ry
from
,·o
tll1tr
y to country
or
state
to
state
.
Warning:
To
reduce
the
risk
of
fi
re or elect
ri
cal shock, do not
expose this appliance to rain or moisture.
Caution:
To
reduce risk
of
electrical shock, do not remove cov
er
(or back).
No
user
serviceable
par
ts inside. Refer servi
ci
ng to
qualified service personnel.
Important
Safety Instructions
Read
these
instructions. All
the
safety
and
operating
instructions
should
be
read
before
the
product
is
oper
-
ated.
Retain
these
instructions. The safety
and
operating instruc-
tions should be retained for future use.
Heed all warnings
on
the
product
and
in
the
owner's guide.
Follow instructions.
All
operating
and
use
instructi
ons
should be followed.
Do
not
use this apparatus
near
water
or moisture.
For
example, do
not
use
this product
near
a bathtub,
was
hbowl,
kitchen sink, laundry tub, in a
wet
basem
ent,
ne
ar a swim-
ming
pool, or anywhere else
that
water or moisture are
present.
Clean only with a dry clo
th
and
as directed by Audyssey
Laboratories, Inc. Unplug this product from the wall outlet
before cleaning.
Do
not
place this product
on
an
unstable cart, stand, tripod,
bracket,
or
table. The product
may
fall, causing injury to a
child
or
adult,
and
damage to the product. Use only with a
cart,
stand
, tripod, bracket, or table recommended by
the
manufacturer, or sold
with
the
product.
Do
not
block any ventilation openings. Install
in
accordance

with
the
manufacturer's instructions.
To
ensure
reliable op-
eration
of
the
product
and
to protect it from overheating,
put
the
product
in a position
and
location
that
will
not
interfere
with
its proper ventilation. For example,
do
not
place
the
product
on
a bed, sofa, or similar surface
that
may
block
the
ventilation openings. Do
not
put
it
in
a built-in system,
such
as a bookcase or a cabinet
that
may
keep air from flowing
through
its ventilation openings.
Do
not
install
near
any
heat
sources,
such
as
radiators,
heat
registers, stoves, or
other
apparatus
(including amplifiers)
that
produce heat.
The
apparatus
shall
not
be
exposed
to
dripping
or
splashing
and
that
no
objects filled
with
liquids
such
as vases shall
be
placed
on
the
apparatus.
Do
not
place anything
on
top
of
this
product.
Protect
the
power
cord from being walked
on
or pinched by
items
placed
upon
or
against
them,
particularly
at
plugs,
convenience receptacles,
and
the
point
where
they exit from
the
product. The appliance coupler is
used
as
the
disconnect
device,
the
disconnect device shall
remain
readily operable.
Only
use
attachments/accessories specified by
the
manu-
facturer.
Unplug
this
apparatus
during lightning
storms
or
when
unused
for long periods
of
time
to prevent
damage
to this
product.
Refer all servicing to qualified service personnel. Servicing
is required
when
the
apparatus
has
been
damaged
in
any
way:
such
as
power supply cord or plug is damaged; liquid
has
been
spilled or objects have fallen
into
the
apparatus;
the
apparatus
has
been
exposed to rain or moisture, does
not
operate normally,
or
has
been
dropped
Do
not
attempt
to service this
product
yourself. Opening or removing covers
may
expose you
to
dangerous voltages or
other
hazards.
Please call Audyssey to
be
referred to
an
authorized service
center
near
you.
To
prevent
risk
of
fire
or
electric shock, avoid overload-
ing wall outlets, extension cords, or integral convenience
receptacles.
Do
not
let objects
or
liquids
enter
the
product
as
they
may
touch dangerous voltage points
or
short-out
parts
that
could
result in a fire
or
electric shock
and
damage to
the
product.
See product enclosure for safety-related markings.
Use proper power sources. Plug
the
product into a proper
power source, as described in
the
operating instructions
or
as
marked
on
the
product. This product
should
be
operated
only from
the
type
of
power
source indicated
on
the
marking
label. If you are
not
sure
of
the
type of
power
supply to your
home,
consu
lt your local power
company
.
FCC
WARNING
This
equipment
may
generate or
use
radio frequency energy.
Changes or modifications
to
this
equipment
may
cause
harmful
interference unless
the
modifications are expressly approved
in
the
manual.
The
user
could lose
the
authority
to
operate this
equipment
if
an
unauthorized
change or modification is
made
.
NOTICE
(in
U.S.A.
only)
This
equipment
has
been
tested
and
found
to
comply with
the
limits for a Class 2 digital device,
pursuant
to Part
15
of
the
FCC
rules. These limits are designed
to
provide reasonable protection
against harmful interference in a residential installation. This
equipment
generates, uses,
and
can
radiate radio frequency
energy and, if
not
installed
and
used in accordance
with
the
instructions,
may
cause
harmful
interference to radio
communi-
cations. However, this is no guarantee
that
interference will
not
occur in a particular installation. If this
equipment
does
cause
harmful
interference to radio
or
television reception,
which
can
be
determined
by
turning
the
equipment
off
and
on, you are
encouraged
to
try to correct
the
interference by
one
or more of
the
following measures:
Reorient or relocate
the
receiving
antenna
.
Increase
the
separation between
the
equipment
and
receiver.

Connect
the
equipment
to
an
outlet
on
a different circuit
than
the
one
to
which
the
receiver is connected.
Consult
the
dealer or
an
experienced
radionv
technician
for help.
In Canada: This Class 2 digital apparatus complies
with
the
Canadian
ICES-003.
Audyssey
and
all
other
marks
used
herein
are registered trade-
marks
or
trademarks
of
Audyssey Laboratories, Inc.
This
product
incorporates technology protected
under
the
intellectual property laws
of
the
United States
and
other
countries, including
but
not
limited to
pending
patents
. Any use
of this technology
without
the
express written authorization
of
Audyssey Laboratories, Inc. is strictly prohibited. This product
is
intended
for
home
and
other
limited viewing
uses
only un-
less otherwise authorized by Audyssey Laboratories, Inc.
The
purchase
and
use
of
this
product
constitutes acceptance
of
all
of
the
terms
set
forth herein.
U.S.
and
foreign
patents
pending
.
©
2011
Audyssey Laboratories, Inc.
All
rights reserved.
Customer
Service
For questions,
contact
Audyssey
at
213-625-4300
or
visit
www.audyssey.com/support

-
 1
1
-
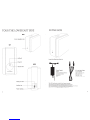 2
2
-
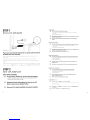 3
3
-
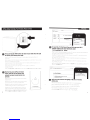 4
4
-
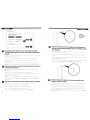 5
5
-
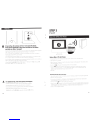 6
6
-
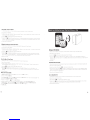 7
7
-
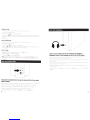 8
8
-
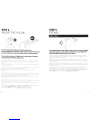 9
9
-
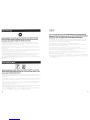 10
10
-
 11
11
-
 12
12
-
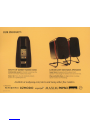 13
13
-
 14
14
-
 15
15
-
 16
16
-
 17
17
-
 18
18
-
 19
19
-
 20
20


Audyssey Audio Dock Air Schnellstartanleitung
- Typ
- Schnellstartanleitung
in anderen Sprachen
Sonstige Unterlagen
-
BW Zeppelin Air Bedienungsanleitung
-
-
PURE CONTOUR100DI Bedienungsanleitung
-
Philips DS9800W Benutzerhandbuch
-
Contour i1 Air Bedienungsanleitung
-
Panasonic SCHC58EG Bedienungsanleitung
-
-
-
GEAR4 AirZone 3 Series Benutzerhandbuch
-
Arlo Essential Indoor Camera 2nd Gen FHD (VMC2060) Schnellstartanleitung