KRK VXT 6/8 Wall Mounting Adapter Installationsanleitung
- Kategorie
- Lautsprecherhalterungen
- Typ
- Installationsanleitung

- During maintenance work, watch out for possible injuries
- Inspect bolted assemblies regularly to ensure they remain tight
- Use a damp cloth an a mild, nonabrasive detergent to clean
- the stands.
PROBLEMS
Problem - VXT sits loosely on speaker plate
Solutions - Check and tighten screws again P1
Solutions - Check speaker threads P2
Problem - VXT doesn´t keep in position
Solutions - Make sure that teeth are in mesh P4
Solutions - Check and tighten hex nuts again P3, P5
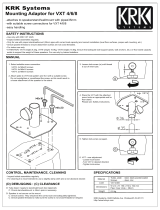
Place VXT on to the speaker plate and
use the following screws and washers:
- VXT8: 4x M8 x 20 mm screws
- VXT6: 4x M6 x 16 mm screws
Screw the monitor onto the plate.
Make sure the screws are snug, but do not
over tighten as this could strip the screws or
inserts from the VXT.
C
MAINTENANCE and CLEANING
SPECIFICATIONS
Material
Tubes, Plates - steel, black powder coated
swivel joint - zinc die-cast
screws - steel, zinc plated
Load VXT6/8 (10,9/15,6 kg)
Dimensions
Speaker plate: 150 x 150 mm,
Wall plate: 170 x 95 mm,
Depth: 276 mm
Weight 1,8 kg
KRK-Systems, 9340 DeSoto Ave. Chatsworth CA91311
http://www.krksys.com
KRK Systems
Wallmount Speaker bracket for KRK VXT6/8
- adjustable to any angle
- securely holds monitor to wall
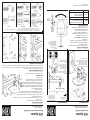
ATTACH THE VXT TO THE WALL MOUNT
TO CHANGE THE SPEAKER TILT:
1. Hold the VXT so that when you
1. loosen the hex nut it will not fall over
2. Remove the side cap
3. Loosen hex nut, (Do not remove)
4. As soon as the bracket is loose
4. enough (teeth are no longer
4. meshed together), rotate the VXT
4. to the desired position
5. Retighten the hex nut,
6. Press on cap.
TO CHANGE THE SPEAKER
DIRECTION
1. Remove the cap at the bottom
2. Loosen hex nut, (Do not remove)
3. Turn the VXT in desired position,
4. Retighten the hex nut,
5. Press on cap.
D
ADJUST THE POSITION AND ANGLE OF THE VXT
The wall adaptor has a toothed
pivot that allows for the adjust-
ment of speaker direction and
tilt angle (15 degree steps).
KRK Systems
Boxenwandhalter für VXT6/8
- verstellbar in Richtung und Neigung
- sicherer Halt des Monitors an der Wand
SICHERHEITSHINWEISE
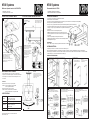
AUFBAUANLEITUNG
Sichtprüfung vornehmen, ob alle Teile vorhanden und in Ordnung sind:
1 Boxenhalteplatte mit Drehgelenk - Platte wird an den Boden der VXT geschraubt - 2 Wandplatte mit Rohren und Drehgelenk -
zur Befestigung an der Wand - 3 Schraubenschlüssel SW8/13 - 4 Inbusschlüssel SW4 - 5 Inbusschlüssel SW5 - 6 Schraube für VXT8
= M8 x 20 mm (4x) - 7 Schraube für VXT6 = M6 x 16 mm (4x)
WANDPLATTE BEFESTIGEN
1. Wandplatte an geeigneter Stelle platzieren und senkrecht ausrichten.
2. Bohrlöcher markieren.
3. Dübellöcher bohren,
3. 4 x mind. 2 x
3. - ø 6 mm für Anker-Bolzen - ø 4 mm für Holzschraube
3. - ø 8 mm für Rahmendübel - DIN571, 6mm
A
B
- Ausschließlich zur Aufnahme der KRK Modelle VXT6/8.
- Nicht für Außen- bwz. Feuchträume.
- Beachten Sie die örtlich gültigen Befestigungsanweisungen (evtl. abweichend von den Beispielen in Kapitel B).
- Montage durch ausgebildetes Installationspersonal.
- Montage nur an geeigneter Wand mit entsprechendem Montagematerial (nicht im Lieferumfang).
- Ungeeignet sind Wände die zu schwach sind oder hinter denen Strom- und Wasser-
- leitungen oder dgl. verlegt sind.Im Zweifel einen qualifizierten Fachmann zu
- Rate ziehen.
- Gewinde der VXT vorab auf Tauglichkeit prüfen.
- BEACHTE: VXT6/8 wiegen 10,9/15,6kg; beim Aufsetzen auf die
- Halterung empfiehlt es sich mit zwei oder mehr geeigneten Personen
- zu arbeiten.
- Prüfen Sie regelmäßig die Festigkeit der Installation.
- Aufmerksame Handhabung erforderlich, da die Verstellmöglichkeiten
- Einklemmgefahren bergen.
WERKZEUGE:
-Bohrer, -Wasserwaage, -Befestigungsmaterial: Anker, Dübel, Schrauben
Betonwand
Bsp.: Bolzen Anker M6 x 65 mm
aufbohren, Loch ausblasen, Anker einschlagen,
Halterung anbringen, U-Scheiben setzen, Muttern
anziehen
Lochsteine
Bsp.: Rahmendübel 8 x 80 mm mit
aufbohren, senken und ausblasen, Dübel setzen, Halterung
anbringen, Schrauben eindrehen
Holzbalken
Bsp.: Holzschraube DIN 571, ø 6 mm
aufbohren, senken und ausblasen, Halterung anbringen,
Schrauben eindrehen

KRK Systems
Wallmount Speaker bracket for KRK VXT6/8
- adjustable to any angle
- securely holds monitor to wall
SAFETY INSTRUCTIONS
INSTALLATION INSTRUCTIONS
Please check to ensure you have all of the following components:
1 speaker plate with swivel joint - this attaches to the bottom of the VXT - 2 wallplate with tube an swivel joint - this attaches to the wall
3 flat wrench SW8/13 - 4 allen wrench SW4 5 allen wrench SW5 - 6 screw VXT8 = M8 x 20 mm (4x) - 7 screw VXT6 = M6 x 16 mm (4x)
ATTACH WALL PLATE TO THE WALL
1. Find a location on the wall where you wish to mount the wall plate, ensuring that it is vertical.
2. Mark the drill holes.
3. Drill the holes for the wall plugs,
3. 4 x min. 2 x
3. - ø 6 mm for anchor bolts - ø 4 mm for wood screw
3. - ø 8 mm for dowels - DIN571, 6mm
A
B
- For use only with KRK VXT6 or VXT8 Studio Monitors
- For indoor use only
- Choose a position and wall attachment method compliant with local building codes and regulations
- For use only by trained installers
- Only for use at proper walls with adequate anchors (see B; not included in delivery)
- Not suitable for fragile walls. Beware of power supply lines and water conduits.
- If you are uncertain about your wall construction or what may lie behind it,
- consult a trained installer.
- Inspect bolted assemblies regularly.
- Keep the two grip screws 6 tightened; only loosen these screws while
- adjusting a new VXT position. NOTE: The VXT speakers are HEAVY.
- Before adjsuting hold the VXT securely so that it does not tilt over.
- In some cases, having a helper may simplify adjusting the angle and
- position of the VXT once ist installed on the wall mount.
- Check speaker threads to ensure attachment screws are
- not cross threaded.
TOOLS REQUIRED:
-Drill, -Level, -Wall anchors or molly bolts (as appropriate)
concrete wall perforated bricks
2. a. For installation into stone or masonary walls, use an appropriate wall anchor ( not supplied).
2. b. For installation on a wood or plaster wall, it is recommended that the wall adapter be attached to a supporting wall stud, or other suitable support.
2. b. The two center holes in the wall plate can be used for a stud wall installation.
wood wall
- Bei Wartungsarbeiten auf Gefährdungen achten (Klemmen etc.)
- und entsprechend sichern.
- Regelmäßig Festigkeit der Schraubverbindungen prüfen.
- Reinigen mit leicht feuchtem Tuch und nicht scheuerndem
- Reinigungsmittel.
(F)FEHLERSUCHE und (B)BESEITIGUNG
F - VXT wackelt auf dem Boxenflansch
B - Verschraubungen überprüfen und nachziehen P1
B - Gewindeeinsätze der VXT überprüfen P2
F - VXT hält die eingestellte Position nicht
B - Prüfen ob Zähne richtig im Eingriff sind P4
B - Sechskantmuttern prüfen und nachziehen P3, P5
VXT auf die Platte legen und mit den
entsprechenden Schrauben befestigen:
- VXT8: 4 x M8 x 20 mm Schrauben
- VXT6: 4 x M6 x 16 mm Schrauben
BEACHTE: Schrauben fest, aber nicht überfest
anziehen, weil sonst die Gewindeeinsätze der
VXT beschädigt werden können.
C
WARTUNG und PFLEGE
TECHNISCHE DATEN
Material
Rohre, Boxenplatte - Stahl, schwarz gepulvert
Gelenkkörper - Zink-Druckguß
Schrauben - Stahl, verzinkt
Tragelast VXT6/8 (10,9/15,6 kg)
Abmessungen
Boxenplatte: 150 x 150 mm,
Wandplatte: 170 x 95 mm,
Tiefe: 276 mm
Eigengewicht 1,8 kg
KRK-Systems, 9340 DeSoto Ave. Chatsworth CA91311
http://www.krksys.com
KRK Systems
Boxenwandhalter für VXT6/8
- verstellbar in Richtung und Neigung
- sicherer Halt des Monitors an der Wand
BEFESTIGEN DER VXT
NEIGUNG
1. VXT so halten, dass sie beim lösen
1. der Sechskantmutter nicht vornüber
1. fallen kann
2. Seitliche Kappe entfernen,
3. Sechskantmutter lösen,
3. (aber nicht herausschrauben)
4. Sobald Zähne nicht mehr greifen
4. VXT in gewünschte Neigung
4. bringen,
5. Sechskantmutter wieder anziehen,
6. Kappe wieder aufdrücken.
RICHTUNG
1. Untere Kappe entfernen,
2. Sechskantmutter lösen,
2. (aber nicht herausschrauben)
3. VXT wie gewünscht verdrehen,
4. Sechskantmutter wieder anziehen,
5. Kappe wieder aufdrücken.
D
POSITIONIEREN DER VXT
Die Wandhalterung verfügt über
ein verzahnzes Drehgelenk
welches die Verstellung der
Richtung sowie der Neigung (in
15º-Schritten) ermöglicht.
-
 1
1
-
 2
2


KRK VXT 6/8 Wall Mounting Adapter Installationsanleitung
- Kategorie
- Lautsprecherhalterungen
- Typ
- Installationsanleitung
in anderen Sprachen
Verwandte Artikel

Andere Dokumente
-
 KRK Systems VXT Series Benutzerhandbuch
-
Genelec 1032-460B Wall mount for 1032 and S30D Bedienungsanleitung
-
Nexo Geo M6 Series Benutzerhandbuch
-
Vox VXT-1 Bedienungsanleitung
-
K&M 24471 Speaker Wall Mount Black Bedienungsanleitung
-
 DOLD SAFEMASTER LG 5933 Datasheet / Operating Instructions
-
Panasonic RXD50EG Bedienungsanleitung
-
Rowenta RO2123 Bedienungsanleitung
-
König & Meyer 24140 Schnellstartanleitung
-

