
DE
EN
ES
FR
I T
NL
NO
SV
Betriebs-/Sicherheitshinweise
Operating/safety Instructions
Instrucciones de operación / seguridad
Consignes de fonctionnement/sécurité
Istruzioni per l'uso e la sicurezza
Gebruiksaanwijzing / Veiligheidsvoorschriften
Bruksanvisning / sikkerhet
Bruksanvisning / säkerhet
www.portablewinch.info
WICHTIG:
Vor Gebrauch
lesen
IMPORTANT:
Read before
using
IMPORTANTE:
Lea antes de
usar
IMPORTANT:
Lire avant
usage
IMPORTANT:
leggere prima
dell'uso
BELANGRIJK:
lees voor
gebruik
VIKTIG:
Les før du
bruker
VIKTIGT:
Läs innan du
använder
WICHTIG:
Vor Gebrauch
lesen
IMPORTANT:
Read before
using
IMPORTANTE:
Lea antes de
usar
IMPORTANT:
Lire avant
usage
IMPORTANT:
leggere prima
dell'uso
BELANGRIJK:
lees voor
gebruik
VIKTIG:
Les før du
bruker
VIKTIGT:
Läs innan du
använder
WICHTIG:
Vor Gebrauch
lesen
IMPORTANT:
Read before
using
IMPORTANTE:
Lea antes de
usar
IMPORTANT:
Lire avant
usage
IMPORTANT:
leggere prima
dell'uso
BELANGRIJK:
lees voor
gebruik
VIKTIG:
Les før du
bruker
VIKTIGT:
Läs innan du
använder
© 2022 Portable Winch Co. – All rights reserved - Printed in Canada

EU DECLARATION OF CONFORMITY
We
of PORTABLE WINCH CO.
1170 Thomas-Tremblay St.
Sherbrooke, QC J1G 5G5
CANADA
Tel: +1 819 563-2193
1) Declare that the product A) Portable Capstan Winch
B) Model PCW3000-Li
C)
Serial number 32220001 and up
2) For intented purpose Pulling non-rolling objects at
angles of +45º from horizontal
surface
3) Fullls all relevant provisions of Machines Directive 2006/42/EC
4) And also fullls all relevant provisions of
A) - 2014/30/EU Electromagnetic Compatibility Directive
B) - 2000/14/EC Directive on environmental noise emissions
C) - 2015/863 Directive on the Restriction of Hazardous
Substances in electrical and electronic
equipment.
5) Signed by :
6) Name : Pierre Roy
7) Position : Managing Director
8) Done at Sherbrooke, QC, Canada
9) On January 26th, 2022
10) The technical documentation is available from EU
Authorised Representative :
Vonblon Maschinen GmbH
Landstrasse 28
A-6714 Nüziders, Austria
DE - EU Konformitätserklärung
1) Informationen zum Produkt
A) Produktname B) Referenz C) Seriennummer
2) Bestimmungsgemäßer Gebrauch : Ziehen von nicht rollenden Gegenständen in einem
Winkel von +45º zur horizontalen Fläche
3) Erfüllt alle relevanten Bestimmungen der Maschinenrichtlinie 2006/42/EG
4) Erfüllt auch alle relevanten Bestimmungen der
A) EMV-Richtlinie
B) Richtlinie Geräuschemissionen im Freien
C) Richtlinie zur Beschränkung der Verwendung bestimmter gefährlicher Stoffe in Elektro- und
Elektronikgeräten.
5) Unterschrift
6) Name
7) Position
8) Geschehen am
9) Datum
10) EU-Zulassungsbeauftragter
SV - EU Försäkran om överenstämmelse
1) Produktinformation
A) Produktnamn B) Artikelnummer C) Serienummer
2)
Avsedd användning : Dra icke-rullande föremål i en vinkel på ungefär 45 grader på en horisontell yta
3) Uppfyller maskindirektivet 2006/42/EC.
4) Och uppfyller också alla relevanta bestämmelser i
A) Direktivet om elektromagnetisk kompatibilitet
B) Direktivet om buller i miljön
C) Direktiv om användning av vissa farliga ämnen i elektrisk och elektronisk.
5) Underskrivet av
6) Namn
7) Befattning
8) Utfärdat i
9) Datum
10) Auktoriserad EU-representant
NL - EU Verklaring van overeenstemming
1) Productinformatie
A) Naam van het product B) Onderdeelnummer C) Serienummer
2) Beoogd gebruik : Het trekken van niet-rollende objecten op een hoek van +45º op een
horizontaal oppervlak
3) In overeenstemming met de ‘machine’ richtlijn 2006/42/EC
4) En voldoet ook aan alle relevante bepalingen van de
A) EMC-richtlijn
B) Richtlijn Omgevingslawaai
C) Richtlijn betreffende de beperking van het gebruik van bepaalde gevaarlijke stoffen in elektrische en
elektronische apparatuur.
5) Getekend door
6) Naam
7) Positie
8) Gedaan te
9) Datum
10) Gemachtigd vertegenwoordiger van de EU
NO - EU SAMSVARSERKLÆRING
1) Produktinformasjon
A) Produktnavn B) Referanse C) Serienummer
2) Tiltenkt bruk : Trekk ikke-rullende gjenstander ved vinkler på 45º på en horisontal overate.
3) I samsvar med «Maskiner»-direktivet 2006/42/EF
4) Og oppfyller også alle relevante bestemmelser i
A) Direktivet om elektromagnetisk kompatibilite
B) Direktivet om miljøstøyutslipp
C) Direktivet om bruk av visse farlige stoffer i elektrisk og elektronisk utstyr.
5) Signert av
6) Navn
7) Stilling
8) Laget i
9) Datert
10) EU-autorisert representant
IT - EU Dichiarazione di conformità
1) Informazioni sul prodotto
A) Nome del prodotto B) Numero di parte C) Numero di serie
2) Uso previsto : Trazione di oggetti non rotanti ad angoli di +45º su una supercie orizzontale.
3) Conforme alla direttiva “Macchine” 2006/42/CE .
4) Ed è anche conforme a tutte le disposizioni pertinenti del
A) Direttiva sulla Compatibilità elettromagnetica
B) Direttiva concernente l’emissione acustica ambientale
C) Direttiva sulla restrizione dell'uso di determinate sostanze pericolose nelle
apparecchiature elettriche ed elettroniche.
5) Firmato da
6) Nome
7) Posizione
8) Fatto a
9) Data
10) Rappresentante autorizzato dell'UE
FR - EU Déclaration de conformité
1) Informations sur le produit
A) Nom du produit B) Référence C) Numéro de série
2) Utilisation prévue : Tirer des objets non roulants à des angles de +45º par rapport à la surface
horizontale.
3) Respecte toutes les dispositions pertinentes de la directive 2006/42/CE relative aux machines.
4) Et répond également à toutes les dispositions pertinentes de la
A) Directive de compatibilité électromagnétique
B) Directive des émissions sonores dans l’environnement
C) Directive relative à la limitation de l’utilisation de certaines substances dangereuses
dans les équipements électriques et électroniques.
5) Signature
6) Nom
7) Fonction
8) Fait à
9) Date
10) Représentant autorisé de l'UE
ES - EU Declaración de conformidad
1) Información sobre el producto
A) Nombre del producto B) Número de pieza C) Número de serie
2) Uso previsto : Tracción de objetos no rodantes a ángulos de +45º sobre una supercie
horizontal.
3) Conforme a la directiva de “Máquinas” 2006/42/CE
4) Y también cumple con todas las disposiciones pertinentes de la
A) Directiva de Compatibilidad Electromagnética
B) Directiva de emisiones de ruidos ambientales
C) Directiva sobre restricciones a la utilización de determinadas sustancias peligrosas en aparatos
eléctricos y electrónicos.
5) Firmado por
6) Nombre
7) Cargo
8) Realizado en
9) Fecha
10) Representante autorizado de la UE

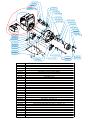
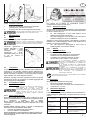
10-0428
10-0422
10-0519
10-0415
10-0135 10-0136
32-0008
43-0057
10-0129
10-0131
10-0102
31-0010
35-0004
10-0098
PCA-1281
35-0004
32-0055
10-0421
32-0016
35-0004
10-0098
PCA-1281
35-0004
33-0005
44-0025
10-0431 32-0056
44-0185
10-0517
39-0026
32-0051
32-0001
10-0516
31-0081
10-0520
31-0081
10-0098
BUSHING FOR SAFETY HOOK
10-0102
RETAINING WASHER (1/4 X 1-1/4 OD) - ZN
10-0129
CAPSTAN DRUM 76 MM
10-0131
ROPE GUIDE FOR CAPSTAN DRUM 76 MM
10-0132
ENGINE ALUMINUM COUPLING PCW3000
10-0135
ROPE EXIT HOOK PCW3000 SERIES
10-0136
ROPE ENTRY HOOK FOR SERIES 3000 AND 4000 WINCHES
10-0415
FULL GEARBOX 200:1
10-0421
GROUND PLATE
10-0422
HOUSING-PLATE JUNCTION
10-0431
BATTERY COVER WITH SPRING AND PIN
10-0432
ELECTRIC POWER HEAD 1.0kW BLACK WITHOUT COVER
10-0516
COUPLING GEARBOX SIDE
10-0517
COUPLING MOTOR SIDE
10-0519
ROUND SLOTTED NUT M10x1.25 - ZN
10-0520
COUPLING FLEXIBLE CENTER
31-0001
SHCS M6-1 X 20 MM - ZN
31-0010
HCS 1/2-13 X 6 - GR5 - ZN
31-0081
HEX-SLOTTED FLANGED THREAD CUTTING SCREW 6-32 X 1/4 - ZN
32-0001
SHCS M6-1 X 20 MM - ZN
32-0008
HEX FLANGE SERRATED BOLT M8-1.25 X 16MM - ZN
32-0016
BHCS M6-1 X 35 MM - SS
32-0051
SHCS M6-1 X 16 MM - SS
32-0055
BHCS M5-0,8 X 8 MM - SS
32-0056
HEX FLANGE SERRATED BOLT M6-1.0 X 20mm - ZN
33-0005
NUT 1/2-13 NYLON - ZN
35-0004
FLAT WASHER 1/2 - ZN
39-0026
RETAINING RING EXT. 25 MM
43-0057
KEY FOR CAPSTAN DRUM 76 MM (8 MM X 30 MM)
44-0025
LABEL - ROPE INSTALLATION PCW3000
44-0185
LABEL FOR AUDITIVE PROTECTION
PCA-1281
SAFETY HOOK WITH LATCH


DE
EN
ES
FR
I T
NL
NO
SV
Betriebs-/Sicherheitshinweise
Operating/safety Instructions
Instrucciones de operación / seguridad
Consignes de fonctionnement/sécurité
Istruzioni per l'uso e la sicurezza
Gebruiksaanwijzing / Veiligheidsvoorschriften
Bruksanvisning / sikkerhet
Bruksanvisning / säkerhet
www.portablewinch.info
WICHTIG:
Vor Gebrauch
lesen
IMPORTANT:
Read before
using
IMPORTANTE:
Lea antes de
usar
IMPORTANT:
Lire avant
usage
IMPORTANT:
leggere prima
dell'uso
BELANGRIJK:
lees voor
gebruik
VIKTIG:
Les før du
bruker
VIKTIGT:
Läs innan du
använder
WICHTIG:
Vor Gebrauch
lesen
IMPORTANT:
Read before
using
IMPORTANTE:
Lea antes de
usar
IMPORTANT:
Lire avant
usage
IMPORTANT:
leggere prima
dell'uso
BELANGRIJK:
lees voor
gebruik
VIKTIG:
Les før du
bruker
VIKTIGT:
Läs innan du
använder
WICHTIG:
Vor Gebrauch
lesen
IMPORTANT:
Read before
using
IMPORTANTE:
Lea antes de
usar
IMPORTANT:
Lire avant
usage
IMPORTANT:
leggere prima
dell'uso
BELANGRIJK:
lees voor
gebruik
VIKTIG:
Les før du
bruker
VIKTIGT:
Läs innan du
använder
© 2022 Portable Winch Co. – Alle Rechte vorbehalten - Gedruckt in Kanada

1
DIE ORIGINALSPRACHE DIESES
DOKUMENTS IST ENGLISCH
EINFÜHRUNG
Portable Winch Co. dankt Ihnen für den Kauf einer Portable
Capstan WinchTM. Diese Bedienungsanleitung wurde erstellt, damit
Sie Ihre neue Winde bestmöglich und auf die sicherste Art
verwenden können.
LESEN SIE DIESE VOR VERWENDUNG DER WINDE SORGFÄLTIG DURCH.
Falls Sie Probleme oder Fragen haben, wenden Sie sich bitte an
einen autorisierten Portable Winch Co. Händler oder nehmen Sie
direkt mit uns Kontakt auf.
1 Sicherheitsrichtlinien
Die Portable Capstan Winches
TM
wurden dazu entworfen objekte zu
ziehen im Allgemeinen bei Winkeln von mehr oder weniger 45 Grad
zur Horizontalen. Die Verwendung einer Winde ist mit ernsten
Verletzungsrisiken, möglicher Sachbeschädigung oder sogar mit
Lebensgefahr behaftet.
1.1 Sicherheitshinweise.
Ihre Sicherheit und die Sicherheit anderer sind sehr wichtig. Sie
nden wichtige Sicherheitshinweise in dieser Bedienungsanleitung.
Bitte lesen Sie diese sorgfältig
.
Diese Sicherheitshinweise dienen zur Warnung vor
Verletzungsgefahr für Sie oder andere Personen. Vor jedem
Sicherheitshinweis steht ein Warnsymbol.
UNTERSCHÄTZEN SIE DIE POTENTIELLEN GEFAHREN NICHT
1.2. Umweltschutz.
Der Akku enthält umweltschädliche Materialien, die für Sie
gefährlich sind. Er muss entfernt werden und separat bei einer
Batterieannahmestelle, die Lithium-Ionen-Akkus annimmt, entsorgt
werden.
1.3 Akku und Ladegerät.
1.3.1 Kompatible Akkus.
Hier ist ein nicht ausschließliche Liste kompatibler Akku-Modelle:
�GREENWORKS PRO 80V – 2Ah.
�GREENWORKS PRO 80V – 4Ah.
�GREENWORKS COMMERCIAL 82V – 2.5Ah.
�GREENWORKS COMMERCIAL 82V – 5Ah.
�POWERWORKS 82V – 2.5Ah.
�POWERWORKS 82V – 5Ah.
�CRAMER 82V – 3Ah.
�CRAMER 82V – 6Ah.
�STIGA VOLTAGE 80V – 2.5Ah.
�STIGA VOLTAGE 80V – 4Ah.
�STIGA VOLTAGE 80V – 5Ah.
�BRIGGS & STRATTON 82V MAX – 2Ah.
�BRIGGS & STRATTON 82V MAX – 4Ah.
�BRIGGS & STRATTON 82V MAX – 5Ah.
Um eine Liste kompatibler Akkus einzusehen, gehen Sie zu unserer
Webseite www.portablewinch.info oder nehmen Sie mit uns
Kontakt auf.
LADEN SIE DEN AKKU AN EINEM TROCKENEN, VOR
WETTEREINFLÜSSEN GESCHÜTZTEN ORT. SCHÜTZEN SIE
DAS LADEGERÄT UND DEN AKKU VOR REGEN.
LADEN SIE DEN AKKU NIE IN EINER FEUCHTEN
UMGEBUNG. VERWENDEN SIE DAS LADEGERÄT BEI
TEMPERATUREN ZWISCHEN 7 UND 40ºC (45 UND 104 ºF).
UM DAS RISIKO EINES STROMSCHLAGS ZU REDUZIEREN,
VERWENDEN SIE NUR DAS VOM HERSTELLER
VORGESEHENE LADEGERÄT ZUM LADEN DES AKKUS
UND LAGERN SIE DAS GERÄT NIE DRAUSSEN.
BEHANDELN SIE DAS NETZKABEL DES LADEGERÄTS
SORGFÄLTIG.
NIE DAS LADEGERÄT AM NETZKABEL TRAGEN.
NIE DEN AKKU ZERQUETSCHEN, FALLEN LASSEN ODER
ANDERWEITIG BESCHÄDIGEN. NIE EINEN AKKU ODER
EIN AKKULADEGERÄT VERWENDEN; DASS GEFALLEN,
GEQUETSCHT, EINER STARKEN ERSCHÜTTERUNG
AUSGESETZT ODER ANDERWEITIG BESCHÄDIGT
WURDE. BEI BESCHÄDIGTEN AKKUS BESTEHT
EXPLOSIONSGEFAHR.
ENTSORGEN SIE BESCHÄDIGTE AKKUS SOFORT MITTELS
EINER ANGEMESSENEN METHODE.
WENN DER AKKU NICHT IN VERWENDUNG IST, HALTEN
SIE IHN VON METALLISCHEN OBJEKTEN WIE:
BÜROKLAMMERN, MÜNZEN, NÄGELN, SCHRAUBEN
UND ANDEREN KLEINEN METALLISCHEN OBJEKTEN
FERN.
BEI BESCHÄDIGUNG DAS LADEGERÄT NICHT WEITER
VERWENDEN. ERSETZEN SIE UMGEHEND DAS
LADEGERÄT ODER SEINE KABEL.
HALTEN SIE DAS LADEGERÄT VON WASSER,
HITZEQUELLEN (HEIZKÖRPER, HEIZGERÄTE, ÖFEN, ETC.),
OFFENEM LICHT UND CHEMIKALIEN FERN.
DRAHTLOSE GERÄTE NIE IN DER NÄHE VON OFFENEM
LICHT VERWENDEN.
STELLEN SIE VOR DER VERWENDUNG DES LADEGERÄTS
SICHER, DASS DER AKKU SICHER IM LADEGERÄT
EINGESETZT IST.
DER AKKU HEIZT SICH WÄHREND DES
LADEVORGANGS LEICHT AUF. DAS IST NORMAL UND
KEIN ANZEICHEN EINES PROBLEMS.
LADEGERÄT NIE AN EINEM EXTREMEN TEMPERATUREN
(HEISS ODER KALT) AUSGESETZTEN ORT PLATZIEREN. ES
FUNKTIONIERT AM BESTEN BEI RAUMTEMPERATUR.
WENN DER AKKU VOLL GELADEN IST, NETZSTECKER
DES LADEGERÄTS ZIEHEN UND AKKU ENTFERNEN.
HALTEN SIE DEN AKKU SAUBER, TROCKEN, SOWIE ÖL-
UND FETTFREI. VERWENDEN SIE STETS EINEN SAUBEREN
LAPPEN ZUR REINIGUNG. VERWENDEN SIE NIE
PRODUKTE AUF BREMSFLÜSSIGKEITS-, BENZIN- ODER
ÖLBASIS, ODER LÖSEMITTEL, UM DEN AKKU ZU
REINIGEN.
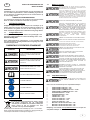
SYMBOL BEDEUTUNG
BEI NICHTBEACHTUNG DIESER
VORSCHRIFTEN BESTEHT HÖCHSTE
LEBENSGEFAHR.
BEI NICHTBEACHTUNG DIESER
VORSCHRIFTEN BESTEHT DIE
MÖGLICHKEIT SCHWERSTER
VERLETZUNGEN ODER HÖCHSTER
LEBENSGEFAHR.
BEI NICHTBEACHTUNG DIESER
VORSCHRIFTEN BESTEHT
VERLETZUNGSGEFAHR.
LESEN SIE DAS HANDBUCH
GEHÖRSCHUTZ
AUGEN GEHÖRSCHUTZ
HANDSCHUHE TRAGEN
Alt-Elektroartikel dürfen nicht mit dem Hausmüll
entsorgt werden. Recyceln Sie diese über die
bestehenden Einrichtungen. Weitere Informationen
über die Recycling-Möglichkeiten erfahren Sie bei
Ihren Kommunalbehörden.
ALLE 80V UND 82V AKKUS DES HERSTELLERS GLOBE
TOOLS KÖNNEN MIT IHRER PCW3000-Li WINDE
VERWENDET WERDEN.
DE

2
DE
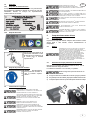
1.4 Kennzeichnungen.
1.4.1 Seriennummernschilder.
Das Seriennummernschild bendet sich auf der rechten Seite
des Windengetriebes. Zusätzlich zur Seriennummer der Winde
nden Sie hier auch die wichtigsten Spezikationen Ihres Modells.
1.4.2 Motorenetikett.
1.4.3 Seilführungsetikett.
1.4.4 Gehörschutzetikett.
1.5 Sicherheitsinformation.
2 Prüfung vor der Verwendung
2.1 Beim Erhalt der Winde.
Kontrollieren Sie die Verpackung auf sichtbare Schäden. Im Falle
von Beschädigung oder fehlender Teile informieren Sie
unverzüglich das Transportunternehmen.
2.2 Akku.
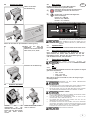
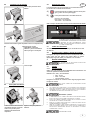
2.3 Montage der Akku-Schutzabdeckung.
Diese Abdeckung dient dazu, 4,0 - 5,0 Ah Akkus außerhalb des
Gehäuses vor Regen zu schützen. Der Deckel wird mit einer Feder
und einem Stift geliefert.
A) Setzen Sie die Feder in den Gehäusehohlraum ein, dann den
Stift.
B) Platzieren Sie die Abdeckung in dem anderen Hohlraum und
drücken Sie die Stange gegen die Feder.
C) Positionieren Sie den Deckel, indem Sie den Stift festhalten,
bis er in das Gehäuse einrastet.
ERSETZEN SIE ALLE BESCHÄDIGTEN,
UNLESERLICHEN ODER ZERRISSENEN
SICHERHEITSKENNZEICHNUNGEN.
ZUSCHAUER STETS AUSSERHALB DES ARBEITSBEREICHS
HALTEN.
BEIM WINDEN, ALSO WENN DAS SEIL UNTER
SPANNUNG STEHT, STELLEN SIE SICHER, DASS SICH
NIEMAND NÄHER ALS 5 M AN DER LAST ODER DEM SEIL
BEFINDET.
NIE ROLLLENDES MATERIAL ZIEHEN, ÜBER DAS SIE DIE
KONTROLLE VERLIEREN KÖNNTEN.
DIE PORTABLE CAPSTAN WINCHTM IST NICHT ZUM
HEBEN VON LASTEN GEEIGNET ODER PERSONEN.
WIR EMPFEHLEN, DASS SIE WÄHREND DER BENUTZUNG
GEHÖRSCHUTZ TRAGEN.
HALTEN SIE IMMER EINEN VISUELLEN KONTAKT
ZWISCHEN DEM BENUTZER UND DEN SPEKTATOREN, UM
EINE GUTE KOMMUNIKATION ZU GEWÄHRLEISTEN.
Diese Kennzeichnung bendet
sich auf dem Windengehäuse.
Es zeigt die Richtung der
Seilführung bei der Portable
Capstan WinchTM.
FÜHREN SIE DIE FOLGENDE OPERATION IN EINEM
GEBÄUDE DURCH:
A B
C
44-0185:
Wir empfehlen, bei der
Verwendung der Portable
Capstan Winch
TM
Gehörschutz
zu tragen.
44-00185
DIE PORTABLE CAPSTAN WINCHTM DARF NICHT VON
KINDERN VERWENDET WERDEN. HALTEN SIE KINDER
UND TIERE VOM ARBEITSBEREICH FERN.
DIE PORTABLE CAPSTAN WINCHTM DARF NICHT VON
UNGESCHULTEN PERSONEN VERWENDET WERDEN.
STELLEN SIE SICHER; DASS DIESE DIE
SICHERHEITSANWEISUNGEN UND DIESES HANDBUCH
GELESEN HABEN.
INFORMIEREN SIE ALLE BENUTZER ÜBER DIE
SICHERHEITSRICHTLINIEN UND NUTZUNGSVORSCHRIFTEN.
MACHEN SIE SICH VOR DER DEM ARBEITSBEGINN MIT
DER CAPSTAN WINCHTTM MIT DER BEDIENUNG DES
PRODUKTS UND DEN SICHERHEITSRICHTLINIEN
VERTRAUT.
STELLEN SIE SICHER, DASS SICH IHRE BEKLEIDUNG
NICHT IN DEN BEWEGLICHEN TEILEN DER CAPSTAN
WINCHTTM VERFANGEN KANN.
ZUM KAUFZEITPUNKT IST DER AKKU NUR HALB GELADEN.
BEVOR SIE IHRE PORTABLE CAPSTAN WINCHTM ZUM
ERSTEN MAL VERWENDEN, BEFOLGEN SIE ALLE
ANWEISUNGEN UND RICHTLINIEN, DIE IN DEN
HANDBÜCHERN VON AKKU UND LADEGERÄT
AUFGEFÜHRT SIND. ENTFERNEN SIE DEN AKKU, BEVOR SIE
DIE PORTABLE CAPSTAN WINCHTM FÜR LÄNGERE ZEIT
EINLAGERN. LADEN SIE DEN AKKU WIEDER FÜR
MINDESTENS EINEN KOMPLETTEN LADEZYKLUS, BEVOR SIE
DIE PORTABLE CAPSTAN WINCHTM ERNEUT VERWENDEN.
DIESER AKKU ZEIGT KEINEN MEMORY-EFFEKT.

DE
3
2.4 Montage des Akkus.
2.5 Entfernen des Akkus.
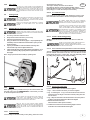
2.6 Motor starten.
Die Motorsteuerung kann auf dem Motorgehäuse
oberhalb des Batteriefachs gefunden werden.
Hinweis: Eine höhere Geschwindigkeit reduziert die Betriebszeit des Akkus.
2.7 Capstantrommel.
Ihre Portable Capstan WinchTM ist mit Trommel Durchmesser 76 mm.
2.8 Raum zwischen Trommel und Seilführung.
Durch Verschleiß an Seilführung oder Seiltrommel kann ein
Spalt zwischen den beiden Teilen entstehen, der das Seil
beschädigen könnte. Tauschen Sie den Seilführungsring und/
oder die Seiltrommel aus, falls erforderlich.
3 Verwendung der Winde
3.1 Seil
3.1.1 Seiltyp
Nur Seile mit niedriger Elastizität verwenden. Wir empfehlen ein doppelt
geochtenes Polyesterseil.
▪Min : 10 mm
▪Max : 12-13 mm
▪Empfohlen : 10 mm
Bitte nehmen Sie mit uns Kontakt auf, wenn Sie Fragen wegen
des Seiltyps haben.
DIE MEISTEN SITUATIONEN WÄHREND DES
WINDENVORGANGS BERGEN POTENTIELLE GEFAHREN!
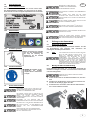
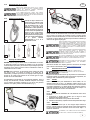
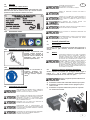
Setzen Sie den Akku ein (Kunststoteil in Richtung Fach)
Önen Sie die Akku-
Schutzabdeckung.
Halten Sie den Gri der
PORTABLE CAPSTAN
WINCHTMund schieben Sie den
Akku hinein, bis es „klickt“.
Schließen Sie die Abdeckung.
Drücken Sie die
Akkulösetaste, die sich
oberhalb des Akkus bendet.
Damit kann der Akku einfach
aus dem Gerät entfernt
werden.
Halten Sie den Gri, um den
Akku zu entfernen.
A) Betrieb der Einheit: Drücken Sie zweimal zum
Einschalten und drücken Sie erneut zum
Ausschalten.
B) Drücken Sie, um die Geschwindigkeit des
Motors festzulegen.
Einmal = 8,1 m/Minute.
Zweimal = 9,9 m/Minute.
Dreimal = 11,6 m/Minute.
1B1A
DER LITHIUM-IONEN-AKKU IST MIT EINEM UNTERBRECHER
AUSGERÜSTET, DER AUTOMATISCH BEI ÜBERLASTUNG DAS
GERÄT UNTERBRICHT. STELLEN SIE IN DIESEM FALL DAS
GERÄT AUS, INDEM SIE DIE TASTE „A“ (SIEHE ABBILDUNG)
DRÜCKEN.
VERWENDEN SIE KEIN GELBES DREISTRÄNGIGES
POLYPROPYLENSEIL!
●POLYPROPYLEN- UND POLYETHYLENSEILE SIND WEGEN IHRER ELASTIZITÄT
UND DES NIEDRIGEN SCHMELZPUNKTES BEIM ZIEHEN GEFÄHRLICH.
●STELLEN SIE SICHER, DASS DAS SEIL KEINE BESCHÄDIGUNGEN AUFWEIST
UND AUSREICHENDEN WIDERSTAND FÜR DIE ZU ZIEHENDE LAST BIETET.
DEHNUNG = GEFAHR!
●EIN SICH DEHNENDES SEIL KANN ZU SCHWEREN VERLETZUNGEN FÜHREN.
VORSICHT BEIM VERRINGERN DER SEILSPANNUNG.
●ALLE SEILE DEHNEN SICH: VERGRÖSSERTE LÄNGE: JE MEHR AM SEIL
GEZOGEN WIRD, DESTO MEHR DEHNT ES SICH.
●DAS DEHNEN DES SEILS KANN DAZU FÜHREN, DASS SICH DIE LAST
UNERWARTET UND GEFÄHRLICH BEWEGT.
●DAS DEHNEN DES SEILS KANN DAZU FÜHREN, DASS ES SICH ENTSPANNT
UND SCHNELL ZURÜCKZIEHT, WODURCH IHRE HAND IN RICHTUNG AUF DIE
WINDE GEZOGEN WERDEN ODER ES ZU SCHWEREN VERBRENNUNGEN
KOMMEN KANN. DAS SEIL NIEMALS UM IHRE HAND WICKELN.
STETS HANDSCHUHE TRAGEN.

DE
4
3.1.2 Seilwartung.
3.1.3 Empfohlene Knoten.
3.2 Verankern der winde.
MÖGLICHKEIT 1 : In den meisten Fällen wird die Winde an einem
xierten Objekt mittels einer Polyesterschlinge oder mit einem unserer
optionalen Anker verankert und das Seil wird an dem Objekt befestigt, das
Sie zu bewegen versuchen. Die Last bewegt sich auf die Winde zu,
während die Winde am Seil zieht.
MÖGLICHKEIT 2 : Manchmal kann die Winde an dem Objekt befestigt
werden, das Sie bewegen möchten und das Seil wird an einem xierten
Objekt befestigt. Die Winde wird mit dem zu bewegenden Objekt auf den
Verankerungspunkt des Seils hingezogen. Diese Methode ist nützlich,
wenn Sie die Last während des Betriebs der Winde führen möchten.
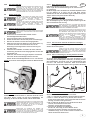
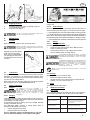
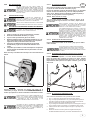
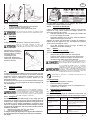
Ihre Winde wird mit einer Polyesterschlinge. Um die Winde zu verankern,
schlingen Sie diese mit der Schlinge um den Verankerungspunkt. Führen
Sie Schlinge in jeweils einen Haken der Winde an der Rückseite der Winde
ein (Abb. 1).
Platzieren Sie die Winde in der Richtung in der die Last gezogen
werden soll. Wenn die Winde eingeschaltet wird, wird sie von
selbst versuchen, sich mit der Last auszurichten. Die Reibung der
Schlinge gegen den Anker kann die korrekte Ausrichtung
verhindern. In diesem Fall lösen Sie die Seilspannung
und bewegen Sie die Schlinge so, dass die Spannung
gleichmäßig auf die zwei Haken verteilt wird.
Wir bieten auch viel Zubehör zu unseren Capstan-Winden an.
Gehen Sie auf www.portablewinch.info
3.4 Seil auegen.
Die große Vielfalt der Situationen, die sich während des
Zugvorgangs ergeben können, hindert uns daran, spezische
Anweisungen für jede Situation zu geben; Sie sollten jedoch die
folgenden Punkte berücksichtigen:
3.4.1 Seil.
Verwenden Sie ein Seil mit geringer Elastizität in einem guten Zustand mit
einem Mindestdurchmesser von 10 mm und einem maximalen
Durchmesser von 12 -13 mm bei zusammen mit guten Knoten. Wir
empfehlen sehr, den Palstek zu verwenden (siehe Abschnitt 3.1.3).
Verwenden Sie Rollen, um das Seil umzulenken und die Zugkraft zu
erhöhen, wenn die Last die Zuggrenze der Winde erreicht oder übersteigt.
3.4.2 Rolle.
Die Verwendung einer Rolle über kurze Distanz bietet mehrere Vorteile:
● Bietet einen Winkel, der es zulässt, die Last leicht
anzuheben, um die Reibung zu verringern;
● Hält die Winde in einer fast horizontalen Position;
● Hält Winde und Bediener außerhalb des Lastpfads.
3.4.3 Richtung.
Führen Sie das Seil so, dass es während des Zugs nicht an irgendwelchen
Objekten reibt. Versuchen Sie, das Seil so zu führen, dass das Vorderteil
der Last leicht erhöht ist. Ziehen Sie nie nach unten oder durch Hindernisse.
WAS SIE NICHT TUN DÜRFEN: WENN SIE DIE SCHLINGE ZUR
VERANKERUNG DER WINDE BEFESTIGEN, VERMEIDEN SIE
ES, EINMAL KOMPLETT UM DEN VERANKERUNGSPUNKT
ZU GEHEN (ABB. 2). DADURCH WIRD VERHINDERT, DASS
SICH DIE WINDE SELBST RICHTIG MIT DER LAST
AUSRICHTET. ES KOMMT DADURCH AUCH ZU EINEM
UNGLEICHEN ZUG AUF DIE HAKEN.
VERMEIDEN SIE ES, DIE SCHLINGE UM SCHARFE KANTEN
ZU LEGEN, DIE WAHRSCHEINLICH ZUR BESCHÄDIGUNG
DER POLYESTERSCHLINGE FÜHREN KÖNNTEN. WENN SIE
EINEN PFAHL, BAUM ODER BAUMSTUMPF ALS
VERANKERUNGSPUNKT VERWENDEN, BEFESTIGEN SIE
DIE SCHLINGE NAHE DER BASIS.
DIE VERANKERUNG UM EINEN BAUMSTUPF ERFORDERT
BESONDERE SORGFALT, UM ZU VERMEIDEN, DASS DIE
SCHLINGE OBEN ÜBER DEN BAUMSTUMPF ABRUTSCHT.
STELLEN SIE SICHER, DASS DER VERANKERUNGSPUNKT
DEN WINDENKRÄFTEN WIDERSTEHEN KANN, OHNE ZU
BRECHEN, HERAUSGERISSEN ZU WERDEN, ODER
BESCHÄDIGT ZU WERDEN.
1
VOR JEDER VERWENDUNG EINE SICHTPRÜFUNG DES
SEILS DURCHFÜHREN. WENN ES DEUTLICHE ZEICHEN
VON VERSCHLEISS ZEIGT (DURCHTRENNTE STRÄNGE,
ÜBERMÄSSIGER ABRIEB); DANN WECHSELN SIE ES AUS.
FALLS IHR SEIL SCHMUTZIG IST, REINIGEN SIE ES. EIN
SCHMUTZIGES SEIL KANN SCHNELL BESCHÄDIGT
WERDEN UND ZU VORZEITIGEM VERSCHLEISS DER TEILE
FÜHREN, MIT DENEN ES IN KONTAKT KOMMT.
Sie müssen die Last am Ende des
Seils befestigen. Obschon
manchmal ein einfacher Knoten
reicht, empfehlen wir die
Verwendung eines Palsteks (Abb.
1). Dieser Knoten erhält etwa 70
% der Stärke des Seils, während
die meisten Knoten die Stärke
des Seils um 50 % oder mehr
reduzieren. Außerdem kann er
leicht nach dem Ziehen einer
schweren Last gelöst werden.
Noch besser ist ein doppelter
Palstek (Abb. 2), der etwa 75 %
der Seilkapazität erhält.
1
1
2
2
DIE RICHTIGE SEILFÜHRUNG IST DER SCHLÜSSEL ZUR
SICHEREN VERWENDUNG DER WINDE.
IM ALLGEMEINEN IST DER AUFBAU FALSCH, WENN DAS
DE SEIL WÄHREND DES ZUGS DEN BODEN BERÜHRT.

DE
5
3.4.4 Auf einem Abhang.
3.5 Ziehen einer Last.
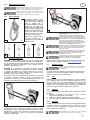
3.5.1 Wickeln des Seils um die Capstantrommel.
1. Drücken Sie den An/Ausschalter zweimal und den
Geschwindigkeitsschalter einmal.
2. Führen Sie das Seil durch den Einstiegshaken.
3. Wickeln Sie das Seil um die Trommel (3 oder 4 Umdrehungen).
4. Nehmen Sie das Seil von hinter dem Ausgangshaken.
5. Halten Sie einen sicheren Abstand von der Winde (etwa 1 m)
und ziehen Sie leicht und horizontal am Seil, bis der
Durchhang im Seil aufgenommen wurde und Sie Zug auf
dem Seil spüren.
6. Prüfen Sie Ihre Installation und stellen Sie sicher, dass die
Verankerung der Winde und der Eingangshaken mit dem Seil
ausgerichtet sind.
7.
Prüfen Sie, dass das Seil nicht gegen Objekte in seinem Pfad
reibt. Wenn Sie die Geschwindigkeit erhöhen möchten,
drücken Sie die Geschwindigkeitstaste noch ein- oder zweimal.
Hinweis: Eine höhere Geschwindigkeit reduziert die Betriebszeit des
Akkus.
3.5.2 Ziehen.
Positionieren Sie sich beim Ziehen so, dass Sie die Winde und die
Last sehen können. Ziehen Sie das Seil HORIZONTAL. Die
Spannung, die Sie auf das Seil ausüben, hält die Winde stabil.
3.5.2.1 Wenn das Seil rutscht.
Falls das Seil auf der Trommel rutscht, während Sie
ziehen, fügen Sie eine Seilumdrehung um die Trommel hinzu
(4. Umdrehung)
Der Motor stoppt, wenn die Winde ihre maximale Kapazität erreicht
hat. Ein Warnton ist zu hören und die LED blinkt viermal.
Wiederholen Sie dann die Installation (fügen Sie Rollen hinzu) oder
„wippen“ Sie die Last (siehe nächster Abschnitt).
3.5.2.2 „Wippen“ einer Last.
Ziehen Sie für einen kurzen Moment kräftig an und lassen Sie
dann die Seilspannung nach. Bringen Sie dann wieder Zug auf das
Seil und wiederholen Sie wie nötig.
3.5.2.3 Um eine Pause während des Ziehens einzulegen.
Lassen Sie langsam die Seilspannung sinken und lassen Sie das
Seil über die Trommel gleiten.
3.5.2.4 Falls es notwendig ist, den Zug auf dem Seil beim
Neustart beizubehalten.
Sie können einen Stopperknoten oder einen Prusikknoten in der
Verbindung zu Ihrem Ankerpunkt verwenden, um den Zug auf dem
Seil beizubehalten. Sie können auch eine selbstsichernde Rolle
PCA-1271 oder PCA-1272 verwenden. Diese sind besonders
nützlich für den Zug rollender Objekte und für gerichteten Einschlag
3.5.2.5 Wenn Ihr Seil zu kurz ist.
Wenn Ihr Seil zu kurz ist, verbinden Sie zwei Seile:
1.
Abb. 1-1: Verwenden Sie 2 Palsteks, um die zwei Seile zu verbinden.
2. Abb. 1-2: Lassen Sie etwa 1 m (3‘) Seil frei, bevor Sie den
Knoten des Zugseils setzen. Diese Länge Seil wird zum Ziehen
benötigt, wenn der Knoten gelöst wird.
3.
Abb. 2: Halten Sie die Winde an, bevor die Knoten die Winde
erreichen, denn die Knoten können nicht
passieren und das Seil wird verwirren.
4. Lösen Sie die Seilspannung. Befestigen
Sie die Last, wenn nötig, an einem xierten Punkt.
5. Lösen Sie den Knoten des Seils und verwenden Sie die
verbliebene Länge, um es um die Trommel zu wickeln und
starten Sie dann die Winde erneut.
GEHEN SIE MIT SORGFALT VOR, WENN SIE DIE METHODE
DER „WIPPENDEN“ LAST VERWENDEN. DIESE METHODE
KANN ZUR VERSTÄRKTEM SEILVERSCHLEISS DURCH DIE VON
DER TROMMEL GENERIERTE HITZE FÜHREN.
FALLS DIE WINDE DAS SEIL ZIEHT UND DIE LAST SICH NICHT
BEWEGT (WIE ES OFT VORKOMMT, WENN EIN SEHR LANGES
SEIL VERWENDET WIRD), BEDEUTET ES, DASS IHR SEIL
GEDEHNT IST UND DER BRUCHPUNKT SCHNELL ERREICHT
WIRD UND SICH DAMIT DIE LAST PLÖTZLICH IN IHRE
RICHTUNG BEWEGEN KÖNNTE.
LÖSEN SIE LANGSAM DIE SEILSPANNUNG UNTER
BEACHTUNG DER AUFGEBAUTEN SPANNUNG: DAS SEIL
KÖNNTE SICH SCHNELL VON IHNEN WEGBEWEGEN UND
ZU VERBRENNUNGEN FÜHREN ODER SIE ZUR WINDE ZIEHEN.
1
ZIEHEN SIE NIE EINE LAST EINEN ABFALLENDEN HANG IN
RICHTUNG AUF DIE WINDE, DA DIE LAST UNTER
UMSTÄNDEN AUF SIE ZU RUTSCHT, BEVOR SIE DIESE
STOPPEN KÖNNEN. VERWENDEN SIE IN DIESEM FALL
EINE ROLLE UNTEN AM HANG UND POSITIONIEREN SIE
DIE WINDE WEITER WEG VON DER ACHSE DER LAST.
PRÜFEN SIE DIE POSITION DER WINDE, DEN ZUSTAND
DES SEILS, DIE STÄRKE DES VERANKERUNGSPUNKTS,
KNOTEN HAKEN UND/ODER SCHÄKEL, UM
VERLETZUNGEN UND SCHÄDEN AM MATERIAL ZU
VERMEIDEN.
PRÜFEN SIE DIE POSITION DER WINDE, DEN ZUSTAND
DES SEILS, DIE STÄRKE DES VERANKERUNGSPUNKTS,
KNOTEN HAKEN UND/ODER SCHÄKEL, UM
VERLETZUNGEN UND SCHÄDEN AM MATERIAL ZU
VERMEIDEN.
NIE BEI LAUFENDEM MOTOR DIE HÄNDE IN DIE NÄHE DER
SEILFÜHRUNG, CAPSTANTROMMEL, DES EINLAUFHAKENs
BRINGEN.
WICKELN SIE DAS SEIL NIEMALS UM IHRE HÄNDE ODER
IHREN KÖRPER! SEIEN SIE SICH AUCH EINER SICH UM SIE
HERUM AUFGEBAUTEN SPANNUNG BEWUSST UND
STELLEN SIE SICHER, DASS SIE SICH IN SICHEREM
ABSTAND VON DIESER BEFINDEN.
BEOBACHTEN SIE WÄHREND DES BETRIEBS DIE
CAPSTANTROMMEL UND STELLEN SIE SICHER, DASS
SICH DAS SEIL NICHT DARAUF ÜBERKREUZT. LÖSEN SIE
IN DIESEM FALL DIE SEILSPANNUNG, STOPPEN SIE DEN
MOTOR UND ENTFERNEN SIE DEN KNOTEN.
LASSEN SIE DAS SEIL NIE FÜR MEHR ALS EIN PAAR
SEKUNDEN ÜBER DIE TROMMEL GLEITEN, WENN EINE
LAST ANGEHÄNGT IST - DIE DURCH DIE REIBUNG
ENTSTEHENDE HITZE KANN DAS SEIL SCHMELZEN LASSEN
ODER BESCHÄDIGEN.

DE
6
3.5.2.6 Anhalten der Winde.
1. Lassen Sie langsam die Spannung nach, um die Winde
zu Boden zu lassen.
2.
Drücken Sie den Ein/Aus Schalter.
4 Wartung
4.1 Reinigung.
Wenn Sie mit der Arbeit fertig sind, reinigen und trocknen Sie die Winde.
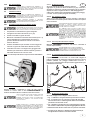
4.2 Schmierung.
Das Getriebe ist ab Werk geschmiert und sollte daher keine Schmierung
oder Wartung erfordern. Falls Ölverlust auällt, prüfen Sie den Ölstand,
indem Sie die Winde auf einer horizontalen Oberäche platzieren und
die Kappe abnehmen. Verwenden Sie einen 8 mm Innensechskant.
Wenn Sie die Winde nach vorn kippen, kann ein wenig Öl durch das
Loch austreten. Falls erforderlich, können Sie etwas SAE80W90EP
Getriebeöl hinzufügen.
4.3 Ladegerät und Akku.
4.3.1 Ladegerät.
4.3.1.1 Laden.
Wenn der Akku mit niedriger Ladung oder ungeladen für längere Zeit
gelagert wurde, geht das Ladegerät in den Neustart-Modus, der für eine
komplette Ladung 20 Stunden benötigt.
Dadurch wird die Akkulebensdauer verlängert. Nach vollständiger
Ladung steht nächstes Mal die Standardladung zur Verfügung.
Ein entladener Akku benötigt eine Abkühlzeit, die im Akkuhandbuch
erwähnt ist.
�Stecken Sie das Ladegerät in eine Steckdose.
�Führen Sie den Akku in das Ladegerät ein.
Das ist ein diagnostisches Ladegerät. Die LED blinken in einer
spezifischen Reihenfolge, um den momentanen Akkuladezustand
anzuzeigen (siehe Abbildung).
4.3.1.2 Fehleranzeige.
Wenn der Akku in das Ladegerät eingesetzt wurde und die LEDs
rot blinken, entfernen Sie den Akku für eine Minute aus dem
Ladegerät und setzen Sie ihn dann erneut ein.
�Wenn die LEDs grün blinken, bedeutet das, dass der Akku
normal lädt.
�Wenn die LED immer noch rot blinkt, entfernen Sie den
Akku und stecken Sie das Ladegerät wieder aus.
Warten Sie eine Minute, stecken Sie dann das Ladegerät wieder
ein und setzen Sie den Akku erneut ein. Wenn die LEDs grün
blinken, bedeutet das, dass der Akku normal lädt.
�Wenn die LEDs rot blinken, ist der Akku defekt und muss
ersetzt werden.
4.3.2 Akku.
4.3.2.1 Ladungskontrolle.
Wenn der Akku nicht richtig lädt:
�Prüfen Sie die Steckdose mit einem anderen Gerät. Stellen
Sie sicher, dass die Steckdose unter Strom steht.
�Prüfen Sie, dass kein Kurzschluss an den Ladegerätpolen
durch Schmutz oder Fremdkörper vorliegt.
4.3.3 Lagerung.
Lagern des Akkus für mehr als 30 Tage:
�Entnehmen Sie den Akku aus dem Gerät.
�
Lagern Sie das Gerät an einem Ort, an dem die Temperatur
zwischen 7 °C und 40° C liegt.
5 Zusätzliche Information
5.1 Fehlercodes.
Fehlercodes werden zur Identikation von Gründen für Stopps
ausgegeben - die LEDs blinken wiederholt. Hier sind die häugsten
Codes:
BERÜHREN SIE DIE CAPSTANTROMMEL NACH DER
VERWENDUNG NICHT. SIE KÖNNTE HEISS SEIN UND ZU
VERBRENNUNGEN FÜHREN.
DER AKKU IST NICHT VOLL GELADEN. WIR EMPFEHLEN,
DEN AKKU VOR DER ERSTEN VERWENDUNG
VOLLSTÄNDIG ZU LADEN, UM EINE MAXIMALE
BETRIEBSDAUER ZU ERREICHEN. DIESER LITHIUM-IONEN-
AKKU HAT KEINEN MEMORY-EFFEKT UND KANN SO
GELADEN WERDEN, WIE SIE ES FÜR NOTWENDIG HALTEN.
1 2
1
2
FALLS DIE UMGEBUNGSTEMPERATUR UNGEWÖHNLICH
IST, BRINGEN SIE DAS LADEGERÄT UND DEN AKKU
DORTHIN, WO DIE TEMPERATUR ZWISCHEN 7 ̊UND
40 °C LIEGT.
WENN DER AKKU IN DAS LADEGERÄT EINGESETZT WIRD,
WENN ER WARM ODER HEISS IST, KÖNNEN DIE ROTEN
LEDS AUFLEUCHTEN. LASSEN SIE IN DIESEM FALL DEN
AKKU ENTFERNT VOM LADEGERÄT ABKÜHLEN. DER
AKKU KANN UNTER UMSTÄNDEN NACH ERREICHEN
EINER NORMALEN LADETEMPERATUR NORMAL
GELADEN WERDEN.
PRÜFEN SIE WÄHREND DES REINIGENS DIE WINDE, DIE
HAKEN, DAS SEIL UND DIE POLYESTERSCHLINGE, AUF
BESCHÄDIGUNG ODER ZEICHEN VON VERSCHEISS.
Entfernen Sie regelmäßig die
Capstantrommel und reinigen Sie
um die Welle herum. Jeglicher
angesammelter Schmutz kann
die Dichtung beschädigen.
Bürsten Sie die Welle mit ein
wenig Öl ab, um Korrosion zu
verhindern.
1
Entnehmen Sie den Akku aus dem Ladegerät, sobald er voll
geladen und betriebsbereit ist.
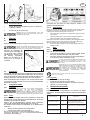
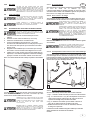
Beschreibungen LED-Code Denitionen
Akkuanschlussproblem 3
Keine Kommunikation zwischen Akku
und der Steuerkarte.
Oder Kommunikationsverlust
während der momentanen Phase.
Überspannungsschutz 4 Der momentane Vorgang
überschreitet die maximal zulässige
Last.
Niederspannungsschutz 5 Die Akkuladung ist bei Minimum
(Akku wieder auaden).
WEITERE INFORMATIONEN FINDEN SIE IN DEN HANDBÜCHERN FÜR
AKKU UND LADEGERÄT.

DE
7
5.2 Entsorgung des Akkus.
Dadurch vermeiden Sie Verletzungen und Brand- oder Explosionsrisiken oder
das Risiko eines elektrischen Schlags oder der Kontamination der Umwelt:
�Decken Sie die Akkupole mit starkem Klebeband ab.
�Versuchen Sie nie, einzelne Akkuteile zu entfernen oder zu
zerstören.
�Öffnen Sie den Akku NICHT.
�Bei Leckagen austretende Elektrolytüssigkeit ist ätzend und giftig.
Tragen Sie Sorge, dass diese Lösung nicht in Kontakt mit Augen
und Haut gerät und verschlucken Sie diese nicht.
�Diesen Akkutyp NICHT mit Ihrem Hausmüll entsorgen.
�NICHT verbrennen.
�NICHT zu einer Mülldeponie bringen.
�Bringen Sie ihn zu einem zugelassenen Recyclingzentrum oder dem
Entsorgungszentrum.
5.3 Zubehör.
Wir bieten ein vollständiges Angebot an Zubehör an. Schauen Sie
unter www.portablewinch.info.
5.4 Garantie.
Die Garantie für Winde und das Zubehör der Firma Portable Winch
Co. gilt für alle Herstellungsmängel, während sich das jeweilige
Produkt im Eigentum des „ursprünglichen Besitzers“, wie folgend
deniert, bendet.
Der „ursprüngliche Besitzer“ wird deniert als Partei oder DE
Gesamtheit, welche die Winde und/oder Zubehör von einem
autorisierten Vertragshändler der Portable Winch Co erwirbt, zu
belegen durch die Originalrechnung. Dieser Garantieanspruch ist
übertragbar, wenn der neue Käufer eine Kopie der
Originalrechnung besitzt. Diese Garantie gilt nicht für Elemente die
,,wie besehen’’ verkauft werden. Diese Garantie gilt nicht für
„Verschleißteile“, deniert als Teile, die während des
Windenvorgangs mit dem Seil in Kontakt stehen.
Die tragbare Capstan-Winde ist wie folgt abgedeckt:
●PCW3000-Li
Kommerzielle Verwendung: 1 Jahr
Private Nutzung: 5 Jahre
Die Firma Portable Winch Co. behält sich das Recht vor, ein defektes
Produkt nach ihrer Wahl auszutauschen oder zu reparieren. Alles
andere Portable Winch Co. Zubehör wird von einer einjährigen (1 Jahr)
Garantie abgedeckt, mit Ausnahme von Seilen, die eine dreimonatige
(3 Monate) Garantie haben. Falls Sie Fragen haben, gehen Sie bitte zu
unserer Garantierichtlinie unter www.portablewinch.info .
Verlängern Sie Ihre Garantie kostenlos
Wir bedanken uns für Ihren Kauf! Dafür möchten wir Ihnen EIN
KOSTENLOSES ZUSÄTZLICHES (1) JAHR GARANTIE anbieten!
Es ist einfach, registrieren Sie nur ihre Winde unter
www.portablewinch.info oder telefonisch unter 1 888 388-7855
oder + 1 819 563-2193.
5.5 Bereich Fehlersuche.
Bei Problemen bitte siehe Abschnitt Fehlersuche unter
www.portablewinch.info im Bereich Handbücher und Anweisungen.
5.6 Explosionszeichnungen.
Für einen Explosionszeichnung Ihrer Winde gehen Sie bitte zu
Explosionszeichnung unter www.portablewinch.info auf der Seite
Handbücher und Anweisungen oder gehen Sie zum Ende des
Handbuchs.
5.7 Technische Daten.
5.8 Hersteller.
Die Portable Capstan WinchesTM werden hergestellt durch:
Portable Winch Co.
1170, rue Thomas-Tremblay
Sherbrooke, Québec, J1G 5G5
CANADA
Phone : +1 819 563-2193
Freephone (CAN & USA.): 1-888-388-7855
Fax : + 1 514 227-5196
E-mail : [email protected]
Website: www.portablewinch.info
DIE ORIGINALSPRACHE DIESES DOKUMENTS IST
ENGLISCH
5.9 Bevollmächtigter Vertreter EU.
- VONBLON Maschinen GmbH
Landstraße 28, 6714 Nüziders, Autrich
DER AKKU DES GERÄTS ENTHÄLT LITHIUM-IONEN, EINE GIFTIGE
SUBSTANZ.
ALLE GIFTIGEN SUBSTANZEN MÜSSEN GEMÄSS
GÜLTIGER RICHTLINIEN ENTSORGT WERDEN, UM EINE
KONTAMINATION DER UMWELT ZU VERMEIDEN. BEVOR
SIE EINEN BESCHÄDIGTEN ODER AM ENDE SEINES
LEBENSZYKLUS ANGELANGTEN LITHIUM-IONEN-AKKU
ENTSORGEN, NEHMEN SIE BITTE KONTAKT MIT IHREM
ÖRTLICHEN ENTSORGER AUF, UM WEITERE
INFORMATIONEN UND DIE ANWENDBAREN
RICHTLINIEN ZU ERHALTEN. NEHMEN SIE DIE AKKUS MIT
ZU IHREM RECYCLING ZENTRUM, DAS FÜR DIE
ENTSORGUNG VON LITHIUM-IONEN-AKKUS
AUTORISIERT IST. FALLS DAS AKKUGEHÄUSE GERISSEN
IST, SELBST WENN DER AKKU NICHT LECKT. SIE DÜRFEN
IHN NICHT LADEN ODER VERWENDEN. SIE MÜSSEN IHN
ENTFERNEN UND DURCH EINEN NEUEN AKKU ERSETZEN.
VERSUCHEN SIE IHN NICHT ZU REPARIEREN!
TECHNISCHE DATEN PCW3000-Li
MOTOR 1KW BÜRSTENLOS
TROMMELABMESSUNGEN Ø 76 MM, BIS ZU 4 UMDREHUNGEN
EINES 10 MM SEILS
MAXIMALE
ZUGKRAFTLEISTUNG (DIREKT) 1000 KG
GESCHWINDIGKEIT GESCHWINDIGKEIT 1 : 8.1 M/MIN
GESCHWINDIGKEIT 2 : 10 M/MIN
GESCHWINDIGKEIT 3 : 11.6 M/MIN
GETRIEBE ZAHNRÄDER AUS GEHÄRTETEM STAHL /
ÖLSCHMIERUNG
GEWICHT (NETTO) 9,4 KG (OHNE AKKU)
ABMESSUNGEN (GESAMT) 30,2 CM X 31,8 CM X 31,0 CM
SEIL DOPPELT GEFLOCHTENES POLYESTERSEIL
NIEDRIGER ELASTIZITÄT (NICHT BEINHALTET)
UNBEGERENZTE LÄNGE
MINIMALER DURCHMESSER 10 MM
MAXIMALER DURCHMESSER 13 MM
EMPFOHLENER DURCHMESSER 10 MM
GERÄUSCHPEGEL AN DER
BEDIENSTATION A LpA 75 dB(A)
SCHALLLEISTUNGSPEGEL
GARANTIERT A LwA 90 dB(A)
UNSICHERHEITSFAKTOR KwA 2.5 dB(A)
BETRIEBSTEMPERATUR -17°C bis 45°C

DE
EN
ES
FR
I T
NL
NO
SV
Betriebs-/Sicherheitshinweise
Operating/safety Instructions
Instrucciones de operación / seguridad
Consignes de fonctionnement/sécurité
Istruzioni per l'uso e la sicurezza
Gebruiksaanwijzing / Veiligheidsvoorschriften
Bruksanvisning / sikkerhet
Bruksanvisning / säkerhet
www.portablewinch.info
WICHTIG:
Vor Gebrauch
lesen
IMPORTANT:
Read before
using
IMPORTANTE:
Lea antes de
usar
IMPORTANT:
Lire avant
usage
IMPORTANT:
leggere prima
dell'uso
BELANGRIJK:
lees voor
gebruik
VIKTIG:
Les før du
bruker
VIKTIGT:
Läs innan du
använder
WICHTIG:
Vor Gebrauch
lesen
IMPORTANT:
Read before
using
IMPORTANTE:
Lea antes de
usar
IMPORTANT:
Lire avant
usage
IMPORTANT:
leggere prima
dell'uso
BELANGRIJK:
lees voor
gebruik
VIKTIG:
Les før du
bruker
VIKTIGT:
Läs innan du
använder
WICHTIG:
Vor Gebrauch
lesen
IMPORTANT:
Read before
using
IMPORTANTE:
Lea antes de
usar
IMPORTANT:
Lire avant
usage
IMPORTANT:
leggere prima
dell'uso
BELANGRIJK:
lees voor
gebruik
VIKTIG:
Les før du
bruker
VIKTIGT:
Läs innan du
använder
© 2022 Portable Winch Co. – All rights reserved - Printed in Canada

1
THE ORIGINAL LANGUAGE OF
THIS DOCUMENT IS ENGLISH
INTRODUCTION
Portable Winch Co. wishes to thank you for purchasing a Portable
Capstan WinchTM. This manual was written to help you get the best
use of your new winch and to use it in the most secure way.
PLEASE READ IT CAREFULLY BEFORE USING THE WINCH.
In case of any problems or questions, please refer to an authorized
Portable Winch Co. dealer or contact us directly.
1 Safety guidelines
Portable Capstan WinchesTM are designed to pull non-rolling
objects, generally at angles of more or less 45 degrees relative to
the horizontal. The use of a winch may present serious risks of
injury, property damage or even death.
1.1 Safety messages.
Your safety and the safety of others are very important. You will
nd important safety messages in this manual.
Please read them carefully.
These security messages are warning you of potential injuries to
either yourself or others. Each safety message is preceded by a
warning symbol.
DO NOT UNDERESTIMATE THE POTENTIAL DANGER.
1.2. Environmental protection.
The battery contains materials which are harmful to you and the
environment. It must be removed and disposed of separately at a
collection point that accepts lithium-ion batteries.
1.3 Battery and charger.
1.3.1 Compatible Batteries.
Here is a non-exclusive list of compatible battery models:
�GREENWORKS PRO 80V – 2Ah.
�GREENWORKS PRO 80V – 4Ah.
�GREENWORKS COMMERCIAL 82V – 2.5Ah.
�GREENWORKS COMMERCIAL 82V – 5Ah.
�POWERWORKS 82V – 2.5Ah.
�POWERWORKS 82V – 5Ah.
�CRAMER 82V – 3Ah.
�CRAMER 82V – 6Ah.
�STIGA VOLTAGE 80V – 2.5Ah.
�STIGA VOLTAGE 80V – 4Ah.
�STIGA VOLTAGE 80V – 5Ah.
�BRIGGS & STRATTON 82V MAX – 2Ah.
�BRIGGS & STRATTON 82V MAX – 4Ah.
�BRIGGS & STRATTON 82V MAX – 5Ah.
Please consult our website www.portablewinch.info for the list of
compatible batteries or contact us.
80V AND 82V BATTERIES MADE BY GLOBE TOOLS CAN
BE USED WITH YOUR PCW3000-Li WINCH.
SYMBOL MEANING
YOU WILL BE MORTALLY OR SEVERELY
INJURED IF YOU DO NOT FOLLOW THESE
INSTRUCTIONS.
YOU COULD BE MORTALLY OR INJURED
IF YOU DO NOT FOLLOW THESE
INSTRUCTIONS.
YOU COULD BE INJURED IF YOU DO NOT
FOLLOW THESE INSTRUCTIONS.
READ THE USER GUIDE.
EYES PROTECTION.
HEARING PROTECTION.
WEAR GLOVES
End-of-life electrical products must not be disposed of
with household waste. Recycle them through the
establishments available. Contact the local
authorities for more information on recycling
conditions.
CHARGE THE BATTERY IN A DRY ENVIRONMENT
PROTECTED FROM THE WEATHER. DO NOT EXPOSE THE
BATTERY OR CHARGER TO RAIN.
NEVER CHARGE THE BATTERY IN A DAMP
ENVIRONMENT. USE THE CHARGER AT TEMPERATURE
BETWEEN 7 AND 40 ºC (45 AND 104 ºF). TO REDUCE
THE RISKS OF ELECTRIC SHOCK, ONLY USE THE
CHARGER PROVIDED BY THE MANUFACTURER TO
CHARGE THE BATTERY; NEVER STORE THE TOOL
OUTDOORS. HANDLE THE CHARGER'S POWER CABLE
WITH CARE.
NEVER CARRY THE CHARGER HOLDING ITS WIRE.
IF THE TOOL IS USED INTENSIVELY OR UNDER EXTREME
TEMPERATURES, BATTERY LEAKS MAY OCCUR. IF THE
LIQUID COMES INTO CONTACT WITH YOUR SKIN, RINSE
THE AFFECTED AREA IMMEDIATELY WITH SOAPY
WATER. IN CASE OF CONTACT WITH YOUR EYES, RINSE
WITH CLEAN WATER FOR AT LEAST 10 MINUTES THEN
CONTACT A DOCTOR IMMEDIATELY. RESPECTING THIS
RULE WILL REDUCE THE RISK OF SERIOUS INJURIES.
NEVER UNPLUG THE CHARGER FROM THE MAINS BY
PULLING ON THE POWER CABLE.
NEVER CRUSH, DROP OR DAMAGE THE BATTERY.
NEVER USE A BATTERY OR CHARGER THAT HAS BEEN
DROPPED, CRUSHED, RECEIVED A VIOLENT SHOCK OR
BEEN DAMAGED IN ANY WAY WHATSOEVER. A
DAMAGED BATTERY RISKS EXPLODING. DISPOSE OF A
DAMAGED BATTERY IMMEDIATELY USING AN
APPROPRIATE METHOD.
WHEN THE BATTERY IS NOT IN USE, KEEP IT AWAY FROM
METAL OBJECTS SUCH AS: PAPER CLIPS, COINS, KEYS,
NAILS, SCREWS AND OTHER SMALL METAL OBJECTS.
DO NOT USE THE CHARGER IF IT IS DAMAGED.
REPLACE THE CHARGER OR ITS CABLES IMMEDIATELY.
KEEP THE CHARGER AWAY FROM WATER, HEAT
SOURCES (RADIATORS, HEATERS, STOVES, ETC),
FLAMES AND CHEMICAL PRODUCTS.
NEVER USE ANY WIRELESS DEVICE IN THE PRESENCE
OF AN OPEN FLAME.
MAKE SURE THAT THE BATTERY IS SECURE IN THE
CHARGER BEFORE USING IT.
THE BATTERY WILL WARM UP SLIGHTLY DURING
CHARGING. THIS IS NORMAL AND DOES NOT
INDICATE A PROBLEM.
NEVER PLACE THE CHARGER IN A LOCATION
EXPOSED TO EXTREME TEMPERATURES (HOT OR
COLD). IT WORKS BEST AT ROOM TEMPERATURE.
WHEN THE BATTERY IS FULLY CHARGED, UNPLUG THE
CHARGER FROM THE MAINS AND REMOVE THE
BATTERY.
KEEP THE BATTERY CLEAN, DRY AND FREE OF OIL AND
GREASE. ALWAYS USE A CLEAN CLOTH FOR
CLEANING. NEVER USE BRAKE FLUID, PETROL, OIL-
BASED PRODUCTS OR ANY SOLVENT TO CLEAN THE
BATTERY.
EN

2
EN
1.4 Labels.
1.4.1 Serial number labels.
The serial number label can be found on the right side of the
winch's gearbox. In addition to the winch’s serial number, the
fundamental specications of your model are also found there.
1.4.2 Engine label.
1.4.3 Line installation label.
1.4.4 Hearing protection label.
1.5 Safety information.
2 Checks before use
2.1 On receiving.
Inspect the box to detect any obvious damage. If a part is missing
or damaged, notify the carrier immediately.
2.2 Batterie.
2.3 Installing the battery’s protective cover.
This cover is designed to protect 4.0 - 5.0Ah batteries located
outside the housing from rain.
The cover is supplied with a spring and a short metal rod.
A) Place the spring in the housing cavity and then the pin.
B) Place the lid in the other cavity and push the pin against the
spring.
C) Position the cover holding the pin until it snaps into the
housing.
This label is placed on the
winch’s housing. It indicates the
installation direction of the line
for the Portable Capstan
WinchTM.
Perform the following operation inside a
building:
A B
C
44-0185:
We recommend
wearing hearing protection
when using the Portable
Capstan Winch
TM
.
44-00185
DO NOT ALLOW CHILDREN TO USE THE PORTABLE
CAPSTAN WINCHTM. KEEP CHILDREN AND ANIMALS
OUTSIDE OF THE WORK ZONE.
NEVER ALLOW AN UNTRAINED PERSON TO USE THE
PORTABLE CAPSTAN WINCHTM. MAKE SURE THAT THEY
ARE AWARE OF THE SAFETY AND USAGE
INSTRUCTIONS AND HAVE READ THIS MANUAL.
INFORM ALL USERS OF THE SAFETY AND USAGE
INSTRUCTIONS.
FAMILIARISE YOURSELF WITH THE OPERATION OF THE
PRODUCT AND THE SECURITY INSTRUCTIONS BEFORE
STARTING WORK WITH THE PORTABLE CAPSTAN
WINCHTM.
MAKE SURE THAT YOUR CLOTHING CANNOT GET
CAUGHT IN THE MOVING PARTS OF THE PORTABLE
CAPSTAN WINCHTM.
CLEAN AND/OR REPLACE ALL SECURITY
LABELS THAT ARE DIRTY, DETERIORATED,
UNREADABLE OR TORN.
ALWAYS KEEP ONLOOKERS OUTSIDE OF THE WORK
ZONE.
WHEN WINCHING THEREFORE WHEN THE ROPE IS
UNDER TENSION MAKE SURE NO ONE IS WITHIN 5
METERS OF THE LOAD OR ROPE.
NEVER PULL ROLLING MATERIAL THAT RISKS ROLLING
OUT OF YOUR CONTROL.
THE PORTABLE CAPSTAN WINCH
TM
IS NOT DESIGNED
TO LIFT LOADS OR PEOPLE.
WE RECOMMEND THAT YOU WEAR HEARING
PROTECTION DURING USE.
ALWAYS KEEP VISUAL CONTACT BETWEEN THE USER
AND THE SPECTATORS TO ENSURE GOOD
COMMUNICATION.
THE BATTERY IS ONLY HALF-CHARGED AT THE TIME OF
PURCHASE. BEFORE USING YOUR PORTABLE CAPSTAN
WINCHTM FOR THE FIRST TIME, FOLLOW ALL THE
INSTRUCTIONS AND GUIDELINES INDICATED IN THE
BATTERY AND CHARGER SUPPLIER GUIDES. REMOVE
THE BATTERY BEFORE STORING THE PORTABLE CAPSTAN
WINCHTM FOR A LONG PERIOD. BEFORE REUSING THE
PORTABLE CAPSTAN WINCHTM AGAIN, CHARGE THE
BATTERY AGAIN FOR AT LEAST ONE COMPLETE
CHARGING PERIOD. THIS BATTERY INCLUDES NO
MEMORY EFFECT.

EN
3
2.4 Installing the battery.
2.5 To remove the battery.
2.6 Starting the engine.
The engine controls can be found on the engine’s housing,
above the battery cavity.
Note : A higher speed reduces the battery’s operating time.
2.7 Capstan drum.
Your Portable Capstan WinchTM is equipped with Drum 76 mm in
diameter.
2.8 Space between drum and rope guide.
Wear on the rope guide or drum may create a gap between the
two parts that could damage the rope. Replace the rope guide
and/or drum if necessary.
3 Using the winch
3.1 Rope.
3.1.1 Type of rope.
Only use a line with low elasticity. We recommend a double braid
polyester line.
Min., max. and recommended diameters:
▪Min : 10 mm
▪Max : 12-13 mm
▪Recommended : 10 mm
Contact us if you have any questions about rope types.
Insert the battery (plastic part towards the compartment)
Open the battery’s protective
cover.
Hold the handle of the
PORTABLE CAPSTAN
WINCHTM and push the battery
until you hear a “click”.
Close the cover.
Press the battery release
button located above the
battery. This allows the battery
to easily be removed from the
device.
Hold the handle to remove the
battery.
A) Operation of the unit: Press twice to turn on and
press again to turn o.
B) Press to select the speed of the engine.
Once = 8.1 m/minute.
Twice = 9.9 m/minute.
3 times = 11.6 m/minute.
1B1A
THE LITHIUM-ION BATTERY IS FITTED WITH AN INTERNAL
BREAKER WHICH WILL AUTOMATICALLY STOP THE DEVICE
IN CASE OF OVERLOAD. IF THIS HAPPENS, TURN THE
DEVICE OFF BY PRESSING BUTTON “A” (SEE ILLUSTRATION).
MOST PULLING SITUATIONS PRESENT POTENTIAL DANGERS!
DO NOT USE A 3-STRAND YELLOW POLYPROPYLENE
LINE!
●POLYPROPYLENE AND POLYETHYLENE LINES ARE DANGEROUS FOR
PULLING DUE TO THEIR ELASTICITY AND THEIR LOW MELTING POINT.
●MAKE SURE THAT THE LINE IS NOT DAMAGED AND OFFERS ADEQUATE
RESISTANCE FOR THE LOAD TO BE PULLED.
STRETCHING = DANGER!
●STRETCHING THE LINE MAY CAUSE SERIOUS INJURY. BE CAREFUL WHEN
RELEASING THE TENSION IN THE LINE.
●ALL LINES STRETCH: INCREASED LENGTH: THE MORE THE LINE IS PULLED, THE
MORE IT STRETCHES.
●STRETCHING THE LINE MAY CAUSE THE LOAD TO MOVE IN AN UNEXPECTED
AND DANGEROUS MANNER.
●STRETCHING THE LINE MAY CAUSE IT TO RELAX AND MOVE BACKWARDS
QUICKLY, PULLING YOUR HAND TOWARDS THE WINCH OR CAUSING
SEVERE BURNS. NEVER WIND THE LINE AROUND YOUR HAND.
ALWAYS WEAR GLOVES.

EN
4
3.1.2 Rope maintenance.
3.1.3 Recommended knots.
3.2 Anchoring the winch.
OPTION 1 : In most cases, the winch is anchored to a xed object
using a polyester sling or one of our optional anchors and the line
is attached to the object you are trying to move. The latter is moved
towards the winch as the winch pulls the line.
OPTION 2 : Sometimes, the winch can be anchored to the object
you want to move and the line is attached to a xed object. The
winch and the object being moved are then pulled towards the line's
anchoring point. This method is useful when you guide the load
while operating the winch.
Your winch is supplied with a polyester sling. To anchor the winch,
wind it around the anchoring point with the sling. Insert the sling in
each of the two safety hooks located on the back of the winch
(g.1).
Place the winch in the direction of the load to be pulled. When the
winch is switched on, it will attempt to align itself with the load. The
friction of the sling against the anchor may prevent correct
alignment; in this case, release the tension in the line and move the
sling so that the tension is distributed over the two hooks equally.
We also oer a wide range of anchoring accessories for our
capstan winches. Visit www.portablewinch.info
3.4 Installing the rope.
The wide range of situations encountered during pulling prevents
us from giving specic instructions for all situations; however, you
should consider the following points:
3.4.1 Rope.
Use a line with a low elasticity in good condition with a minimum
diameter of 10 mm and a maximum diameter of 12 -13 mm with
good knots. We highly recommend the bowline knot (see section
3.1.3). Use pulleys to divert the line and increase the pulling power
when the load approaches or exceeds the winch's pulling capacity.
3.4.2 Pulley.
The use of a pulley at a short-distance from the winch oers several
benets:
●Provides an angle allowing the load to be slightly raised to
reduce friction;
●Maintains the winch in near horizontal position;
●Keeps the winch and the operator away from the load's
trajectory.
3.4.3 Direction.
Install the line so that it doesn't rub against any objects during
pulling. Try to install the line so that the front of the load is slightly
raised. Never pull downwards or through obstacles.
WHAT NOT TO DO: WHEN YOU INSTALL THE SLING TO
ANCHOR THE WINCH, AVOID A FULL TURN AROUND
AN ANCHORING POINT (FIG, 2). THIS WILL PREVENT THE
WINCH FROM ALIGNING ITSELF WITH THE LOAD
CORRECTLY. THIS WILL ALSO APPLY UNEVEN TENSION
TO EACH OF THE HOOKS.
AVOID INSTALLING THE SLING ON SHARP CORNERS
WHICH ARE LIKELY TO DAMAGE THE POLYESTER SLING.
WHEN YOU USE A POLE, A TREE OR A STUMP AS AN
ANCHORING POINT, INSTALL THE SLING CLOSE TO THE
BASE.
ANCHORING AROUND A STUMP REQUIRES SPECIAL
ATTENTION TO AVOID THE SLING SLIPPING OFF THE TOP
OF THE STUMP.
ENSURE THAT THE ANCHORING POINT IS ABLE TO
WITHSTAND THE WINCHING WITHOUT BREAKING, BEING
EXTRACTED OR BECOMING DAMAGED.
You must attach the load to the
end of the line. Although a
simple knot may sometimes
suce, we recommend using a
bowline knot (g. 1). This knot
holds approximately 70% of the
line's capacity while most knots
reduce the line's capacity by
50% or more. Additionally, it
may be easy to untie even after
pulling a heavy load.
Even better, a double bowline
knot (g. 2) allows you to
maintain approx. 75% of the
line’s capacity.
1
1
2
1
PERFORM A VISUAL INSPECTION OF THE LINE BEFORE
EACH USE. IF IT SHOWS OBVIOUS SIGNS OF WEAR
(STRANDS CUT, EXCESSIVE ABRASION)
THEN CHANGE IT.
IF YOUR LINE IS DIRTY, CLEAN IT. A DIRTY LINE CAN
QUICKLY BECOME DAMAGED AND CAUSE
PREMATURE WEAR OF PARTS WHICH COME INTO
CONTACT WITH IT.
2
THE CORRECT DIRECTION WHEN DEPLOYING THE LINE
IS THE KEY TO THE SAFE USE OF THE WINCH.
IN GENERAL, IF THE LINE TOUCHES THE GROUND
DURING PULLING THEN THE SETUP IS INCORRECT.

EN
5
3.4.4 On a slope.
3.5 Pulling a load.
3.5.1 Winding the line around the capstan drum.
1. Thru entry hook then under the drum.
2. Wrap the line around the drum (3 or 4 turns).
3. Take the line behind the exit hook.
4.
Keep your distance from the winch (approx. 1 m) and pull slowly and
horizontally on the line until the line's slack is taken up and you feel
tension in the line.
5.
Inspect your installation to make sure that the anchoring of the
winch and the entry hook are aligned with the line.
6.
Check that the line does not rub against objects in its trajectory; if you
want to increase the pulling speed, press the speed button once or
twice again.
Note : A high speed reduces the battery’s operating time.
3.5.2 Pulling.
When pulling, position yourself so that you can see the winch and
the load. Pull on the line HORIZONTALLY. The tension you exert
on the line keeps the winch level.
3.5.2.1 If the line slips.
If the line slips on the drum while you are pulling, add a turn of line
around the drum (4th turn).
The engine will stop when the winch reaches
its maximum capacity. A warning will be audible and the
LEDs will ash four times. You should then repeat the installation
(add pulleys) or “cradle” the load (see next section).
3.5.2.2 To “cradle” the load.
Pull sharply for a brief moment and release the tension in the
line. Then return the tension to the line and repeat as required.
3.5.2.3 To take a break during pulling.
Slowly release the tension in the line and allow it to slide over
the drum.
3.5.2.4 If it is essential to keep the tension in the line at startup.
You can use a blocker or a Prusik knot connected to your anchoring
point to maintain the tension in the line. You can also use a self-
locking pulley PCA-1271 or PCA-1272. They are particularly useful
for pulling rolling objects and for directional felling.
3.5.2.5 If your rope is too short.
If your line is too short, connect two lines together:
1.
Fig. 1-1: Use 2 bowline knots to link your two lines together.
2.
Fig. 1-2: Allow approx. 1 m (3') of line to exceed the knot of the line
pulling the load. This length of line will be used for pulling when the
knot is undone.
3.
Fig. 2: Stop the winch before the knots reach the winch; they will not
be able to pass through and the line will become tangled.
4.
Release the tension in the line.
Attach the load to a xed point if necessary.
5. Untie the line's knot and use the remaining length to wind it
around the drum and restart the winch again.
BE CAREFUL WHEN USING THE LOAD ''CRADLING''
METHOD. THIS METHOD MAY CAUSE RAPID WEAR TO
THE LINE DUE TO THE HEAT CREATED ON THE DRUM.
IF THE WINCH PULLS THE LINE AND THE LOAD DOESN'T
MOVE (OFTEN WHEN A VERY LONG LINE IS BEING
USED), THE LINE STRETCHES AND THE BREAKING POINT
MAY BE REACHED CAUSING IT TO SUDDENLY COME
BACK ON TO YOU. SLOWLY RELEASE THE TENSION IN
THE LINE BUT BEWARE OF THE BUILT-UP TENSION: THE
LINE MAY QUICKLY GET AWAY FROM YOU CAUSING
BURNS OR TAKING YOU TOWARDS THE WINCH.
DO NOT WRAP THE LINE AROUND YOUR HANDS OR
YOUR BODY! ALSO, BEWARE OF BUILT-UP TENSION
CLOSE TO YOU AND MAKE SURE THAT YOU ARE A SAFE
DISTANCE FROM THIS ACCUMULATION.
KEEP AN EYE ON THE CAPSTAN DRUM DURING
OPERATION AND MAKE SURE THAT THE LINE DOES NOT
CROSS THE LATTER. IF THIS OCCURS, RELEASE THE
TENSION IN THE LINE, STOP THE ENGINE AND REMOVE
THE KINK.
1
DO NOT PULL A LOAD DOWN A SLOPE TOWARDS THE
WINCH BECAUSE THE LOAD MAY SLIDE TOWARDS YOU
BEFORE YOU CAN STOP IT. IN THIS CASE, USE A PULLEY
AT THE BOTTOM OF THE SLOPE AND POSITION THE
WINCH FURTHER BACK AWAY FROM THE AXIS OF THE
LOAD.
CHECK THE POSITION OF THE WINCH, THE STATE OF THE
LINE, THE STRENGTH OF THE ANCHORING POINT,
KNOTS, HOOKS AND/OR SHACKLES TO AVOID INJURIES
AND MATERIAL DAMAGE.
WATCH THE ANCHOR WHILE WINCHING. POSITION
YOURSELF TO AVOID BEING HIT IF THE ANCHOR
MOVES.
NEVER PLACE YOUR HANDS CLOSE TO THE LINE GUIDE,
CAPSTAN DRUM AND GUIDE PULLEY WHEN THE ENGINE
IS RUNNING.
NEVER ALLOW THE LINE TO SLIDE OVER THE DRUM FOR
MORE THAN A FEW SECONDS WHEN A LOAD IS
ATTACHED - THE HEAT CREATED BY THE FRICTION COULD
MELT OR DAMAGE THE LINE.

EN
6
3.5.2.6 Stopping the winch.
1) Gradually release the tension to gradually lower the
winch towards the ground;
2) Press the on/o button.
4 Maintenance
4.1 Cleaning.
When your work is complete, clean and dry the winch.
4.2 Lubrication.
The gearbox is lubricated in the factory and thus should not require
lubrication or maintenance. If oil losses become apparent, check
the oil level by placing the winch on a level surface and unscrew the
cap. Use an 8 mm hexagonal key.
When tipping the winch forwards, a little oil may escape through the
hole. If required, you can add SAE80W90EP gear oil.
4.3 Charger and battery.
4.3.1 Charger.
4.3.1.1 Charging.
If the battery has been stored with little charge or with no charge for
a long period, the charger enters restart mode which takes 20 hours
for the battery to be fully charged.
This prolongs the life of the battery. Once fully charged, standard
charging is available next time.
Any discharged battery requires a cooling period which is
mentioned in the battery user manual.
�Plug the charger into the mains.
�Insert the battery into the charger.
This is a diagnostic charger. The LED will ash in a specic
order to indicate the battery's current status. (See gure).
4.3.1.2 Fault indication.
When the battery is inserted in the charger and the LEDs ash red,
remove the battery from the charger for a minute and then insert again.
�
If the LEDs ash green, this means that the battery is charging normally.
�
If the LEDs still ash red, remove the battery and unplug the charger again.
Wait a minute, then plug the charger in again and reinsert the battery. If
the LEDs ash green, this means that the battery is charging normally.
�If the LEDs ash red, the battery is defective and must be replaced.
4.3.2 Battery.
4.3.2.1 Charge verication.
If the battery does not charge correctly :
�Check the socket using another device. Make sure that
power is reaching the socket.
�Check that the contacts on the charger have not been
short-circuited by debris or foreign objects.
4.3.3 Storage.
Storing the battery for more than 30 days:
�Remove the battery from the device.
�Storage the device in a location where the temperature is
between 7 ̊C et 40 ̊C (45 and 104 ºF).
4.4 Motor.
1 kW DC brushless electric motor.
5Additional information
5.1 Error codes.
Error codes are generated to identify the cause of the stoppage -
the LEDs ash repeatedly. Here are the most common codes:
DO NOT TOUCH THE CAPSTAN DRUM AFTER USE. IT
MAY BE HOT AND BURN YOUR SKIN.
DURING CLEANING, CHECK THE WINCH, THE HOOKS,
THE LINE AND THE POLYESTER SLING FOR ANY DAMAGE
OR SIGNS OF WEAR.
Regularly remove the capstan
drum and clean around the
shaft. Any accumulated debris
may damage the seal. Brush
the shaft with a little oil to avoid
corrosion.
1
THE BATTERY IS NOT FULLY CHARGED. IT IS
RECOMMENDED TO CHARGE THE BATTERY FULLY
BEFORE THE FIRST USE TO ACHIEVE MAXIMUM
OPERATING TIME. THIS LITHIUM-ION BATTERY HAS NO
MEMORY AND CAN BE CHARGED AT YOUR
DISCRETION.
1 2
1
2
Never leave the battery on the charger once it is fully charged and
ready to use.
IF THE AMBIENT TEMPERATURE IS UNUSUAL, MOVE THE
CHARGER AND THE BATTERY TO SOMEWHERE WHERE
THE TEMPERATURE IS BETWEEN 7° AND 40 °C (45 AND
104 ºF).
iF THE BATTERY IS INSERTED IN THE CHARGER WHEN IT IS
WARM OR HOT, THE RED LEDs MAY COME ON. IF THIS
HAPPENS, ALLOW THE BATTERY TO COOL AWAY FROM
THE CHARGER. THE BATTERY MAY BE CHARGED
NORMALLY ONCE A NORMAL CHARGING
TEMPERATURE IS ACHIEVED.
REFER TO THE CHARGER AND BATTERY MANUAL FOR MORE
INFORMATION.
Descriptions LED code Denitions
Battery connection
issue 3
No communication between the
battery and the control card.Or loss
of communication during the
current phase.
Surge protection 4 The current process exceeds the
maximum admissible load.
Low-voltage protection 5 The battery charge is
minimum(Recharge the battery).

EN
7
5.2 Disposing of the battery.
This avoids injuries and risks of re, explosion or electric shock or
contaminating the environment:
�Cover the battery's terminals using resistant adhesive tape.
�Never try to remove or destroy any battery component.
�Do NOT open the battery.
�Should a leak occur, the electrolyte substances released are
corrosive and toxic.
●AVOID this solution coming into contact with your eyes or skin
and do not swallow it.
�AVOID disposing of this type of battery with your household
waste.
�AVOID burning them.
�AVOID taking then to a landll site or any municipal solid
waste facilities.
�Take them to an approved recycling or landll center.
5.3 Accessoires.
A full range of accessories are available. Take a look at
www.portablewinch.info.
5.4 Warranty.
The Portable Winch Co. winch and accessories are guaranteed
against all manufacturing defects when owned by the ''original
owner'' as dened here below.
The "original owner'' is dened as the person or entity that
purchased the winch or accessories from an authorized Portable
Winch Co. dealer as shown by the original invoice. The warranty is
transferable if the new buyer holds a copy of the original invoice.
This warranty does not apply to items sold ''as is''. The warranty
does not apply to the wear parts dened as those coming into
contact with the line during pulling.
The portable capstan winch is covered as follows:
●PCW3000-Li
Commercial use: 1 year
Private use: 5 years
Serviced by Portable Winch Co. or its retailers.
Portable Winch Co. will replace or repair, at its discretion, any faulty
products. All other Portable Winch Co. accessories are covered by
a one-year (1) warranty with the exception of the lines which are
covered by a 3-month warranty. If you have any questions, please
consult the warranty policy at www.portablewinch.info .
Extend your warranty for free
We want to thank you for your purchase. To do this, we are oering
you AN ADDITIONAL ONE-YEAR (1) WARRANTY FOR FREE! It’s
easy, just register your winch at www.portablewinch.info or over the
phone on 1 888 388-7855 or + 1 819 563-2193.
5.5 Troubleshooting area.
In case of unexpected problems, consult the document
Troubleshooting area at www.portablewinch.info in the section
Manuals and instructions.
5.6 Exploded-views.
To access the exploded view of your winch, consult Exploded views
at www.portablewinch.info on the Manuals and instructions page or
see the end of the manual.
5.7 Technical data.
5.8 Manufacturer.
The Portable Capstan WinchesTM are manufactured by:
Portable Winch Co.
1170, rue Thomas-Tremblay
Sherbrooke, Québec, J1G 5G5
CANADA
Téléphone : +1 819 563-2193
Freephone (CAN & É.-U.): 1-888-388-7855
Fax : + 1 514 227-5196
E-mail : [email protected]
Website: www.portablewinch.info
ENGLISH IS THE ORIGINAL LANGUAGE OF THIS
DOCUMENT
5.9 Authorized representative EU.
- VONBLON Maschinen GmbH
Landstraße 28, 6714 Nüziders, Autrich
THE DEVICE'S BATTERY CONTAINS LITHIUM-ION WHICH IS A TOXIC
SUBSTANCE.
ALL TOXIC MATERIALS MUST BE DISPOSED OF IN
ACCORDANCE WITH DIRECTIVES TO AVOID
CONTAMINATING THE ENVIRONMENT.
BEFORE DISPOSING OF A DAMAGED OR END-OF-LIFE LITHIUM-ION BATTERY,
CONTACT YOUR LOCAL WASTE DISPOSAL FACILITY FOR MORE INFORMATION
AND THE APPROPRIATE GUIDELINES. TAKE THE BATTERIES TO THE LOCAL
RECYCLING AND LANDFILL CENTER AUTHORIZED TO DISPOSE OF LITHIUM-ION
BATTERIES. IF THE BATTERY IS CRACKED, EVEN IN THE ABSENCE OF A LEAK. YOU
MUST NOT CHARGE OR USE IT. YOU SHOULD REMOVE IT AND REPLACE IT WITH A
NEW BATTERY. DO NOT TRY TO REPAIR IT!
SPECIFICATIONS PCW3000-Li
ENGINE 1KW BRUSHLESS
DRUM DIMENSIONS Ø 76 MM, UP TO 4 TURNS OF 10 MM ROPE
MAXIMUM PULLING FORCE
(SINGLE LINE) 1000 KG
SPEED SPEED 1- 8.1 m/min
SPEED 2- 10 m/min
SPEED 3- 11.6 m/min
GEARBOX HARDENED STEEL GEARS/OIL LUBRICATION
WEIGHT (DRY) 9,4 KG (WITHOUT BATTERY)
DIMENSIONS (OVERALL) 30,2 cm x 31,8 cm x 31,0 cm
ROPE DOUBLE BRAID POLYESTER WITH LOW
ELASTICITY (NOT INCLUDED)
LENGTH UNLIMITED
MINIMUM DIAMETER 10 MM
MAXIMUM DIAMETER 13 MM
RECOMMENDED DIAMETER 10 MM
EMISSION-WEIGHTED SOUND
PRESSURE LEVEL A LpA 75 dB(A)
WEIGHTED SOUND POWER
LEVEL A LwA 90 dB(A)
UNCERTAINTY FACTOR
INCLUDED KwA 2.5 dB(A)
OPERATING TEMPERATURE -17°C to 45°C
Seite wird geladen ...
Seite wird geladen ...
Seite wird geladen ...
Seite wird geladen ...
Seite wird geladen ...
Seite wird geladen ...
Seite wird geladen ...
Seite wird geladen ...
Seite wird geladen ...
Seite wird geladen ...
Seite wird geladen ...
Seite wird geladen ...
Seite wird geladen ...
Seite wird geladen ...
Seite wird geladen ...
Seite wird geladen ...
Seite wird geladen ...
Seite wird geladen ...
Seite wird geladen ...
Seite wird geladen ...
Seite wird geladen ...
Seite wird geladen ...
Seite wird geladen ...
Seite wird geladen ...
Seite wird geladen ...
Seite wird geladen ...
Seite wird geladen ...
Seite wird geladen ...
Seite wird geladen ...
Seite wird geladen ...
Seite wird geladen ...
Seite wird geladen ...
Seite wird geladen ...
Seite wird geladen ...
Seite wird geladen ...
Seite wird geladen ...
Seite wird geladen ...
Seite wird geladen ...
Seite wird geladen ...
Seite wird geladen ...
Seite wird geladen ...
Seite wird geladen ...
Seite wird geladen ...
Seite wird geladen ...
Seite wird geladen ...
Seite wird geladen ...
Seite wird geladen ...
Seite wird geladen ...
Seite wird geladen ...
Seite wird geladen ...
Seite wird geladen ...
Seite wird geladen ...
-
 1
1
-
 2
2
-
 3
3
-
 4
4
-
 5
5
-
 6
6
-
 7
7
-
 8
8
-
 9
9
-
 10
10
-
 11
11
-
 12
12
-
 13
13
-
 14
14
-
 15
15
-
 16
16
-
 17
17
-
 18
18
-
 19
19
-
 20
20
-
 21
21
-
 22
22
-
 23
23
-
 24
24
-
 25
25
-
 26
26
-
 27
27
-
 28
28
-
 29
29
-
 30
30
-
 31
31
-
 32
32
-
 33
33
-
 34
34
-
 35
35
-
 36
36
-
 37
37
-
 38
38
-
 39
39
-
 40
40
-
 41
41
-
 42
42
-
 43
43
-
 44
44
-
 45
45
-
 46
46
-
 47
47
-
 48
48
-
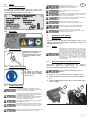 49
49
-
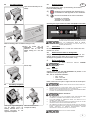 50
50
-
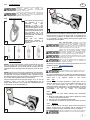 51
51
-
 52
52
-
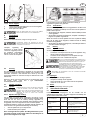 53
53
-
 54
54
-
 55
55
-
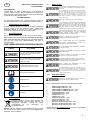 56
56
-
 57
57
-
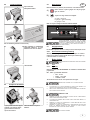 58
58
-
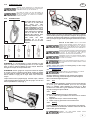 59
59
-
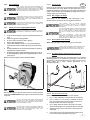 60
60
-
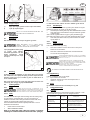 61
61
-
 62
62
-
 63
63
-
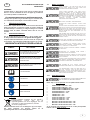 64
64
-
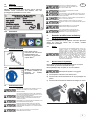 65
65
-
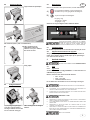 66
66
-
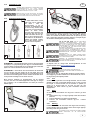 67
67
-
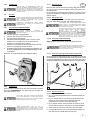 68
68
-
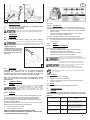 69
69
-
 70
70
-
 71
71
-
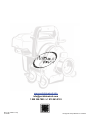 72
72


