
DIGITAL CAMERA/APPAREIL PHOTO NUMÉRIQUE
DIGITALKAMERA/CAMERA DIGITAL/
C-100/D-370
BASIC MANUAL/MANUEL DE BASE
KURZANLEITUNG/MANUAL BÁSICO/
ENGLISH
FRANÇAIS
DEUTSCH
ESPAÑOL
■ Before using your camera, read this manual carefully to ensure correct use.
■ We recommend that you take test shots to get accustomed to your camera before taking important
photographs.
■ These instructions are only a basic manual. For more details on the functions described here, refer to
the software CD’s reference manual on CD-ROM. The CD-ROM reference manual also includes
instructions for connecting the camera to a PC.
■ Avant d’utiliser votre appareil photo, veuillez lire attentivement ce mode d’emploi, de manière à obtenir
les meilleurs résultats possibles.
■ Avant d’effectuer des prises de vues importantes, nous vous conseillons par ailleurs de faire quelques
essais afin de vous familiariser avec le maniement de l’appareil photo.
■ Ces instructions ne sont qu’un manuel de base. Pour plus de détails sur les fonctions décrites ici, se
référer aux manuel de référence du CD logiciel sur le CD-ROM. Le manuel de référence compris dans
le CD-ROM comprend aussi des instructions pour la connexion à un ordinateur.
■ Bitte lesen Sie vor dem Gebrauch dieser Kamera sorgfältig diese Bedienungsanleitung, um optimale
Ergebnisse beim Fotografieren zu erzielen.
■ Wir empfehlen, vor wichtigen Aufnahmen Probeaufnahmen durchzuführen, um sich mit der
Bedienung und den Funktionen der Kamera vertraut zu machen.
■ Die vorliegende Broschüre stellt nur eine einfache Anleitung dar. Falls Sie ausführlichere Angaben zu
den hier beschriebenen Funktionen benötigen, steht Ihnen die KURZANLEITUNG auf der CD-ROM
zur Verfügung. Das CD-ROM Nachschlage-Handbuch enthält auch Anweisungen für den Anschluss
der Kamera an einen PC.
■ Antes de usar su cámara lea este manual detalladamente para asegurar el uso correcto.
■ Nosotros le recomendamos que tome fotografías de prueba para familiarizarse con su cámara antes
de tomar fotografías importantes.
■ Estas instrucciones constituyen sólo un manual básico. Para más detalles de las funciones descritas
aquí, refiérase a las manual de consultas del software CD en el CD-ROM. En el manual de consulta
de CD-ROM también se incluyen las instrucciones para conectar la cámara a un PC.
■
■
■ CD-ROM CD CD-ROM
5/22/01, 4:39 PM1

2 En
■ Introduction
About this manual
● The information contained in this manual may be subject to change without
notice. For the latest information on the product names, model numbers,
etc., plaese contact Olympus representative.
● The information contained in this manual has been compiled by taking all
possible measures to ensure its accuracy. However, if you find any errors
or incomplete information, please contact Olympus representative.
● It is prohibited by copyright laws to duplicate in part or in whole the
information contained in this manual, except for personal use. Reproduction
without permission of the copyright owner is prohibited.
● Olympus will not assume any liability for damages, loss of profit or claim
from a third party due to improper use of this product.
● Olympus will not assume any liability for damages and loss of profit due to
loss of image data resulting from servicing by a third party who is not
designated by Olympus or from other causes.
● The quality of the images shot with this product differs from that of the
images shot with ordinary film-based cameras.
Copyright
©
2001 OLYMPUS OPTICAL CO., LTD.
Radio and Television Interference
Change or modifications not expressly approved by the manufacturer may
void the user’s authority to operate this equipment. This equipment has been
tested and found to comply with the limits for a Class B digital device, pursuant
to Part 15 of the FCC Rules. These limits are designed to provide reasonable
protection against harmful interference in a residential installation. This
equipment generates, uses, and can radiate radio frequency energy and, if
not installed and used in accordance with the instructions, may cause harmful
interference to radio communications.
However, there is no guarantee that interference will not occur in a particular
installation. If this equipment does cause harmful interference to radio or
television reception, which can be determined by turning the equipment off
and on, the user is encouraged to try to correct the interference by one or
more of the following measures:
• Adjust or relocate the receiving antenna.
• Increase the distance between the camera and receiver.
• Connect the equipment to an outlet on a circuit different from that to which
the receiver is connected.
Only the included USB cable should be used to connect the camera to a
personal computer (PC).
4/24/01, 3:36 PMPage 2

3En
Declaration of conformity
Model Number: C-100/D-370
Trade Name: OLYMPUS
Responsible Party: Olympus America Inc.
Address: 2 Corporate Center Drive, Melville, New York
11747-3157 USA
Telephone Number: 631-844-5000
This device complies with Part 15 of the FCC rules. Operation is subject
to the following two conditions:
(1) This device may not cause harmful interference, and
(2) This device must accept any interference received, including
interference that may cause undesired operation.
This Class B digital apparatus meets all requirements of the Canadian
Interference-Causing Equipment Regulations
“CE” mark indicates that this product complies with the European
requirements for safety, health, environment and customer
protection.
Trademarks
● Microsoft products, such as Windows and Internet Explorer, are registered
trademarks or trademarks of Microsoft Corporation in the United States of
America and in other countries.
● Macintosh and Apple are registered trademarks of Apple Computers, Inc.
● Other brand names and product names mentioned in this manual are
trademarks or registered trademarks of their respective owners.
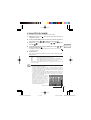
About the camera file system
The DCF (Design rule for Camera File system) is a standard established by
JEITA (Japan Electronics and Information Technology Association).
4/24/01, 3:36 PMPage 3

4 En
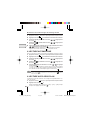
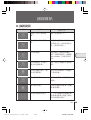
■CONTENTS
PREPARATIONS 5
Names of parts ................................ 5
Attaching the strap ........................... 6
Loading the batteries ....................... 6
Using a smartmedia card (optional) ....
7
Turning the camera on/off ................ 8
Adjusting the date and time ............. 9
TAKING PICTURES 11
Taking pictures ............................... 11
Using the flash ............................... 12
Macro mode ................................... 13
Selftimer ......................................... 13
Digital Tele mode ............................ 14
Sequence mode ............................. 14
Exposure compensation ................ 15
White balance ................................ 16
Image quality .................................. 17
Spot metering mode ...................... 18
PLAYING BACK PICTURES 19
Playing back an image ................... 19
Index playback ............................... 19
Auto playback ................................. 20
Close-up playback .......................... 20
Erasing an image ........................... 21
Erasing all images .......................... 22
Protecting important images .......... 22
OTHER FUNCTIONS 24
Recording a moving image ............ 24
Playing back moving images .......... 24
Rec view ........................................ 25
Beep sound .................................... 25
Adjusting the monitor brightness .... 25
Card format/memory setup ............ 26
Memory back-up ............................ 27
Displaying image information ......... 27
ERROR MESSAGES 29
Error codes .................................... 29
Specifications 30
4/24/01, 3:36 PMPage 4

5En
P
REPARATIONS
1
3
4
5
8 0 ABC
E
F
D
G
I
H
96
72
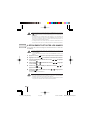
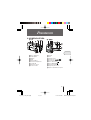
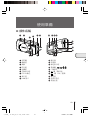
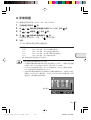
■ NAMES OF PARTS
1 Shutter button
2 Lens barrier
3 Lens
4 Flash
5 Macro lever
6 Selftimer lamp
7 DC-IN jack
8 Connector cover
9 USB connector
0 Monitor
A Viewfinder
B Green lamp
C Arrow pad
D Tripod socket
E
(Monitor) button
F
(OK/Menu) button
G Card cover
H Strap eyelet
I Battery compartment cover
4/24/01, 3:41 PMPage 5

6 En
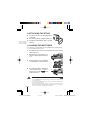
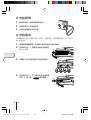
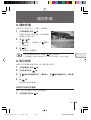
■ ATTACHING THE STRAP
1 Pass the short end of the strap through the
strap eyelet.
2
Pass the long end of the strap through the loop.
3 Pull tight and check that the strap is securely
attached.
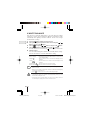
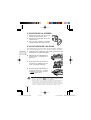
■ LOADING THE BATTERIES
This camera uses four AA alkaline (included), NiMH, lithium or NiCD batteries,
or two CR-V3 lithium battery packs.
1 Check that the lens barrier is closed and both the monitor and the
green lamp are off.
2 Pull the battery compartment cover
toward A and pull up in the direction
of B.
3 Insert the batteries as shown, making
sure that they are correctly oriented.
4 Pull down the battery compartment
cover in the direction of C and close
firmly by pressing the
mark
in the direction of D.
Caution
• If the battery compartment cover is difficult to close, press on the
mark and [OPEN] mark on the cover with your both thumbs without applying
unreasonable force.
• If the camera is left without batteries for about one hour, all the settings will be
reset to the default settings.
• When powering the camera by batteries, if the batteries start to run low, the
red battery status will be displayed. When the batteries are close to exhaustion,
the LCD monitor turns off and the green lamp blinks.
A
B
C
D
4/24/01, 3:41 PMPage 6

7En
Card
insertion mark
➜➜➜
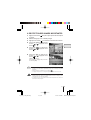
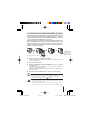
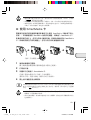
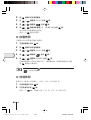
■
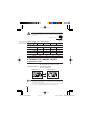
USING A SMARTMEDIA CARD (OPTIONAL)
A SmartMedia card should be used if you need to store more pictures
than the internal memory can hold. (Please see the chart on the following
page.) SmartMedia is not included with this camera, it must be purchased
separately.
This camera accepts only SmartMedia removable memory. If you insert
a SmartMedia card, the image will be stored on the card and you can
playback the image with the card. If you remove the card from the camera,
the image will be stored on the internal memory and you can playback
the image with the internal memory.
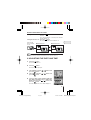
1 Make sure that the camera is turned off.
Close the lens barrier and check that both the monitor and the green
lamp are off.
2 Open the card cover.
3 Insert the SmartMedia card correctly as shown.
There is a mark showing the correct orientation of the card on the inside
of the card cover.
To remove the card, grasp it with your fingertips and pull it out in the
direction shown.
4 Close the card cover until it clicks.
Note
Non-Olympus or non-Lexar cards, or cards formatted on other equipment, such
as a PC, may not be recognized by the camera. Format the card with the camera
before using it. See “Card format/Memory setup” ( p.26).
Caution
• Never open the card cover or remove the SmartMedia card or batteries when
the camera is turned on. The data on the card may be lost, and once lost, it
cannot be restored.
•
The SmartMedia card is a precision instrument. Do not subject it to unreasonable
force or impact. Do not touch the gold-colored metal area of the card.
5/24/01, 4:44 PMPage 7

8 En
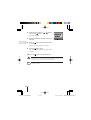
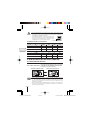
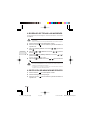
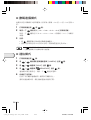
■ TURNING THE CAMERA ON/OFF
WHEN TAKING PICTURES
Turning the camera on .... Open the lens barrier.
The camera will turn on in Record mode.
Turning the camera off ... Close the lens barrier.
The camera will turn off.
Note
• When the lens barrier is opened with no card inserted, “NO CARD” will be
displayed on the monitor. This is not a malfunction. Use the internal memory
of the camera to take pictures.
• The camera’s mode will change to power save mode if you do not carry out
any operation for 3 minutes. To take pictures, turn the camera on.
Camera turns on
Camera turns off
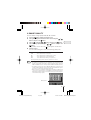
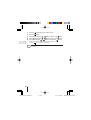
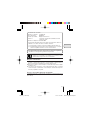
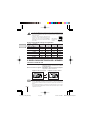
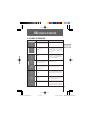
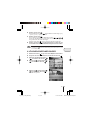
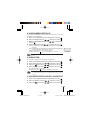
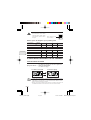
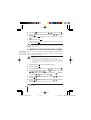
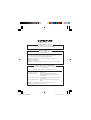
Approx. number of recordable images
SHQ HQ SQ1 SQ2
Internal memory Approx. 1 3 4 7
4 MB 6 12 16 29
8 MB 12 24 33 58
16 MB 25 49 66 110
32 MB 51 99 132 221
64 MB 102 199 265 442
128 MB 204 399 532 887
Card memory
capacity
Image
quality
Write-protect seal
Caution
• Some of the camera function are ignored if a write-protect seal is affixed to
the SmartMedia card. When you use these functions, remove the seal from
the card.
4/24/01, 3:41 PMPage 8

9En
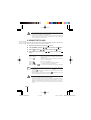
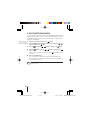
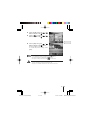
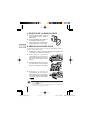
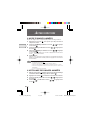
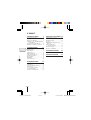
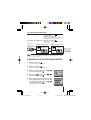
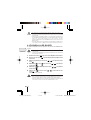
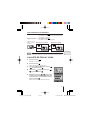
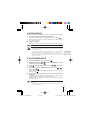
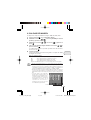
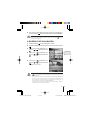
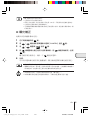
■ ADJUSTING THE DATE AND TIME
1 Press the button.
The monitor will turn on.
2 Press the button.
The menu will be displayed.
3 Select [SETUP] using the / buttons and
press the
button.
4 Select [ ] using the / buttons and
press the
button.
5 Select the date format [Y-M-D (Year-Month-
Day), M-D-Y (Month-Day-Year) or D-M-Y (Day-
Month-Year)] using the
/ buttons, and
press the
button.
The date adjustment screen will be displayed.
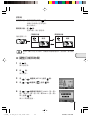
Monitor turns on
Monitor turns off
Camera with
the lens barrier
closed
lights up goes off
WHEN PLAYING BACK PICTURES
Turning the monitor on ... Press the button with the lens barrier
closed.
The camera will turn on in Play mode and the
monitor will turn on.
Turning the monitor off ... Press the
button.
The camera and the monitor will turn off.
Note
The camera’s mode will change to power save mode if you do not carry out any
operation for 3 minutes. To play back pictures, turn the camera on.
4/24/01, 3:41 PMPage 9

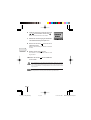
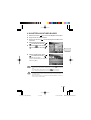
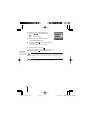
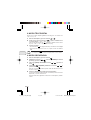
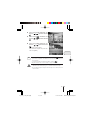
10 En
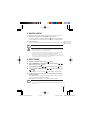
6 Set the first item using the / buttons
and press the
button.
Move to the next item.
7 Repeat until the date and time settings are
adjusted.
8 Press the button when the time reaches
00 seconds.
Setting of the date and time is completed.
9 Press the button again.
The date and time adjustment menu will be
completed.
10 Press the button to turn the monitor off.
Caution
The date and time settings will be erased or become incorrect if the camera is
left without batteries or the batteries are exhausted. Make sure that the date and
time settings are correct before taking an important picture.
Note
The date and time can be adjusted both in Record mode and Play mode using
the same procedure.
4/24/01, 3:42 PMPage 10

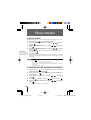
11En
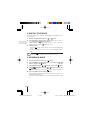
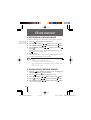
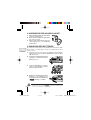
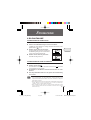
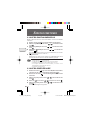
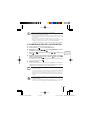
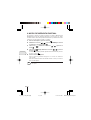
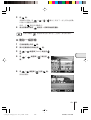
■ TAKING PICTURES
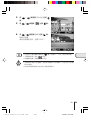
TAKING PICTURES USING THE VIEWFINDER
1 Slide the lens barrier open until it clicks.
2 Position the subject in the viewfinder using the Target mark.
To take pictures at a distance of less than 60cm (2ft.), see “Macro mode”
(
p.13).
3 Press the Shutter button halfway.
The green lamp next to the viewfinder
lights.
The exposure is locked while the Shutter
button is pressed halfway.
4 Press the Shutter button fully.
The picture is taken.
TAKING PICTURES USING THE MONITOR
1 Open the lens barrier.
2 Press the button.
The monitor will turn on. Press the
button again to turn the monitor off.
3 Compose the picture by looking at the subject in the monitor.
4 Take the picture in the same way as you would when using the
viewfinder.
Note
• If the green lamp blinks when the Shutter button is pressed halfway, the flash
is not fully charged. The green lamp blinks while the camera is recording the
picture taken. Wait for 2 to 40 seconds untill the green lamp stops blinking.
• When the memory gauge is full, no more images can be taken. Wait a few
seconds until the memory gauge goes off before taking any more pictures.
• When a picture is taken in bright light, such as sunlight, vertical lines may
appear on the monitor. This is not a malfunction.
• The monitor is for checking the composition only. Check the hand jitter, focus
and exposure accuracy afterwards by displaying the image on a PC.
• It will take longer to record a picture when the monitor is used.
T
aking pictures
4/24/01, 3:39 PMPage 11

12 En
Caution
• Press the Shutter button gently. Pressing the button down hard will cause the
camera to move, resulting in a blurred picture.
• Never remove the battery or AC adapter, open the card cover while the green
lamp is blinking. The picture you have just taken may not be recorded and
previous pictures may be destroyed.
■ USING THE FLASH
The flash automatically fires in lowlight and backlight conditions, but the flash
mode can be selected to suit various conditions.
1 Open the lens barrier and press the button.
2 Select [CAMERA] using the / buttons and press the button.
3 Select [ ] using the / buttons and press the button.
4 Select the flash mode using the / buttons and press the
button.
FLASH MODE SETTINGS
Auto (no display) : Flash fires automatically in low light or backlit conditions
(default setting)
Red-eye ( ) : Reduces the phenomenon of a subject's eyes appearing
red in the resulting picture
Flash on ( ) : Fires in any circumstances
Flash off ( ) : Does not fire regardless of the light conditions
Night view ( ) : Use this mode when taking night views
Night view/Red-eye
( ) : Use this mode when taking people against a night view
Note
• To comfirm the current flash mode setting, press the button with the lens
barrier open.
Press the button after the confirmation to change the flash mode setting.
• Range of flash: ~ 2.5m/8ft.
• All the flash mode settings except for Red-eye ( ) will return to Auto mode
(default setting) when the lens barrier is closed.
Caution
• The green lamp blinks while the flash is charging and the shutter button will
not be pressed. Wait until the green lamp goes off.
• When taking pictures at close range using the flash, the appropriate brightness
may not be achieved and there may be pronounced shadows as a result.
Olympus recommends that you check the picture on the camera’s LCD monitor.
• The flash cannot be used in Sequence mode, Panorama mode and Movie
mode.
5/22/01, 6:11 PMPage 12

13En
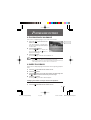
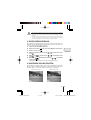
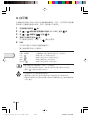
■ MACRO MODE
Use this mode to take close-up pictures at a distance of less than 25-60cm (10"-2ft.).
1 Open the lens barrier and slide the Macro lever across.
The monitor will turn on automatically and the
symbol will be displayed.
To cancel Macro mode, slide the macro lever back to its original position.
2 Take the picture.
Macro mode is automatically cancelled when the camera is turned off.
Note
Macro mode is canceled when the lens barrier is closed.
Caution
• Make sure to slide the macro lever completely.
• When using the Macro mode, keep the distance between the camera and the
subject at a distance of more than 25cm (10'').
• If you try to take a picture at a distance of less than 25cm (10''), the autofocus
will not work properly even though the Shutter button is released.
• If you use the flash in Macro mode, the brightness may not be correct and
there may be pronounced shadows as a result. Olympus recommends that
you check the picture on the camera’s monitor.
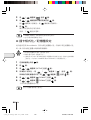
■ SELFTIMER
1 Open the lens barrier and press the button.
2 Select [CAMERA] from the Camera menu screen using the /
buttons and press the button.
3 Select [DRIVE] using the / buttons and press the button.
4 Select [ SELF-TIMER] using the / buttons and press the
button.
The Selftimer is now set. Press the
button again to exit the menu.
5 Compose the picture on the monitor or in the viewfinder and press
the Shutter button.
The Selftimer lamp on the front of the camera lights for 10 sec. and then
blinks for 2 sec. before the picture is taken.
The Selftimer automatically goes off after the picture is taken.
Note
• The Selftimer is canceled automatically after the picture is taken.
• To cancel the Selftimer after the Shutter button has been pressed, shut the
lens barrier off.
4/24/01, 3:39 PMPage 13

14 En
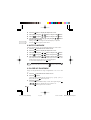
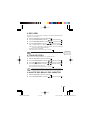
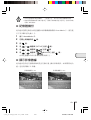
■ DIGITAL TELE MODE
This mode enables you to enlarge the image digitally to magnifications 1.6×,
2×, 3.2× and 4×.
1 Open the lens barrier and press the or button.
2 The magnification changes in the sequence [1.6× → 2.0× → 3.2× →
4.0×] each time the
button is pressed.
The magnification changes in the sequence [3.2× → 2.0× → 1.6× → No
display (1.0)] each time the
button is pressed.
3 Take the picture.
· Press the
button to turn the monitor off and cancel the Digital Tele
mode.
· When the magnification is set to 3.2× or 4×, set the Quality mode to
SQ2.
Note
• Press the button to turn the monitor off and cancel Digital Tele mode.
• The pictures taken in Digital Tele mode may become coarser.
■ SEQUENCE MODE
1 Open the lens barrier and press the button.
2 Select [CAMERA] from the Camera menu screen using the /
buttons, and press the button.
3 Select [DRIVE] using the / buttons, and press the button.
4 Select [ SEQUENCE] using the / buttons and press the
button.
Sequence mode is now set. Press the
button again to exit the menu.
5 Press the Shutter button and keep it pressed.
Picture-taking will continue while the Shutter button is pressed and stop
when the button is released.
To return to normal recording mode, close the lens barrier and then reopen
it.
4/24/01, 3:39 PMPage 14

15En
Note
• Sequence mode is canceled when the lens barrier is closed.
• The flash cannot be used in this mode.
• Since the shutter speed is set to the maximum 1/30 sec. to prevent hand jitter,
the resulting picture may be darker than usual.
• It takes a while to record the images taken in this mode.
• The number of recordable pictures will vary depending on the image quality
mode and whether a SmartMedia card is used.
If you intend to take a lot of pictures, a SmartMedia card is recommended.
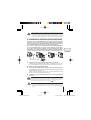
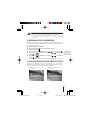
■ EXPOSURE COMPENSATION
This mode enables you to change the brightness of the image.
1 Press the button with the lens barrier open.
2 Select [CAMERA] from the Camera menu screen using the /
buttons and press the button.
3 Select [ ] using the / buttons and press the button.
4 Adjust the exposure compensation setting by pressing the
button to make the image darker and the button to make it lighter,
and press the
button.
The exposure compensation is now set. Press the
button again to exit
the menu.
5 Take the picture.
You can continue taking pictures with the selected exposure compensation
setting. Close the lens barrier to cancel the exposure compensation setting.
Note
• The setting of exposure compensation will be returned to ±0.0 (default setting)
when the lens barrier is closed.
• When you adjust the exposure compensation, the image displayed on the
monitor changes to the relevant brightness setting. If it is hard to see any
difference because the subject is dark, display the recorded image on the
camera’s monitor to check the brightness.
Caution
• The desired brightness (exposure compensation) may not be obtained if the
flash is used.
• The exposure compensation values may be inadequate if the subject is in
extremely bright or extremely dark surroundings.
4/24/01, 3:39 PMPage 15

16 En
■ WHITE BALANCE
This camera uses automatic white balance to shoot the subject in a natural-
looking tone. However, it may sometimes be difficult to get satisfactory results
automatically due to lighting or weather conditions. In such cases, change
the white balance settings.
1 Press the button with the lens barrier open.
2 Select [PICTURE] from the Camera menu screen using the /
buttons and press the button.
3 Select [ ] using the / buttons and press the button.
4 Select the white balance setting and press the button.
Tne white balance is now set. Press the
button again to exit the menu.
5 Take the picture.
You can continue taking photos with the selected white balance setting.
Close the lens barrier to cancel the white balance setting.
White balance settings
Auto (no display) : Automatically adjusts the white balance to ensure natural
colors (default setting).
Daylight ( ) : Ensures natural colors outside in full daylight (sunny
weather).
Cloudy ( ) : Ensures natural colors outside in overcast daylight (cloudy
weather).
Tungsten Light ( ) : Ensures natural colors in tungsten light.
Fluorescent Light ( ) : Ensures natural colors in fluorescent light.
Note
• The white balance setting will return to [AUTO] (default setting) when the lens
barrier is closed.
• Natural colors are hard to obtain under a mixture of artificial and natural lighting
or under fluorescent lights, etc.
• Select [ ] to obtain colors close to those under tungsten light.
Caution
• The white balance may not function under special lighting.
• Check that the setting is the optimum setting by displaying the image on the
monitor and checking the colors.
• To determine if the selected setting is the best choice, always check the
recorded image by playing it back on the camera’s monitor.
5/22/01, 6:12 PMPage 16

17En
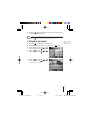
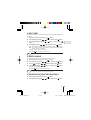
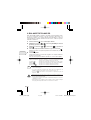
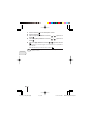
■ IMAGE QUALITY
There are 4 kinds of image quality: SHQ, HQ, SQ1 and SQ2.
1 Press the button with the lens barrier open.
2 Select [PICTURE] from the Camera menu screen using the /
buttons and press the button.
3 Select [ ] using the / buttons and press the button.
4 Select the image quality using the / buttons and press the
button.
Image quality is now set. Press the
button again to exit the menu.
5 Take the picture.
You can continue taking photos in the selected image quality mode.
Image Quality modes
SHQ 1280 × 960 Pixels (For clear prints)
HQ 1280 × 960 Pixels (For viewing images on a PC)
SQ1 1024 × 768 Pixels (For e-mail attachments)
SQ2 640 × 480 Pixels (For taking a lot of pictures)
The Image Quality setting remains when the lens barrier is closed.
Note
• The image quality setting will remain even when the lens barrier is closed.
• The number of recordable images varies depending on the image quality setting
and the storage method used. (The camera’s internal memory capacity is
1MB, SmartMedia cards are currently available in 8MB to 128 MB capacities.)
• The number of pixels is the same for HQ and SHQ, but the compression rate
is lower for SHQ, resulting in a clearer image when enlarged. SHQ also requires
more time to record and play back images than HQ.
• When you change to a high image quality and the remaining recordable image
count is low, the internal memory or SmartMedia card warning mark may be
displayed. This indicates that there is insufficient memory space. If this happens,
select a different image quality.
Warning mark
4/24/01, 3:40 PMPage 17

18 En
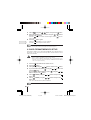
■ SPOT METERING MODE
If a shot is backlit, ordinary photometric settings (Digital ESP Metering) will
make the subject appear too dark. To compensate for this, switch the camera
to Spot Metering Mode. This feature is used to obtain the right exposure
regardless of backlighting.
1 Open the lens barrier and press the button.
2 Select [CAMERA] from the Camera menu screen using the /
buttons and press the button.
3 Select [ ] using the / buttons and press the button.
4 Select [ SPOT] using the / buttons and press the
button.
Setting of spot metering is completed. Press the
button again to exit
the menu.
5 Press the Shutter button.
You can continue recording images in the selected metering mode.
The metering mode will return to ESP mode when the lens barrier is
closed and then reopened.
Note
The metering mode will return to ESP mode (default setting) when the lens
barrier is closed.
4/24/01, 3:40 PMPage 18

19En
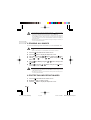
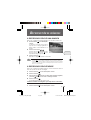
■ PLAYING BACK AN IMAGE
This mode is for displaying images one at a time on the monitor.
1 Press the button with the lens
barrier closed.
The camera will turn on in Play mode.
The last recorded image will be displayed
on the monitor.
2 Press the / buttons.
Press the
button to display the
previous image and the
button to
display the next image.
3 Press the button.
The monitor will go off and the camera will turn off.
Note
• If the button is pressed quickly twice (double-clicked) when the camera is
in Record mode, the camera’s mode will change to Play mode.
• After the camera is turned on, the monitor may light momentarily and an image
will be displayed after a short while. This is not a malfunction.
■ INDEX PLAYBACK
This mode is for displaying images in index mode from single-image playback
mode.
1 Press the button with the lens barrier closed.
2 Press the button.
3 Press the button to move the green frame to the next image and
the
button to move the frame to the previous image.
4 Press the button.
The image in the green frame will be displayed.
Changing the number of images in the index playback
Select the number of images in the index playback from 4, 9 or 16.
1 Press the button with the lens barrier closed.
P
LAYING BACK PICTURES
4/24/01, 3:49 PMPage 19

20 En
2 Press the button to display the Play menu screen.
3 Select [PLAY] using the / buttons and press the button.
4 Select [ ] using the / buttons and press the button.
5 Select the number of images [4], [9] or [16] using the / buttons
and press the
button.
Setting of the number of images in the index display is completed.
Press the button again to exit the menu.
■ AUTO PLAYBACK
In this mode all the images are automatically displayed one after another.
1 Press the button with the lens barrier closed.
2 Press the button to display the Play menu screen.
3 Select [PLAY] using the / buttons and press the button.
4 Select [ ] using the / buttons and press the button.
5 Select [START] using the / buttons and press the button.
Auto Playback will start. Each image will be played back for 3 seconds
starting from the image after the one currently displayed.
To cancel Auto Playback, press the
button.
Note
If you display the Play menu while an image marked by the Moving Image ( )
symbol is being played, you cannot select [ ]. Display a still picture first.
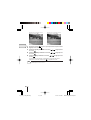
■ CLOSE-UP PLAYBACK
Images can be played back in 4 stages of magnification: 1.5×, 2×, 2.5× and
3×.
1 Press the button with the lens barrier closed.
2 Press the button.
The image will be magnified in the sequence [1.5×] → [2.0×] → [2.5×] →
[3.0×] each time the
button is pressed.
3 Press the button.
Scroll mode will be enabled. Scroll up or down, left or right, using the
/ / / buttons to display the area you want to see.
Press the
button again to exit scroll mode.
4/24/01, 3:49 PMPage 20
Seite wird geladen ...
Seite wird geladen ...
Seite wird geladen ...
Seite wird geladen ...
Seite wird geladen ...
Seite wird geladen ...
Seite wird geladen ...
Seite wird geladen ...
Seite wird geladen ...
Seite wird geladen ...
Seite wird geladen ...
Seite wird geladen ...
Seite wird geladen ...
Seite wird geladen ...
Seite wird geladen ...
Seite wird geladen ...
Seite wird geladen ...
Seite wird geladen ...
Seite wird geladen ...
Seite wird geladen ...
Seite wird geladen ...
Seite wird geladen ...
Seite wird geladen ...
Seite wird geladen ...
Seite wird geladen ...
Seite wird geladen ...
Seite wird geladen ...
Seite wird geladen ...
Seite wird geladen ...
Seite wird geladen ...
Seite wird geladen ...
Seite wird geladen ...
Seite wird geladen ...
Seite wird geladen ...
Seite wird geladen ...
Seite wird geladen ...
Seite wird geladen ...
Seite wird geladen ...
Seite wird geladen ...
Seite wird geladen ...
Seite wird geladen ...
Seite wird geladen ...
Seite wird geladen ...
Seite wird geladen ...
Seite wird geladen ...
Seite wird geladen ...
Seite wird geladen ...
Seite wird geladen ...
Seite wird geladen ...
Seite wird geladen ...
Seite wird geladen ...
Seite wird geladen ...
Seite wird geladen ...
Seite wird geladen ...
Seite wird geladen ...
Seite wird geladen ...
Seite wird geladen ...
Seite wird geladen ...
Seite wird geladen ...
Seite wird geladen ...
Seite wird geladen ...
Seite wird geladen ...
Seite wird geladen ...
Seite wird geladen ...
Seite wird geladen ...
Seite wird geladen ...
Seite wird geladen ...
Seite wird geladen ...
Seite wird geladen ...
Seite wird geladen ...
Seite wird geladen ...
Seite wird geladen ...
Seite wird geladen ...
Seite wird geladen ...
Seite wird geladen ...
Seite wird geladen ...
Seite wird geladen ...
Seite wird geladen ...
Seite wird geladen ...
Seite wird geladen ...
Seite wird geladen ...
Seite wird geladen ...
Seite wird geladen ...
Seite wird geladen ...
Seite wird geladen ...
Seite wird geladen ...
Seite wird geladen ...
Seite wird geladen ...
Seite wird geladen ...
Seite wird geladen ...
Seite wird geladen ...
Seite wird geladen ...
Seite wird geladen ...
Seite wird geladen ...
Seite wird geladen ...
Seite wird geladen ...
Seite wird geladen ...
Seite wird geladen ...
Seite wird geladen ...
Seite wird geladen ...
Seite wird geladen ...
Seite wird geladen ...
Seite wird geladen ...
Seite wird geladen ...
Seite wird geladen ...
Seite wird geladen ...
Seite wird geladen ...
Seite wird geladen ...
Seite wird geladen ...
Seite wird geladen ...
Seite wird geladen ...
Seite wird geladen ...
Seite wird geladen ...
Seite wird geladen ...
Seite wird geladen ...
Seite wird geladen ...
Seite wird geladen ...
Seite wird geladen ...
Seite wird geladen ...
Seite wird geladen ...
Seite wird geladen ...
Seite wird geladen ...
Seite wird geladen ...
Seite wird geladen ...
Seite wird geladen ...
Seite wird geladen ...
Seite wird geladen ...
Seite wird geladen ...
Seite wird geladen ...
Seite wird geladen ...
Seite wird geladen ...
Seite wird geladen ...
-
 1
1
-
 2
2
-
 3
3
-
 4
4
-
 5
5
-
 6
6
-
 7
7
-
 8
8
-
 9
9
-
 10
10
-
 11
11
-
 12
12
-
 13
13
-
 14
14
-
 15
15
-
 16
16
-
 17
17
-
 18
18
-
 19
19
-
 20
20
-
 21
21
-
 22
22
-
 23
23
-
 24
24
-
 25
25
-
 26
26
-
 27
27
-
 28
28
-
 29
29
-
 30
30
-
 31
31
-
 32
32
-
 33
33
-
 34
34
-
 35
35
-
 36
36
-
 37
37
-
 38
38
-
 39
39
-
 40
40
-
 41
41
-
 42
42
-
 43
43
-
 44
44
-
 45
45
-
 46
46
-
 47
47
-
 48
48
-
 49
49
-
 50
50
-
 51
51
-
 52
52
-
 53
53
-
 54
54
-
 55
55
-
 56
56
-
 57
57
-
 58
58
-
 59
59
-
 60
60
-
 61
61
-
 62
62
-
 63
63
-
 64
64
-
 65
65
-
 66
66
-
 67
67
-
 68
68
-
 69
69
-
 70
70
-
 71
71
-
 72
72
-
 73
73
-
 74
74
-
 75
75
-
 76
76
-
 77
77
-
 78
78
-
 79
79
-
 80
80
-
 81
81
-
 82
82
-
 83
83
-
 84
84
-
 85
85
-
 86
86
-
 87
87
-
 88
88
-
 89
89
-
 90
90
-
 91
91
-
 92
92
-
 93
93
-
 94
94
-
 95
95
-
 96
96
-
 97
97
-
 98
98
-
 99
99
-
 100
100
-
 101
101
-
 102
102
-
 103
103
-
 104
104
-
 105
105
-
 106
106
-
 107
107
-
 108
108
-
 109
109
-
 110
110
-
 111
111
-
 112
112
-
 113
113
-
 114
114
-
 115
115
-
 116
116
-
 117
117
-
 118
118
-
 119
119
-
 120
120
-
 121
121
-
 122
122
-
 123
123
-
 124
124
-
 125
125
-
 126
126
-
 127
127
-
 128
128
-
 129
129
-
 130
130
-
 131
131
-
 132
132
-
 133
133
-
 134
134
-
 135
135
-
 136
136
-
 137
137
-
 138
138
-
 139
139
-
 140
140
-
 141
141
-
 142
142
-
 143
143
-
 144
144
-
 145
145
-
 146
146
-
 147
147
-
 148
148
-
 149
149
-
 150
150
-
 151
151
-
 152
152


Olympus D370 Bedienungsanleitung
- Typ
- Bedienungsanleitung
in anderen Sprachen
- English: Olympus D370 Owner's manual
- français: Olympus D370 Le manuel du propriétaire
- español: Olympus D370 El manual del propietario
Verwandte Artikel
-
Olympus C-100 Bedienungsanleitung
-
-
-
-
-
-
-
-