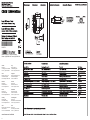
Baumer OBDM 12N6940/S35A Bedienungsanleitung
- Typ
- Bedienungsanleitung

10158756
Í?*/wXÂÂ*ÂuÎ
1/4
Canada
Baumer Inc.
CA-Burlington, ON L7M 4B9
Phone +1 (1)905 335-8444
China
Baumer (China) Co., Ltd.
CN-201612 Shanghai
Phone +86 (0)21 6768 7095
Denmark
Baumer A/S
DK-8210 Aarhus V
Phone +45 (0)8931 7611
France
Baumer SAS
FR-74250 Fillinges
Phone +33 (0)450 392 466
Germany
Baumer GmbH
DE-61169 Friedberg
Phone +49 (0)6031 60 07 0
India
Baumer India Private Limited
IN-411038 Pune
Phone +91 20 2528 6833/34
Italy
Baumer Italia S.r.l.
IT-20090 Assago, MI
Phone +39 (0)2 45 70 60 65
Singapore
Baumer (Singapore) Pte. Ltd.
SG-339412 Singapore
Phone +65 6396 4131
Sweden
Baumer A/S
SE-56133 Huskvarna
Phone +46 (0)36 13 94 30
Switzerland
Baumer Electric AG
CH-8501 Frauenfeld
Phone +41 (0)52 728 1313
United Kingdom
Baumer Ltd.
GB-Watchfield, Swindon, SN6 8TZ
Phone +44 (0)1793 783 839
USA
Baumer Ltd.
US-Southington, CT 06489
Phone +1 (1)860 621-2121
www.baumer.com/worldwide
Baumer Electric AG · CH-8501 Frauenfeld
Phone +41 (0)52 728 1122 · Fax +41 (0)52 728 1144
IND. CONT. EQ.
1DD2

2/4
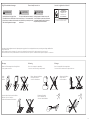
Runde, glänzende Oberflächen
Round glossy surfaces
Surfaces ronds brillantes
Glänzende Oberflächen
Glossy surfaces
Surfaces brillantes
Gradins
Stufen
Steps
Einwirkung Fremdlicht
Effect of ambient light
Influence lumiére ambiante
Surfaces differemment réfléchissantes
Unterschiedlich reflektierende Oberflächen
Different reflection of surfaces
Allg. Sicherheitsbestimmungen
General safety instructions
Instructions générales de sécurité
Montage
Mounting
Montage
Hinweis zur Elektromagnetischen Verträglichkeit:
Sensor geerdet montieren.
Note to electromagnetic compatibility:
Connect the sensor housing to earth potential.
Note à la compatibilité électromagnétique:
Connecter le boîtier du détecteur au potentiel de terre.
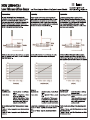
•Aus Lasersicherheitsgründen muss die Spannungsversorgung dieses Sensors abgeschaltet werden, wenn die ganze Anlage oder Maschine
abgeschaltet wird.
•Laser regulations require the power of the sensor to be switched off when turning off the whole system this sensor is part of.
•Pour des raisons de sécurité, l'alimentation de ce détecteur laser doit être coupée en cas d'arrêt total du système incorporan t ce détecteur.
Laserstrahl nie auf ein Auge richten.
Es empfiehlt sich, den Strahl nicht ins Leere
laufen zu lassen, sondern mit einem matten
Blech oder Gegenstand zu stoppen.
Do not point the laser beam towards
someone's eye. It is recommended to
stop the beam by a mat object or mat
metal sheet.
Ne dirigez jamais le faisceau vers un oeil.
Il est conseillé de ne pas laisser le faisceau
se propager librement mais de l'arrêter au
moyen d'un objet de surface mate.
VORSICHT
CAUTION
ATTENTION
LASER RADIATION
DO NOT STARE INTO BEAM
Wavelength: 640...670nm
IEC 60825-1, Ed. 3, 2014
CLASS 2 LASER PRODUCT
Complies with 21 CFR 1040.10 and 1040.11 except for deviations
pursuant to laser notice No. 50, dated June 24, 2007
Seite wird geladen ...

4/4
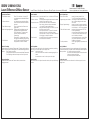
Dynamischer Teach-in
1. Teach Modus starten Taste 5 Sek. drücken -> bis rote LED
vom langsamen zum schnellen Blinken
wechselt
2. Fenster einlernen ein Objekt mit den gewünschte Grenz-
werten (Fenster) durch den Laserstrahl
schieben
3. Teach Modus stoppen Taste kurz drücken (das Fenster wird
gespeichert)
4. Wahl der Ausgangsfunktion Während des Doppelblinken kann die
Ausgangsfunktion gewählt werden
Taste nicht drücken -> Ausgang aktiv,
wenn das Objekt innerhalb des
Fensters liegt
Taste drücken -> Ausgang aktiv, wenn
das Objekt ausserhalb des Fensters liegt
5. Ende Teach-in rote LED zeigt an ob der Teach-Prozess
erfolgreich war (Teach-in Feedback)
Teach-in Feedback
Beginnt die rote LED nach dem Einlernen der 2. Position schnell zu blinken,
war der Teach-in Prozess nicht erfolgreich. Der alte Wert bleibt gespeichert.
Gründe: - Das Fenster war zu klein
- Eine oder beide Positionen waren ausserhalb des Tastbereichs
- Der Empfänger sieht den Laserspot auf dem Objekt nicht
Ausgangsfunktion
Sobald die aktuelle Distanz das Fenster verlässt, ändert sich der
Ausgangszustand.
Dynamic teach-in
1. Start teach-in mode press the button 5 sec. -> until the red LED starts
blinking fast
2. Teach-in a window move an object through the laser beam, the sensor
records the max. and min. values
3. Stop teach-in mode press the button (the sensor memorizes the
max. and min. values as the two thresholds)
-> the red LED starts double blinking
4. Output function during the double blinking of the red LED, you can
choose the output function
do not press the button -> output ON, when the
distance to the object is within the window,
press the button -> output ON, when the distance
to the object is outside the window
5. End of teach-in the red LED shows if the teach-in procedure was
successful (teach-in feedback)
Teach-in feedback
If the red LED starts blinking fast after the teach-in procedure, something
went wrong. The sensor keeps its last taught value.
Reasons: - step was too small
- one or both levels were outside the measuring range of the
sensor
- the receiver do not see the laser spot on the object
Output function
When the distance to the object leaves the window, the output will change
its status.
Teach-in dynamique
1. Entrer dans le mode presser le bouton pendant 5 sec
-> la LED rouge clignote rapidement
2. Apprentissage de la fenêtre faire bouger un objet devant le faisceau
laser, le capteur enregistre les valeurs
max et min
3. Stopper lapprentissage presser le bouton (le capteur mémorise
les valeurs max et min comme les 2 seuils
de la «fenêtre») -> la LED rouge clignote
4. Choix de la fonction sortie pendant le clignotement de la LED à la
fin de lapprentissage,
si vous ne pressez pas le bouton -> sortie
à létat ON, quand la distance de lobjet
est à lintérieur de la fenêtre
si vous pressez le bouton -> sortie à létat
ON, quand la distance de lobjet est à
lextérieur de la fenêtre
5. Fin de la procédure la LED rouge signale que la procédure est
réussie
Teach-in feedback
Si la LED rouge commence à clignoter rapidement après lapprentissage,
la procédure a échouée. Le capteur conserve les dernières valeurs apprises.
Causes possibles: - la «fenêtre» apprise est trop faible
- une ou les deux valeurs apprises est en dehors de la
distance de mesure du capteur
- aucune réception du faisceau laser
Fonction de sortie
Lorsque la distance lue est en dehors de la «fenêtre» apprise, la sortie
change détat.
OBDM 12N6940/S35A
Laser Difference Diffuse Sensor
Laser-Differenz-Taster/Laser difference diffuse/Capteur de mesure difféfentielle
Phone
+41 (0)52 728 1122
· Fax +41 (0)52 728 1144
Baumer Electric AG
· CH-8501 Frauenfeld
-
 1
1
-
 2
2
-
 3
3
-
 4
4


Baumer OBDM 12N6940/S35A Bedienungsanleitung
- Typ
- Bedienungsanleitung
in anderen Sprachen
Verwandte Artikel
-
Baumer OBDM 12N6920/S35A Bedienungsanleitung
-
-
-
-
-
-