Hercules XPS 101 Benutzerhandbuch
- Kategorie
- Lautsprechersets
- Typ
- Benutzerhandbuch


РУССКИЙ
ITALIANO
DEUTSCH
NEDERLANDS
ENGLISH
ESPAÑOL
PORTUGUÊS
FRANÇAIS
CONTENTS
1. INTRODUCTION ................................................................................................................ 2
1.1. Box contents ............................................................................................................... 2
1.2.
Technical specifications .............................................................................................. 2
1.3.
Recommended use ..................................................................................................... 3
2.
INSTALLING THE XPS 101 SPEAKER SYSTEM ............................................................ 4
2.1.
Positioning the speaker system .................................................................................. 4
2.2.
Connecting the speaker system to an audio source ................................................... 4
2.2.1.
Connection to a PC ......................................................................................... 6
2.2.2. Connection to a television set equipped with a headphone jack .................... 6
2.2.3. Connection to a DVD player/television set equipped with Left and Right
audio outputs
................................................................................................... 7
2.2.4.
Connection to a game console ....................................................................... 7
3.
USING THE XPS 101 SPEAKER SYSTEM ...................................................................... 8
4. TECHNICAL SUPPORT .................................................................................................... 9
5. WARRANTY INFORMATION .......................................................................................... 10

2/10 – User Manual
1. INTRODUCTION
1.1. Box contents
2 independent satellite speakers
1 subwoofer
1 wired remote control
Microphone cable: mini-jack (M) / mini-jack (F)
Line In cable: mini-jack (M) / mini-jack (M)
Mini-jack (F) / double RCA (F) cable
Cable clamp
User Manual
1.2. Technical specifications
Output power (effective
power)
Subwoofer: 60W RMS
8 ohms impedance
Satellite speakers: 2 x 20.5W RMS
4 ohms impedance
Total power
101W RMS
Frequency response
30Hz – 20KHz
Dimensions
Satellite speakers: 15,5cm (H) x 11cm (W) x 11cm (D)
Subwoofer: 27cm (H) x 24,5cm (W) x 24,5cm (D)
Magnetic shielding
Satellite speakers are magnetically shielded, allowing them to be
placed close to a screen without disturbing the display
For use with
PC, Consoles, DVD, Audio CD and MP3 player

РУССКИЙ
ESPAÑOL
PORTUGUÊS
ITALIANO
DEUTSCH
NEDERLANDS
ENGLISH
FRANÇAIS
User Manual – 3/10
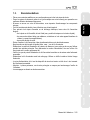
1.3. Recommended use
− Place the satellite speakers on a flat surface, to avoid the risk of the speakers falling.
− Place the subwoofer directly on the floor (underneath your desk, for example), to allow for
better diffusion of bass frequencies.
− Never open up your speaker system, as you risk damaging its internal components.
− This speaker system is intended for use in a temperate environment.
− To prevent the risk of fire or electrical discharge, keep your speaker system away from:
o rain or humidity, as well as all fluids (water, chemical products or any other liquids),
o sources of heat such as heaters and radiators, stoves or any other heat-producing devices
(including amplifiers),
o direct sunlight.
− Do not expose your speaker system to drips or splashes of water.
− Never place any object filled with liquid (a glass, vase...) on your speaker system.
− Unplug the subwoofer’s power cable, if you do not plan on using your speaker system for an
extended period of time. To unplug the power cable, pull on the power cable’s plug (never pull
on the power cable itself).
− Make sure that the subwoofer’s power cable remains easily accessible, when plugged into an
electrical outlet. Unplug the power cable from the electrical outlet to completely disconnect
your speaker system’s power supply.
− Disconnect the speaker system before cleaning. Use a damp cloth and avoid using aerosol
cleaners.
− The speaker system's power plug serves to power off the device and must therefore be easily
accessible at all times.
− Attention: At full power, prolonged listening with headphones can result in damage to the user’s
hearing.
− Markings are located on the back of the speakers.

4/10 – User Manual
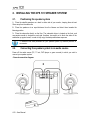
2. INSTALLING THE XPS 101 SPEAKER SYSTEM
2.1. Positioning the speaker system
1. Place the satellite speakers on a desk to either side of your monitor, keeping them at least
50cm away from the side walls.
2. Place the speakers at an equal distance from the listener and direct them towards the
listening position.
3. Place the subwoofer directly on the floor. The subwoofer driver is located on the front, and
one passive woofer is located on each side: therefore, be careful not to block the sides of the
subwoofer up against a wall, in order to fully enjoy the best possible bass response.
To determine the ideal placement for your speaker system, try different positions in
succession.
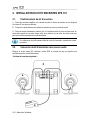
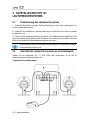
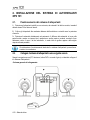
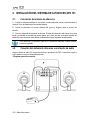
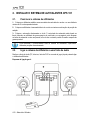
2.2. Connecting the speaker system to an audio source
Power off the audio source (PC, TV set, DVD player or game console) to which you wish to
connect your speaker system.
- General connection diagram:

РУССКИЙ
ESPAÑOL
PORTUGUÊS
ITALIANO
DEUTSCH
NEDERLANDS
ENGLISH
FRANÇAIS
User Manual – 5/10
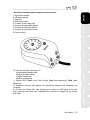
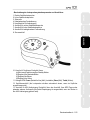
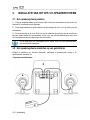
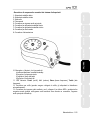
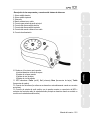
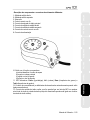
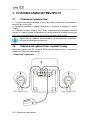
- Description of speaker system components and connectors:
1: Right satellite speaker
2: Left satellite speaker
3: Subwoofer
4: Wired remote control
5: Connector for main audio input
6: Connector for right satellite speaker
7: Connector for left satellite speaker
8: Connector for wired remote control
9: Power connector
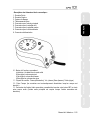
10: Knob with 4 functions, allowing you to:
(a) enable/disable standby mode
(b) adjust the master volume
(c) adjust the bass level
(d) adjust the treble level
11: Indicator LEDs: Power (on/off), Vol. (volume), Bass (bass frequencies), Treble (treble
frequencies).
12: Headphone connector (the speakers are automatically disabled when headphones are
connected).
13: Connector for auxiliary audio input, allowing you to connect your MP3 player or any other
audio source (the main audio input is disabled when a connector is plugged into the auxiliary
audio input).

6/10 – User Manual
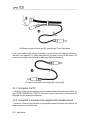
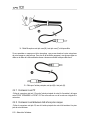
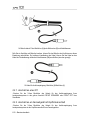
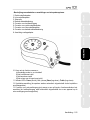
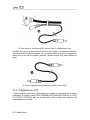
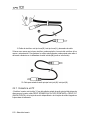
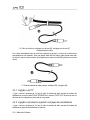
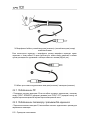
14: Microphone cable: pink mini-jack (M) / pink mini-jack (F) and Cable clamp
If you have a headset which includes a microphone, you can connect your headset’s microphone
connector to this extension. For easier management of the cables, you can clip this cable to the
remote control’s cable, using the included cable clamp (14) (as shown above).
15: Cable for main audio input: mini-jack (M) / mini-jack (M).
2.2.1. Connection to a PC
- Connect the 3.5mm mini-jack connector on your speaker system’s main audio input cable to the
green FRONT SPEAKERS or FRONT OUT connector on your sound card or on the sound card
integrated into your computer's motherboard.
2.2.2. Connection to a television set equipped with a headphone jack
- Connect the 3.5mm mini-jack connector on your speaker system’s main audio input cable to the
headphone jack on your television set.

РУССКИЙ
ESPAÑOL
PORTUGUÊS
ITALIANO
DEUTSCH
NEDERLANDS
ENGLISH
FRANÇAIS
User Manual – 7/10
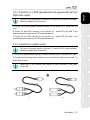
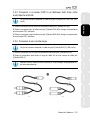
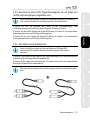
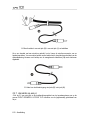
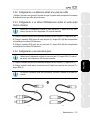
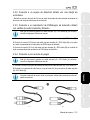
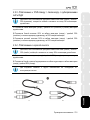
2.2.3. Connection to a DVD player/television set equipped with Left and
Right audio outputs
This type of connection requires a mini-jack (F) / double RCA (M) cable (not included):
please see diagram 16A in this manual.
1. Connect your speaker system's mini-jack connector to the mini-jack (F) / double RCA (M)
cable.
2. Connect the white RCA connector on the mini-jack (F) / double RCA (M) cable to the
corresponding audio output on your DVD player/television set.
3. Connect the red RCA connector on the mini-jack (F) / double RCA (M) cable to the
corresponding audio output on your DVD player/television set.
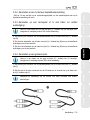
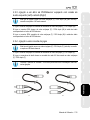
2.2.4. Connection to a game console
This type of connection requires a mini-jack (F) / double RCA (F) cable (included):
please see diagram 16B in this manual.
1. Connect your speaker system's mini-jack connector to the mini-jack (F) / double RCA (F) cable.
2. Connect the white and red audio connectors on your console's A/V cable to the mini-jack (F) /
double RCA (F) cable.
Please refer to your console's user manual for more information on the other
connections.

8/10 – User Manual
3. USING THE XPS 101 SPEAKER SYSTEM
1. Turn on the audio source you wish to use (PC, television set, DVD player or game console).
2. Power on the speaker system by pressing the main knob on the remote control (10). The
“power” and “volume” LEDs (11-Power and Vol.) light up on the remote control.
3. Adjust the volume by turning the main knob on the remote control (10): the “+” or “-” LED
flashes for each step you make in increasing or decreasing the volume. If the volume is already at
the maximum or minimum setting and you try to set it even higher or lower, the corresponding
LED remains lit up (without flashing) while you are turning the knob, indicating that the volume
can’t go any further in that direction.
4. To adjust the bass level, press and release the main knob on the remote control (10): the bass
LED (11-Bass) lights up.
5. Adjust the bass level by turning the main knob on the remote control (10): the “+” or “-” LED
flashes for each step you make in increasing or decreasing the bass level. If the bass level is
already at the maximum or minimum setting and you try to set it even higher or lower, the
corresponding LED remains lit up (without flashing) while you are turning the knob, indicating that
the bass level can’t go any further in that direction.
6. Press the main knob on the remote control (10) again to adjust the treble level. The treble LED
(11-Treble) lights up and, as described previously, the “+” or “-” LED flashes for each step you
make in increasing or decreasing the treble level. If the treble level is already at the maximum or
minimum setting and you try to set it even higher or lower, the corresponding LED stops flashing.
7. To switch between adjusting the volume, the bass level and the treble level, briefly press the
main knob on the remote control (10). After 10 seconds of inactivity in "bass level adjustment" or
"treble level adjustment" mode, the system automatically reverts to the master volume adjustment
mode.
8. To put your XPS 101 speaker system in standby mode, press and hold the main knob on the
remote control (10) for more than 3 seconds: the LEDs (11) go off. Your speaker system's power
consumption in standby mode is less than 1W, in compliance with the EC 1275/2008 standard.
9. Your volume, bass level and treble level settings are saved; however, your settings will no
longer be saved if you unplug the speaker system’s power cable.
When you connect an audio source to the Line In connector on the remote control, the
main audio source is disabled.
When you connect headphones to the remote control, the satellites and the
subwoofer are automatically disabled, and only the headphone output is enabled.

РУССКИЙ
ESPAÑOL
PORTUGUÊS
ITALIANO
DEUTSCH
NEDERLANDS
ENGLISH
FRANÇAIS
User Manual – 9/10
4. TECHNICAL SUPPORT
If you encounter a problem with your product, please go to http://ts.hercules.com and select your language.
From there you will be able to access various utilities (Frequently Asked Questions (FAQ), the latest versions
of drivers and software) that may help to resolve your problem. If the problem persists, you can contact the
Hercules products technical support service (“Technical Support”):
In order to take advantage of technical support by email, you must first register online. The information you
provide will help the agents to resolve your problem more quickly.
By email:
Click Registration on the left-hand side of the Technical Support page and follow the on-screen instructions.
If you have already registered, fill in the Username and Password fields and then click Login.
United
Kingdom
By telephone:
08450800942
Charges
at local rate
Monday to Friday from Noon to 4pm and 5pm to 10pm
Saturday from 9am to Noon and 1pm to 7pm
Sunday from 9am to Noon and 1pm to 4pm
United States
1-866-889-5036
Free
Monday to Friday from 7am to 11am and from Noon to 5pm
Saturday from 8am to 2pm
Sunday from 8am to 10am
(Eastern Standard Time)
Canada
1-866-889-2181
Free
Monday to Friday from 7am to 11am and from Noon to 5pm
Saturday from 8am to 2pm
Sunday from 8am to 10am
(Eastern Standard Time)
Denmark
80887690
Free
Monday to Friday from 1pm to 5pm and 6pm to 11pm
Saturday from 9am to 1pm and 2pm to 8pm
Sunday from 10am to 1pm and 2pm to 5pm
(English)
Sweden
0200884567
Free
Monday to Friday from 1pm to 5pm and 6pm to 11pm
Saturday from 9am to 1pm and 2pm to 8pm
Sunday from 10am to 1pm and 2pm to 5pm
(English)
Finland
0800 913060
Free
Monday to Friday from 2pm to 6pm and 7pm to Midnight
Saturday from 10am to 2pm and 3pm to 9pm
Sunday from 11am to 2pm and 3pm to 6pm
(English)

10/10 – User Manual
5. WARRANTY INFORMATION
Worldwide, Guillemot Corporation S.A. (“Guillemot”) warrants to the consumer that this Hercules product will
be free from material defects and manufacturing flaws for a period of two (2) years from the original date of
purchase. Should the product appear to be defective during the warranty period, immediately contact
Technical Support, who will indicate the procedure to follow. If the defect is confirmed, the product must be
returned to its place of purchase (or any other location indicated by Technical Support).
Within the context of this warranty, the consumer’s defective product will, at Technical Support’s option, be
either repaired or replaced. Where authorized by applicable law, the full liability of Guillemot and its
subsidiaries (including for indirect damages) is limited to the repair or replacement of the Hercules product.
The consumer’s legal rights with respect to legislation applicable to the sale of consumer goods are not
affected by this warranty.
This warranty shall not apply: (1) if the product has been modified, opened, altered, or has suffered damage
as a result of inappropriate or abusive use, negligence, an accident, normal wear, or any other cause not
related to a material defect or manufacturing flaw; (2) in the event of failure to comply with the instructions
provided by Technical Support; (3) to software not published by Guillemot, said software being subject to a
specific warranty provided by its publisher.
Copyright
© 2010 Guillemot Corporation S.A. – All rights reserved.
Hercules® is a registered trademark of Guillemot Corporation S.A. All other trademarks and brand names are
hereby acknowledged and are property of their respective owners. Illustrations not binding. Contents, designs
and specifications are subject to change without notice and may vary from one country to another.
ENVIRONMENTAL PROTECTION RECOMMENDATION
At the end of its working life, this product should not be disposed of with standard household
waste, but rather dropped off at a collection point for the disposal of Waste Electrical and
Electronic Equipment (WEEE) for recycling.
This is confirmed by the symbol found on the product, user manual or packaging.
Depending on their characteristics, the materials may be recycled. Through recycling and
other forms of processing Waste Electrical and Electronic Equipment, you can make a
significant contribution towards helping to protect the environment.
Please contact your local authorities for information on the collection point nearest you.

РУССКИЙ
ITALIANO
DEUTSCH
NEDERLANDS
ENGLISH
ESPAÑOL
PORTUGUÊS
FRANÇAIS
TABLE DES MATIÈRES
1. INTRODUCTION ................................................................................................................ 2
1.1. Contenu de la boîte ..................................................................................................... 2
1.2.
Spécifications techniques ........................................................................................... 2
1.3.
Recommandations ...................................................................................................... 3
2.
INSTALLATION DU KIT D’ENCEINTES XPS 101 ............................................................ 4
2.1.
Positionnement du kit d’enceintes .............................................................................. 4
2.2.
Connexion du kit d’enceintes à une source audio ...................................................... 4
2.2.1.
Connexion à un PC ......................................................................................... 6
2.2.2. Connexion à un téléviseur doté d’une prise casque ....................................... 6
2.2.3. Connexion à un lecteur DVD / à un téléviseur doté d’une sortie audio
Gauche et Droite
............................................................................................. 7
2.2.4.
Connexion à une console de jeu ..................................................................... 7
3.
UTILISATION DU KIT D’ENCEINTES XPS 101 ............................................................... 8
4. ASSISTANCE TECHNIQUE .............................................................................................. 9
5. GARANTIE ....................................................................................................................... 10

2/10 – Manuel de l’utilisateur
1. INTRODUCTION
1.1. Contenu de la boîte
2 enceintes satellites
1 caisson de basses
1 télécommande filaire
Câble Micro mini-jack (M) / mini-jack (F)
Câble Line In mini-jack (M) / mini-jack (M)
Câble Mini-jack (F)/double RCA (F)
Bloque-câble
Manuel de l’utilisateur
1.2. Spécifications techniques
Puissance utile
(puissance efficace)
Caisson de basses : 60 W RMS
Impédance 8 Ohms
Enceintes satellites : 2 x 20,5 W RMS
Impédance 4 Ohms
Puissance totale
101 W RMS
Réponse en fréquence
40 Hz – 20 KHz
Dimensions
Satellites : 15,5 cm (H) x 11 cm (L) x 11 cm (P)
Caisson de basses : 27 cm (H) x 24,5 cm (L) x 24,5 cm (P)
Blindage amagnétique
Blindage amagnétique des enceintes pour permettre un placement à
proximité du moniteur sans perturber l’affichage
Utilisation
PC, DVD, console de jeu, CD-Audio, MP3

Русский
ESPAÑOL
PORTUGUÊS
ITALIANO
DEUTSCH
NEDERLANDS
ENGLISH
FRANÇAIS
Manuel de l’utilisateur – 3/10
1.3. Recommandations
- Placez vos enceintes satellites sur une surface plane pour éviter tout risque de chute.
- Posez le caisson de basses à même le sol (par exemple sous votre bureau) pour permettre une
meilleure diffusion des basses fréquences.
- N’ouvrez en aucun cas votre kit d’enceintes, vous risqueriez d’endommager les composants
internes.
- Ce kit d’enceintes est destiné à une utilisation sous climat tempéré.
- Pour prévenir tout risque d’incendie ou de décharge électrique, tenez votre kit d’enceintes
éloigné :
- de la pluie ou de l’humidité, de tout fluide (eau, produits chimiques ou tout autre liquide),
- de sources de chaleur telles que radiateurs, cuisinières ou tout autre appareil émetteur de
chaleur (y compris les amplificateurs),
- des rayons directs du soleil.
- Evitez d’exposer le kit d’enceintes à des égouttements d’eau ou à des éclaboussures.
- Ne placez aucun objet rempli de liquide (verre, vase…) sur le kit d’enceintes.
- Débranchez le cordon d’alimentation du caisson de basses si vous prévoyez de ne pas l’utiliser
pendant une période prolongée. Pour débrancher le cordon d’alimentation, tirez sur la fiche. Ne
tirez jamais sur le cordon proprement dit.
- Veillez à ce que la prise d’alimentation du kit d’enceintes branchée sur le secteur reste facilement
accessible.
- Débranchez le kit d’enceintes avant tout nettoyage. Utilisez un chiffon humide et évitez l’usage
d’aérosols.
- La prise d’alimentation du kit sert de dispositif de mise hors tension et doit donc à tout moment
être facilement accessible.
- Attention : à pleine puissance, une écoute prolongée au casque peut endommager l’oreille de
l’utilisateur.
- Les marquages se situent au dos des enceintes.

4/10 – Manuel de l’utilisateur
2. INSTALLATION DU KIT D’ENCEINTES XPS 101
2.1. Positionnement du kit d’enceintes
1. Posez les enceintes satellites sur le bureau de part et d’autre du moniteur en les éloignant
d’au moins 50 cm des murs latéraux.
2. Placez-les à égale distance de l’auditeur et orientez-les vers la position d’écoute.
3. Posez le caisson de basses à même le sol. Le haut-parleur actif se trouve en face avant, un
haut-parleur passif se trouve de chaque côté, donc veillez à ne pas coller les cotés contre une
paroi pour profiter pleinement du rendu des basses.
Pour déterminer le positionnement idéal de votre kit d’enceintes, procédez par essais
successifs.
2.2. Connexion du kit d’enceintes à une source audio
Éteignez la source audio (PC, téléviseur, lecteur DVD ou console de jeu) sur laquelle vous
souhaitez brancher votre kit d’enceintes.
- Schéma de branchement général :

Русский
ESPAÑOL
PORTUGUÊS
ITALIANO
DEUTSCH
NEDERLANDS
ENGLISH
FRANÇAIS
Manuel de l’utilisateur – 5/10
- Description des éléments et de la connectique :
1 : Enceinte Droite
2 : Enceinte Gauche
3 : Caisson de Basses
4 : Télécommande filaire
5 : Connecteur pour l’entrée principale
6 : Connecteur pour le satellite droit
7 : Connecteur pour le satellite gauche
8 : Connecteur pour la télécommande
9 : Connecteur d’alimentation
10 : Bouton à 4 fonctions, permettant :
(a) d’activer / de désactiver le mode veille
(b) de régler le volume principal
(c) de régler le volume des basses
(d) de régler les volumes des aigus
11 : Voyants de contrôle : Power (alimentation), Vol. (volume), Bass (basses), Treble (aigus)
12 : Prise Casque (les enceintes sont automatiquement désactivées lorsqu’un casque est
branché.).
13 : Connecteur de l’entrée Audio secondaire, permettant de brancher votre lecteur MP3 ou toute
autre source audio (l’entrée audio principale est coupée lorsque l’entrée secondaire est
branchée.)

6/10 – Manuel de l’utilisateur
14 : Câble Microphone mini-jack rose (M) / mini-jack rose (F) et bloque-câble
Si vous possédez un casque muni d’un microphone, vous pouvez brancher la prise microphone
de votre casque sur cette rallonge. Pour plus de fa facilité de rangement, vous pouvez clipper ce
câble sur le câble de la télécommande comme ci-dessus en utilisant le bloque-câble fourni.
15 : Câble pour l’entrée principale, mini-jack (M) / mini-jack (M).
2.2.1. Connexion à un PC
- Reliez le connecteur mini-jack 3,5 mm de l’entrée principale de votre kit d’enceintes à la bague
verte FRONT SPEAKERS ou FRONT OUT de votre carte son ou de la carte son intégrée à la
carte mère.
2.2.2. Connexion à un téléviseur doté d’une prise casque
- Reliez le connecteur mini-jack 3,5 mm de l’entrée principale de votre kit d’enceintes à la prise
jack de votre téléviseur.

Русский
ESPAÑOL
PORTUGUÊS
ITALIANO
DEUTSCH
NEDERLANDS
ENGLISH
FRANÇAIS
Manuel de l’utilisateur – 7/10
2.2.3. Connexion à un lecteur DVD / à un téléviseur doté d’une sortie
audio Gauche et Droite
Ce type de connexion nécessite un câble mini-jack (F)/double RCA (M) (16A, non
inclus).
1. Reliez le connecteur jack de votre kit d’enceintes au câble jack (F)/double RCA (M).
2. Reliez le connecteur blanc du câble mini-jack (F)/double RCA (M) à la bague correspondante
de votre lecteur DVD / téléviseur.
3. Reliez le connecteur rouge du câble mini-jack (F)/double RCA (M) à la bague correspondante
de votre lecteur DVD / téléviseur.
2.2.4. Connexion à une console de jeu
Ce type de connexion nécessite un câble mini-jack (F)/double RCA (F) (16B, inclus).
1. Reliez le connecteur jack de votre kit d’enceintes au câble mini-jack (F)/double RCA (F).
2. Reliez les connecteurs audio blanc et rouge du câble A/V de votre console au câble jack
(F)/double RCA (F).
Reportez-vous au manuel de votre console pour de plus amples renseignements sur
les autres branchements.

8/10 – Manuel de l’utilisateur
3. UTILISATION DU KIT D’ENCEINTES XPS 101
1. Allumez la source audio souhaitée (PC, téléviseur, lecteur DVD ou console de jeu).
2. Allumez le système en appuyant sur le bouton principal de la télécommande (10). Les témoins
‘power’ et ‘volume’ (11-Power et Vol.) s’allument sur la télécommande.
3. Réglez le volume en tournant le bouton principal de la télécommande (10) : l’indicateur ‘+’ ou ‘-‘
clignote à chaque augmentation ou diminution du volume. Si le volume est déjà réglé au
maximum ou au minimum et que vous essayez de l’augmenter ou de le baisser, le témoin
correspondant reste allumé (sans clignoter) pendant que vous tournez le bouton, indiquant qu’il
est impossible de continuer à augmenter / baisser le volume dans cette direction.
4. Pour ajuster le volume des basses, pressez puis relâchez le bouton principal de la
télécommande (10) : le témoin de basses (11-Bass) s’allume.
5. Réglez le volume des basses en tournant le bouton principal de la télécommande (10) :
l’indicateur ‘+’ ou ‘-‘ clignote à chaque augmentation ou diminution du volume des basses. Si le
volume est déjà réglé au maximum ou au minimum et que vous essayez de l’augmenter ou de le
baisser, le témoin correspondant reste allumé pendant que vous tournez le bouton, indiquant qu’il
est impossible de continuer à augmenter / baisser le volume des basses dans cette direction.
6. Une nouvelle pression sur le bouton principal de la télécommande (10) permet de régler le
volume des aigus. Le témoin des aigus (11-Treble) s’allume et comme précédemment,
l’indicateur ‘+’ ou ‘-‘ clignote à chaque augmentation ou diminution du volume des aigus. Si le
volume est déjà réglé au maximum ou au minimum et que vous essayez de l’augmenter ou de le
baisser, le témoin correspondant cesse de clignoter.
7. Pour alterner entre réglage du volume, des basses et des aigus, appuyez brièvement sur le
bouton principal de la télécommande (10). Après 10 secondes d’inactivité en mode Réglages des
basses ou des aigus, le système repasse automatiquement en réglage du volume principal.
8. Pour mettre en veille votre XPS 101, appuyez plus de 3 secondes sur le bouton principal de la
télécommande (10) : les témoins (11) s’éteignent. La consommation en veille est alors inférieure
à 1 W, conformément à la norme EC No 1275/2008.
9. Vos réglages de volume, basses et aigus restent mémorisés tant que vous ne débranchez pas
le câble d’alimentation.
Lorsque vous branchez une source audio sur la prise Line In de la télécommande, la
source audio principale est désactivée.
Lorsque vous branchez un casque sur la télécommande, les satellites et le caisson de
basses sont automatiquement coupés et seule la sortie casque est active.

Русский
ESPAÑOL
PORTUGUÊS
ITALIANO
DEUTSCH
NEDERLANDS
ENGLISH
FRANÇAIS
Manuel de l’utilisateur – 9/10
4. ASSISTANCE TECHNIQUE
Si vous rencontrez un problème avec votre produit, rendez-vous sur le site http://ts.hercules.com et
sélectionnez votre langue. Vous aurez alors accès à différents services (Foire Aux Questions (FAQ),
dernières versions des pilotes et logiciels) susceptibles de résoudre votre problème. Si le problème persiste,
vous pouvez contacter notre support technique :
Pour bénéficier du support technique par e-mail, vous devez d’abord vous enregistrer en ligne. Les
informations fournies vont permettre aux techniciens de résoudre plus rapidement votre problème.
Par e-mail :
Cliquez sur Enregistrement à gauche de la page Support technique et suivez les instructions à l’écran.
Si vous êtes déjà enregistré, renseignez les champs Nom d’utilisateur et Mot de passe puis cliquez sur
Connexion.
Canada
Par téléphone (si vous n’avez pas d’accès Internet) :
1-866-889-2181
Gratuit
Du lundi au vendredi de 7h à 11h et de 12h à 16h
Le samedi de 8h à 14h
Le dimanche de 8h à 10h
(Heure de l’Est)
France
02 99 93 21 33
Numéro fixe France Telecom non surtaxé.
Tarif selon opérateur
Du lundi au vendredi de 13h à 17h et de 18h à 22h
Le samedi de 9h à 13h et de 14h à 20h
Le dimanche de 10h à 13h et de 14h à 17h
Suisse
0842 000 022
Tarif d’une communication locale
Du lundi au vendredi de 13h à 17h et de 18h à 22h
Le samedi de 9h à 13h et de 14h à 20h
Le dimanche de 10h à 13h et de 14h à 17h
Belgique
078 16 60 56
Tarif d’une communication nationale
Du lundi au vendredi de 13h à 17h et de 18h à 22h
Le samedi de 9h à 13h et de 14h à 20h
Le dimanche de 10h à 13h et de 14h à 17h
Luxembourg
80028612
Gratuit
Du lundi au vendredi de 13h à 17h et de 18h à 22h
Le samedi de 9h à 13h et de 14h à 20h
Le dimanche de 10h à 13h et de 14h à 17h
Seite wird geladen ...
Seite wird geladen ...
Seite wird geladen ...
Seite wird geladen ...
Seite wird geladen ...
Seite wird geladen ...
Seite wird geladen ...
Seite wird geladen ...
Seite wird geladen ...
Seite wird geladen ...
Seite wird geladen ...
Seite wird geladen ...
Seite wird geladen ...
Seite wird geladen ...
Seite wird geladen ...
Seite wird geladen ...
Seite wird geladen ...
Seite wird geladen ...
Seite wird geladen ...
Seite wird geladen ...
Seite wird geladen ...
Seite wird geladen ...
Seite wird geladen ...
Seite wird geladen ...
Seite wird geladen ...
Seite wird geladen ...
Seite wird geladen ...
Seite wird geladen ...
Seite wird geladen ...
Seite wird geladen ...
Seite wird geladen ...
Seite wird geladen ...
Seite wird geladen ...
Seite wird geladen ...
Seite wird geladen ...
Seite wird geladen ...
Seite wird geladen ...
Seite wird geladen ...
Seite wird geladen ...
Seite wird geladen ...
Seite wird geladen ...
Seite wird geladen ...
Seite wird geladen ...
Seite wird geladen ...
Seite wird geladen ...
Seite wird geladen ...
Seite wird geladen ...
Seite wird geladen ...
Seite wird geladen ...
Seite wird geladen ...
Seite wird geladen ...
Seite wird geladen ...
Seite wird geladen ...
Seite wird geladen ...
Seite wird geladen ...
Seite wird geladen ...
Seite wird geladen ...
Seite wird geladen ...
Seite wird geladen ...
Seite wird geladen ...
Seite wird geladen ...
Seite wird geladen ...
-
 1
1
-
 2
2
-
 3
3
-
 4
4
-
 5
5
-
 6
6
-
 7
7
-
 8
8
-
 9
9
-
 10
10
-
 11
11
-
 12
12
-
 13
13
-
 14
14
-
 15
15
-
 16
16
-
 17
17
-
 18
18
-
 19
19
-
 20
20
-
 21
21
-
 22
22
-
 23
23
-
 24
24
-
 25
25
-
 26
26
-
 27
27
-
 28
28
-
 29
29
-
 30
30
-
 31
31
-
 32
32
-
 33
33
-
 34
34
-
 35
35
-
 36
36
-
 37
37
-
 38
38
-
 39
39
-
 40
40
-
 41
41
-
 42
42
-
 43
43
-
 44
44
-
 45
45
-
 46
46
-
 47
47
-
 48
48
-
 49
49
-
 50
50
-
 51
51
-
 52
52
-
 53
53
-
 54
54
-
 55
55
-
 56
56
-
 57
57
-
 58
58
-
 59
59
-
 60
60
-
 61
61
-
 62
62
-
 63
63
-
 64
64
-
 65
65
-
 66
66
-
 67
67
-
 68
68
-
 69
69
-
 70
70
-
 71
71
-
 72
72
-
 73
73
-
 74
74
-
 75
75
-
 76
76
-
 77
77
-
 78
78
-
 79
79
-
 80
80
-
 81
81
-
 82
82


Hercules XPS 101 Benutzerhandbuch
- Kategorie
- Lautsprechersets
- Typ
- Benutzerhandbuch
in anderen Sprachen
- français: Hercules XPS 101 Manuel utilisateur
- español: Hercules XPS 101 Manual de usuario
- italiano: Hercules XPS 101 Manuale utente
- Nederlands: Hercules XPS 101 Handleiding
- português: Hercules XPS 101 Manual do usuário
Verwandte Artikel
-
 Hercules Computer Technology XPS 210 Benutzerhandbuch
-
Hercules XPS 2.0 10 Benutzerhandbuch
-
-
-
-
-
-
Hercules DJLearning Kit Benutzerhandbuch
-
-

Andere Dokumente
-
TRUSTMASTER 5.1 SOUND SYSTEM Bedienungsanleitung
-
 Audio Authority A-3780 Bedienungsanleitung
-
 Acoustic Authority A-5640 Bedienungsanleitung
-
 Speed Link Gravity 2.1 Benutzerhandbuch
-
ENHANCE ENPCSB2300BLUS_DS Benutzerhandbuch
-
Thrustmaster 2.1 SOUND SYSTEM KARAOKE Bedienungsanleitung
-
 Altec Lansing XA3051 Benutzerhandbuch
-
Altec Lansing PVA 7 Benutzerhandbuch
-
Altec Lansing VS4121 Benutzerhandbuch
-
 Altec Lansing XA3021 Benutzerhandbuch


