
Siros
Operating instructions | Bedienungsanleitung | Mode d‘emploi
Bron Elektronik AG
CH – 4123 Allschwil / Switzerland
www.broncolor.swiss
BA109.00 | Printed in Germany 01/ 18
|| Jessica Keller, Switzerland
Siros WiFi / RFS 2
Siros S WiFi / RFS 2

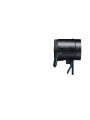
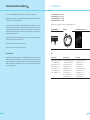
Eléments de commande et d‘affichage
1 Lumière de mise au point marche / arrêt
2 Bouton de réglage
3 Signalisation Wi-Fi
4 Affichage numérique de l’énergie d’éclair
5 Touche « test »
6 -13 Fonctions de menu
14 Poignée
15 Prise de synchronisation
16 Connexion Mini-USB
17 Interrupteur principal
*Function HS: seulement Siros 800 / 800 S
Bedienungs- und Anzeigeelemente
1 Einstelllicht ein / aus
2 Drehregler
3 WiFi-Anzeige
4 Leuchtzifferanzeige für Blitzenergieverteilung
5 “test” Taste
6 -13 Menüfunktionen
14 Griff
15 Synchro-Buchse
16 Mini-USB
17 Netzschalter
*HS Funktion: nur Siros 800 / 800 S
Controls and displays
1 Modelling light on / off
2 Rotary controller
3 WiFi display
4 Digital power distribution display
5 “test” key
6 -13 Menu settings
14 Handle
15 Sync socket
16 Mini USB
17 Mains switch
*HS function: Siros 800 / 800 S only
21 5
14
34
16
17
15
14
|| Alexander Palacios, Switzerland
13
12
11*
10
6
7
8
9


5
OPERATING INSTRUCTIONS | BRONCOLOR SIROS
Before use
Thank you for choosing broncolor Siros, which is a high-quality product in every respect. If used
properly, it will give you many years of good service. Please read all the information contained in
these operating instructions carefully. They contain important instructions for use, safety and main-
tenance
of the appliance. Keep these operating instructions in a safe place and pass them on to
further users if necessary. Observe the safety instructions.
Contents Page
Important safety instructions 6
1. Scope of supply 9
2. First start-up 10
3. Control elements 11
4. Overview of main menu functions 12
5. Menu navigation 12
6. Controlling flash times 14
7. Release 15
8. HS function 15
9. Special functions 16
10. Information and fault messages 17
11. FAQs 18
12. Accessories 20
13. Maintenance / repairs 21
14. Environmental protection information 21
15. Guarantee 21
16. Technical data 22

67
> Sudden temperature differences may result in condensation forming inside the unit. In such situ-
ations allow the equipment to stand for at least one hour in a well-ventilated place to acclimatise
to the new temperature before start-up!
> Do not operate the flash equipment in places where there is an explosion hazard!
> Monolights must never be used in water, on water or submerged in any other liquid! Attention: High
voltage – danger of fatal injury!
> For safety reasons never operate the monolight without the safety glass in place! To protect eyes
from UV radiation either a UV-coated safety glass or a UV-coated flash tube must be used.
> Before start-up the monolight must be mounted on a stand or suspended from a suitable mounting.
When a lamp is suspended it must be secured to the stand adapter by tightening the retaining screw.
> For monolights, use only sand-filled fuses of the type indicated on the safety plate to protect halo-
gen lamps! Sand-filled fuses can be identified by their opaque body. If the wrong fuse is used, the
modelling lamp may burst.
> Filters or diffusers should not be fastened directly on to flash tubes, halogen modelling lamps, or
safety glasses!
> Do not operate appliance with a damaged earthed cable. Cables which are damaged or twisted
must be replaced!
> The unit must only be connected to an earthed socket, or an emergency power generator!
> If an extension cable is necessary, a cable with a current rating at least equal to that of the ap-
pliance should be used. Cables rated for less amperage than the appliance may overheat. When
using a cable reel, it must be completely unrolled before use to prevent overheating of the cable!
> Make sure the cooling slots on the monolight are not covered or obstructed!
> When laying, clearing away or rolling up cables, make sure they do not contact hot equipment or
parts of lamps and that they do not cause a tripping hazard!
> Flash tubes, modelling lights, halogen lamps and safety glasses operate at high temperatures. This
applies also to the front face of monolights. Any accessories used on the front of a lamp also be-
come very hot. Take great care when handling them! Touching hot components can cause injuries!
When operating flash equipment, never touch glass or metal parts!
> After use allow the monolight to cool before packing it away!
> Monolights that have fallen over or been damaged must be checked by a competent specialist
before they are put back into service!
IMPORTANT SAFETY INSTRUCTIONS
Before you use your flash equipment for the first time, please read all the information contained
in these operating instructions carefully. The safety instructions they contain must be strictly fol-
lowed!
> Make sure you are thoroughly familiar with the operating instructions!
> Remove all transport protection and packing materials!
> Take special care of your equipment, particularly when there are children present! Never leave flash
equipment unattended!
> Like sunlight, flash light contains a certain amount of UV radiation! Using flash tubes or wearing
glasses that provide UV protection considerably reduces the undesirable side effects on skin and
eyes! Nevertheless, when taking pictures at close range, avoid exposing unprotected skin and
eyes to flashes! Eye contact with the light source should also be avoided! The maximum daily
exposure to UV radiation according to IEC 60335–2–27 / DIN 5031–10 is 50 J / m². This value must
not be exceeded.
> The distance between a lamp and a person or a lamp and an inflammable or heat-sensitive surface
must be at least 1 m to prevent injury or damage from thermal radiation!
> Always unplug appliance from electrical socket before cleaning, servicing and when not in use!
Never jerk cable to pull the plug from the socket. Grasp plug and pull to disconnect! Allow at least
10 minutes for cooling before replacing a halogen lamp or the flash tube!
> broncolor flash systems should only be used with original broncolor flash tubes, original broncolor
bulbs and fuses, original broncolor accessories, and original broncolor spare parts.
> broncolor monolights and accessories comply with extremely high safety standards! However, if
equipment from other manufacturers is used with broncolor monolights, the built-in safety meas-
ures may be rendered ineffective. Our guarantee is invalidated by the use of such unauthorised
combinations and we accept no liability for damage arising from such use.
>
To minimise the risk of fire, electric shock, or injury to persons, use exclusively accessories rec-
ommended by the manufacturer!
> Check that the mains voltage corresponds to the information on the type plate!
>
The flash equipment is designed for use in dry conditions and in an ambient temperature between
–10° C and 45° C. Protect the flash equipment from moisture, condensation, from dripping and
splash water, humidity, dirt, sand, metal chips and the effects of dust!
> Protect flash equipment from electromagnetic fields, shock and vibration!
> Protect flash equipment from heat and frost! If the monolight is exposed to sub-zero temperatures,
a permanent loss of power output and serious technical damage may result!

9
8
IMPORTANT SAFETY INSTRUCTIONS
> To avoid danger from electric shock never open a monolight! There may still be dangerous voltages
inside the unit. Units should only be opened, and all service and repair carried out by authorised
broncolor service stations. Incorrect assembly can cause dangerous contact voltages, even on
connected units.
> When using Siros in conjunction with a stand, use a sandbag if the stand is extended more than 2
metres.
> Remove the protective cover before use!
> Never put the unit in its case when it is hot!
> Shipping instructions:
> When transporting a monolight use the original broncolor packing. Before shipping flash tubes,
halogen lamps and safety glasses, fit the transport protection elements (protective covers) supplied
by us. If the transport protection elements are not all available, remove the flash tubes, halogen
lamps and safety glasses from the lamps and pack and ship them separately!
1. SCOPE OF SUPPLY
Siros 400 WiFi / RFS 2 – 31.613.XX
Siros 800 WiFi / RFS 2 – 31.631.XX
Siros 400 S WiFi / RFS 2 – 31.623.XX
Siros 800 S WiFi / RFS 2 – 31.643.XX
Check that all the following items have been delivered:
Siros monolight Mains cable Operating instructions (BA109.00)
> Kits
Siros Basic Kit Siros Expert Kit Siros Pro Kit
2 × Siros 400 WiFi / RFS 2 or
Siros 800 WiFi / RFS 2
2 × Umbrella, 85 cm (33.574.00)
2 × Basic M stand (35.105.00)
1 × Flash Bag 2 (36.532.00)
1 × Accessory Bag (36.535.00)
1 × Sync cable (34.111.00)
2 × Siros 400 S WiFi / RFS 2 or
Siros 800 S WiFi / RFS 2
1 × Umbrella, 85 cm (33.574.00)
1 × Softbox 60 x 60 (33.561.00)
1 × Adapter ring (33.401.00)
2 × Basic M stand (35.105.00)
1 × Flash Bag 2 (36.532.00)
1 × Accessory Bag (36.535.00)
1 × Sync cable (34.111.00)
3 × Siros 800 S WiFi / RFS 2
1 × Softbox 60 x 60 (33.561.00)
1 × Octabox 75 (33.600.00)
2 × Adapter ring (33.401.00)
2 × L40 standard reflector (33.115.00)
3 × Basic M stand (35.105.00)
1 × Flash Bag 3 (36.533.00)
1 × Accessory Bag (36.535.00)
1 × Sync cable (34.111.00)

10 11
2. FIRST STARTUP
1. Remove protective cover 2. Plug in mains cable
3. Switch the unit on at the main switch
3. CONTROL ELEMENTS
Element Function
Rotary controller (2) Switches the unit on and off (stand-by mode).
Pressing on the rotary controller for 3 s switches
the unit to stand-by.
In menu: menu navigation and confirmation of menu
items. There is an explanation of menu navigation in
chapter 5.
In operation: changes the flash energy. Turning anti-
clockwise reduces the flash energy, turning clockwise
increases it. Turning slowly changes it in 1 / 10 f-stop
steps, turning fast ("twisting") in 1 / 1 f-stop steps.
Info display (4) Shows the flash energy selected, or the menu selection
options.
full rf cell
propseqlamp WiFi HS
st/chsyncbeep
speed
testtest
Mod
Modelling light
on / off (1)
Switches the modelling light on or off. A longer press
changes the operating mode from "full" to "prop"
or vice versa.
full rf cell
propseqlamp WiFi HS
st/chsyncbeep
speed
test
test
Test (5) Starts test: the "Ready" display around the rotary
controller changes to blue as soon as the
charge / discharge operation has been completed.
Menu functions
full rf cell
propseqlamp WiFi HS
st/chsyncbeep
speed
testtest
Speed (13) For fast charging and flash times. See explanation
in chapter 6.
full rf cell
propseqlamp
WiFi
HS
st/chsyncbeep
speed
testtest
WiFi (12) Indicates whether WiFi is switched on or off.
full rf cell
propseqlamp WiFi
HS
st/chsyncbeep
speed
testtest
HS (11) Indicates whether HS is switched on or off
(Siros 800 / 800 S only).
full rf cell
propseqlamp WiFi HS
st/ch
syncbeep
speed
testtest
Studio / Channel (10) For switching the current studio channel (RFS2)
full rf cell
propseq
lamp
WiFi HS
st/chsyncbeep
speed
testtest
Lamp (9) For selecting the lamp channel (RFS2)
full rf cell
prop
seq
lamp WiFi HS
st/chsyncbeep
speed
testtest
Sequence (8) To select the number of flashes.
full rf cell
propseqlamp WiFi HS
st/chsync
beep
speed
testtest
Beep (7) Shows if the acoustic "Ready" warning is switched
on or off.
full rf cell
propseqlamp WiFi HS
st/ch
sync
beep
speed
testtest
Sync (6) Permits the selection of different methods of release
(photocell, radio, photocell and / or radio).
full rf cell
propseqlamp WiFi HS
st/chsyncbeep
speed
testtest
Sync socket /
Mini USB (15 / 16)
For release via the sync cable, or software update
via Mini USB.
full rf cell
propseqlamp WiFi HS
st/chsyncbeep
speed
testtest
On / Off (17) Switches the unit on or off.

12 13
After pressing the rotary controller (2), you enter the main menu of the monolight. From there you
have access to the various functions.
Please note: if a menu item cannot be selected, the unit does not support this function!
Example: Set a sequence of 15 flashes per release
1) Press the rotary controller (2) to enter the main menu. The menu item last selected will be
displayed. The main display changes from showing the output power to the selected menu
item.
2) Turn the rotary controller (2) until you reach the menu item "seq".
3) Press the rotary controller (2), to confirm this function. The "seq" display begins to blink.
4) Turn the rotary controller (2) until "15" appears in the main display.
5) Confirm this selection by pressing the rotary controller (2). After this confirmation, the unit
switches to its normal state. If the selection is not confirmed within 5 s, the unit switches to its
normal state without changing its setting.
1) 2) 3)
4) 5)
4. OVERVIEW OF MAIN MENU FUNCTIONS
1) To enter the main menu, press the rotary controller (2).
2) Turn the rotary controller (2) clockwise or anti-clockwise to reach the required menu item.
3) To confirm your selection, press the rotary controller (2) again. The selected menu item
starts to blink.
Display Selection options Description
speed on
off
See chapter 6 – Controlling flash times
WiFi on
off
sync
See chapter 9.2 – WiFi settings
HS on
off
Switches HS on or off (Siros 800 / 800 S only)
st / ch 1 – 99 Sets the studio address / channel from 1 – 99
lamp 1 – 40 Setting the lamp address / zone from 1 – 40
seq off
2 – 50
Selects a certain number of flash releases from 2 – 50
beep on
off
Switches acoustic "Ready" signal on or off
sync rf
ce
all
--
Selection of different methods of release (radio "rf",
photocell "ce", photocell and radio "all" or only sync
cable "--")
5. MENU NAVIGATION
Overview of menu functions
Siros 400 / 800 Siros 400 / 800
WiFi / RFS 2
Siros 400 S / 800 S
WiFi / RFS 2
speed •
WiFi • •
HS • (800 only) • (800 S only)
st/ch • •
lamp • •
seq • • •
beep • • •
sync • • •

14 15
6. CONTROLLING FLASH TIMES
With Siros, you can control the flash time in two different ways:
6.1 Controlling flash time using the "speed" setting in the main menu
In the main menu you can set the flash time of the monolight to "speed". This setting calculates
the fastest possible flash time for the chosen energy level. This also may cause the flash colour to
shift slightly towards the blue region.
1) Press the rotary controller (2) to enter the main menu.
2) Turn the rotary controller (2) until you reach the menu item "speed".
3) Confirm this selection by pressing the rotary controller (2).
4) Use the rotary controller (2) to select the option "on" or "off".
5) Confirm this with the rotary controller (2).
1) 2) 3)
4) 5)
7. RELEASE
7.1 RFS 2 module (radio frequency system)
For RFS 2 flash control, the channel (studio address) must correspond to the transmitter’s chan-
nel. The studio address is set in the menu at position "st". The lamp channel is defined in the menu
under "lamp". See chapter 9.3 for more information about changing the colours of the cognition
lights.
With the radio transceiver, you can define and set the individual lamps as you wish. To learn how
to do this, please see the operating instructions for the transceiver. The transceiver is not included
with individual heads as standard.
7.2 Photocell (cell)
The photocell can be switched on and off using the menu function "sync" (6). When it is active, the
blue LED beside the "cell" label is illuminated. After the first flash of a sequence, the active pho-
tocell is deactivated, and the blue LED beside the "sync" key (6) blinks. Pressing the "test" key
switches it on again.
7.3 Sync socket (15)
The sync cables, 5 m (16.4 ft) (Art. No. 34.111.00) and 10 m (32.8 ft) (34.112.00), can be fitted to the
socket for cable release (15).
7.4 "test" key (5)
Using this key, the monolight can be triggered manually. The flash can be triggered as soon as 70 %
of the set energy level is reached. The visual "Ready" indicator, on the other hand, only illuminates
when 100 % is attained.
8. HS FUNCTION
In combination with the RFS 2.2 transmitter, you can use Siros monolights (Siros 800 / 800 S only)
with extremely fast shutter speeds. For example, with ambient light, even with the aperture wide
open (selective focus), the image can be underexposed correctly with up to 1/8000 s and Siros still
lets you set dominant and creative light effects.
All you need for this is the RFS 2.2 transmitter, which is available for Canon, Fuji, Nikon and Sony
cameras. In addition, HS must be activated on all Siros units. This modifies the flash curve and
guarantees, in combination with RFS 2.2, correct exposure with no limits on your choice of shutter
speed.
Please read the operating instructions for the RFS 2.2 transmitter to learn more about optimum
use of the HS function.
While working in HS mode you are only able to use flash power level 4 to 10 with Siros.

16 17
9. SPECIAL FUNCTIONS
9.1 Reset (to factory settings)
Press the "test" key (5) for 4 s. This resets all functions to the works settings. Resetting is acknow-
ledged with a double beep.
9.2 "bronControl" app and WiFi settings
To control your Siros monolight, you can also download the "bronControl" app free of charge. To
find the app, search for "bronControl" in Apple’s App Store, or in Google’s Play Store.
9.2.1 Operating modes
9.2.1.1 Operation in "private" mode (factory setting)
If the WiFi mode is activated on more than one monolight, these units all link up automa-
tically with the same studio address to form a private network. A smartphone or tablet
must then be connected to this network in order to control it. To use this, activate the
WiFi function on your smartphone or tablet. Your device will then automatically search
for available WiFi networks. Connect your smartphone or tablet to the appropriate
Bron-Studio network. The connection password is: bronControl. Now start the
"bronControl" app on your device. Add the appropriate studio number under "add new
studio" and connect the app with this studio. For further instructions about operation,
please use the help function "?" in the app.
9.2.1.2 Operation in "enterprise" mode
If there is an existing WiFi network (router), the unit can be integrated into this network
using a smartphone or tablet. To achieve this, in the "bronControl" app, under settings, go
to "Network Settings" and enter your router’s settings in "enterprise" mode. Make sure
the units are set to the correct studio address. Siros saves the last type of connection and
tries to connect to the last network the next time it starts.
9.2.2 Menu settings
on / off / sync (on / -- / sy)
on WiFi module is activated. The unit tries to connect to a network.
-- WiFi module is deactivated.
sy When "sy" is selected, the unit reverts to a "private" mode.
This means that the unit looses its network setting and connects to the private network.
9.2.3 WiFi display (3) on unit
Symbol Description
Off WiFi is not activated or there is no WiFi module installed
Blinking WiFi is activated, but not connected to a network
Permanently on blue WiFi is activated and connected to a Siros network (private)
Permanently on violet WiFi is activated and connected to an existing network (enterprise)
9.3 Cognition lights
When the various lamp channels are selected (zones), the cognition light on the top surface of the
unit changes colour. The purpose of this is to differentiate between individual units when they are
controlled by the "bronControl" app. The light on the unit changes colour when the app is activated
on a smartphone or tablet or when the rotary controller on the unit is pressed; it changes back to
blue on leaving the menu.
The lamp channel colours are as follows:
Lamp channel 1 blue
Lamp channel 2 green
Lamp channel 3 violet
Lamp channel 4 yellow
Lamp channel 5 turquoise
From lamp channel 6, the colours repeat in the same order (starting with blue).
10. INFORMATION AND FAULT MESSAGES*
10.1 Acoustic signals
Beep sound end of charging or discharging
Double beep energy demand above or below energy control setting via RFS 2.1 / 2.2 transmitter
10.2 Message in display
Error 1
(f1)
No flash after triggering
→ Is the ignition wire correctly connected?
Is the flash tube correctly installed?
Otherwise replace flash tube
Error 2
(f2)
Afterglow
→ Switch the unit off and then on again. If this fault occurs repeatedly,
the flash tube is defective
Error 3
(f3)
Electronics defective
→ Unit must be sent to Service for repair
Error 4
(f4)
Overvoltage in flash capacitors
→ Unit must be sent to Service for repair
Error 5
(f5)
Thermal alarm, capacitors overheated
→ A cooling phase of approximately 20 minutes starts. Do not switch
the unit off!
* Error messages are always also indicated by the red cognition light

18 19
11. FAQs
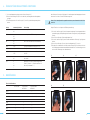
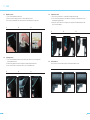
11.1 Changing flash tubes
1) Disconnect the mains cable from the unit.
2) Remove the safety glass by pulling it out of its retaining clips.
3) Press the contact spring downwards and pull the flash tube out carefully.
1) 2) 3)
11.2 Changing the fuse
1)
Disconnect the mains cable from the unit (see picture 1 above). Open the fuse compartment
beneath the unit.
2) Prise the blown fuse carefully out with a pointed object.
3) Insert the replacement fuse and close the fuse compartment again.
1) 2) 3)
11.3 Changing light shapers
1) Turn the light shaper in either direction to its stop.
2) Pull the release backwards and, at the same time, turn the light shaper until it is free of the
bayonet fitting.
3) Remove the light shaper carefully to the front. Take care not to damage the safety glass.
1) 2) 3)
11.4 Mounting an umbrella
Insert the umbrella in the opening provided beneath the unit.

20 21
12. ACCESSORIES
Siros is compatible with the entire range of broncolor light shapers.
The articles listed here are specially recommended accessories:
33.115.00 L40 standard reflector
34.260.00 Halogen modelling light, 300 W for Siros
34.360.00 Flash tube, 400 / 800 J for Siros
34.369.00 Safety glass for Siros
35.105.00 Basic M stand
36.531.00 Flash Bag 1
36.532.00 Flash Bag 2
36.533.00 Flash Bag 3
33.194.00 Honeycomb grid set for L40
33.570.00 Umbrella 105 cm silver / black
33.571.00 Umbrella 105 cm white / black
33.572.00 Umbrella 105 cm transparent
33.573.00 Umbrella 85 cm white / black
33.574.00 Umbrella 85 cm silver / black
33.117.00 Umbrella reflector for Siros incl. protective cover
33.118.00 Protective cover for Siros
33.119.00 Barn door with 4 wings for L40
33.318.00 Colour filters for barn door for L40
33.319.00 Colour correcting and diffusion filters for barn door for L40
33.576.00 Focus 110 umbrella silver / black Ø 110 cm (43.3")
36.133.00 RFS 2.1 transmitter
36.160.00 RFS 2.2 C transmitter (Canon)
36.161.00 RFS 2.2 N transmitter (Nikon)
36.162.00 RFS 2.2 S transmitter (Sony)
36.163.00 RFS 2.2 F transmitter (Fuji)
13. MAINTENANCE AND REPAIRS
Your broncolor monolight is a precision instrument and will give many years trouble-free operation
if treated with the appropriate care. However should a fault occur please do not try to open the unit
and repair it yourself. Even when the unit is switched off there may still be dangerous voltages in-
side it. Therefore, for maintenance and repairs always send the unit to your broncolor service point.
14. ENVIRONMENTAL PROTECTION INFORMATION
At the end of its useful life, this product may not be disposed of as normal household waste but
should be taken to a collection point for the recycling of electrical and electronic appliances. The
materials are recyclable according to their markings. By re-use, recycling or other form of using
old appliances you are making an important contribution to the protection of our environment.
Please ask your local authorities or our sales partner for the appropriate disposal point.
15. GUARANTEE
All broncolor power packs, lamps, monolights and accessories are built to a high quality standard.
We offer a two-year factory guarantee from the date of purchase (for the first owner) on the above
broncolor products. Excluded from this guarantee are flash tubes, halogen lamps, safety
glasses,
cables, batteries and textiles. Faults resulting from non-observance of safety instructions,
incorrect
handling, use of accessories from another manufacturer, unauthorised intervention or modifica-
tion are excluded from the factory guarantee. We assume no liability for damage resulting from
non-observance of safety instructions, incorrect handling, use of accessories from another manu-
facturer or unauthorised intervention or modification. In the event of technical problems, please
contact the nearest authorised broncolor service station immediately. Article numbers, product
descriptions and the scope of supply can vary from one country to another. For more detailed in-
formation please contact your broncolor sales partner. Errors and misprints excepted.

22 23
16. TECHNICAL DATA
Flash energy
Aperture at 2 m (6 ½ ft), 100 ISO With reflector L40
With reflector P70
Flash duration t 0.1 (t 0.5) Min. energy
Max. energy
Charging time (100 % of selected energy) 230 V / 50 Hz
120 V / 60 Hz
100 V / 50 Hz
Setting range for flash energy
Colour temperature Max. energy / P70
Connection data
Modelling light
Flash triggering
Remote control
"Ready" indicator
Additional functions
HS function
Cooling
Standards
Dimensions
Weight
Siros 400 WiFi / RFS 2 | 31.613.XX Siros 800 WiFi / RFS 2 | 31.631.XX
400 J / WS 800 J / WS
22 5 / 10 32 8 / 10
32 5 / 10 45 6 / 10
1 / 400 s (1 / 1000 s) 1 / 200 s (1 / 500 s)
1 / 1000 s (1 / 2200 s) 1 / 500 s (1 / 1100 s)
0.1 – 0.95 s 0.2 – 1.9 s
0.1 – 0.95 s 0.14 – 1.9 s
0.1 – 1.45 s 0.18 – 3.1 s
Over 7 f-stops, in steps of 1 / 10 or full f-stops
6.5 – 400 J / WS 13 – 800 J / WS
5750 K 5750 K
Adapts automatically to 100–120 V / 50–60 Hz mains voltage: 5.5 A, 200–240 V / 50–60 Hz: 3.5 A
Operation independent of mains possible with external battery converter
Halogen max. 300 W / 120 V, adjustable: off, full or proportional to flash energy
Manual release button, photocell, sync cable, with a built-in broncolor RFS 2 receiver
With
"bronControl"
app for mobile devices (only devices with a built-in WiFi module)
RFS 2.1 / 2.2 transmitter (only with built-in RFS 2 receiver)
Visual and acoustic (can be switched off)
Sequences (flash series) up to 50 flashes
Integral umbrella mounting and integral umbrella reflector
Speed mode for fastest flash times
USB connection for software updates
Thermal monitoring of power electronics
Internal discharge for output reduction
not available HS mode for use with fast shutter speeds
Fan, temperature controlled
EN 60065 / EN 61000-4-2
EN 55015
EN 301489-1 / EN 301489-3
ISO 10330
32 × 13 × 18 cm (12.6 × 5.1 × 7.1")
3.2 kg (7.1 lbs) 3.6 kg (7.9 lbs)

24 25
Flash energy
Aperture at 2 m (6 ½ ft), 100 ISO With reflector L40
With reflector P70
Flash duration t 0.1 (t 0.5) Min. energy
Max. energy
Charging time (100 % of selected energy) 230 V / 50 Hz
120 V / 60 Hz
100 V / 50 Hz
Setting range for flash energy
Colour temperature Max. energy / P70
Connection data
Modelling light
Flash triggering
Remote control
"Ready" indicator
Additional functions
HS function
Cooling
Standards
Dimensions
Weight
Siros 400 S WiFi / RFS 2 | 31.623.XX Siros 800 S WiFi / RFS 2 | 31.643.XX
400 J / WS 800 J / WS
22 5 / 10 32 8 / 10
32 5 / 10 45 6 / 10
1 / 6500 s (1 / 13000 s) 1 / 4000 s (1 / 8000 s)
1 / 1000 s (1 / 2200 s) 1 / 500 s (1 / 1100 s)
0.02 – 0.95 s 0.07 – 1.9 s
0.02 – 0.95 s 0.04 – 1.9 s
0.02 – 1.4 s 0.08 – 2.9 s
Over 9 f-stops, in steps of 1 / 10 or full f-stops
2 – 400 J / WS 4 – 800 J / WS
ECTC technology (Enhanced Colour temperature Control) for constant colour temperature
Adapts automatically to 100 – 120 V / 50 – 60 Hz mains voltage: 5.5 A, 200 – 240 V / 50 – 60 Hz: 3.5 A
Operation independent of mains possible with external battery converter
Halogen max. 300 W / 120 V, adjustable: off, full or proportional to flash energy
Manual release button, photocell, sync cable, with a built-in broncolor RFS 2 receiver
With
"bronControl"
app for mobile devices (only devices with a built-in WiFi module)
RFS 2.1 / 2.2 transmitter (only with built-in RFS 2 receiver)
Visual and acoustic (can be switched off)
Sequences (flash series) up to 50 flashes
Integral umbrella mounting and integral umbrella reflector
Speed mode for fastest flash times
USB connection for software updates
Thermal monitoring of power electronics
Internal discharge for output reduction
not available HS mode for use with fast shutter speeds
Fan, temperature controlled
EN 60065 / EN 61000-4-2
EN 55015
EN 301489-1 / EN 301489-3
ISO 10330
32 × 13 × 18 cm (12.6 × 5.1 × 7.1")
3.2 kg (7.1 lbs) 3.6 kg (7.9 lbs)


29
BEDIENUNGSANLEITUNG | BRONCOLOR SIROS
Vor dem Benutzen
Es freut uns, dass Sie sich für das in jeder Beziehung hochwertige Produkt broncolor Siros ent-
schieden haben. Bei sachgemässer Behandlung wird es Ihnen lange Jahre gute Dienste leisten.
Bitte lesen Sie alle in dieser Bedienungsanleitung aufgeführten Informationen aufmerksam durch.
Sie geben Ihnen wichtige Hinweise für den Gebrauch, die Sicherheit und die Wartung des Gerätes.
Bewahren Sie diese Gebrauchsanweisung sorgfältig auf und geben Sie diese gegebenenfalls an
Nachbenutzer weiter. Beachten Sie die Sicherheitshinweise.
Inhaltsverzeichnis Seite
Wichtige Sicherheitshinweise 30
1. Lieferumfang 33
2. Erste Inbetriebnahme 34
3. Bedienungselemente 35
4. Übersicht über die Hauptmenü-Funktionen 36
5. Menüführung 36
6. Abblitzzeiten steuern 38
7. Auslösung 39
8. HS Funktion 39
9. Spezialfunktionen 40
10. Infomeldungen / Fehlermeldungen 41
11. FAQs 42
12. Zubehör 44
13. Wartung / Reparaturen 45
14. Hinweis zum Umweltschutz 45
15. Garantie 45
16. Technische Daten 46

30 31
WICHTIGE SICHERHEITSHINWEISE
Vor Inbetriebnahme Ihrer Blitzlichtausrüstung lesen Sie alle in dieser Bedienungsanleitung auf-
geführten Informationen aufmerksam durch. Die darin aufgeführten Sicherheitshinweise müssen
zwingend befolgt werden!
> Machen Sie sich gründlich mit der Bedienungsanleitung vertraut!
> Sämtliche Transportschutz- und Verpackungselemente entfernen!
> Achten Sie besonders in Gegenwart von Kindern auf Ihre Ausrüstung! Lassen Sie die Blitzlicht-
ausrüstung nicht unbeaufsichtigt!
> Blitzlicht enthält, ähnlich wie Sonnenlicht, einen gewissen Anteil
UV
-Strahlen! Die unerwünschten
Nebenwirkungen auf Haut und Augen werden durch die Verwendung von Blitzröhren oder Schutz-
gläsern mit
UV
-Schutzmassnahmen gemindert! Trotzdem ist bei Bildaufnahmen im Nahbereich
die Bestrahlung ungeschützter Haut und Augen zu vermeiden! Der Blickkontakt mit der Licht-
quelle ist zu vermeiden! Die maximale tägliche UV-Bestrahlung gemäss IEC 60335–2–27 / DIN
5031–10 beträgt: 50 J / m2. Dieser Wert darf nicht überschritten werden!
> Die Distanz zwischen Leuchte und Personen oder Leuchte und brennbarem respektive wärmeemp-
findlichem Material muss mit Rücksicht auf die Wärmestrahlung mindestens 1 m betragen!
> Ziehen Sie den Stecker des Netzanschlusskabels heraus, wenn Sie das Gerät reinigen oder pflegen
bzw. wenn es nicht gebraucht wird! Zum Ausstecken nie am Kabel selber ziehen, sondern immer
direkt am Steckergehäuse! Vor dem Auswechseln der Halogenlampe oder der Blitzröhre ist die
Leuchte mindestens 10 Minuten abkühlen zu lassen!
> broncolor Blitzlichtsysteme dürfen nur mit original broncolor Blitzröhren, original broncolor Brenn-
und Schutzelementen, original broncolor Zubehör sowie original broncolor Ersatzteilen bestückt
werden!
> broncolor Kompaktgeräte und Zubehör genügen einem sehr hohen Sicherheitsstandard! Beim
Anschluss von fremdem Zubehör an broncolor Kompaktgeräte können jedoch die eingebauten
Sicherheitsvorkehrungen unwirksam werden! Wir lehnen ausdrücklich jegliche Garantie und Haf-
tung für Schäden ab, die aufgrund solcher unerlaubter Kombinationen entstehen!
> Um die Gefahr eines Feuers, eines elektrischen Schlages oder einer Verletzung zu vermeiden,
verwenden Sie ausschliesslich das vom Hersteller empfohlene Zubehör!
> Kontrollieren Sie, ob die Netzspannung mit den Angaben auf dem Typenschild übereinstimmt!
> Die Blitzlichtausrüstung ist für den Betrieb in trockener Umgebung sowie einer Umgebungstem-
peratur von –10° C bis 45° C ausgelegt! Die Blitzlichtausrüstung ist vor Nässe, Kondensation, Tropf-
u
nd Spritzwasser, Luftfeuchtigkeit, Schmutz, Sand, Metallspänen sowie Staubeinwirkung zu
schützen!
> Die Blitzlichtausrüstung ist vor elektromagnetischen Feldern sowie Erschütterungen und Vibra-
tionen zu schützen!
> Die Blitzlichtausrüstung vor Hitze und Frost schützen! Friert das Kompaktgerät ein, können daraus
anhaltende Leistungsverluste und schwere technischen Schäden resultieren!
> Plötzliche Temperaturunterschiede können im Gerät zu Kondenswasserbildung führen! In solchen
Situationen muss die Blitzlichtausrüstung vor Inbetriebnahme mindestens eine Stunde an einem
gut belüfteten Ort an die neue Temperatur angepasst werden!
> Die Blitzlichtausrüstung nicht in explosionsgefährdeter Umgebung einsetzen!
> Kompaktgeräte dürfen nicht im Wasser, am Wasser oder in andere Flüssigkeiten getaucht betrie-
ben werden! Achtung: Hochspannung – Lebensgefahr!
> Aus Sicherheitsgründen dürfen die Kompaktgeräte nur mit aufgestecktem Schutzglas betrieben
werden! Zum Schutz der Augen vor UV-Strahlung muss entweder ein UV-beschichtetes Schutz-
glas oder eine UV-beschichtete Blitzröhre verwendet werden!
> Das Kompaktgerät ist vor Inbetriebnahme auf einem Stativ oder an einer geeigneten Aufhänge-
vorrichtung zu befestigen! Bei Hängemontage muss das Kompaktgerät an dessen Stativaufnahme
durch Festziehen der Halterungsschraube gesichert werden!
> Bei den Kompaktgeräten dürfen zur Absicherung der Halogenlampe nur sandgefüllte Sicherungen
des auf der Sicherungsetikette angegebenen Typs verwendet werden! Sandgefüllte Sicherungen
sind am undurchsichtigen Sicherungskörper erkennbar! Bei falscher Absicherung kann die Halo-
genlampe platzen!
> Filter oder Diffusoren dürfen nicht direkt auf der Blitzröhre, der Halogen-Einstelllampe oder dem
Schutzglas befestigt werden!
> Es dürfen nur intakte, geerdete Anschlusskabel verwendet werden. Beschädigte oder verdrehte
Anschlusskabel müssen durch intakte Anschlusskabel ersetzt werden!
> Dieses Gerät darf nur an Steckdosen bzw. Notstromaggregaten betrieben werden!
> Falls ein Verlängerungskabel nötig ist, so muss es für das zu versorgende Gerät ausreichend di-
mensioniert sein! Kabel, die nicht für die betreffende Stromstärke ausgelegt sind, können sich
überhitzen! Bei Verwendung einer Kabelrolle muss diese vor Gebrauch vollständig entrollt werden,
um eine Überhitzung des Kabels zu vermeiden!
> Die Kühlschlitze am Kompaktgerät dürfen nicht abgedeckt werden!
> Achten Sie beim Verlegen, Wegräumen sowie Aufrollen von Kabeln darauf, dass diese keine heis-
sen Geräte- oder Leuchtenteile berühren und für Personen keine Stolpergefahr darstellen!
> Blitzröhren, Halogen-Einstelllampen und Schutzgläser weisen eine hohe Betriebstemperatur auf!
Dies gilt auch für die Vorderseite des Kompaktgerätes! Deshalb nimmt das verwendete Vorsatz-
Zubehör ebenfalls hohe Temperaturen an! Bei dessen Handhabung ist grösste Vorsicht geboten!
Das Berühren von heissen Komponenten kann Verletzungen verursachen! Beim Betrieb der Blitz-
lichtausrüstung dürfen keine Glas- und Metallteile berührt werden!

33
32
> Lassen Sie das Kompaktgerät nach Gebrauch abkühlen, bevor Sie dieses verpacken!
> Kompaktgeräte, die fallengelassen wurden oder beschädigt sind, müssen vor Wiederinbetrieb-
nahme von einer Fachperson geprüft werden!
>
Um gefährliche elektrische Schläge zu vermeiden, Kompaktgeräte niemals öffnen! Im Geräteinnern
können gefährliche Spannungen bestehen bleiben! Das Öffnen der Geräte sowie die Service- oder
Reparaturarbeiten dürfen deshalb nur durch autorisierte broncolor Service-Stellen ausgeführt
werden! Bei unsachgemässem Zusammenbau können selbst am geschlossenen Gerät gefährliche
Berührungsspannungen auftreten!
> Bei Benutzung eines Statives in Verbindung mit Siros muss ein Sandsack verwendet werden sobald
das Stativ auf mehr als 2 Meter ausgezogen wird.
> Vor dem Betrieb muss der Schutzdeckel entfernt werden!
> Das Gerät nicht im heissen Zustand in den Koffer legen!
> Versandinstruktion:
> Für den Transport der Kompaktgeräte broncolor Originalverpackung verwenden. Vor dem Versand
Blitzröhre, Halogenlampe und Schutzglas mit den von uns mitgelieferten Transportschutzelemen-
ten (Schutzdeckel) bestücken. Sind diese Transportschutzelemente nicht vollständig vorhanden,
Blitzröhre, Halogenlampe und Schutzglas aus der Leuchte entfernen und separat verpackt mit-
senden, resp. transportieren!
WICHTIGE SICHERHEITSHINWEISE 1. LIEFERUMFANG
Siros 400 WiFi / RFS 2 – 31.613.XX
Siros 800 WiFi / RFS 2 – 31.631.XX
Siros 400 S WiFi / RFS 2 – 31.623.XX
Siros 800 S WiFi / RFS 2 – 31.643.XX
Überprüfen Sie, ob folgende Teile im Lieferumfang vorhanden sind:
Siros Kompaktgerät Netzkabel Bedienungsanleitung (BA109.00)
> Kits
Siros Basic Kit Siros Expert Kit Siros Pro Kit
2 × Siros 400 WiFi / RFS 2 oder
Siros 800 WiFi / RFS 2
2 × Schirm 85 cm (33.574.00)
2 × Basic M Stativ (35.105.00)
1 × Flash Bag 2 (36.532.00)
1 × Accessory Bag (36.535.00)
1 × Synchronkabel (34.111.00)
2 × Siros 400 S WiFi / RFS 2 oder
Siros 800 S WiFi / RFS 2
1 × Schirm 85 cm (33.574.00)
1 × Softbox 60 × 60 (33.561.00)
1 × Adapterring (33.401.00)
2 × Basic M Stativ (35.105.00)
1 × Flash Bag 2 (36.532.00)
1 × Accessory Bag (36.535.00)
1 × Synchronkabel (34.111.00)
3 × Siros 800 S WiFi / RFS 2
1 × Softbox 60 × 60 (33.561.00)
1 × Octabox 75 (33.600.00)
2 × Adapterring (33.401.00)
2 × L40 Normalreflektor (33.115.00)
3 × Basic M Stativ (35.105.00)
1 × Flash Bag 3 (36.533.00)
1 × Accessory Bag (36.535.00)
1 × Synchronkabel (34.111.00)

34 35
3. BEDIENUNGSELEMENTE
Element Funktion
Drehregler (2) Ein- und Ausschalten des Geräts (Standby-Modus).
3 s Druck auf Drehregler schaltet das Gerät in Standby
Im Menü: Menüregelung und Bestätigung der Menü-
punkte. Erläuterung der Menüführung unter Kapitel 5
Im Betrieb: Ändert die Blitzenergie. Drehen nach links
reduziert, drehen nach rechts erhöht die Blitzenergie.
Langsames Drehen ändert um 1 / 10-, schnelles Drehen
("Twist") ändert um 1 / 1-Blendenstufe.
Infodisplay (4) Zeigt die gewählte Blitzenergie beziehungsweise die
Menüauswahlmöglichkeiten an
full rf cell
propseqlamp WiFi HS
st/chsyncbeep
speed
testtest
Mod
Einstelllicht
ein / aus (1)
Schaltet das Einstelllicht ein oder aus. Langer Druck
verändert den Betriebsmodus von "full" auf "prop" oder
umgekehrt.
full rf cell
propseqlamp WiFi HS
st/chsyncbeep
speed
test
test
Test (5) Testauslösung. Bereitschaftsanzeige um den Drehregler
wird blau, sobald der (Ent)ladevorgang abgeschlossen ist.
Menüfunktionen
full rf cell
propseqlamp WiFi HS
st/chsyncbeep
speed
testtest
Speed (13) Für schnelle Lade- und Blitzabbrennzeiten. Erläuterung
unter Kapitel 6
full rf cell
propseqlamp
WiFi
HS
st/chsyncbeep
speed
testtest
WiFi (12) Zeigt an, ob WiFi ein- oder ausgeschaltet ist
full rf cell
propseqlamp WiFi
HS
st/chsyncbeep
speed
testtest
HS (11) Zeigt an, ob HS ein- oder ausgeschaltet ist
(nur Siros 800 / 800 S)
full rf cell
propseqlamp WiFi HS
st/ch
syncbeep
speed
testtest
Studio / Kanal (10)
Dient im Menü zur Auswahl des jeweiligen Studiokanals
(RFS 2)
full rf cell
propseqlamp WiFi HS
st/chsyncbeep
speed
testtest
Leuchte (9) Dient im Menü zur Auswahl des jeweiligen Leuchten-
kanals
(RFS 2)
full rf cell
prop
seq
lamp WiFi HS
st/chsyncbeep
speed
testtest
Sequenz (8) Dient im Menü zur Auswahl einer bestimmten Anzahl
Blitzauslösungen
full rf cell
propseqlamp WiFi HS
st/chsync
beep
speed
testtest
Beep (7) Zeigt an, ob die akustische Bereitschaftsanzeige ein-
oder ausgeschaltet ist
full rf cell
propseqlamp WiFi HS
st/ch
sync
beep
speed
testtest
Sync (6) Ermöglicht die Auswahl der verschiedenen Auslöse-
möglichkeiten (Fotozelle, Funk, Fotozelle und / oder
Funk)
full rf cell
propseqlamp WiFi HS
st/chsyncbeep
speed
testtest
Synchro-Buchse /
Mini-USB (15 / 16)
Zur Auslösung via Synchronkabel bzw. Softwareupdate
über Mini-USB
full rf cell
propseqlamp WiFi HS
st/chsyncbeep
speed
testtest
Ein / Aus (17) Ein- und Ausschalten des Geräts
2. ERSTE INBETRIEBNAHME
1. Schutzdeckel entfernen 2. Netzkabel einstecken
3. Gerät am Hauptschalter einschalten

36 37
Nach Drücken des Drehreglers (2) gelangen Sie in das Hauptmenü des Kompaktgeräts. Von dort
aus können Sie auf die verschiedenen Funktionen zugreifen.
Hinweis: Falls ein Menüpunkt nicht angewählt werden kann, unterstützt das Gerät diese Funk-
tion nicht!
Beispiel: Einstellen einer Sequenz von 15 Blitzen pro Auslösung
1) Drücken Sie den Drehregler (2), um ins Hauptmenü zu gelangen. Der zuletzt gewählte Menü-
punkt wird angezeigt. Die Hauptanzeige ändert von der Leistungs- zu der jeweiligen Menüpunkt-
Anzeige.
2) Drehen Sie den Drehregler (2) bis zum Menüpunkt "seq".
3) Drücken Sie den Drehregler (2), um die Funktion auszuwählen. Die Anzeige "seq" beginnt zu
blinken.
4) Drehen Sie den Drehregler (2) so weit, bis auf der Hauptanzeige "15" erscheint.
5) Bestätigen Sie die Auswahl mit einem Druck auf den Drehregler (2). Das Gerät wechselt nach
der Bestätigung in den Normalzustand. Wird die Auswahl nach 5 s nicht bestätigt, wechselt
das Gerät ohne Änderungen in den Normalzustand.
1) 2) 3)
4) 5)
4. ÜBERSICHT ÜBER DIE HAUPTMENÜFUNKTIONEN
1) Um in das Hauptmenü zu gelangen, drücken Sie den Drehregler (2).
2)
Drehen Sie den Drehregler
(2)
nach rechts oder links, um zum gewünschten Menüpunkt zu
gelangen.
3) Zum Bestätigen drücken Sie den Drehregler (2) erneut. Der gewählte Menüpunkt beginnt zu
blinken.
Anzeige Auswahlmöglichkeiten Beschreibung
speed on
off
siehe Kapitel 6 – Abblitzzeiten steuern
WiFi on
off
sync
siehe Kapitel 9.2 – WiFi Einstellungen
HS on
off
HS ein- oder ausschalten (nur Siros 800 / 800 S)
st / ch 1 – 99 Festlegen der Studioadresse / Kanal von 1 – 99
lamp 1 – 40 Festlegen der Leuchtenadresse / Zone von 1 – 40
seq off
2 – 50
Auswahl einer bestimmten Anzahl Blitzauslösungen
von 2 – 50
beep on
off
Akustische Bereitschaftsanzeige ein- oder
ausschalten
sync rf
ce
all
--
Auswahl der verschiedenen Auslösemöglichkeiten.
(Funk "rf", Fotozelle "ce", Fotozelle und Funk "all"
oder nur Synchronkabel "--")
5. MENÜFÜHRUNG
Übersicht Menüfunktionen
Siros 400 / 800 Siros 400 / 800
WiFi / RFS 2
Siros 400 S / 800 S
WiFi / RFS 2
speed •
WiFi • •
HS • (nur 800) • (nur 800 S)
st/ch • •
lamp • •
seq • • •
beep • • •
sync • • •
Seite wird geladen ...
Seite wird geladen ...
Seite wird geladen ...
Seite wird geladen ...
Seite wird geladen ...
Seite wird geladen ...
Seite wird geladen ...
Seite wird geladen ...
Seite wird geladen ...
Seite wird geladen ...
Seite wird geladen ...
Seite wird geladen ...
Seite wird geladen ...
Seite wird geladen ...
Seite wird geladen ...
Seite wird geladen ...
Seite wird geladen ...
Seite wird geladen ...
Seite wird geladen ...
-
 1
1
-
 2
2
-
 3
3
-
 4
4
-
 5
5
-
 6
6
-
 7
7
-
 8
8
-
 9
9
-
 10
10
-
 11
11
-
 12
12
-
 13
13
-
 14
14
-
 15
15
-
 16
16
-
 17
17
-
 18
18
-
 19
19
-
 20
20
-
 21
21
-
 22
22
-
 23
23
-
 24
24
-
 25
25
-
 26
26
-
 27
27
-
 28
28
-
 29
29
-
 30
30
-
 31
31
-
 32
32
-
 33
33
-
 34
34
-
 35
35
-
 36
36
-
 37
37
-
 38
38
-
 39
39


in anderen Sprachen
- English: Broncolor Siros S Owner's manual
- français: Broncolor Siros S Le manuel du propriétaire
Verwandte Artikel
-
Broncolor Siros L Bedienungsanleitung
-
-
-
-
-
-
-
-
-