
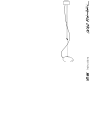
Instructions

3
Deutsch Seite 4
English Page 7
Français Page 10
Italiano Pagina 13
Zeichnungen Seite 16
Drawings Page 16
Dessins Page 16
Disegni Pagina 16
2
Montageanleitung
Bitte vor der Montage aufmerksam lesen und
aufbewahren!
Mounting Instructions
Please read these instructions carefully before going
any further, and keep them in a safe place for future
reference!
Instructions de montage
A lire attentivement avant le montage et à conserver!
Istruzioni di montaggio
Prima del montaggio, leggere attentamente le
istruzioni e conservarle!

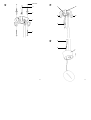
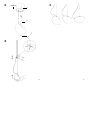
Schieben Sie den Baldachin am Kabel entlang ganz nach
oben und lassen Sie die drei Halteklammern (10) in der
Öffnung des Baldachins einrasten. Achten Sie darauf, dass
die Seilschlinge innerhalb des Baldachins nicht verdreht ist,
da sonst die Höhenverstellung erschwert wird.
Wichtig: Achten Sie auf sicheren Sitz der drei Halte-
klammern.
Einstellen der Höhe
Lösen Sie die Madenschraube am Stellring (11 ) mit bei-
liegendem Inbusschlüssel und ziehen Sie das Seilende
heraus. Fädeln Sie das lose Ende des Seils (12) von außen
durch den Schlitz in das Porzellan-Ei und weiter durch
die große Öffnung nach außen. Fädeln Sie den Stellring
wieder auf das Seilende auf und legen Sie die Seillänge
fest. Ziehen Sie die Madenschraube des Stellrings wieder
an. Überprüfen Sie die Seil- und die Kabellänge und korri-
gieren Sie gegebenenfalls. Schneiden Sie das überstehende
Seilende knapp unterhalb des Stellrings ab.
Höhenverstellung und Neigung
Achtung: Die Lampe ausschalten und vollständig abkühlen
lassen!
Die Höhe der Lampe können Sie verstellen, indem Sie zuerst
das Porzellan-Ei anheben und das Seil entlasten. Schieben
Sie dann den Höhenverstellring (13) wie in Zeichnung
gezeigt in die gewünschte Position.
Verändern Sie die Neigung der Lampe, indem Sie das Ei
anheben und das Seil entlasten. Verschieben Sie das Seil
im Schlitz der Lampe, bis der Stellring in der gewünschten
Position einrastet.
5
Deutsch
Montage und der Elektroanschluss sind von einer Elektro-
fachkraft auszuführen.
Die Porzellanteile für Öff Öff werden von Hand gefertigt:
etwaige Unregelmäßigkeiten in Form und Oberfläche sind
herstellungstechnisch bedingt und erwünscht.
Achtung: Schalten Sie vor der Montage die Sicherung
des Deckenauslasses aus!
Wichtig: Achten Sie unbedingt auf den Verlauf von Elektro-
leitungen, damit auf keinen Fall ein Kabel angebohrt wird!
Montage des Baldachins
Ziehen Sie die Montageplatte (1) vom Porzellanbaldachin
und benutzen Sie sie als Schablone zum Markieren der
Bohrlöcher. Bohren Sie die beiden Dübellöcher Ø 6 mm,
setzen Sie die Dübel S6 (2) ein und befestigen Sie die
Montageplatte mit beiliegenden Schrauben (3) an der
Decke. Lassen Sie die abgemantelten Zuleitungen (Phase,
Null-Leiter, Schutzleiter) des Deckenauslasses (4) etwa
8 cm durch die große Bohrung der Montageplatte heraus-
ragen und isolieren Sie die Enden etwa 5 mm ab.
Schließen Sie Phase und Null-Leiter des Deckenauslasses
in der mitgelieferten Lüsterklemme (5) und den Schutz-
leiter am Erdungsnippel (6) der Montageplatte an.
Fädeln Sie das Lampenkabel von außen nach innen durch
die größere der drei Bohrungen in den Porzellanbalda-
chin (7). Fädeln Sie die beiliegende Zugentlastung (8) auf
das Lampenkabel. Legen Sie mit Hilfe der Zugentlastung
die Kabellänge fest. Schließen Sie die beiden Adern des
Lampenkabels in der Lüsterklemme (5) an und verwenden
Sie beiliegende Aderendhülsen (9).
1
2
4
4
5
▲
Deutsch
▲
▲
3
4
6

English
7
Deutsch
6
Wechsel des Leuchtmittels
Achtung: Die Sicherung des Deckenauslasses ausschalten
und die Lampe vollständig abkühlen lassen!
Fassen Sie mit zwei Fingern in die Öffnung des Eis und
drehen Sie das alte Leuchtmittel um eine Vierteldrehung
nach links, bis Sie es ohne Widerstand entnehmen können.
Setzen Sie das neue Leuchtmittel ein, indem Sie die Stifte
des Leuchtmittels in die Löcher der Bajonettfassung stecken
und das Leuchtmittel um eine Vierteldrehung nach rechts
drehen, bis es einrastet.
Technische Daten
230/125 Volt. Hochvolt Halogen HI Spot 50 Watt, Sockel
GU 10.
Der Mindestabstand zu angestrahlten Flächen
beträgt 0,5 m.
Eventuell notwendige Reparaturen dürfen nur von einer
Elektrofachkraft ausgeführt werden.
The lamp assembly and all electrical work must be carried
out by a qualified electrician. The porcelain parts for Öff Öff
are hand-made: minor irregularities of shape and finish are
a natural result of the production process.
Caution: Switch off or remove the fuse for the mains supply
before beginning the assembly.
Important: Please take care to ascertain the exact position
of the mains cable, so as to avoid drilling into it.
Assembling the canopy
Detach the mounting plate (1) from the porcelain canopy
and use it as a guide to mark the drill holes. Drill the two
6 mm-diameter holes, insert the S6 plugs (2) and attach the
mounting plate with the screws (3) provided. Remove an
8 cm section of the outer covering from the mains cable (4)
and thread the leads through the large aperture in the
mounting plate. Now strip about 5 mm from the ends of
the three leads (plus, minus, earth).
Connect the plus and minus leads to the contacts in the
terminal block (5) and screw the earth lead firmly into the
special earth terminal (6) on the mounting plate.
Feed the lamp cable up through the largest of the three
holes in the canopy (7) and attach the retaining clamp (8).
Adjust the length of the lamp cable by moving the
retaining clamp to the required height. Connect the two
leads to the contacts in the terminal block (5), using the
protective caps supplied (9).
▲
1
2
▲
▲
3
0,5 m

Changing the bulb
Caution: Remove or switch off the fuse for the mains
supply and allow the lamp to cool down completely.
Insert two fingers into the opening of the egg and remove
the spent bulb by giving it a quarter-turn to the left until it
comes out without any resistance.
Fit the new bulb, by inserting the pins in the holes in the
bayonet fitting and giving the bulb a quarter-turn to the
right until it locks into position.
Technical specification
230/125volts. HI Spot 50 watts high-voltage halogen bulb,
GU 10 socket.
Minimum distance from lit surfaces: 50 cm.
Any repairs that may become necessary must be carried
out by a qualified electrician.
English
9
English
8
Slide the canopy up the cable until it snaps into position
over the three retaining hooks (10) on the mounting plate.
Ensure that the wire loop is not twisted inside the canopy,
otherwise problems will arise in adjusting the height of the
lamp.
Important: Ensure that the three retaining hooks are
securely in position.
Adjusting the height of the lamp
Using the Allen key provided, undo the grub screw on the
ring lock (11), and pull out the end of the wire. Thread
the loose end of the wire (12) through the slit in the
porcelain egg and then upwards and out through the large
aperture. Thread the ring lock back onto the end of the
wire and determine the length of the wire. Tighten the
grub screw on the ring lock, check the length of the
wire and cable again, and make any necessary further
corrections. Cut off the excess wire just below the ring
lock.
Altering the height and angle of the lamp
Important: Switch the lamp off and allow it to cool down
completely.
To alter the height, first lift the porcelain egg and take the
strain off the wire. Then push the height adjustment
ring (13) into the desired position as shown in Fig. .
To alter the angle, first lift the porcelain egg and take
the strain off the wire. Move the wire through the slit to
the desired position and allow the ring lock to snap into
place.
4
▲
▲
5
6
▲
▲
4
0,5 m

Pousser le baldaquin le long du câble vers le haut et laisser
s’enclencher les trois crochets de serrage dans l‘ouverture
du baldaquin. Veiller à ce que le nœud du fil ne se torde
pas à l‘intérieur du baldaquin, car cela complique le réglage
de la hauteur.
Important: Veiller à une position stable des trois
crochets de serrage.
Réglage en hauteur
Oter la vis sans tête de la bague d’arrêt (11) avec la
clé à six pans et retirer le bout du câble de suspension.
Enfiler le bout libre du câble (12) de l‘extérieur par la
fente de l‘œuf en porcelaine jusqu‘à la grande ouverture
vers l‘extérieur. Enfiler la bague d‘arrêt à nouveau sur le
câble de suspension et déterminer la longueur du câble.
Resserrer à nouveau la vis sans tête. Vérifier la longueur
du câble de la lampe et du câble de suspension et si
nécessaire la corriger. Couper le câble restant au ras de
la bague d‘arrêt.
Variation en hauteur et inclinaison
Attention: Eteindre la lampe et la laisser refroidir
complètement!
La hauteur de la lampe peut être réglée en soulevant
d‘abord l‘œuf en porcelaine et en allégeant le câble de
suspension. Pousser l‘anneau coulissant (13) dans la
position souhaitée comme illustré sur le dessin .
Changer l‘inclinaison de la lampe en soulevant l‘œuf et
en allégeant le câble de suspension. Déplacer le câble
de suspension dans la fente de la lampe jusqu‘à ce que
la bague d‘arrêt s‘enclenche dans la position souhaitée.
Français
11
Français
10
Le montage et la connexion électrique sont à effectuer
par un électricien qualifié.
La porcelaine de Öff Öff est faite à la main, la forme ou
surface irrégulière provient donc du procédé technique
et est voulue.
Attention: Débrancher le fusible avant le montage!
Important: Il est indispensable de respecter le
positionnement des conduites électriques afin d‘éviter
de percer un câble électrique!
Montage du baldaquin
Tirer la plaque de fixation (1) du baldaquin en porcelaine
et l‘utiliser comme mesure pour marquer les trous de
perçage. Percer les trous des deux chevilles de Ø 6 mm,
insérer les chevilles S6 (2) et visser la plaque de
fixation avec les vis jointes (3). Laisser dépasser les fils
d‘alimentations (phase, phase nulle et prise de terre) de
la sortie électrique du plafond (4) d‘environ 8 cm du
grand perçage dans la plaque de fixation et dénuder les
fils d‘environ 5mm.
Connecter phase et phase nulle au domino joint (5) et
la prise de terre au raccord à vis de terre (6) de la plaque
de fixation.
Enfiler le câble de la lampe de l’extérieur par le plus grand
des trois perçages dans le baldaquin en porcelaine (7).
Enfiler le dispositif anti-traction joint (8) sur le câble de
la lampe. Déterminer la longueur du câble à l’aide du
dispositif anti-traction. Utiliser les bagues d’arrêt jointes (9)
pour les fils et les connecter dans le domino (5).
▲
1
3
▲
4
▲
2
5
4
6

Changement de l’ampoule
Attention: Déconnecter le fusible contrôlant l’arrivée
du courant au plafond et laisser refroidir la lampe
complètement!
Saisir l‘ampoule usée avec deux doigts dans l‘ouverture
de l‘œuf et la tourner à 90° vers la gauche jusqu‘à ce
qu‘elle se laisse retirer sans résistance.
Placer la nouvelle ampoule en enfonçant les fiches de
l‘ampoule dans les trous de la douille à baïonnette et la
tourner à 90° vers la droite jusqu‘à l‘enclenchement.
Données techniques
230/125 volts. Ampoule halogène haut-voltage HI spot
50 watts, culot GU 10.
La distance minimum aux surfaces éclairées est
de 0,5 m.
Des réparations éventuellement nécessaires ne sont
à effectuer que par un électricien qualifié.
Italiano
13
Français
12
▲
Montaggio e collegamento elettrico devono essere eseguiti
da un elettricista specializzato.
I pezzi in porcellana per Öff Öff vengono fatti a mano:
eventuali irregolarità della forma o della superficie sono
dovute al metodo di produzione e sono volute.
Attenzione: Prima di procedere con il montaggio, staccare
la corrente!
Importante: Fare attenzione al percorso delle linee di
alimentazione, per evitare di danneggiare i cavi!
Montaggio del rosone
Staccare la piastra di montaggio (1) dal rosone in porcellana
e impiegarla come dima per contrassegnare i fori. Effettuare
i due fori da tassello Ø mm 6, inserire i tasselli S6 (2) e
avvitare la piastra di montaggio saldamente al soffitto con
le viti allegate (3). Lasciare spuntare dall’apertura grande
della piastra di montaggio i cavi di alimentazione (fase,
neutro, terra) dell’uscita soffitto (4) di cm 8 all’incirca e
spelarne l’estremità su circa mm 5.
Collegare la fase e il neutro dell’uscita soffitto al morsetto
allegato (5) e la terra all’appostito raccordo (6) della piastra
di montaggio.
Inserire dall’esterno il cavo della lampada nella più grande
delle tre aperture del rosone in porcellana (7). Infilare
l’apposito fermacavo (8) sul cavo della lampada. Fissare
la lunghezza del cavo con l’aiuto del fermacavo. Collegare i
due fili del cavo della lampada al morsetto (5) impiegando
i due terminali forniti (9).
▲
1
2
▲
3
0,5 m

Italiano
15
Italiano
14
Spingere verso l’alto il rosone lungo il cavo e far scattare le
tre linguette (10) nell’apertura del rosone. Assicurarsi del
posizionamento corretto del rosone. Il cappio all’interno del
rosone non deve essere contorto per non rendere più
difficile la regolazione dell’altezza.
Importante: Assicurarsi del posizionamento corretto
delle tre linguette.
Preregolazione dell’altezza
Svitare le due viti senza testa dell’anello di bloccaggio (11)
con la chiave a brugola allegata ed estrarre il cavo. Intro-
durlo dall’esterno nella fessura dell’uovo in porcellana
facendolo uscire dall’apertura grande. Infilare sul cavo (12)
nuovamente l’anello di bloccaggio dell’altezza e fissare la
lunghezza del cavo. Stringere le viti senza testa dell’anello
di regolazione. Controllare ed eventualmente correggere
la lunghezza del cavo metallico e del cavo elettrico. Tagliare
il cavo superfluo poco sotto l’anello di bloccaggio.
Regolazione dell’altezza ed inclinazione
Attenzione: Spegnere la lampada e attendere che sia
completamente fredda!
Regolare l’altezza sollevando prima l’uovo in porcellana
per alleggerire il cavo. Spostare l’anello per la regolazione
dell’altezza (13) nella posizione desiderata come viene
mostrato nel disegno .
Modificare l’inclinazione della lampada, sollevando l’uovo
per alleggerire il cavo. Spostare il cavo nella fessura della
lampada, finché l’anello di bloccaggio scatta nella posizione
desiderata.
4
6
Sostituzione della lampadina
Attenzione: Prima della sostituzione della lampadina
spegnere la lampada con l’interruttore e attendere che
la lampada sia completamente fredda.
Afferrare la lampadina da sostituire con due dita nell’aper-
tura dell’uovo e girarla di un quarto giro a sinistra finché
può essere estratta facilmente.
Inserire la lampadina nuova introducendo i perni di questa
nei buchi del portalampada a baionetta e girarla di un quarto
giro a destra finché scatta.
Dati tecnici
230/125 volt. Lampadina alogena ad alto voltaggio HI Spot
50 watt, base GU 10.
Distanza minima dalle superfici illuminate m. 0,5.
Eventuali riparazioni possono essere eseguite esclusivamente
da un elettricista specializzato.
▲▲
5
▲▲
4
0,5 m

16
1
4
2
1
3
Ø 6 mm
10
2
3
10
10
5
6
17
9
8
7

5
18
4
13
7
11
12
»click «
19
6

Ingo Maurer GmbH
Kaiserstrasse 47
80801 München
Tel. 089-381606-0
Fax 089-381606 20
September 1999 Made in Germany
-
 1
1
-
 2
2
-
 3
3
-
 4
4
-
 5
5
-
 6
6
-
 7
7
-
 8
8
-
 9
9
-
 10
10
-
 11
11


in anderen Sprachen
Verwandte Artikel
-
Ingo Maurer Da + Dort Bedienungsanleitung
-
-
-
-
-
-
-
-
-