Ingo Maurer Lucellino Table Bedienungsanleitung
- Typ
- Bedienungsanleitung

Made in Germany
Instructions
Importante: Leggere attentamente prima dell’uso.
Attenzione: Effettuare il collegamento alla rete solta-
nto dopo avere collocato la lampada.
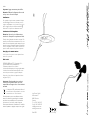
Installazione
Con entrambe le mani estrarre cautamente la lampa-
da dall’imballaggio. Rimuovere le fascette per cavi e
svolgere completamente i cavi. Inserire le due spine a
basso voltaggio nelle prese della base metallica. ①
Assicurarsi che le spine siano saldamente inserite.
Sostituzione della lampadina
Attenzione: Staccare la spina di alimentazione e
attendere che la lampada sia completamente fredda.
Prima di svitare la lampadina da sostituire, staccare il filo
metallico rosso. Distendere accuratamente il filo rosso
saldato sulla nuova lampadina, passarlo attraverso il porta-
lampada e avvitare la lampadina. Adattare il filo metallico
rosso di collegamento al filo di ottone e infilarlo nella
presa di contatto disposta sulla piastra di copertura.
Consiglio per la manutenzione
Le ali in piume d’oca possono essere pulite delicata-
mente con un pennello.
Dati tecnici
100-240V~, 50/60 Hz., PF 0.9, Secondario 12 V~,
5W LED, 2000-2700K, portalampada E27.
Trasformatore elettronico con varialuce.
La luminosità della lampada può essere regolata tramite
il varialuce lineare del trasformatore. Questo cursore
serve anche per accendere e spegnere la lampada.
Il dispositivo è viene fornita con lampadinas di classe
energetica G (A-G).
Importante: Questa lampadina viene prodotta in
esclusiva per la Ingo Maurer GmbH e può essere
acquistata dal nostro negozio online o i nostri rivenditori
autorizzati.
Un lampadine LED o trasformatore difettoso è
da conside rare un rifi utto elettrici e non deve
essere smalti to con i rifi uti domestici.
Eventuali riparazioni possono essere effettuate esclusiva-
mente da un elettricista. La garanzia legale e contrattuale
per difetti e la responsabilità per danni da prodotti difet-
tosi, decadono in caso di danni o reclami conseguenti
all’inosservanza delle istruzioni d’installazione e/o a modifiche
strutturali, soprattutto se impiegati componenti non originali.
Italiano
Lucellino ambient
Ingo Maurer GmbH
Kaiserstrasse 47
80801 München
Germany
Tel. +49. 89. 381 606-0
Fax +49. 89. 381 606 20
www.ingo-maurer.com
März 2022
①

Wichtig: Bitte vor Inbetriebnahme aufmerksam lesen.
Achtung: Schließen Sie die Lampe erst nach dem Auf-
stellen an das Netz an.
Montage
Bitte nehmen Sie die Leuchte vorsichtig aus der
Verpackung. Entfernen Sie die Kabelbinder und wickeln
Sie die Kabel vollständig ab. Stecken Sie die beiden
Niedervolt-Stecker in die Buchsen der Bodenplatte. ①
Bitte achten Sie auf festen Sitz der beiden Stecker.
Wechsel des Leuchtmittels
Achtung: Den Netzstecker ziehen und die Lampe
vollständig abkühlen lassen.
Bevor Sie die zu ersetzende Glühlampe abschrauben,
ziehen Sie den roten Draht aus der Buchse. Wickeln
Sie den roten Draht vorsichtig vom neuen Leuchtmittel,
führen Sie ihn durch den Schraubring und schrauben
Sie das Leuchtmittel in die Fassung. Passen Sie den
roten Schaltdraht dem Verlauf des Messingdrahtes
an und stecken Sie ihn in die Kontaktbuchse auf der
Abdeckscheibe.
Pflegehinweis
Die Flügel aus Gänsefedern können vorsichtig mit einem
Pinsel gesäubert werden.
Technische Daten
100-240V~, 50/60 Hz., PF 0.9, Sekundär 12V~,
5W LED, 2000-2700K, Sockel E27.
Elektronischer Transformator mit Schieberegler.
Die Helligkeit der Leuchte lässt sich am Regler des
Transformators stufenlos verstellen. Der Dimmer dient zugleich
zum Ein-und Ausschalten der Leuchte.
Die Leuchte wird geliefert mit Lichtquelle der
Energieklasse G (A-G).
Wichtig: Diese Leuchtmittel werden exklusiv für die
Ingo Maurer GmbH hergestellt und können nur über
unseren Webshop oder unsere Händler bezogen werden.
Eine defektes LED Leuchtmittel oder Vorschaltgerät,
muss als Elektroschrott entsorgt werden, es darf nicht in
den Hausmüll gelangen.
Eventuell notwendige Reparaturen müssen von einer
Elektrofachkraft ausgeführt werden.
Bei Schäden, die durch Nichtbeachten dieser Bedienungs-
anleitung, unsachgemäßer Inbetriebnahme und/oder bau-
licher Veränderung z.B. durch Fremdbauteile, Handhabung
oder Fremdeingriff verursacht werden, erlischt der
Garantieanspruch.
Important: Please read these instructions carefully
before going any further.
Caution: Do not connect the lamp to the power
supply before completing the assembly.
Assembly
Unpack the lamp very carefully. Remove the cable ties
and unwind the cables completely. Insert the two low-
voltage connectors in the sockets in the base plate. ①
Ensure that the connectors are securely in position.
Changing the bulb
Caution: Disconnect the plug and allow the lamp to
cool down completely.
Pull the red connecting lead out of the socket before un-
screwing the spent bulb. Gently unwind the lead on the
replacement bulb, thread it through the ring and screw
the bulb into the socket. Adjust the position of the lead
to allow for the brass mounting wire. Finally, insert the
end of the lead into the contact in the base plate.
Cleaning
The goose-feather wings may be cleaned by gentle
dusting with a paintbrush or similar implement.
Technical specification
100-240V~, 50/60 Hz., PF 0.9, Secondary 12V~,
5W LED, 2000-2700K, socket E27.
Electronic transformer with integrated dimmer.
The brightness of the light is freely adjustable via the
dimm controller on the transformer, which also switches
the lamp on and off.
The lamp comes with light source of the energy class G
(A-G).
Important: The lamps are manufactured exclusively
for Ingo Maurer GmbH. Replacements are only available
from our webshop or authorized retailers.
A defective LED or transformer must be disposed
as electronic scrap, it must not get into domestic
waste.
Any repairs that may become necessary must be carried out
by a qualified electrician.
The legal and contractual warranty for defects and product lia-
bility will be void, should the installation instructions not be duly
followed or non-original components be employed.
Important: A lire attentivement avant la mise en
service.
Attention: Ne brancher la lampe au courant
qu’après l’avoir installée!
Montage
Veuillez sortir la lampe soigneusement de son emballage.
Retirez les attaches de câble et déroulez complètement les
câbles. Introduire les deux fiches basse tension dans les trous
prévus à cet effet dans le socle de la lampe. ①
Assurez vous que les deux fiches soient correctement enfon-
cées.
Remplacement de l’ampoule
Attention: Débrancher la lampe et laisser refroidir
complètement.
Avant d’enlever l’ampoule à remplacer, retirer le fil rouge
de la fiche. Dérouler le fil rouge soudé avec précaution
de la nouvelle ampoule, le passer par l’anneau fileté et
visser l’ampoule dans la douille. Prière d’adapter le fil
rouge à la forme du fil en laiton et de le ficher dans le
trou de contact prévu sur le pied de la lampe.
Indications d’entretien
Nettoyer les ailes en plumes d’oie avec précaution au
pinceau.
Données techniques
100-240V~, 50/60 Hz., PF 0.9, Secondaire 12V~,
5W LED, 2000-2700K, culot E27.
Transformateur électronique avec variateur. Le régula-
teur du transformateur permet de régler sans gradua-
tion l’intensité lumineuse de la lampe. Le variateur sert
aussi à allumer et à éteindre la lampe.
Le luminaire livré avec source de lumière de la classe
énergétique G (A-G).
Important: Cette ampoule est produite exclusive-
ment pour la société Ingo Maurer GmbH. Ampoules de
rechange sont à commander auprès de nos revendeurs
et notre webshop.
Un ampoule LED ou transformateur défectueux
devra être jeté avec des déchets électroniques,
ne pas le jeter avec vos ordures ménagères.
Des réparations éventuellement nécessaires ne sont à
effectuer que par un spécialiste.
La garantie légale et contractuelle pour les défauts et la
responsabilité pour les dommages causés par des produits
défectueux, expireront en cas de dommages ou de réclama-
tions résultant du non-respect des instructions d‘installation
et/ou des modifications structurelles, en particulier si des
composants non originaux sont utilisés.
Deutsch English Français
-
 1
1
-
 2
2


Ingo Maurer Lucellino Table Bedienungsanleitung
- Typ
- Bedienungsanleitung
in anderen Sprachen
Verwandte Artikel
-
Ingo Maurer Flying Disc Bedienungsanleitung
-
-
-
-
-
-
-
-
-