
Information
Power Parts
www.ktm.com
62011042044
04. 2013 3.211.456
*3211456*

Danke, dass Sie sich für KTM Power Parts entschlossen haben.
Alle unsere Produkte wurden nach den höchsten Standards entwickelt und gefertigt, unter Verwendung der besten verfügbaren
Materialien.
KTM Power Parts sind rennerprobt und gewährleisten ultimative Performance.
KTM KANN NICHT VERANTWORTLICH GEMACHT WERDEN FÜR FALSCHE MONTAGE ODER VERWENDUNG DIESES PRODUKTS. Bitte
befolgen Sie die Montageanleitung. Fachmännische Beratung und korrekte Installation der KTM PowerParts durch einen autorisierten
KTM Händler sind unerlässlich, um das Optimum an Sicherheit und Funktionalität zu gewährleisten.
Danke.
Thank you for choosing KTM Power Parts!
All of our products are designed and built to the highest standards using the finest materials available.
KTM Power Parts are race proven to offer the ultimate in performance.
KTM WILL NOT BE HELD LIABLE FOR IMPROPER INSTALLATION OR USE OF THIS PRODUCT. Please follow all instructions provided.
Professional advice and proper installation of the KTM PowerParts by an authorized KTM dealer are essential to provide maximum
safety and functions.
Thank you.
Grazie per aver deciso di acquistare un prodotto KTM Power Parts.
Tutti i nostri prodotti sono stati sviluppati e realizzati secondo i massimi standard e con l'impiego dei migliori materiali disponibili.
Le KTM Power Parts sono collaudate nelle competizioni ed assicurano altissime prestazioni.
KTM NON PUÒ ESSERE RESA RESPONSABILE PER UN MONTAGGIO O USO IMPROPRIO DI QUESTO PRODOTTO. Per favore osservate le
istruzioni nel manuale d'uso. Al fine di garantire la massima sicurezza e il corretto funzionamento, è indispensabile farsi consigliare
da persone esperte e competenti e far eseguire l'installazione delle KTM PowerPart presso i concessionari KTM autorizzati.
Grazie.
Nous vous remercions d'avoir choisi KTM Power Parts.
Tous nos produits ont été développés et réalisés selon les plus hauts standards et en utilisant les meilleurs matériaux disponibles.
Les Power Parts de KTM ont fait leurs preuves en compétition et garantissent les meilleures performances.
LA RESPONSABILITÉ DE KTM NE SAURAIT ÊTRE ENGAGÉE EN CAS D'ERREUR DANS LE MONTAGE OU L'UTILISATION DE CE PRODUIT.
Il convient de respecter les instructions de montage.
Le conseil spécialisé et l'installation dans les règles de l'art des PowerParts KTM par un concessionnaire KTM agréé sont
indispensables pour assurer un maximum de sécurité et de fonctionnalité.
Merci.
Gracias por haberse decidido por el Power Parts KTM.
Todos nuestros productos han sido desarrollados y producidos según los estándares más altos utilizando los mejores materiales
disponibles.
Las KTM Power Parts están probadas en competencia y garantizan un óptimo rendimiento.
NO SE PUEDE HACER RESPONSABLE A LA KTM POR UN MONTAJE O UN USO INCORRECTO DE ESTE PRODUCTO.
Le rogamos seguir las instrucciones para el montaje.
A fin de garantizar la máxima seguridad y un funcionamiento correcto es imprescindible acudir a un concesionario autorizado de KTM
para obtener el mejor asesoramiento técnico e instalar correctamente las KTM PowerParts.
Gracias.
DEUTSCH
2
ENGLISH
2
ESPANOL
2
ITALIANO
2
FRANCAIS
2

DEUTSCH
3
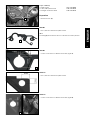
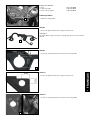
Lieferumfang:
1x Steckdose 60111042000
1x Kabel Steckdose SMT 62011042060
1x Sechskantmutter M18x1 SW22 62011042050
Vorarbeiten
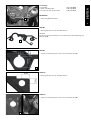
- Verkleidung (1) demontieren.
990 SMT
- Bohrung ø18,5mm für die Steckdose bohren.
HINWEIS
Für die richtige Position befindet sich auf der Rückseite der Verkleidung eine
Markierung (2)
990 SMT
- Zusätzlich zur Bohrung eine kleine Nut ausschneiden (Bild A).
690 Duke
- Bohrung ø18,5mm für die Steckdose bohren.
690 Duke
- Zusätzlich zur Bohrung eine kleine Nut ausschneiden (Bild B).
1
2
3,2mm
18,5mm 2,5mm
A
B

DEUTSCH
4
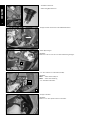
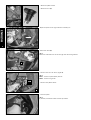
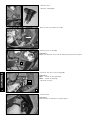
- Klappe schließen
HINWEIS:
Kabel ev. mit dem Spiralschlauch mitbinden.
- mit ACC1 oder ACC2 verbinden (Bild A).
HINWEIS:
ACC1 - Strom über Dauerplus.
ACC2 - Strom über Zündung.
- mit Steckdose verbinden.
- Kabel (1) verlegen.
HINWEIS:
Kabel von links nach rechts mit dem Kabelstrang verlegen.
1
ACC1
ACC2
A
- Steckdose montieren.
- Verkleidung (1) montieren.
- Klappe auf der rechten Seite des Motorrads öffnen.

ENGLISH
5
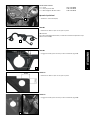
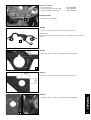
Scope of delivery:
1x power socket 60111042000
1x cable, SMT power socket 62011042060
1x hexagon nut M18x1 SW22 62011042050
Preparations
- Remove the trim (1).
990 SMT
- Drill a ø18.5mm hole for the power socket.
NOTE
A marking (2) on the back of the trim indicates the correct position.
990 SMT
- Cut out a small notch in addition to the hole (figure A).
1
2
3,2mm
18,5mm 2,5mm
A
690 Duke
- Drill a ø18.5mm hole for the power socket.
690 Duke
- Cut out a small notch in addition to the hole (figure B).
B

ENGLISH
6
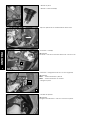
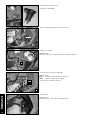
- Close the panel.
NOTE:
If possible, thread the cable into the spiral hose.
- Connect with ACC1 or ACC2 (figure A).
NOTE:
ACC1 - Current via permanent positive.
ACC2 - Current via ignition.
- Connect with power socket.
- Route the cable (1).
NOTE:
Route the cable from the left to the right with the wiring harness.
1
ACC1
ACC2
A
- Mount the power socket.
- Mount the trim (1).
- Open the panel on the right side of the motorcycle.

ITALIANO
7
Volume della fornitura:
N. 1. presa 60111042000
N. 1 cavo per presa SMT 62011042060
N. 1 dado esagonale M18x1 SW22 62011042050
Operazioni preliminari
- Smontare il rivestimento (1).
990 SMT
- Effettuare un foro di 18,5 mm di ø per la presa.
NOTA BENE
Ai fini del corretto posizionamento, sul retro del rivestimento è presente un'ap-
posita marcatura (2).
990 SMT
- In aggiunta al foro, praticare una piccola scanalatura (figura A).
1
2
3,2mm
18,5mm 2,5mm
A
690 Duke
- Effettuare un foro di 18,5 mm di ø per la presa.
690 Duke
- In aggiunta al foro, praticare una piccola scanalatura (figura B).
B

ITALIANO
8
- Chiudere lo sportello
NOTA BENE:
Collegare eventualmente il cavo con il flessibile a spirale.
- Effettuare il collegamento con ACC1 o ACC2 (figura A).
NOTA BENE:
ACC1 - corrente attraverso il positivo
ACC2 - corrente attraverso l'accensione.
- Collegare la presa.
- Sistemare il cavo (1).
NOTA BENE:
Sistemare il cavo da sinistra verso destra con il fascio di cavi.
1
ACC1
ACC2
A
- Montare la presa.
- Montare il rivestimento (1).
- Aprire lo sportellino sul lato destro della motocicletta.

FRANCAIS
9
Contenu de la livraison :
1x Prise 60111042000
1x Câble prise SMT 62011042060
1x Écrou M18x1 SW22 62011042050
Travaux préalables
- Déposer le carénage (1) .
990 SMT
- Percer l'alésage ø18,5mm pour le logement de la prise.
REMARQUE
Un repère (2) est marqué au dos du carénage pour percer le trou en bonne
position
990 SMT
- En plus de l'alésage, découper une petite encoche (figure A).
1
2
3,2mm
18,5mm 2,5mm
A
690 Duke
- Percer l'alésage ø18,5mm pour le logement de la prise.
690 Duke
- En plus de l'alésage, découper une petite encoche (figure B).
B

FRANCAIS
10
- Fermer le volet.
REMARQUE :
Relier éventuel. le câble avec le flexible spiralé.
- Connecter avec ACC1 ou ACC2 (figure A).
REMARQUE :
ACC1 - courant sur Plus permanent.
ACC2 - courant sur allumage.
- Connecter à la prise.
- Mettre en place le câble (1).
REMARQUE :
Déplacer le câble avec le faisceau de câbles de la gauche vers la droite.
1
ACC1
ACC2
A
- Monter la prise.
- Monter le carénage (1).
- Ouvrir le volet sur la droite de la moto.

ESPANOL
11
Volumen de suministro:
1x toma de corriente 60111042000
1x cable para toma de corriente SMT 62011042060
1x tuerca hexagonal M18x1 SW22 62011042050
Trabajos previos
- Desmontar el carenado (1).
990 SMT
- Perforar un orificio de ø18,5mm para la toma de corriente.
ADVERTENCIA
En la parte posterior del carenado hay una marca (2) que indica la posición
correcta
990 SMT
- Además del orificio, trazar una pequeña hendidura (figura A).
1
2
3,2mm
18,5mm 2,5mm
A
690 Duke
- Perforar un orificio de ø18,5mm para la toma de corriente.
690 Duke
- Además del orificio, trazar una pequeña hendidura (figura B).
B

ESPANOL
12
- Cerrar la tapa.
ADVERTENCIA:
Si procede, unir el cable con la manguera espiral.
- Conectar con ACC1 ó ACC2 (figura A).
ADVERTENCIA:
ACC1 - corriente a través de positivo continuo.
ACC2 - corriente a través del encendido.
- Conectar con la toma de corriente.
- Colocar el cable (1).
ADVERTENCIA:
Colocar el cable con el ramal de cables de izquierda a derecha.
1
ACC1
ACC2
A
- Montar la toma de corriente.
- Montar el carenado (1).
- Abrir la tapa del lado derecho de la motocicleta.
-
 1
1
-
 2
2
-
 3
3
-
 4
4
-
 5
5
-
 6
6
-
 7
7
-
 8
8
-
 9
9
-
 10
10
-
 11
11
-
 12
12


in anderen Sprachen
- français: KTM 62011042044 Le manuel du propriétaire
- español: KTM 62011042044 El manual del propietario
- italiano: KTM 62011042044 Manuale del proprietario
Verwandte Papiere
-
KTM 60307940000 Bedienungsanleitung
-
-
-
-
-
-
-
KTM 390 Duke 2021 Bedienungsanleitung
-
KTM 1290 Super Duke RR Bedienungsanleitung