JVC AV14BJ8EPS Benutzerhandbuch
- Kategorie
- LCD-Fernseher
- Typ
- Benutzerhandbuch
Dieses Handbuch eignet sich auch für


ENGLISH - 1 -
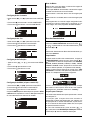
Safety Precautions
1. Power Source
The receiver should be operated only from a 220-240V AC,
50 Hz. outlet. Ensure you select the correct voltage setting
for your convenience.
2. Power Cord
The power supply cord should be placed so that they are not
likely to be walked on or pinched by items placed upon them
or against them. Pay particular attention to cord where they
enter the plug, power outlet, and the point where they exit
from the receiver.
3. Moisture and Water
Do not use this equipment in a humid and damp place (avoid
the bathroom, the sink in the kitchen, and near the washing
machine). Do not expose this equipment to rain or water and
do not place objects filled with liquids on it as this may be
dangerous.
4. Cleaning
Before cleaning, unplug the receiver from the main supply
outlet. Do not use liquid or aerosol cleaners. Use with soft
and dry cloth.
5. Ventilation
The slots and openings on the receiver are intended for venti-
lation and to ensure reliable operation. To prevent overheating,
these openings must not be blocked or covered in anyway.
6. Lightning
In case of storm and lightning or when going on holiday, dis-
connect the power cord from the wall outlet.
7. Replacement Part
When replacement parts are required, be sure the service
technician has used replacement parts which are specified
by the manufacturer or have the same specifications as the
original one. Unauthorized substitutions may result in fire,
electrical shock, or other hazards.
8. Servicing
Please refer all servicing to qualified personnel. Do not re-
move cover as this may result in electric shock.
9. Flame sources
Do not place naked flame sources on the apparatus.
10. Stand-By
Do not leave your TV stand-by or operating condition when you
leave your house.
Warning!
Any intervention contrary to regulations, in particular, any
modification of high voltage or a replacement of the picture
tube may lead to an increased concentration of x-rays. Any
television modified in this way no longer complies with license
and must not be operated.
Instructions for waste disposal:
Packaging and packaging aids are recyclable and should
principally be recycled. Packaging materials, such as foil
bag, must be kept away from children.
Contents
Safety Precautions ................................................... 1
Remote Control Buttons .......................................... 2
Control Panel Buttons .............................................. 3
Antenna Connections ............................................... 3
Preparation ................................................................ 4
Features .......................................................................... 4
Before Switching on your TV .................................. 4
Power connection ............................................................. 4
Aerial Connections ........................................................... 4
How to connect the external equipments .......................... 4
Inserting batteries in the remote control handset .............. 4
Switching the TV ON/OFF ........................................ 4
To switch the TV on.......................................................... 4
To switch the TV off .......................................................... 4
Initial Settings ...........................................................4
Operating with the onset buttons ...................................... 5
Operating with Remote Control ......................................... 5
Menu System ............................................................. 5
Picture Menu ................................................................... 5
Feature Menu ................................................................... 6
Install. Menu .................................................................... 7
Program. (Programming) Menu ........................................ 7
Other Features.......................................................... 8
Sound Mute ..................................................................... 8
Information on Screen ...................................................... 8
To Display the Time .......................................................... 8
Standard .......................................................................... 8
VCR Control Buttons ........................................................ 8
Teletext ......................................................................9
To operate Teletext ........................................................... 9
To select a page of Teletext .............................................. 9
To Select Index Page ....................................................... 9
Searching for a teletext page while watching TV ............... 9
To Select Double Height Text ........................................... 9
To Reveal concealed Information .................................... 9
To Stop Automatic Page Change ...................................... 9
To Select a Subcode Page ............................................... 9
To exit Teletext ................................................................. 9
Connect the External Equipments ........................ 10
Via the Euroconnector ..................................................... 11
AV-1 S Mode ................................................................... 11
Via the RCA jacks ........................................................... 11
Via the ANT (aerial) socket .............................................. 11
TV and Video Recoder (VCR) .......................................... 11
NTSC Playback .............................................................. 11
Connecting Headphones ................................................. 11
Tips........................................................................... 11
Specifications .......................................................... 12

ENGLISH - 2 -
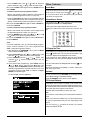
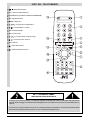
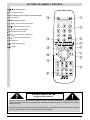
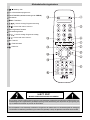
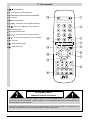
= Stand By / Power
0 - 9 = Direct Program
Standard Button (PICTURE default settings)
Colour Buttons
MENU = Menu Button
( ) = Cursor Up / Programme Up
( ) = Cursor Right / Volume +
Teletext Control Buttons
VCR Control Buttons
( ) = Cursor Down / Programme Down
( ) = Cursor Left / Volume -
AV = AV Button
= Information Button
= Mute
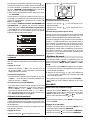
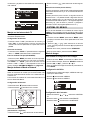
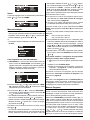
Remote Control Buttons
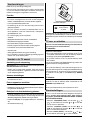
CAUTION
RISK OF ELECTRIC SHOCK
The lightning flash with arrowhead symbol, within an equilateral triangle, is intended to alert the user to the presence of
uninsulated "dangerous voltage" within the product's enclosure that may be of sufficient magnitude to constitute a risk
of electric shock of persons.
The exclamation point within an equilateral triangle is intended to alert the user to the presence of important operating
and maintenance (servicing) instructions in the literature accompanying the appliance.

ENGLISH - 3 -
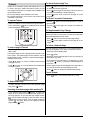
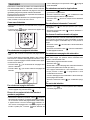
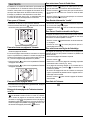
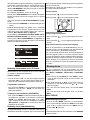
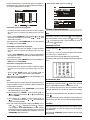
Control Panel Buttons
Antenna Connections
AV14BM8EPS AV14BJ8EPS

ENGLISH - 4 -
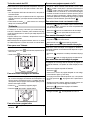
Preparation
Place TV on a solid surface.
For ventilation, leave a space of at least 10 cm free all around
the set. To prevent any fault and unsafe situations, please do
not place any objects on top of the set.
Features
It is a remote controlled colour television.
100 programmes from VHF, UHF bands or cable channels
can be preset.
It can tune cable channels.
Controlling the TV is very easy by its menu driven system.
It has an Euroconnector socket for external devices (such
as video recorder, video games, audio set, etc.)
Front AV Input available.
Teletext.
It is possible to connect headphone.
Direct channel access.
APS (Automatic Programming System).
All programmes can be named.
Forward or backward automatic tuning.
Sleep timer.
Automatic sound mute when no transmission.
5 minutes after the broadcasting (closedown), the TV
switches itself automatically to stand-by mode.
Before Switching on your TV
Power connection
Important: The TV set is designed to operate on 220-240 V
AC, 50 Hz.
After unpacking, allow the TV set to reach the ambient room
temperature before you connect the set to the mains.
Aerial Connections
Connect the aerial plug to the aerial input socket located at
the back of the TV.
How to connect the external equipments
See Connect the External Equipments on page 10.
See the instruction manuals provided with the external de-
vices too.
Inserting batteries in the remote control handset
Remove the battery cover located on the back of the hand-
set by gently pulling upwards from the indicated part.
Insert two AA (R6) or equivalent type batteries inside.
Replace the battery cover.
NOTE: Remove batteries from remote control handset when it is
not to be used for a long period. Otherwise it can be damaged
due to any leakage of batteries.
Switching the TV ON/OFF
You can operate your TV either using the remote control
handset or directly using the TV onset buttons.
To switch the TV on
Your TV will switch on in two steps:
1- Press the power button located on the front of the TV. Then
the TV switches itself to standby mode and the RED LED
located below the TV turns on.
2- To switch on the TV from stand-by mode either:
Press a digit button on the remote control so that a program-
me number is selected,
or,
Press Standby / Power Button or Programme Up and Down
buttons on the front of the TV or on the remote control re-
spectively, so the TV will switch on and the RED Led will turn
GREEN.
To switch the TV off
Press the stand-by button on the remote control, so the TV
will switch to stand-by mode and the GREEN LED will be-
come RED, or,
Press the power button located on the front of the TV.
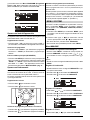
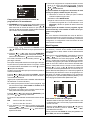
Initial Settings
The message "PLEASE CHECK ANTENNA CABLE AUTO.
PROGRAMMING SYSTEM" will be displayed when you turn
on your TV for the first time.
1- Select LANGUAGE with the or button, then
press the or button to select a menu language.
2- Select COUNTRY with the or button, then
press the or button to select the country you are
now located.
3- Select START with the or button, then press
the button to start APS.
APS (Automatic Programming System) automatically pro-
grammes the received channels in your TVs programme
numbers. During APS, "A. P. S. IS RUNNING" will be dis-
played. After APS is finalized, the PROGRAM. menu ap-
pears.
To cancel APS, press the button.
You can delete a channel, insert a channel into a programme
number, or re-start APS with the PROGRAM. menu.
For details, see Program. (Programming) Menu on page
7.
4- Press the "STANDARD" button to complete the initial set-
tings.
After the initial settings are complete, you can change a pro-
gramme number or to name a programme number or to pro-
gramme new channel manually. For details, see
Install. Menu on page 7.
If the message "PLEASE CHECK ANTENNA CABLE AUTO.
PROGRAMMING SYSTEM" does not appear, follow the de-
scription Program. (Programming) Menu on page 7 to
select a menu language and the country where you are now
located, and to use A.P.S..

ENGLISH - 5 -
Operating with the onset buttons
Volume setting and programme selection can be made using
the buttons on the front panel.
Volume Setting
Press - VOL. button to decrease volume or VOL. + but-
ton to increase volume, so a volume level scale will be dis-
played on the screen.
Programme Selecting
Press PROG. + button to select next programme or
- PROG. button to select the previous programme.
Entering Main Menu (AV14BJ8EPS)
Press MENU button to enter main menu. In the main
menu select submenu using PROG. + or - PROG. button
and enter the submenu using VOL. + or - VOL. button.
To learn the usage of the menus, refer to Menu System
on page 5.
Operating with Remote Control
The remote control handset of your TV is designed to control
all the functions of the model you selected. The functions will
be described in accordance with the menu system of your
TV.
Functions which you can use out of menu system are de-
scribed below.
Volume Setting
Press button to increase volume.
Press button to decrease volume.
Programme Selecting
(Previous or next programme)
Press button to select the previous programme.
Press button to select the next programme.
Programme Selecting (direct access):
Press digit buttons on the remote control handset to select
programmes between 0 and 9. TV will switch to the selected
program after a short delay.
When you press first digit, second digit will be displayed with
- symbol for 3 seconds. To select programmes between 10
and 99 press corresponding digit buttons consecutively be-
fore - symbol on the second digit disappears. (e.g. for pro-
gramme 27, first press 2 and then 7 while program number
displayed as 2- )
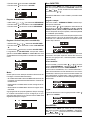
Menu System
Your TV has been designed with a menu system. Display
MENU (main menu) and enter one of four menus (PIC-
TURE, FEATURE, INSTALL. and PROGRAM.).
1- Press MENU button to display MENU (main menu).
The menu titles will be displayed in the main menu.
2- Press or button to select a menu title, then
press or button to enter the menu.
To exit a menu, press STANDARD button.
To go to the previous menu, press MENU button.
Picture Menu
To change picture settings:
Press MENU button, now you are in main menu. In the
main menu, select PICTURE using or button,
then enter the picture menu pressing or button.
or,
Enter the Picture Menu directly, pressing the GREEN but-
ton.
Setting Brightness:
As you enter the picture menu, BRIGHTNESS will be the
first selected option.
Press button to increase BRIGHTNESS.
Press button to decrease BRIGHTNESS.
Setting Contrast:
Using or button select CONTRAST.
Press button to increase CONTRAST level.
Press button to decrease CONTRAST level.
Setting Colour:
Using or button select COLOUR.
Press button to increase COLOUR level.

ENGLISH - 6 -
Press button to decrease COLOUR level.
Setting Sharpness:
Using or button select SHARPNESS.
Press button to increase SHARPNESS level.
Press button to decrease SHARPNESS level.
Setting Hue (In AV mode only) :
Using or button select HUE.
Press button to increase HUE level.
Press button to decrease HUE level.
HUE adjust is functional only when NTSC 3.58/4.43 is ap-
plied in AV mode. It does not appear when other colour sys-
tems used.
Mode:
This option is used to change the picture size according to
the coming transmission.
If AUTO function is selected, then the picture size will be
automatically changed according to the transmission.
Selecting 4 : 3 mode forces picture ratio size to 4 : 3.
Selecting 16 : 9 mode forces picture ratio size to 16 : 9.
Every program has its own picture mode setting. When you
store the picture mode for a program other programs keep
their picture mode setting unaffected.
Feature Menu
Press MENU button, now you are in main menu. In the
main menu, select FEATURE, using or button.
Then enter the feature menu pressing or button.
or,
Enter the Feature Menu directly, pressing the YELLOW
button.
Sleep Timer:
As you enter the feature menu, SLEEP TIMER will be the
first selected option.
Use
or button to change the value of the sleep timer
between OFF, 0:15:00, 0:30:00, 0:45:00, 1:00:00, 1:15:00,
1:30:00, 1:45:00 and 2:00:00. hours. Your TV will get into
standby mode when the period you selected passes after
you make the selection.
It is displayed on the upper right of the screen. If sleep timer
is activated it is displayed with the TV status and erased with
it after 3 seconds.
During the last minute of the count down, the timer is dis-
played on the upper right of the screen. When the timer
reaches zero, TV goes to stand-by.
Child Lock:
In Feature Menu, press or button to select
CHILD LOCK. Using or button turn CHILD LOCK On
or Off.
When Off is selected, there will be no difference in the opera-
tion of your TV. When On is selected, the TV can only be
controlled by the remote control handset. In this case, the
front panel buttons (except the Switch On/Off button) will not
work.
Language:
Menu Language can be selected by pressing or button
on LANGUAGE item.

ENGLISH - 7 -
Install. Menu
Press MENU button, now you are in main menu. In the
main menu, select INSTALL. using or button,
then enter the Installation menu pressing or button.
or
Enter the Installation Menu directly, pressing the BLUE but-
ton.
To programme a channel in a TVs programme
number manually:
1. PROGRAMME will be the first selected item as you enter
the INSTALL. menu. Pressing or button select the
programme number where you want to the tuned channel
to be stored. (You may also type the programme number
using the digit buttons.)
2. Press or button to select BAND. Using or
button to select the band in which you want to search a
channel.
3. Press or button to select SEARCH. Press
or button to start searching. (Press button to search
forward.Press button to search backwards.)
If the found channel is not the desired one, press or
button to start searching again.
To stop searching before a channel is found, press the re-
verse direction button. For example, when the TV is search-
ing forward with button, press button to stop searching.
If you know the channel number which you want to find, you
can find the channel directly.
Press or button to select CHANNEL, then press
or button to select the channel number, or enter the
number with the digit buttons.
(Follow the step 5 to select the correct standard before you
select a channel number.)
4. If you want to name the new programme, follow the instruc-
tions under "To change the name of a programme" on
page 7.
5. If the sound or picture is abnormal, change the standard
(broadcasting system) of new channel.
Press or button to select STANDARD, then
press or button to change the correct one.
The indicated channel number will be changed when you
change the standard.
B/G : C02-C73 / S01-S41 / S75-S79
L : C01-C73 / S01-S41 / S75-S77
6. If the channel reception is poor, fine-tune the channel.
Press or button to select FINE TUNING,then
press or to fine-tune the channel.
7. After the all settings are completed, store the new
channels setting to the programme number which you se-
lected. Press or button to select STORE,
then press or to store it.
If you want to modify the current programme numbers
setting (for example, changing fine tuning, etc.) :
1. Select the programme number you want to modify the
settings while no menu appears.
2. Display the INSTALL. menu.
3. Follow To programme a channel in a TVs program-
me number manually: on page 7 and change the set-
tings of the current programme number.
If you want to name the new programme, follow the in-
structions under "To change the name of a programme"
on page 7.
Note:
Do not use Programme item in the INSTALL. menu to select
the programme number. If you select the programme number
with Programme item and store the settings, the selected
programme numbers current settings are cancelled.
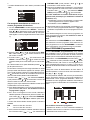
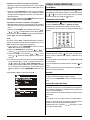
Program. (Programming) Menu
PROGRAM. (Programming) menu is used to display the
programme names and numbers. You can use this menu to
delete a channel, to insert a channel and to autostore the
programmes.
Select the PROGRAM. menu pressing or but-
ton and open it pressing or button. When you enter the
programme menu, all the programme numbers and names
will be displayed on the screen. The programme number and
name of the tuned channel will be shown by the cyan color.
All the other channel numbers will be white. You can move
the number in cyan using or or or button.
Also, it's possible to use digit buttons to select programme
numbers. As you pass through the programme numbers this
way, to reach the programme number you want, the channels
corresponding to the programme numbers you pass through
will be tuned and the selected programme number will be
shown in cyan.
To change the name of a programme:
Move to the channel you want to rename or use the digits
so that the selected programme number is in cyan color.

ENGLISH - 8 -
Press the RED button. Use or button to select the
position and press
or button to select a letter.
Now, press the RED button again to store or BLUE button to
cancel NAME.
To delete a channel from a programme number:
Move to the channel you want to delete or use the digits so
that the selected programme number is in cyan color.
Press the YELLOW button. Now the corresponding channel
will be deleted and all the other channels below this pro-
gramme number will be moved one programme number up.
Now, press the YELLOW button again to delete or BLUE but-
ton to cancel DELETE.
To insert a channel into a programme number:
Move to the channel to be inserted or use the digits so that
the selected programme number is in cyan color.
Press the GREEN button. Now using
or or
or buttons, move to the programme number.
Now, press the GREEN button again to insert or BLUE button
to cancel INSERT.
A.P.S.
If you enter the A.P.S. menu, you can automatically program-
me the received channels in your TVs programmes with
A.P.S. ( Automatic programme system ).
1. After displaying the PROGRAM. menu, press the BLUE
button to enter the A.P.S. menu.
2. Select LANGUAGE with the or button, then
press the or button to select a menu language.
3. Select COUNTRY with the or button, then
press the or button to select the country you are
now located.
4. If you want to start programming, select START with the
or button, then press the button. The
message A.P.S. IS RUNNING appears and A.P.S. auto-
matically programmes the received channels in your TVs
programme numbers. Afrer A.P.S. is finalized, the PRO-
GRAM. menu appears again.
To cancel A.P.S., press the button.
Other Features
Sound Mute
To cut off the sound of the TV, press button. The sound
will be cut off. To cancel mute, press or or but-
ton. The volume level will be the same as the level before
mute when you cancel mute.
Information on Screen
First pressing the button displays the current status
Programme number and Station name.
Pressing this button again displays the current time.
Pressing this button once more remove the on-screen dis-
play.
To Display the Time
While watching a TV programme with Teletext transmission
press button twice. The current time information, cap-
tured from Teletext will be displayed on the screen.
If the programme being watched does not have Teletext
transmission, only a box will be displayed at the same loca-
tion.
The time information will disappear after pressing but-
ton again.
When time information is displayed on screen, entering an-
other menu will remove it.
Standard
You can re-set the current PICTURE menu settings (except
Picture Mode setting) to the default settings.
Press STANDARD button when no menu appears.
VCR Control Buttons
The buttons can be used to operate a JVC brand VCR.
Pressing the button having the same appearance as the origi-
nal remote control button of a device makes the function work
in the same way as the original remote control.
Press the VCR Control Button to control your VCR.
Note:
If your device is not made by JVC, these buttons cannot be
used.
Even if your device is made by JVC, some of these buttons
or any one of the buttons may not work, depending on the
device.
You can use the / buttons to choose a TV channel
which the VCR will receive.

ENGLISH - 9 -
Teletext
Teletext is an information system that displays text on your
TV screen. Using the Teletext information system you can
view a page of information on a subject that is available in the
list of contents (index).
No on screen display will be available in text mode.
No contrast, brightness or colour control, but volume control
is available in text mode.
To operate Teletext
Select a TV station on which Teletext is being transmitted.
Press (TELETEXT) button. Usually the list of contents
(index) is displayed on the screen.
To select a page of Teletext
Press the appropriate digit buttons for the required Teletext
page number.
The selected page number is displayed at the top left corner
of the screen. The Teletext page counter searches until the
selected page number is located, so that the desired page is
displayed on the screen.
Press button to move the Teletext screen forward
one page at a time.
Press button to move the Teletext screen backward
one page at a time.
To Select Index Page
To select the page number of the index (generally page
100), press button.
Searching for a teletext page while watching TV
In the Teletext mode pressing button will switch the
screen to the TV mode. In the TV mode enter a page num-
ber using digit keys. As you enter last digit of page number,
sign will replace the page number and flash until the
entered page number is found. Then the page number will
replace sign again. Now you can display this teletext
page pressing button.
To Select Double Height Text
Press button for the top half of the information page to
be displayed in double height text.
Press
button again for the bottom half of the informa-
tion page to be displayed in double height text.
Press
button once more for the full page of normal
height text.
To Reveal concealed Information
Pressing button once will reveal answers on a quiz or
games page.
Pressing button again will conceal the revealed an-
swers.
To Stop Automatic Page Change
The teletext page you have selected may contain more infor-
mation than what is on the screen; the rest of the information
will be displayed after a period of time.
Press button to stop the automatic page change.
Press button again to allow the next page to be dis-
played.
To Select a Subcode Page
Subcode pages are subsections of long Teletext pages that
can only be displayed on the screen one section at a time.
Select the required Teletext page.
Press button.
Select the required subcode page number by pressing four
digit buttons (e.g. 0001).
If the selected subcode page is not displayed in a short
time, press button. TV programme will be displayed on
the screen.
Teletext page number will be displayed on the upper left cor-
ner of the screen when the selected page is found.
Press button to display the selected Teletext page.
To exit Teletext
Press button. The screen will switch to TV mode.

ENGLISH - 10 -
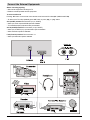
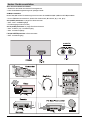
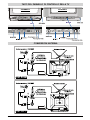
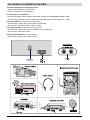
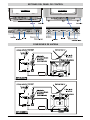
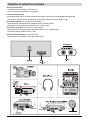
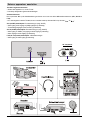
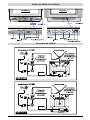
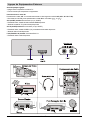
Connect the External Equipments
Before connecting anything
Switch off all equipments including the TV.
Read the manuals provided with the equipments.
To select an AV mode
Pressing AV button on the remote control selects one of the three AV modes (AV- 1, AV-1 S and F-AV).
To return to the TV mode, repeatedly press AV button or press or button.
AV-1 (SCART) terminal: Euroconnector (21-pin, SCART)
Video input, Audio input and RGB inputs are available.
TV broadcast outputs (Video and Audio) are available.
AV-1 S (SCART) terminal: Euroconnector (21-pin, SCART)
Video input, S-VIDEO (Y/C) input and Audio input are available.
Video and Audio outputs are available.
F-AV (Front AV) terminal: RCA connectors x 2
Video input and Audio input are available.
FRONT AV

ENGLISH - 11 -
Via the Euroconnector
Your TV set has an Euroconnector socket. If you want to
connect equipments (e.g. video recorder, decoder, etc.) which
have Euroconnectors, to your TV, use the AV-1 (SCART) or
AV-1 S (SCART) terminals.
AV-1 S Mode
If the equipment connected to your TV set supports S-Video
(Y/C) output from Euroconnector, you can have a better pic-
ture quality by selecting AV-1 S mode and connecting your
equipment to the AV-1 S (SCART) terminal of TV. See your
equipment's booklet to check if your equipment has such fea-
ture.
Via the RCA jacks
If you have an equipment (such as a Camcorder) which has
the RCA jacks, connect it to the F-AV (Front AV) terminal
with the video and audio cables.
Via the ANT (aerial) socket
If your equipment does not have an Euroconnecter or RCA
jacks, connect it to the TV with an aerial cable. For details,
see the manual provided with the equipment.
To store the test signal that comes from the equipment, see
"Install. Menu" on page 7 and store it to the programme
number 0. You can watch images from that equipment to
select the programme number which you stored the test
signal.
TV and Video Recoder (VCR)
Connect the Video Recorder to the ANT (antenna input)
socket of the TV with the aerial cable.
Connect the Video Recorder to the AV-1 or AV-1 S terminal
with the SCART cable, or connect it to the F-AV (Front AV)
terminal with the audio and video cables.
NTSC Playback
Connect a NTSC video recorder to a terminal. Then press
AV button to select the corresponding AV mode.
NTSC 3.58/4.43 system is detected automatically in AV
mode.
Connecting Headphones
Use the headphone socket of your TV, to connect head-
phones.
Tips
Care of the Screen:
Clean the screen with a slightly damp, soft cloth. Do not use
abrasive solvents as they may damage the TV screen coating
layer.
Poor Picture:
Have you selected the correct TV system? Is your TV set or
house aerial located too close to the loudspeakers, non-
earthed audio equipment or neon lights, etc. ?
Mountains or high buildings can cause double pictures or
ghost images. Sometimes you can improve the picture quali-
ty by changing the direction of the aerial.
The picture quality may degrade when two peripherals are
connected to the TV at the same time. In such a case, dis-
connect one of the peripherals.
No Picture:
Is the aerial connected properly? Are the plugs connected
tightly to the aerial socket? Is the aerial cable damaged? Are
suitable plugs used to connect the aerial? If you are in doubt,
consult your dealer.
No Picture means that your TV is not receiving any trans-
mission. Have you pressed the correct keys on the remote
control? Try once more.
Remote Control:
Your TV no longer responds to the remote control. Press the
STANDARD button on the remote control once more. Per-
haps the batteries are exhausted. If so you can still use the
local buttons at the front of your TV.
Have you selected the wrong menu? Press STANDARD but-
ton to return to TV mode or press MENU button to return to
the previous menu.
No solution:
Switch your TV set off and on. If this does not work, call the
service personnel; never attempt to repair it yourself.

ENGLISH - 12 -
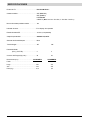
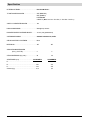
Specifications
TV BROADCASTING .......................................... PAL SECAM B/G L
RECEIVING CHANNELS ..................................... VHF (BAND I/III)
UHF (BAND U)
HYPERBAND
CABLE TV (B/G : S01-S41 / S75-S79 ; L: S01-S41 / S75-S77)
NUMBER OF PRESET CHANNELS ................... 100
CHANNEL INDICATOR ........................................ On Screen Display
RF AERIAL INPUT .............................................. 75 Ohm (unbalanced)
OPERATING VOLTAGE ...................................... 220-240V AC, 50 Hz.
SOUND-MULTIPLEX SYSTEMS .......................... Mono
PICTURE TUBE .................................................. For 14 For 14
AUDIO OUTPUT POWER
(W
RMS.
) (%10 THD) .................................. 2 2
POWER CONSUMPTION (W) (max.) .................. 59 59
DIMENSIONS (mm) ................................... AV14BJ8EPS AV14BM8EPS
D........................................................................ 377 378
L ........................................................................ 446 374
H........................................................................ 334 332
Weight (Kg.) ....................................................... 9,75 9,4

FRANÇAIS - 13 -
Consignes de sécurité
1. Source d'alimentation
Le récepteur doit être impérativement branché sur une prise
secteur 220-240 V CA, 50 Hz.
Assurez-vous que la tension de votre source d'alimentation
est correcte.
2. Cordon d'alimentation
Le cordon d'alimentation doit être disposé de telle sorte qu'il
ne sera ni piétiné, ni gêné par des objets placés sur ou con-
tre lui. Faites particulièrement attention aux endroits où le
cordon est raccordé à la prise secteur et à la sortie du récep-
teur.
3. Humidité et eau
Ne placez pas le téléviseur dans un endroit humide. Evitez de
l'installer à proximité de la salle de bains, de l'évier de la cui-
sine ou de la machine à laver. N'exposez pas votre appareil à
la pluie ou à une éventuelle projection d'eau, et ne placez pas
dessus d'objets remplis d'eau, tel qu'un vase. Toutes ces sit-
uations peuvent être la cause d'accidents.
4. Nettoyage
Avant de nettoyer votre appareil, débranchez le récepteur de
la prise d'alimentation principale. N'utilisez pas de produits
nettoyants liquides ou en aérosol. Utilisez un chiffon doux et
sec.
5. Ventilation
Les fentes et ouvertures situées sur l'appareil sont conçues
pour la circulation d'air et assurer un bon fonctionnement du
téléviseur. Afin d'éviter toute surchauffe de l'appareil, celles-ci
ne doivent en aucun cas être obstruées ni recouvertes.
6. Foudre
En cas de tempête et de foudre ou lorsque vous partez en
vacances, débranchez le cordon d'alimentation de la prise
secteur.
7. Pièces détachées
Si certaines pièces doivent être remplacées, assurez-vous
que le technicien du service après-vente utilise les pièces
détachées spécifiées par le fabricant ou que celles-ci ont les
mêmes spécifications que les pièces d'origine. Le non-re-
spect de cette condition peut entraîner des risques
d'incendie, de chocs électriques ou autres.
8. Service après-vente
Toute réparation doit être effectuée par un technicien qualifié.
Pour éviter tout danger de choc électrique, ne retirez jamais
le capot de l'appareil.
9. Flammes
Ne placez jamais de source de flammes nues, une bougie
par exemple, sur l'appareil.
10. Veille
Ne laissez pas votre appareil en fonctionnement ou en mode
Veille lorsque vous quittez votre domicile.
Avertissement !
Toute intervention contraire aux réglementations, en particuli-
er toute modification de la tension ou le remplacement du
tube cathodique, risque d'augmenter la concentration des
rayons X. Si des modifications de ce type ont été apportées
à votre téléviseur, ce dernier n'est plus compatible avec la li-
cence et ne doit pas être utilisé.
Évacuation des déchets
L'emballage a été conçu pour être recyclé. Les matériaux
d'emballage, et notamment les sacs en plastique, doivent
être tenus à l'écart des enfants.
Sommaire
Consignes de sécurité ...........................................13
Fonctions de la télécommande .............................14
Fonctions du panneau de commande .................. 15
Branchement de l'antenne ....................................15
Préparation ..............................................................16
Spécifications ..................................................................16
Avant d'allumer le téléviseur .................................16
Branchement du téléviseur .............................................. 16
Branchement de l'antenne ...............................................16
Branchement de périphériques externes ......................... 16
Introduction des piles dans la télécommande ..................16
Mise en marche ou arrêt du téléviseur ................16
Mise en marche du téléviseur ..........................................16
Arrêt du téléviseur ...........................................................16
Paramètres initiaux .................................................16
Utilisation des touches situées sur le panneau de
commande ......................................................................17
Utilisation de la télécommande .......................................17
Système de menu ...................................................17
Menu IMAGE ..................................................................17
Menu SPECIF. (Fonctions)..............................................18
Menu INSTALL. ...............................................................19
Menu PROGRAM. (Programmation) ................................19
Autres fonctions...................................................... 20
Coupure temporaire du son .............................................20
Informations à l'écran ......................................................20
Affichage de l'heure .........................................................20
Touche STANDARD .........................................................20
Touches de commande VCR et sélecteur........................21
TÉLÉTEXTE ............................................................ 21
Fonctionnement du Télétexte ..........................................21
Sélection d'une page de texte .........................................21
Sélection de la page d'index ............................................21
Recherche d'une page Teletext tout en suivant un
programme de télévision ..................................................21
Sélection du texte en double hauteur ..............................21
Affichage d'informations masquées..................................21
Arrêt de la modification automatique d'une page ..............21
Sélection d'une sous-page .............................................. 21
Sortie du Télétexte .......................................................... 21
Branchement des périphériques externes .........22
Via les prises Péritel .......................................................23
Mode AV-1 S ...................................................................23
Via les prises RCA ..........................................................23
Via la prise d'antenne (ANT) ............................................23
Magnétoscope ................................................................23
Lecture NTSC .................................................................23
Branchement des casques..............................................23
Conseils ...................................................................23
Caractéristiques techniques .................................24

FRANÇAIS - 14 -
= Veille / Marche
0 - 9 = Sélection du numéro de programme 0 à 9
Touche STANDARD (Image REGLAGES D'USINE)
Touches de couleur
MENU = Touche MENU
( ) = Curseur haut / Sélection de programme par
ordre croissant
( ) = Curseur droite / Augmentation du volume
Touches de commande Télétexte
Touches de commande Magnétoscope
( ) = Curseur bas / Sélection de programme par ordre
décroissant
( ) = Curseur gauche / Diminution du volume
AV = Touche AV
= Touche Informations
= Touche Silence
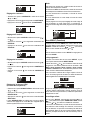
Fonctions de la télécommande
ATTENTION
RISQUE DE CHOC ÉLECTRIQUE
Le symbole ci-contre signale la présence d'une haute tension électrique dangereuse à l'intérieur de votre téléviseur,
ce qui peut représenter un risque de choc électrique.
Le point d'exclamation dans le triangle vous signale des instructions importantes concernant la mise en marche et le
service après-vente du produit dans la documentation fournie avec votre appareil.

FRANÇAIS - 15 -
Fonctions du panneau de commande
Branchement de l'antenne
AV14BM8EPS AV14BJ8EPS

FRANÇAIS - 16 -
Préparation
Placez le téléviseur sur un support stable.
Prévoyez un espace d'au moins 10 cm de chaque côté du
téléviseur de façon à assurer une ventilation suffisante.
Afin d'éviter toute situation dangereuse, ne posez pas d'objet
sur le dessus de l'appareil.
Spécifications
Téléviseur couleur à télécommande.
Mémorisation de 100 stations des chaînes câblées ou des
bandes VHF ou UHF.
Réglage des chaînes câblées.
Navigation facilitée par des menus.
Prise Pérotel pour les équipements externes (ex. magné-
toscope, console de jeux vidéos, chaîne audio, etc.).
Panneau de commande avant.
Télétexte.
Prise de casque.
Accès direct aux programmes.
Système APS.
Possibilité d'attribution de noms aux stations.
Réglage automatique avant ou arrière.
Arrêt programmé.
Coupure automatique du son lors d'absence de transmis-
sion.
5 minutes après la fin des émissions, le téléviseur passe
automatiquement en mode Veille.
Avant d'allumer le téléviseur
Branchement du téléviseur
IMPORTANT : Le téléviseur doit être impérativement branché
sur une prise 220-240 V CA, 50 Hz.
Une fois déballé, laissez votre appareil s'adapter à la tempé-
rature ambiante de la pièce avant de le brancher sur la prise
secteur.
Branchement de l'antenne
Insérez le cordon d'arrivée de l'antenne dans la prise située
sur la face arrière du téléviseur.
Branchement de périphériques externes
Reportez-vous à la section « Branchement des périphéri-
ques externes » à la page 22.
Consultez également la documentation fournie avec ces ap-
pareils.
Introduction des piles dans la télécommande
Retirez le couvercle situé au dos de la télécommande en le
poussant légèrement vers le haut à partir de lendroit indi-
qué.
Insérez deux piles AA (R6) ou de type équivalent dans le
sens indiqué.
Remettez le couvercle en place.
REMARQUE : Si vous prévoyez de ne pas utiliser la télécom-
mande pendant une période prolongée, il est préférable de re-
tirer les piles. Des fuites risqueraient en effet d'endommager
l'appareil.
Mise en marche ou arrêt du téléviseur
Vous pouvez faire fonctionner votre téléviseur à l'aide de
la télécommande ou directement à partir des boutons du
panneau de commande situé à l'avant de l'appareil.
Mise en marche du téléviseur
La mise en marche seffectue en deux temps:
1. Appuyez sur le bouton dalimentation situé à lavant du té-
léviseur. Ce dernier est alors sous tension et passe en
mode Veille. Le voyant ROUGE en bas de lappareil est
allumé.
2. Pour quitter le mode Veille et mettre le téléviseur en mar-
che, procédez comme suit:
Appuyez sur une touche numérique de la télécommande pour
sélectionner un programme, ou
Appuyez sur la touche Veille / Marche ou lune des touches
de sélection de programme à lavant du téléviseur ou sur la
télécommande, le téléviseur se met alors en marche et le
voyant ROUGE devient VERT.
Arrêt du téléviseur
Appuyez sur la touche Veille de la télécommande. Le télévi-
seur bascule alors en mode Veille et le voyant VERT devient
ROUGE ou
Appuyez sur le bouton d'alimentation situé à l'avant du télé-
viseur.
Paramètres initiaux
Le message « Please check antenna cable Auto. Pro-
gramming System » (VERIFIER ANTENNE PROGRAMMA-
TION AUTOMATIQUE) s'affiche lorsque vous mettez votre
téléviseur sous tension pour la première fois.
1. À l'aide de la touche ou , sélectionnez LAN-
GUAGE (LANGUE), puis appuyez sur la touche ou
pour sélectionner la langue souhaitée.
2. À l'aide de la touche ou , sélectionnez COUN-
TRY (PAYS), puis appuyez sur la touche ou pour
sélectionner le pays dans lequel vous vous trouvez.
3. À l'aide de la touche ou , sélectionnez START
(MARCHE), puis appuyez sur la touche pour démarrer
le système APS.
Le système APS programme automatiquement les chaînes
reçues dans les numéros de station de votre téléviseur.
Le message « A.P.S. EN MARCHE » s'affiche pendant le
chargement. Une fois le système finalisé, le menu PRO-
GRAM. (Programmation) s'affiche.

FRANÇAIS - 17 -
Pour annuler le système APS, appuyez sur la touche .
Vous pouvez supprimer une chaîne, insérer une chaîne dans
un numéro de station ou redémarrer le système APS à l'aide
du menu PROGRAM. (Programmation).Pour plus de dé-
tails sur ce menu, reportez-vous à la page 19.
4. Pour terminer les paramètres initiaux, appuyez sur la tou-
che STANDARD.
Une fois terminé, vous pouvez modifier le numéro ou le nom
d'une station ou programmer une nouvelle chaîne manuelle-
ment. Pour plus de détails, reportez-vous à la section IN-
STALL. à la page 19.
Si le message « VERIFIER ANTENNE PROGRAMMATION
AUTOMATIQUE » ne s'affiche pas, suivez les indications
fournies à la section « Menu PROGRAM. (Programmation)
» à la page 19 pour choisir la langue du menu, le nom du
pays et utiliser l'A.P.S. (Automatic Programming System,
système de programmation automatique).
Utilisation des touches situées sur le panneau de
commande
Le réglage du volume et la sélection des programmes peu-
vent être réalisés à l'aide des touches situées à l'avant du
téléviseur.
Réglage du volume
Appuyez sur la touche « - VOL. » pour diminuer le son ou
sur la touche « VOL. + » pour l'augmenter. Une échelle de
réglage apparaît alors à l'écran.
Sélection des programmes
Pour sélectionner la chaîne suivante, appuyez sur la touche
« PROG. + ». Pour sélectionner la chaîne précédente, ap-
puyez sur la touche « - PROG. ».
Accès au menu principal (AV14BJ8EPS)
Pour entrer dans le menu principal, appuyez sur la touche
MENU. Ensuite, sélectionnez un sous-menu à l'aide de la
touche « PROG. + » ou « - PROG. » et entrez dans le
sous-menu à l'aide de la touche « VOL. + » ou « - VOL. ».
Pour apprendre à utiliser les menus, reportez-vous à la sec-
tion « Système de menus » à la page 17.
Utilisation de la télécommande
La télécommande de votre téléviseur est conçue pour com-
mander toutes les fonctions du modèle que vous avez choisi.
Les fonctions décrites correspondent au système de menus
de votre téléviseur.
Les fonctions accessibles en dehors du système de menus
sont décrites ci-dessous.
Réglage du volume
Appuyez sur la touche pour augmenter le volume.
Appuyez sur la touche pour diminuer le volume.
Sélection des programmes
(Programme suivant ou précédent)
Appuyez sur la touche « » pour sélectionner le pro-
gramme précédent.
Appuyez sur la touche « » pour sélectionner le pro-
gramme suivant.
Sélection des programmes (Accès direct)
Appuyez sur les touches numériques de la télécommande
pour sélectionner les programmes compris entre 0 et 9. Le
téléviseur bascule rapidement sur la chaîne sélectionnée.
Lorsque vous appuyez sur une première touche numérique, le
symbole « - » s'affiche pendant trois secondes à la place du
second chiffre. Pour sélectionner les programmes compris
entre 10 et 99, appuyez sur les touches numériques corre-
spondantes consécutivement avant que le symbole « - »
matérialisant le second chiffre ne disparaisse. (Par exemple,
pour obtenir la chaîne 27, appuyez d'abord sur la touche
numérique 2, puis sur la touche numérique 7 pendant que le
programme « 2- » est affiché.)
Système de menu
Votre téléviseur a été conçu avec un système de menus. Af-
fichez le menu principal MENU, puis entrez dans lun des
quatre sous-menus: IMAGE, SPECIF., INSTALL. ou PRO-
GRAM..
1. Appuyez sur la touche MENU pour afficher le menu princi-
pal. Les noms des sous-menus apparaissent alors dans le
menu principal qui s'affiche.
2. Appuyez sur la touche ou pour sélectionner
un nom de menu, puis appuyez sur la touche ou
pour entrer dans le menu.
Pour quitter un menu, appuyez sur la touche STANDARD.
Pour passer au menu précédent, appuyez sur la touche
MENU.
Menu IMAGE
Modification des paramètres image
Appuyez sur la touche MENU pour entrer dans le menu
principal. Dans le menu affiché, sélectionnez le sous-menu
IMAGE à l'aide de la touche ou , puis entrez
dans ce menu à l'aide de la touche ou .
ou
Entrez directement dans le menu IMAGE en appuyant sur
la touche VERTE.
Réglage de la luminosite :
Lorsque vous entrez dans le sous-menu IMAGE, la pre-
mière option sélectionnée est LUMINOSITE.
Appuyez sur la touche pour augmenter la LUMINOSITE.
Appuyez sur la touche pour diminuer la LUMINOSITE.

FRANÇAIS - 18 -
Réglage du contraste :
Sélectionnez l'option CONTRASTE à l'aide de la touche
ou ,
Appuyez sur la touche pour augmenter le CONTRASTE.
Appuyez sur la touche pour diminuer le CONTRASTE.
Réglage des couleur :
Sélectionnez l'option COULEUR à l'aide de la touche
ou ,
Appuyez sur la touche pour augmenter la saturation des
COULEUR.
Appuyez sur la touche pour diminuer la saturation des
COULEUR.
Réglage de la contour :
Sélectionnez l'option CONTOUR à l'aide de la touche
ou ,
Appuyez sur la touche pour augmenter la CONTOUR de
l'image.
Appuyez sur la touche pour réduire la CONTOUR de
l'image.
Réglage de la Nuance NTSC
(en mode AV uniquement) :
Sélectionnez l'option NUANCE NTSC à l'aide de la touche
ou ,
Appuyez sur la touche pour augmenter le niveau de la
NUANCE NTSC.
Appuyez sur la touche pour diminuer le niveau de la NU-
ANCE NTSC.
L'option NUANCE NTSC ne s'affiche que si la norme NTSC
3.58/4.43 est appliquée en mode AV. Elle n'apparaît pas si
d'autres systèmes de couleur sont utilisés.
Mode:
Cette option est utilisée pour modifier la taille de l'écran en
fonction de la transmission entrante.
Si la fonction AUTO est sélectionnée, la taille de l'écran est
automatiquement modifiée en fonction de la transmission.
Si vous sélectionnez le mode 4:3, le format de l'écran
passe à 4:3.
Si vous sélectionnez le mode 16:9, le format de l'écran
passe à 16:9.
Chaque programme a son propre réglage de mode image. Si
vous enregistrez un mode image pour un programme, le
réglage du mode image des autres programmes n'est pas af-
fecté.
Menu SPECIF. (Fonctions)
Appuyez sur la touche MENU pour entrer dans le menu
principal. Dans le menu affiché, sélectionnez le sous-menu
SPECIF. à l'aide de la touche ou , puis entrez
dans ce menu à l'aide de la touche ou .
ou
Entrez directement dans le menu SPECIF. en appuyant sur
la touche JAUNE.
Arrêt programmé :
Lorsque vous entrez dans le sous-menu SPECIF., la pre-
mière option sélectionnée est ARRET PROG.
Utilisez la touche ou pour modifier la valeur de l'arrêt
programmé. Les valeurs possibles sont les suivantes : AR-
RET, 0:15:00, 0:30:00, 0:45:00, 1:00:00, 1:15:00, 1:30:00,
1:45:00 ou 2:00:00 heures. Votre téléviseur passe en mode
veille une fois le délai sélectionné dépassé.
Cette information s'affiche dans l'angle supérieur droit de
l'écran. Si l'arrêt programmé est activé, le statut du téléviseur
s'affiche également et disparaît après 3 secondes.
Lorsqu'il ne reste plus qu'une minute avant l'arrêt programmé,
le temps restant s'affiche dans l'angle supérieur droit de
l'écran. A la fin du compte à rebours, le téléviseur passe auto-
matiquement en veille.
Verrouillage enfant :
Dans le menu SPECIF., appuyez sur la touche ou
pour sélectionner l'option VERROUILLAGE. Utilisez
la touche ou pour activer ou désactiver la fonction.
Si la fonction est désactivée, le mode de fonctionnement de
votre téléviseur reste inchangé. En revanche, si elle est ac-
tivée, le téléviseur ne peut être commandé qu'à l'aide de la
télécommande. Dans ce cas, les touches situées à l'avant du
téléviseur (excepté la touche de mise sous tension) sont in-
actives.

FRANÇAIS - 19 -
Langue :
Vous pouvez choisir la langue du menu en appuyant sur la
touche ou dans le sous-menu «LANGUE».
Menu INSTALL.
Appuyez sur la touche MENU pour entrer dans le menu
principal. Dans le menu affiché, sélectionnez le sous-menu
INSTALL. (INSTALLATION) à l'aide de la touche ou
, puis entrez dans ce menu à l'aide de la touche
oã .
ou
Entrez directement dans le menu Installation en appuyant
sur la touche BLEUE.
Programmation manuelle d'une chaîne dans un
numéro de station :
1. Lorsque vous entrez dans le menu INSTALL., PRO-
GRAMME est la première option sélectionnée. Pour sélec-
tionner le numéro de station dans lequel vous souhaitez
mémoriser la chaîne, appuyez sur la touche ou .
(Vous pouvez également entrer le numéro de la station à
l'aide des touches numériques correspondantes.)
2. Sélectionnez l'option BANDE à l'aide de la touche
ou . Utilisez la touche ou pour sélectionner la
bande sur laquelle vous souhaitez rechercher une chaîne.
3. Sélectionnez l'option RECHERCHE à l'aide de la touche
ou . Appuyez sur la touche ou pour
commencer la recherche. (Si vous appuyez sur la touche
, la recherche s'effectue en ordre croissant. En revanche
si vous appuyez sur la touche , elle s'effectue dans le
sens inverse.)
Si la chaîne trouvée n'est pas celle souhaitée, appuyez de
nouveau sur la touche ou pour recommencer la recher-
che.
Pour mettre fin à la recherche avant qu'une chaîne ne soit
trouvée, appuyez sur le bouton inverse. Par exemple, si la re-
cherche s'effectue vers l'avant avec la touche , appuyez sur
la touche pour arrêter la recherche.
Si vous connaissez le numéro de la chaîne à rechercher,
vous pouvez le trouver directement.
Pour ce faire, appuyez sur la touche ou pour
sélectionner l'option CANAL. Puis, appuyez sur la touche
ou
pour sélectionner le numéro de la canal ou entrez-le
directement à l'aide des touches numériques.
(Suivez létape 5 pour sélectionner la norme correcte avant de
sélectionner un numéro de canal.)
4. Pour attribuer un nom au nouveau programme, suivez les in-
dications de la section « Pour modifier le nom d'un pro-
gramme » à la page 20.
5. Si le son ou limage est incorrect, changez la norme (sys-
tème de diffusion) utilisée pour la nouvelle chaîne.
Appuyez sur la touche ou pour sélectionner
loption STANDARD (Norme), puis appuyez sur la touche
ou pour choisir la norme correcte.
Le numéro de chaîne indiqué change lorsque vous modifiez la
norme.
B/G : C02-C73 / S01-S41 / S75-S79
L : C01-C73 / S01-S41 / S75-S77
6. Si la réception de la chaîne est médiocre, effectuez un ré-
glage fin de la chaîne. Sélectionnez l'option REGLAGE FIN
à l'aide de la touche ou . Puis, appuyez sur la
touche ou pour effectuer le réglage fin de la chaîne.
7. Une fois tous les réglages terminés, enregistrez les para-
mètres de la nouvelle chaîne dans le numéro de station
choisi. Appuyez sur la touche ou pour sélec-
tionner MEMORISATION, puis appuyez sur la touche
ou pour lancer la mémorisation.
Si vous souhaitez modifier les paramètres du numéro de
station courant (par exemple, modifier la valeur de régla-
ge fin, etc.) procédez comme suit :
1. Sélectionnez le numéro de station dont vous souhaitez
modifier les paramètres tant qu'aucun menu n'est affi-
ché.
2. Affichez le menu INSTALL. (Installation).
3. Suivez les indications de la section « Programmation
manuelle d'une chaîne dans un numéro de station » à la
page 19 et modifiez le numéro du programme en cours.
Si vous souhaitez attribuer un nom au nouveau program-
me, suivez les indications de la section « Pour modifier
le nom d'un programme » à la page 20.
Remarque :
N'utilisez pas l'option Programme du menu INSTALL. pour
sélectionner le numéro de station. Si vous procédez de la
sorte et enregistrez les paramètres, les paramètres courants
du numéro de station sélectionné sont annulés.
Menu PROGRAM. (Programmation)
Ce menu est utilisé pour afficher les noms et les numéros
des stations. Vous pouvez l'utiliser pour supprimer une
chaîne, insérer une chaîne et mémoriser les stations de
manière automatique.
Sélectionnez le menu PROGRAM. (Programmation) à l'aide
des touches ou et ouvrez-le avec les touches
ou . Tous les numéros et les noms de programme s'affi-
chent à l'ouverture du menu de programmation. Le nom et le
numéro de programme du canal réglé s'affichent en couleur
Bleu. Tous les autres numéros de canal s'affichent en blanc.
Vous pouvez mettre le numéro en Bleu en appuyant sur les
Seite wird geladen ...
Seite wird geladen ...
Seite wird geladen ...
Seite wird geladen ...
Seite wird geladen ...
Seite wird geladen ...
Seite wird geladen ...
Seite wird geladen ...
Seite wird geladen ...
Seite wird geladen ...
Seite wird geladen ...
Seite wird geladen ...
Seite wird geladen ...
Seite wird geladen ...
Seite wird geladen ...
Seite wird geladen ...
Seite wird geladen ...
Seite wird geladen ...
Seite wird geladen ...
Seite wird geladen ...
Seite wird geladen ...
Seite wird geladen ...
Seite wird geladen ...
Seite wird geladen ...
Seite wird geladen ...
Seite wird geladen ...
Seite wird geladen ...
Seite wird geladen ...
Seite wird geladen ...
Seite wird geladen ...
Seite wird geladen ...
Seite wird geladen ...
Seite wird geladen ...
Seite wird geladen ...
Seite wird geladen ...
Seite wird geladen ...
Seite wird geladen ...
Seite wird geladen ...
Seite wird geladen ...
Seite wird geladen ...
Seite wird geladen ...
Seite wird geladen ...
Seite wird geladen ...
Seite wird geladen ...
Seite wird geladen ...
Seite wird geladen ...
Seite wird geladen ...
Seite wird geladen ...
Seite wird geladen ...
Seite wird geladen ...
Seite wird geladen ...
Seite wird geladen ...
Seite wird geladen ...
Seite wird geladen ...
Seite wird geladen ...
Seite wird geladen ...
Seite wird geladen ...
Seite wird geladen ...
Seite wird geladen ...
Seite wird geladen ...
Seite wird geladen ...
Seite wird geladen ...
Seite wird geladen ...
Seite wird geladen ...
Seite wird geladen ...
Seite wird geladen ...
-
 1
1
-
 2
2
-
 3
3
-
 4
4
-
 5
5
-
 6
6
-
 7
7
-
 8
8
-
 9
9
-
 10
10
-
 11
11
-
 12
12
-
 13
13
-
 14
14
-
 15
15
-
 16
16
-
 17
17
-
 18
18
-
 19
19
-
 20
20
-
 21
21
-
 22
22
-
 23
23
-
 24
24
-
 25
25
-
 26
26
-
 27
27
-
 28
28
-
 29
29
-
 30
30
-
 31
31
-
 32
32
-
 33
33
-
 34
34
-
 35
35
-
 36
36
-
 37
37
-
 38
38
-
 39
39
-
 40
40
-
 41
41
-
 42
42
-
 43
43
-
 44
44
-
 45
45
-
 46
46
-
 47
47
-
 48
48
-
 49
49
-
 50
50
-
 51
51
-
 52
52
-
 53
53
-
 54
54
-
 55
55
-
 56
56
-
 57
57
-
 58
58
-
 59
59
-
 60
60
-
 61
61
-
 62
62
-
 63
63
-
 64
64
-
 65
65
-
 66
66
-
 67
67
-
 68
68
-
 69
69
-
 70
70
-
 71
71
-
 72
72
-
 73
73
-
 74
74
-
 75
75
-
 76
76
-
 77
77
-
 78
78
-
 79
79
-
 80
80
-
 81
81
-
 82
82
-
 83
83
-
 84
84
-
 85
85
-
 86
86


JVC AV14BJ8EPS Benutzerhandbuch
- Kategorie
- LCD-Fernseher
- Typ
- Benutzerhandbuch
- Dieses Handbuch eignet sich auch für
in anderen Sprachen
- français: JVC AV14BJ8EPS Manuel utilisateur
- español: JVC AV14BJ8EPS Manual de usuario
- italiano: JVC AV14BJ8EPS Manuale utente
- Nederlands: JVC AV14BJ8EPS Handleiding
- português: JVC AV14BJ8EPS Manual do usuário
