Simplicity 1693678 Benutzerhandbuch
- Kategorie
- Spielzeuge
- Typ
- Benutzerhandbuch
Dieses Handbuch eignet sich auch für

Print Vendor
Instructions
How to use this file
Viking Operator’s Manuals
Paper Size: • 11x17
• Body - 50 lbs brilliant white offset or equivalent
Press: • Body - 1 color, 2-sided
• Cover imprint - 1 color, 1 or 2 sided (“Dear customer” letter can be
printed on the back side of the front cover)
Bindery: • Saddle stitch, face trim *if too thick for saddle stitch, tape bind
Covers: • FRONT COVER is present at the beginning of the file.
• BACK COVER is the page immediately after the front cover.
• The part number for this manual (typically a 17XXXXX number) is located
on the back cover.
Body: • Odd number pages are always right hand pages, even number pages are
always left hand pages.
General: • This instruction sheet is NOT part of the manual and must not be printed.
• Pages labeled “THIS PAGE INTENSIONALLY BLANK” are placement
pages and should NOT be printed.
If you have further questions on how to utilize this file, please contact
Simplicity Technical Publications Department 262-284-8647

THIS PAGE INTENTIONALLY BLANK

MT 880
Always follow safety precautions in Owner's Manual.
Unbedingt Gebrauchsanleitung vor erster Inbetriebnahme lesen.
Veuillez lire la notice d'emploi avant la première mise en service.
Owner's Manual
Gebrauchsanleitung
Manuel d’utilisation
EN
DE
FR
B

1721123-05

0478 189 9010. B. Sim. Printed in USA © 2000 VIKING Umwelttechnik, A - 6330 Kufstein
Dear customer,
Thank you for deciding to purchase a quality
appliance from VIKING.
This appliance is manufactured using the most up-
to-date production techniques and comprehensive
quality assurance procedures. Our aim is to ensure
that you are 100% satisfied.
If you have any queries about your appliance please
direct them to your retailer or directly to our
marketing company.
I hope you will be completely satisfied with your
VIKING appliance
Signed
Nikolas Stihl
Managing Director


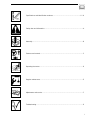
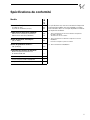
Troubleshooting..................................................................................................................G
Specifications and Identification numbers....................................................................II - VI
Safety rules and information...............................................................................................A
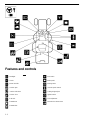
Features and controls.........................................................................................................C
Operating the tractor..........................................................................................................D
Regular maintenance..........................................................................................................E
Adjustments and service ....................................................................................................F
I
Assembly ............................................................................................................................B

B
C
II
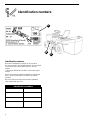
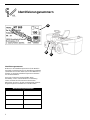
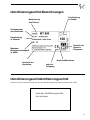
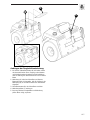
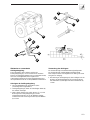
Identification numbers
Record the identification numbers for your model in
the space provided.The identification tags (A) are located
on the tractor (B) and the mower deck (C). For the
location
of the engine identification numbers, refer to the engine
manual.
When contacting your authorized dealer for replacement
parts, service or information, you MUST have these
numbers.
Be sure to fill out and return the warranty registration
card supplied with your unit.
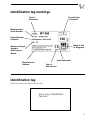
Identification numbers
Tractor manufacturing number Tractor serial number
Mower deck manufacturing number Mower deck serial number
Dealer name Date purchased
Engine make and model Engine serial number
SSAAMMPPLLEE
Identification numbers
A

III
Type of
lawntractor
Manufacturer’s
Address
Manufacturer’s
Serial Number
Maximum Engine
Speed in
Rotations per
Minute
Power Rating in
Kilowatts
Sound Power
in Decibels
Mass of Unit
in Kilograms
Conformity mark
Year of
Manufacture
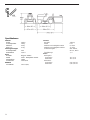
Identification tag markings
Identification tag
Note: See I.D. tag on unit frame for serial number.
Place copy of Identification
Tag here.

IV
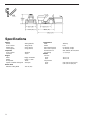
Transmission
Make Tuff Torq
Model K-51
Max. forward speed 6,5 km/h (4,1 mph)
Max. reverse speed 3,0 km/h (1,9 mph)
Transmission oil SAE 10W30, API SG,Motor
Oil capacity 1,7 l (2,5 qt)
Wheels
Tire size
Front 15 x 6,0-6
Rear 18 x 8,5-8
Tire pressure
Front 0,83-1,04 bar (12-15 psi)
Rear 0,41-0,55 bar (6-8 psi)
Specifications
Weight
Tractor 218 kg (480 lb)
Grass catcher 18 kg (40 lb)
Mower deck 50 kg (110 lb)
Crate (approx) 57 kg (125 lb)
Capacities
Grass catcher 310 liters
Fuel tank 13,25 l
Engine
Make Briggs & Stratton
Model InTek™ V-Twin
Horsepower 18 HP
Speed of rotation during test 2250 rpm
Mower deck
Effective cutting width 102 cm (40”)

V
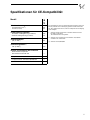
CE Compliance Specifications
Model
MT 880
Vibration Data*
At the Steering Wheel (in m/s
2
) 4,8
AT the Seat (in m/s
2
) 0,3
Drawbar Force Limits
Horizontal Force Limit (in Newton) 444
Vertical Force Limit
(in Newton) 222
Sound Pressure Data**
LpA [in db(A)] 86
Sound Power Data***
LwA [in db(A)] 100
Standards & Directive Compliance
European Harmonized
Lawn Mower Standard EN 836 x
European Machinery Directive 98/37/EEC x
European EMC Directive 89/336/EEC x
GS Marke Certified by TÜV Rheinland x
Specifications are correct at the time of printing and subject to
change without notice. Items marked ”N/A” are not available at the
time of printing.
* Tested according to European Normative Vibration Standards
EN 1032 und EN 1033.
Test performed on a concrete floor.
** Tested according to European Noise Directive 79/113/EEC.
Sound pressure at operator’s position.
*** Tested according to 84/538/EEC

VI
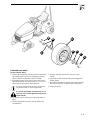
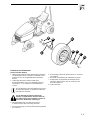
Replacement Parts
QTY. DESCRIPTION PART NO.
1
Mower Blades
, R.H. 6153 702 0110
1
Mower Blades
, L.H. 6153 702 0100
Listed below are the more common replacement parts. Only genuine factory replacement parts will assure optimum
performance and safety. Do not attempt repairs or maintenance unless proper procedures and safety precautions are
followed. For assistance in any area, see your dealer.
Common replacement parts

A-1
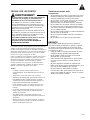
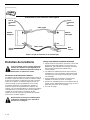
Safety rules
and information

SLOPE OPERATION
Slopes are a major factor related to loss-of-control and
tip-over accidents, which can result in severe injury or
death. All slopes require extra caution. If you cannot
back up the slope or if you feel uneasy on it, do not
operate on it.
Control of a ride-on machine sliding on a slope will not
be regained by the application of the brake. The main
reasons for loss of control are: insufficient tire grip on the
ground, speed too fast, inadequate braking, the type of
machine is unsuitable for its task, lack of awareness of
the ground conditions, incorrect hitching and load
distribution.
Do
• See your authorized dealer for recommendations of
wheel weights or counterweights to improve
stability.
• Mow up and down slopes, not across.
• Remove obstacles such as rocks, tree limbs, etc.
• Watch for holes, ruts, or bumps. Uneven terrain
could overturn the unit.Tall grass can hide
obstacles.
• Use slow speed. Choose a low gear so that you will
not have to stop or shift while on the slope.
• Use extra care with grass catchers or other
attachments.These can change the stability of the
unit.
• Keep all movement on the slopes slow and gradual.
Do not make sudden changes in speed or
direction.
• Always keep unit in gear especially when traveling
downhill. When clutching, release clutch slowly.
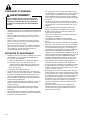
A-2
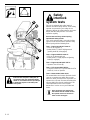
Read these safety rules and follow them closely. Failure to obey these rules could result in loss of
control of unit, severe personal injury or death to you, or bystanders, or damage to property or
equipment. This mo
wing deck is capable of amputating hands and feet and throwing objects.
The triangle in text signifies important cautions or warnings which must be followed.
Safety Rules & Information
GENERAL OPERATION
• Read, understand, and follow all instructions in the
manual and on the unit before starting.
• Only allow responsible adults, who are familiar with
the instructions, to operate the unit (local
regulations can restrict operator age).
• Clear the area of objects such as rocks, toys, wire,
etc., which could be picked up and thrown by the
blade(s).
• Be sure the area is clear of other people before
mowing. Stop unit if anyone enters the area.
• Never carry passengers.
• Do not mow in reverse unless absolutely necessary.
Always look down and behind before and while
travelling in reverse.
• Be aware of the mower discharge direction and do
not point it at anyone. Do not operate the mower
without either the entire grass catcher or the
deflector in place.
• Slow down before turning.
• Never leave a running unit unattended. Always
disengage the PTO, set parking brake, stop engine,
and remove keys before dismounting.
• Turn off the PTO switch to disengage the blades
when not mowing.
• Stop engine before removing grass catcher or
unclogging chute.
• Mow only in daylight or good artificial light.
• Do not operate the unit while under the influence of
alcohol or drugs.
• Watch for traffic when operating near or crossing
roadways.
• Use extra care when loading or unloading the unit
into a trailer or truck.
• Data indicates that operators, age 60 years and
above, are involved in a large percentage of riding
mower-related injuries.These operators should
evaluate their ability to operate the riding mower
safely enough to protect themselves and others
from injury.
• Keep in mind the operator is responsible for
accidents occurring to other people or property.
• All drivers should seek and obtain professional and
practical instruction.
• Always wear substantial footwear and trousers.
Never operate when barefoot or wearing sandals.
• Before using, always visually check that the blades
and blade hardware are present, intact, and
secure. Replace worn or damaged parts.
• Never operate the machine with defective guards,
or without safety protective devises in place.
• Disengage attachments before: refuelling, removing
an attachment, making adjustments (unless the
adjustment can be made from the operator’s
position).
• When the machine is parked, stored, or left
unattended, lower the cutting means unless a
positive mechanical lock is used.
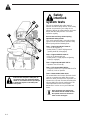
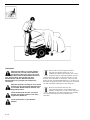
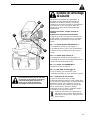
WARNING
Never operate on slopes greater than 17,6
percent (10°) which is a rise of 106 cm (3.5 feet)
vertically in 607 cm (20 feet) horizontally.
When operating on slopes use additional wheel
weights or counterweights. See your dealer to
determine which weights are available and
appropriate for your unit.
Select slow ground speed before driving onto slope.
In addition to front and rear weights, use extra
caution when operating on slopes with rear-
mounted grass catcher.
Mow UP and DOWN the slope, never across the
face, use caution when changing directions and
DO NOT START OR STOP ON SLOPE.

A-3
Slope Operation Continued
Do Not
• Do not start or stop on a slope. If tires lose traction,
disengage the blade(s) and proceed slowly straight
down the slope.
• Do not turn on slopes unless necessary, and then,
turn slowly and gradually uphill, if possible.
• Do not mow near drop-offs, ditches, or
embankments.The mower could suddenly turn over
if a wheel is over the edge of a cliff or ditch, or if an
edge caves in.
• Do not mow on wet grass. Reduced traction could
cause sliding.
• Do not try to stabilize the unit by putting your foot
on the ground.
• Do not use grass catcher on steep slopes.
CHILDREN
Tragic accidents can occur if the operator is not alert
to the presence of children. Children are often
attracted to the unit and the mowing activity. Never
assume that children will remain where you last saw
them.
• Keep children out of the mowing area and under
the watchful care of another responsible adult.
• Be alert and turn unit off if children enter the area.
• Before and during reverse operation, look behind
and down for small children.
• Never carry children.They may fall off and be
seriously injured or interfere with safe unit
operation.
• Never allow children to operate the unit.
• Use extra care when approaching blind corners,
shrubs, trees, or other objects that may obscure
vision.
TRANSPORTING AND STORAGE
• Always observe safe refueling and fuel handling
practices when refueling the tractor after
transportation or storage.
• Always follow the engine manual instructions for
storage preparations before storing the tractor for
both short and long term periods.
• Always follow the engine manual instructions for
proper start-up procedures when returning the unit
to service.
• Never store the unit or fuel container inside where
there is an open flame or pilot light, such as in a
water heater. Allow unit to cool before storing.
SERVICE AND MAINTENANCE
• Use extra care in handling gasoline and other fuels.
They are flammable and vapors are explosive.
a) Use only an approved container.
b) Never remove gas cap or add fuel with the
engine running. Allow engine to cool before
refueling. Do not smoke.
c) Never refuel the unit indoors.
• Never run a unit in an enclosed area.
• Keep nuts and bolts, especially blade attachment
bolts, tight and keep equipment in good condition.
• Never tamper with safety devices. Check their
proper operation regularly and make necessary
repairs if they are not functioning properly.
• Keep unit free of grass, leaves, or other debris
build-up. Clean up oil or fuel spillage.
• Stop and inspect the equipment if you strike an
object. Repair, if necessary, before restarting.
• Never make adjustments or repairs with the engine
running unless specified otherwise in the engine
manufacturer’s manual.
• Grass catcher components are subject to wear,
damage, and deterioration, which could expose
moving parts or allow objects to be thrown.
Frequently check components and replace with
manufacturer’s recommended parts, when
necessary.
• Mower blades are sharp and can cut. Wrap the
blade(s) or wear gloves, and use extra caution
when servicing them.
• Check brake operation frequently. Adjust and
service as required.
• Use only factory authorized replacement parts
when making repairs.
• Always comply with factory specifications on all
settings and adjustments.
• Only authorized service locations should be utilized
for major service and repair requirements.
• Never attempt to make major repairs on this unit
unless you have been properly trained. Improper
service procedures can result in hazardous
operation, equipment damage and voiding of
manufacturer’s warranty.
• If fuel is spilled, do not attempt to start the engine
but move the machine away from the area of
spillage and avoid creating any source of ignition
until petrol vapors have dissipated.
• Replace all fuel tank caps and fuel container caps
securely.
• On multiple blade mowers, take care as rotating
one blade can cause other blades to rotate.
• Do not change engine governor settings or over-
speed the engine. Operating the engine at
excessive speed can increase the hazard of
personal injury.
• Disengage drive attachments, stop the engine,
remove the key, and disconnect the spark plug
wire(s) before: clearing attachment blockages and
chutes, performing service work, striking an object,
or if the unit vibrates abnormally. After striking an
object, inspect the machine for damage and make
repairs before restarting and operating the
equipment.
• Never place hands near the hydro pump cooling fan
when the tractor is running. Cooling fan is located
on top of the transaxle.
WARNING
When transporting this tractor on an open
trailer, make sure unit is facing forward, toward
the direction of travel. If tractor is facing
backward, wind lift could cause damage to the
hood.

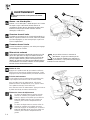
A-4
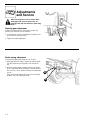
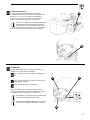
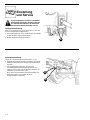
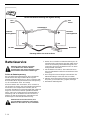
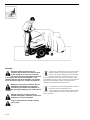
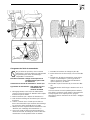
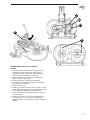
Safety
interlock
system tests
This unit is equipped with safety interlock
switches and other safety devices.These safety
systems are present for your safety: do not
attempt to bypass the safety switches and never
tamper with the safety devices. Check their
operation regularly.
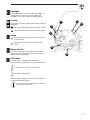
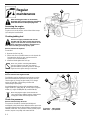
Service interval: Every fall and spring
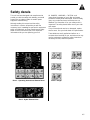
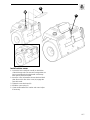
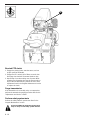
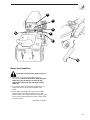
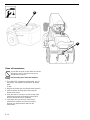
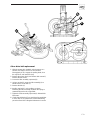
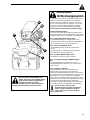
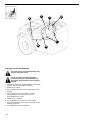
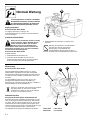
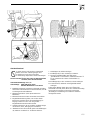
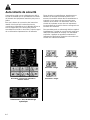
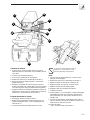
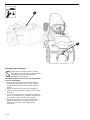
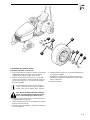
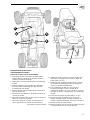
Operational safety checks
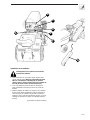
Your unit is equipped with a seat switch safety
system. Check the seat switch operation every
fall and spring with the following tests:
Test 1 - Engine should NOT crank if:
• PTO (A) is engaged, or
• Brake pedal (C) is NOT fully depressed
[parking brake (B) disengaged].
Test 2 - Engine SHOULD crank if:
• PTO (A) is disengaged, and
• Brake pedal (C) is fully depressed [parking
brake (B) engaged].
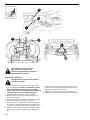
Test 3 - Engine should SHUT OFF if:
• Operator rises off seat (E).
Test 4 - PTO should SHUT OFF if:
• The grass catcher (F) is opened with the PTO
switch (A) in the on position.
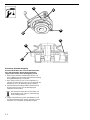
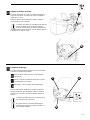
Test 5 - Mower blade brake check
The mower blades and mower drive belt should
come to a complete stop within five seconds
after PTO switch is turned to the off position (or
operator rises off seat). If mower drive belt does
not stop within five seconds, perform the PTO
clutch adjustment found in the “Regular
Maintenance” section or see your authorized
dealer.
Once the engine has stopped, the
PTO switch must be turned off after
the operator returns to the seat in
order to start the engine.
A
B
C
D
E
F
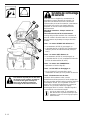
If the unit does not pass a safety test, do
not operate it. See your authorized dealer.
Under no circumstance should you attempt
to defeat the purpose of the safety inter-
lock system.

A-5
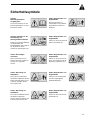
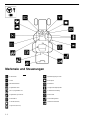
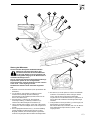
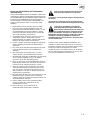
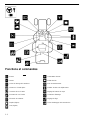
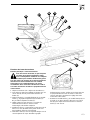
Safety decals
This unit has been designed and manufactured to
provide you with the safety and reliability you would
expect from an industry leader in outdoor power
equipment manufacturing.
Although reading this manual and the safety
instructions it contains will provide you with the
necessary basic knowledge to operate this equipment
safely and effectively, we have placed several safety
labels on the unit to remind you of this important
information while you are operating your unit.
All DANGER, WARNING, CAUTION and
instructional messages on your rider and mower
should be carefully read and obeyed. Personal bodily
injury can result when these instructions are not
followed.The information is for your safety and it is
important! The safety decals below are on your rider
and mower.
If any of these decals are lost or damaged, replace
them at once. See your local dealer for replacements.
These labels are easily applied and will act as a
constant visual reminder to you, and others who may
use the equipment, to follow the safety instructions
necessary for safe, effective operation.
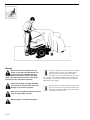
Decal - Danger
Decal - Danger
Decal - Danger
Decal - Danger
Decal - Danger
Decal - Operating Instructions Bottom Panel
Decal - Hydro Release Valve

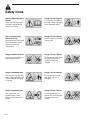
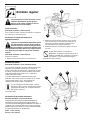
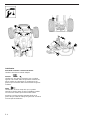
A-6
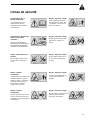
Warning: Read Operator’s
Manual.
Read and understand the
Operator’s Manual before
using this machine.
Danger: Thrown Objects.
This machine is capable of
throwing objects and debris.
Keep bystanders away.
Warning: Remove Key
Before Servicing.
Remove the key and consult
technical literature before
performing repairs or
maintenance.
Danger: Thrown Objects.
Do not operate the unit with
hopper open.
Danger: Machine Rollover.
Do not use this machine on
slopes greater than 10°.
Danger: Dismemberment.
This machine can amputate
limbs. Keep bystanders and
children away when engine
is running.
Danger: Dismemberment.
This mower deck can
amputate limbs. Keep
hands and feet away from
blades.
Danger: Thrown Objects.
Do not operate the unit with
the hopper removed, or
without the deflector
installed.
Danger: Thrown Objects.
Do not open the hopper
door when the PTO is
engaged.
Danger: Thrown Objects.
Do not operate the unit
without first connecting the
discharge tube to the
mower.
Safety Icons

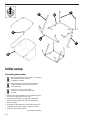
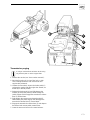
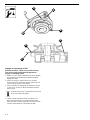
B- 1
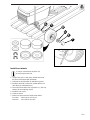
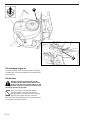
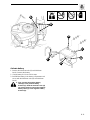
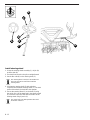
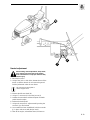
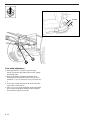
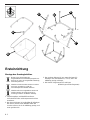
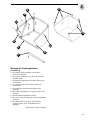
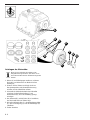
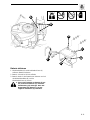
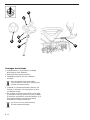
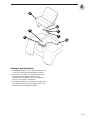
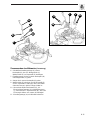
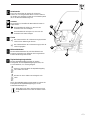
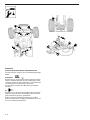
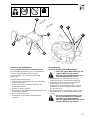
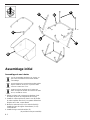
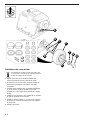
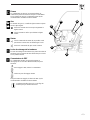
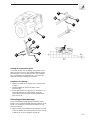
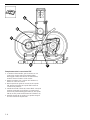
Assembly

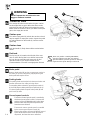
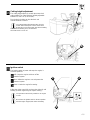
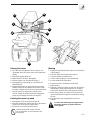
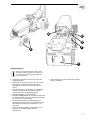
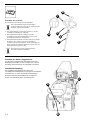
Initial setup
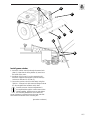
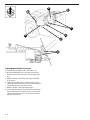
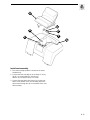
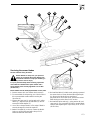
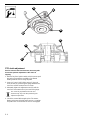
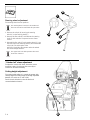
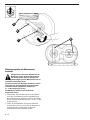
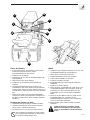
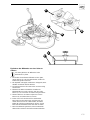
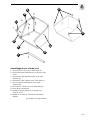
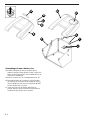
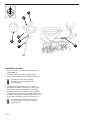
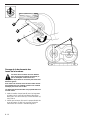
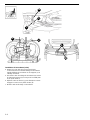
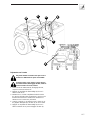
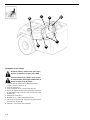
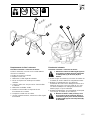
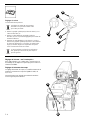
Assemble grass catcher
When assembling the catcher frame, do not tighten
the hardware until the catcher is
completely assembled.
All carriage bolts are inserted from the outside
inward so that the head of the carriage bolt
contacts the bag.
All catcher parts are secured with
5/16-18 x 1" carriage bolts, lockwashers
and nuts.
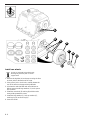
1. Remove the crate and plastic cover. Remove the parts
boxes and components from the crate.
2. Install the top frame (A) in the bag (B).Thread the
top portion through the bag.The tabs should point
down as shown.
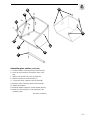
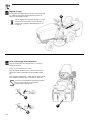
3. Assemble the front frame (G) to the bottom frame (D).
Install the shock support arms (C and F) as shown.
4. Install the rear vertical rods (E).
(procedure continues)
A
B
C
E
F
G
D
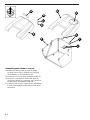
B- 2
Seite wird geladen ...
Seite wird geladen ...
Seite wird geladen ...
Seite wird geladen ...
Seite wird geladen ...
Seite wird geladen ...
Seite wird geladen ...
Seite wird geladen ...
Seite wird geladen ...
Seite wird geladen ...
Seite wird geladen ...
Seite wird geladen ...
Seite wird geladen ...
Seite wird geladen ...
Seite wird geladen ...
Seite wird geladen ...
Seite wird geladen ...
Seite wird geladen ...
Seite wird geladen ...
Seite wird geladen ...
Seite wird geladen ...
Seite wird geladen ...
Seite wird geladen ...
Seite wird geladen ...
Seite wird geladen ...
Seite wird geladen ...
Seite wird geladen ...
Seite wird geladen ...
Seite wird geladen ...
Seite wird geladen ...
Seite wird geladen ...
Seite wird geladen ...
Seite wird geladen ...
Seite wird geladen ...
Seite wird geladen ...
Seite wird geladen ...
Seite wird geladen ...
Seite wird geladen ...
Seite wird geladen ...
Seite wird geladen ...
Seite wird geladen ...
Seite wird geladen ...
Seite wird geladen ...
Seite wird geladen ...
Seite wird geladen ...
Seite wird geladen ...
Seite wird geladen ...
Seite wird geladen ...
Seite wird geladen ...
Seite wird geladen ...
Seite wird geladen ...
Seite wird geladen ...
Seite wird geladen ...
Seite wird geladen ...
Seite wird geladen ...
Seite wird geladen ...
Seite wird geladen ...
Seite wird geladen ...
Seite wird geladen ...
Seite wird geladen ...
Seite wird geladen ...
Seite wird geladen ...
Seite wird geladen ...
Seite wird geladen ...
Seite wird geladen ...
Seite wird geladen ...
Seite wird geladen ...
Seite wird geladen ...
Seite wird geladen ...
Seite wird geladen ...
Seite wird geladen ...
Seite wird geladen ...
Seite wird geladen ...
Seite wird geladen ...
Seite wird geladen ...
Seite wird geladen ...
Seite wird geladen ...
Seite wird geladen ...
Seite wird geladen ...
Seite wird geladen ...
Seite wird geladen ...
Seite wird geladen ...
Seite wird geladen ...
Seite wird geladen ...
Seite wird geladen ...
Seite wird geladen ...
Seite wird geladen ...
Seite wird geladen ...
Seite wird geladen ...
Seite wird geladen ...
Seite wird geladen ...
Seite wird geladen ...
Seite wird geladen ...
Seite wird geladen ...
Seite wird geladen ...
Seite wird geladen ...
Seite wird geladen ...
Seite wird geladen ...
Seite wird geladen ...
Seite wird geladen ...
Seite wird geladen ...
Seite wird geladen ...
Seite wird geladen ...
Seite wird geladen ...
Seite wird geladen ...
Seite wird geladen ...
Seite wird geladen ...
Seite wird geladen ...
Seite wird geladen ...
Seite wird geladen ...
Seite wird geladen ...
Seite wird geladen ...
Seite wird geladen ...
Seite wird geladen ...
Seite wird geladen ...
Seite wird geladen ...
Seite wird geladen ...
Seite wird geladen ...
Seite wird geladen ...
Seite wird geladen ...
Seite wird geladen ...
Seite wird geladen ...
Seite wird geladen ...
Seite wird geladen ...
Seite wird geladen ...
Seite wird geladen ...
Seite wird geladen ...
Seite wird geladen ...
Seite wird geladen ...
Seite wird geladen ...
Seite wird geladen ...
Seite wird geladen ...
Seite wird geladen ...
Seite wird geladen ...
Seite wird geladen ...
Seite wird geladen ...
Seite wird geladen ...
Seite wird geladen ...
Seite wird geladen ...
Seite wird geladen ...
Seite wird geladen ...
Seite wird geladen ...
Seite wird geladen ...
Seite wird geladen ...
Seite wird geladen ...
Seite wird geladen ...
Seite wird geladen ...
Seite wird geladen ...
Seite wird geladen ...
Seite wird geladen ...
Seite wird geladen ...
Seite wird geladen ...
Seite wird geladen ...
Seite wird geladen ...
Seite wird geladen ...
Seite wird geladen ...
Seite wird geladen ...
Seite wird geladen ...
Seite wird geladen ...
Seite wird geladen ...
Seite wird geladen ...
Seite wird geladen ...
Seite wird geladen ...
Seite wird geladen ...
Seite wird geladen ...
Seite wird geladen ...
Seite wird geladen ...
Seite wird geladen ...
Seite wird geladen ...
Seite wird geladen ...
Seite wird geladen ...
Seite wird geladen ...
Seite wird geladen ...
Seite wird geladen ...
Seite wird geladen ...
Seite wird geladen ...
Seite wird geladen ...
Seite wird geladen ...
Seite wird geladen ...
Seite wird geladen ...
Seite wird geladen ...
Seite wird geladen ...
Seite wird geladen ...
Seite wird geladen ...
Seite wird geladen ...
Seite wird geladen ...
Seite wird geladen ...
Seite wird geladen ...
Seite wird geladen ...
Seite wird geladen ...
Seite wird geladen ...
Seite wird geladen ...
Seite wird geladen ...
Seite wird geladen ...
Seite wird geladen ...
Seite wird geladen ...
Seite wird geladen ...
Seite wird geladen ...
Seite wird geladen ...
Seite wird geladen ...
Seite wird geladen ...
Seite wird geladen ...
Seite wird geladen ...
Seite wird geladen ...
Seite wird geladen ...
Seite wird geladen ...
Seite wird geladen ...
Seite wird geladen ...
Seite wird geladen ...
Seite wird geladen ...
Seite wird geladen ...
Seite wird geladen ...
Seite wird geladen ...
Seite wird geladen ...
Seite wird geladen ...
Seite wird geladen ...
Seite wird geladen ...
Seite wird geladen ...
Seite wird geladen ...
Seite wird geladen ...
Seite wird geladen ...
Seite wird geladen ...
Seite wird geladen ...
Seite wird geladen ...
Seite wird geladen ...
Seite wird geladen ...
Seite wird geladen ...
Seite wird geladen ...
Seite wird geladen ...
Seite wird geladen ...
Seite wird geladen ...
Seite wird geladen ...
Seite wird geladen ...
Seite wird geladen ...
Seite wird geladen ...
Seite wird geladen ...
-
 1
1
-
 2
2
-
 3
3
-
 4
4
-
 5
5
-
 6
6
-
 7
7
-
 8
8
-
 9
9
-
 10
10
-
 11
11
-
 12
12
-
 13
13
-
 14
14
-
 15
15
-
 16
16
-
 17
17
-
 18
18
-
 19
19
-
 20
20
-
 21
21
-
 22
22
-
 23
23
-
 24
24
-
 25
25
-
 26
26
-
 27
27
-
 28
28
-
 29
29
-
 30
30
-
 31
31
-
 32
32
-
 33
33
-
 34
34
-
 35
35
-
 36
36
-
 37
37
-
 38
38
-
 39
39
-
 40
40
-
 41
41
-
 42
42
-
 43
43
-
 44
44
-
 45
45
-
 46
46
-
 47
47
-
 48
48
-
 49
49
-
 50
50
-
 51
51
-
 52
52
-
 53
53
-
 54
54
-
 55
55
-
 56
56
-
 57
57
-
 58
58
-
 59
59
-
 60
60
-
 61
61
-
 62
62
-
 63
63
-
 64
64
-
 65
65
-
 66
66
-
 67
67
-
 68
68
-
 69
69
-
 70
70
-
 71
71
-
 72
72
-
 73
73
-
 74
74
-
 75
75
-
 76
76
-
 77
77
-
 78
78
-
 79
79
-
 80
80
-
 81
81
-
 82
82
-
 83
83
-
 84
84
-
 85
85
-
 86
86
-
 87
87
-
 88
88
-
 89
89
-
 90
90
-
 91
91
-
 92
92
-
 93
93
-
 94
94
-
 95
95
-
 96
96
-
 97
97
-
 98
98
-
 99
99
-
 100
100
-
 101
101
-
 102
102
-
 103
103
-
 104
104
-
 105
105
-
 106
106
-
 107
107
-
 108
108
-
 109
109
-
 110
110
-
 111
111
-
 112
112
-
 113
113
-
 114
114
-
 115
115
-
 116
116
-
 117
117
-
 118
118
-
 119
119
-
 120
120
-
 121
121
-
 122
122
-
 123
123
-
 124
124
-
 125
125
-
 126
126
-
 127
127
-
 128
128
-
 129
129
-
 130
130
-
 131
131
-
 132
132
-
 133
133
-
 134
134
-
 135
135
-
 136
136
-
 137
137
-
 138
138
-
 139
139
-
 140
140
-
 141
141
-
 142
142
-
 143
143
-
 144
144
-
 145
145
-
 146
146
-
 147
147
-
 148
148
-
 149
149
-
 150
150
-
 151
151
-
 152
152
-
 153
153
-
 154
154
-
 155
155
-
 156
156
-
 157
157
-
 158
158
-
 159
159
-
 160
160
-
 161
161
-
 162
162
-
 163
163
-
 164
164
-
 165
165
-
 166
166
-
 167
167
-
 168
168
-
 169
169
-
 170
170
-
 171
171
-
 172
172
-
 173
173
-
 174
174
-
 175
175
-
 176
176
-
 177
177
-
 178
178
-
 179
179
-
 180
180
-
 181
181
-
 182
182
-
 183
183
-
 184
184
-
 185
185
-
 186
186
-
 187
187
-
 188
188
-
 189
189
-
 190
190
-
 191
191
-
 192
192
-
 193
193
-
 194
194
-
 195
195
-
 196
196
-
 197
197
-
 198
198
-
 199
199
-
 200
200
-
 201
201
-
 202
202
-
 203
203
-
 204
204
-
 205
205
-
 206
206
-
 207
207
-
 208
208
-
 209
209
-
 210
210
-
 211
211
-
 212
212
-
 213
213
-
 214
214
-
 215
215
-
 216
216
-
 217
217
-
 218
218
-
 219
219
-
 220
220
-
 221
221
-
 222
222
-
 223
223
-
 224
224
-
 225
225
-
 226
226
-
 227
227
-
 228
228
-
 229
229
-
 230
230
-
 231
231
-
 232
232
-
 233
233
-
 234
234
-
 235
235
-
 236
236
-
 237
237
-
 238
238
-
 239
239
-
 240
240
-
 241
241
-
 242
242
-
 243
243
-
 244
244
-
 245
245
-
 246
246
-
 247
247
-
 248
248
-
 249
249
-
 250
250
-
 251
251
-
 252
252
-
 253
253
-
 254
254
-
 255
255
-
 256
256


Simplicity 1693678 Benutzerhandbuch
- Kategorie
- Spielzeuge
- Typ
- Benutzerhandbuch
- Dieses Handbuch eignet sich auch für
in anderen Sprachen
- English: Simplicity 1693678 User manual
- français: Simplicity 1693678 Manuel utilisateur
Verwandte Artikel
-
Simplicity SIMPLICITY REGENT CE, TRACTOR AND 107 CM (42") MOWER DECK Benutzerhandbuch
-
Snapper 2691382-01 Benutzerhandbuch
-
Simplicity 2691274-00 Benutzerhandbuch
-
-
Simplicity 2691070 Benutzerhandbuch
-
-
-
-
-
Andere Dokumente
-
Murray LT-200 Serie Benutzerhandbuch
-
Murray 312006x51A Bedienungsanleitung
-
Mountfield 4140H Benutzerhandbuch
-
Wolf Garten EXPERT 105.220 H Original Operating Instructions
-
-
Wolf Garten A 96.165 H Bedienungsanleitung
-
 EMAK EF 92/13 H Bedienungsanleitung
-
Toro 122cm Z Master 4000 Series Riding Mower Benutzerhandbuch
-
-
AL-KO T 13-92.5 HD Benutzerhandbuch
