Rotel CD Player RCD-961 Benutzerhandbuch
- Kategorie
- CD-Spieler
- Typ
- Benutzerhandbuch
Dieses Handbuch ist auch geeignet für

Owner’s Manual
Manuel de l’utilisateur
Bedienungsanleitung
Manuale di Istruzioni
Manual de Instrucciones
RCD-961
Stereo Compact Disc Player
Lecteur de disque compact
Stereo-CD-Player
Lettore CD
Reproductor de Discos Compactos

2
CAUTION: TO PREVENT ELECTRIC SHOCK, MATCH WIDE BLADE
OF PLUG TO WIDE SLOT. INSERT FULLY.
APPLICABLE FOR USA, CANADA OR WHERE
APPROVED FOR THE USAGE
ATTENTION: POUR EVITER LES CHOCS ELECTRIQUES,
INTRODUIRE LA LAME LA PLUS LARGE DE LA FICHE
DANS LA BORNE CORRESPONDANTE DE LA PRISE ET
POUSSER JUSQU AU FOND.
CAUTION
RISK OF ELECTRIC SHOCK
DO NOT OPEN
CAUTION: TO REDUCE THE RISK OF ELECTRIC SHOCK, DO
NOT REMOVE COVER. NO USER-SERVICEABLE PARTS INSIDE
REFER SERVICING TO QUALIFIED SERVICE PERSONNEL.
WARNING: There are no user serviceable parts inside. Re-
fer all servicing to qualified service personnel.
WARNING: To reduce the risk of fire or electric shock, do
not expose the unit to moisture or water. Do not allow for-
eign objects to get into the enclosure. If the unit is exposed
to moisture, or a foreign object gets into the enclosure, im-
mediately disconnect the power cord from the wall. Take
the unit to a qualified service person for inspection and nec-
essary repairs.
Read all the instructions before connecting or operating the component.
Keep this manual so you can refer to these safety instructions.
Heed all warnings and safety information in these instructions and on the
product itself. Follow all operating instructions.
Clean the enclosure only with a dry cloth or a vacuum cleaner.
You must allow 10 cm or 4 inches of unobstructed clearance around the
unit. Do not place the unit on a bed, sofa, rug, or similar surface that could
block the ventilation slots. If the component is placed in a bookcase or
cabinet, there must be ventilation of the cabinet to allow proper cooling.
Keep the component away from radiators, heat registers, stoves, or any
other appliance that produces heat.
The unit must be connected to a power supply only of the type and volt-
age specified on the rear panel of the unit.
Connect the component to the power outlet only with the supplied power
supply cable or an exact equivalent. Do not modify the supplied cable in
any way. Do not attempt to defeat grounding and/or polarization provi-
sions. Do not use extension cords.
Do not route the power cord where it will be crushed, pinched, bent at
severe angles, exposed to heat, or damaged in any way. Pay particular
attention to the power cord at the plug and where it exits the back of the
unit.
The power cord should be unplugged from the wall outlet if the unit is to
be left unused for a long period of time.
Immediately stop using the component and have it inspected and/or ser-
viced by a qualified service agency if:
• The power supply cord or plug has been damaged.
• Objects have fallen or liquid has been spilled into the unit.
• The unit has been exposed to rain.
• The unit shows signs of improper operation
• The unit has been dropped or damaged in any way
Place the unit on a fixed, level surface strong enough
to support its weight. Do not place it on a moveable
cart that could tip over.
IMPORTANT FOR LASER PRODUCTS
1. CLASS 1 LASER PRODUCT
2. DANGER: Visible laser radiation when open and interlock failed or bypassed. Avoid direct
exposure to beam.
3. CAUTION: Do not open the top cover. There are no user serviceable parts inside the player;
leave all servicing to qualified service personnel.
WARNING!
To reduce the risk of electrical shock, fires, etc.:
1. Do not remove screws, covers or cabinet.
2. Do not expose the unit to rain or moisture.
3. Do not touch the power cord or plug with wet hands.

3
Figure 1: Controls and Connections
Commandes et branchements
Bedienelemente und Anschlüsse
Comandi E Collegamenti
Controles y Conexiones

4

5
About Rotel
A family whose passionate interest in music
led them to manufacture high fidelity compo-
nents of uncompromising quality founded Rotel
over 40 years ago. Through the years that
passion has remained undiminished and the
family goal of providing exceptional value for
audiophiles and music lovers regardless of their
budget, is shared by all Rotel employees.
The engineers work as a close team, listen-
ing to, and fine tuning each new product until
it reaches their exacting musical standards.
They are free to choose components from
around the world in order to make that product
the best they can. You are likely to find ca-
pacitors from the United Kingdom and Ger-
many, semi conductors from Japan or the
United States, while toroidal power transform-
ers are manufactured in Rotel’s own factory.
Rotel’s reputation for excellence has been
earned through hundreds of good reviews and
awards from the most respected reviewers in
the industry, who listen to music every day.
Their comments keep the company true to its
goal - the pursuit of equipment that is musi-
cal, reliable and affordable.
All of us at Rotel, thank you for buying this
product and hope it will bring you many hours
of enjoyment.
Getting Started
Thank you for purchasing the Rotel RCD-961
Stereo Compact Disc Player. Its precision trans-
port is back up by an 18-bit equivalent, multi-
level Delta-Sigma D/A converter with 8x
oversampling and HDCD
®
. These features,
combined with Rotel’s Balanced Design, en-
sure the RCD-961 will deliver the highest level
of audio performance. When used in a high-
quality audio system, your Rotel CD player
will provide years of enjoyment.
A Few Precautions
Please read this manual carefully. In addition
to installation and operating instructions, it pro-
vides valuable information on various RCD-961
system configurations as well as general infor-
mation that will help you get optimum perfor-
mance from your system. Please contact your
authorized Rotel dealer for answers to any
quesions you might have. In addition, all of us
at Rotel welcome your questions and comments.
Save the RCD-961 shipping carton and all
enclosed packing material for future use.
Shipping or moving the RCD-961 in anything
other than the original packing material may
result in severe damage that is not covered
by the warranty.
Fill out and send in the owner’s registration
card packed with the RCD-961. Also be sure
to keep the original sales receipt. It is your
best record of the date of purchase, which you
will need in the event warranty service is re-
quired.
Placement
Use common sense when placing the RCD-961
in a cabinet or when stacking other equip-
ment. Make sure that the shelf or cabinet can
support its weight. Do not stack heavy com-
ponents on top of the RCD-961. Avoid plac-
ing the unit where it may be subject to excessive
heat such as on top of a large power ampli-
fier or near a heat register. For best perfor-
mance, avoid placing the unit where it may
be subject to vibration, such as near a speaker.
Control Identification
The cover of this manual has a fold out panel
that shows illustrations of the front and rear
panels and the RR-D94 remote control. Each
item in the illustrations is identified with a call
out in a gray box. Through out this manual
the items refered to in the text are identified
by the corresponding call out. The items on
the front and rear panels are identified with
a number call out, such a
. The items on
the remote control are labeled with a letter
call out, such as
.
Contents
Figure 1: Controls and Connections 3
Figure 2: RR-D94 Remote Control 3
Figure 3: Analog Outputs 4
Figure 4: Digtial Outputs 4
About Rotel .......................................... 5
Getting Started ..................................... 5
A Few Precautions 5
Placement 5
Control Identification 5
AC Power and Control ........................... 6
AC Power Input 6
Power Switch and Power Indicator 6
Output Connections ............................... 6
Analog Outputs 6
Digital Output 6
Operation ............................................. 6
Infrared Remote Control 6
Display 6
Disc Drawer 6
Transport Control Buttons ...................... 7
OPEN/CLOSE Button 7
PLAY Button 7
STOP Button 7
PAUSE Button 7
TRACK Buttons 7
DIRECT ACCESS Buttons 7
SEARCH Buttons 7
Additional Features ............................... 7
HDCD
®
7
PROGRAM Button 8
REVIEW Button 8
CLEAR Button 8
RANDOM Button 8
REPEAT Button 8
SCAN Button 8
TIME Button 9
Troubleshooting ..................................... 9
Power Indicator Is Not Lit 9
Fuse Replacement 9
No Sound 9
Specifications ........................................ 9
, HDCD
®
, High Definition Compatible
Digital
®
and Pacific Microsonics™ are either
registered trademarks or trademarks of
Pacific Microsonics, Inc. in the United States
and/or other countries.HDCD system
manufactured under license from Pacific
Microsonics, Inc. This product is covered by
one or more of the following: In the USA:
5,479,168, 5,638,074, 5,640,161,
5,808,574, 5,838,274, 5,854,600,
5,872,531 and in Australia: 669114. Other
patents pending.
English

6
AC Power and Control
AC Power Input
Your RCD-961 is configured at the factory for
the proper AC voltage in the country where
you purchased it (either 115 volts or 230/
240 volts. The AC line configuration is noted
on a decal on the back panel.
Note: Should you move your CD player to
another country, it may be possible to
reconfigure it for use on a different line
voltage. Do not attempt to perform this
conversion yourself. Opening the enclosure
of the RCD-961 exposes you to dangerous
voltages. Consult a qualified service person
or the Rotel factory service department for
information.
The RCD-961 should be plugged directly into
a 2-pin polarized wall outlet or into the
switched outlet on another component in your
audio system. Do not use an extension cord.
Be sure the power switch on the front panel
of the RCD-961 is turned off (in the “out”
position). Then, connect the supplied power
cord to the AC power receptacle on the rear
of the unit and the AC power outlet.
If you are going to be away from home for
an extended period of time such as a month-
long vacation, it is a sensible precaution to
unplug your CD player (as well as other au-
dio and video components) while you are
away.
Power Switch and Power
Indicator
The power switch is located on the front panel
of your CD player. To turn the CD player on,
push the switch in. The LED indicator above
the switch and the Display will light up, indi-
cating that the CD player is turned on. To turn
the CD player off, push the button again and
return it to the “out” position.
Note: If you are using a switched outlet to
turn on and off your CD player, you should
leave the power switch in the “on” position.
When AC power is applied to the unit, it
will power up in fully active mode.
Output Connections
The RCD-961 gives you a choice of two dif-
ferent kinds of output connections — an analog
output signal from the built-in D/A converter
for use with conventional analog audio com-
ponents and a coax digital output which pro-
vides an unprocessed digital data signal for
use with outboard D/A converters or digital
processors.
Note: To prevent loud noises that neither
you nor your speakers will appreciate,
make sure the CD player is turned off when
you make any signal connections.
Analog Outputs
[See Figure 3 for wiring illustration]
A pair of standard RCA jacks supplies an
analog output signal from the RCD-961 to the
source inputs of an audio preamplifier, in-
tegrated amplifier, or receiver.
Select high quality audio interconnect cables.
Connect the left channel output of the RCD-961
to the left channel source input on the pream-
plifier or other component. Connect the right
output of the RCD-961 to the right channel
source input on the preamplifier or other com-
ponent.
Digital Output
[See Figure 4 for wiring illustration]
If you are using an outboard D/A converter
or other digital processor, you will need an
unprocessed digital data stream from the
RCD-961, taken before the built-in D/A con-
verter. This signal is supplied by the RCD-961’s
back-panel digital output jack. Using a stan-
dard 75 ohm coax digital cable, connect the
RCD-961’s coax digital output to the coax
digital input connector on the outboard D/A
converter.
Operation
The RCD-961 can be operated using its front
panel buttons or from corresponding buttons
on the supplied infrared remote control. Spe-
cific instructions for each of these controls are
detailed below. Most of the buttons are du-
plicated on the front panel and on the IR re-
mote control. However, there are a few ex-
ceptions where the buttons are only available
on one or the other. These exceptions are noted
in the instructions.
Infrared Remote Control
Before using the IR remote control, it is nec-
essary to install two “UM-4/AAA” batteries
(supplied). Remove the plastic cover on the
back of the IR remote, install the batteries (ob-
serving the + and – polarity indications), and
reinstall the cover.
To use the IR remote control, aim it at the IR
sensor
located in the Display area on the
front panel of the RCD-961.
Display
A lighted Display on the front panel of the
RCD-961 provides useful information about
the status of the unit, activation of special
features, and track/time information for the
disc being played. Each of these indicators
is described in the detailed operating instruc-
tions that follow.
Disc Drawer
A motor-driven disc drawer, located in the
center of the RCD-961, slides out to accept a
compact disc and retracts to play the disc. Place
the compact disc in the drawer label-side up.
Make sure the disc is properly centered in the
tray. The drawer can be closed in two ways:
pushing the OPN/CLS button or pushing the
PLAY button.
RCD-961 Stereo Compact Disc Player

7
Transport Control Buttons
These buttons provide basic control functions
for the disc transport mechanism. Except where
noted, all functions are available on the
RCD-961 front panel and the IR remote con-
trol. The numbered call outs
OPEN/CLOSE Button
When the transport disc drawer is closed,
pressing this button automatically opens the
drawer. To close the drawer, press this but-
ton again. The drawer can also be closed by
pressing the PLAY button
When the drawer is open, the Display will read
“OPEN”. When it is closed with no disc, the
display will read “NO DISC”. When the
drawer closes with a disc inserted, the Dis-
play will indicate the number of tracks on the
disc and the total time of the disc in minutes
and seconds.
PLAY Button
Press the PLAY button to start playing the disc.
If the disc drawer is open, it will close auto-
matically. The number of the track being played
and the elapsed time will be shown in the
display, along with the PLAY indicator. Nor-
mally, the disc will start playing with the first
track. However, you can select a different track
using the TRACK buttons or the DIRECT AC-
CESS buttons (see below) before pressing the
PLAY button to start playing a different selec-
tion.
STOP Button
This button stops a disc that is playing and
resets the player, i.e. if play is resumed, the
disc will start over from the first track. Press-
ing the STOP button twice quickly in succes-
sion cancels any programmed selections (see
below).
PAUSE Button
This button is used to temporarily suspend play.
The disc continues to spin and play will be
resumed from the current position. The PAUSE
indicator will light in the Display. To resume
playing the disc, press the PAUSE button again
or press the PLAY button.
TRACK Buttons
These buttons are used to select tracks on the
disc. When a disc is playing, pressing the right
TRACK button advances to the beginning of
the next track. Pressing the left TRACK but-
ton returns to the beginning of the current track.
Pressing twice quickly in succession returns
to the beginning of the previous track. The new
track number appears in the Display.
These buttons are also used to select a track
before pressing the PLAY button or when
memorizing tracks for the PROGRAM play
mode (see below). These selections are made
by continuously pressing the TRACK buttons
until the desired track is reached.
In PROGRAM mode, the TRACK buttons ad-
vance or reverse to the next track in the memo-
rized selection list.
DIRECT ACCESS Buttons
(remote only)
These eleven numeric buttons (labeled 1
through 10 and >10) are used to directly ac-
cess a track from the IR remote control instead
of stepping through the tracks using the TRACK
buttons.
The first ten tracks on a disc can be selected
by pressing the corresponding button. For
example, to play the third track, press the 3
button on the remote control.
When accessing track numbers greater than
10, press the>10 button followed by the track
number. For example, to select track 12, press
the >10 button followed by the 1 button and
then the 2 button.-
The number of the selected track will appear
in the main numeric area at the center of the
Display.
There is also a four by four matrix of track
numbers (1 – 16) located at the right side of
the display. This display indicates all of the
tracks on the disc. If there are more than 16
tracks on the disc, all of the digits will light
accompanied by the word OVER, regardless
of which track is playing. This matrix is inde-
pendent of the main numeric area of the Dis-
play, which will always indicate the currently
playing track, even if above 16.
The DIRECT ACCESS buttons may also be used
to memorize tracks in PROGRAM mode (see
below).
SEARCH Buttons
These buttons fast forward or fast reverse
through the currently playing disc as long as
they are pressed. While the buttons are
pressed, you will hear high-speed audio.
Releasing the buttons returns to PLAY mode.
Additional Features
These convenience features add extra func-
tionality to the RCD-961, including the abil-
ity to play high-definition HDCD discs, to
memorize a group of tracks to be played, to
repeat a disc, program, or track over and over,
to play the tracks on a disc in random order,
to automatically play the first 10 seconds of
each track, and to select from several avail-
able time displays.
HDCD
®
HDCD
®
is an encoding technique that allows
a CD to have greater effective dynamic range,
reduced distortion, and increased detail. When
playing HDCD encoded discs, the RCD-961
can reproduce as much as 18-bit dynamic
range. HDCD discs are indentified by an
HDCD logo on the package.
No user action is required to play an HDCD
recording. The CD player automatically senses
HDCD encoding and enables the circuitry. The
HDCD LED on the front panel will light to in-
dicate that an HDCD disc is being played.
English

8
PROGRAM Button
This button, labeled PROG, allows you to
memorize as many as 20 tracks on the cur-
rent disc for playback in a specific order. For
example, you could instruct the RCD-961 to
play track 5, followed by track 3, followed
by track 8. To begin a program:
1 Insert a disc and press the OPEN/CLOSE
button to close the drawer. The RCD-961
will read the contents of the disc.
2 Press the PROGRAM button on the front
panel or the remote control. The PROGRAM
indicator will light up in the Display, along
with “P:00” indicating that the unit is wait-
ing for the first track to be memorized.
3. To program tracks from the handheld re-
mote control, enter the first track number
using the DIRECT ACCESS buttons. Your
selection will be memorized automatically
and the Display indicator will change to
“P:01”, indicating that one track has been
memorized. Continue entering the rest of
your selections using the DIRECT ACCESS
buttons. Note that there is no need to press
the PROGRAM button as each selection
is memorized as it is entered.
4. To program tracks from the front panel, select
the first track number using the TRACK
buttons. The track number and the pro-
gram number in the display will flash for
3 seconds. While the display is flashing,
press the PROGRAM button to memorize
your selection. Note that once the flash-
ing stops, you will no longer be able to
memorize your selection. To memorize
additional tracks, select them with the
TRACK buttons, pressing the PROGRAM
button after each selection.
Once you have memorized a play list, the RCD-
961 remains in PROGRAM mode until you
open the disc drawer or press the STOP but-
ton twice in succession. If you press the PLAY
button, the memorized program will play
instead of the entire disc, starting with the first
selection in the memorized list.
When a PROGRAM has been memorized,
most functions that would normally effect the
entire disc operate on just the memo-rized
program. For example, the TRACK buttons
advance to the next track in the memorized
program, not the next track on the disc. Like-
wise, the REPEAT button (see below) continu-
ously plays the memorized program, not the
entire disc.
REVIEW Button
This button is used to review the memorized
tracks in PROGRAM mode. Press the button
and the first memorized track number will
appear in order in the Display, flashing for
approximately five seconds. Pressing the
REVIEW button again while the track num-
ber is flashing will continue the review se-
quence, showing the next memorized track.
Continue pressing the REVIEW button to see
the complete memorized track list.
If you do not press the REVIEW button while
the track number is flashing, the review pro-
cess is terminated and the unit resumes what-
ever mode it was in before you started to
review, except that the last reviewed track
number will remain active and shown in the
display.
Note that you may remove a selection from
the play list during the review procedure us-
ing the CLEAR button, as described below.
CLEAR Button
(remote only)
This button allows you to remove a track se-
lection from the memorized program play list
during the review procedure described above.
Follow the review procedure until the desired
track number is flashing. Then, instead of
pressing the REVIEW button to continue, re-
move the displayed track by pressing the
CLEAR button while the number is still flash-
ing. You may then continue the review pro-
cedure.
RANDOM Button
This instructs the CD player to play tracks from
the entire disc in random order. Once all of
the selections have been played once, the disc
will stop playing, unless the REPEAT Button
(see below) has been engaged, in which case
the random play will continue until the STOP
button is pressed. When the RANDOM but-
ton is engaged, the word RANDOM appears
in the Display.
REPEAT Button
This button allows you to repeat the current track
or the entire disc continuously until the feature
is cancelled by disengaging the REPEAT but-
ton or pressing STOP. The REPEAT button steps
sequentially through the available options. Press
the button once and the RCD-961 will repeat
just the current track, displaying the indicators
REPEAT 1 in the Display. Press the button a
second time and the RCD-961 will repeat the
entire disc, displaying REPEAT ALL in the Dis-
play. Press the button a third time to cancel the
REPEAT function.
As noted above, REPEAT can be used in con-
junction with the RANDOM play feature.
Note: The REPEAT function is automati-
cally cancelled when the disc drawer is
opened.
SCAN Button
This feature automatically plays the first ten
seconds of each track on the disc (or the memo-
rized program). To activate the feature, press
the SCAN button. The word INTRO appears
in the Dis play. To stop scanning and resume
normal operation at the current track, press
the SCAN button again or press the PLAY
button.
TIME Button
Normally, the RCD-961 displays the elapsed
time of the currently playing track. The TIME
button allows you to step through two al-
ternative time displays. Pressing the button once
displays the time remaining in the current track,
which counts down as the track continues play-
ing. Pressing the button a second time displays
the time remaining on the entire disc (or memo-
rized program). Pressing the button a third
time reverts to the standard elapsed time dis-
play. When the TIME feature is activated, the
word REMAIN appears in the Display.
RCD-961 Stereo Compact Disc Player

9
Troubleshooting
Most difficulties in audio systems are the re-
sult of incorrect connections, or improper
control settings. If you encounter problems,
isolate the area of the difficulty, check the con-
trol settings, determine the cause of the fault
and make the necessary changes. If you are
unable to get sound from the RCD-961, re-
fer to the suggestions for the following con-
ditions:
Power Indicator Is Not Lit
The Power Indicator and the basic items in
the Display window should be lit whenever
the RCD-961 is plugged into the wall power
outlet and the Power button is pushed in. If it
does not light, test the power outlet with an-
other electrical device, such as a lamp. Be sure
the power outlet being used is not controlled
by a switch that has been turned off.
Specifications
Total Harmonic Distortion + Noise 0.0045% @ 1kHz
Intermodulation Distortion 0.0045% @ 1kHz
Frequency Response (± 0.5 dB) 20-20,000 Hz
Channel Balance ± 0.5 dB
Phase Linearity ± 0.5 degree
Channel Separation > 98 dB @ 1kHz
Signal to Noise Ratio > 100dB
Dynamic Range > 96 dB
Digital to Analog Converters 18 bit equivalent, multi-level Delta-Sigma DAC with
8x oversampling digital filter and HDCD
Speed Accuracy, Wow & Flutter Quartz Crystal Precision
Output Impedance 100 Ohms
Digital Output 0.5 Volt, Peak to Peak
Load Impedance 75 Ohms
Power Requirements
USA Version AC 115V, 60 Hz
European Version: AC 230V, 50 Hz
Power Consumption 20 Watts
Dimensions (W, H, D) 17
3
/8 x 2
7
/8 x 12
7
/16 inches
440 x 72 x 316 mm
Weight (net) 5.4 kg, 11.9 lb.
All specifications are accurate at the 571 -ofe sr vs nhe 5rght o Pmake imp ,verents

10
ATTENTION␣ : Pour réduire le risque d’électrocution,
ne pas retirer le capot. Il n’y a à l’intérieur aucune
pièce susceptible d’être modifiée par l’utilisateur. En
cas de problème, adressez-vous à un réparateur agréé.
ATTENTION␣ :
Il n’y a à l’intérieur aucune pièce susceptible d’être
modifiée par l’utilisateur. Adressez-vous
impérativement à une personne qualifiée.
ATTENTION␣ :
Prenez garde à ce qu’aucun objet ou liquide ne tombe
à l’intérieur de l’appareil par ses orifices de venti-
lation␣ ; Si l’appareil est exposé à l’humidité ou si un
objet tombe à l’intérieur, couper immédiatement
l’alimentation secteur de tous les appareils.
Débrancher l’appareil des autres maillons, et adressez-
vous immédiatement et uniquement à une personne
qualifiée et agréée.
Lisez les instructions de ce manuel avant d’effectuer le moindre
branchement et de faire fonctionner l’appareil. Conservez
soigneusement ce livret pour le consulter à nouveau pour de
futures références.
Tous les conseils de sécurité contenus dans ce manuel doivent
être soigneusement respectés. Respectez les procédures
d’installation et de fonctionnement.
L’appareil doit être nettoyé uniquement avec un chiffon sec
ou un aspirateur.
L’appareil doit être placé de telle manière qu’il existe un espace
d’au moins 10␣ cm tout autour de lui. Par exemple, il ne doit
pas être posé sur un fauteuil, un canapé, une couverture ou
toute autre surface susceptible de boucher ses ouïes d’aération␣ ;
ou placé dans un meuble empêchant la bonne circulation d’air
autour des orifices d’aération.
Cet appareil doit être placé loin de toute source de chaleur,
tels que radiateurs, chaudières, bouches de chaleur ou d’autres
appareils (y compris amplificateurs de puissance) produisant
de la chaleur.
Cet appareil doit être branché sur une prise d’alimentation
secteur, d’une tension et d’un type conformes à ceux qui sont
indiqués sur la face arrière de l’appareil.
Brancher l’appareil uniquement grâce au cordon secteur fourni,
ou à un modèle équivalent. Ne pas tenter de modifier ou
changer la prise. Notamment, ne pas tenter de supprimer la
prise de terre si celle-ci est présente. Ne pas utiliser de cor-
don rallonge.
Prendre garde à ce que ce cordon d’alimentation ne soit pas
pincé, écrasé ou détérioré sur tout son trajet, à ce qu’il ne
soit pas mis en contact avec une source de chaleur. Vérifier
soigneusement la bonne qualité des contacts, à l’arrière de
l’appareil comme dans la prise murale.
Si l’appareil ne doit pas être utilisé pendant une longue période,
la prise secteur sera débranchée.
L’appareil doit être immédiatement éteint, débranché puis
retourné au service après-vente agréé dans les cas suivants␣ :
• Un objet est tombé, ou du liquide a coulé à l’intérieur de
l’appareil.
• L’appareil a été exposé à la pluie.
• L’appareil ne fonctionne pas normalement, ou ses perfor-
mances sont anormalement limitées.
• L’appareil est tombé, ou le coffret est endommagé.
Installer l’appareil sur une surface plane, solide et rigide. Ne
jamais placer l’appareil sur une
surface ou un support mobile
pouvant basculer.
RCD-961 Lecteur de Disque Compact
Sommaire
Figure 1: Commandes et branchements 3
Figure 2: Télécommande RR-D94 3
Figure 3: Sorties analogiques 4
Figure 4: Sorties numériques 4
Au sujet de Rotel................................. 11
Démarrage .......................................... 11
Quelques précautions 11
Installation 11
Identification des commandes 11
Alimentation électrique et mise
en service ........................................... 11
Prise d’alimentation secteur 11
Interrupteur de mise sous tension et
indicateur Power 12
Branchements en sortie........................ 12
Sorties analogiques ....................... 12
Sortie numérique 12
Fonctionnement ................................... 12
Télécommande infrarouge et capteur 12
Afficheur 12
Tiroir du disque 12
Commandes du transport du disque ...... 12
Touche d’ouverture/fermeture
OPEN/CLOSE 12
Touches de lecture PLAY 12
Touche STOP 13
Touche PAUSE 13
Touches d’accès par plage TRACK 13
Touche d’accès direct DIRECT ACCESS 13
Touches de recherche SEARCH 13
Fonctions additionnelles ....................... 13
HDCD
®
13
Touche de programmation PROGRAM 13
Touche de vérification de la programmation
REVIEW 14
Touche d’effacement CLEAR 14
Touche de lecture aléatoire RANDOM 14
Touche de répétition REPEAT 14
Touche de balayage des introductions
SCAN 14
Touche d’affichage des durées TIME 15
Problèmes de fonctionnement............... 15
L’afficheur ne s’allume pas 15
Remplacement du fusible 15
Pas de son 15
Spécifications ...................................... 15

11
Au sujet de Rotel
C’est une famille de passionnés de musique
qui a fondé Rotel, il y a maintenant quarante
ans. Pendant toutes ces années, leur passion
ne s’est jamais émoussée et tous les membres
de la famille se sont toujours battus pour
fabriquer des appareils présentant un
exceptionnel rapport musicalité-prix, suivis en
cela par tous les employés.
Les ingénieurs travaillent toujours en équipe
réduite, écoutant et peaufinant soigneusement
chaque appareil pour qu’il corresponde
parfaitement à leurs standards musicaux. Ils
sont libres de choisir n’importe quels
composants dans le monde entier, uniquement
en fonction de leur qualité. C’est ainsi que vous
trouvez dans les appareils Rotel des
condensateurs britanniques ou allemands, des
transistors japonais ou américains, tandis que
tous les transformateurs toriques sont
directement fabriqués dans une usine Rotel.
L’excellente réputation musicale des appareils
Rotel a été saluée par la plupart des maga-
zines spécialisés␣ ; ils ont reçu d’innombrables
récompenses, et sont choisis par de nombreux
journalistes critiques du monde entier, parmi
les plus célèbres, ceux qui écoutent de la
musique quotidiennement. Leurs commentaires
restent immuables␣ : Rotel propose toujours des
maillons à la fois musicaux, fiables et
abordables.
Mais plus que tout, Rotel vous remercie pour
l’achat de cet appareil, et souhaite qu’il vous
apporte de nombreuses heures de plaisir
musical.
Démarrage
Nous vous remercions pour l’acquisition de ce
lecteur de CD Rotel RCD-961. Son mécanisme
de transport du disque de haute précision est
parfaitement épaulé par un convertisseur
numérique/analogique Delta Sigma, de type
18 bits, à suréchantillonnage␣ 8␣ fois et circuit
HDCD
®
. Ces caractéristiques, associées à notre
traditionnelle philosophie d’équilibre “␣ Balanced
Design␣ ”, permettent au RCD-961 de fournir
le degré de performances musicales le plus élevé
possible. Utilisé au sein d’un système Haute
Fidélité de très grande qualité, il vous assure
des heures de plaisir musical.
Quelques précautions
Veuillez lire très soigneusement ce manuel
d’utilisation. Il vous indique tout ce qu’il faut
savoir pour intégrer parfaitement ce lecteur
de CD RCD-961 dans votre chaîne, et com-
ment en tirer les performances optimales. Si
vous vous posez ensuite encore des questions,
veuillez contacter votre revendeur agréé Rotel,
qui se fera un plaisir d’y répondre.
Conservez le carton d’emballage et tous ses
composants. Il constitue le meilleur moyen pour
transporter l’appareil dans le futur, sans ris-
que de détérioration. Sans cet emballage
d’origine, la garantie ne pourrait s’appliquer.
Conservez la facture d’achat et renvoyez le
bon d’enregistrement fourni avec l’appareil.
Vous avez ainsi la preuve de la date d’achat,
qui vous sera utile dans le cas où il serait
nécessaire de faire jouer la garantie.
Installation
Nous vous recommandons d’installer le
RCD-961 de manière logique, de préférence
dans un meuble spécialement destiné aux
appareils hi-fi. Évitez de le placer sur un autre
maillon dégageant beaucoup de chaleur ou
de parasites, tel un amplificateur de puissance.
Pour obtenir des performances optimales,
éloignez-le aussi de toute source de vibration,
comme les enceintes acoustiques par exemple.
Identification des commandes
La couverture de ce manuel d’utilisation
possède un volet replié qui contient les illus-
trations des faces avant et arrière de l’appareil
et de la télécommande RR-D94. Chaque
élément de ces illustrations est identifié par
un numéro ou une lettre dans un cadre grisé.
Tout au long de ce manuel, ces mêmes
commandes sont clairement identifiées par ces
mêmes numéros ou lettres. Les commandes
de l’appareil sont repérées par un numéro,
comme
. Les commandes de la
télécommande sont repérées par une lettre,
comme
.
Alimentation électrique et
mise en service
Prise d’alimentation secteur
Le lecteur de CD RCD-961 est configuré en
usine, sa tension correcte étant indiquée sur
sa face arrière (115 ou 230␣ volts, 50 ou
60␣ Hz).
Note␣ : Si vous devez déménager dans un
autre pays, il est possible de modifier la
tension d’alimentation de votre appareil.
Cette modification est exclusivement
réalisée en usine␣ : demandez conseil à un
revendeur agréé Rotel. Il n’y a pas de
pièces susceptibles d’être modifiées ou de
commandes à l’intérieur du coffret. Ne pas
enlever son capot␣ : vous risqueriez
l’électrocution. Cela peut également
endommager les circuits internes, et annule
la garantie.
Le RCD-961 doit être branché dans une prise
murale deux broches.␣ Nous vous déconseillons
d’utiliser un câble rallonge.
Avant le branchement, vérifiez que le bou-
ton de mise sous tension en face avant est bien
en position “␣ Out␣ ”. Puis branchez le cordon
secteur dans la prise murale.
Si vous quittez votre domicile pendant une
longue période (un mois ou plus), débranchez
la prise d’alimentation secteur (de même que
celles des autres maillons audio et vidéo).
Francais
Le logo et le nom HDCD®, High Defi-
nition Compatible Digital® et Pacific
Microsonics™ sont des marques déposées ou
la marque de Pacific Microsonics, Inc., pour
les États-Unis comme le monde entier. Le
système HDCD est fabriqué sous licence de
Pacific Microsonics, Inc. Ce système est cou-
vert par les brevets suivants␣ : 5,479,168,
5,638,074, 5,640,161, 5,808,574,
5,838,274, 5,854,600, 5,872,531 aux États-
Unis, et 669␣ 114 en Australie. Autres brevets
en cours.

12
Interrupteur de mise sous
tension et indicateur
Power
L’interrupteur de mise sous tension sur la face
avant de l’appareil. Pour allumer le lecteur
de CD, pressez la touche Power. Lorsque
l’appareil est effectivement sous tension, la
diode Power et l’afficheur s’allument. Une
seconde pression sur cet interrupteur éteint
l’appareil.
Note␣ : si vous utilisez une prise de renvoi
secteur (en face arrière d’un autre
appareil) pour alimenter le RCD-961, vous
devez laisser le bouton de mise sous ten-
sion de ce dernier toujours sur “␣ On␣ ”. La
mise sous tension effective se fera alors par
l’appareil qui alimente le RCD-961.
Branchements en sortie
Le RCD-961 vous laisse le choix entre une sortie
analogique stéréophonique traditionnelle, et
une sortie numérique. La sortie analogique
utilise un convertisseur numérique/analogique
intégré dans le RCD-961, permettant le
branchement direct sur n’importe quel
préamplificateur ou amplificateur intégré. La
sortie numérique délivre un signal numérique
non traité, destiné à être utilisé avec un
convertisseur numérique/analogique ou un
processeur externe.
Note␣ : pour éviter tout bruit parasite que
n’apprécieraient ni les enceintes
acoustiques ni vos oreilles, toujours
éteindre le système avant d’effectuer des
branchements sur celui-ci.
Sorties analogiques
[Voir la figure␣ 3 pour le câblage
correspondant]
Une paire de prises Cinch-RCA traditionnelles
fournit le signal stéréo en provenance du
RCD-961 pour les entrées correspondantes
repérées “␣ CD␣ ” d’un préamplificateur,
amplificateur intégré ou ampli-tuner.
Choisissez des câbles de liaison de la meilleure
qualité possible. Respectez bien le
branchement␣ : canal gauche sur canal gauche
(couleur noire ou blanche), et canal droit sur
canal droit (couleur rouge).
Sortie numérique
[Voir la figure␣ 4 pour le câblage
correspondant]
Si vous désirez utiliser le RCD-961 avec un
convertisseur numérique/analogique ou un
processeur externe, vous devez utiliser cette
sortie numérique. Ce signal est donc fourni
en face arrière de l’appareil. Il est au stan-
dard coaxial par prise RCA, nécessitant un
câble de liaison 75␣ ohms pour la liaison avec
l’entrée numérique du convertisseur externe.
Fonctionnement
Le RCD-961 peut être utilisé à partir des
commandes de sa face avant, ou à partir des
touches correspondantes de la télécommande
infrarouge fournie. Les instructions spécifiques
pour toutes ces commandes sont données ci-
dessous. La plupart des touches sont doublées
sur la façade et la télécommande. Cependant,
il y en a certaines qui ne sont disponibles que
sur l’une ou sur l’autre. Ces exceptions sont
notées dans les instructions.
Télécommande infrarouge et
capteur
Avant d’utiliser la télécommande, il est
nécessaire d’y installer les deux piles type
“␣ UM-4/AAA␣ ” fournies. Ôtez le couvercle
en plastique au dos de la télécommande,
installez les piles (en respectant bien la polarité
“␣ +␣ ” et “␣ -␣ ”) et réinstallez le couvercle.
Pour utiliser la télécommande, pointez-la vers
le capteur infrarouge
situé derrière
l’afficheur de la face avant du RCD-961.
Afficheur
Un afficheur éclairé, sur la façade du
RCD-961, donne en permanence toutes les
informations souhaitables sur son mode de
fonctionnement, l’activation ou non de
certaines fonctions spéciales, les indications
de plage en lecture/durée du disque lu.
Chacun de ces indicateurs est décrit en détail
dans les paragraphes suivants.
Tiroir du disque
Un tiroir au déplacement motorisé, placé au
centre de la façade, s’ouvre pour recevoir le
disque compact et se referme pour le lire. Placez
le disque à l’intérieur, étiquette vers le haut.
Assurez-vous que le disque est correctement
centré dans le réceptacle du tiroir␣ ; Le tiroir peut
être refermé de deux manières␣ : soit en pressant
la touche repérée OPN/CLOSE, soit en pressant
la touche de lecture PLAY.
Commandes du transport
du disque
Ces touches permettent d’effectuer les opérations
de base pour le fonctionnement du mécanisme
du lecteur de CD. Sauf lorsque cela est précisé,
toutes ces fonctions sont accessibles au choix
à partir de la face avant du RCD-961 ou à partir
de la télécommande (voir les numéros).
Touche d’ouverture/
fermeture OPEN/CLOSE
Lorsque le tiroir du disque est fermé, une
pression sur cette touche l’ouvre
automatiquement. Pour refermer le tiroir,
pressez de nouveau sur cette touche. Le tiroir
peut également être refermé en pressant la
touche de lecture PLAY.
Lorsque le tiroir est ouvert, l’afficheur indique
“␣ OPEN␣ ” (ouvert)␣ ; S’il est fermé et qu’aucun
disque ne se trouve à l’intérieur, il indique “␣ NO
DISC␣ ” (Pas de disque). Lorsqu’il est refermé
avec un disque à l’intérieur, l’afficheur indique
le nombre de pistes présentes sur ce disque,
ainsi que la durée totale de lecture exprimée
en minutes et secondes.
Touches de lecture PLAY
Pressez la touche de lecture PLAY pour
démarrer la lecture du disque. Si le tiroir est
ouvert, il se ferme alors automatiquement. Le
numéro de la piste en cours de lecture et la
durée écoulée depuis le début sont indiqués
dans l’afficheur, en même temps que
l’indication “␣ PLAY␣ ”. Normalement, la lecture
débute sur la première piste (plage).
Cependant, vous pouvez aussi sélectionner
une autre piste en utilisant les touches repérées
TRACK ou DIRECT ACCESS (voir plus bas),
avant de presser la touche PLAY.

13
Touche STOP
Cette touche stoppe la lecture du disque et
remet le lecteur “␣ à zéro␣ ”␣ : par exemple, si
la lecture est arrêtée, elle repartira ensuite de
la première piste. Pressez deux fois de suite
la touche STOP permet également d’effacer
tous les programmes éventuellement mis en
mémoire au préalable (voir plus bas).
Touche PAUSE
Cette touche est utilisée pour arrêter
temporairement la lecture. Le disque continue
à tourner, et la lecture pourra être reprise à
l’endroit où elle a été arrêtée. L’indicateur
PAUSE s’allume dans l’afficheur. Pour
reprendre la lecture, pressez de nouveau sur
la touche PAUSE ou pressez la touche PLAY.
Touches d’accès par plage
TRACK
Ces touches sont utilisées pour sélectionner
des plages particulières sur le disque. Le disque
étant en lecture, une pression sur la touche
de droite repérée TRACK permet d’avancer
au début de la plage suivante. Une pression
sur la touche TRACK de gauche revient au
début de la plage en lecture. Deux pressions
successives rapides sur cette même touche
permettent de revenir au début de la plage
précédente. À chaque fois, le nouveau numéro
de plage apparaît dans l’afficheur.
Ces touches permettent également de
sélectionner un numéro précis de plage avant
de débuter la lecture en pressant la touche
PLAY, ou encore pour mettre en mémoire des
plages lors d’une programmation PROGRAM
(voir plus loin). Ces sélections sont faites en
pressant plusieurs fois les touches TRACK
jusqu’à ce que le numéro de plage voulu soit
atteint.
En mode de programmation PROGRAM, les
touches TRACK permettent aussi de passer à
la plage précédente ou suivante de la
programmation, par rapport à celle en lecture.
Touche d’accès direct DIRECT
ACCESS
(Télécommande uniquement)
Ces onze touches (repérées de 1 à 10 et >␣ 10)
constituent un clavier numérique permettant de
taper directement le numéro d’une plage, à partir
de la télécommande, plutôt que de faire défiler
les numéros de plages avec les touches TRACK.
Les dix premières plages d’un disque peuvent
être sélectionnées directement en tapant
simplement leur numéro. Par exemple, pour
écouter la plage n°3, pressez simplement la
touche “␣ 3␣ ” sur la télécommande.
Pour accéder à des numéros de plage
supérieurs à 10, pressez tout d’abord la touche
repérée “␣ >␣ 10␣ ” avant celle du numéro réel
de la plage. Par exemple, pour sélectionner
la plage n°12, pressez successivement les
touches repérées “␣ >␣ 10␣ ”, “␣ 1␣ ” et “␣ 2␣ ”.
Le numéro sélectionné apparaît alors au centre
de l’afficheur.
À la droite de l’afficheur, apparaît également
une matrice 4 par 4 des numéros de plages
(1-16)␣ : elle indique le nombre total de plages
contenues sur le disque␣ ; Si celui-ci contient plus
de 16 plages, tous les chiffres s’allument, ainsi
que l’inscription “␣ OVER␣ ” (nombre dépassé),
quelle que soit la plage en cours de lecture.
Cette matrice est toujours indépendante de
l’afficheur central principal, qui lui indique en
permanence le numéro de plage en lecture,
même si celui-ci est supérieur à 16.
Le clavier numérique DIRECT ACCESS peut
également être utilisé pour mettre en mémoire
des plages lors d’une programmation PRO-
GRAM (voir plus bas).
Touches de recherche SEARCH
Ces touches permettent de faire défiler le
disque à vitesse accélérée, vers l’avant ou vers
l’arrière, pendant tout le temps où elles sont
pressées. Vous entendez alors un son
correspondant à la musique “␣ accélérée␣ ”␣ ;
Le fait de relâcher ces touches permet de
revenir automatiquement à la vitesse de lec-
ture normale.
Fonctions additionnelles
Ces fonctions supplémentaires ajoutent encore
au plaisir et à la facilité d’utilisation du
RCD-961, avec notamment possibilité de
bénéficier des avantages des CD codés selon
le principe HDCD
®
, programmation de
certaines plages dans l’ordre voulu, de répéter
un disque entier, une programmation, de lire
les plages d’un disque en ordre aléatoire, de
lire automatiquement les dix premières
secondes de chaque plage, et enfin de
sélectionner plusieurs informations différentes
de durée pour affichage.
HDCD
®
Les disques de type HDCD sont codés avec
un flux numérique haute densité. Durant la
lecture, ce flux numérique haute densité est
décodé␣ pour redevenir un signal numérique
conventionnel. Ce principe de gravure haute
densité réduit énormément les risques d’erreurs
généralement constatées pendant les étapes
de conversion tant analogique/numérique que
numérique/analogique. Les disques encodés
HDCD sont identifiés par un logo
correspondant sur leur jaquette.
Aucune intervention de l’utilisateur n’est
nécessaire pour la lecture d’un disque HDCD.
Le circuit HDCD est automatiquement activé
par le lecteur après détection. Le voyant HDCD
s’allume dès qu’un disque codé HDCD est
détecté.
Touche de programmation
PROGRAM
Cette touche, repérée “␣ PROG␣ ”, vous permet
de mettre en mémoire jusqu’à 20 plages
présentes sur le même disque en lecture, dans
un ordre voulu. Par exemple, vous pouvez
demander au RCD-961 de lire d’abord la plage
5, suivie par la plage 3, suivie par la plage 8,
etc. Pour effectuer une telle programmation␣ :
1. Insérez un disque et pressez la touche
OPEN/CLOSE pour fermer le tiroir. Le
RCD-961 va lire le contenu du disque
(nombre de plages, durée, etc.)
2. Pressez la touche PROGRAM sur la façade
ou la télécommande. L’indicateur PRO-
GRAM s’allume sur l’afficheur, suivi de la
mention “␣ P␣ :00␣ ” indiquant que l’appareil
est prêt à mettre en mémoire la première
plage à mémoriser.
Francais

14
3. Pour programmer les plages à partir de
la télécommande, entre le numéro de la
première plage en utilisant le clavier
numérique DIRECT ACCESS. Votre
sélection est alors automatiquement mise
en mémoire, et l’afficheur change pour
devenir “␣ P␣ :01␣ ”, indiquant que la
première plage a bien été mémorisée.
Continuez à entrer les autres plages
désirées via le clavier numérique. Notez
qu’il est inutile de presser la touche PRO-
GRAM après chaque nouvelle sélection.
4. Pour programmer les plages à partir des
commandes de la face avant du RCD-961,
utilisez les touches TRACK␣ ; Le numéro de
plage en cours de sélection clignote pendant
trois secondes sur l’afficheur. Pour le mettre
réellement en mémoire, pressez la touche
PROGRAM␣ ; Si vous attendez trop et que le
clignotement cesse, la plage correspondante
ne peut plus être mise en mémoire␣ ; il faut
alors réutiliser les touches TRACK pour revenir
sur ce numéro de plage. Procédez ainsi pour
toutes les plages souhaitées, en pressant la
touche PROGRAM à chaque fois pour rendre
une sélection effective.
Une fois que votre liste de lecture est
mémorisée, le RCD-961 restera dans ce mode
de programmation, avec le programme
mémorisé jusqu’à ce que vous ouvriez le tiroir
ou que vous pressiez la touche STOP deux
fois de suite␣ ; si vous pressez la touche de
lecture PLAY, c’est le programme mémorisé
qui sera lu, démarrant sur la première plage
réellement mise en mémoire.
Lorsqu’un programme a été mémorisé, la
plupart des autres fonctions de l’appareil ne
s’appliquent plus qu’aux plages effectivement
mémorisées, et non sur le disque entier. Par
exemple, les touches TRACK permettent de
passer sur les plages précédente ou suivante
uniquement mémorisées, et pas sur les plages
suivante et précédente du disque. De même,
la fonction de répétition REPEAT (voir plus bas)
répète le programme, et pas le disque entier.
Touche de vérification de la
programmation REVIEW
Cette touche repérée REVIEW permet de revoir
le programme que l’on vient de mettre en
mémoire en mode PROGRAM. Pressez cette
touche et le numéro de la première plage mise
en mémoire apparaît dans l’afficheur,
clignotant pendant environ 5 secondes. Une
seconde pression sur la touche REVIEW et la
plage mémorisée suivante s’affiche dans les
mêmes conditions. Vous pouvez ainsi faire
défiler toutes les plages mises en mémoire.
Si vous ne pressez plus la touche REVIEW alors
que le numéro de plage affiché clignote, le
processus de vérification cesse
automatiquement, et l’appareil se remet dans
le mode de fonctionnement qui était le sien
avant que vous ne procédiez à cette
vérification, sauf si c’était le dernier numéro
de plage mémorisé, qui reste actif et visible
dans l’afficheur.
Notez que vous pouvez éliminer une plage
programmée pendant cette vérification, en
pressant simplement la touche d’effacement
CLEAR, comme indiqué dans le paragraphe
suivant.
Touche d’effacement CLEAR
(télécommande uniquement)
Cette touche vous permet de retirer une plage
d’un programme précédemment mémorisé,
durant la vérification de la programmation
décrite au paragraphe précédent. Suivez la
procédure de vérification jusqu’à ce que le
numéro de la plage voulue clignote dans
l’afficheur. Puis, au lieu de presser la touche
REVIEW pour continuer la vérification, pressez
la touche CLEAR pendant que le numéro
clignote encore. Vous pouvez ensuite reprendre
normalement la procédure de vérification.
Touche de lecture aléatoire
RANDOM
Cette fonction permet au RCD-961 de lire le
contenu entier du disque, mais dans un ordre
aléatoire␣ ; Lorsque toutes les plages auront
été lues dans cet ordre imprévisible, la lec-
ture s’arrêtera, à moins que vous n’ayez aussi
pressé la touche de répétition REPEAT (voir
le paragraphe suivant). Dans ce cas, la lec-
ture continuera indéfiniment jusqu’à ce que
vous pressiez la touche STOP. Lorsque cette
fonction est activée, le mot “␣ RANDOM␣ ”
apparaît sur l’afficheur.
Touche de répétition REPEAT
Cette touche vous permet de répéter la plage
en cours de lecture, ou le disque en entier,
indéfiniment, jusqu’à ce que vous désactiviez
cette fonction, soit en pressant à nouveau la
touche REPEAT, soit en pressant la touche STOP.
Les pressions sur la touche REPEAT fonctionnent
de manière cyclique pour choisir parmi ses
différentes options. Pressez la touche REPEAT
une seule fois, et l’appareil ne répétera que la
plage en cours de lecture. L’indication “␣ REPEAT
1␣ ” apparaît alors dans l’afficheur. Pressez la
touche REPEAT une seconde fois, et le RCD-961
répétera le disque en entier. L’indication “␣ RE-
PEAT ALL␣ ” apparaît cette fois dans l’afficheur.
Une troisième pression sur la touche REPEAT
annule toutes les fonctions de répétition.
Comme déjà précisé, la fonction de répétition
REPEAT peut être utilisée en association avec la
fonction de lecture en mode aléatoire RANDOM.
Note␣ : la fonction REPEAT est
automatiquement annulée lorsque le tiroir
du disque est ouvert.
Touche de balayage des
introductions SCAN
Cette fonction permet de lire automatiquement
les dix premières secondes de chaque plage
du disque (ou de la programmation mise en
mémoire). Pour activer cette fonction, pressez
la touche repérée SCAN. Le mot “␣ INTRO␣ ”
apparaît alors dans l’afficheur␣ ; pour arrêter
ce balayage des introductions, et revenir à
un fonctionnement normal du lecteur sur la
piste en cours, pressez de nouveau la touche
SCAN ou pressez la touche PLAY.
RCD-961 Lecteur de Disque Compact

15
Touche d’affichage des
durées TIME
Normalement, l’afficheur du RCD-961 indique
la durée écoulée de lecture de la plage en
cours. Toutefois, la touche repérée TIME vous
permet de choisir deux autres modes
d’affichage de durée. Une première pression
sur la touche TIME affiche le temps de lecture
restant sur la plage en cours, avec un compte
à rebours visible pendant cette lecture. Une
seconde pression sur TIME affiche cette fois
le temps restant pour la lecture du disque en
entier (ou du programme mémorisé dans son
entier). Une troisième pression sur TIME fait
revenir à l’affichage d’origine. Lorsqu’une des
deux fonctions supplémentaires du mode
d’affichage est choisie, le mot “␣ REMAIN␣ ”
(temps restant) apparaît dans l’afficheur.
Problèmes de
fonctionnement
La majorité des problèmes dans une chaîne
haute-fidélité provient de mauvais
branchements, ou de sélecteurs ou commandes
mal positionnés. En cas de difficulté, essayez
de cerner le problème (quelle source, quel
canal, etc.), vérifiez la position des différents
interrupteurs et sélecteurs et effectuez les
modifications nécessaires. Si vous ne parvenez
toujours pas à faire fonctionner correctement
le RCD-961, vérifiez plus particulièrement les
points suivants␣ :
L’afficheur ne s’allume pas
Les indicateurs permanents de l’afficheur
doivent s’allumer lorsque le RCD-961 est mis
sous tension. Si ce n’est pas le cas, testez la
prise d’alimentation secteur avec un autre
appareil électrique (par exemple, une lampe
de chevet). Soyez sûr que la prise utilisée n’est
pas une prise commutée, c’est-à-dire active
uniquement si un autre appareil est mis sous
tension.
Remplacement du fusible
Si l’afficheur ne s’allume toujours pas alors
que tout est par ailleurs normal, le fusible de
protection interne du RCD-961 a peut-être
fondu. Veuillez dans ce cas contactez votre
revendeur agréé Rotel qui se chargera de le
vérifier et éventuellement de le changer.
Spécifications
Distorsion harmonique totale +␣ bruit 0,0045␣ % @ 1␣ kHz
Distorsion d’intermodulation 0,0045␣ %
Réponse en fréquence (± 0,5 dB) 20 - 20␣ 000␣ Hz
Balance entre les canaux ± 0,5␣ dB
Linéarité de phase ± 0,5°
Séparation des canaux >␣ 98␣ dB @ 1␣ kHz
Rapport signal/bruit >␣ 100 dB
Gamme dynamique >␣ 96 dB
Convertisseurs numérique/analogique 18 bits, Delta Sigma multi niveaux avec
suréchantillonnage 8 fois et circuit HDCD
Précision de vitesse, pleurage et scintillement Précision du cristal de quartz
Impédance de sortie 100 ohms
Sortie numérique 0,5 V, crête-à-crête
Impédance de charge 75 ohms
Alimentation
Version USA 115 V CA 50/60␣ Hz (USA) ou
Version Europe 230 V CA 50/60␣ Hz (Europe)
Consommation maximum 20 watts
Dimensions (L x H x P) 440 x 72 x 316␣ mm
Poids 5,4␣ kg
Toutes les spécifications sont certifiées exactes au moment de l’impression. Rotel se réserve le droit d’améliorer
les performances sans préavis.
Rotel et le logo Rotel HiFi sont des marques déposées de The Rotel CO., Ltd., Tokyo, Japon
Le logo␣ HDCD
®,
les marques High Definition Compatible Digital et Pacific Microsonics™ sont toutes des marques
déposées ou la propriété de Pacific Microsonics, Inc, pour les États-Unis et/ou les autres pays.
Francais
Pas de son
Vérifiez que le sélecteur d’écoute de
l’amplificateur ou préamplificateur est bien
positionné sur la source CD. Vérifiez que la
fonction tape Monitor n’est pas activée.
Vérifiez, s’il y a lieu, que l’amplificateur de
puissance est bien branché, allumé, et
fonctionne correctement. Vérifiez une fois
encore tous les câbles entre le RCD-961 et
l’amplificateur intégré ou le préamplificateur.
Vérifiez aussi les câbles entre l’amplificateur
et les enceintes acoustiques.

16
Bitte lesen Sie sich die Bedienungsanleitung vor Gebrauch des
Gerätes genau durch. Sie enthält wichtige
Sicherheitsvorschriften, die unbedingt zu beachten sind!
Bewahren Sie die Bedienungsanleitung so auf, daß sie jederzeit
zugänglich ist.
WARNUNG: Außer den in der Bedienungsanleitung
beschriebenen Handgriffen sollten vom Bediener keine
Arbeiten am Gerät vorgenommen werden. Das Gerät
ist ausschließlich von einem qualifizierten Fachmann
zu öffnen und zu reparieren.
WARNUNG: Dieses Gerät darf nur in trockenen
Räumen betrieben werden. Um die Gefahr von Feuer
oder eines elektrischen Schlags auszuschließen, dürfen
keine Flüssigkeiten oder Fremdkörper in das Gerät
gelangen. Sollte dieser Fall trotzdem einmal eintreten,
trennen Sie das Gerät sofort vom Netz ab. Lassen
Sie es von einem Fachmann prüfen und die
notwendigen Reparaturarbeiten durchführen.
Befolgen Sie alle Warn- und Sicherheitshinweise in der
Bedienungsanleitung und auf dem Gerät.
Dieses Gerät sollte, wie andere Elektrogeräte auch, nicht
unbeaufsichtigt betrieben werden.
Ist das Gerät z.B. während des Transports über längere Zeit
Kälte ausgesetzt worden, so warten Sie mit der Inbetriebnahme,
bis es sich auf Raumtemperatur erwärmt hat und das
Kondenswasser verdunstet ist.
Um das Gerät sollte ein Freiraum von 10 cm vorhanden sein.
Stellen Sie es daher weder auf ein Bett, Sofa, Teppich oder
ähnliche Oberflächen. Ferner sollte es nicht an einem Ort
aufgestellt werden, an dem keine ausreichende Luftzufuhr
gegeben ist, zum Beispiel in einem engen Regalfach oder in
einem Einbauschrank.
Stellen Sie das Gerät nicht in die Nähe von Wärmequellen
(Heizkörper, Wärmespeicher, Öfen oder sonstige
wärmeerzeugende Geräte).
Bevor Sie das Gerät in Betrieb nehmen, prüfen Sie, ob die
Betriebsspannung mit der örtlichen Netzspannung
übereinstimmt. Die Betriebsspannung ist an der Rückseite des
Gerätes angegeben.
Schließen Sie das Gerät nur mit dem dazugehörigen zweipoligen
Netzkabel an die Wandsteckdose an. Modifizieren Sie das
Netzkabel auf keinen Fall. Versuchen Sie nicht, die Erdungs-
und/oder Polarisationsvorschriften zu umgehen. Das Netzkabel
sollte an eine zweipolige Wandsteckdose angeschlossen werden.
Verwenden Sie keine Verlängerungskabel.
Netzkabel sind so zu verlegen, daß sie nicht beschädigt werden
können (z.B. durch Trittbelastung, Möbelstücke oder
Erwärmung). Besondere Vorsicht ist dabei an den Steckern,
Verteilern und den Anschlußstellen des Gerätes geboten.
Sollten Sie das Gerät für eine längere Zeit nicht in Betrieb
nehmen, ziehen Sie den Netzstecker aus der Steckdose.
Schalten Sie das Gerät sofort aus und ziehen Sie geschultes
Fachpersonal zu Rate, wenn:
• das Netzkabel oder der Stecker beschädigt sind,
• Gegenstände bzw. Flüssigkeit in das Gerät gelangt sind,
• das Gerät Regen ausgesetzt war,
• das Gerät nicht ordnungsgemäß funktioniert bzw. eine
deutliche Leistungsminderung aufweist,
• das Gerät hingefallen ist bzw. beschädigt wurde.
Ziehen Sie den Netzstecker aus der Steckdose, bevor Sie mit
der Reinigung des Gerätes beginnen. Reinigen Sie die
Oberflächen des Gerätes nur mit einem weichen, trockenen
Tuch. Verwenden Sie keine scharfen Reinigungs- oder
Lösungsmittel. Vor der erneuten Inbetriebnahme des Gerätes
ist sicherzustellen, daß an den Anschlußstellen keine
Kurzschlüsse bestehen und alle Anschlüsse ordnungsgemäß sind.
Stellen Sie das Gerät waagerecht auf eine feste, ebene
Unterlage. Es sollte weder auf
beweglichen Unterlagen noch
Wagen oder fahrbaren
Untergestellen transportiert
werden.
RCD-961 Stereo CD Player
Inhaltsverzeichnis
Figure 1: Bedienelemente und Anschlüsse 3
Figure 2: Fernbedienung RR-D94 3
Figure 3: Analoge Ausgänge 4
Figure 4: Digitalausgang 4
Die Firma Rotel ................................... 17
Zu dieser Anleitung ............................. 17
Einige Vorsichtsmaßnahmen 17
Aufstellung des Gerätes 17
Kennzeichnung der Geräteabbildungen 17
Netzspannung und Bedienung............... 17
Netzeingang 17
POWER-Schalter und POWER-LED 18
Ausgangsanschlüsse ............................ 18
Analoge Ausgänge 18
Digitalausgang 18
Betrieb ............................................... 18
Infrarot-Fernbedienung 18
Display 18
CD-Schublade 18
Laufwerksbedienung............................ 18
OPEN/CLOSE-Taste (Öffnen/Schließen) 18
PLAY-Taste 19
STOP-Taste 19
PAUSE-Taste 19
TRACK-Tasten 19
Zifferntasten 19
SEARCH-Tasten (Suche rückwärts/vorwärts) 19
Zusätzliche Ausstattungsmerkmale ...... 19
HDCD
®
-LED 19
PROGRAM-Taste 19
REVIEW-Taste 20
CLEAR-Taste 20
RANDOM-Taste 20
REPEAT-Taste 20
SCAN-Taste 20
TIME-Taste 20
Bei Störungen...................................... 21
Die POWER-LED leuchtet nicht 21
Austauschen der Sicherung 21
Kein Ton 21
Technische Daten ................................. 21

17
Die Firma Rotel
Die Firma Rotel wurde vor 40 Jahren von einer
Familie gegründet, deren Interesse an Musik
so groß war, daß sie beschloß, hochwertigste
HiFi-Produkte herzustellen und
Musikliebhabern ungeachtet ihres Geldbeutels
einen außergewöhnlichen Wert zukommen zu
lassen. Ein Ziel, das von allen Rotel-
Angestellten verfolgt wird.
Die Ingenieure arbeiten als Team eng
zusammen. Sie hören sich jedes Gerät an und
optimieren es klanglich, bis es den
gewünschten Musikstandards entspricht. Die
eingesetzten Bauteile stammen aus
verschiedenen Ländern und wurden
ausgewählt, um das jeweilige Produkt zu
optimieren. So finden Sie in Rotel-Geräten
Kondensatoren aus Großbritannien und
Deutschland, Halbleiter aus Japan oder den
USA und direkt bei Rotel gefertigte
Ringkerntransformatoren.
Rotels guter Ruf wird durch hunderte von
Testerfolgen von den angesehensten Testern
der Branche, die jeden Tag Musik hören,
untermauert. Die Ergebnisse beweisen, daß
das Unternehmen sein Ziel konsequent verfolgt
hat, mit Equipment hoher Musikalität und
Zuverlässigkeit bei gleichzeitig günstigen
Preisen.
Zu dieser Anleitung
Vielen Dank, daß Sie sich für den RCD-961
von Rotel entschieden haben. Mit seinem
Präzisionslaufwerk, einem Multi Level-Delta-
Sigma-D/A-Wandler mit 8fach-Oversampling
(18-Bit-Äquivalent), HDCD
®
und Rotels Bal-
anced-Design-Konzept garantiert dieser Ste-
reo-CD-Player erstklassigen Klang und ist somit
eine ideale Komponente für jedes qualitativ
hochwertige Audiosystem.
Einige Vorsichtsmaßnahmen
Lesen Sie sich bitte die Bedienungsanleitung
vor der Inbetriebnahme genau durch. Neben
grundsätzlichen Installations- und
Bedienungshinweisen (bitte beachten Sie auch
die Sicherheits- und Warnhinweise am Anfang
der Bedienungsanleitung) enthält sie wertvolle
Informationen zu verschiedenen
Systemkonfigurationen mit dem RCD-961
sowie allgemeine Informationen, die Ihnen
helfen werden, Ihr System mit seiner
maximalen Leistungsfähigkeit zu betreiben.
Bitte setzen Sie sich bei etwaigen Fragen mit
Ihrem autorisierten Rotel-Fachhändler in
Verbindung.
Bewahren Sie den Versandkarton und das
übrige Verpackungsmaterial des RCD-961 für
einen eventuellen späteren Einsatz auf. Der
Versand oder Transport des RCD-961 in einer
anderen als der Originalverpackung kann zu
erheblichen Beschädigungen Ihres CD-Play-
ers führen, für die Sie keinerlei
Garantieansprüche geltend machen können.
Schicken Sie die Ihrem CD-Player beiliegende
Garantieanforderungskarte ausgefüllt an den
Rotel-Distributor in Ihrem Land. Bewahren Sie
bitte die Original-Kaufquittung auf. Sie belegt
am besten das Kaufdatum, das für Sie wichtig
wird, sobald Sie eine Garantieleistung in
Anspruch nehmen.
Aufstellung des Gerätes
Möchten Sie den RCD-961 auf ein Regal oder
in einen Schrank stellen, so vergewissern Sie
sich, daß diese stabil genug sind. Stellen Sie
keine schweren Komponenten auf den
RCD-961 und vermeiden Sie es, ihn extremer
Wärme auszusetzen. Plazieren Sie ihn z.B.
nicht auf einer Endstufe oder in der Nähe eines
Heizkörpers. Die Klangqualität ist am besten,
wenn das Gerät keinerlei Schwingungen
ausgesetzt wird, wie sie z.B. in der Nähe von
Lautsprechern auftreten.
Kennzeichnung der
Geräteabbildungen
In der ausklappbaren Deckseite am Anfang der
Bedienungsanleitung finden Sie Abbildungen
der Gerätefront, -rückseite und der
Fernbedienung RR-D94. Diese Abbildungen
sind mit grau unterlegten Zahlen bzw.
Buchstaben gekennzeichnet. Diese Zahlen und
Buchstaben finden Sie in den Abschnitten dieser
Bedienungsanleitung wieder, in denen die
entsprechenden Funktionen behandelt werden.
Grau unterlegte Zahlen, wie z.B.
, beziehen
sich auf die Bedienelemente an der Gerätefront
und -rückseite. Die Tasten auf der
Fernbedienung werden mit grau unterlegten
Buchstaben, wie z.B.
, beschriftet.
Netzspannung und
Bedienung
Netzeingang
Der RCD-961 wird von Rotel so eingestellt,
daß er der in Ihrem Land üblichen
Wechselspannung (entweder 230/240 oder
115 Volt) entspricht. Die Einstellung ist an der
Geräterückseite angegeben.
Hinweis: Sollten Sie mit Ihrem RCD-961
in ein anderes Land umziehen, kann die
Einstellung des CD-Players geändert
werden, so daß er mit einer anderen
Netzspannung betrieben werden kann.
Versuchen Sie auf keinen Fall, diese
Änderung selber vorzunehmen. Durch
Öffnen des Gehäuses setzen Sie sich
gefährlichen Spannungen aus. Ziehen Sie
hierzu stets qualifiziertes Servicepersonal
zu Rate.
Deutsch
, HDCD
®
, High Definition Compatible
Digital
®
und Pacific Microsonics™ sind
entweder eingetragene Warenzeichen oder
Warenzeichen der Pacific Microsonics, Inc.
in den USA und/oder anderen Ländern. Das
HDCD-System wird in Lizenz der Pacific
Microsonics, Inc. hergestellt. Dieses Produkt
wird durch folgendes geschützt: 5.479.168,
5.638.074, 5.640.161, 5.808.574,
5.838.274, 5.854.600, 5.872.531 (in den
USA) und 669114 (in Australien). Weitere
Patente angemeldet.

18
Das Netzkabel sollte an eine zweipolige
Wandsteckdose oder an die Gerätesteckdose
einer anderen Komponente Ihres Audiosystems
angeschlossen werden. Verwenden Sie kein
Verlängerungskabel.
Stellen Sie sicher, daß der RCD-961
abgeschaltet (d.h. der POWER-Schalter in der
„Aus“-Position) ist. Schließen Sie nun das
beiliegende Netzkabel an den Netzeingang
an der Geräterückseite und ans Netz an.
Sind Sie, wie z.B. bei einer mehrwöchigen
Urlaubsreise, für längere Zeit nicht zu Hause,
sollten Sie Ihren CD-Player (ebenso wie alle
anderen Audio- und Videokomponenten)
während Ihrer Abwesenheit vom Netz trennen.
POWER-Schalter und
POWER-LED
Der POWER-Schalter ist in die Gerätefront des
RCD-961 integriert. Drücken Sie ihn zum
Einschalten des Gerätes. Die LED über dem
Schalter und das Display beginnen zu leuchten
und zeigen an, daß der CD-Player
eingeschaltet ist. Drücken Sie zum Ausschalten
des CD-Players erneut den POWER-Schalter.
Hinweis: Ist der CD-Player an eine
Gerätesteckdose angeschlossen, sollten Sie
ihn eingeschaltet lassen. Er ist dann sofort
spielbereit, wenn Netzspannung anliegt.
Ausgangsanschlüsse
Der RCD-961 verfügt an der Rückseite über
analoge und digitale Ausgangsanschlüsse.
Über die analogen Ausgänge wird ein
analoges Signal vom eingebauten D/A-
Wandler zu einer herkömmlichen analogen
Audiokomponente geleitet. Am Koaxial-
Digitalausgang liegt ein digitales
Ausgangssignal an, das zu externen D/A-
Wandlern oder Digitalprozessoren gesendet
wird.
Hinweis: Beim Verkabeln und
Anschließen sollte der CD-Player generell
abgeschaltet sein.
Analoge Ausgänge
[Siehe Anschlußdiagramm in Abbildung 3]
Ein Paar Cinch-Analoganschlüsse stehen am
RCD-961 zur Verbindung mit den Eingängen
eines Vorverstärkers, Vollverstärkers bzw.
Receivers zur Verfügung.
Wählen Sie qualitativ hochwertige Audio-
Verbindungskabel. Schließen Sie den Ausgang
des linken Kanals des RCD-961 an den linken
Eingangskanal am Vorverstärker bzw. einer
anderen Komponente an. Verbinden Sie den
rechten Ausgang des RCD-961 mit dem
rechten Eingangskanal des Vorverstärkers bzw.
einer anderen Komponente.
Digitalausgang
[Siehe Anschlußdiagramm in Abbildung 4]
Verwenden Sie einen externen D/A-Wandler
oder sonstigen Digitalprozessor, so benötigen
Sie einen digitalen Datenstrom vom RCD-961.
Dieses Signal steht an der Rückseite des
RCD-961 an der digitalen Ausgangsbuchse
zur Verfügung. Verwenden Sie ein Standard-
75-Ohm-Koaxial-Digitalkabel, um den
Koaxial-Digitalausgang des RCD-961 mit dem
Koaxial-Digitaleingang am externen D/A-
Wandler zu verbinden.
Betrieb
Der RCD-961 kann über die Bedienelemente
an der Gerätefront oder über die Tasten der
beiliegenden Infrarot-Fernbedienung bedient
werden. Detaillierte Hinweise zu den einzelnen
Funktionen finden Sie unten. Bis auf wenige,
in der Anleitung entsprechend ausgewiesene
Ausnahmen können die Funktionen über die
Bedienelemente und über die Fernbedienung
aktiviert werden.
Infrarot-Fernbedienung
Vor Inbetriebnahme der Infrarot-
Fernbedienung setzen Sie bitte die beiden
beiliegenden Batterien (UM-4/Größe: AAA)
ein. Nehmen Sie den Batteriefachdeckel an
der Rückseite der Fernbedienung ab. Legen
Sie die Batterien mit richtiger Polarität
(beachten Sie die +/– Zeichen auf dem
Batteriefachboden und auf den Batterien) ein.
Schließen Sie den Batteriefachdeckel, so daß
er einrastet.
Richten Sie die Infrarot-Fernbedienung direkt
auf den Fernbedienungssensor
. Dieser
befindet sich im Display-Bereich an der
Gerätefront des RCD-961.
Display
Über das beleuchtete Display erhält der
Bediener nützliche Informationen über den
Status des Gerätes, aktivierte Zusatzfunktionen
und Titelnummer/Spieldauer der gerade
gespielten CD. Jede dieser Funktionen wird
im folgenden genau beschrieben.
CD-Schublade
Das Gerät verfügt über ein mittig angeordnetes
Laufwerk. Die CD-Schublade ist
motorgetrieben und kann zum Einlegen einer
CD ausgefahren und zum Abspielen der CD
eingefahren werden. Legen Sie die CD mit der
bedruckten Seite nach oben ein. Stellen Sie
sicher, daß die CD zentriert in der CD-
Schublade liegt.
Die Lade kann durch Drücken der OPN/CLS-
Taste und durch Drücken der PLAY-Taste
eingefahren werden.
Laufwerksbedienung
Über die im folgenden beschriebenen Tasten
werden die laufwerksbezogenen Funktionen
gesteuert. Bis auf wenige, in der Anleitung
ausgewiesene Ausnahmen sind alle Funktionen
über die Bedienelemente und die Infrarot-
Fernbedienung aktivierbar. Grau unterlegte
Zahlen beziehen sich auf die Bedienelemente
an der Gerätefront, grau unterlegte Buchstaben
auf die Tasten der Fernbedienung.
OPEN/CLOSE-Taste (Öffnen/
Schließen)
Durch Drücken dieser mit OPN/CLS
gekennzeichneten Taste wird die CD-Schub-
lade geöffnet. Durch erneutes Drücken wird
die CD-Schublade geschlossen. Die CD-
Schublade kann auch durch Drücken der PLAY-
Taste geschlossen werden.
RCD-961 Stereo CD Player

19
Bei geöffneter CD-Schublade erscheint im
Display das Wort „OPEN“. Wird die CD-
Schublade eingefahren und ist keine CD
eingelegt, so erscheint im Display „NO DISC“.
Wird die CD-Schublade mit eingelegter CD
eingefahren, erscheint im Display die Anzahl
der Titel auf der CD und die Gesamtspieldauer
der Disc in Minuten und Sekunden.
PLAY-Taste
Drücken Sie diese Taste, um die Wiedergabe
zu starten. Ist die CD-Schublade geöffnet, wird
sie durch Drücken der PLAY-Taste automatisch
geschlossen. Während der Wiedergabe
erscheinen im Display neben dem PLAY-Sym-
bol die Titelnummer und die abgelaufene
Spieldauer des laufenden Titels.
Normalerweise wird mit der Wiedergabe des
ersten Titels auf der CD begonnen. Jedoch kann
der CD-Player vor dem Drücken der PLAY-Taste
über die TRACK-Tasten oder die Zifferntasten
der Fernbedienung (siehe unten) so eingestellt
werden, daß die Wiedergabe mit einem
anderen Titel beginnt.
STOP-Taste
Drücken Sie diese Taste, um die Wiedergabe
zu stoppen. Wird nach der STOP- die PLAY-
Taste gedrückt, so beginnt der CD-Player mit
der Wiedergabe des ersten Titels. Drücken Sie
die STOP-Taste zweimal schnell hintereinander,
so dient diese Taste zum Löschen von
Programmen (siehe unten).
PAUSE-Taste
Drücken Sie die PAUSE-Taste, um die
Wiedergabe vorübergehend zu unterbrechen.
Während der Wiedergabepause dreht sich
die CD weiter, und das PAUSE-Symbol leuchtet.
Bei nochmaligem Drücken der PAUSE-Taste
oder bei Drücken der PLAY-Taste erlischt die
Anzeige und die Wiedergabe wird an der
Position, an der sie unterbrochen wurde,
fortgesetzt.
TRACK-Tasten
Mit diesen Tasten können Titel auf der CD
angewählt werden. Wird die rechte TRACK-
Taste während der Wiedergabe gedrückt,
springt der CD-Player zum Anfang des
nachfolgenden Titels. Durch Drücken der linken
TRACK-Taste kehrt der CD-Player zum Anfang
des geraden gespielten Titels zurück. Drücken
Sie die linke TRACK-Taste zweimal kurz
hintereinander, so kehrt der CD-Player zum
Anfang des vorhergehenden Titels zurück. Im
Display erscheint die Nummer des neuen Titels.
Diese Tasten können auch genutzt werden, um
vor dem Drücken der PLAY-Taste einen Titel
auszuwählen oder um Titel im PROGRAM-
Modus zu speichern (siehe unten). Drücken
Sie die entsprechende TRACK-Taste so oft, bis
Sie den gewünschten Titel angewählt haben.
Im PROGRAM-Modus können Sie mit Hilfe der
TRACK-Tasten von einem programmierten Titel
zum vorherigen oder nächsten springen.
Zifferntasten
(nur auf der Fernbedienung)
Die elf Zifferntasten (1 bis 10 und > 10) auf
der Fernbedienung dienen zur direkten
Eingabe der Nummer des Titels, der
wiedergegeben werden soll.
Die ersten zehn Titel einer CD können durch
Drücken der entsprechenden Tasten angewählt
werden. Um z.B. den dritten Titel zu spielen,
drücken Sie Taste 3 auf der Fernbedienung.
Beim Zugriff auf einen Titel mit einer höheren
Nummer als 10 drücken Sie zunächst auf die
> 10-Taste und anschließend auf die Tasten für
die Titelnummer. Möchten Sie beispielsweise Titel
12 anwählen, so drücken Sie auf die > 10-Taste
und anschließend auf die Tasten 1 und 2.
Die Nummer des ausgewählten Titels wird im
numerischen Bereich in der Mitte des Displays
angezeigt.
Im rechten Display-Bereich befindet sich eine
4x4-Matrix für die Anzeige von Titelnummern
(1 - 16). Dieser Anzeige können Sie entnehmen,
wie viele Titel sich auf der CD befinden. Hat die
CD mehr als 16 Titel, leuchten alle Ziffern und
das Wort „OVER“. Das Wort „OVER“ erscheint
unabhängig von dem gerade gespielten Titel.
Im Gegensatz zu dieser Matrix zeigt die
numerische Titelanzeige im Display stets die
Titelnummer des laufenden Titels an, auch wenn
die Titelnummer höher als 16 ist.
Die Zifferntasten dienen außerdem zur
Auswahl der Titel beim Programmieren.
SEARCH-Tasten (Suche
rückwärts/vorwärts)
Diese Tasten dienen, solange Sie gedrückt
gehalten werden, zum Schnelldurchlauf der
CD. Die Musik ist bei gedrückter Taste weiterhin
zu hören, die Wiedergabe erfolgt nur schneller.
Werden die Tasten losgelassen, kehrt der CD-
Player in den normalen PLAY-Modus zurück.
Zusätzliche
Ausstattungsmerkmale
Der RCD-961 ist sehr bedienerfreundlich
ausgestattet und bietet neben den oben
aufgeführten weitere Ausstattungsmerkmale, wie
z.B. die Möglichkeit, High-Definition(HD)-CDs
abzuspielen, Titel zu programmieren, eine CD,
ein Programm oder einen Titel zu wiederholen,
die Titel auf einer CD in zufälliger Reihenfolge
abzuspielen, automatisch die ersten 10 Sekunden
jedes Titels anzuspielen und zwischen
unterschiedlichen Zeitanzeigen zu wählen.
HDCD
®
-LED
HDCD
®
ist eine Codiertechnik, durch die der
effektive Dynamikbereich einer CD vergrößert
und die Detailtreue verbessert wird.
Verzerrungen werden auf ein Minimum
reduziert. Beim Abspielen von HDCD-
codierten CDs erreicht der RCD-961 einen
Dynamikbereich von 18 Bit. HDCD-Discs sind
durch das HDCD-Logo auf der Verpackung
gekennzeichnet.
Beim Abspielen einer HDCD-codierten Disc
muß der Bediener nichts weiter beachten. Der
CD-Player erkennt die HDCD-Codierung
automatisch und aktiviert den Schaltkreis. An
der Gerätefront leuchtet die HDCD-LED und
zeigt an, daß eine HDCD-CD abgespielt wird.
PROGRAM-Taste
Über diese mit PROG gekennzeichnete Taste
können Sie 20 Titel einer CD in beliebiger
Reihenfolge speichern und beispielsweise
nacheinander Titel 5, Titel 3 und Titel 8
abspielen.
Deutsch

20
Programmiervorgang:
1 Legen Sie eine CD ein und schließen Sie
die CD-Schublade durch Drücken der
OPN/CLS-Taste. Im Display des RCD-961
wird der Inhalt der CD angezeigt.
2 Drücken Sie die PROGRAM-Taste an der
Gerätefront oder auf der Fernbedienung.
Das Wort PROGRAM erscheint mit der
Anzeige „P-00“ im Display des RCD-961.
Das Gerät wartet auf die Eingabe der
ersten Titelnummer.
3 Programmieren Sie die Titelnummern über
die Fernbedienung, geben Sie die erste
Titelnummer über die Zifferntasten ein. Der
gewählte Titel wird automatisch gespeichert
und im Display erscheint die Anzeige
„P:01“ und gibt damit an, daß der erste
Titel erfolgreich gespeichert wurde. Geben
Sie alle zu speichernden Titel über die
Zifferntasten ein. Jeder Titel wird direkt
gespeichert, d.h., ein erneutes Drücken der
PROGRAM-Taste ist nicht erforderlich.
4 Programmieren Sie die Titelnummern über die
Bedienelemente an der Gerätefront, so wählen
Sie die erste Titelnummer über die TRACK-
Tasten aus. Die Titel- und die
Programmnummer blinken drei Sekunden im
Display. Drücken Sie in dieser Zeit die PRO-
GRAM-Taste, um Ihre Wahl zu bestätigen.
Beachten Sie, daß das Abspeichern nur
solange möglich ist, wie die Nummern im
Display blinken. Zur Programmierung weiterer
Titel wählen Sie deren Nummern über die
TRACK-Tasten aus und drücken anschließend
zur Bestätigung die PROGRAM-Taste.
Haben Sie ein Programm gespeichert, so bleibt
der RCD-961 solange im PROGRAM-Modus,
bis Sie die CD-Schublade öffnen oder zweimal
hintereinander die STOP-Taste drücken.
Drücken Sie die PLAY-Taste, so wird anstelle
der gesamten CD das gespeicherte Programm
gespielt. Die Wiedergabe beginnt mit dem
ersten gespeicherten Titel.
Ist ein Programm gespeichert, so werden die
meisten Funktionen nur für die im Programm
gespeicherten Titel aktiviert und nicht, wie bei
der normalen Wiedergabe, für die gesamte
CD. So springt der CD-Player z.B. mit Drücken
der rechten TRACK-Taste zum nächsten Titel
des gespeicherten Programms und nicht zum
nächsten Titel auf der CD. Nach Drücken der
REPEAT-Taste (siehe unten) werden alle in
einem Programm gespeicherten Titel und nicht
alle Titel auf der CD wiederholt.
REVIEW-Taste
Nach Drücken dieser Taste blinken die im
PROGRAM-Modus programmierten
Titelnummern der Reihenfolge nach für die
Dauer von ca. 5 Sekunden im Display. Drücken
Sie in dieser Zeit erneut die REVIEW-Taste,
wird der REVIEW-Modus fortgesetzt und der
nächste gespeicherte Titel angezeigt. Auf diese
Weise können Sie nacheinander alle im
Programm gespeicherten Titel abrufen.
Drücken Sie während des Aufblinkens der
Titelnummer nicht die REVIEW-Taste, so wird
der REVIEW-Modus beendet. Das Gerät kehrt
in den Modus zurück, in dem es sich befand,
bevor Sie mit dem Überprüfen des
Programminhalts begonnen haben.
Über die CLEAR-Taste haben Sie die
Möglichkeit, im REVIEW-Modus bestimmte
Titelnummern aus einem Programm zu löschen
(siehe unten).
CLEAR-Taste
(nur auf der Fernbedienung)
Diese Taste dient während des oben
beschriebenen REVIEW-Modus zum Löschen
von bestimmten Titelnummern aus einem
Programm. Durchlaufen Sie den REVIEW-
Prozeß solange, bis die gesuchte Titelnummer
blinkt. Nun drücken Sie anstelle der REVIEW-
Taste die CLEAR-Taste und löschen damit den
angezeigten Titel. Anschließend können Sie
mit dem Überprüfen des Programminhalts
fortfahren.
RANDOM-Taste
Wird diese Taste gedrückt, schaltet der CD-
Player auf Zufallswiedergabe. Sind alle Titel
einmal wiedergegeben worden, hört der CD-
Player automatisch auf zu spielen, es sei denn,
der REPEAT-Modus wurde aktiviert (siehe
unten). In diesem Fall wird die
Zufallswiedergabe solange fortgesetzt, bis die
STOP-Taste gedrückt wird. Bei gedrückter
RANDOM-Taste erscheint das Wort „RAN-
DOM“ im Display.
REPEAT-Taste
Durch Drücken dieser Taste haben Sie die
Möglichkeit, den gerade gespielten Titel oder
die gesamte CD solange zu wiederholen, bis
erneut die REPEAT- oder die STOP-Taste
gedrückt wird. Drücken Sie die REPEAT-Taste
einmal, wiederholt der RCD-961 nur den
gerade gespielten Titel, im Display wird „RE-
PEAT 1“ angezeigt. Drücken Sie die REPEAT-
Taste ein zweites Mal, wiederholt der RCD-961
die gesamte CD. Im Display erscheint „REPEAT
ALL“. Wird die REPEAT-Taste ein drittes Mal
gedrückt, wird damit die REPEAT-Funktion
deaktiviert.
Wie oben bereits erwähnt, kann die REPEAT-
Funktion mit der RANDOM-Funktion
kombiniert werden.
Hinweis: Durch Öffnen der CD-
Schublade wird die REPEAT-Funktion
automatisch deaktiviert.
SCAN-Taste
Wird diese Taste gedrückt, spielt der CD-Player
nacheinander die ersten 10 Sekunden aller
Titel auf der CD (oder des gespeicherten
Programms) an. Sie aktivieren diese Funktion
durch Drücken der SCAN-Taste. Im Display
erscheint das Wort „INTRO“. Zum Beenden
der SCAN-Funktion und zum Fortsetzen der
normalen Wiedergabe mit dem gerade
gespielten Titel drücken Sie noch einmal die
SCAN-Taste oder Sie drücken die PLAY-Taste.
TIME-Taste
Normalerweise zeigt der RCD-961 die
abgelaufende Spieldauer des laufenden Titels
an. Über die TIME-Taste haben Sie nun die
Möglichkeit, zwei weitere Zeitanzeigen
aufzurufen. Drücken Sie die TIME-Taste einmal,
so wird im Display die verbleibende Spieldauer
von der jeweiligen Wiedergabeposition bis
zum Ende des laufenden Titels angezeigt. Wird
die TIME-Taste ein zweites Mal gedrückt, wird
die auf der gesamten CD (oder die vom
gespeicherten Programm) verbleibende Zeit
angezeigt. Drücken Sie die TIME-Taste ein
drittes Mal, so erscheint im Display wiederum
die abgelaufene Spieldauer des laufenden
Titels. Bei aktivierter TIME-Funktion erscheint
das Wort „REMAIN“ im Display.
RCD-961 Stereo CD Player
Seite laden ...
Seite laden ...
Seite laden ...
Seite laden ...
Seite laden ...
Seite laden ...
Seite laden ...
Seite laden ...
Seite laden ...
Seite laden ...
Seite laden ...
Seite laden ...
Seite laden ...
Seite laden ...
-
 1
1
-
 2
2
-
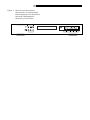 3
3
-
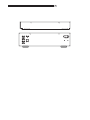 4
4
-
 5
5
-
 6
6
-
 7
7
-
 8
8
-
 9
9
-
 10
10
-
 11
11
-
 12
12
-
 13
13
-
 14
14
-
 15
15
-
 16
16
-
 17
17
-
 18
18
-
 19
19
-
 20
20
-
 21
21
-
 22
22
-
 23
23
-
 24
24
-
 25
25
-
 26
26
-
 27
27
-
 28
28
-
 29
29
-
 30
30
-
 31
31
-
 32
32
-
 33
33
-
 34
34


Rotel CD Player RCD-961 Benutzerhandbuch
- Kategorie
- CD-Spieler
- Typ
- Benutzerhandbuch
- Dieses Handbuch ist auch geeignet für
in anderen Sprachen
- English: Rotel CD Player RCD-961 User manual
- français: Rotel CD Player RCD-961 Manuel utilisateur
- español: Rotel CD Player RCD-961 Manual de usuario
- italiano: Rotel CD Player RCD-961 Manuale utente
Verwandte Papiere
-
Rotel RCD-961 Bedienungsanleitung
-
-
-
-
-
-
-
-
Rotel RCD-12 Bedienungsanleitung
-