Electrolux EHS30020P Benutzerhandbuch
- Kategorie
- Kochfelder
- Typ
- Benutzerhandbuch

EHS30020P
................................................ .............................................
NL KOOKPLAAT GEBRUIKSAANWIJZING 2
EN HOB USER MANUAL 14
FR TABLE DE CUISSON NOTICE D'UTILISATION 25
DE KOCHFELD BENUTZERINFORMATION 37

Electrolux. Thinking of you.
Ga voor meer van onze ideeën naar www.electrolux.com
INHOUD
Veiligheidsinformatie 2
Veiligheidsvoorschriften 3
Beschrijving van het product 5
Dagelijks gebruik 6
Nuttige aanwijzingen en tips 8
Onderhoud en reiniging 9
Probleemoplossing 10
Montage-instructies 11
Technische informatie 12
Milieubescherming 12
Wijzigingen voorbehouden.
VEILIGHEIDSINFORMATIE
Lees zorgvuldig de meegeleverde instructies voor installatie en
gebruik van het apparaat. De fabrikant is niet verantwoordelijk
voor letsel en schade veroorzaakt door een foutieve installatie.
Bewaar de instructies van het apparaat voor toekomstig ge-
bruik.
VEILIGHEID VAN KINDEREN EN KWETSBARE
MENSEN
Waarschuwing! Gevaar voor verstikking, letsel of
permanente invaliditeit.
• Dit apparaat kan worden gebruikt door kinderen van 8 jaar
en ouder en door mensen met beperkte lichamelijke, zintuig-
lijke of verstandelijke vermogens of een gebrek aan ervaring
en kennis, indien zij onder toezicht staan van een volwasse-
ne of van iemand die verantwoordelijk is voor hun veiligheid.
• Laat kinderen niet met het apparaat spelen.
• Houd alle verpakkingsmaterialen uit de buurt van kinderen.
• Houd kinderen en huisdieren uit de buurt van het apparaat
als het in werking is of afkoelt. Het apparaat is heet.
• Als het apparaat is uitgerust met een kinderbeveiliging, ra-
den wij aan dit te activeren.
• Reiniging en onderhoud mag niet worden uitgevoerd door
kinderen zonder toezicht.
2 electrolux

ALGEMENE VEILIGHEID
• Het apparaat en de toegankelijke onderdelen ervan worden
heet tijdens gebruik. De verwarmingselementen niet aanra-
ken.
• Bedien het apparaat niet met een externe timer of een apart
afstandbedieningssysteem.
• Zonder toezicht koken op een kookplaat met vet of olie kan
gevaarlijk zijn en brandgevaar opleveren.
• Probeer brand nooit met water te blussen, maar schakel in
plaats daarvan het apparaat uit en bedek de vlam, d.w.z.
met een deksel of blusdeken.
• Bewaar geen voorwerpen op de kookplaten.
• Gebruik geen stoomreiniger om het apparaat schoon te ma-
ken.
• Metalen voorwerpen, zoals messen, vorken, lepels en dek-
sels mogen niet op de kookplaat worden geplaatst, aange-
zien ze heet kunnen worden.
• Als de glaskeramische oppervlakte gebarsten is, schakel het
apparaat dan uit om het risico op elektrische schokken te
voorkomen.
VEILIGHEIDSVOORSCHRIFTEN
MONTAGE
Waarschuwing! Alleen een erkende
installatietechnicus mag het apparaat
installeren.
• Verwijder alle verpakkingsmaterialen.
• Installeer en gebruik geen beschadigd
apparaat.
• Volg de installatie-instructies op die zijn
meegeleverd met het apparaat.
• Houd de minimumafstand naar andere
apparaten en units in acht.
• Wees voorzichtig met het verplaatsen van
het apparaat, het is zwaar. Draag altijd
veiligheidshandschoenen.
• Dicht de oppervlakken af met kit om te
voorkomen dat ze gaan opzetten door
vocht.
• Bescherm de bodem van het apparaat
tegen stoom en vocht.
• Installeer het apparaat niet naast een
deur of onder een raam. Dit voorkomt dat
hete pennen van het apparaat vallen als
de deur of het raam wordt geopend.
• Als het apparaat geïnstalleerd is boven
lades zorg er dan voor dat de ruimte tus-
sen de onderkant van het apparaat en de
bovenste lade voldoende is voor luchtcir-
culatie.
• De onderkant van het apparaat kan heet
worden. Wij raden aan om een onbrand-
baar scheidingspaneel te plaatsen onder
het apparaat om te voorkomen dat de
onderkant kan worden aangeraakt.
Aansluiting aan het elektriciteitsnet
Waarschuwing! Gevaar voor brand en
elektrische schokken.
electrolux 3

• Alle elektrische aansluitingen moeten
door een gediplomeerd elektromonteur
worden gemaakt.
• Dit apparaat moet worden aangesloten
op een geaard stopcontact.
• Verzeker u ervan dat de stekker uit het
stopcontact is getrokken, voordat u wel-
ke werkzaamheden dan ook uitvoert.
• Gebruik de juiste stroomkabel.
• Voorkom dat de stroomkabels verstrikt
raken.
• Zorg ervoor dat de stroomkabel of stek-
ker (indien van toepassing) het hete ap-
paraat of heet kookgerei niet aanraakt als
u het apparaat op de nabijgelegen con-
tactdozen aansluit
• Zorg ervoor dat het apparaat correct is
geïnstalleerd. Losse en onjuiste stroom-
kabels of stekkers (indien van toepassing)
kunnen ervoor zorgen dat de contact-
klem te heet wordt.
• Zorg ervoor dat er een schokbescher-
ming wordt geïnstalleerd.
• Zorg ervoor dat het snoer niet wordt be-
last door trekken.
• Zorg dat u de hoofdstekker (indien van
toepassing) of kabel niet beschadigt.
Neem contact op met de service-afdeling
of een elektromonteur om een bescha-
digde hoofdkabel te vervangen.
• De elektrische installatie moet een isola-
tieapparaat bevatten waardoor het appa-
raat volledig van het lichtnet afgesloten
kan worden. Het isolatieapparaat moet
een contactopening hebben met een mi-
nimale breedte van 3 mm.
• Gebruik alleen de juiste isolatie-appara-
ten: stroomonderbrekers, zekeringen
(schroefzekeringen moeten uit de houder
worden verwijderd), aardlekschakelaars
en contactgevers.
GEBRUIK
Waarschuwing! Gevaar op letsel,
brandwonden of elektrische schokken
• Gebruik dit apparaat in een huishoudelij-
ke omgeving.
• De specificatie van het apparaat mag niet
worden veranderd.
• Bedien het apparaat niet met een externe
timer of een apart afstandbedieningssys-
teem.
• Laat het apparaat tijdens het gebruik niet
onbeheerd achter.
• Bedien het apparaat niet met natte han-
den of als het contact maakt met water.
• Leg geen bestek of deksels van steelpan-
nen op de kookzones. Ze zijn heet.
• Zet de kookzone op "uit" na elk gebruik.
• Het apparaat mag niet worden gebruikt
als werkblad of aanrecht.
• Sluit het apparaat direct af van de
stroomtoevoer als het oppervlak van het
apparaat gebroken is. Dit om elektrische
schokken te voorkomen.
Waarschuwing! Brand- of
explosiegevaar.
• Verhitte vetten en olie kunnen ontvlamba-
re damp afgeven. Houd vlammen of ver-
warmde voorwerpen uit de buurt van vet
en olie als u er mee kookt.
• De dampen die hete olie afgeeft kunnen
spontane ontbranding veroorzaken.
• Gebruikte olie die voedselresten bevat
kan brand veroorzaken bij een lagere
temperatuur dan olie die voor de eerste
keer wordt gebruikt.
• Plaats geen ontvlambare producten of
items die vochtig zijn door ontvlambare
producten in, bij of op het apparaat.
• Probeer niet om een brand te blussen
met water. Haal het apparaat uit het
stopcontact en dek de vlammen af met
een deksel of blusdeken.
Waarschuwing! Risico op schade aan
het apparaat.
• Zet geen hete pannen op het bedienings-
paneel.
• Laat kookgerei niet droogkoken.
• Laat geen voorwerpen of kookgerei op
het apparaat vallen. Het oppervlak kan
beschadigen.
• Activeer de kookzones niet met lege pan-
nen of zonder pannen erop.
• Geen aluminiumfolie op het apparaat leg-
gen.
• Pannen van gietijzer, aluminium of met
beschadigde bodems kunnen krassen
veroorzaken in het glaskeramiek. Til deze
voorwerpen altijd op als u ze moet ver-
plaatsen op het kookoppervlak.
4 electrolux

ONDERHOUD EN REINIGING
Waarschuwing! Risico op schade aan
het apparaat.
• Reinig het apparaat regelmatig om te
voorkomen dat het materiaal van het op-
pervlak achteruitgaat.
• Gebruik geen waterstralen of stoom om
het apparaat te reinigen.
• Maak het apparaat schoon met een
vochtige, zachte doek. Gebruik alleen
neutrale schoonmaakmiddelen. Gebruik
geen schuurmiddelen, schuursponsjes,
oplosmiddelen of metalen voorwerpen.
VERWIJDERING
Waarschuwing! Gevaar voor letsel of
verstikking.
• Neem contact met uw plaatselijke over-
heid voor informatie m.b.t. correcte afval-
verwerking van het apparaat.
• Haal de stekker uit het stopcontact.
• Snijd het netsnoer van het apparaat af en
gooi dit weg.
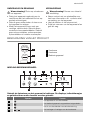
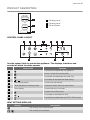
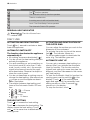
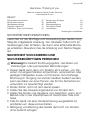
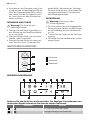
BESCHRIJVING VAN HET PRODUCT
145
mm
1
2
3
120/180
mm
1
Kookzone
2
Kookzone
3
Bedieningspaneel
INDELING BEDIENINGSPANEEL
1 2 3 5 6 74
8910
Gebruik de tiptoetsen om het apparaat te bedienen. De displays, indicatielampjes
en geluiden tonen welke functies worden gebruikt.
Tiptoets Functie
1
Het apparaat in- en uitschakelen.
2
Het bedieningspaneel vergrendelen/ontgrendelen.
3
Het in- en uitschakelen van de buitenste ring.
4
/
Het verhogen of verlagen van de kookstand.
electrolux 5

Tiptoets Functie
5
Kookstanddisplay De kookstand weergeven.
6
Indicatielampjes timer voor de kook-
zones
Geeft aan voor welke zone u de tijd instelt.
7
Timerdisplay Geeft de tijd in minuten weer.
8
Kookzone selecteren:
9
/
De tijd verlengen of verkorten.
10
De functie STOP+GO in- en uitschakelen.
KOOKSTANDDISPLAYS
Display (weergave) Beschrijving
De kookzone is uitgeschakeld.
-
De kookzone wordt gebruikt.
De -functie is in werking.
De automatische verwarmingsfunctie is in werking.
Er is een storing.
Er is nog een kookzone heet (restwarmte).
Slot/kinderbeveiliging is in werking.
De automatische uitschakeling is in werking getreden.
RESTWARMTE-INDICATIE
Waarschuwing!
Verbrandingsgevaar door restwarmte!
DAGELIJKS GEBRUIK
IN- EN UITSCHAKELING
Raak
1 seconde aan om het apparaat
in– of uit te schakelen.
AUTOMATISCHE UITSCHAKELING
De functie schakelt het apparaat
automatisch uit als:
•
Alle kookzones uitgeschakeld zijn (
).
• U de kookstand niet instelt nadat u het
apparaat hebt ingeschakeld.
• U iets hebt gemorst of iets langer dan 10
seconden op het bedieningspaneel hebt
gelegd (een pan, doek, etc.). Er klinkt een
geluidssignaal en het apparaat wordt uit-
geschakeld. Verwijder het voorwerp of
reinig het bedieningspaneel.
• U een kookzone niet uitschakelt of de
kookstand verandert. Na enige tijd gaat
branden en wordt het apparaat uitge-
schakeld. Zie hieronder.
• De verhouding tussen warmte-instelling
en tijden van de automatische uitschakel-
ingsfunctie:
•
, - — 6 uur
•
- — 5 uur
•
— 4 uur
•
- — 1,5 uur
TEMPERATUURINSTELLING
aanraken om te verhogen. aanraken
om te verlagen. Het display toont de kook-
stand. Raak
en tegelijkertijd aan om
de kookzone uit te schakelen.
IN- EN UITSCHAKELEN VAN DE
BUITENSTE RING
Het verwarmingsvlak kan worden aange-
past aan de grootte van het kookgerei.
6 electrolux

Raak sensorveld aan om de buitenste
ring in te schakelen. Het controlelampje
gaat branden.
Voer de procedure opnieuw uit om de bui-
tenste ring uit te schakelen. Het controle-
lampje gaat uit.
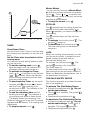
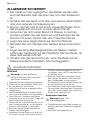
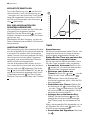
AUTOMATISCH OPWARMEN
U kunt een gewenste kookstand sneller ver-
krijgen als u de functie Automatisch opwar-
men inschakelt. Deze functie schakelt even
de hoogste kookstand in (zie afbeelding) en
verlaagt dan naar de gewenste kookstand.
Om de functie Automatisch opwarmen te
starten, dient de kookplaat koud te zijn
(geen
in het display). van de kookzo-
ne keer op keer aanraken totdat de gewen-
ste kookstand wordt ingeschakeld. Na 3
seconden verschijnt
op de display.
Om de functie te stoppen, raakt u
aan.
1
2
3
4
5
6
7
8
9
10
11
0
123456789
TIMER
Timer met aftelfunctie
Gebruik de timer met aftelfunctie om in te
stellen hoe lang de kookzone deze keer
wordt gebruikt.
Stel de timer in nadat u de kookzone
hebt geselecteerd.
U kunt de kookstand vóór of na het instel-
len van de timer selecteren.
•
De kookzone instellen:raak
herhaal-
delijk aan totdat het controlelampje van
een benodigde kookzone aan gaat.
•
De timer in- of uitschakelen: raak
of van de timer aan om de tijd in te
stellen (
00
-
99
minuten). Als het lampje
van de kookzone langzamer gaat knippe-
ren, wordt de tijd afgeteld.
• De timer uitschakelen: stel de kookzo-
ne in met
en raak aan om de timer
uit te schakelen. De resterende tijd telt af
tot
00
. Het indicatielampje van de kook-
zone gaat uit.
• Resterende tijd weergeven: selecteer
de kookzone met
. Het indicatielampje
van de kookzone gaat sneller knipperen.
Op het display wordt de resterende tijd
weergegeven.
Als de tijd verstreken is, klinkt er een ge-
luidssignaal en knippert
00
. De kookzone
wordt uitgeschakeld.
• Het geluidssignaal stopzetten: Aanra-
ken van
Kookwekker
U kunt de timer gebruiken als kookwekker
als de kookzones uitgeschakeld zijn. Raak
aan. Raak of aan om de tijd in te
stellen. Als de tijd verstreken is, klinkt er een
geluidssignaal en knippert
00
.
• Het geluidssignaal stopzetten: Aanra-
ken van
STOP+GO
De
-functie stelt alle kookzones in op de
laagste instelling (
).
Als
in werking is, kunt u de warmte-in-
stelling niet wijzigen.
stopt de timerfunctie niet.
• Voor het inschakelen van deze functie,
raakt u
aan. Het symbool gaat
branden.
• Raak voor het uitschakelen van deze
functie
aan. De kookstand die u eer-
der hebt ingesteld, wordt weergegeven.
SLOT
U kunt het bedieningspaneel vergrendelen.
Hiermee wordt voorkomen dat de kook-
stand per ongeluk wordt veranderd.
Stel eerst de kookstand in.
Voor het inschakelen van deze functie raakt
u
aan. Het symbool verschijnt gedu-
rende vier seconden.
electrolux 7

De timer blijft aan.
Raak,om deze functie te stoppen
aan.
De kookstand die u eerder hebt ingesteld,
wordt weergegeven.
Als u het apparaat stopt, stopt u deze func-
tie ook.
DE KINDERBEVEILIGING
Deze functie voorkomt dat het apparaat on-
bedoeld wordt gebruikt.
De kinderbeveiliging inschakelen
•
Schakel het apparaat in met
. Stel
geen kookstand in.
•
Raak
4 seconden aan. Het symbool
gaat branden.
•
Schakel het apparaat uit met
.
De kinderbeveiliging uitschakelen
•
Schakel het apparaat in met
. Stel
geen kookstand in. Raak
4 secon-
den aan. Het symbool
gaat branden.
•
Schakel het apparaat uit met
.
De kinderbeveiliging gedurende een
kooksessie onderdrukken
•
Schakel het apparaat in met
. Het
symbool
gaat branden.
•
Raak
4 seconden aan. Stel de kook-
stand in binnen 10 seconden. U kunt
het apparaat bedienen.
•
Als u het apparaat uitschakelt met
,
gaat de kinderbeveiliging weer werken.
NUTTIGE AANWIJZINGEN EN TIPS
KOOKGEREI
Informatie over het kookgerei
• De bodem van het kookgerei moet zo dik
en vlak mogelijk zijn.
• Kookgerei gemaakt van geëmailleerd
staal of met aluminium of kopperen bo-
dems, kunnen tot verkleuringen leiden
van de glazen keramische kookplaat.
ENERGIE BESPAREN
Energie besparen
• Doe indien mogelijk altijd een deksel op
de pan.
• Zet het kookgerei op de kookzone voor-
dat u deze inschakelt.
• Schakel voor het einde van de berei-
dingstijd de kookzones uit, om gebruik te
maken van de restwarmte.
• De bodems van de pannen en kookzo-
nes dienen dezelfde afmeting te hebben.
DE VOORBEELDEN VAN
KOOKTOEPASSINGEN
De gegevens in de volgende tabel dienen
slechts als richtlijn.
Tem-
pera-
tuurin-
stel-
ling
Gebruik om: Tijdsin-
stelling
Tips
1
Het door u gekookte eten warm te hou-
den
naar be-
hoefte
Leg een deksel op de pan.
1-2 Hollandaisesaus, smelten: boter, choco-
lade, gelatine
5-25
min
Meng het geheel van tijd tot tijd.
1-2 Stollen: luchtige omeletten, gebakken
eieren
10-40
min
Met deksel bereiden.
2-3 Zachtjes aan de kook brengen van rijst
en gerechten op melkbasis, reeds berei-
de gerechten opwarmen
25-50
min
Voeg minstens tweemaal zoveel
vloeistof toe als rijst, melkgerechten
tijdens het bereiden tussendoor
roeren.
3-4 Stomen van groenten, vis en vlees 20-45
min
Enkele eetlepels vloeistof toevoegen
8 electrolux

Tem-
pera-
tuurin-
stel-
ling
Gebruik om: Tijdsin-
stelling
Tips
4-5 Aardappelen stomen 20-60
min
Gebruik max. ¼ l water voor 750 g
aardappelen
4-5 Bereiden van grotere hoeveelheden
voedsel, stoofschotels en soepen
60-150
min
Tot 3 l vloeistof plus ingrediënten
6-7 Lichtjes braden: kalfsoester, cordon
bleu van kalfsvlees, koteletten, rissoles,
worstjes, lever, roux, eieren, pannen-
koeken, donuts
zoals
nodig
Halverwege de bereidingstijd om-
draaien
7-8 Door-en-door gebraden, opgebakken
aardappelen, lendenbiefstukken, steaks
5-15
min
Halverwege de bereidingstijd om-
draaien
9 Aan de kook brengen van grotere hoeveelheden water, pasta koken, aanbraden van vlees
(goulash, stoofvlees), frituren van friet
Informatie over acrylamides
Belangrijk! Volgens recente
wetenschappelijke informatie kan het
intensief bruinen van levensmiddelen (met
name in producten die zetmeel bevatten),
een gezondheidsrisico vormen tengevolge
van acrylamides. Om die reden adviseren
wij levensmiddelen zoveel mogelijk bij lage
temperaturen gaar te laten worden en de
gerechten niet te veel te bruinen.
ONDERHOUD EN REINIGING
Reinig het apparaat telkens na gebruik
Gebruik altijd kookgerei met een schone
bodem.
Krassen of donkere vlekken in de glas-
keramiek hebben geen invloed op de
werking van het apparaat.
Vuil verwijderen:
1. – Verwijder direct:gesmolten plastic,
gesmolten folie en suikerhoudende
gerechten. Anders kan het vuil het
apparaat beschadigen. Gebruik een
speciale schraper voor de glazen
plaat. Plaats de schraper schuin op
de glazen plaat en verwijder resten
door het blad over het oppervlak te
schuiven.
– Verwijder nadat het apparaat vol-
doende is afgekoeld:kalkvlekken,
waterkringen, vetvlekken, glimmende
metaalachtige verkleuringen. Gebruik
een speciaal schoonmaakmiddel
voor glaskeramiek of roestvrij staal.
2. Reinig het apparaat met een vochtige
doek en een beetje afwasmiddel.
3. Wrijf het apparaat ten slotte droog
met een schone doek.
electrolux 9

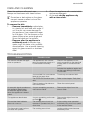
PROBLEEMOPLOSSING
Probleem Mogelijke oorzaak oplossing
U kunt het apparaat niet in-
schakelen of bedienen.
Het apparaat is niet aangeslo-
ten op een stopcontact of is
niet goed geïnstalleerd.
Controleer of het apparaat goed
is aangesloten op het stopcon-
tact (zie aansluitdiagram).
Schakel het apparaat opnieuw
in en stel de kookstand binnen
10 seconden in.
U hebt twee of meer tiptoetsen
tegelijk aangeraakt.
Raak slechts één tiptoets tege-
lijk aan.
De STOP+GO-functie is in
werking.
Raadpleeg het hoofdstuk "Da-
gelijks gebruik".
Er bevindt zich water of vet-
spatten op het bedieningspa-
neel.
Reinig het bedieningspaneel.
Er klinkt een geluidssignaal en
het apparaat wordt uitgescha-
keld.
Er weerklinkt een geluidssig-
naal als het apparaat uit is.
U hebt een of meer tiptoetsen
afgedekt.
Verwijder het voorwerp van de
tiptoetsen.
Het apparaat wordt uitgescha-
keld.
U hebt iets op de tiptoets
gezet.
Verwijder het voorwerp van de
tiptoets.
De restwarmte-indicatie gaat
niet aan.
De kookzone is niet heet, om-
dat hij slechts kortstondig is
gebruikt.
Als het lang duurt alvorens de
kookzone voldoende heet is,
neem dan contact op met de
klantenservice.
De automatische opwarmfunc-
tie start niet.
Kookzone is heet. Laat de kookzone voldoende af-
koelen.
De hoogste verwarmingsstand
is ingesteld.
De hoogste kookstand heeft
hetzelfde vermogen als de auto-
matische opwarmfunctie.
U heeft de kookstand verlaagd
van
.
Begin vanaf en verhoog al-
leen de kookstand.
U kunt de buitenste ring niet in-
schakelen.
Schakel eerst de binnenring in.
De sensorvelden worden
warm.
Het kookgerei is te groot of
staat te dicht bij het bedie-
ningspaneel.
Plaats groter kookgerei op de
achterste kookzones indien no-
dig.
gaat branden.
De automatische uitschakeling
is in werking getreden.
Schakel het apparaat uit en
weer in.
gaat branden.
De kinderbeveiliging of toets-
blokkering is actief.
Raadpleeg het hoofdstuk "Da-
gelijks gebruik".
en een getal gaat branden.
Er heeft zich een fout in het ap-
paraat voorgedaan.
Ontkoppel het apparaat enige
tijd van de stroomtoevoer. Ont-
koppel de zekering uit het elek-
trische systeem van het huis.
Sluit het apparaat opnieuw aan.
Als
weer gaat branden,
neem dan contact op met de
klantenservice.
10 electrolux

Als u door het volgen van de bovenstaande
suggesties het probleem niet kunt oplos-
sen, dient u contact op te nemen met uw
vakhandelaar of de klantenservice. Geef de
gegevens door van het typeplaatje, een
driecijferige code voor de glaskeramiek (be-
vindt zich op de hoek van het glazen opper-
vlak) en de foutmelding die wordt weerge-
geven.
Controleer of u het apparaat op de juiste
manier gebruikt hebt. Bij onjuist gebruik van
het apparaat wordt het bezoek van de
technicus van de klantenservice of de vak-
handelaar in rekening gebracht, zelfs tijdens
de garantieperiode. De instructies over de
klantenservice en de garantiebepalingen
vindt u in het garantieboekje.
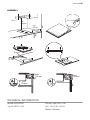
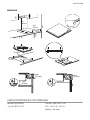
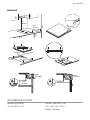
MONTAGE-INSTRUCTIES
Waarschuwing! Raadpleeg de
hoofdstukken Veiligheid.
Voor montage
Noteer voor montage van het apparaat de
onderstaande informatie van het typepla-
tje. Het typeplaatje bevindt zich aan de on-
derkant van de behuizing van het apparaat.
• Model ...........................
• Productnummer
(PNC) ........................................
• Serienummer (S.N.)..............
INBOUWAPPARATUUR
• Inbouwapparaten mogen alleen worden
gebruikt nadat zij ingebouwd zijn in ge-
schikte inbouwunits of werkbladen die
aan de normen voldoen.
AANSLUITKABEL
• Het apparaat is voorzien van een aan-
sluitsnoer.
• Vervang de beschadigde voedingskabel
door een speciale kabel (type H05BB-F
Tmax 90°C of hoger). Neem contact op
met een klantenservice bij u in de buurt.
HET BEVESTIGEN VAN DE
AFDICHTSTRIP.
• Het werkblad op de plaats van de uitsnij-
ding reinigen.
• Trek de afdichtstrip rondom de onder-
rand van het apparaat langs de buiten-
rand van de glazen keramische plaat.
Rek het afdichtband daarbij niet uit. De
plaats van het punt waar de strip samen-
komt dient in het midden van één van de
zijden te liggen. Duw de twee uiteinden
tegen elkaar als u de strip op lengte knipt
(houd een marge van een paar mm aan).
MONTAGE
min.
50mm
min.
500mm
electrolux 11

490
mm
270
mm
R 5mm
55 mm
0
+1
0
+1
min.
12 mm
min.
20 mm
min.
28 mm
TECHNISCHE INFORMATIE
Modell EHS30020P Prod.Nr. 949 594 210 01
Typ 58 HED D1 KO 220 - 240 V 50 - 60 Hz
Made in Germany
Ser.Nr. .......... 2.9 kW
ELECTROLUX
Vermogen van kookzones
Kookzone Nominaal vermogen (max warmte-instel-
ling) [W]
Middenachter — 120 / 180 mm 700 / 1700 W
Middenvoor — 145 mm 1200 W
MILIEUBESCHERMING
Het symbool op het product of op de
verpakking wijst erop dat dit product niet
als huishoudafval mag worden behandeld,
maar moet worden afgegeven bij een
verzamelpunt waar elektrische en
elektronische apparatuur wordt gerecycled.
Als u ervoor zorgt dat dit product op de
juiste manier wordt verwijderd, voorkomt u
mogelijke negatieve gevolgen voor mens en
milieu die zich zouden kunnen voordoen in
geval van verkeerde afvalverwerking. Voor
12 electrolux

gedetailleerdere informatie over het
recyclen van dit product, kunt u contact
opnemen met de gemeente, de
gemeentereiniging of de winkel waar u het
product hebt gekocht.
VERPAKKINGSMATERIAAL
De verpakkingsmaterialen zijn milieu-
vriendelijk en herbruikbaar. De kunst-
stof onderdelen zijn gemarkeerd, bijv.:
>PE<,>PS<, etc. Gooi het verpak-
kingsmateriaal weg in de juiste afval-
container bij uw plaatselijke afvalver-
werkingsdienst.
electrolux 13

Electrolux. Thinking of you.
Share more of our thinking at www.electrolux.com
CONTENTS
Safety information 14
Safety instructions 15
Product description 17
Daily use 18
Helpful hints and tips 20
Care and cleaning 21
Troubleshooting 21
Installation instructions 22
Technical information 23
Environment concerns 24
Subject to change without notice.
SAFETY INFORMATION
Before the installation and use of the appliance, carefully read
the supplied instructions. The manufacturer is not responsible
if an incorrect installation and use causes injuries and dam-
ages. Always keep the instructions with the appliance for fu-
ture reference.
CHILDREN AND VULNERABLE PEOPLE SAFETY
Warning! Risk of suffocation, injury or permanent disability.
• This appliance can be used by children aged from 8 years
and above and persons with reduced physical, sensory or
mental capabilities or lack of experience and knowledge if
they are supervised by an adult or a person who is responsi-
ble for their safety.
• Do not let children play with the appliance.
• Keep all packaging away from children.
• Keep children and pets away from the appliance when it op-
erates or when it cools down. Accessible parts are hot.
• If the appliance has a child safety device, we recommend
that you activate it.
• Cleaning and user maintenance shall not be made by chil-
dren without supervision.
GENERAL SAFETY
• The appliance and its accessible parts become hot during
use. Do not touch the heating elements.
• Do not operate the appliance by means of an external timer
or separate remote-control system.
14 electrolux

• Unattended cooking on a hob with fat or oil can be danger-
ous and may result in fire.
• Never try to extinguish a fire with water, but switch off the
appliance and then cover flame e.g. with a lid or a fire blan-
ket.
• Do not store items on the cooking surfaces.
• Do not use a steam cleaner to clean the appliance.
• Metallic objects such as knives, forks, spoons and lids
should not be placed on the hob surface since they can get
hot.
• If the glass ceramic surface is cracked, switch off the appli-
ance to avoid the possibility of electric shock.
SAFETY INSTRUCTIONS
INSTALLATION
Warning! Only a qualified person must
install this appliance.
• Remove all the packaging.
• Do not install or use a damaged appli-
ance.
• Obey the installation instruction supplied
with the appliance.
• Keep the minimum distance from the
other appliances and units.
• Always be careful when you move the
appliance because it is heavy. Always
wear safety gloves.
• Seal the cut surfaces with a sealant to
prevent moisture to cause swelling.
• Protect the bottom of the appliance from
steam and moisture.
• Do not install the appliance adjacent to a
door or under a window. This prevents
hot cookware to fall from the appliance
when the door or the window is opened.
• If the appliance is installed above drawers
make sure that the space, between the
bottom of the appliance and the upper
drawer, is sufficient for air circulation.
• The bottom of the appliance can get hot.
We recommend to install a non-combus-
tile separation panel under the appliance
to prevent access to the bottom.
Electrical connection
Warning! Risk of fire and electrical
shock.
• All electrical connections must be made
by a qualified electrician.
• The appliance must be earthed.
• Before carrying out any operation make
sure that the appliance is disconnected
from the power supply.
• Use the correct electricity mains cable.
• Do not let the electricity mains cable tan-
gle.
• Make sure the mains cable or plug (if ap-
plicable) does not touch the hot appli-
ance or hot cookware, when you con-
nect the appliance to the near sockets
• Make sure the appliance is installed cor-
rectly. Loose and incorrect electricity
mains cable or plug (if applicable) can
make the terminal become too hot.
• Make sure that a shock protection is in-
stalled.
• Use the strain relief clamp on cable.
• Make sure not to cause damage to the
mains plug (if applicable) or to the mains
cable. Contact the Service or an electri-
cian to change a damaged mains cable.
• The electrical installation must have an
isolation device which lets you discon-
nect the appliance from the mains at all
poles. The isolation device must have a
electrolux 15

contact opening width of minimum 3
mm.
• Use only correct isolation devices: line
protecting cut-outs, fuses (screw type
fuses removed from the holder), earth
leakage trips and contactors.
USE
Warning! Risk of injury, burns or
electric shock.
• Use this appliance in a household envi-
ronment.
• Do not change the specification of this
appliance.
• Do not use an external timer or a sepa-
rate remote-control system to operate
the appliance.
• Do not let the appliance stay unattended
during operation.
• Do not operate the appliance with wet
hands or when it has contact with water.
• Do not put cutlery or saucepan lids on
the cooking zones. They become hot.
• Set the cooking zone to “off” after use.
• Do not use the appliance as a work sur-
face or as a storage surface.
• If the surface of the appliance is cracked,
disconnect immediately the appliance
from the power supply. This to prevent
an electrical shock.
Warning! Risk of fire or explosion.
• Fats and oil when heated can release
flammable vapours. Keep flames or heat-
ed objects away from fats and oils when
you cook with them.
• The vapours that very hot oil releases can
cause spontaneous combustion.
• Used oil, that can contain food remnants,
can cause fire at a lower temperature
than oil used for the first time.
• Do not put flammable products or items
that are wet with flammable products in,
near or on the appliance.
• Do not try to extinguish a fire with water.
Disconnect the appliance and cover the
flame with a lid or a fire blanket.
Warning! Risk of damage to the
appliance.
• Do not keep hot cookware on the control
panel.
• Do not let cookware to boil dry.
• Be careful not to let objects or cookware
fall on the appliance. The surface can be
damaged.
• Do not activate the cooking zones with
empty cookware or without cookware.
• Do not put aluminium foil on the appli-
ance.
• Cookware made of cast iron, aluminium
or with a damaged bottom can cause
scratches on the glass ceramic. Always
lift these objects up when you have to
move them on the cooking surface.
CARE AND CLEANING
Warning! Risk of damage to the
appliance.
• Clean regularly the appliance to prevent
the deterioration of the surface material.
• Do not use water spray and steam to
clean the appliance.
• Clean the appliance with a moist soft
cloth. Only use neutral detergents. Do
not use abrasive products, abrasive
cleaning pads, solvents or metal objects.
DISPOSAL
Warning! Risk of injury or suffocation.
• Contact your municipal authority for infor-
mation on how to discard the appliance
correctly.
• Disconnect the appliance from the mains
supply.
• Cut off the mains cable and discard it.
16 electrolux

PRODUCT DESCRIPTION
145
mm
1
2
3
120/180
mm
1
Cooking zone
2
Cooking zone
3
Control panel
CONTROL PANEL LAYOUT
1 2 3 5 6 74
8910
Use the sensor fields to operate the appliance. The displays, indicators and
sounds tell which functions operate.
Sensor field Function
1
To activate and deactivate the appliance.
2
To lock / unlock the control panel.
3
To activate and deactivate the outer ring.
4
/
To increase or decrease the heat setting.
5
Heat setting display To show the heat setting.
6
Timer indicators of cooking zones To show for which zone you set the time.
7
Timer display To show the time in minutes.
8
To select the cooking zone.
9
/
To increase or decrease the time.
10
To activate and deactivate the STOP+GO function.
HEAT SETTING DISPLAYS
Display Description
The cooking zone is deactivated.
-
The cooking zone operates.
electrolux 17

Display Description
The function operates.
The Automatic Heat Up function operates.
There is a malfunction.
A cooking zone is still hot (residual heat).
Lock / The Child Safety Device operates.
The Automatic Switch Off operates.
RESIDUAL HEAT INDICATOR
Warning! The risk of burns from
residual heat!
DAILY USE
ACTIVATION AND DEACTIVATION
Touch
for 1 second to activate or deac-
tivate the appliance.
AUTOMATIC SWITCH OFF
The function deactivates the appliance
automatically if:
•
All cooking zones are deactivated (
).
• You do not set the heat setting after you
activate the appliance.
• You spill something or put something on
the control panel for more than 10 sec-
onds, (a pan, a cloth, etc.). An acoustic
signal sound some time and the appli-
ance deactivates. Remove the object or
clean the control panel.
• You do not deactivate a cooking zone or
change the heat setting. After some time
comes on and the appliance deacti-
vates. See below.
• The relation between heat setting and
times of the Automatic Switch Off func-
tion:
•
, - — 6 hours
•
- — 5 hours
•
— 4 hours
•
- — 1.5 hours
THE HEAT SETTING
Touch
to increase the heat setting.
Touch
to decrease the heat setting. The
display shows the heat setting. Touch
and at the same time to deactivate the
cooking zone.
ACTIVATION AND DEACTIVATION OF
THE OUTER RING
You can adjust the surface you cook to the
dimension of the cookware.
To activate the outer ring touch the sensor
field
. The indicator comes on.
Do the procedure again to deactivate the
outer ring. The indicator goes out.
AUTOMATIC HEAT UP
You can get a necessary heat setting in a
shorter time if you activate the Automatic
Heat Up function. This function sets the
highest heat setting for some time (see the
diagram), and then decreases to the neces-
sary heat setting.
To start the Automatic Heat Up function the
cooking zone must be cold (no
in the
display). Touch
of the cooking zone
again and again until the necessary heat
setting comes on. After 3 seconds
comes on in the display.
To stop the function, touch
.
18 electrolux

1
2
3
4
5
6
7
8
9
10
11
0
123456789
TIMER
Count Down Timer
Use the Count Down Timer to set how long
the cooking zone operates for only this one
time.
Set the Timer after the selection of the
cooking zone.
You can set the heat setting before or after
you set the timer.
•
To set the cooking zone: touch
again and again until the indicator of a
necessary cooking zone comes on.
• To activate or change the Timer:
touch
or of the timer to set the time
(
00
-
99
minutes). When the indicator
of the cooking zone starts to flash slow,
the time counts down.
• To deactivate the Timer: set the cook-
ing zone with
and touch to deacti-
vate the Timer. The remaining time
counts back to
00
. The indicator of the
cooking zone goes out.
• To see the remaining time: set the
cooking zone with
. The indicator of
the cooking zone starts to flash quickly.
The display shows the remaining time.
When the time comes to an end, the sound
operates and
00
flashes. The cooking zone
deactivates.
•
To stop the sound: touch
Minute Minder
You can use the Timer as a Minute Mind-
er while the cooking zones do not operate.
Touch
. Touch or to set the time.
When the time comes to an end, the sound
operates and
00
flashes
•
To stop the sound: touch
STOP+GO
The
function sets all cooking zones that
operate to the lowest heat setting (
).
When
operates, you cannot change the
heat setting.
The
function does not stop the timer
function.
•
To activate this function touch
. The
symbol
comes on.
•
To deactivate this function touch
.
The heat setting that you set before
comes on.
LOCK
When the cooking zones operate, you can
lock the control panel. It prevents an acci-
dental change of the heat setting.
Set the heat setting first.
To activate this function touch
. The
symbol
comes on for 4 seconds.
The Timer stays on.
To deactivate this function touch
. The
heat setting that you set before comes on.
When you deactivate the appliance, you al-
so deactivate this function.
THE CHILD SAFETY DEVICE
This function prevents an accidental opera-
tion of the appliance.
To activate The Child Safety Device
•
Activate the appliance with
. Do not
set the heat settings.
•
Touch
for 4 seconds. The symbol
comes on.
•
Deactivate the appliance with
.
To deactivate The Child Safety Device
•
Activate the appliance with
. Do not
set the heat settings. Touch
for 4
seconds. The symbol
comes on.
•
Deactivate the appliance with
.
electrolux 19

To override The Child Safety Device for
only one cooking time
•
Activate the appliance with
. The sym-
bol
comes on.
•
Touch
for 4 seconds. Set the heat
setting in 10 seconds. You can operate
the appliance.
• When you deactivate the appliance with
, The Child Safety Device operates
again.
HELPFUL HINTS AND TIPS
COOKWARE
Information about the cookware
• The bottom of the cookware must be as
thick and flat as possible.
• Cookware made of enamelled steel and
with aluminium or copper bottoms can
cause the colour change on the glass-ce-
ramic surface.
ENERGY SAVING
How to save energy
• If it is possible, always put the lids on the
cookware.
• Put cookware on a cooking zone before
you start it.
• Stop the cooking zones before the end of
the cooking time to use residual heat.
• The bottom of pans and cooking zones
must have the same dimension.
THE EXAMPLES OF COOKING
APPLICATIONS
The data in the table is for guidance only.
Heat
set-
ting
Use to: Time Hints
1
Keep warm the food you cooked as re-
quired
Put a lid on a cookware
1-2 Hollandaise sauce, melt: butter, choco-
late, gelatine
5-25
min
Mix from time to time
1-2 Solidify: fluffy omelettes, baked eggs 10-40
min
Cook with a lid on
2-3 Simmer rice and milkbased dishes,
heating up ready-cooked meals
25-50
min
Add the minimum twice as much
liquid as rice, mix milk dishes part
procedure through
3-4 Steam vegetables, fish, meat 20-45
min
Add some tablespoons of liquid
4-5 Steam potatoes 20-60
min
Use max. ¼ l water for 750 g of po-
tatoes
4-5 Cook larger quantities of food, stews
and soups
60-150
min
Up to 3 l liquid plus ingredients
6-7 Gentle fry: escalope, veal cordon bleu,
cutlets, rissoles, sausages, liver, roux,
eggs, pancakes, doughnuts
as nec-
essary
Turn halfway through
7-8 Heavy fry, hash browns, loin steaks,
steaks
5-15
min
Turn halfway through
9 Boil large quantities of water, cook pasta, sear meat (goulash, pot roast), deep-fry chips
Information on acrylamides
Important! According to the newest
scientific knowledge, if you brown food
(specially the one which contains starch),
acrylamides can pose a health risk. Thus,
we recommend that you cook at the lowest
temperatures and do not brown food too
much.
20 electrolux
Seite wird geladen ...
Seite wird geladen ...
Seite wird geladen ...
Seite wird geladen ...
Seite wird geladen ...
Seite wird geladen ...
Seite wird geladen ...
Seite wird geladen ...
Seite wird geladen ...
Seite wird geladen ...
Seite wird geladen ...
Seite wird geladen ...
Seite wird geladen ...
Seite wird geladen ...
Seite wird geladen ...
Seite wird geladen ...
Seite wird geladen ...
Seite wird geladen ...
Seite wird geladen ...
Seite wird geladen ...
Seite wird geladen ...
Seite wird geladen ...
Seite wird geladen ...
Seite wird geladen ...
Seite wird geladen ...
Seite wird geladen ...
Seite wird geladen ...
Seite wird geladen ...
Seite wird geladen ...
Seite wird geladen ...
Seite wird geladen ...
Seite wird geladen ...
-
 1
1
-
 2
2
-
 3
3
-
 4
4
-
 5
5
-
 6
6
-
 7
7
-
 8
8
-
 9
9
-
 10
10
-
 11
11
-
 12
12
-
 13
13
-
 14
14
-
 15
15
-
 16
16
-
 17
17
-
 18
18
-
 19
19
-
 20
20
-
 21
21
-
 22
22
-
 23
23
-
 24
24
-
 25
25
-
 26
26
-
 27
27
-
 28
28
-
 29
29
-
 30
30
-
 31
31
-
 32
32
-
 33
33
-
 34
34
-
 35
35
-
 36
36
-
 37
37
-
 38
38
-
 39
39
-
 40
40
-
 41
41
-
 42
42
-
 43
43
-
 44
44
-
 45
45
-
 46
46
-
 47
47
-
 48
48
-
 49
49
-
 50
50
-
 51
51
-
 52
52


Electrolux EHS30020P Benutzerhandbuch
- Kategorie
- Kochfelder
- Typ
- Benutzerhandbuch
in anderen Sprachen
- English: Electrolux EHS30020P User manual
- français: Electrolux EHS30020P Manuel utilisateur
- Nederlands: Electrolux EHS30020P Handleiding
Verwandte Artikel
-
Electrolux EHS60210P Benutzerhandbuch
-
-
-
-
Electrolux EHF3320FOK Benutzerhandbuch
-
-
-