ZANKER ZKG8509 Benutzerhandbuch
- Kategorie
- Kühl- / Gefrierkombinationen
- Typ
- Benutzerhandbuch

2222737-16
Gefrierschrank
Freezer
ZKG 8509
Gebrauchsanweisung
Instruction Manual

2 Gedruckt auf umweltschonend hergestelltem Papier
Sicherheitshinweise
Bevor Sie Ihr neues Kältegerät in Betrieb
nehmen, lesen Sie bitte diese
Gebrauchsanweisung aufmerksam durch.
Diese sind Sicherheitshinweise. Wir ersuchen Sie
daher, die folgenden Punkte vor der Installation
des Gerätes und seiner Inbetriebnahme
aufmerksam durchzulesen.
Es wird empfohlen, diese Gebrauchsanweisung gut
aufzubewahren und bei einem eventuellen Verkauf
des Gerätes dem neuen Besitzer auszuhändigen.
Benutzung im Haushalt
• Die Kühl- und/oder Gefrierschränke sind zur
Einlagerung und/oder zum Einfrieren von
Lebensmitteln bestimmt.
• Vor der Installation sicherstellen, dass das Gerät
nicht beschädigt ist. Mögliche Transportschäden
sind dem Händler unverzüglich mitzuteilen.
•
Das Gerät ist schwer. Scharfe Metallkanten am
Gerät hinten und unten stellen ein Verletzungsrisiko
dar. Beim Aufstellen oder Verschieben sind
Schutzhandschuhe zu tragen.
• Sollte die Installation des Gerätes eine Änderung
der elektrischen Hausinstallation verlangen, so darf
diese nur von Elektro-Fachkräften durchgeführt
werden.
• Bitte prüfen, dass das Netzkabel nicht von der
Geräterückseite eingeklemmt und beschädigt wird.
Ein beschädigtes Netzkabel kann überhitzen und
einen Brand verursachen.
• Keine schweren Gegenstände bzw. das Gerät
selbst auf das Netzkabel stellen. Kurzschluss- und
Brandgefahr!
• Den Netzstecker nie am Kabel aus der Steckdose
ziehen, besonders wenn das Gerät aus der Nische
gezogen wurde. Eine Beschädigung des
Netzkabels kann Kurzschluss, Feuer und/oder
Stromschlag verursachen.
• Keine Elektrogeräte (z.B. Eismaschinen) in das
Gerät stellen.
• Es sollten keine kohlensäurehaltigen Getränke in
das Gefrier- bzw. Frosterfach eingestellt werden,
sie könnten platzen.
• Speiseeis und Eiswürfel nicht unmittelbar aus dem
Gefrierfach in den Mund nehmen. Sehr kaltes Eis
kann an Lippen oder Zunge festfrieren und
Verletzungen verursachen.
• Tiefkühlgut nicht mit nassen Händen berühren. Die
Hände könnten daran festfrieren.
• Tritt eine Störung oder ein Defekt ein, versuchen
Sie nicht, das Gerät selbst zu reparieren.
Elektrogeräte dürfen nur von Elektro-Fachkräften
repariert werden, da durch unsachgemässe
Reparaturen erhebliche Folgeschäden entstehen
können. Sich an die nächstgelegene
Kundendienststelle wenden und nur Original-
Ersatzteile anfordern.
Sicherheit für Kinder
• Die Teile des Verpackungsmaterials (z.B.
Kunststoffhüllen, Polystyrol) können für Kinder
gefährlich werden. Erstickungsgefahr!
• Im Falle der Entsorgung des Gerätes ist das
Anschlusskabel durchzutrennen und der
Türverschluss unbrauchbar zu machen, damit sich
spielende Kinder nicht im Gerät einschließen
können.
Umweltnormen
• Das Gerät darf nicht mit dem Hausmüll oder
Sperrmüll entsorgt werden. Auskunft über
Abholtermine oder Sammelplätze gibt die örtliche
Gemeindeverwaltung an.
Hinweise zur Benutzung der Gebrauchsanweisung
Die folgenden Symbole erleichtern das Lesen der Gebrauchanweisung:
Sicherheitshinweise bezüglich der Benutzung des Gerätes
Ratschläge für den korrekten Gebrauch und die optimale Ausnutzung des Gerätes.
Informationen zum Umweltschutz

3
Inhalt
Sicherheitshinweise . . . . . . . . . . . . . . . . . . . . . . . . . . . . . . . . . . . . . . . . . . . . . . . . . . . . . . . . . . . . . . . . . . . . . .2
Entsorgung . . . . . . . . . . . . . . . . . . . . . . . . . . . . . . . . . . . . . . . . . . . . . . . . . . . . . . . . . . . . . . . . . . . . . . . . . . . . .3
Gebrauch . . . . . . . . . . . . . . . . . . . . . . . . . . . . . . . . . . . . . . . . . . . . . . . . . . . . . . . . . . . . . . . . . . . . . . . . . . . . . .3
Vor Inbetriebnahme/Bedienungsblende/Inbetriebnhame/Temperatureinstellung/Schnellgefriervorgang . . . . .4
Alarmlampe / Gefrierkalender / Gefrierabteilausstattung / Tipps . . . . . . . . . . . . . . . . . . . . . . . . . . . . . . . . . . .5
Wartung Abtauen / Reinigung . . . . . . . . . . . . . . . . . . . . . . . . . . . . . . . . . . . . . . . . . . . . . . . . . . . . . . . . . . . . . .6
Wenn etwas nicht funktioniert . . . . . . . . . . . . . . . . . . . . . . . . . . . . . . . . . . . . . . . . . . . . . . . . . . . . . . . . . . . . . .7
Kundendienst und Ersatzteile . . . . . . . . . . . . . . . . . . . . . . . . . . . . . . . . . . . . . . . . . . . . . . . . . . . . . . . . . . . . . .7
Technische Angabe . . . . . . . . . . . . . . . . . . . . . . . . . . . . . . . . . . . . . . . . . . . . . . . . . . . . . . . . . . . . . . . . . . . . . .7
Türanschlagwechsel . . . . . . . . . . . . . . . . . . . . . . . . . . . . . . . . . . . . . . . . . . . . . . . . . . . . . . . . . . . . . . . . . . . . .8
Installation Aufstellung . . . . . . . . . . . . . . . . . . . . . . . . . . . . . . . . . . . . . . . . . . . . . . . . . . . . . . . . . . . . . . . . . . .8
Elektrischer Anschluss . . . . . . . . . . . . . . . . . . . . . . . . . . . . . . . . . . . . . . . . . . . . . . . . . . . . . . . . . . . . . . . . . . .9
Einbau . . . . . . . . . . . . . . . . . . . . . . . . . . . . . . . . . . . . . . . . . . . . . . . . . . . . . . . . . . . . . . . . . . . . . . . . . . . . . . . . .9
Entsorgung
Verpackungsmaterialien
• Die mit dem Symbol gekennzeichneten Materialien sind recyclingfähig.
>PE<=Polyäthylen
>PS<=Polystyrol
>PP<=Polypropylen
Die Kartonteile werden aus Altpapier hergestellt und sollten auch wieder zur Altpapiersammlung gegeben
werden.
In Deutschland können Sie die Verpackung an den Händler zurückgeben, bei dem Sie das Gerät gekauft
haben.
Entsorgung von Altgeräten
Das Symbol auf dem Produkt oder seiner Verpackung weist darauf hin, dass dieses Produkt nicht als
normaler Haushaltsabfall zu behandeln ist, sondern an einem Sammelpunkt für das Recycling von elektrischen
und elektronischen Geräten abgegeben werden muss.
Durch Ihren Beitrag zum korrekten Entsorgen dieses Produkts schützen Sie die Umwelt und die Gesundheit
Ihrer Mitmenschen. Umwelt und Gesundheit werden durch falsches Entsorgen gefährdet. Weitere
Informationen über das Recycling dieses Produkts erhalten Sie von Ihrem Rathaus, Ihrer Müllabfuhr oder dem
Geschäft, in dem Sie das Produkt gekauft haben.
Gebrauch
Dieses Gerät ist mit dem «Viersterne-» Symbol versehen, was bedeutet, dass darin sowohl frische
Lebensmittel eingefroren als auch Tiefkühlkost langfristig gelagert werden können.
Vor Inbetriebnahme
Man sollte mindestens 2 Std. warten, bevor das
Gerät in Betrieb genommen wird, damit das
Kältemittel zurückströmen kann.
• Bevor Sie das Gerät in Betrieb nehmen, beseitigen
Sie den typischen «Neugeruch» am besten durch
Auswaschen der Innenteile mit lauwarmem Wasser
und einem neutralen Reinigungsmittel. Sorgfältig
nachtrocknen.
Bitte keine Reinigungs- bzw. Scheuermittel
verwenden, die das Gerät beschädigen
könnten.
Das Gerät sowie Teile der Innenausstattung sind für
den Transport geschützt.
Alle Klebebänder sowie Polsterteile aus dem
Geräteinnenraum entfernen.

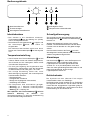
Bedienungsblende
Temperatureinstellung
• Durch Drehen des Thermostatknopfes
➁➁
auf die
höheren Zahlen erhält man kältere Temperaturen,
durch Drehen auf die niedrigeren Zahlen erhält
man wärmere Temperaturen.
• Für eine gute Lagerung der eingefrorenen bzw.
tiefgefrorenen Lebensmittel, muss die Temperatur
im Gefrierschrank unter oder gleich -18°C sein.
• Die richtige Einstellung erhält man, unter
Berücksichtigung folgender, die Innentemperatur
beeinflussender Faktoren:
• Raumtemperatur
• Häufigkeit des Türöffnens
• Menge der eingelagerten Lebensmittel,
• Aufstellung des Gerätes.
• Die Temperatur wird automatisch geregelt.
• Stellung „1“ = wärmste Innentemperatur
• Stellung „6“ = kälteste Innentemperatur
• Stellung „O“ = Kühlung aus
Wir empfehlen, den Thermostatknopf
➁➁
auf eine
mittlere Stellung zu drehen. Die
Temperaturregelung zur optimalen Aufbewahrung
der Lebensmittel erfolgt automatisch.
Schnellgefriervorgang
Zur Durchführung des Schnellgefriervorganges die
Schnellgefriertaste
➃➃
drücken. Die Kontrollampe
➂➂
leuchtet auf.
Wird die Schnellgefrier-Funktion nicht manuell
beendet, schaltet die Elektronik des Gerätes diese
Funktion nach 52 Stunden ab . Die gelbe Anzeige
erlischt.
Durch erneutes Drücken der Taste
➃➃
kann die
Schnellgefrier-Funktion jederzeit manuell beendet
werden. Die gelbe Anzeige erlischt.
Alarmlampe
Die Alarmlampe
➄➄
blinkt, wenn die Temperatur im
Geräteinneren steigt, und dadurch die richtige
Lagertemperatur nicht mehr gewährleistet wird
(wärmer als -12°C). Sie blinkt jedoch auch dann,
wenn das Gerät gerade eingeschaltet worden ist und
bleibt solange blinkend, bis die richtige
Lagertemperatur erreicht ist.
4
Gefrierkalender
Die Symbole auf dem obersten Fach zeigen
unterschiedliche Arten von Tiefkühlgut.
Die Zahlen geben für die jeweilige Art von Tiefkühlgut
die Lagerzeit in Monaten an. Ob der obere oder der
untere Wert der angegebenen Lagerzeiten gültig ist,
hängt von der Qualität der Lebensmittel und deren
Vorbehandlung vor dem Einfrieren ab.
5
6
4
2
1
3
➁➁
➂➂
➃➃
➄➄
➀➀
➀➀
Netz-Kontrollleuchte
➁➁
Thermostatregler
➂➂
Schnellgefrier-Kontrollleuchte
➃➃
Schnellgefrier-Taste
➄➄
Temperaturalarm-Kontrollleuchte
Inbetriebnahme
• Den Stecker in die Steckdose einsetzen.
Thermostatknopf
➁➁
von der Stellung «O» (STOP)
aus im Uhrzeigersinn drehen.
• Die Aufleuchten der Netzkontrolle
➀➀
) zeigt an und
der Alarmlampe
➄➄
blinkt. Das Gerät ist
eingeschaltet.
Den Stillstand des Gerätes erhält man durch
Drehen des Thermostatknopfes
➁➁
auf das Symbol
«O».

5
Gefrierabteilausstattung
Eiswürfelbereitung
Das Gerät hat Eiswürfelschalen, welche mit Wasser
aufgefüllt in das Gefrierfach gestellt werden. Die
Eiswürfel können herausgenommen werden, indem
die Eiswürfelschale kurz unter Leitungswasser
gehalten wird.
Bitte zur Entnahme der Eiswürfelschalen
keine Metallgegenstände benutzen!
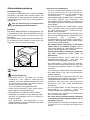
Schublade
Die stabilen Kälteschubladen sind kippgesichert und
in Endstellung arretiert. Dies gewährleistet sicheres
und bequemes Einlagern und Entnehmen des
Gefrierguts.
Zum Herausnehmen ziehen Sie die Schubladen bis
zur Arretierung heraus, kippen sie nach oben und
ziehen sie nach vorn heraus (siehe Abb.)
PR001c
Tipps
Energie-Einsparung
• Das Gerät nicht in der Nähe von Herden,
Heizkörpern oder anderen Wärmequellen
aufstellen. Bei hoher Umgebungstemperatur läuft
der Kompressor häufiger und länger. Bitte im
Abschnitt “Aufstellung” nachsehen.
• Tür nur so lange wie nötig geöffnet lassen.
• Keine warmen Speisen in das Gerät stellen.
Warme Speisen erst abkühlen lassen.
• Die Temperatur nicht kälter als nötig einstellen.
• Tiefkühlgut zum Auftauen in den Kühlraum legen.
Die Kälte im Tiefkühlgut wird so zur Kühlung im
Kühlraum genutzt.
• Den Verflüssiger, das Metallgitter an der
Geräterückseite, mit einem Staubsauger oder einer
Bürste immer sauber halten.
Einfrieren und Tiefkühllagern
• Um den Schnellgefriervorgang durchzuführen,
muss das Gerät, falls es nicht in Betrieb ist,
wenigstens drei Stunden vor der Einlagerung der
einzufrierenden Lebensmittel auf
Schnellgefriervorgang gestellt werden. Läuft jedoch
das Gerät bereits, wird empfohlen, den
Schnellgefriervorgang mindestens 24 Stunden vor
der Einlagerung der einzufrierenden Lebensmittel
einzuschalten.
• Nach der Einlagerung der Lebensmittel, rechnet
man 24 Stunden, bis der Gefriervorgang beendet
ist. Nach dieser Zeit den «Aufbewahrungs-
Betrieb» wieder einstellen.
• Nach einem längeren Stillstand des Gerätes muss
dieses vor der Einlagerung der Lebensmittel, durch
Einstellung des Schalters auf
Schnellgefriervorgang (SUPER), wenigstens 2
Stunden in Betrieb gesetzt werden; danach wieder
den normalen Betrieb einstellen.
• Die einzufrierenden Lebensmittel in die beiden
oberen Fächer des Gerätes einlegen; soll nur
eine geringe Menge an Lebensmitteln eingefroren
werden, nur das oberste Fach verwenden.
•
Das Gefriervermögen in 24 Stunden finden Sie
auf dem «Typschild» links unten im
Gefrierraum.
• Eingelagerte Waren dürfen nicht über die
Stapelmarkierungen bzw. nicht über die
Vorderkante der Ablagefläche hervorstehen.
• Die Lebensmittel in kleine Portionen einteilen,
damit der Gefriervorgang beschleunigt wird; dies
ermöglicht das spätere Auftauen von kleineren
Portionen.
• Tür so wenig wie möglich öffnen oder offen lassen.
• Die Lebensmittel in Alu- oder Polyäthylenfolien
luftdicht verpacken.
• Die einzufrierenden Lebensmittel sollen mit den
Tiefkühlkosten nicht in Berührung kommen, um ein
Temperaturanstieg an diese zu verhindern.
• Speiseeis, das direkt aus dem Gefrierfach
genommen wird, kann Kälte-Brandwunden
verursachen.
• Es ist empfehlenswert, auf der Verpackung das
Einfrierdatum zu notieren, damit die
Aufbewahrungszeit eingehalten werden kann.
• Der Transport vom Verkäufer zum Verbraucher
muss in kurzer Zeit erfolgen.
• Es sollten keine kohlensäurehaltigen Getränke
in das Gefrierschrank eingestellt werden, da sie
explodieren können.
• Einmal aufgetaute Lebensmittel verderben schnell
und können kein ein zweites Mal eingefroren
werden.

6
Wartung
Vor jeder Reinigungsarbeit immer den
Netzstecker aus der Steckdose ziehen.
Dieses Gerät erhält im Kaltekreislauf
Kohlenwasserstoff. Aus diesem Grund darf
die Wartung und das Nachfüllen
ausschließlich von autorisierten
Fachpersonal durchgeführt werden.
Beschädigte Versorgungskabel müssen
durch ein Spezialkabel bzw. einen
Spezialsatz ersetzt werden, die beim
Hersteller oder dem Kundendienststellen
erhältlich sind.
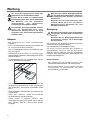
Abtauen
• Die Reifschicht mit einem Plastikschaber
abkratzen.
• Wenn im Gefrierschrank die Eisschicht stärker als
ca. 5 mm ist, tauen Sie Ihr Gerät ab.
Um ein vollständiges Abtauen durchzuführen, geht
man wie folgt vor:
• Tiefkühlgut herausnehmen, in mehrere Lagen
Zeitungspapier einpacken und abgedeckt an einem
kühlen Ort lagern.
• Thermostatknopf auf «O» einstellen oder Stecker
aus der Steckdose herausziehen;
• Tür offen lassen und den Plastikschaber als
Verlängerung der Abtaurinne in den vorgesehenen
Sitz einstecken; eine Schale unterstellen (siehe
Abb.).
• Nach beendetem Abtauprozess das Gefrierteil gut
nachtrocknen.
• Nach dem Abtauen, Gerät einschließlich
Innenausstattung gründlich reinigen.
• Gerät wieder in Betrieb nehmen. Den
Schnellgefriervorgang einschalten. Nach zwei bis
drei Stunden Betrieb Lebensmittel wieder
einlagern.
Benutzen Sie niemals Metallgegenstände,
um die Reifschicht abzukratzen, damit eine
Beschädigung des Gerätes vermieden
werden kann.
Benutzen Sie kein mechanisches oder
anderes Mittel für einen schnelleren
Abtauprozeß mit Ausnahme der vom
Hersteller empfohlenen.
D068
Reinigung
Bitte keine Reinigungs- bzw. Scheuermittel
verwenden, die das Gerät beschädigen
könnten.
Benutzen Sie nie Metallgegenstände um
das Gerät zu reinigen, da es beschädigt
werden könnte.
Den Innenraum mit lauwarmem Wasser und einem
neutralen Reinigungsmittel reinigen.
Gut nachwaschen und sorgfältig trocknen.
Um einen sicheren Betrieb des Gerätes zu
gerwährleisten, einmal im Jahr den Sockel-Grill
abbauen und die Luftkanäle mit einem Staubsauger
reinigen. Dies begünstigt den guten Betrieb mit
folglicher Stromersparnis.
Stillstandszeiten
• Den Stecker aus der Steckdose ziehen. Alle
Lebensmittel herausnehmen und Gerät reinigen.
• Die Tür offen lassen, um im Inneren eine gute
Luftzirkulation zu gewährleisten und somit
Geruchsbildung zu vermeiden.

7
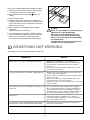
Wenn etwas nicht funktioniert
Falls das Gerät Störungen aufweisen sollte, bevor Sie den Kundendienst verständigen, überprüfen Sie
zuerst folgendes:
Störung Abhilfe
Gerät arbeitet, die grüne Lampe blinkt
Im Gerät wird es nicht kalt genug
Gerät kühlt zu stark.
Der Kompressor läuft ständig
Geräusche
Kundendienst verständigen.
Der Drehknopf auf kältere Temperatur drehen.
Die Lebensmittel müssen so eingelagert werden, dass die Kälte um sie frei zirkulieren
kann.
Tür richtig schließen.
Die Umgebungstemperatur ist zu warm. Siehe Abschnitt “Aufstellung”.
Der Drehknopf auf wärmere Temperatur drehen.
Der Drehknopf auf niedrigere Zahlen drehen.
Die Umgebungstemperatur ist zu warm.
Achten Sie darauf, dass diese Öffnungen nicht durch Sockelblenden oder Geschirr
abgedeckt werden.
Innerhalb der letzen 24 Std. wurden größere Mengen warmer Lebensmittel eingelagert.
Tür nur so lange wie nötig geöffnet lassen.
Manchmal sind sie charakterstisch für Kältegeräte.
Wenn Kältemittel in dünne Rohre einströmt, können Sie ein blubberndes oder
plätscherndes Geräusch hören.
Immer wenn der Kompressor ein- oder ausschaltet, ist ein Klicken zu hören.
Geräusche können durch das Instand setzen der Möbelstruktur entstehen.
Kundendienst und Ersatzteile
Sollten Sie nach o.e. Prüfungen zu keinem Resultat
kommen, so wenden Sie sich bitte an unseren
nächsten Kundendienst.
Um ein rasches Beheben des Schadens zu
ermöglichen, ist es beim Anruf an den Kundendienst
notwendig anzugeben:
• Modellbezeichnung
• Erzeugnis-Nummer (PNC)
• Fertigungs-Nummer (S-No.)
Diese Angaben finden Sie auf dem Typschild links an
der Innenseite des Gerätes. Damit Sie die Daten
schnell bei der Hand haben, empfehlen wir, sie hier
einzutragen.
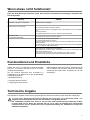
Technische Angabe
Die technischen Angaben sind auf dem Typschild genannt, das auf der linken inneren Seite der Anlage liegt.
Im Falle einer Stromunterbrechung während der Lagerung von Tiefkühlkost bzw. von
eingefrorenen Lebensmitteln soll die Tür des Gerätes nicht geöffnet werden.
Die Tiefkühlkost verdirbt nicht, wenn es sich um eine kurze Unterbrechung handelt (bis 20 Std.)
und das Gerät voll ist. Wenn das nicht der Fall ist, ist es nötig, die tiefgefrorenen Lebensmittel
innerhalb kurzer Zeit zu verbrauchen (eine Temperaturerhöhung der Tiefkühlkost verkürzt die
Aufbewahrungsdauer).

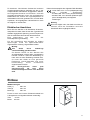
Zur Transportsicherung wurde die Gerätetür an
beiden Auschlagseiten mit Scharnierstiften befestigt.
Je nach Türanschlag, Scharnierstift (A und B) auf
einer Seite oben und unten entfernen.
Achtung!
Bei einer niedrigen Raumtemperatur (z.B. im
Winter) kann es vorkommen, dass die
Dichtung nicht perfekt am Schrank haftet. Die
Wiederherstellung der Dichtung erfolgt
automatisch nach gewisser Zeit. Wollen Sie
aber diesen Prozess beschleunigen, so
genügt es die Dichtung mit einem Fön zu
erwärmen.
Türanschlag wechseln
B
A
Installation
Vor der Installation sicherstellen, dass das
Gerät nicht beschädigt ist. Mögliche
Transportschäden sind dem Händler
unverzüglich mitzuteilen.
• Während das Gerät in Betrieb ist, werden der
Verflüssiger und der Kompressor, die sich auf der
Rückseite des Gerätes befinden, heiß. Aus
Gründen der Sicherheit muss eine
Mindestbelüftung gesichert sein. Siehe
Aufstellungsanweisungen.
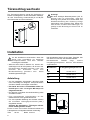
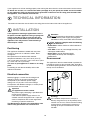
Aufstellung
• Vor der Installation sicherstellen, dass das Gerät
nicht beschädigt ist. Mögliche Transportschäden
sind dem Händler unverzüglich mitzuteilen.
• Das Gerät darf nicht in unmittelbarer Nähe von
Heizkörpern oder sonstigen Wärmequelle
aufgestellt werden.
• Ein Standort mit direkter Sonneneinstrahlung sollte
vermieden werden.
• Eine ausreichende Luftzirkulation an der
Geräterückseite muss gewährleistet sein.
• Für eine optimale Belüftung des Gerätes müssen
die minimalen Lüftungsquerschnitet (Abb.)
eingehalten werden.
Achtung: Die Ventilations - Öffnungen müssen
immer saubergehalten werden.
Ferner ist auch am hinteren Einbauschrankteil ein
Lüftungskamin mit folgenden Massen notwendig:
Tiefe 50 mm Breite 540 mm
50 mm
min.
200 cm
2
200 cm
2
min.
D526
Die Klimaklasse finden Sie auf dem Typschild, das
sich links im Innenraum des Gerätes befindet.
Nachstehende Tabelle zeigt, welche
Umgebungstemperatur welcher Klimaklasse
zugeordnet ist:
Klimaklasse
SN +10 bis +32°C
+16 bis +32°C
+18 bis +38°C
+18 bis +43°C
N
ST
T
für Umgebungstemperatur von
8

9
Zu beachten: Wird dieses Gerätes bei anderen
Umgebungstemperaturen betrieben als den in der
entsprechenden Klimaklasse angegebenen Werten,
sind folgende Hinweise zu beachten: sinkt die
Umgebungstemperatur unter den angegebenen
Mindestwert ab, könnte die Lagertemperatur im
Gefrierabteil nicht mehr garantiert sein; es wird daher
empfohlen, die eingelagerten Lebensmittel so rasch
als möglich zu verbrauchen.
Elektrischer Anschluss
Bevor Sie den Stecker in die Steckdose einstecken,
überprüfen Sie bitte, dass die auf dem Typschild des
Gerätes angegebene Spannung sowie Frequenz mit
dem Anschlusswert des Hauses übereinstimmen.
Eine Abweichung von ±6% von der
Nominalspannung ist zulässig.
Für die Anpassung des Gerätes an andere
Spannungen muss ein Spartransformator
angemessener Leistung vorgeschaltet werden.
Wichtig
Das Gerät muss unbedingt
vorschriftsmäßig geerdet werden.
Zu diesem Zweck ist der Stecker des
Anschlusskabels mit dem dafür vorgesehenen
Kontakt versehen. Sollte die Netzleitung im
Haus nicht mit einer Erdleitung versehen sein,
so muss das Gerät an eine getrennte
Erdleitung vorschriftsmäßig und unter
Hinzuziehung eines Fachmanns
angeschlossen werden.
Die Erzeugerfirma lehnt jede
Verantwortung ab, falls diese
Unfallverhütungsvorschrift nicht beachtet
wird.
Dieses Gerät entspricht der folgende EWG Richtlinie:
- 73/23 EWG vom 19.2.73 (Niederspannung)
und folgende Änderungen;
- 87/308 EWG vom 2.6.87 (Funkentstörung);
- 89/336 EWG vom 03/05/89 (Elektromagne-
tische Verträglichkeit) und folgende
Änderungen.
Wichtig
Es muss möglich sein, das Gerät vom Netz zu
trennen; nach der Installation muss die
Steckdose daher zugänglich bleiben.
Einbau
Maßzeichnungen
Höhe (1) 880 mm
Tiefe (2) 550 mm
Breite (3) 560 mm
Ferner ist auch am hinteren Einbauschrankteil ein
Lüftungskamin mit folgenden Massen notwendig:
Tiefe 50 mm
Breite 540 mm
540
50
560
550
880
PR 32

10
D022
1
2
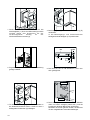
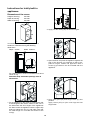
1. Gerät in die Nische einschieben, bis die
Anschlagleiste (1) oben am Möbel anliegt und die
vordere Kante des Scharniers mit der
Türöffnungsseite bündig an der
Nischenseitenwand ansteht (2).
D132
2. Fugenabdeckprofil am Gerät, wie in Abbildung
gezeigt ankleben.
I
3. Tür öffnen und Gerät gegenüber der Bandseite an
die Möbelseitenwand rücken. Gerät mit den 4
beiliegenden Schrauben (I) befestigen.
B
E
C
D
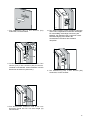
4. Belüftungsgitter (B) und Scharnierabdeckung (E)
aufstecken.
In die Befestigungs- und Scharnierlöcher
beiliegende Abdeckkappen (C-D) eindrücken.
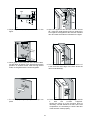
5. Die Teile Ha, Hb, Hc Hd abnehmen, wie in der
Abb. gezeigt wird.
PR266
Ha
Hb
Hc
Hd
6. Die Schiene (Ha) auf der Innenseite der Möbeltür
oben und unten auflegen (siehe Abb.) und die
Position der äußeren Bohrlöcher anzeichnen.
Nachdem die Löcher gebohrt wurden, die Schiene
mit den mitgelieferten Schrauben befestigen.
2
1
m
m
2
1
m
m
ca. 50 mm
90°
90°
ca. 50 mm

11
7. Die Abdeckung (Hc) in die Scheine (Ha)
eindrücken, bis sie einrastet.
PR33
Hc
Ha
PR167
Ha
Hb
8mm
8. Gerätetür und Möbeltür auf ca. 90°öffnen. Den
Winkel (Hb) in der Schiene (Ha) einsetzen.
Gerätetür und Möbeltür zusammenhalten und die
Bohrlöcher anzeichnen (siehe Abb.).
PR167
Ha
8mm
K
9. Die Winkeleisen entfernen und 8 mm vom
äusseren Rand der Tür mit dem Nagel (K)
kennzeichnen.
10. Den Winkel wieder auf der Schiene anbringen
und mit den mitgelieferten Schrauben befestigen.
Für eine allfällig notwendige Ausrichtung der
Möbeltür, den Spielraum der Langlöcher nutzen.
Nach Beendigung der Arbeiten den
einwandfreien Verschluss der Gerätetür
überprüfen.
PR168
Hb
11. Die Abdeckung (Hd) in den Winkel (Hb)
eindrücken, bis sie einrastet.
PR167/1
Hd
Hb

12
CONTENTS
Instructions for the User
Important Safety Instructions 13
Use 15
Cleaning the interior 15
Control panel 15
Operation 15
Temperature regulation 15
Quick freezing 16
Warning light 16
Freezing calendar 16
Freezing of fresh foods 16
Storage of commercially frozen food 16
Thawing 16
Ice-cube production 16
Tips 17
Tips for freezing fresh foods 17
Tips for storage of commercially frozen food 17
Maintenance 17
Periodic cleaning 17
Periodios of non-operation 17
Defrosting 17
Something not Working 18
Instructions for the Installer
Technical specifications 19
Installation 19
Positioning 19
Electrical connection 19
Door reversal 19
Instructions for totally built-in appliances 20

13
IMPORTANT SAFETY
INSTRUCTIONS
It is most important that this instruction book should be retained with the appliance for future
reference. Should the appliance be sold or transferred to another owner, or should you move house and
leave the appliance, always ensure that the book is supplied with the appliance in order that the new
owner can be acquainted with the functioning of the appliance and the relevant warnings.
These warnings are provided in the interest of safety. You must read them carefully before installing or
using the appliance.
■
This appliance contains hydrocarbons in its
cooling unit; maintenance and recharging must
therefore only be carried out by authorised
technicians.
Use
■
The domestic refrigerators and freezers are
designed to be used specifically for the storage of
edible foodstuffs only.
■
Frozen food must not be re-frozen once it has
been thawed out.
■
Manufacturers’ storage recommendations should
be strictly adhered to. Refer to relevant
instructions.
■
The inner lining of the appliance consists of
channels through which the refrigerant passes. If
these should be punctured this would damage the
appliance beyond repair and cause food loss. DO
NOT USE SHARP INSTRUMENTS to scrape off
frost or ice. Frost may be removed by using the
scraper provided. Under no circumstances should
solid ice be forced off the liner. Solid ice should be
allowed to thaw when defrosting the appliance.
See defrost instructions.
■
Do not place carbonated or fizzy drinks in the
freezer as it creates pressure on the container,
which may cause it to explode, resulting in
damage to the appliance. Do not use a mechanical
device or any artificial means to speed up the
thawing process other than those recommended
by the manufacturer. Never use metal objects for
cleaning your appliance as it may get damaged.
Installation
■
Care must be taken to ensure that the appliance
does not stand on the electrical supply cable.
Important: if the supply cable is damaged, it must
be replaced by authorised service or qualified
personnel using a special cable of the same type.
■
During normal operation, the condenser and
compressor at the back of the appliance heat up
considerably. For safety reasons, minimum
ventilation must be as shown in the relevant
paragraph.
General Safety
■
This appliance is designed to be operated by
adults. Children should not be allowed to tamper
with the controls or play with the product.
■
It is dangerous to alter the specifications or modify
this product in any way.
■
Before any cleaning or maintenance work is
carried out, be sure to switch off and unplug the
appliance.
■
This appliance is heavy. Care should be taken
when moving it.
■
Ice follies can cause frost burns if consumed
straight from the appliance.
■
Take utmost care when handling your
appliance so as not to cause any damages to
the cooling unit with consequent possible fluid
leakages.
■
The appliance must not be located close to
radiators or gas cookers.
■
Avoid prolonged exposure of the appliance to
direct sunlight.
■
There must be adequate ventilation round the
back of the appliance and any damage to the
refrigerant circuit must be avoided.
■
For freezers only (except built-in models): an
ideal location is the cellar or basement.
■
Do not use other electrical appliances (such as
ice cream makers) inside of refrigerating
appliances.
Service / Repair
■
Any electrical work required to install this
appliance should be carried out by a qualified
electrician or competent person.
■
This appliance should be serviced by an
authorised Service Centre, and only genuine
spare parts should be used.
■
Under no circumstances should you attempt to
repair the appliance yourself. Repairs carried out
by inexperienced persons may cause injury or
more serious malfunctioning. Refer to your local
Service Centre, and always insist on genuine
spare parts.

14
Environment Protection
■
This appliance does not contain gasses which
could damage the ozone layer, in either its
refrigerant circuit or insulation materials. The
appliance shall not be discarded together with
the urban refuse and rubbish. Avoid damaging
the cooling unit, especially at the rear near the
heat exchanger. Information on your local
disposal sites may be obtained from your
municipal authorities.
■
The materials used on this appliance marked
with the symbol are recyclable.
Disposal of old appliances
The symbol on the product or on its packaging
indicates that this product may not be treated as
household waste. Instead it shall be handed over to
the applicable collection point for the recycling of
electrical and electronic equipment. By ensuring this
product is disposed of correctly, you will help prevent
potential negative consequences for the environment
and human health, which could otherwise be caused
by inappropriate waste handling of this product. For
more detailed information about recycling of this
product, please contact your local city office, your
household waste disposal service or the shop where
you purchased the product.
Attention: keep ventilation openings clear of
obstruction.
■
If the appliance is transported horizontally, it is
possible that the oil contained in the compressor
flows in the refrigerant circuit. It is advisable to wait
at least two hours before connecting the appliance
to allow the oil to flow back in the compressor.
■
There are working parts in this product which heat
up. Always ensure that there is adequate
ventilation as a failure to do this will result in
component failure and possible food loss. See
installation instructions.
■
Parts which heat up should not be exposed.
Wherever possible the back of the product should
be against a wall.
■
If the appliance has been transported horizontally,
it is possible that the oil contained in the
compressor flows in the refrigerant circuit. It is
advisable to wait at least two hours before
connecting the appliance to allow the oil to flow
back in the compressor.

15
USE
Cleaning the interior
Before using the appliance for the first time, wash the
interior and all internal accessories with lukewarm
water and some neutral soap so as to remove the
typical smell of a brand-new product, then dry
thoroughly.
Do not use detergents or abrasive powders,
as these will damage the finish.
The freezer is marked with the symbol, which means that the compartment is suitable for freezing
fresie food and long-term storage of frozen food.
5
6
4
2
1
3
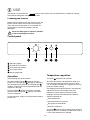
Control panel
➁➁
➂➂
➃➃
➄➄
➀➀
Pilot light (green)
➁➁
Thermostat control knob
➂➂
Fast freeze light (yellow)
➃➃
Fast freeze switch
➄➄
Warning light (red)
➀➀
Temperature regulation
Turn knob
➁➁
.beyond the«0» position.
To safely store frozen and deep-frozen foods, the
inner temperature of the freezer must be at least
-18° C or colder. Therefore, we suggest you turn the
knob to a medium setting.
The temperature inside the freezer is automatically
adjusted to ensure safe storage of the food.
However, the exact setting should be chosen
keeping in mind that the temperature inside the
appliance depends on:
•
room temperature;
•
how often the door is opened;
•
the quantity of food stored;
•
location of appliance.
Turn knob
➁➁
towards higher settings to obtain lower
temperatures and, conversely, towards lower setting
if a less cold temperature is required.
Operation
Insert the plug into the wall socket.
Turn the thermostat knob
➁➁
clockwise after the
position «0». The pilot light
➀➀
will light up, indicating
that the appliance is powered. The warning light
➄➄
will blink , indicating that the temperature inside the
appliance is too high.
Push the button
➃➃
, pushing the button a second
time the super control light
➂➂
light up. The freezer
will start to operate.
To stop operation, simply turn the thermostat knob to
position «0»

16
Ice-cube production
This appliance is equipped with one or more trays for
the production of ice-cubes.
Fill these trays with water, then put them in the
freezer.
Do not use metallic instruments to remove
the trays from the freezer.
Quick freezing
For quick-freezing, push the button
➃➃
. The super
control light
➂➂
will then light up.
If the quick-freezing function is not ended manually,
the appliance switch off the quick-freezing function
after 52 hours. The yellow light goes out.
The quick-freezing function can be ended manually at
any time by pressing the button
➃➃
again. The yellow
light goes out.
Warning light
This light
➄➄
flashes when the temperature inside the
appliance has increased so much as to jeopardize the
preservation of food in the compartment (warmer than
-12°C).
When the appliance is switched on for the first time or
when food is placed in the compartment for freezing,
this light flashes until the temperature has reached
the level required for correct storage.
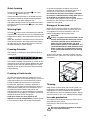
Freezing Calendar
The symbols on the drawers show different types of
frozen goods.
The numbers indicate storage times in months for the
appropriate types of frozen goods. Whether the upper
or lower value of the indicated storage time is valid
depends on the quality of the foods and pre-treating
before freezing.
10 - 1210 - 1210 - 1210 - 123-63-63-63-63-41-2
Freezing of fresh foods
To quick-freeze foods when the appliance has not
been in use, switch on the freezer and let it run on the
quick-freeze setting for at least three hours before
putting the food to be frozen in the compartment.
If instead the appliance is already in operation, it
should run on the quick-freeze setting for at least 24
hours before the foods are put in the freezer. Once
the foods have been placed in the freezer, the
freezing operation can be considered to be complete
24 hours later. Once freezing is complete, the freezer
should be reset for normal storage use.
Food to be frozen has to be placed in the
appliance's two top compartments; if freezing only
a small amount of food, use the top compartment.
In the top compartment, products must only be
stacked up to the mark on the cabinet wall so as to
ensure that air circulation is not obstructed.
The maximum amount of food which is freezable
in 24 hours is indicated on the rating plate. This is
to be found on the bottom left-hand side.
You should never freeze all at once a greater quantity
of foods than the maximum indicated on the
appliance’s rating plate.
Storage of frozen food
When you first start the freezer or if the freezer has
been out of use for some time, we advise you to run
your appliance for at least two hours in the «fast
freeze» mode before storing frozen food.
Important
If there is a power failure when food is in the
freezer, do not open the door of the freezer.
The frozen food will not be affected if the
power cut is of short duration (up to 20
hours) and the freezer is full, otherwise, it is
recommended that the food should be used
within a short time (a temperature increase
of the frozen food shortens its safe storage
period).
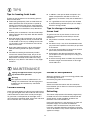
To remove the drawers, proceed as follows: pull the
drawer out until it comes to a stop, then tilt it upwards
(see figure).
PR001c
Thawing
Deep-frozen or frozen food, prior to being used, can
be thawed in the refrigerator or at room temperature,
depending on the time available for this operation.
Small pieces may even be cooked still frozen, directly
from the freezer: in this case, cooking will take longer.

17
Defrosting
The freezer compartment will become progressively
covered with frost. This should be removed with the
special plastic scraper provided, whenever the
thickness of the frost exceeds 1/4".
During this operation it is not necessary to switch off
the power supply or to remove the foodstuffs.
However, when the ice becomes very thick on the
inner liner, complete defrosting should be carried out
and it is advisable to carry out this operation when the
appliance is empty.
Periodic cleaning
Never use metal objects for clearing your appliance as
it may get damaged. Clean the inside with warm water
and bicarbonate of soda. Rinse and dry thoroughly.
To guarantee a safe operation of the fridge, once a
year remove the ventilation grille at the base and clean
the air channels with a vacuum cleaner.
Periods of non-operation
When the appliance is not in use for long periods, take
the following precautions:
remove the plug from the wall socket;
remove all food:
defrost and clean the interior and all accessories;
leave the door ajar to allow air to circulate to prevent
unpleasant smells.
TIPS
Tips for freezing fresh foods
To help you get the best out of the freezing process,
here are a few hints:
■ Freeze only good-quality, fresh and well-cleaned
foods. Split them into small portions to speed up
freezing and avoid having to thaw more food than
you require. It is in fact important to remember that
once the foods have thawed out, they deteriorate
fast.
■ Another point to remember is that lean foods keep
better and longer than fatty foods. Salt too reduces
storage times.
■ Wrap the foods in foil or polythene ½lm, ensuring
that the wrapping adheres closely to the food and
is well sealed. In this way, by avoiding contact with
air, the colour ¾avour and nutritional value of the
foods remain intact.
■ During the freezing process, do not add further
foods for freezing and do not open the freezer
door.
■ The foods for freezing should not be placed in
contact with already frozen foods, but put in the
special freezing compartment. This will stop the
temperature of already frozen foods from rising.
■ Never put ½zzy drinks in the freezer as they might
well burst.
Tips for storage of commercially
frozen food
To get the best out of your freezer, in the case of
storage of commercially frozen food you should
ensure that:
■ the products have been correctly stored by the
retailer;
■ that there is only a very short time between when
you purchase the products and when you put them
in the freezer;
■ you do not store products for longer than the time
speci½ed by the food manufacturer;
■ Avoid opening the door too frequently and when
you do open it, leave it open only for as long as is
strictly necessary;
■ A word of warning about ice lollies: they should not
be eaten straight out of the freezer as this might
cause cold burns.
Unplug the appliance before carrying out
any maintenance operation.
Warning
This appliance contains hydrocarbons in its
cooling unit maintenance and recharging must
therefore only be carried out by authorised
technicians.
MAINTENANCE
■ In addition, never put hot foods or liquids in the
freezer compartment and take care not to ½ll
recipients up to the brim if they are covered with a
lid.
■ It is a good idea to mark the packs with the date
on which freezing started so that you can keep a
check on storage periods.

18
D068
To carry out complete defrosting proceed as follows:
1. Remove any stored food, wrap it in several layers
of newspaper and put it in a cool place.
2. Turn the thermostat control knob
➁➁
to the «0»
setting.
3. Leave the door open.
4. Introduce the plastic scraper in the appropriate
seating at the base of the cabinet as shown in the
figure and place a basin underneath to collect the
defrost water (see fig.).
5. When defrosting is completed dry the interior
thoroughly.
Keep the scraper for future use.
6. Turn the thermostat control to a medium setting
and, after letting the appliance run for at least two
hours in the «fast freeze» mode, replace the
previously removed food into the compartments.
SOMETHING NOT WORKING
If the appliance is not functioning properly, check that:
Malfunction
Remedy
Appliance does not function, no pilot light is illuminated.
The freezer temperature is not sufficient, red light lights up.
Large accumulation of frost in the appliance, perhaps also at
the door seal.
Unusual noises.
The compressor does not start immediately after pressing the
fast freeze button or after changing the temperature setting.
The appliance works, but the pilot light is flashing
- Appliance is not switched on; switch appliance on.
- Mains plug is not inserted or is loose; insert mains plug.
- Fuse has blown or is defective; check fuse, replace if
necessary.
- Mains socket is defective; Mains malfunctions are to be
corrected by an electrician.
- Temperature is not properly adjusted; please refer to the
section “Temperature regulation”.
- Door was open for a long time; only leave the door open as
long as necessary.
- Within the last 24 hours a large quantity of warm foods
were loaded; press the fast freeze button.
- Appliance is next to a source of warmth; please refer to the
section “Location”.
- Door is not properly sealed (perhaps after re-hanging
door); carefully warm the door seal with a hand-held hair
dryer at those points which are not airtight (no warmer
than approx. 50°C). At the same time, shape the warmed
door seal by hand, so that it is again properly seated.
- A part at the back of the appliance, e.g. a tube, is in
contact with another appliance part or the wall; bend this
part away carefully if necessary.
- This is normal, no error has occurred; the compressor
starts after a period of time.
Please contact the nearest service centre.
Warning
Never use metal objects for defrosting your
appliance as it may get damaged.
Do not use a mechanical device or any
artificial means to speed up the thawing
process other than those recommended by
the manufacturer.
A temperature increase of the frozen food
shortens its safe storage period.

19
INSTALLATION
lf this appliance featuring magnetic door seals is
to replace an older appliance having a spring lock
(latch) on the door or lid, be sure to make that
spring lock unusable before you discard the old
appliance. This will prevent it from becoming a
death-trap for a child.
Positioning
The appliance should be installed well away from
sources of heat such as radiators, boilers, direct
sunlight etc.
Best performance is obtained with ambient
temperature between +18°C and +43°C (class T);
+18°C and +38°C (class ST); +16°C and +32°C (class
N); +10°C and +32°C (class SN).
The class of your appliance is shown on its rating
plate.
For building-in and door reversibility refer to the
relevant instructions.
Electrical connection
Before plugging in, ensure that the voltage and
frequency shown on the serial number plate
correspond to your domestic power supply.
Voltage can vary by ±6% of the rated voltage.
For operation with different voltages, a suitably sized
auto-transformer must be used.
Important
The appliance must be earthed.
The power supply cable plug is provided with a
contact for this purpose.
If the domestic power supply socket is not
earthed. connect the appliance to a separate
earth in compliance with current regulations,
consulting a specialist technician.
The Manufacturer declines all responsibility if the
above safety precautions are not observed.
Attention!
It m
ust be possible to disconnect the appliance
from the mains power supply; the plug must
therefore be easily accessible after installation.
This appliance complies with the following
E.E.C. Directives:
- 87/308 EEC of 2/6/87 relative to radio interference
suppression.
- 73/23 EEC of 19.2.73 (Low Voltage Directive) and
subsequent modifications;
- 89/336 EEC of 3.5.89 (Electromagnetic
Compatibility Directive) and subsequent
modifications.
Door reversal
The appliance’s door has been locked in position for
transport by means of pins on both sides. According
to the door opening direction, remove relevant pins at
the top and at the bottom.
Warning!
If the ambient temperature is cold (i.e. in
Winter), the gasket may not fit perfectly to the
cabinet. In that case, wait for the natural fitting
of the gasket or accelerate this process by
heating up the part involved with a normal
hairdrier.
B
A
TECHNICAL INFORMATION
If your appliance is still not working properly after making the above checks, contact the nearest service centre.
To obtain fast service, it is essential that when you apply for it you specify the model and serial number
of your appliance which can be found on the guarantee certificate or on the rating plate located inside
the appliance, on the bottom left-hand side.
The technical infomation are situated in the rating plate on the internal left side of the appliance .

20
Instructions for totally built-in
appliances
Dimensions of the recess
Height of housing mm 880
Depth of housing mm 550
Width of housing mm 560
It is necessary that the niche is provided with a
conduct of ventilation having the following
dimensions:
Depth 50 mm Width 540 mm
For safety reasons, minimum ventilation must be as
shown in Fig.
Attention: keep ventilation openings clear of
obstruction.
50 mm
min.
200 cm
2
200 cm
2
min.
D526
540
50
5
60
550
880
PR 32
D022
1
2
1. Fit the appliance in the niche by making sure that
it stands against the interior surface of the unit on
the side where the door hinges of the appliances
are fitted. Insert the appliance until the upper strip
butts up against the unit (1) and make sure that
the lower hinge is in line with the surface of the
unit (2).
D132
2. Apply joint the sealing strip as shown in figure.
4. Snap vent grille (B) and hinge cover (E) into
position.
Apply covers (C-D) on joint cover lugs and into
hinge holes.
3. Open the door and push the appliance against the
side of the kitchen unit opposite to that of ap-
pliance hinges. Fasten the appliance with 4
screws (I) provided in the kit included with the
appliance.
I
B
E
C
D
Seite laden ...
Seite laden ...
Seite laden ...
Seite laden ...
-
 1
1
-
 2
2
-
 3
3
-
 4
4
-
 5
5
-
 6
6
-
 7
7
-
 8
8
-
 9
9
-
 10
10
-
 11
11
-
 12
12
-
 13
13
-
 14
14
-
 15
15
-
 16
16
-
 17
17
-
 18
18
-
 19
19
-
 20
20
-
 21
21
-
 22
22
-
 23
23
-
 24
24


ZANKER ZKG8509 Benutzerhandbuch
- Kategorie
- Kühl- / Gefrierkombinationen
- Typ
- Benutzerhandbuch
in anderen Sprachen
- English: ZANKER ZKG8509 User manual
Sonstige Unterlagen
-
Küppersbusch ITE127-8 Benutzerhandbuch
-
Electrolux EU6220I Benutzerhandbuch
-
Juno-Electrolux JGI4429 Benutzerhandbuch
-
BORETTI BV88 Benutzerhandbuch
-
-
Groupe Brandt DFS611JE Bedienungsanleitung
-
Juno-Electrolux JUN44882 Benutzerhandbuch
-
-
Zanussi ZBF3124A Benutzerhandbuch
-
Aeg-Electrolux AU86055-6I Benutzerhandbuch