Eizo SX2262W Installationsanleitung
- Kategorie
- Fernseher
- Typ
- Installationsanleitung
Dieses Handbuch ist auch geeignet für

Copyright© 2010-2012 EIZO NANAO CORPORATION All rights reserved.
The EIZO LCD Utility Disk contains
detailed information.
Die EIZO LCD Utility Disk enthält
detaillierte Informationen.
Le « EIZO LCD Utility Disk » contient
des informations détaillées.
EIZO LCD Utility Disk 中包含详细信息。
1
2
3
5
6
7
4
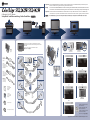
EIZO EasyPIX Software (CD-ROM)
1920×1200
A graphics board in conformance with VESA standard is required.
Eine Grakkarte ist erforderlich, die die Anforderungen des Standards
VESA erfüllt.
Une carte vidéo conforme à la norme VESA est requise.
需要符合 VESA 标准的显卡。
FD-C16
FD-C39
MD-C93
PP200
option
option
en option
选购件
or
oder
ou
或
or
oder
ou
或
Digital connection
Digitale Verbindung
Connexion numérique
数字连接
Digital connection
Digitale Verbindung
Connexion numérique
数字连接
Digital connection
Digitale Verbindung
Connexion numérique
数字连接
Digital connection
Digitale Verbindung
Connexion numérique
数字连接
Analog connection
Analoge Verbindung
Connexion analogique
模拟连接
Analog connection
Analoge Verbindung
Connexion analogique
模拟连接
DVI
D-Sub
USB
DisplayPort
DisplayPort
Power cord
Netzkabel
Cordon d’alimentation
电源线
FD-C39
Digital signal cable
Digitales Signalkabel
Câble de signal numérique
数字信号电缆
FD-C16
Analog signal cable
Analoges Signalkabel
Câble de signal analogique
模拟信号电缆
PRECAUTIONS
VORSICHTSMASSNAHMEN
PRECAUTIONS
预防措施
Monitor
Monitor
Moniteur
显示器
MD-C93
EIZO USB cable
EIZO USB-Kabel
Câble EIZO USB
EIZO USB 电缆
EIZO LCD Utility Disk
Setup Guide
Installationsanleitung
Guide d'installation
设定指南
Important : Please read PRECAUTIONS, this Setup Guide and the User’s Manual stored on the CD-ROM carefully to familiarize yourself
with safe and eective usage. Please retain this guide for future reference.
Wichtig :
Lesen Sie die VORSICHTSMASSNAHMEN, diese Installationsanleitung und das Benutzerhandbuch (auf der CD-ROM) aufmerksam durch,
um sich mit der sicheren und ezienten Bedienung vertraut zu machen. Bewahren Sie diese Anleitung zum späteren Nachschlagen auf.
Important :
Veuillez lire attentivement les PRECAUTIONS, ce Guide d’installation ainsi que le Manuel d’utilisation inclus sur le CD-ROM, an de
vous familiariser avec ce produit et de l’utiliser ecacement et en toute sécurité. Veuillez conserver ce guide pour référence ultérieure.
重要事项 : 请仔细阅读储存在光盘上的用户手册、本设定指南和预防措施,掌握如何安全、有效地使用本产品。请保留本指南,以便今后参考。
Setup Guide Installationsanleitung Guide d'installation
设定指南
Calibration Color LCD Monitor

预本显示器不属于《计算机显示器能源效率标识实施规则》中所特指的“普通用途计算机使用的 LCD 显示器”。
Tips
Auto EcoView
The sensor on the front side of the monitor detects the environmental brightness to adjust the screen brightness automatically and comfortably by using
the Auto EcoView function.
Der Sensor auf der Vorderseite des Monitors erkennt die Umgebungshelligkeit, damit die Bildschirmhelligkeit automatisch und bequem mit der Auto
EcoView-Funktion angepasst werden kann.
Le capteur situé sur la face avant du moniteur utilise la
fonction Auto EcoView et détecte la luminosité
ambiante pour régler automatiquement la luminosité
de l’écran à un niveau confortable.
通过使用 Auto EcoView 功能、显示器正面的传感器
检测环境亮度并自动调整到舒适的屏幕亮度。
1
2 3
This indicator shows the power saving ratio,
power reduction and CO
2
reduction as a result
of the brightness of the monitor.
Diese Anzeige zeigt die Energiesparquote, die
Reduzierung des Stromverbrauchs und
CO
2
-Reduzierung als Ergebnis der Helligkeit
des Monitors.
Cet indicateur affiche les niveaux d’ économie
d’ énergie, de réduction d’ énergie et de
réduction de CO
2
résultant de la luminosité du
moniteur.
此指示器根据显示器的亮度表示省电率、
省电和减少 CO
2
。
EcoView Index
No-Picture Problem
Problems
No
picture
Possible cause and remedy Problems Possible cause and remedy
If no picture is displayed on the monitor even after the following remedial action is taken, contact your local dealer.
• Check whether the power cord is
connected correctly. If the problem
persists, turn o the monitor, and then
turn it on again a few minutes later.
• Turn the main power switch on.
• Press .
• Switch the input signal with .
• Operate the mouse or keyboard.
• Check whether the PC is turned on.
• Set each adjusting value in
[Brightness], [Contrast] and [Gain] to
higher level.
The
message
appears.
• Check whether the signal setting of your
PC matches the resolution and the vertical
frequency settings for the monitor.
• Reboot the PC.
• Select an appropriate display mode using
the graphics board’s utility. Refer to the
manual of the graphics board for details.
fD : Dot Clock (Displayed only when the
digital signal inputs)
fH : Horizontal Frequency
fV : Vertical Frequency
• The message shown left may appear,
because some PCs do not output the
signal soon after power-on.
• Check whether the PC is turned on.
• Check whether the signal cable is
connected properly.
• Switch the input signal with .
Power
indicator
does not
light.
Power
indicator
lights
blue.
This message appears when no
signal is input.
Example:
The message shows that the
input signal is out of the specied
frequency range. (Such signal
frequency is displayed in red.)
Example:
Power
indicator
lights
orange.
Probleme
Kein
Bild
Mögliche Ursache und Lösung Probleme Mögliche Ursache und Lösung
• Setzen Sie alle anzupassenden Werte
unter [Helligkeit], [Kontrast] und
[Gain-Einstellung] auf einen höheren
Wert.
•
Prüfen Sie, ob die Signaleinstellung Ihres PCs mit den
Einstellungen für Auösung und vertikale
Bildwiederholfrequenz des Monitors übereinstimmt.
• Starten Sie den PC neu.
•
Wählen Sie mithilfe des zur Grakkarte
gehörenden Dienstprogramms einen geeigneten
Anzeigemodus. Weitere Informationen hierzu
entnehmen Sie dem Handbuch der Grakkarte.
fD :
Punktfrequenz (Wird nur bei digitalem Eingangssignal angezeigt)
fH : Horizontale Frequenz
fV : Vertikale Frequenz
• Die links stehende Meldung wird
angezeigt, wenn PCs das Signal nicht
gleich nach dem Einschalten übertragen.
•
Prüfen Sie, ob der Computer eingeschaltet ist.
• Prüfen Sie, ob das Signalkabel richtig
eingesteckt ist.
• Wechseln Sie durch Drücken der Taste
das Eingangssignal.
Netzkon-
troll-LED:
Aus.
Netzkon-
troll-LED
leuchtet
blau.
Diese Meldung wird angezeigt,
wenn kein Signal übertragen
wird.
Beispiel:
Diese Meldung zeigt an, dass sich
das Eingangssignal außerhalb
des angegebenen Frequenzbe-
reichs bendet. (Diese Signalfre-
quenz wird rot angezeigt.)
Beispiel:
Netzkon-
troll-LED
leuchtet
orange.
• Wechseln Sie durch Drücken der
Taste das Eingangssignal.
• Bewegen Sie die Maus, oder drücken
Sie eine Taste.
• Prüfen Sie, ob der Computer
eingeschaltet ist.
Problèmes
Aucune
image
Cause et solution Problèmes Cause et solution
• Vériez que le cordon d’alimentation
est correctement raccordé. Si le
problème persiste, mettez le moniteur
hors tension, puis remettez-le sous
tension après quelques minutes.
• Activez le commutateur d’alimentation
principal.
• Appuyez sur .
• Changez le signal d’entrée en
appuyant sur .
• Appuyez sur une touche du clavier ou
utilisez la souris.
• Vériez si l’ordinateur est sous tension.
•
Augmentez chaque valeur de réglage
dans [Luminosité], [Contraste] et [Gain].
•
Vériez si le réglage du signal de votre ordinateur
correspond aux paramètres de résolution et de
fréquence verticale du moniteur.
• Redémarrez l’ordinateur.
•
Sélectionnez un mode d’achage approprié à
l’aide de l’utilitaire de la carte vidéo. Consultez le
manuel de la carte vidéo pour plus d’informations.
fD : Fréquence de point (Aché
uniquement à l’entrée des signaux
numériques)
fH : Fréquence horizontale
fV : Fréquence verticale
• Le message illustré à gauche risque de
s’acher, étant donné que certains
ordinateurs n’émettent pas de signal dès
leur mise sous tension.
• Vériez si l’ordinateur est sous tension.
• Vériez que le câble de signal est
correctement branché.
• Changez le signal d’entrée en appuyant
sur .
Le voyant
Tension
ne
s’allume
pas.
Le voyant
Tension
s’allume
en bleu.
Ce message s’ache si aucun
signal n’est entré.
Exemple :
Le message indique que le signal
d’entrée est en dehors de la
bande de fréquence spéciée.
(Cette fréquence de signal
s’ache en rouge.)
Exemple :
Le voyant
Tension
s’allume
en
orange.
Problem: Kein Bild
Wird auch nach dem Durchführen der nachfolgend vorgeschlagenen Lösungen kein Bild angezeigt, wenden Sie sich an Ihren Fachhändler.
Problème de non-affichage d’images
Si aucune image ne s’affiche sur le moniteur même après avoir utilisé les solutions suivantes, contactez votre revendeur local.
问题
无图像
问题
• 检查电源线连接是否正确。如果问题
仍然存在、请关闭显示器电源、然后过
几分钟再重新打开显示器。
• 打开主电源开关。
• 按 。
• 使用 切换输入信号。
• 操作鼠标或键盘。
• 检查个人计算机的电源是否已打开。
• 将 [ 亮度 ]、[ 对比 ] 和 [ 增益 ] 中的
各调节值设定为较高级别。
• 检查个人计算机的信号设定是否与该显
示器的分辨率及垂直频率设定相匹配。
• 重新启动个人计算机。
• 使用图形卡实用程序软件选择适当的显
示模式。详细说明、请参阅图形卡使用手
册。
fD : 点时钟(仅当数字信号输入时显示)
fH : 水平频率
fV : 垂直频率
• 可能会出现左边所示的信息、因为某些
个人计算机不会在刚开启电源时即输出
信号。
• 检查个人计算机的电源是否已打开。
• 检查信号电缆是否连接正确。
• 使用 切换输入信号。
电源指示
灯不亮。
电源指示
灯亮蓝色。
该信息表示输入信号不在指定频
率范围之内。(该信号频率将以红
色显示。)
示例 :
电源指示
灯亮橙色。
无图片的问题
可能的原因和解决方法 可能的原因和解决方法
若已使用建议的修正方法后仍然无画面显示,请与您所在地的经销商联系。
当没有信号输入时、出现该信息。
示例 :
Die
Meldung
wird
angezeigt.
Le
message
s’ache.
出现信息。
• Prüfen Sie, ob das Netzkabel richtig
eingesteckt ist. Besteht das Problem
weiterhin, schalten Sie den Monitor aus
und nach wenigen Minuten wieder ein.
• Schalten Sie den Netzschalter ein.
• Drücken Sie .
1st Edition-October, 2012
00N0L775A1
(U.M-SUGSX2462W-CL-4)
-
 1
1
-
 2
2


Eizo SX2262W Installationsanleitung
- Kategorie
- Fernseher
- Typ
- Installationsanleitung
- Dieses Handbuch ist auch geeignet für
in anderen Sprachen
- English: Eizo SX2262W Installation guide
- français: Eizo SX2262W Guide d'installation
Verwandte Papiere
-
Eizo SX2262W Bedienungsanleitung
-
Eizo T1751 Bedienungsanleitung
-
Eizo S2242W Bedienungsanleitung
-
Eizo S2133 Installationsanleitung
-
-
-
Eizo FORIS FS2331 Bedienungsanleitung
-
-
Eizo FLEXSCAN S2243W Bedienungsanleitung
-