
quickstart guide
HS2
HS2 Blitzstart
HS2 – Prise en main
Guía de inicio rápido de HS2
Guida Veloce del HS2
HS2
HS2
HS2 퀵스타트 가이드
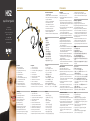
Descrizione dei Componenti
1. Capsula Microfonica
2. Asticella del Microfono in Acciaio Inossidabile
3. Ganci per le Orecchie in Silicone Ipoallergenico
4. Supporto dell’Asticella
5. Archetto per la Testa Regolabile
6. Ammortizzatore per il Cavo
7. Gancio Removibile per il Cavo
8. Cavo da 1,2m rinforzato in Kevlar
9. Uscita Microfono TRS 3,5mm
10. Ghiera di Fissaggio TRS Removibile
11. Filtro Anti Pop (Non illustrato)
12. Mini Schermo Anti Vento in Pelo (Non illustrato)
配件指南
1. 话筒极头
2. 不锈钢悬臂
3. 防过敏硅胶耳夹
4. 悬臂架
5. 可调节头带
6. 无应力线缆
7. 可拆卸线缆整理夹
8. 1.2m芳纶增强线缆
9. 3.5mmTRS话筒输出
10. 可拆卸TRS锁紧螺母
11. 泡沫防扑罩(未显示)
12. 迷你皮质防扑罩(未显示)
1. マイク・カプセル
2. ステンレス製ブームアーム
3. 低アレルギー性シリコーンイヤークリップ
4. ブームアームホルダー
5. 調整可能ヘッドバンド
6. ケーブル張力緩和
7. 取り外し可能ケーブルクリップ
8. 1.2m Kevlar強化ケーブル
9. 3.5mm TRS マイク出力
10. 取り外し可能 TRS 固定ナット
11. フォーム製ポップシールド(表示無し)
12. ミニファー・ウインドシールド(表示無し)
PARTS GUIDE
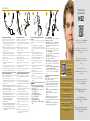
Fitting Guide
1. Position the HS2 behind your head.
2. Fit ear clips over your ears.
3. Adjust headband width at each side to ensure a
comfortable fi t.
4. Adjust placement of Microphone Capsule by
sliding Boom Arm forward or backward through
Boom Arm Holder. Optimum placement is close to,
but to the side of your mouth.
5. Ensure cable is held neatly in place by Removable
Cable Management Clip.
6. Run cable length and 3.5mm TRS connection to
your recording or belt-pack device.
7. Ensure cable and HS2 does not tug or pull when
moving your head naturally from side to side.
Anbringen des Mikros
1. Ordnen Sie das HS2 hinter dem Kopf an.
2. Bringen Sie die Ohrclips an den Ohren an.
3. Stellen Sie das Kopfband an beiden Seiten für
einen optimalen Sitz ein.
4. Ordnen Sie das Mikrofon in Mundnähe an, indem
Sie die Teleskopangel durch die Halterung vor-
oder zurückschieben. Das Mikrofon muss sich
seitlich des Mundes befi nden.
5. Arretieren Sie das Kabel mit der Kabelklemme.
6. Schließen Sie das Kabel und den 3,5mm-
Stecker (TRS) an das Aufnahmegerät oder den
Gürtelpacksender an.
7. Bewegen Sie den Kopf hin und her, um
sicherzustellen, dass das Kabel und das HS2 die
Bewegungen nicht einschränken.
Guide d’installation
1. Placez le HS2 derrière votre tête.
2. Glissez les tours d’oreille sur vos oreilles.
3. Réglez le serre-tête de part et d’autre pour assurer
une pose confortable.
4. Réglez la position de la capsule du micro en faisant
glisser le bras vers l’avant ou l’arrière dans la
fi xation du bras. La position optimale est proche de
la bouche mais sur le côté.
5. Vérifi ez que le câble est bien fi xé avec le guide-
câble amovible.
6. Amenez le câble et la fi che TRS 3,5mm jusqu’à
votre enregistreur ou boîtier ceinture.
7. Vérifi ez qu’il n’y a pas de traction sur le câble ou le
HS2 quand vous bougez la tête d’un côté à l’autre.
Instrucciones de colocación
1. Colócate el HS2 detrás de la cabeza.
2. Sitúa los clips encima de los oídos.
3. Ajusta la anchura de la diadema a cada lado de la
cabeza hasta conseguir un ajuste cómodo.
4. Ajusta la colocación de la cápsula del micrófono
deslizando el brazo articulado hacia delante o
hacia atrás mediante su soporte. La posición ideal
es cerca de la boca y a un lado.
5. Asegúrate de que el cable se encuentre bien
sujeto en su posición con el clip de sujeción
extraíble.
6. Pasa el cable y la conexión TRS de 3,5mm hacia el
FITTING GUIDE
dispositivo de grabación o de petaca.
7. Comprueba que el cable y el HS2 no queden
tensos al mover la cabeza de lado a lado y de una
forma natural.
Istruzioni per l’Applicazione
1. Mettete l’HS2 dietro la testa.
2. Appoggiate i ganci intorno alle orecchie.
3. Regolate la larghezza dell’archetto da entrambe le
parti per adattarlo alla vostra testa.
4. Regolate la posizione della Capsula Microfonica
facendo scorrere l’asticella avanti o indietro nel
suo Supporto. La posizione ottimale è quella più
ravvicinata possibile, ma lateralmente alla bocca.
5. Accertatevi che il cavo sia ben fi ssato al Gancetto
Removibile per il Cavo.
6. Collegate il connettore TRS da 3,5mm al vostro
dispositivo di registrazione o al trasmettitore.
7. Assicuratevi che il cavo e l’HS2 non tirino o si
strappino quando girate la testa da entrambi i lati.
安装指南
1. 将HS2放在您的头后面。
2. 将耳夹装在您的耳朵上。
3. 调整两侧头带宽度,以确保舒适。
4. 通过吊臂滑动架吊臂向前或向后调整话筒极头的位
置。 最佳位置靠近您的嘴的一侧。
5. 确保线缆在可拆卸线缆整理夹中整齐装好。
6. 将线缆通过3.5mmTRS接头与您的录音或腰包式设备
连接。
7. 确保您的头处于自然位置时线缆和HS2不会被拉扯或
向一边移。
1. 頭の後ろに HS2を充てます。
2. イヤークリップを耳に固定します。
3. 心地良いフィット感が得られるようにヘッドバンド
の幅を両側で調節します。
4. ブームアームホルダーに沿ってブームアームを前後
へスライドさせることでマイクカプセルの位置を調
節します。 最適な位置は口角に近い箇所です。
5. ケーブルが邪魔にならないように、取り外し可能な
ケーブルマネージメントクリップでケーブルをきち
んと固定します。
6. 3.5mm TRS ケーブルで録音装置またはベルトパッ
ク装置へ接続します。
7. 頭を自然に左右に動かしても、ケーブルと HS2 が
引っ張られることがないように調節します。
Parts Guide
1. Microphone Capsule
2. Stainless Steel Boom Arm
3. Hypoallergenic Silicone Ear Clip
4. Boom Arm Holder
5. Adjustable Headband
6. Cable Strain Relief
7. Removable Cable Management Clip
8. 1.2m Kevlar Reinforced Cable
9. 3.5mm TRS Mic Output
10. Removable TRS Locking Nut
11. Foam Pop Shield (Not shown)
12. Mini Fur Wind Shield (Not shown)
Vorstellung
1. Mikrofonkapsel
2. Teleskopangel aus Edelstahl
3. Hypoallergener Ohrclip
4. Halter für die Teleskopangel
5. Einstellbares Kopfband
6. Kabelzugentlastung
7. Entfernbarer Kabelclip
8. Mit Kevlar verstärktes 1,2m-Kabel
9. Mikrofonausgang (3,5mm, TRS)
10. Entfernbare TRS-Klemmschraube
11. Schaumgummi-Poppschutz (nicht gezeigt)
12. Kleiner Fellwindschutz (nicht gezeigt)
Description
1. Capsule de microphone
2. Bras en acier inoxydable
3. Tour d’oreille en silicone hypoallergénique
4. Fixation du bras
5. Serre-tête réglable
6. Protection anti-traction du câble
7. Guide-câble amovible
8. Câble renforcé en kevlar de 1.2m
9. Sortie micro TRS 3,5mm
10. Ecrou de blocage TRS amovible
11. Bonnette anti-pop en mousse (non illustrée)
12. Bonnette anti-vent en fourrure (non illustrée)
Lista de componentes
1. Cápsula del micrófono
2. Brazo articulado de acero inoxidable
3. Clip para el oído de silicona hipoalergénica
4. Soporte del brazo articulado
5. Diadema ajustable
6. Reductor de tensiones del cable
7. Clip de sujeción del cable extraíble
8. Cable reforzado con Kevlar de 1,2m
9. Salida de micrófono TRS de 3,5mm
10. Tuerca de fi jación TRS extraíble
11. Protector de espuma (no se muestra)
12. Mini protector peludo contra el viento (no se muestra)
8
9
10
1
2
3
4
5
6
7

Tun Sie Ihrem HS2 etwas Gutes. Registrieren Sie
es online, um die 5-Jahres-Garantie zu aktivieren.
Protégez votre HS2. Enregistrez-vous maintenant
pour bénéfi cier d’une garantie de 5 ans.
Protege tu HS2. Regístrate online para disfrutar
de 5 años de garantía.
Proteggete il vostro HS2. Registratevi ora online
per ottenere la garanzia di 5 anni.
保护您的 HS2。马上在线注册,获得 5 年保修。
Lavalierを保護してください。オンライン登録で
直ちに 5 年保証が得られます。
Protect Your HS2.
Register online
now for your 5-year
extended warranty.
warranty.rode.com/hs2
ブームアームは使用スタイルに合わせて HS2の右また
は左へ装着することが可能です。
1. 取り外す場合は、先ずヘッドバンドの幅を両側で
最短にすることでHS2をコンパクトにして、それ
からケーブルマネジメントクリップからケーブル
を外します。
2. A) ブームアームホルダーに沿ってブームアームを
前方へスライドさせます。 小さい長方形のストッ
パーが行き過ぎを防ぎます。
B) ブームアームをブームアームホルダーの最も後
部に位置する箇所で外します。
3. 外した後は、ブームアームをイヤークリップの上へ
持ち上げるようにして取り外します。
4. A) 取り付ける際は、ブームアームを上から下げる
ようにしてイヤークリップの内側へ合わせます。
B) ブームアームをブームアームホルダーの溝に合
わせて取り付けます。
5. 長方形のストッパーを最も前に位置する箇所に設置
し、最も後ろに位置する箇所で留めます。
6. ケーブルマネージメントクリップでケーブルを留
め、ブームアームとヘッドバンドを元の場所に戻
します。
1.
2. A)
B)
3.
4. A)
B)
5.
6.
Cambiare il Lato di Montaggio dell’Asticella del
Microfono
Per adattarsi al vostro stile di presentazione, l’Asticella
del Microfono può essere montata a destra o a sinistra
dell’HS2.
1. Per toglierla, prima di tutto rimpicciolite l’HS2
riducendo la dimensione dell’archetto da entrambi i
lati, poi staccate il cavo dal suo Gancio di Fissaggio
Removibile.
2. A) Fate scorrere l’Asticella del Microfono
estraendola dal suo Supporto. Un piccolo fermo
rettangolare eviterà che l’asticella fuoriesca.
B) Staccate l’Asticella del Microfono dal Supporto,
sganciandola nel punto più arretrato.
3. Una volta liberata, per rimuovere l’Asticella
sollevatela verso l’alto, sopra i Ganci per le
Orecchie.
4. A) Per rimetterla, infi late l’Asticella dall’alto dentro i
Ganci per le Orecchie.
B) Mettete l’Asticella nel solco del Supporto
dell’Asticella stessa.
5. Posizionate il fermo rettangolare nella parte
anteriore e poi portatelo ad agganciare nel punto
più arretrato.
6. Inserite il cavo nel suo Gancio di Fissaggio e
riportate l’Asticella e l’Archetto nella posizione
originale.
改变吊臂方向
吊臂可安装在HS2左或右侧,以满足您的表演风格。
1. 要拆除,首先缩短两侧的头戴然后从线缆整理夹中拆
除线,将HS2压小。
2. A) 将吊臂滑动架吊臂向前滑动。 吊臂上有个小矩形
挡片,以防您过度滑出。
B) 从末端将吊臂与吊臂架分离。
3. 松开后,抬起吊臂并将上面的耳夹拆除。
4. A) 从上方降低吊臂到耳夹内。
B) 将吊臂装入吊臂架轨道。
5. 最前点位置和最后点会有矩形挡片。
6. 将线缆夹入线缆整理夹,将吊臂和头带恢复到原来
的位置。
Changer l’orientation du bras
Le bras peut être monté du côté droit ou gauche du
HS2 selon votre style de présentation.
1. Pour le retirer, réduisez au minimum le serre-tête
du HS2 de part et d’autre et détachez le câble du
guide-câble.
2. A) Faites glisser le bras vers l’avant à travers sa
fi xation. Une petite butée rectangulaire vous
empêche d’aller trop loin.
B) Détachez le bras de la fi xation en libérant son
extrémité arrière.
3. Quand il est libéré, soulevez le bras au-dessus du
tour d’oreille pour le retirer.
4. A) Réinstallez le bras par le haut en passant par
l’intérieur du tour d’oreille.
B) Insérez le bras dans la rainure de la fi xation de
bras.
5. Placez la butée rectangulaire à l’extrémité avant et
clipsez l’arrière du bras.
6. Insérez le câble dans le guide-câble puis ajustez le
bras du micro et le serre-tête.
Cambiar la orientación del brazo articulado
El brazo articulado puede colocarse a la izquierda o
a la derecha del HS2 para adaptarse a tu estilo de
presentación.
1. Para retirarlo, primero deberás plegar el HS2
reduciendo al mínimo la anchura de la diadema a
cada lado de la cabeza y separando el cable de su
clip de sujeción.
2. A) Desliza el brazo articulado hacia delante
pasándolo a través de su soporte. Un pequeño tope
rectangular evita ir demasiado lejos.
B) Separa el brazo articulado de su soporte
desenganchándolo por el punto más alejado.
3. Una vez suelto, levanta el brazo articulado por
encima de los clips para los oídos y retíralo.
4. A) Para colocarlo, baja el brazo articulado desde
arriba y hacia el interior del clip para el oído.
B) Encaja el brazo articulado en la guía de su
soporte.
5. Coloca el tope rectangular en el punto más
avanzado y fíjalo en su posición en el punto más
alejado.
6. Engancha el cable en su clip de sujeción y vuelve
a colocar el brazo articulado y la diadema en sus
posiciones originales.
Changing Boom Arm Orientation
The Boom Arm can be mounted on either the left or
right of the HS2 to suit your presentation style.
1. To remove, fi rst compact the HS2 by minimising the
headband width at each side and detaching the
cable from the Cable Management Clip.
2. A) Slide the Boom Arm forwards through the Boom
Arm Holder. A small rectangle stopper will prevent
you from going too far.
B) Detach the Boom Arm from the Boom Arm
Holder by unclipping at the rearmost point.
3. When loose, lift the Boom Arm up and above the
Ear Clips to remove.
4. A) To fi t, lower the Boom Arm from above and
inside the Ear Clip.
B) Fit the Boom Arm into the Boom Arm
Holder track.
5. Position the rectangle stopper at the most forward
point, and clip into place at the rearmost point.
6. Clip cable into Cable Management Clip and return
the Boom Arm and Headband to original positions.
Ändern der Teleskopangelposition
Die Teleskopangel kann wahlweise an der rechten oder
linken Seite des HS2 angebracht werden.
1. Um sie zu entfernen, müssen Sie zuerst die
Kopfbandlänge an beiden Seiten des HS2 maximal
reduzieren und anschließend das Kabel aus der
Klemme ziehen.
2. A) Schieben Sie die Teleskopangel in die Halterung.
Der kleine rechteckige Stopper verhindert, dass
man die Gabel zu weit schiebt.
B) Lösen Sie die Teleskopangel von der Halterung,
indem Sie sie aus dem Clip ziehen.
3. Wenn die Teleskopangel locker sitzt, heben Sie sie
über die Ohrclips, um sie zu entfernen.
4. A) Um die Teleskopangel anzubringen, müssen Sie
sie von oben in den Ohrclip schieben.
B) Schieben Sie die Teleskopangel in die
Halterungsschiene.
5. Bringen Sie den rechteckigen Stopper so weit wie
möglich vorne an und clippen Sie ihn hinten fest.
6. Arretieren Sie das Kabel mit dem Kabelclip und
ordnen Sie die Teleskopangel und das Kopfband
wunschgemäß an.
USING THE HS2
Thank you for
purchasing the
HS2
Scan the QR code or visit rode.com/hs2
for more information on the HS2
Scannen Sie den QR-Code oder surfen Sie
zu rode.com/hs2 für weitere Informationen
über das HS2
Scannez le code QR ou rendez-vous sur
rode.com/hs2 pour plus d’informations
sur le HS2
Escanea el código QR o visita
rode.com/hs2 si deseas más información
acerca del HS2
Per maggiori informazioni riguardante
il HS2 scansionate il codice QR oppure
visitate il sito rode.com/hs2
扫描QR码或者访问 rode.com/hs2 了解
关于HS2 的更多信息
rode.com/hs2
HS2에 대한 더 자세한 정보를 알고 싶으시면
QR 코드를 스캔하시거나
rode.com/hs2
을 방문해 주십시오
31 2
A
A
4 5
B
B
6
-
 1
1
-
 2
2


Rode HS2 Benutzerhandbuch
- Typ
- Benutzerhandbuch
- Dieses Handbuch eignet sich auch für
in anderen Sprachen
- English: Rode HS2 User guide
- français: Rode HS2 Mode d'emploi
- español: Rode HS2 Guía del usuario
- italiano: Rode HS2 Guida utente
- 日本語: Rode HS2 ユーザーガイド
Verwandte Artikel
Andere Dokumente
-
SWITEL DF851 Bedienungsanleitung
-
iHealth Lina HS2 Benutzerhandbuch
-
 Olimpia Splendid OS-CEBCH36EI Installationsanleitung
-
AUDIOLINE Euro 282 Bedienungsanleitung
-
-
-
-
Kemper KHS-HS2 689 03 001 Installation and Operating Instruction
