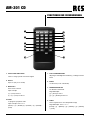
RCS AM-201CD Bedienungsanleitung
- Kategorie
- Zusätzliche Musikausrüstung
- Typ
- Bedienungsanleitung

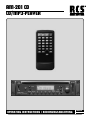
OPERATING INSTRUCTIONS / BEDIENUNGSANLEITUNG
AM-201 CD
CD/MP3-PLAYER
- ENGLISH
- DEUTSCH

AM-201 CD
2
Electromagnetic compatibility and low-voltage guidelines: RCS leaves all devices and products, which are subject to the CE guidelines by certified test laboratories test.
By the fact it is guaranteed that you may sell our devices in Germany and in the European Union domestic market without additional checks.
Elektromagnetische Verträglichkeit und Niederspannungsrichtlinien: RCS läßt alle Geräte und Produkte, die den CE-Richtlinien unterliegen durch zertifizierte Prüflabors
testen. Dadurch ist sichergestellt, dass Sie unsere Geräte in Deutschland und im EU-Binnenmarkt ohne zusätzliche Prüfungen verkaufen dürfen.
AUSPACKEN UND KONTROLLE DES PRODUKTS
Bitte überprüfen Sie das Gerät sofort auf evtl. Transport-
schäden. Jedes RCS Produkt wird vor dem Verpacken sorg-
fältig überprüft und in einem speziell dafür vorgesehenen
Karton geliefert.
Alle Transportschäden müssen sofort bei der Transport
-
firma reklamiert werden!
Rücksendung: Wenn es nötig sein sollte ein defektes Ge
-
rät zurückzusenden, nehmen Sie bitte Kontakt mit Ihrem
Händler auf. Bitte versenden sie alle Rücksendungen in der
Originalverpackung.
INSPECTION AND INVENTORY OF THE PRODUCT
Check unit carefully for damage which may have occurred
during transport. Each RCS product is carefully inspected
at the factory and packed in a special carton for safe
transport.
Notify the freight carrier immediately if you observe any
damage to the shipping carton or product!
Return: Repack the unit in the carton and await inspection
by the carrier’s claim agent. Notify your dealer of the pending
freight claim. Returning your unit for service or repairs.
Should your unit require service, contact your dealer.
CAUTION / ACHTUNG
CAUTION: TO REDUCE THE RISK OF ELECTRIC SHOCK DO NOT REMOVE
COVER (OR BACK) NO USER-SERVICEABLE PARTS INSIDE REFER SER
-
VICIING TO QUALIFIED PERSONNEL.
ACHTUNG: ZUR VERMEIDUNG VON STROMSCHLÄGEN GEHÄUSEAB
-
DECKUNG ODER RÜCKSEITE NICHT ENTFERNEN. KEINE VOM BENUT-
ZER WARTENDEN TEILE IM INNEREN. WARTUNG NUR DURCH QUALIFI-
ZIERTEM PERSONAL.
SAFETY INSTRUCTIONS
1. Heed all warnings.
2. Follow all instructions.
3. Do not use this apparatus near water.
4. Do not block any ventilation openings. Install in accor
-
dance with the manufacturer’s instructions.
5. Do not install near any heat sources.
6. Do not defeat the safety purpose of the polarized or
grounding-type plug. A polarized plug has two blades
with one wider than the other. A grounding type plug has
two blades and a third grounding prong. The wide
blade or the third prong are provided for your safety. If
the provided plug does not fit into your outlet, consult an
electrician for replacement of the obsolete outlet.
7. Protect the power cord from being walked on or pinched
particularly at plugs, convenience receptacles, and the
point where they exit from the apparatus.
8. Only use attachments/accessories specified by the ma
-
nufacturer.
SICHERHEITSHINWEISE
Vor Inbetriebnahme des Gerätes bitten wir Sie die Si-
cherheitshinweise aufmerksam zu lesen!
1. Setzen Sie das Gerät niemals Flüssigkeiten oder hoher
Feuchtigkeit aus.
2. Vermeiden Sie die Nähe zu Heizungen und anderen Hit-
zequellen.
3. Zur korrekten Bedienung des Gerätes, empfehlen wir zu
-
erst die Bedienungsanleitung zu lesen.
RCS AUDIO SYSTEME
Vielen Dank, dass Sie sich für ein RCS-Gerät entschieden
haben. Alle RCS-Systeme werden für höchste Ansprüche
entwickelt und hergestellt. Auch wenn der AM-200 CD leicht
zu bedienen ist, empfehlen wir Ihnen, dass Sie sich die Zeit
nehmen, diese Anleitung zu lesen um die wichtigsten Infor
-
mationen zu diesem Produkt bezüglich Einrichtung und Be-
trieb sicherzustellen.

AM-201 CD
3
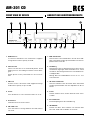
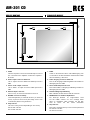
FRONT VIEW OF DEVICE ANSICHT DER GERÄTEVORDERSEITE
AUX
IN
A 4P O
9 J
2
5 7 8
3
8
6
LK M N
1. USB-Schnittstelle
Zum Anschluss eines USB-Gerätes, wie z.B. einen USB-
Stick. Unterstützt werden Speichermedien mit einer Ka
-
pazität von bis zu 16 GB.
2. CD-Einzug
Zum Einlegen einer CD. Bitte beachten Sie, dass die CD
automatisch eingezogen wird. Vermeiden Sie es, Druck
auszuüben, der Einzugmechanismus kann dadurch be
-
schädigt werden.
Wichtig: bitte nur handelsübliche CD`s im 12 cm -For
-
mat verwenden.
3. SD-Card Schnittstelle
Dient zur Aufnahme einer SD-/SDHC-Karte. Unterstützt
werden Speichermedien mit einer Kapazität von bis zu
16 GB.
4. Power
Drücken Sie diese Taste, um das Gerät ein- bzw. auszu
-
schalten.
5. IR-Schnittstelle
Infrarot-Empfänger für die Fernbedienung
6. SD/USB/CD
Drücken Sie diese Taste mehrfach, um zwischen dem
SD-Card-, USB- und CD-Modus zu wechseln.
1. USB Interface
To connect a USB device such a USB stick. It supports
storage devices with a capacity of 16 GB.
2. CD Collection
Please note that the CD is automatically drawn. Avoid
putting pressure, the feeding mechanism can be dama
-
ged.
Urgent: please use only commercial CD`s in 12 inch for
-
mat.
3. SD-Card
Used to receive a SD-/SDHC-Card. Supported storage
media with a capacity of up to 16 GB.
4. Power
Press the button on / off to switch the device on or off.
5. IR-Interface
Infrared receiver for remote control
6. SD / USB / CD
Press this button to change between SD-card, USB or
CD mode.

AM-201 CD
4
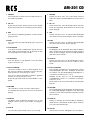
7. FOLDER
Press this button to switch to the next folder from the ac
-
tive medium (only MP3)
8. FB + F.F
By pressing the button FB the previous track is dialed.
By pressing the button F.F the following track is dialed
9. REV
Press this key to skip during playback of a title to the be
-
ginning of them.
10. F.WD
Press this button to jump while playing the song to the
next one
11. PLAY/PAUSE
If you press the PLAY / PAUSE button to play, where al
-
ready it will not automatically start. By pressing the but-
ton stops playback in the pause mode.
12. STOP/EJECT
Press this button to stop playback. Press this button
again to remove the CD.
13. PITCH CONTROL
This feature enables a faster or slower playback of the
title. Press the HI button repeatedly to increase the play
-
back speed in 2% increments (up to +20%).
Press the LO button repeatedly to retard the playback
speed in 2% increments (up to -20%).
By pressing the NOR mode, the PITCH-Modus is com
-
pleted.
14. VOLUME
This controller is used to control the output volume.
It is advisable that the volume control is on zero before
playing.
15. DISPLAY
The display show the different operations such as CD/
USB/SD, shuffle, repeat, track number and progress
bar.
16. AUX-IN
For connecting external audio sources (3.5 mm jack).
7. FOLDER
Drücken Sie diese Taste, um in den jeweils nächsten
Ordner des aktiven Speicher-Mediums zu wechseln (nur
MP3)
8. FB + F.F
Durch Drücken der Taste FB wird der jeweils vorherge
-
hende Titel angewählt, durch Drücken der Taste F.F der
jeweils folgende.
9. REV
Drücken Sie diese Taste, um während der Wiedergabe
eines Titels zurück an den Anfang des Titels zu springen.
10. F.WD
Drücken Sie diese Taste, um während der Wiedergabe
eines Titels zum nächsten Titel zu springen.
11. PLAY/PAUSE
Bei Betätigen der PLAY/PAUSE-Taste wird die Wieder
-
gabe, soweit bereits nicht automatisch erfolgt, gestartet.
Durch erneutes Betätigen der Taste stoppt die Wieder
-
gabe in den Pause-Modus.
12. STOP/EJ
Drücken Sie diese Taste, um die Wiedergabe zu been
-
den. Drücken Sie diese Taste erneut, um die CD auszu-
werfen.
13. PITCH-CONTROL
Diese Funktion ermöglicht eine schnellere bzw. verlang
-
samte Wiedergabe des Titels. Betätigen Sie die Taste
HI mehrfach, um die Wiedergabegeschwindigkeit in 2
%-Schritten zu erhöhen (max. + 20 %).
Betätigen Sie die Taste LO, um die Wiedergabege
-
schwindigkeit des Titels in 2 %-Schritten zu verlangsa-
men (max. -20 %).
Durch Drücken der Taste NOR wird der PITCH-Modus
beendet.
14. VOLUME
Dieser Regler dient der Regelung der Ausgangslautstär
-
ke. Vor Wiedergabebeginn empfiehlt es sich, den Regler
auf Null zu setzen und erst dann die Lautstärke nach Be
-
darf zu erhöhen.
15. DISPLAY
Display zur Anzeige der unterschiedlichen Betriebszu
-
stände wie z.B. CD/USB/SD, Shuffle, Repeat, Titelnum-
mer sowie Fortschrittsanzeige.
16. AUX-IN
Zum Anschluss externer Audioquellen (3.5 mm Klinke).

AM-201 CD
5
FUNKTIONEN DER FERNBEDIENUNG
A
4
9
J
C
G
H
E
F
K
L
M
B
1. PITCH LOW/NOR/HIGH
Abspielgeschwindigkeitsveränderung niedriger/normal/
höher
2. EJECT
CD-Auswurf (nur im CD-Modus)
3. ZiFFERNTASTEN 0-9
Zur direkten Titelanwahl.
Eingabebeispiel:
[3] + [Enter] für Titel 3
[1] + [2] + [ENTER] für Titel 12
4. PROG
Zum Programmieren einer Abspielreihenfolge
Eingabebeispiel: Titel 3 + 5 + 7
[PROG] + [3] + [ENTER] + [5] + [ENTER] + [7] + [ENTER]
+ [PLAY]
1. PITCH LOW/ NOR /HIGH
Click to change speed: low/normal /higher
2. EJECT
Eject CD (only in CD mode)
3. DIGITS 0-9
Direct track selection
Input example:
(3) + (enter) for title 3
(1) + (2) + (enter) for title 12
4. PROG
To program a playback order
Input example: Title 3+5+7
(PROG) + (3) + (ENTER) (5) + (ENTER) + (7) + (ENTER) +
(PLAY)

AM-201 CD
6
5. RAN
Zum Aktivieren der Zufallswiedergabe
Durch Drücken der Taste 7 oder 8 wird zusätzlich die
Scan-Funktion aktiviert, in der jeder Titel für einige Se
-
kunden angespielt wird.
6. REP
Bei Betätigen dieser Taste wechselt das Gerät in den
Wiederholungsmodus.
Beispiel:
Taste [REP] 1 x drücken: wiederholt alle Titel in allen Ord
-
nern
Taste [REP] 2 x drücken: wiederholt alle Titel des aktu
-
ellen Ordners (nur MP3-Modus)
Taste [REP] 3 x drücken: wiederholt nur den aktuellen Titel
7. FOLDER
Drücken Sie diese Taste [FOLDER], um zum nächsten
Ordner des Speichermediums zu wechseln.
8. Tasten 5 und 6
Betätigen Sie die Taste 5, um den schnellen Rücklauf zu
starten. Um diesen zu beenden, drücken Sie die Taste L2.
Betätigen Sie die Taste 6, um den schnellen Vorlauf zu
starten. Um diesen zu beenden, drücken Sie die Taste L2.
9. CD/USB/SD
Drücken Sie die Taste [CD/USB/SD] mehrmals, um zwi
-
schen den Modi CD, USB und SD-Card zu wählen.
10. A-B
Betätigen Sie diese Taste während der laufenden Wie
-
dergabe 1 x, um den Standpunkt der Ausschnittswieder-
holfunkion festzulegen. Durch ein zweites Betätigen der
Taste wird der Endpunkt festgelegt. Die Wiedergabe des
festgelegten Ausschnitts beginnt sofort.
11. Tasten 5 und 6
Drücken Sie die Tasten 7 oder 8, um den jeweils vor
-
herigen bzw. folgenden Titel anzuwählen
12. g
Drücken Sie die Taste g, um die Wiedergabelautstärke
auf 0 zu setzen. Durch erneutes Drücken der Taste wird der
Titel wieder in der Ursprungslautstärke wiedergegeben.
13. Enter-Taste
Bestätigungstaste für die Programm-Funktion (siehe
Punkt 4)
5. RAN
To activate the Radom Playback
By pressing the button 7 Or 8 in addition the scan
function is activated. Each track is played for a few se
-
conds
6. REP
When pressing this button the unit is in repeat mode.
Example:
Press 1 x: repeats all the tracks in all folders
Press 2 x: repeats all the tracks of current folder (only
MP3 mode)
Press 3 x: repeat only the current title
7. FOLDER
Press this button to change them to another folder on
the storage medium
8. Button 5 and 6.
Press the button 5 to start the quick response. To stop
this, press the button L2
Press the button 6 to start fast forward. To stop this,
press the button L2
9. CD/USB/SD
Press the button to switch between the modes
10. A-B
Press this button during the current playback 1x to de
-
termine the the position of the section of repeating. Press
this button again to fix the end point. The playback of the
specified section begins immediately.
11. Button 5 and 6
Press the button 7 or 8 to select the previous or follow
-
ing title
12. g
Press the button g to set the playback volume to 0.
Press it again to play the original volume.
13. Enter Button
Confirmation button for the program function (see point
4)

AM-201 CD
7
MODULE MONTAGE EINBAU DER MODULE
1. CON1
CON1 is the power connector and audio output. Connect
this connection to the amplifier / small center. Caption: +
B G OUT.
2. Audio output connector balanced
This is output connector balanced. Audio input level is
0dB.
3. Stereo audio output connector
This is audio L, R ouput connector. Audio input level is
0dB.
4. Antenna input connector
Fix accessory of antenna terminal and connect it.
5. ON/OFF selector for battery
The back-up battery is switched off when you leave the
factory to prevent unnecessary discharge. Please turn
on the battery before using the device.
6. Step Selector
This is the tuning selector depending on the country.
EU: EU ON / US OFF
US: US ON / EU OFF
1. CON1
CON1 ist der Stromanschluss und Audioausgang. Die
-
sen Anschluss mit dem Verstärker / Kleinzentrale verbin-
den. Beschriftung: +B G OUT.
2. Audio Ausgang Connector balanced
Dies ist die Ausgangsverbindung balanced und das Au
-
dioeingangslevel ist 0 dB.
3. Stereo Audio Output Connector
Dies ist die Audio L,R Ausgangsverbindung und das Au
-
dioeingangslevel ist 0 dB.
4. Antennen-Eingangsverbindung
Bitte schließen Sie die Antenne and das Gerät an.
5. ON/OFF Selector für Back-Up Batterie
Die Back-up Batterie ist ausgeschaltet wenn
Sie die Fabrik verlässt um eine unnötige Entla
-
dung zu verhindern. Bitte Schalten Sie die Bat-
terie an bevor Sie das Gerät verwenden.
6. Step Selector
Dies ist der Tuning-Selector je nach Land entsprechend.
EU: EU ON / US OFF
US: US ON / EU OFF
1
5
4
6
2 3
ON OFF
BAT SW
EU US

AM-201 CD
© Copyright by RCS AUDIO-SYSTEMS GmbH. Veröffentlichung und Vervielfältigung der enthaltenen Daten, auch auszugsweise, nur mit unserer Genehmigung.
RCS27.04.2020
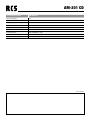
Technische Daten AM-200 CD
Stromversorgung 12 V
Stromaufnahme 240mA
Ausgangspegel 1V+-2 dB
Rausch- Signalabstand < 60 dB
Kanaltrennung < 50 dB
Klirrfaktor < 0,1 % (1 kHz)
Frequenzbereich 20Hz-20.000Hz (± 3 dB)
Abmessungen(BxHxT)
190x42x183 mm
Gewicht
923 g
-
 1
1
-
 2
2
-
 3
3
-
 4
4
-
 5
5
-
 6
6
-
 7
7
-
 8
8


RCS AM-201CD Bedienungsanleitung
- Kategorie
- Zusätzliche Musikausrüstung
- Typ
- Bedienungsanleitung
in anderen Sprachen
- English: RCS AM-201CD Owner's manual
Verwandte Artikel
-
RCS AM-200-SMM-05B Bedienungsanleitung
-
-
-
-
-
-
-
-
-