ZANKER GE66005 Benutzerhandbuch
- Kategorie
- Geschirrspüler
- Typ
- Benutzerhandbuch
Dieses Handbuch ist auch geeignet für

User manual
Dishwasher
Benutzer-
information
Geschirrspüler
GE 66005

Contents
Safety information _ _ _ _ _ _ _ _ _ _ _ _ _ _ _ _ _ 2
Control panel _ _ _ _ _ _ _ _ _ _ _ _ _ _ _ _ _ _ _ _ 4
Washing programmes _ _ _ _ _ _ _ _ _ _ _ _ _ _ _ 5
Use of the appliance _ _ _ _ _ _ _ _ _ _ _ _ _ _ _ _ 6
Setting the water softener _ _ _ _ _ _ _ _ _ _ _ _ _ 6
Use of dishwasher salt _ _ _ _ _ _ _ _ _ _ _ _ _ _ _ 7
Use of detergent and rinse aid _ _ _ _ _ _ _ _ _ _ _ 8
Loading cutlery and dishes _ _ _ _ _ _ _ _ _ _ _ _ 9
Setting and starting a washing programme _ _ _ 10
Care and cleaning _ _ _ _ _ _ _ _ _ _ _ _ _ _ _ _ 11
What to do if… _ _ _ _ _ _ _ _ _ _ _ _ _ _ _ _ _ _ 12
Technical data _ _ _ _ _ _ _ _ _ _ _ _ _ _ _ _ _ _ 14
Environment concerns _ _ _ _ _ _ _ _ _ _ _ _ _ _ 15
Installation _ _ _ _ _ _ _ _ _ _ _ _ _ _ _ _ _ _ _ _ 15
Subject to change without notice
Safety information
Before the installation and use, read this manual care-
fully:
• For your personal safety and the safety of your prop-
erty.
• For the respect of the environment,
• For the correct operation of the appliance.
Always keep these instructions with the appliance also
if you move or sell it.
The manufacturer is not responsible if an incorrect in-
stallation and use causes damage.
Children and vulnerable persons safety
• Do not let persons, children included, with reduced
physical sensory, reduced mental functions or lack
of experience and knowledge use the appliance.
They must have supervision or instruction for the
operation of the appliance by a person who is re-
sponsible for their safety.
• Keep all packaging away from children. There is the
risk of suffocation or physical injury.
• Keep all detergents in a safe area. Do not let the
children touch the detergents.
• Keep children and small animals away from the ap-
pliance when the door is open.
General safety
• Do not change the specifications of this appliance.
There is the risk of injury and damage to the appli-
ance.
• Obey the safety instructions from the manufacturer
of the dishwasher detergent to prevent burns to
eyes, mouth and throat.
• Do not drink the water from the appliance. Detergent
residue can stay in your appliance.
• Always close the door after you load or unload the
appliance to prevent injury and to prevent someone
falling on an open door.
• Do not sit or stand on the open door.
Use
• The appliance is only for domestic use. Do not use
the appliance for commercial and industrial use or
for other uses.
• Do not use the appliance for uses other than that for
which it made. You will prevent physical injury to
persons or prevent damage to property.
• Only use the appliance to clean household utensils
that are applicable for dishwashers.
• Do not put flammable products or items that are wet
with flammable products in, near or on the appliance.
Risk of explosion or fire.
• Put the knives and all items with sharp points in the
cutlery basket with their points down. If not, put in a
horizontal position in the upper basket or in the knife
basket. (Not all models have the knife basket).
• Use only specified products for dishwashers (deter-
gent, salt, rinse aid).
• Types of salt that are not specified for dishwashers
can cause damage to the water softener.
• Fill the appliance with salt before you start a washing
programme. The grains of salt and salty water can
cause corrosion or make a hole in the bottom of the
appliance.
• Do not fill the rinse aid dispenser with products other
than rinse aid, (e.g. dishwasher cleaning agent, liq-
uid detergent). This can cause damage to the ap-
pliance.
2

• Make sure that the spray arms can move freely be-
fore you start a washing programme.
• If you open the door while the appliance is in oper-
ation, hot steam can escape. There is a risk of skin
burns.
• Do not remove the dishes from the appliance before
the end of the washing programme.
Care and cleaning
• Before maintenance, switch off the appliance and
disconnect the mains plug from the mains socket.
• Do not use flammable products or products that can
cause corrosion.
• Do not use the appliance without the filters. Make
sure that the installation of the filters is correct. An
incorrect installation causes unsatisfactory washing
results and damage to the appliance.
• Do not use spray water or steam to clean the appli-
ance. Risk of electrocution and damage to the ap-
pliance.
Installation
• Make sure that the appliance has not suffered any
damage while in transport. Do not connect a dam-
aged appliance. If necessary, contact the supplier.
• Remove all packaging before first use.
• Only a qualified person must do the electrical and
the plumbing installation, the set up and the main-
tenance of the appliance. This to prevent the risks
of structural damage or physical injury.
• Make sure that the mains plug is disconnected from
the mains socket during installation.
• Do not drill into the sides of the appliance to prevent
damage to hydraulic components and electrical
components.
Frost precautions
• Do not install the appliance where the temperature
is below 0°C.
• The manufacturer is not responsible for frost dam-
age.
Water connection
• Use new hoses to connect the appliance to the water
supply. Do not use used hoses.
• Do not connect the appliance to new pipes or pipes
not used for a long time. Let the water flow for some
minutes, then connect the inlet hose.
• Make sure not to squash or cause damage to the
water hoses when you install the appliance.
• Make sure that the water couplings are tight to pre-
vent a water leakage.
• The first time you use the appliance, make sure that
the hoses do not have water leaks.
• The water inlet hose is double-walled and has an
inner mains cable and a safety valve. The water inlet
hose is under pressure only when the water flows.
If there is a leak in the water inlet hose, the safety
valve interrupts the running water.
– Be careful when you connect the water inlet hose:
– Do not put the water inlet hose or the safety
valve in water.
– If the water inlet hose or the safety valve are
damaged, immediately disconnect the mains
plug from the mains socket.
– Contact the service centre to replace the water
inlet hose with safety valve.
Warning! Dangerous voltage.
Electrical connection
• The appliance must be earthed.
• Make sure that the electrical data on the rating plate
agree with your domestic power supply.
• Always use a correctly installed shockproof socket.
• Do not use multi-way plugs, connectors and exten-
sion cables. There is a risk of fire.
• Do not replace or change the mains cable. Contact
the service centre.
• Make sure not to squash or cause damage to the
mains plug and cable behind the appliance.
• Make sure that the mains plug is accessible after the
installation.
• Do not pull the mains cable to disconnect the appli-
ance. Always pull the mains plug.
3

Service centre
• Only an approved engineer can repair or work on
the appliance. Contact the service centre.
• Use only original spare parts.
Disposal of the appliance
• To prevent the risk of physical injury or damage:
– Disconnect the mains plug from the mains socket.
– Cut off the mains cable and discard it.
– Discard the door catch. This prevents children or
small animals from being closed inside of the ap-
pliance. There is a risk of suffocation.
Warning! The dishwasher detergents are
dangerous and can cause corrosion !
• If an accident occurs with these detergents, contact
immediately your regional poisons centre and a doc-
tor.
• If the detergent gets into the mouth, contact imme-
diately your regional poisons centre and a doctor.
• If the detergent gets into the eyes, contact immedi-
ately a doctor and wet the eyes with water.
• Keep dishwasher detergents in a safe area and out
of children touch.
• Do not keep the appliance door open when there is
detergent in the detergent dispenser.
• Fill the detergent dispenser only before you start a
washing programme.
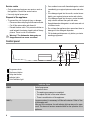
Control panel
5
1 Programme knob
2 Start/cancel button
3 Delay start button
4 Indicator lights
5 On/off indicator light
Indicator lights
ENDE
End-of-programme.
It comes on when:
• The washing programme is completed.
• You adjust the level of the water softener.
• There is a malfunction of the appliance.
SALZ
1)
It comes on when it is necessary to fill the salt container. Refer to 'Use
of dishwasher salt'.
After you fill the container, the salt indicator light can stay on for some
hours. This does not have an unwanted effect on the operation of the
appliance.
4

Indicator lights
KLARSPÜLER
1)
It comes on when it is necessary to fill the rinse aid dispenser. Refer
to 'Use of detergent and rinse aid'.
1) When the salt and/or rinse aid containers are empty, the related indicator lights do not come on while a washing programme
operates.
Delay start button
Use this button to delay the start of the washing pro-
gramme with an interval of 3 hours. Refer to 'Select and
start a washing programme'.
Programme knob and on/off indicator light
To switch on the appliance and select a washing
programme:
• Turn the programme knob clockwise or counter-
clockwise. The programme marker on the pro-
gramme knob must agree with one of the washing
programmes on the control panel.
• The on/off indicator light comes on.
To switch off the appliance:
– Turn the programme knob clockwise or counter-
clockwise until the programme marker agrees with
the on/off indicator light.
– The on/off indicator light goes off.
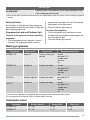
Washing programmes
Programme Degree of soil Type of load Programme description
INTENSIV 70° Heavy soil Crockery, cutlery, pots
and pans
Prewash
Main wash 70 °C
2 middle rinses
Last rinse
Dry
NORMAL 65° Normal soil Crockery and cutlery Prewash
Main wash 65 °C
2 middle rinses
Last rinse
Dry
EILT 60°
1)
Normal or light soil Crockery and cutlery Main wash 60 °C
Rinse
BIO 50°
2)
Normal soil Crockery and cutlery Prewash
Main wash 50 °C
1 middle rinse
Last rinse
Dry
1) When you have a light load, this programme gives a timesaving solution with perfect washing results.
2) Test programme for test institutes. Refer to supplied leaflet for test data.
Consumption values
Programme Duration (minute) Energy (kWh) Water (litre)
INTENSIV 70° 120 - 130 1,8 - 2,0 22 - 24
NORMAL 65° 105 - 115 1,5 - 1,7 23 - 25
5

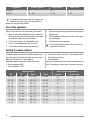
Programme Duration (minute) Energy (kWh) Water (litre)
EILT 60° 30 0,9 9
BIO 50° 130 - 140 1,0 - 1,2 14 - 16
The pressure and temperature of the water, the
variations of power supply and the quantity of
dishes can change these values.
Use of the appliance
Refer to the instructions for each step of procedure:
1. Make a check if the adjustment of the water soft-
ener agrees with the water hardness in your area.
If necessary, adjust the water softener.
2. Fill the salt container with dishwasher salt.
3. Fill the rinse aid dispenser with rinse aid.
4. Load cutlery and dishes into the appliance.
5. Set the correct washing programme for the type of
load and soil.
6. Fill the detergent dispenser with the correct quan-
tity of detergent.
7. Start the washing programme.
If you use detergent tablets, refer to 'Use of de-
tergent and rinse aid'.
Setting the water softener
The water softener removes minerals and salts from
the water supply. Minerals and salts can have a bad
effect on the operation of the appliance.
Equivalent scales measure the water hardness:
• German degrees (dH°).
• French degrees (°TH).
• mmol/l (millimol for each litre - international unit for
the hardness of water).
• Clarke degrees.
Adjust the water softener to the water hardness in your
area. If necessary, contact your local water authority.
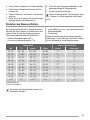
Water hardness Water hardness adjustment
°dH °TH mmol/l Clarke manually electronically
51 - 70 91 - 125 9,1 - 12,5 64 - 88
2
1)
10
43 - 50 76 - 90 7,6 - 9,0 53 - 63
2
1)
9
37 - 42 65 - 75 6,5 - 7,5 46 - 52
2
1)
8
29 - 36 51 - 64 5,1 - 6,4 36 - 45
2
1)
7
23 - 28 40 - 50 4,0 - 5,0 28 - 35
2
1)
6
19 - 22 33 - 39 3,3 - 3,9 23 - 27
2
1)
5
1)
15 - 18 26 - 32 2,6 - 3,2 18 - 22 1 4
11 - 14 19 - 25 1,9 - 2,5 13 - 17 1 3
4 - 10 7 - 18 0,7 - 1,8 5 - 12 1 2
6

Water hardness Water hardness adjustment
°dH °TH mmol/l Clarke manually electronically
< 4 < 7 < 0,7 < 5
1
2)
1
2)
1) Factory position.
2) No use of salt is necessary.
You must adjust the water softener manually and
electronically.
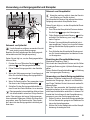
Manual adjustment
1
2
Turn the water hardness
dial to the position 1 or 2
(refer to the chart).
Electronic adjustment
1. Press and hold the start/cancel button.
2. Turn the programme knob clockwise until the pro-
gramme marker agrees with the first available
washing programme on the control panel.
3. Release the start/cancel button when the on/off
and the start/cancel indicator lights start to flash.
4. At the same time, the end-of-programme indicator
light starts to flash. The number of flashes shows
the current adjustment.
Example: 5 flashes / pause / 5 flashes = level 5.
5. Press the start/cancel button to change the adjust-
ment. Each time you press the start/cancel button,
the adjustment goes to the subsequent level.
6. Switch off the appliance to keep the operation.
If the water softener is set electronically to the
level 1, the salt indicator light stays off.
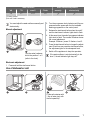
Use of dishwasher salt
1 2
3
Fill the salt container with
1 litre of water (only with
the first operation).
4
7

5
6
It is correct that water comes out from the salt
container when you fill it with salt.
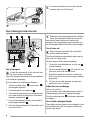
Use of detergent and rinse aid
2
0
0
3
1
2
3
4
-
+
M
A
x
1
2
3
4
5
6
7
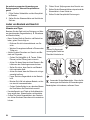
Use of detergent
To help the environment, do not use more than
the correct quantity of detergent.
Follow the detergent manufacturer recommendations
on the detergent packaging.
Do these steps to fill the detergent dispenser:
1.
Press the release button
2
to open the lid
7
of
the detergent dispenser.
2.
Put the detergent in the dispenser
1
.
3. If the washing programme has a prewash phase,
put a small quantity of detergent in the prewash
detergent compartment
3
.
4. If you use the detergent tablets, put the tablet in
the detergent dispenser
1
.
5. Close the detergent dispenser. Press the lid until it
locks into position.
Different brands of detergent dissolve in different
times. Some detergent tablets do not have the
best cleaning results during short washing pro-
grammes. Use long washing programmes when you
use the detergent tablets to fully remove the detergent.
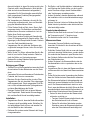
Use of rinse aid
Rinse aid makes it possible to dry the dishes
without streaks and stains.
The rinse aid dispenser automatically adds rinse aid
during the last rinsing phase.
Do these steps to fill the rinse aid dispenser:
1.
To open the rinse aid dispenser, turn the cap
4
counterclockwise
2.
Fill the rinse aid dispenser
5
with rinse aid. The
mark 'max' shows the maximum level.
3. Remove the spilled rinse aid with an absorbent
cloth to prevent too much foam during the washing
programme.
4. To close the rinse aid dispenser, put the cap in
position and turn it clockwise.
Adjust the rinse aid dosage
Factory set: position 3.
You can set the rinse aid dosage between position 1
(lowest dosage) and position 4 (highest dosage).
Turn the rinse aid selector
6
to increase or decrease
the dosage.
Use of combi detergent tablets
These tablets contain agents such as detergent, rinse
aid and dishwasher salt. Some types of tablets can
contain other agents.
8

When you use tablets, that contain special salt and
rinse aid, it is not necessary to fill the salt and rinse aid
containers. In this condition the rinse aid indicator light
stays on when the appliance is switched on.
1. Do a check if these tablets are applicable for the
local water hardness. Refer to the instructions from
the manufacturer.
2. Select the lowest setting for the water hardness
and rinse aid dosage.
To go back and use separately detergent, salt and
rinse aid
1. Fill the salt container and rinse aid dispenser.
2. Adjust the water hardness setting to the highest
level.
3. Do a washing programme without dishes.
4. Adjust the water softener to the water hardness in
your area.
5. Adjust the rinse aid dosage.
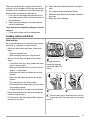
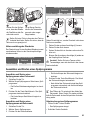
Loading cutlery and dishes
Hints and tips
Do not use the appliance to clean objects that can ab-
sorb water (e.g. sponges, household cloths).
• Before you load cutlery and dishes, follow these
steps:
– Remove remaining food.
– Make remaining burnt food in the pans soft.
• While you load cutlery and dishes, follow these
steps:
– Load hollow items (e.g. cups, glasses and pans)
with the opening down.
– Make sure that water does not collect in the con-
tainer or in a deep base.
– Make sure that cutlery and dishes do not bond
together.
– Make sure that the glasses do not touch other
glasses.
– Put small objects in the cutlery basket.
– Mix the spoons with other cutlery to prevent them
from bonding together.
– Arrange the items to let water touch all surfaces.
• Plastic items and pans with non-stick coatings can
retain the water droplets.
• Put light items in the upper basket. Make sure that
the items do not move.
1
Arrange the service
dishes and large lids
around the edge of the
basket.
2
1
2
Use the cutlery grid. If the dimensions of the cut-
lery prevent use of the cutlery grid, you can easily
remove it.
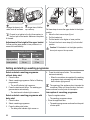
9

1
Arrange the items to let
water touch all surfaces.
2
For longer items, fold the
cup racks up.
Prevent to put plates in the first three sectors in
the front part of the basket. Make sure the plates
tilt forward.
Adjustment of the height of the upper basket
You can put the upper basket in two positions to in-
crease the load flexibility.
Maximum height of the dishes in :
the upper bas-
ket
the lower bas-
ket
Higher position 20 cm 31 cm
Lower position 24 cm 27 cm
1
2
Do these steps to move the upper basket to the higher
position:
1. Move the front runner stops (A) out.
2. Pull the basket out.
3. Put the basket in the higher or lower position.
4. Put back the front runner stops (A) in their initial
position.
Caution! If the basket is in the higher position,
do not put cups on the cup racks.
Setting and starting a washing programme
Select and start a washing programme
without delay start
1. Close the door.
2. Select a washing programme. Refer to 'Washing
programmes'.
– The on/off indicator light comes on.
3. Press the start/cancel button. The washing pro-
gramme starts automatically.
– The start/cancel indicator light comes on.
Select and start a washing programme with
delay start
1. Close the door.
2. Select a washing programme.
3. Press the delay start button.
– The delay start indicator light comes on.
4. Press the start/cancel button. The countdown
starts automatically.
– When the countdown is completed, the washing
programme starts automatically and the delay
start indicator light goes off.
The opening of the appliance door interrupts the
countdown. When you close the door, the count-
down continues from the point of interruption.
Interruption of a washing programme
• Open the appliance door.
– The washing programme stops.
• Close the appliance door.
– The washing programme continues from the point
of interruption.
10

How to cancel a washing programme or a
delay start
If a washing programme or a delay start has not
started, you can change the selection.
When a washing programme or a delay start are in
progress, it is not possible to change the selection. It is
necessary to cancel the washing programme or the
delay start to make a new selection.
How to cancel a washing programme
1. Press and hold the start/cancel button until the
start/cancel indicator light goes off.
2. Make sure that there is detergent in the detergent
dispenser before you start a new washing pro-
gramme.
How to cancel a delay start
1. Press and hold the start/cancel button until the
start/cancel and the delay start indicator lights go
off.
2. Press the start/cancel button to start the washing
programme.
At the end of the washing programme
• The appliance stops automatically.
• The end-of-programme indicator light is on.
1. Switch off the appliance.
2. Open the appliance door.
3. For better drying results, keep the door ajar for
some minutes.
Remove the load
• Let the dishes become cold before you remove them
from the appliance. Hot dishes are easily damaged.
• First remove the items from the lower basket, then
from the upper basket.
• There can be water on the sides and door of the
appliance. Stainless steel becomes cool more quick-
ly than the dishes.
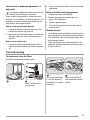
Care and cleaning
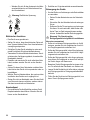
To remove and clean the filters
Dirty filters decrease the washing results.
1
2
Clean the filters below
running water.
3
To remove filters B and
C, turn the handle ap-
proximately 1/4 counter-
clockwise .
4
Remove the flat filter A
from the bottom of the ap-
pliance.
11

5
Put the flat filter A in the
bottom of the appliance.
Install the flat filter cor-
rectly under the two
guides D.
6
Put the filter system in po-
sition. To lock the filter
system, turn the handle
clockwise until it locks in
position.
To clean the spray arms
Do not remove the spray arms.
If the holes in the spray arms become clogged, remove
remaining parts of soil with a cocktail stick.
To clean the external surfaces
Clean the external surfaces of the appliance and con-
trol panel with a damp soft cloth. Only use neutral de-
tergents. Do not use abrasive products, scouring pads
or solvents (e.g. acetone).
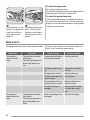
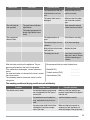
What to do if…
The appliance does not start or stops during operation. First try to find a solution to the problem (refer to the
chart). If not, contact the service centre.
Malfunction Fault code Possible cause Possible solution
The appliance
does not fill with
water.
• The start/cancel indicator
light flashes.
• The end-of-programme in-
dicator light flashes one
time.
The water tap is blocked or
is furred with limescale.
Clean the water tap.
The water pressure is too
low.
Contact your local water
authority.
The water tap is closed. Open the water tap.
The filter in the water inlet
hose is blocked.
Clean the filter.
The connection of the wa-
ter inlet hose is not correct.
Make sure that the con-
nection is correct.
The water inlet hose is
damaged.
Make sure that the water
inlet hose has no dam-
ages.
The appliance
does not drain the
water.
• The start/cancel indicator
light flashes. .
• The end-of-programme in-
dicator light flashes two
times.
There is a blockage in the
sink spigot.
Clean the sink spigot.
12

Malfunction Fault code Possible cause Possible solution
The connection of the wa-
ter drain hose is not cor-
rect.
Make sure that the con-
nection is correct.
The water drain hose is
damaged.
Make sure that the water
drain hose has no dam-
ages.
The anti-flood de-
vice operates.
• The start/cancel indicator
light flashes.
• The end-of-programme in-
dicator light flashes three
times.
Close the water tap and
contact the service centre.
The programme
does not start.
The appliance door is
open.
Close the door correctly.
The mains plug is not con-
nected in.
Put in the mains plug.
Blow out fuse in the house-
hold fuse box.
Replace the fuse.
The delay start is set. If you want to cancel the
delay start, refer to 'Select
and start a washing pro-
gramme'.
After the check, switch on the appliance. The pro-
gramme continues from the point of interruption.
If the malfunction shows again, contact the service
centre.
For other fault codes, not showed in the chart, contact
the service centre.
The necessary data for the service centre is on the
rating plate.
We recommend that you write the data here:
Model (MOD.) ....................
Product number (PNC) ....................
Serial number (S.N.) ....................
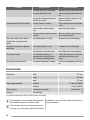
The washing results and drying results are not satisfactory
Problem Possible cause Possible solution
The dishes are not clean. The selected washing programme
was not applicable for the type of
load and soil.
Make sure that the washing pro-
gramme is applicable for the type of
load and soil.
The baskets were not loaded cor-
rectly, water did not touch all sur-
faces.
Load the baskets correctly.
The spray arms could not turn free-
ly because of incorrect arrange-
ment of the load.
Make sure that an incorrect ar-
rangement of the load does not
cause a blockage of the spray arms.
13

Problem Possible cause Possible solution
The filters are dirty or not assem-
bled and installed correctly.
Make sure that the filters are clean
and correctly assembled and instal-
led.
The quantity of detergent was not
sufficient or missing.
Make sure that the quantity of de-
tergent is sufficient.
Limescale particles on the dishes. The salt container is empty. Fill the salt container with dishwash-
er salt.
Incorrect water softener adjust-
ment
Adjust the water softener.
The salt container cap is not closed
correctly.
Make sure that the salt container
cap is closed correctly.
There are streaks, milky stains, or
a bluish layer on glasses and
dishes.
Rinse aid dosage is too high. Decrease the rinse aid dosage.
Dry water drop stains on glasses
and dishes.
Rinse aid dosage is too low. Increase the rinse aid dosage.
The detergent can be the cause. Use a different brand of detergent.
The dishes are wet. You have set a washing pro-
gramme without drying phase or
with a decreased drying phase.
Let the door stay ajar for some mi-
nutes before you remove the
dishes.
The dishes are wet and dull. The rinse aid dispenser is empty. Fill the rinse aid dispenser with rinse
aid.
Technical data
Dimensions Width 600 mm
Height 850 mm
Depth 610 mm
Water supply pressure Minimum 0,5 bar (0,05 MPa)
Maximum 8 bar (0,8 MPa)
Water supply
1)
Cold water or hot water maximum 60 °C
Capacity Place settings 12
1) Connect the water inlet hose to a water tap with a 3/4'' thread.
The rating plate on the inner edge of the appliance
door shows the electrical connection data.
If the hot water comes from alternative sources
of energy, (e.g. solar panels, photovoltaic panels
and aeolian), use a hot water supply to decrease en-
ergy consumption.
14

Environment concerns
The symbol on the product or on its packaging
indicates that this product may not be treated as
household waste. Instead it should be taken to the
appropriate collection point for the recycling of
electrical and electronic equipment. By ensuring this
product is disposed of correctly, you will help prevent
potential negative consequences for the environment
and human health, which could otherwise be caused
by inappropriate waste handling of this product. For
more detailed information about recycling of this
product, please contact your local council, your
household waste disposal service or the shop where
you purchased the product.
Recycle the materials with the symbol
. Put the
packaging in applicable containers to recycle it.
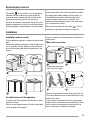
Installation
Installation under a counter
Put the appliance adjacent to a water tap and a water
drain.
Remove the appliance worktop to install it under a sink
unit or a kitchen worktop. Make sure that the dimen-
sions of the recess agree with the dimensions in the
picture.
1
2
3
4
To adjust the level of the appliance
A correct level of the appliance lets the door to close
and seal correctly.
With an incorrect appliance level, the door does catch-
es on the sides of the cabinet.
Loosen or tighten the adjustable feet to make the ap-
pliance level.
Water drain connection
1
Connect the water drain
hose to the sink spigot.
max 85 cm
min 40 cm
max 400 cm
2
3
4
The drain hose extension must not be longer than 2 m.
The internal diameter must not be smaller than the di-
ameter of the hose.
If you connect the water drain hose to a trap spigot
under the sink, remove the plastic membrane (A). If you
do not remove the membrane, remaining food can
cause a blockage in the drain hose spigot
15

Inhalt
Sicherheitshinweise _ _ _ _ _ _ _ _ _ _ _ _ _ _ _ 16
Bedienblende _ _ _ _ _ _ _ _ _ _ _ _ _ _ _ _ _ _ _ 19
Spülprogramme _ _ _ _ _ _ _ _ _ _ _ _ _ _ _ _ _ 20
Gebrauch des Gerätes _ _ _ _ _ _ _ _ _ _ _ _ _ _ 20
Einstellen des Wasserenthärters _ _ _ _ _ _ _ _ _ 21
Gebrauch von Salz für Geschirrspüler _ _ _ _ _ _ 22
Verwendung von Reinigungsmittel und
Klarspüler _ _ _ _ _ _ _ _ _ _ _ _ _ _ _ _ _ _ _ _ _ 23
Laden von Besteck und Geschirr _ _ _ _ _ _ _ _ _ 24
Auswählen und Starten eines
Spülprogramms _ _ _ _ _ _ _ _ _ _ _ _ _ _ _ _ _ _ 25
Reinigung und Pflege _ _ _ _ _ _ _ _ _ _ _ _ _ _ _ 26
Was tun, wenn … _ _ _ _ _ _ _ _ _ _ _ _ _ _ _ _ _ 27
Technische Daten _ _ _ _ _ _ _ _ _ _ _ _ _ _ _ _ 29
Umwelttipps _ _ _ _ _ _ _ _ _ _ _ _ _ _ _ _ _ _ _ 30
Montage _ _ _ _ _ _ _ _ _ _ _ _ _ _ _ _ _ _ _ _ _ 30
Garantiebedingungen / Kundendienst _ _ _ _ _ _ 31
Änderungen vorbehalten
Sicherheitshinweise
Lesen Sie vor der Installation und Anwendung sorgfäl-
tig dieses Handbuch:
• Für Ihre persönliche Sicherheit und die Sicherheit
Ihres Eigentums.
• Für die Achtung der der Umwelt.
• Für die korrekte Bedienung des Geräts.
Bewahren Sie diese Bedienungsanleitung in der Nähe
des Geräts auf, auch wenn Sie dieses anderswo auf-
stellen oder verkaufen.
Der Hersteller ist nicht dafür verantwortlich, wenn eine
inkorrekte Installation und Verwendung Schäden ver-
ursacht.
Sicherheit von Kindern und
schutzbedürftigen Personen
• Lassen Sie keine Personen (einschließlich Kinder)
mit eingeschränkten physischen, sensorischen oder
geistigen Fähigkeiten oder fehlenden Erfahrungen
und Kenntnissen dieses Gerät benutzen. Solche
Personen müssen von einer Person beaufsichtigt
oder bei der Bedienung des Geräts angeleitet wer-
den, die für ihre Sicherheit verantwortlich ist.
• Halten Sie das Verpackungsmaterial von Kindern
fern. Andernfalls besteht Erstickungs- oder Verlet-
zungsgefahr.
• Bewahren Sie alle Reinigungsmittel an einem si-
cheren Ort auf. Reinigungsmittel dürfen nicht in die
Hände von Kindern gelangen.
• Halten Sie Kinder und kleine Tiere vom geöffneten
Gerät fern.
Allgemeine Sicherheitshinweise
• Nehmen Sie keine technischen Änderungen am Ge-
rät vor. Hierdurch besteht Verletzungsgefahr und
das Gerät kann beschädigt werden.
• Beachten Sie die Sicherheitsanweisungen des Rei-
nigungsmittelherstellers, um Verätzungen an Au-
gen, Mund oder im Hals zu vermeiden.
• Trinken Sie kein Wasser aus dem Geschirrspüler.
Es können Reinigungsmittelrückstände im Gerät zu-
rückbleiben.
• Schließen Sie nach dem Beladen oder Entladen des
Gerätes stets die Tür, um Verletzungen oder das
Stolpern über die offene Tür zu vermeiden.
• Setzen oder stellen Sie sich nie auf die offene Tür.
Verwendung
• Dieses Gerät ist nur zur Verwendung im Haushalt
bestimmt und darf nicht für gewerbliche, industrielle
oder sonstige Zwecke verwendet werden.
• Verwenden Sie das Gerät nicht für andere Zwecke,
als für die es gefertigt wurde. Sie vermeiden so Ver-
letzungen von Personen oder Schäden am Eigen-
tum.
• Spülen Sie in diesem Gerät ausschließlich spülma-
schinengeeignete Haushaltsutensilien.
• Laden Sie keine entflammbaren Produkte oder Ge-
genstände, die mit entflammbaren Produkten be-
netzt sind, in das Gerät und stellen Sie solche nicht
in die Nähe oder auf das Gerät. Dabei besteht Ex-
plosions- und Brandgefahr.
• Stellen Sie Messer und andere spitze Gegenstände
mit der Spitze nach unten in den Besteckkorb. Wenn
16

dies nicht möglich ist, legen Sie sie horizontal in den
Oberkorb oder in den Messerkorb. (Nicht alle Mo-
delle sind mit einem Messerkorb ausgestattet.)
• Verwenden Sie für Geschirrspüler ausschließlich
dafür vorgesehene Produkte (Reinigungsmittel,
Salz, Klarspülmittel).
• Die Verwendung von Salzarten, die nicht für Ge-
schirrspüler vorgesehen sind, kann zur Beschädi-
gung des Wasserenthärters führen.
• Füllen Sie das Gerät mit Salz, bevor Sie ein Spül-
programm starten. Die Salzkörner und das Salz-
wasser können Korrosion und damit ein Loch im
Boden Ihres Geräts verursachen.
• Füllen Sie nie andere Produkte als Klarspülmittel
(wie z. B. Reinigungsmittel für Geschirrspüler, Flüs-
sigreiniger) in den Klarspülmittel-Dosierer. Dadurch
kann das Gerät beschädigt werden.
• Vergewissern Sie sich, dass die Sprüharme sich
ungehindert bewegen können, bevor Sie ein Spül-
programm starten.
• Wenn Sie die Tür öffnen, während das Gerät in Be-
trieb ist, kann heißer Dampf austreten. Dabei be-
steht die Gefahr von Hautverbrennungen.
• Nehmen Sie vor dem Ende des Spülprogramms kein
Geschirr aus dem Gerät.
Reinigung und Pflege
• Schalten Sie vor Wartungsarbeiten immer das Gerät
ab und ziehen Sie den Netzstecker aus der Steck-
dose.
• Verwenden Sie keine entflammbaren Produkte oder
Produkte, die Korrosion verursachen.
• Benutzen Sie den Geschirrspüler nie ohne Filter.
Vergewissern Sie sich, dass die Filter ordnungsge-
mäß eingesetzt sind. Falsch eingesetzte Filter füh-
ren zu nicht zufriedenstellenden Spülergebnissen
und einer Beschädigung des Geräts.
• Reinigen Sie das Gerät nicht mit einem Wasser-
oder Dampfstrahl. Dabei besteht Stromschlagge-
fahr und das Gerät könnte beschädigt werden.
Installation
• Vergewissern Sie sich, dass das Gerät während des
Transports nicht beschädigt wurde. Schließen Sie
ein beschädigtes Gerät nicht an und wenden Sie
sich bei Bedarf an den Lieferanten.
• Entfernen Sie vor dem ersten Gebrauch alle Verpa-
ckungsmaterialien.
• Die Elektro- und Sanitärinstallation, Inbetriebnahme
und Wartung des Geräts dürfen nur durch qualifi-
zierte Personen erfolgen, damit Geräteschäden
oder Verletzungen vermieden werden.
• Achten Sie darauf, dass der Netzstecker während
der Installation nicht an eine Netzsteckdose ange-
schlossen ist.
• Bohren Sie keine Löcher ins Gehäuse des Geräts.
Dabei könnten hydraulische oder elektrische Bau-
teile beschädigt werden.
Frostschutzmaßnahmen
• Stellen Sie das Gerät nicht an einem Ort auf, an dem
die Temperatur unter 0 °C absinken kann.
• Der Hersteller haftet nicht für Frostschäden.
Wasseranschluss
• Verwenden Sie neue Schläuche und keine ge-
brauchten Schläuche für den Anschluss der Was-
serversorgung.
• Schließen Sie das Gerät nicht an neue oder lange
nicht mehr benutzte Schläuche an, sondern lassen
Sie zunächst das Wasser ein paar Minuten durch
den Schlauch fließen und schließen Sie erst dann
den Zulaufschlauch an.
• Achten Sie darauf, die Wasserschläuche bei der
Geräteinstallation nicht zu quetschen oder zu be-
schädigen.
• Vergewissern Sie sich, dass alle Wasseranschlüsse
vollkommen dicht sind, damit kein Wasser austreten
kann.
• Prüfen Sie bei der ersten Verwendung des Gerätes,
dass die Schläuche keine Wasserlecks aufweisen.
• Der Wasserzulaufschlauch ist doppelwandig und
besitzt ein inneres Netzkabel und ein Sicherheits-
ventil. Der Wasserzulaufschlauch steht nur unter
Druck, wenn das Wasser durchläuft. Wenn der Was-
serzulaufschlauch eine undichte Stelle aufweist, un-
terbricht das Sicherheitsventil den Wasserzulauf.
– Gehen Sie beim Anschluss des Wasserzulauf-
schlauchs vorsichtig vor:
– Tauchen Sie den Wasserzulaufschlauch oder
das Sicherheitsventil nicht in Wasser.
– Ziehen Sie sofort den Netzstecker aus der
Steckdose, wenn der Wasserzulaufschlauch
oder das Sicherheitsventil beschädigt sind.
17

– Wenden Sie sich für den Austausch des Was-
serzulaufschlauchs mit Sicherheitsventil an
den Kundendienst.
Warnung! Gefährliche Spannung.
Elektrischer Anschluss
• Das Gerät muss geerdet sein.
• Stellen Sie sicher, dass die elektrischen Daten auf
dem Typenschild den Daten Ihrer Haushaltsstrom-
versorgung entsprechen.
• Schließen Sie das Gerät unbedingt an eine sach-
gemäß installierte Schutzkontaktsteckdose an.
• Verwenden Sie keine Mehrfachsteckdosen, Steck-
erleisten oder Verlängerungskabel, da andernfalls
Brandgefahr besteht.
• Ersetzen oder wechseln Sie nicht selbst das Netz-
kabel, sondern wenden Sie sich an den Kunden-
dienst.
• Achten Sie darauf, den Netzstecker und das Netz-
kabel hinter dem Gerät nicht zu quetschen oder zu
beschädigen.
• Wählen Sie eine Netzsteckdose, die auch nach der
Installation des Gerätes noch zugänglich ist.
• Ziehen Sie nicht am Netzkabel, wenn Sie das Gerät
vom Stromnetz trennen möchten, sondern ziehen
Sie dazu immer direkt am Netzstecker.
Kundendienst
• Nur qualifizierte Fachkräfte dürfen an dem Gerät
Reparaturarbeiten durchführen. Wenden Sie sich
hierzu an den Kundendienst.
• Es dürfen nur Originalersatzteile verwendet werden.
Entsorgung des Geräts
• Um das Risiko von Verletzungen oder Sachschäden
zu vermeiden:
– Ziehen Sie den Netzstecker aus der Netzsteck-
dose.
– Schneiden Sie das Netzkabel ab und entsorgen
Sie es.
– Entfernen Sie die Türverriegelung und entsorgen
Sie diese. So wird verhindert, dass Kinder oder
kleine Tiere im Gerät eingeschlossen werden
können. Andernfalls besteht Erstickungsgefahr.
Warnung! Die Geschirrspüler-
Reinigungsmittel sind gefährlich und können
Korrosion verursachen!
• Sollte sich mit diesen Reinigungsmitteln ein Unfall
ereignen, wenden Sie sich umgehend an Ihre örtli-
che Vergiftungszentrale und einen Arzt.
• Sollte das Reinigungsmittel in den Mund gelangen,
wenden Sie sich umgehend an Ihre örtliche Vergif-
tungszentrale und einen Arzt.
• Sollte das Reinigungsmittel in die Augen gelangen,
konsultieren Sie umgehend an einen Arzt und spü-
len Sie die Augen mit Wasser aus.
• Bewahren Sie die Reinigungsmittel an einem siche-
ren Ort außerhalb der Reichweite von Kindern auf.
• Lassen Sie die Gerätetür nicht offen stehen, solange
sich Reinigungsmittel im Reinigungsmittelbehälter
befindet.
• Füllen Sie das Gerät erst mit Reinigungsmittel, kurz
bevor Sie ein Spülprogramm starten.
18

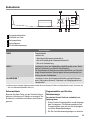
Bedienblende
5
1 Programmwahlschalter
2 Start/Abbruch-Taste
3 Zeitvorwahltaste
4 Kontrolllampen
5 Ein/Aus-Betriebsanzeige
Kontrolllampen
ENDE
Programmende
Leuchtet auf:
• Wenn das Spülprogramm beendet ist.
• Bei der Einstellung der Wasserenthärterstufe.
• Bei einer Gerätestörung.
SALZ
1)
Leuchtet auf, wenn der Salzbehälter aufgefüllt werden muss. Siehe
Abschnitt „Gebrauch von Salz für Geschirrspüler“.
Die Kontrolllampe für Salz kann nach dem Nachfüllen von Salz noch
einige Stunden leuchten. Dies hat jedoch keine unerwünschte Aus-
wirkung auf den Gerätebetrieb.
KLARSPÜLER
1)
Leuchtet auf, wenn der Klarspülmittelbehälter nachgefüllt werden
muss. Siehe hierzu Abschnitt „Gebrauch von Reinigungsmittel und
Klarspülmittel“.
1) Während eines laufenden Spülprogramms leuchten die Kontrolllampen für Salz und Klarspülmittel nie auf, auch wenn die
Salz- und Klarspülmittelbehälter leer sind.
Zeitvorwahltaste
Benutzen Sie diese Taste, um den Start des Spülpro-
gramms in Schritten von 3 Stunden zu verzögern. Sie-
he Abschnitt „Auswählen und Starten eines Spülpro-
gramms“.
Programmwähler und Ein-/Aus-
Betriebsanzeige
So schalten Sie das Gerät ein und wählen ein
Spülprogramm:
• Drehen Sie den Programmwähler im oder entgegen
dem Uhrzeigersinn. Die Referenzmarkierung am
Programmwähler muss auf eins der Spülprogram-
me auf der Bedienblende zeigen.
• Die Ein-/Aus-Betriebsanzeige beginnt zu leuchten.
19

So schalten Sie das Gerät aus:
– Drehen Sie den Programmwähler im oder entgegen
dem Uhrzeigersinn, so dass die Referenzmarkie-
rung auf die Ein-/Aus-Betriebsanzeige zeigt.
– Die Ein-/Aus-Betriebsanzeige erlischt.
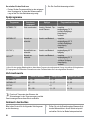
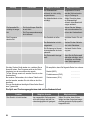
Spülprogramme
Programme Verschmut-
zungsgrad
Spülgut Programmbeschreibung
INTENSIV 70° Stark verschmutzt Geschirr, Besteck, Töp-
fe und Pfannen
Vorspülen
Hauptspülgang 70 °C
2 mittlere Spülgänge
Klarspülgang
Trocknen
NORMAL 65° Normal ver-
schmutzt
Geschirr und Besteck Vorspülen
Hauptspülgang 65 °C
2 mittlere Spülgänge
Klarspülgang
Trocknen
EILT 60°
1)
Normal/leicht ver-
schmutzt
Geschirr und Besteck Hauptspülgang 60 °C
Spülgang
BIO 50°
2)
Normal ver-
schmutzt
Geschirr und Besteck Vorspülen
Hauptspülgang 50 °C
1 mittlerer Spülgang
Klarspülgang
Trocknen
1) Wenn Sie eine geringe Beladung haben, bietet dieses Programm eine zeitsparende Lösung mit perfekten Spülergebnissen.
2) Testprogramm für Prüfinstitute. Informationen zu den Testdaten finden Sie in der mitgelieferten Broschüre.
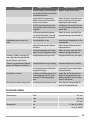
Verbrauchswerte
Programme Dauer (in Minuten) Energie (kWh) Wasser (in Litern)
INTENSIV 70° 120 - 130 1,8 - 2,0 22 - 24
NORMAL 65° 105 - 115 1,5 - 1,7 23 - 25
EILT 60° 30 0,9 9
BIO 50° 130 - 140 1,0 - 1,2 14 - 16
Druck und Temperatur des Wassers, die
Schwankungen in der Stromversorgung und die
Geschirrmenge können diese Werte verändern.
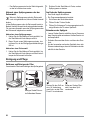
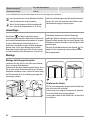
Gebrauch des Gerätes
Bitte halten Sie sich für die folgenden Schritte genau
an die Anweisung:
1. Prüfen Sie, ob die Einstellung des Wasserenthär-
ters der Wasserhärte in Ihrem Gebiet entspricht
und stellen Sie ihn bei Bedarf entsprechend ein.
20
Seite laden ...
Seite laden ...
Seite laden ...
Seite laden ...
Seite laden ...
Seite laden ...
Seite laden ...
Seite laden ...
Seite laden ...
Seite laden ...
Seite laden ...
Seite laden ...
Seite laden ...
Seite laden ...
Seite laden ...
Seite laden ...
-
 1
1
-
 2
2
-
 3
3
-
 4
4
-
 5
5
-
 6
6
-
 7
7
-
 8
8
-
 9
9
-
 10
10
-
 11
11
-
 12
12
-
 13
13
-
 14
14
-
 15
15
-
 16
16
-
 17
17
-
 18
18
-
 19
19
-
 20
20
-
 21
21
-
 22
22
-
 23
23
-
 24
24
-
 25
25
-
 26
26
-
 27
27
-
 28
28
-
 29
29
-
 30
30
-
 31
31
-
 32
32
-
 33
33
-
 34
34
-
 35
35
-
 36
36


ZANKER GE66005 Benutzerhandbuch
- Kategorie
- Geschirrspüler
- Typ
- Benutzerhandbuch
- Dieses Handbuch ist auch geeignet für
in anderen Sprachen
- English: ZANKER GE66005 User manual