ZANKER KOU10311XK Benutzerhandbuch
- Kategorie
- Kochfelder
- Typ
- Benutzerhandbuch

KOU10311
User Manual
Oven
Benutzerin‐
formation
Backofen

Contents
Safety information 2
Safety instructions 3
Product description 5
Before first use 5
Daily use 5
Using the accessories 7
Additional functions
7
Hints and tips 7
Care and cleaning 11
Troubleshooting 12
Installation 13
Energy efficiency 14
Subject to change without notice.
Safety information
Before the installation and use of the appliance, carefully read the supplied
instructions. The manufacturer is not responsible for any injuries or damages
that are the result of incorrect installation or usage. Always keep the
instructions in a safe and accessible location for future reference.
Children and vulnerable people safety
• This appliance can be used by children aged from 8 years and above and
persons with reduced physical, sensory or mental capabilities or lack of
experience and knowledge if they have been given supervision or
instruction concerning the use of the appliance in a safe way and
understand the hazards involved.
• Do not let children play with the appliance.
• Keep all packaging away from children and dispose of it appropriately.
• Keep children and pets away from the appliance when it operates or when
it cools down. Accessible parts are hot.
• If the appliance has a child safety device, this should be activated.
• Children shall not carry out cleaning and user maintenance of the
appliance without supervision.
• Children aged 3 years and under must be kept away from this appliance
when it is in operation at all times.
General Safety
• Only a qualified person must install this appliance and replace the cable.
• The control panel must be connected to specified heating unit with
matching colours of connectors, to avoid possible hazard.
• WARNING: The appliance and its accessible parts become hot during
use. Care should be taken to avoid touching heating elements. Children
2

less than 8 years of age shall be kept away unless continuously
supervised.
• Always use oven gloves to remove or put in accessories or ovenware.
• Before maintenance cut the power supply.
• Ensure that the appliance is switched off before replacing the lamp to
avoid the possibility of electric shock.
• Do not use a steam cleaner to clean the appliance.
• Do not use harsh abrasive cleaners or sharp metal scrapers to clean the
glass door since they can scratch the surface, which may result in
shattering of the glass.
• If the mains power supply cable is damaged, it must be replaced by the
manufacturer, its Authorised Service Centre or similarly qualified persons
to avoid an electrical hazard.
• The means for disconnection must be incorporated in the fixed wiring in
accordance with the wiring rules.
Safety instructions
Installation
Warning! Only a qualified person must
install this appliance.
• Remove all the packaging.
• Do not install or use a damaged appliance.
• Follow the installation instruction supplied with the
appliance.
• Always take care when moving the appliance as it is
heavy. Always use safety gloves and enclosed
footwear.
• Do not pull the appliance by the handle.
• The kitchen cabinet and the recess must have
suitable dimensions.
• Keep the minimum distance from the other
appliances and units.
• Make sure that the appliance is installed below and
adjacent safe structures.
• Parts of the appliance carry current. Close the
appliance with furniture to prevent touching the
dangerous parts.
• The sides of the appliance must stay adjacent to
appliances or to units with the same height.
• The appliance is equipped with an electric cooling
system. It must be operated with the electric power
supply.
Electrical connection
Warning! Risk of fire and electrical
shock.
• All electrical connections should be made by a
qualified electrician.
• The appliance must be earthed.
• Make sure that the electrical information on the
rating plate agrees with the power supply. If not,
contact an electrician.
• Always use a correctly installed shockproof socket.
• Do not use multi-plug adapters and extension
cables.
• Make sure not to cause damage to the mains plug
and to the mains cable. Should the mains cable
need to be replaced, this must be carried out by our
Authorised Service Centre.
• Do not let mains cables touch or come near the
appliance door, especially when the door is hot.
• The shock protection of live and insulated parts
must be fastened in such a way that it cannot be
removed without tools.
• Connect the mains plug to the mains socket only at
the end of the installation. Make sure that there is
access to the mains plug after the installation.
• If the mains socket is loose, do not connect the
mains plug.
• Do not pull the mains cable to disconnect the
appliance. Always pull the mains plug.
3

• Use only correct isolation devices: line protecting
cut-outs, fuses (screw type fuses removed from the
holder), earth leakage trips and contactors.
• The electrical installation must have an isolation
device which lets you disconnect the appliance from
the mains at all poles. The isolation device must
have a contact opening width of minimum 3 mm.
• This appliance complies with the E.E.C. Directives.
Use
Warning! Risk of injury, burns and
electrical shock or explosion.
• This appliance is for household use only.
• Do not change the specification of this appliance.
• Make sure that the ventilation openings are not
blocked.
• Do not let the appliance stay unattended during
operation.
• Deactivate the appliance after each use.
• Be careful when you open the appliance door while
the appliance is in operation. Hot air can release.
• Do not operate the appliance with wet hands or
when it has contact with water.
• Do not apply pressure on the open door.
• Do not use the appliance as a work surface or as a
storage surface.
• Open the appliance door carefully. The use of
ingredients with alcohol can cause a mixture of
alcohol and air.
• Do not let sparks or open flames to come in contact
with the appliance when you open the door.
• Do not put flammable products or items that are wet
with flammable products in, near or on the
appliance.
• Do not use microwave function to preheat the oven.
Warning! Risk of damage to the
appliance.
• To prevent damage or discoloration to the enamel:
– do not put ovenware or other objects in the
appliance directly on the bottom.
– do not put aluminium foil directly on the bottom
of the appliance.
– do not put water directly into the hot appliance.
– do not keep moist dishes and food in the
appliance after you finish the cooking.
– be careful when you remove or install the
accessories.
• Discoloration of the enamel has no effect on the
performance of the appliance.
• Use a deep pan for moist cakes. Fruit juices cause
stains that can be permanent.
• This appliance is for cooking purposes only. It must
not be used for other purposes, for example room
heating.
• Always cook with the oven door closed.
Care and cleaning
Warning! Risk of injury, fire, or damage
to the appliance.
• Before maintenance, deactivate the appliance and
disconnect the mains plug from the mains socket.
• Make sure the appliance is cold. There is the risk
that the glass panels can break.
• Replace immediately the door glass panels when
they are damaged. Contact the Authorised Service
Centre.
• Be careful when you remove the door from the
appliance. The door is heavy!
• Clean regularly the appliance to prevent the
deterioration of the surface material.
• Clean the appliance with a moist soft cloth. Only use
neutral detergents. Do not use any abrasive
products, abrasive cleaning pads, solvents or metal
objects.
• If you use an oven spray, obey the safety
instructions on the packaging.
• Do not clean the catalytic enamel (if applicable) with
any kind of detergent.
Internal light
• The type of light bulb or halogen lamp used for this
appliance is only for household appliances. Do not
use it for house lighting.
Warning! Risk of electrical shock.
• Before replacing the lamp, disconnect the appliance
from the power supply.
• Only use lamps with the same specifications.
Disposal
Warning! Risk of injury or suffocation.
• Disconnect the appliance from the mains supply.
• Cut off the mains electrical cable close to the
appliance and dispose of it.
• Remove the door catch to prevent children or pets
from becoming trapped in the appliance.
Service
• To repair the appliance contact an Authorised
Service Centre.
• Use original spare parts only.
4

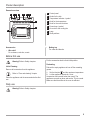
Product description
General overview
1 3 4 5 62 2
7
8
4
3
2
1
9
1
Control panel
2
Knobs for the hob
3
Temperature indicator / symbol
4
Knob for the temperature
5
Knob for the oven functions
6
Power lamp / symbol
7
Air vents for the cooling fan
8
Lamp
9
Shelf positions
Accessories
• Wire shelf
For cookware, cake tins, roasts.
• Baking tray
For cakes and biscuits.
Before first use
Warning! Refer to Safety chapters.
Initial Cleaning
Remove all accessories from the appliance.
Refer to "Care and cleaning" chapter.
Clean the appliance and the accessories before first
use.
Put the accessories back to their initial position.
Preheating
Preheat the empty appliance to burn off the remaining
grease.
1. Set the function and the maximum temperature.
2. Let the appliance operate for 1 hour.
Accessories can become hotter than usual. The
appliance can emit an odour and smoke. This is normal.
Make sure that the airflow in the room is sufficient.
Daily use
Warning! Refer to Safety chapters.
5

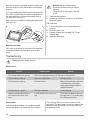
Activating and deactivating the appliance
It depends on the model if your
appliance has lamps, knob symbols
or indicators:
• The lamp comes on when the
appliance operates.
• The symbol shows whether the knob
controls one of the cooking zones,
the oven functions or the
temperature.
• The indicator comes on when the
oven heats up.
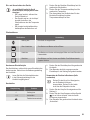
1. Turn the knob for the oven functions to select an
oven function.
2. Turn the knob for the temperature to select a
temperature.
3. To deactivate the appliance turn the knobs for the
oven functions and temperature to the off position.
Oven functions
Oven function Application
Off position The appliance is off.
Top / Bottom Heat To bake and roast food on one shelf position.
Bottom Heat To bake cakes with crispy bottom and to preserve food.
Top Heat To brown bread, cakes and pastries. To finish cooked dishes.
Knobs for the cooking zones
You can operate the hob with the knobs for the cooking
zones. Refer to the hob user manual.
You must read the Safety chapters in the
hob user manual.
Heat settings
Knob indication Function
0 Off position
1 - 9 Heat settings
Double zone switch
1. Turn the knob to a necessary heat setting.
2. To complete the cooking process, turn the knob to
the off position.
Using the double zone (if applicable)
To activate the double zone, turn the
knob clockwise. Do not turn it through
the stop position.
1. Turn the knob clockwise to position 9.
2. Turn the knob slowly to the symbol until you
can hear a click. The two cooking zones are on.
3. To set the necessary heat setting refer to "Heat
settings".
6

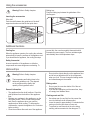
Using the accessories
Warning! Refer to Safety chapters.
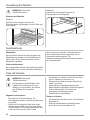
Inserting the accessories
Wire shelf:
Push the shelf between the guide bars of the shelf
support and make sure that the feet point down.
Baking tray:
Push the baking tray between the guide bars of the
shelf support.
Additional functions
Cooling fan
When the appliance operates, the cooling fan activates
automatically to keep the surfaces of the appliance cool.
If you deactivate the appliance, the cooling fan stops.
Safety thermostat
Incorrect operation of the appliance or defective
components can cause dangerous overheating. To
prevent this, the oven has a safety thermostat which
interrupts the power supply. The oven activates again
automatically when the temperature drops.
Hints and tips
Warning! Refer to Safety chapters.
The temperature and baking times in the
tables are guidelines only. They depend
on the recipes and the quality and
quantity of the ingredients used.
General information
• The appliance has four shelf positions. Count the
shelf positions from the bottom of the appliance
floor.
• Moisture can condense in the appliance or on the
door glass panels. This is normal. Always stand
back from the appliance when you open the
appliance door while cooking. To decrease the
condensation, operate the appliance for 10 minutes
before cooking.
• Clean the moisture after each use of the appliance.
• Do not put the objects directly on the appliance floor
and do not put aluminium foil on the components
when you cook. This can change the baking results
and cause damage to the enamel.
Baking cakes
• Do not open the oven door before 3/4 of the set
cooking time is up.
• If you use two baking trays at the same time, keep
one empty level between them.
Cooking meat and fish
• Use a deep pan for very fatty food to prevent the
oven from stains that can be permanent.
• Leave the meat for approximately 15 minutes before
carving so that the juice does not seep out.
• To prevent too much smoke in the oven during
roasting, add some water into the deep pan. To
7

prevent the smoke condensation, add water each
time after it dries up.
Cooking times
Cooking times depend on the type of food, its
consistency, and volume.
Initially, monitor the performance when you cook. Find
the best settings (heat setting, cooking time, etc.) for
your cookware, recipes and quantities when you use
this appliance.
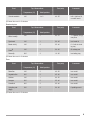
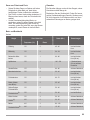
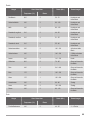
Baking and roasting table
Cakes
Food Top / Bottom Heat Time (min) Comments
Temperature (°C) Shelf position
Whisked recipes 170 2 45 - 60 In a cake mould
Shortbread dough 170 2 24 - 34 In a cake mould
Butter-milk cheese
cake
170 1 60 - 80 In a 26 cm cake
mould
Apple cake (Apple
pie)
170 1 100 - 120 In two 20 cm cake
moulds on a wire
shelf
Strudel 175 2 60 - 80 In a baking tray
Jam-tart 170 2 30 - 40 In a 26 cm cake
mould
Fruit cake 170 2 60 - 70 In a 26 cm cake
mould
Sponge cake (Fat-
less sponge cake)
170 2 35 - 45 In a 26 cm cake
mould
Christmas cake /
Rich fruit cake
170 2 50 - 60 In a 20 cm cake
mould
Plum cake
1)
170 2 50 - 60 In a bread tin
Small cakes 170 3 20 - 30 In a baking tray
Biscuits
1)
150 3 20 - 30 In a baking tray
Meringues 100 3 90 - 120 In a baking tray
Buns
1)
190 3 15 - 20 In a baking tray
Choux
1)
190 3 25 - 35 In a baking tray
Plate tarts 180 3 45 - 70 In a 20 cm cake
mould
8

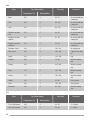
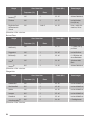
Food Top / Bottom Heat Time (min) Comments
Temperature (°C) Shelf position
Victoria sandwich 180 1 or 2 40 - 55 Left + right in a 20
cm cake mould
1) Preheat the oven for 10 minutes.
Bread and pizza
Food Top / Bottom Heat Time (min) Comments
Temperature (°C) Shelf position
White bread
1)
190 1 60 - 70 1 - 2 pieces, 500 gr
one piece
Rye bread 190 1 30 - 45 In a bread tin
Bread rolls
1)
190 2 25 - 40 6 - 8 rolls in a bak-
ing tray
Pizza
1)
190 1 20 - 30 On a deep pan
Scones
1)
200 3 10 - 20 In a baking tray
1) Preheat the oven for 10 minutes.
Flans
Food Top / Bottom Heat Time (min) Comments
Temperature (°C) Shelf position
Pasta flan 180 2 40 - 50 In a mould
Vegetable flan 200 2 45 - 60 In a mould
Quiches 190 1 40 - 50 In a mould
Lasagne 200 2 25 - 40 In a mould
Cannelloni 200 2 25 - 40 In a mould
Yorkshire pud-
ding
1)
220 2 20 - 30 6 pudding mould
1) Preheat the oven for 10 minutes.
9

Meat
Food Top / Bottom Heat Time (min) Comments
Temperature (°C) Shelf position
Beef 200 2 50 - 70 On a wire shelf and
a deep pan
Pork 180 2 90 - 120 On a wire shelf and
a deep pan
Veal 190 2 90 - 120 On a wire shelf and
a deep pan
English roast beef
rare
210 2 44 - 50 On a wire shelf and
a deep pan
English roast beef
medium
210 2 51 - 55 On a wire shelf and
a deep pan
English roast beef
well done
210 2 55 - 60 On a wire shelf and
a deep pan
Shoulder of pork 180 2 120 - 150 On a deep pan
Shin of pork 180 2 100 - 120 2 pieces on a deep
an
Lamb 190 2 110 - 130 Leg
Chicken 200 2 70 - 85 Whole on a deep
pan
Turkey 180 1 210 - 240 Whole on a deep
pan
Duck 175 2 120 - 150 Whole on a deep
pan
Goose 175 1 150 - 200 Whole on a deep
pan
Rabbit 190 2 60 - 80 Cut in pieces
Hare 190 2 150 - 200 Cut in pieces
Pheasant 190 2 90 - 120 Whole on a deep
pan
Fish
Food Top / Bottom Heat Time (min) Comments
Temperature (°C) Shelf position
Trout / Sea bream 190 2 40 - 55 3 - 4 fishes
Tuna fish / Salmon 190 2 35 - 60 4 - 6 fillets
10

Care and cleaning
Warning! Refer to Safety chapters.
Notes on cleaning
• Clean the front of the appliance with a soft cloth with
warm water and a cleaning agent.
• To clean metal surfaces, use a dedicated cleaning
agent.
• Clean the appliance interior after each use. Fat
accumulation or other food remains may result in a
fire.
• Clean stubborn dirt with a special oven cleaner.
• Clean all accessories after each use and let them
dry. Use a soft cloth with warm water and a cleaning
agent.
• If you have nonstick accessories, do not clean them
using aggressive agents, sharp-edged objects or a
dishwasher. It can cause damage to the nonstick
coating.
Stainless steel or aluminium appliances
Clean the oven door with a damp cloth or
sponge only. Dry it with a soft cloth.
Do not use steel wool, acids or abrasive
materials as they can damage the oven
surface. Clean the oven control panel
with the same precautions.
Cleaning the door gasket
• Regularly do a check of the door gasket. The door
gasket is around the frame of the oven cavity. Do
not use the appliance if the door gasket is damaged.
Contact an Authorised Service Centre.
• To clean the door gasket, refer to the general
information about cleaning.
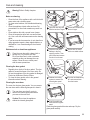
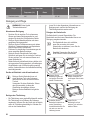
Cleaning the oven door
The oven door has two glass panels. You can remove
the oven door and the internal glass panel to clean it.
The oven door can close if you try to
remove the internal glass panel before
you remove the oven door.
Caution! Do not use the appliance
without the internal glass panel.
1
Open the door fully and
hold the two door hinges.
1
2
Lift and turn the levers on
the two hinges.
2
3
Close the oven door
halfway to the first
opening position. Then
pull forward and remove
the door from its seat.
3
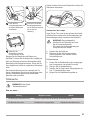
4
Put the door on a soft
cloth on a stable surface.
4
5
Release the locking
system to remove the
internal glass panel.
5
90°
6
Turn the two fasteners by
90° and remove them
from their seats.
6
2
1
7
First lift carefully and
then remove the glass
panel.
7
Clean the glass panel with water and soap. Dry the
glass panel carefully.
11

When the cleaning is completed, install the glass panel
and the oven door. Do the above steps in the opposite
sequence.
The screen-printing zone must face the inner side of the
door. Make sure that after the installation the surface of
the glass panel frame on the screen-printing zones is
not rough when you touch it.
Make sure that you install the internal glass panel in the
seats correctly.
Replacing the lamp
Put a cloth on the bottom of the interior of the appliance.
It prevents damage to the lamp glass cover and the
cavity.
Warning! Danger of electrocution!
Disconnect the fuse before you replace
the lamp.
The lamp and the lamp glass cover can
be hot.
1. Deactivate the appliance.
2. Remove the fuses from the fuse box or deactivate
the circuit breaker.
The back lamp
1. Turn the lamp glass cover counterclockwise to
remove it.
2. Clean the glass cover.
3. Replace the lamp with a suitable 300 °C heat-
resistant lamp.
4. Install the glass cover.
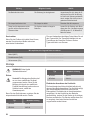
Troubleshooting
Warning! Refer to Safety chapters.
What to do if...
Problem Possible cause Remedy
The cooking zones do not operate. Refer to the operating instructions for the built-in cooking surface.
The oven does not heat up. The oven is deactivated. Activate the oven.
The oven does not heat up. The fuse is blown. Make sure that the fuse is the cause
of the malfunction. If the fuse is
blown again and again, contact a
qualified electrician.
The lamp does not operate. The lamp is defective. Replace the lamp.
Steam and condensation settle on
the food and in the cavity of the
oven.
You left the dish in the oven for too
long.
Do not leave the dishes in the oven
for longer than 15 - 20 minutes after
the cooking process ends.
Service data
If you cannot find a solution to the problem yourself,
contact your dealer or an Authorised Service Centre.
The necessary data for the service centre is on the
rating plate. The rating plate is on the front frame of the
appliance cavity. Do not remove the rating plate from
the appliance cavity.
12

We recommend that you write the data here:
Model (MOD.) .........................................
Product number (PNC) .........................................
Serial number (S.N.) .........................................
Installation
Warning! Refer to Safety chapters.
Building Under
Caution! Only a qualified and competent
person must do the installation of the
appliance. If you do not contact a
qualified or competent person, the
guarantee becomes invalid if there is
damage.
Before you install the appliance, fit it with the applicable
hob from the table.
Type Maximum power
KAV6041 6500 W
KEV6041 6000 W
KEV6043 7600 W
KEV6046 7400 W
Electrical connection with the hob
The hob connection socket is at the top of the oven
cabinet. The hob has connection leads for the cooking
zones and the ground cable. The leads have plug-in
connectors. To connect the hob to the oven, plug the
connectors into the correct oven sockets. The design of
the plugs and sockets prevents incorrect connections.
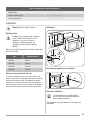
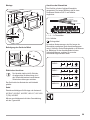
Building In
589
598
594
114
19
21540
570
558
min. 550
20
600
min. 560
3
9
Securing the appliance to the cabinet
A
B
Electrical installation
The manufacturer is not responsible if
you do not follow the safety precautions
from the Safety chapters.
This appliance is supplied without a main plug and a
main cable.
13

Cable
Cable types applicable for installation or replacement:
H07 RN-F, H05 RN-F, H05 RRF, H05 VV-F, H05 V2V2-
F (T90), H05 BB-F
For the section of the cable refer to the total power on
the rating plate.
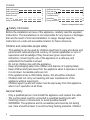
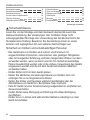
Connecting the terminal board
The appliance has a six-pole terminal board. The
jumpers (bridges) are set for operation on a 400 V
three-phase with a neutral wire.
1 = 45 mm
2 = 45 mm
3 = 60 mm
4 = 60 mm
= 70 mm
1 2 3 4 5
L 1 – 2 – 3 = phase cables
N 4 = neutral cable
= earth cable
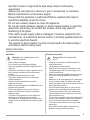
If the mains voltage is different, rearrange the jumpers
on the terminal board (refer to the connection diagram
below). Connect the ground cable to the terminal. After
you connect the supply cable to the terminal board,
attach it with a junction clamp.
1 2 3 4 5
1 2 3 4 5
1 2 3 4 5
1 2 3 4 5
230V 3~
230V 1~
400V 2N~
400V 3N~
L1
L1 N
L2
L1 N
N
L2
L3
L1 L2 L3
PE
PE
PE
PE
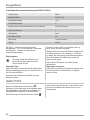
Energy efficiency
Product Fiche and information according to EU 65-66/2014
Supplier's name Zanker
Model identification KOU10311XK
Energy Efficiency Index 105.1
Energy efficiency class A
Energy consumption with a standard load, conventional mode 0.83 kWh/cycle
Number of cavities 1
Heat source Electricity
Volume 56 l
Type of oven Built-Under Oven
Mass 26.3 kg
EN 60350-1 - Household electric cooking appliances -
Part 1: Ranges, ovens, steam ovens and grills -
Methods for measuring performance.
14

Energy saving
The appliance contains features which
help you save energy during everyday
cooking.
General hints
Make sure that the oven door is closed properly when
the appliance operates and keep it closed as much as
possible during the cooking.
Use metal dishes to improve energy saving.
When possible, do not preheat the oven before you put
the food inside.
When the cooking duration is longer than 30 minutes,
reduce the oven temperature to minimum 3 - 10 minutes
before the end of the cooking time, depending on the
duration of the cooking. The residual heat inside the
oven will continue to cook.
Use the residual heat to warm up other dishes.
Keep food warm
Choose the lowest possible temperature setting to use
residual heat and keep a meal warm.
ENVIRONMENTAL CONCERNS
Recycle the materials with the symbol . Put the
packaging in applicable containers to recycle it. Help
protect the environment and human health and to
recycle waste of electrical and electronic appliances. Do
not dispose appliances marked with the symbol with
the household waste. Return the product to your local
recycling facility or contact your municipal office.
15

Inhaltsverzeichnis
Sicherheitshinweise 16
Sicherheitsanweisungen 17
Gerätebeschreibung 20
Vor der ersten Inbetriebnahme 20
Täglicher Gebrauch 20
Verwendung des Zubehörs 22
Zusatzfunktionen
22
Tipps und Hinweise 22
Reinigung und Pflege 26
Fehlersuche 27
Montage 28
Energieeffizienz 30
Änderungen vorbehalten.
Sicherheitshinweise
Lesen Sie vor der Montage und dem Gebrauch des Geräts zuerst die
Gebrauchsanleitung. Bei Verletzungen oder Schäden infolge nicht
ordnungsgemäßer Montage oder Verwendung des Geräts übernimmt der
Hersteller keine Haftung. Bewahren Sie die Anleitung immer an einem
sicheren und zugänglichen Ort zum späteren Nachschlagen auf.
Sicherheit von Kindern und schutzbedürftigen Personen
• Das Gerät kann von Kindern ab 8 Jahren und Personen mit
eingeschränkten physischen, sensorischen oder geistigen Fähigkeiten
oder mit mangelnder Erfahrung und/oder mangelndem Wissen nur dann
verwendet werden, wenn sie durch eine für ihre Sicherheit zuständige
Person beaufsichtigt werden oder in die sichere Verwendung des Geräts
eingewiesen wurden und die mit dem Gerät verbundenen Gefahren
verstanden haben.
• Kinder dürfen nicht mit dem Gerät spielen.
• Halten Sie sämtliches Verpackungsmaterial von Kindern fern und
entsorgen Sie es auf angemessene Weise.
• Halten Sie Kinder und Haustiere während des Betriebs oder der
Abkühlphase vom Gerät fern. Berührbare Teile sind heiß.
• Falls Ihr Gerät mit einer Kindersicherung ausgestattet ist, empfehlen wir,
diese einzuschalten.
• Kinder dürfen keine Reinigung und Wartung ohne Beaufsichtigung
durchführen.
• Kinder bis zu 3 Jahren sind während des Betriebs unbedingt von dem
Gerät fernzuhalten.
16

Allgemeine Sicherheit
• Die Montage des Geräts und der Austausch des Kabels muss von einer
Fachkraft vorgenommen werden.
• Zur Vermeidung von möglichen Gefahren muss das Bedienfeld so an den
Backofen angeschlossen werden, dass die Farben der Anschlüsse
übereinstimmen.
• WARNUNG: Das Gerät und die zugänglichen Geräteteile werden
während des Betriebs heiß. Seien Sie vorsichtig und berühren Sie niemals
die Heizelemente. Halten Sie Kinder unter 8 Jahren vom Gerät fern, wenn
sie nicht ständig beaufsichtigt werden.
• Verwenden Sie zum Anfassen des Zubehörs und der Töpfe
wärmeisolierende Handschuhe.
• Trennen Sie das Gerät vor Wartungsarbeiten von der Stromversorgung.
• Vergewissern Sie sich, dass das Gerät ausgeschaltet ist, bevor Sie die
Lampe austauschen, um einen Stromschlag zu vermeiden.
• Reinigen Sie das Gerät nicht mit einem Dampfstrahlreiniger.
• Benutzen Sie zum Reinigen der Glastür keine scharfen Scheuermittel
oder Metallschwämmchen; sie können die Glasfläche verkratzen und zum
Zersplittern der Scheibe führen.
• Wenn das Netzkabel beschädigt ist, muss es vom Hersteller, seinem
autorisierten Kundenservice oder einer gleichermaßen qualifizierten
Person ausgetauscht werden, um Gefahren durch elektrischen Strom zu
vermeiden.
• Gemäß den Verdrahtungsregeln muss bei Festverdrahtung eine
Vorrichtung zur Trennung des Gerätes von der Spannungsversorgung
vorhanden sein.
Sicherheitsanweisungen
Montage
WARNUNG! Nur eine qualifizierte
Fachkraft darf den elektrischen
Anschluss des Geräts vornehmen.
• Entfernen Sie das gesamte Verpackungsmaterial.
• Montieren Sie ein beschädigtes Gerät nicht und
benutzen Sie es nicht.
• Halten Sie sich an die mitgelieferte
Montageanleitung.
• Seien Sie beim Bewegen des Gerätes vorsichtig, da
es sehr schwer ist. Tragen Sie stets
Sicherheitshandschuhe und festes Schuhwerk.
• Ziehen Sie das Gerät nicht am Griff.
• Das Küchenmöbel und die Einbaunische müssen
die passenden Abmessungen aufweisen.
• Die Mindestabstände zu anderen Geräten und
Küchenmöbeln sind einzuhalten.
• Stellen Sie sicher, dass das Gerät unterhalb von
bzw. zwischen sicheren Konstruktionen montiert
wird.
• Einige Teile des Geräts sind stromführend. Das
Küchenmöbel muss auf allen Seiten mit dem Gerät
abschließen, um einen Kontakt mit stromführenden
Teilen zu vermeiden.
17

• Die Seiten des Geräts dürfen nur an Geräte oder
Einheiten in gleicher Höhe angrenzen.
• Das Gerät ist mit einem elektrischen Kühlsystem
ausgestattet. Es muss an die Stromversorgung
angeschlossen werden.
Elektrischer Anschluss
WARNUNG! Brand- und
Stromschlaggefahr.
• Alle elektrischen Anschlüsse sind von einem
geprüften Elektriker vorzunehmen.
• Das Gerät muss geerdet sein.
• Stellen Sie sicher, dass die elektrischen Daten auf
dem Typenschild den Daten Ihrer Stromversorgung
entsprechen. Wenden Sie sich anderenfalls an eine
Elektrofachkraft.
• Schließen Sie das Gerät unbedingt an eine
sachgemäß installierte Schutzkontaktsteckdose an.
• Verwenden Sie keine Mehrfachsteckdosen oder
Verlängerungskabel.
• Achten Sie darauf, Netzstecker und Netzkabel nicht
zu beschädigen. Falls das Netzkabel des Geräts
ersetzt werden muss, lassen Sie diese Arbeit durch
unseren autorisierten Kundendienst durchführen.
• Achten Sie darauf, dass das Netzkabel die
Gerätetür nicht berührt oder in ihre Nähe gelangt,
insbesondere wenn die Tür heiß ist.
• Alle Teile, die gegen direktes Berühren schützen,
sowie die isolierten Teile müssen so befestigt
werden, dass sie nicht ohne Werkzeug entfernt
werden können.
• Stecken Sie den Netzstecker erst nach Abschluss
der Montage in die Steckdose. Stellen Sie sicher,
dass der Netzstecker nach der Montage noch
zugänglich ist.
• Falls die Steckdose lose ist, schließen Sie den
Netzstecker nicht an.
• Ziehen Sie nicht am Netzkabel, wenn Sie das Gerät
vom Netzstrom trennen möchten. Ziehen Sie stets
am Netzstecker.
• Verwenden Sie nur geeignete Trenneinrichtungen:
Überlastschalter, Sicherungen (Schraubsicherungen
müssen aus dem Halter entfernt werden können),
Erdschlüsse, Kontakte.
• Die elektrische Installation muss eine
Trenneinrichtung aufweisen, mit der Sie das Gerät
allpolig von der Stromversorgung trennen können.
Die Trenneinrichtung muss mit einer
Kontaktöffnungsbreite von mindestens 3 mm
ausgeführt sein.
• Das Gerät entspricht den EWG-Richtlinien.
Gebrauch
WARNUNG! Verletzungs-,
Verbrennungs-, Stromschlag- oder
Explosionsgefahr.
• Dieses Gerät ist ausschließlich zur Verwendung im
Haushalt bestimmt.
• Nehmen Sie keine technischen Änderungen am
Gerät vor.
• Die Lüftungsöffnungen dürfen nicht abgedeckt
werden.
• Lassen Sie das Gerät bei Betrieb nicht
unbeaufsichtigt.
• Schalten Sie das Gerät nach jedem Gebrauch aus.
• Gehen Sie beim Öffnen der Tür vorsichtig vor, wenn
das Gerät in Betrieb ist. Es kann heiße Luft
austreten.
• Bedienen Sie das Gerät nicht mit feuchten oder
nassen Händen oder wenn es mit Wasser in
Kontakt gekommen ist.
• Üben Sie keinen Druck auf die geöffnete Gerätetür
aus.
• Benutzen Sie das Gerät nicht als Arbeits- oder
Abstellfläche.
• Öffnen Sie die Gerätetür vorsichtig. Bei der
Verwendung von Zutaten, die Alkohol enthalten,
kann ein Alkohol-Luftgemisch entstehen.
• Achten Sie beim Öffnen der Tür darauf, dass keine
Funken oder offenen Flammen in das Geräts
gelangen.
• Platzieren Sie keine entflammbaren Produkte oder
Gegenstände, die mit entflammbaren Produkten
benetzt sind, im Gerät, auf dem Gerät oder in der
Nähe des Geräts.
• Heizen Sie den Backofen nicht mit der
Mikrowellenfunktion vor.
WARNUNG! Das Gerät könnte
beschädigt werden.
• Um Beschädigungen und Verfärbungen der
Emaillebeschichtung zu vermeiden:
– Stellen Sie feuerfestes Geschirr oder andere
Gegenstände nicht direkt auf den Boden des
Geräts.
– Legen Sie keine Alufolie direkt auf den Boden
des Geräts.
– Stellen Sie kein Wasser in das heiße Gerät.
– Lassen Sie nach dem Ausschalten des Geräts
kein feuchtes Geschirr oder feuchte Speisen im
Backofeninnenraum stehen.
– Gehen Sie beim Herausnehmen oder
Einsetzen der Innenausstattung sorgfältig vor.
• Verfärbungen der Emailbeschichtung haben keine
Auswirkung auf die Leistung des Geräts.
18

• Verwenden Sie für feuchte Kuchen das tiefe Blech.
Fruchtsäfte können bleibende Flecken verursachen.
• Dieses Gerät ist nur zum Kochen bestimmt. Jeder
andere Gebrauch ist als bestimmungsfremd
anzusehen, zum Beispiel das Beheizen eines
Raums.
• Die Backofentür muss bei Betrieb stets geschlossen
sein.
Reinigung und Pflege
WARNUNG! Verletzungs-, Brandgefahr
sowie Risiko von Schäden am Gerät.
• Schalten Sie das Gerät immer aus und ziehen Sie
den Netzstecker aus der Steckdose, bevor
Reinigungsarbeiten durchgeführt werden.
• Vergewissern Sie sich, dass das Gerät abgekühlt
ist. Es besteht die Gefahr, dass die Glasscheiben
brechen.
• Ersetzen Sie die Türglasscheiben umgehend, wenn
sie beschädigt sind. Wenden Sie sich an den
autorisierten Kundendienst.
• Gehen Sie beim Aushängen der Tür vorsichtig vor.
Die Tür ist schwer!
• Reinigen Sie das Gerät regelmäßig, um eine
Verschlechterung des Oberflächenmaterials zu
verhindern.
• Reinigen Sie das Gerät mit einem weichen,
feuchten Tuch. Verwenden Sie ausschließlich
Neutralreiniger. Benutzen Sie keine Scheuermittel,
scheuernde Reinigungsschwämmchen,
Lösungsmittel oder Metallgegenstände.
• Falls Sie ein Backofenspray verwenden, befolgen
Sie bitte unbedingt die Anweisungen auf der
Verpackung.
• Reinigen Sie die katalytische Emailbeschichtung
(falls vorhanden) nicht mit Reinigungsmitteln.
Backofenbeleuchtung
• Die Leuchtmittel in diesem Gerät sind nur für
Haushaltsgeräte geeignet. Benutzen Sie sie nicht
für die Raumbeleuchtung.
WARNUNG! Stromschlaggefahr.
• Trennen Sie das Gerät von der Stromversorgung,
bevor Sie die Lampe austauschen.
• Verwenden Sie dazu eine Lampe mit der gleichen
Leistung.
Entsorgung
WARNUNG! Verletzungs- und
Erstickungsgefahr.
• Trennen Sie das Gerät von der Stromversorgung.
• Schneiden Sie das Netzkabel in der Nähe des
Geräts ab, und entsorgen Sie es.
• Entfernen Sie das Türschloss, um zu verhindern,
dass sich Kinder oder Haustiere im Gerät
einschließen.
Service
• Wenden Sie sich zur Reparatur des Geräts an einen
autorisierten Kundendienst.
• Verwenden Sie ausschließlich Originalersatzteile.
19

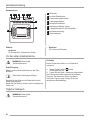
Gerätebeschreibung
Gesamtansicht
1 3 4 5 62 2
7
8
4
3
2
1
9
1
Bedienfeld
2
Kochfeld-Einstellknöpfe
3
Temperaturanzeige/-symbol
4
Temperaturwahlknopf
5
Backofen-Einstellknopf
6
Betriebskontrolllampe/-symbol
7
Lüftungsöffnungen für das Kühlgebläse
8
Backofenbeleuchtung
9
Einschubebenen
Zubehör
• Kombirost
Für Kochgeschirr, Kuchenformen, Braten.
• Backblech
Für Kuchen und Plätzchen.
Vor der ersten Inbetriebnahme
WARNUNG! Siehe Kapitel
"Sicherheitshinweise".
Erste Reinigung
Bitte die gesamte Innenausstattung aus dem Ofen
entfernen.
Siehe Kapitel „Reinigung und Pflege“.
Reinigen Sie das Gerät und die Zubehörteile vor der
ersten Inbetriebnahme.
Setzen Sie das Zubehör wieder in seiner ursprünglichen
Position ein.
Vorheizen
Heizen Sie das leere Gerät vor, um Fettreste zu
verbrennen.
1. Stellen Sie die Funktion und die
Höchsttemperatur ein.
2. Lassen Sie das Gerät 1 Stunde lang eingeschaltet.
Das Zubehör kann heißer werden als bei normalem
Gebrauch. Das Gerät kann Geruch und Rauch
verströmen. Das ist normal. Sorgen Sie für eine
ausreichende Raumbelüftung.
Täglicher Gebrauch
WARNUNG! Siehe Kapitel
"Sicherheitshinweise".
20
Seite laden ...
Seite laden ...
Seite laden ...
Seite laden ...
Seite laden ...
Seite laden ...
Seite laden ...
Seite laden ...
Seite laden ...
Seite laden ...
Seite laden ...
Seite laden ...
-
 1
1
-
 2
2
-
 3
3
-
 4
4
-
 5
5
-
 6
6
-
 7
7
-
 8
8
-
 9
9
-
 10
10
-
 11
11
-
 12
12
-
 13
13
-
 14
14
-
 15
15
-
 16
16
-
 17
17
-
 18
18
-
 19
19
-
 20
20
-
 21
21
-
 22
22
-
 23
23
-
 24
24
-
 25
25
-
 26
26
-
 27
27
-
 28
28
-
 29
29
-
 30
30
-
 31
31
-
 32
32


ZANKER KOU10311XK Benutzerhandbuch
- Kategorie
- Kochfelder
- Typ
- Benutzerhandbuch
in anderen Sprachen
- English: ZANKER KOU10311XK User manual