Avocent SWITCHVIEW PC Quick Installation Manual
- Kategorie
- KVM-Schalter
- Typ
- Quick Installation Manual
Dieses Handbuch eignet sich auch für

The Power of Being There
®
Quick Installation Guide
SwitchView
®
PC
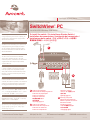
2 or 4-Port PS/2 Desktop KVM Switch
To Contact Avocent Technical Support CALL (888) 793-8763 VISIT www.avocent.com/support DOWNLOAD www.avocent.com
Avocent, the Avocent logo, The Power of Being There and SwitchView are registered trademarks of Avocent Corporation or its affiliates. ©2005 Avocent Corporation. All rights reserved. 590-572-615A
Console port
Monitor
COMPUTER 4
COMPUTER 3
COMPUTER 2
COMPUTER 1
DC 9V
VGA 4
K4 M4
VGA 3
K3 M3
VGA 2
K2 M2
VGA 1
K1 M1
1
2
NOTE: If keyboard or mouse issues arise when
using a low-power system such as a laptop, you
should order an optional power supply. Contact
Avocent for more details.
HINWEIS: Treten Probleme mit der Tastatur oder
der Maus bei der Verwendung eines Systems mit
niedriger Spannung (z. B. Laptop) auf, sollten
Sie eine optionale Stromversorgung bestellen.
Für weitere Informationen nehmen Sie bitte mit
Avocent Kontakt auf.
NOTA :
Si des problèmes surviennent au niveau
du clavier et de la souris lors de l’utilisation
d’un système de faible puissance, tel qu’un
ordinateur portable, commandez une alimentation
supplémentaire. Pour de plus amples détails,
contactez Avocent .
NOTA:
Si se producen problemas con el teclado
y el ratón al utilizar un sistema de bajo voltaje,
como por ejemplo una computadora portátil,
debe pedir una fuente de alimentación opcional.
Póngase en contacto con Avocent para obtener
más información.
NOTA: se si verificano problemi con la tastiera
o il mouse durante l’uso di un sistema a basso
consumo, ad esempio un portatile, si raccomanda di
ordinare un cavo di alimentazione supplementare.
Per maggiori informazioni rivolgersi ad Avocent.
注:ラップトップなどの低出力システムをご使用中
にキーボードやマウスに支障が生じる場合には、オ
プションの電源装置を取り寄せてください。詳細に
ついてはAvocentまでお問い合わせください。
注:如果在使用低电压系统(例如便携机)时出现与
键盘或鼠标有关的问题,您应该订购一个可选电源。
请联系 Avocent,以获取详细信息。
참고: 랩톱과 같은 저전압 시스템을 사용하는 도
중 키보드 또는 마우스에 문제가 발생하면 추가 전
원 공급 장치를 구입해야 합니다. 자세한 내용은
Avocent에 문의하십시오.
1
3
2
Connect your peripherals
Schließen Sie die Peripheriegeräte an
Connectez vos périphériques
Conecte los periféricos
Collegare le periferiche
周辺機器を接続します
连接外围设备
주변기기를 연결합니다
Connect your computers
Schließen Sie Ihre Computer an
Connectez vos ordinateurs
Conecte las computadoras
Collegare i computer
コンピューターを接続します
连接计算机
컴퓨터를 연결합니다
Power up your system
Fahren Sie das System hoch
Mettez le système sous tension
Encienda el sistema
Accendere il sistema
システムの電源を入れます
打开系统的电源
시스템 전원을 켭니다
To install the switch / So installieren Sie den Switch /
Installation du commutateur / Instalación del conmutador /
Installazione dello switch /
スイッチのインストール手順
/
要安装此交换机
/
스위치 설치 방법

Quick Installation Guide
SwitchView
®
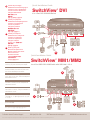
DVI
2 or 4-Port DVI USB KVM Switch
To Contact Avocent Technical Support CALL (888) 793-8763 VISIT www.avocent.com/support DOWNLOAD www.avocent.com
Avocent, the Avocent logo, The Power of Being There and SwitchView are registered trademarks of Avocent Corporation or its affiliates. ©2005 Avocent Corporation. All rights reserved.
Connect the power supply
Schließen Sie die Stromversorgung an
Connectez la source d’alimentation
Conecte la fuente de alimentación
Collegare l’alimentazione
電源に接続します
连接电源
전원 공급 장치를 연결합니다
Connect your peripherals
Schließen Sie die Peripheriegeräte an
Connectez vos périphériques
Conecte los periféricos
Collegare le periferiche
周辺機器を接続します
连接外围设备
주변기기를 연결합니다
Connect your computers
Schließen Sie Ihre Computer an
Connectez vos ordinateurs
Conecte las computadoras
Collegare i computer
コンピューターを接続します
连接计算机
컴퓨터를 연결합니다
Power up your system
Fahren Sie das System hoch
Mettez le système sous tension
Encienda el sistema
Accendere il sistema
システムの電源を入れます
打开系统的电源
시스템 전원을 켭니다
NOTE: If using a USB device other than a keyboard
or mouse, plug in the external power adaptor.
HINWEIS: Wenn ein USB-Gerät (abgesehen von
Tastatur und Maus) verwendet wird, müssen Sie
den externen Netzadapter anschließen.
NOTA :
Si vous utilisez un équipement USB autre
qu’un clavier ou une souris, branchez l’adaptateur
d’alimentation externe.
NOTA:
Si utiliza un dispositivo USB que no sea
un teclado o un ratón, conecte el adaptador de
alimentación externo.
NOTA:
se si utilizza un dispositivo USB diverso da
una tastiera o un mouse, collegare l’adattatore di
alimentazione esterno.
注:キーボードやマウス以外のUSBデバイスを使
用する場合は、外付けの電源アダプターを使用し
てください。
注:如果使用除键盘和鼠标之外的 USB 设备,请连
接外部电源适配器。
참고: 키보드 또는 마우스 이외의 USB 장치를 사용
하는 경우 외부 전원 어댑터를 연결합니다.
4
3
2
1
1
2
3
Quick Installation Guide
SwitchView
®
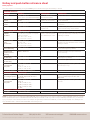
MM1/MM2
2 or 4-Port USB PS/2 KVM Switch with USB Hub 1.1/2.0
3
1
2
Safety, EMC and Environmental Approvals and Markings
Caution: To ensure safe use of this product, use only the power adaptor provided by the manufacturer.
USA Notification
Warning: Changes or modifications to this unit not expressly approved by the party responsible for compliance could void the
user’s authority to operate the equipment.
Note: This equipment has been tested and found to comply with the limits for a Class B digital device, pursuant to Part 15
of the FCC Rules. These limits are designed to provide reasonable protection against harmful interference in a residential
installation. This equipment generates, uses and can radiate radio frequency energy and, if not installed and used in
accordance with the instructions, may cause harmful interference to radio communications. However, there is no guarantee
that interference will not occur in a particular installation. If this equipment does cause harmful interference to radio or
television reception, which can be determined by turning the equipment off and on, the user is encouraged to try to correct
the interference by one or more of the following measures:
• Reorient or relocate the receiving antenna.
• Increase the separation between the equipment and receiver.
• Connect the equipment into an outlet on a circuit different from that to which the receiver is connected.
• Consult the dealer or an experienced radio/TV technician for help.
Canadian Notification
This Class B digital apparatus complies with Canadian ICES-003.
Cet appareil numérique de la classe B est conforme à la norme NMB-003 du Canada.
WEEE
In the European Union, this label indicates that this product should not be disposed of with household
waste. It should be deposited at an appropriate facility to enable recovery and recycling. For information
on how to recycle this product
responsibly in your country, please check with the seller of the product, or
the seller of the product that replaces this product.
To Contact Avocent Technical Support CALL (888) 793-8763 VISIT www.avocent.com/support DOWNLOAD www.avocent.com
Avocent, the Avocent logo, The Power of Being There and SwitchView are registered trademarks of Avocent Corporation or its affiliates. ©2005 Avocent Corporation. All rights reserved.
Seite wird geladen ...

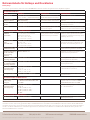
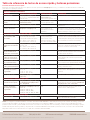
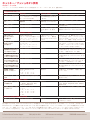
热键和按钮参考表
To Contact Avocent Technical Support CALL (888) 793-8763 VISIT www.avocent.com/support DOWNLOAD www.avocent.com
Avocent, the Avocent logo, The Power of Being There and SwitchView are registered trademarks of Avocent Corporation or its affiliates. ©2005 Avocent Corporation. All rights reserved.
适用于所有的 SwitchView 交换机
命令 热键 按钮 说明
选择 PC ScrLk + ScrLk + X
x = 1 ~ 2 或 1 ~ 4,代表 PC 通道编号
按 Select(选择)键选择下
一个通道
选择活动通道
下一个较高/较低通道 ScrLk + ScrLk + 上箭头/下箭头 按 Select 按钮切换到下个
通道
选择下一个已连接的通道
蜂鸣声开/关 ScrLk + ScrLk + B
不适用 切换蜂鸣声的开/关,以进行切换确认
自动扫描 ScrLk + ScrLk + S
按任意键停止自动扫描 自动扫描每个已连接的通道,以快速浏览每个通
道的屏幕
仅适用于 SwitchView DVI、MM1 和 MM2 交换机
切换 KVM 和 USB 插
座(没有音频)
ScrLk + ScrLk + Fx
Fx 是对应于端口编号的功能键
(F1 ~ 端口 1,F2 ~ 端口 2,
F3 ~ 端口 3,F4 ~ 端口 4)
按相应的按钮选择特定的 PC
+ USB 插座端口控制。
选择所有 USB 插座端口控制的 PC 通道(如果
启用了绑定功能,则会一起选择 PC 端口和插座
端口控制)
切换 KVM 和 音频
(没有USB 插座)
ScrLk + ScrLk + Fy
Fy = F5 ~ F8
(F5 ~ 端口 1,F6 ~ 端口 2,
F7 ~ 端口 3,F8 ~ 端口 4)
不适用 选择活动的音频和麦克风通道(如果启用了绑定
功能,则会一起选择 PC/音频和麦克风通道)
绑定 PC 和插座端口控
制切换
ScrLk + ScrLk + Z
不适用 启用 PC 端口和插座端口控制切换绑定功能(出
厂默认设置)
解除 PC 和插座端口控
制切换绑定
ScrLk + ScrLk + X
不适用 禁用 PC 端口和插座端口控制切换绑定功能
绑定 PC 和音频/麦克
风切换
ScrLk + ScrLk + Q
不适用 启用 PC 端口和音频/麦克风切换绑定功能(出厂
默认设置)
解除 PC 和音频/麦克风
切换绑定
ScrLk + ScrLk + W
不适用 禁用 PC 端口和音频/麦克风切换绑定功能
延时时间可编程的自动
扫描
ScrLk + ScrLk + S + X
X = 1 ~ 6
1 - 10”; 2 - 20”; 3 - 3”;
4 - 40”; 5 - 50”; 6 - 60”
不适用 在 10 ~ 60 秒的范围内确定延迟时间(仅适用于
4 端口型号)
前一个 PC 通道 ScrLk + ScrLk +(空格)
不适用 在前一个通道和当前通道之间切换
仅适用于 SwitchView DVI 和 MM2 交换机
定义热键优先序列 ScrLk + ScrLk + H + (y)
y = ScrLk、Caps Lock、Esc、F12
或 Num Lock
不适用
从下面选择热键优先序列:ScrLk、Caps
Lock、Esc、F12 或 Num Lock
延时时间可编程的自动
扫描
ScrLk + ScrLk + S + (z)
z = 0 ~ 9
1 - 10”; 2 - 20”; 3 - 3”;
4 - 40”; 5 - 50”; 6 - 60”;
7 - 70”; 8 - 80”; 9 - 90”;
0 - 100”
不适用 在 10 ~ 100 秒的范围内确定延迟时间
仅适用于 SwitchView PC 和 MM1 交换机
重设 KVM ScrLk + ScrLk + End
不适用 重设 KVM 交换机以重新启动交换机系统
热键序列
按 ScrLk 键两次,然后输入所需的热键命令,即可激活热键序列。
注:SwitchView MM1 USB KVM 交换机的默认设置适用于大多数系统。然而,如果要使用 USB 键盘/鼠标,您可能需要在 BIOS 里禁用 PS/2 选项,
并启用 USB 选项来替代。要使您的 PC 找到 USB 键盘和鼠标,您将需要同步选择插座端口和 PC 端口(例如,绿色的 PC 端口发光二极管和红色的
USB 插座端口发光二极管必须匹配)。而且,使用 USB 键盘的用户将无法使用 SwitchView MM1 交换机的热键功能。
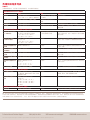
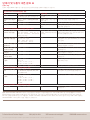
Referenztabelle für Hotkeys und Drucktasten
To Contact Avocent Technical Support CALL (888) 793-8763 VISIT www.avocent.com/support DOWNLOAD www.avocent.com
Avocent, the Avocent logo, The Power of Being There and SwitchView are registered trademarks of Avocent Corporation or its affiliates. ©2005 Avocent Corporation. All rights reserved.
Alle SwitchView-Switches
BEFEHL HOTKEYS DRUCKTASTE BESCHREIBUNG
PC auswählen
Rollen + Rollen + X
x = 1 ~ 2 oder 1 ~ 4 für PC-Kanalnummer
Die Auswahltaste drücken, um
den nächsten Kanal auszuwählen.
Wählt den aktiven Kanal aus.
Nächst höherer/
niedrigerer Kanal
Rollen +Rollen + Pfeil nach oben/
Pfeil nach unten
Die Auswahltaste drücken, um
zum nächsten Kanal umzuschalten.
Wählt den nächsten angeschlossenen
Kanal aus.
Signalton
ein/aus
Rollen + Rollen + B n/v Schaltet den Signalton für Switching-
Bestätigung ein und aus.
Autoscan Rollen + Rollen + S Eine beliebige Taste drücken, um
Autoscan zu stoppen.
Führt Autoscan über alle angeschlossenen
Kanäle aus, um diese schnell zu durchsuchen.
Nur SwitchView DVI-, MM1- und MM2-Switches
Switch KVM und
USB-Hub
(kein Audio)
Rollen + Rollen + Fx
Fx ist die Funktionstaste, die der
Portnummer entspricht
(F1 ~ Port 1, F2 ~ Port 2,
F3 ~ Port 3, F4 ~ Port 4)
Die entsprechende Taste drücken,
um die gewünschte PC- und USB-
Hub-Portsteuerung auszuwählen.
Wählt den PC-Kanal aus, der alle USB-
Hub-Ports steuert (gemeinsame Auswahl
von PC-Port- und Hub-Portsteuerung, wenn
Anbindung aktiviert ist).
Switch KVM und
Audio
(kein USB-Hub)
Rollen + Rollen + Fy
Fy = F5 ~ F8
(F5 ~ Port 1, F6 ~ Port 2,
F7 ~ Port 3, F8 ~ Port 4)
n/v Wählt den aktiven Audio- und Mik.-Kanal aus
(gemeinsame Auswahl von PC/Audio- und
Mik.-Kanal, wenn Anbindung aktiviert ist).
Switching für PC- und
Hub-Portsteuerung
Rollen + Rollen + Z n/v Anbindung von Switching für PC-Port- und
Hub-Portsteuerung aktivieren (Standard)
Switching-Anbindung
von PC- und Hub-
Portsteuerung
aufheben
Rollen + Rollen + X n/v Anbindung von Switching für PC-Port- und
Hub-Portsteuerung deaktivieren
PC- und Audio/Mik.-
Switching anbinden
Rollen + Rollen + Q n/v Anbindung von PC-Port- und Audio/Mik.-
Switching aktivieren (Standard)
Anbindung von
PC- und Audio/Mik.-
Switching aufheben
Rollen + Rollen + W n/v Anbindung von PC-Port- und Audio/Mik.-
Switching deaktivieren
Autoscan mit
programmierbarer
Zeitverzögerung
Rollen + Rollen + S + X
X = 1 ~ 6
1 - 10” ; 2 - 20” ; 3 - 3” ;
4 - 40” ; 5 - 50” ; 6 - 60”
n/v Gibt die Zeitverzögerung im Bereich von 10
~ 60 Sekunden an (nur 4-Port).
Vorheriger PC-Kanal Rollen + Rollen + (Rücktaste) n/v
Zwischen vorherigem Kanal und aktuellem
Kanal umschalten
Nur SwitchView DVI- und MM2-Switches
Vorangehende
Hotkey-Folge
festlegen
Rollen + Rollen + H + (y)
y = Rollen, Feststelltaste, Esc, F12
oder Num
n/v Vorangehende Hotkey-Folge aus
folgenden Optionen auswählen: Rollen,
Feststelltaste, Esc, F12 oder Num
Autoscan mit
programmierbarer
Zeitverzögerung
Rollen + Rollen + S + (z)
z = 0 ~ 9
1 - 10” ; 2 - 20” ; 3 - 3” ;
4 - 40” ; 5 - 50” ; 6 - 60” ;
7 - 70” ; 8 - 80” ; 9 - 90” ;
0 - 100”
n/v Gibt die Zeitverzögerung im Bereich von
10 ~ 100 Sekunden an.
Nur SwitchView PC- und MM1-Switches
KVM zurücksetzen Rollen + Rollen + Ende n/v Setzt den KVM-Switch für einen Neustart des
Switch-Systems zurück.
Hotkey-Folge
Die Hotkey-Folge wird aktiviert, indem Sie zweimal die
Rollen-Taste drücken und dann den gewünschten Hotkey-Befehl eingeben.
HINWEIS:
Die Standardeinstellung des SwitchView MM1 USB KVM-Switch eignet sich für die meisten Systeme. Wenn Sie eine USB-Tastatur/-Maus
verwenden möchten, müssen Sie ggf. die PS/2-Option im BIOS deaktivieren und stattdessen die USB-Option aktivieren. Damit Ihr PC die USB-Tastatur
und -Maus erkennen kann, müssen Sie die Hub-Portsteuerung und die Portauswahl des PCs synchronisieren (z. B. sollten die grüne LED für den PC-Port
und die rote LED des USB-Hub-Ports aufeinander abgestimmt sein). Außerdem können Benutzer von USB-Tastaturen NICHT die Hotkey-Funktion des
SwitchView MM1-Switches verwenden.
Seite wird geladen ...
Seite wird geladen ...
Seite wird geladen ...
Seite wird geladen ...
Seite wird geladen ...
Seite wird geladen ...
Seite wird geladen ...
Seite wird geladen ...
-
 1
1
-
 2
2
-
 3
3
-
 4
4
-
 5
5
-
 6
6
-
 7
7
-
 8
8
-
 9
9
-
 10
10
-
 11
11
-
 12
12


Avocent SWITCHVIEW PC Quick Installation Manual
- Kategorie
- KVM-Schalter
- Typ
- Quick Installation Manual
- Dieses Handbuch eignet sich auch für
in anderen Sprachen
- English: Avocent SWITCHVIEW PC
- français: Avocent SWITCHVIEW PC
- español: Avocent SWITCHVIEW PC
- italiano: Avocent SWITCHVIEW PC
- 日本語: Avocent SWITCHVIEW PC
Verwandte Artikel
Andere Dokumente
-
Intellinet 150101 Benutzerhandbuch
-
Belkin belkin Benutzerhandbuch
-
ATEN CS1784 Schnellstartanleitung
-
-
ATEN CS682 Schnellstartanleitung
-
-
ATEN CS692 Schnellstartanleitung
-
ATEN CS62U Schnellstartanleitung
-
-
Lindy 2 Port USB KM Switch Benutzerhandbuch