Hama 00053136 Bedienungsanleitung
- Kategorie
- Spielzeuge
- Typ
- Bedienungsanleitung

00053136/12.09
All listed brands are trademarks of the corresponding companies. Errors and omissions excepted,
and subject to technical changes. Our general terms of delivery and payment are applied.
Hama GmbH & Co KG
D-86651 Monheim/Germany
www.hama.com

Powerline LAN
85 Mbps
NETWORK
00053136
00053139

2
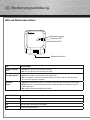
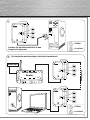
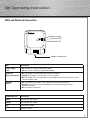
LEDs und Netzwerkanschluss
d Bedienungsanleitung
Stromversorgung
Powerline LED
Netzwerk LED
Netzwerkanschluss
LED Beschreibung
Stromversorgung
(Rot)
- Leuchet: Das Gerät wird mit Strom versorgt.
- Aus: Das Gerät wird nicht mit Strom versorgt.
Powerline
(Grün/Orange/Rot)
- Leuchet: Der Adapter ist mit dem Powerline-Netzwerk verbunden.
- Blinkt: Der Adapter empfängt oder überträgt Daten.
- Aus: Der Adapter hat keine kompatiblen Powerline-Geräte erkannt, die denselben
Verschlüsselungscode verweden.
Netzwerk
(Grün)
- Leuchet: Der Netzwerkanschluss ist belegt, aber es werden keine Daten übertragen.
- Blinkt: Zwischen einem Netzwerkanschluss und dem Powerline-Netzwerk werden
Daten übertragen.
- Aus: Keine Netzwerkverbindung vorhanden
POWERLINE LED Beschreibung
Grün
optimale Übertragungsgeschwindigkeit
Orange
durchschnittliche Übertragungsgeschwindigkeit
Rot
geringe Übertragungsgeschwindigkeit
Aus
Keine Datenübertragung

3
Internet
1
3
A
2
A
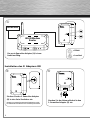
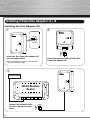
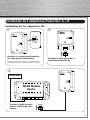
Installation von 2 Powerline Adapter: A + B
A
WLAN Modem
Router
Schließen sie das Netzwerk-
kabel an eine freie LAN-
Buchse Ihres Routers an.
Stecken Sie den 1. Powerline Adapter
(A) in eine freie Steckdose ein.
Hinweis: Das Powerline Netzwerk funktioniert nicht
bei Mehrfachsteckdosenleisten mit Überspannschutz.
Stecken Sie das Netzwerkkabel in den
1. Powerline Adapter (A) ein.
Installation des 1. Adapters (A)

4
Internet
4
5
6
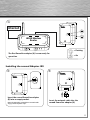
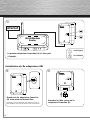
Installation des 2. Adapters (B)
Der erste Powerline Adapter (A) ist nun
funktionsfähig.
WLAN Modem
Router
Stecken Sie den 2. Powerline Adapter
(B) in eine freie Steckdose ein.
Hinweis: Das Powerline Netzwerk funktioniert nicht
bei Mehrfachsteckdosenleisten mit Überspannschutz.
Stecken Sie das Netzwerkkabel in den
2. Powerline Adapter (B) ein.
A
B
B
= Leuchtet
= Blinkt

5
7
Internet
8
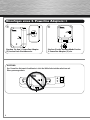
A
Stecken Sie das Netzwerkkabel in den
Computer/Laptop ein.
B
Die beiden Powerline Adapter sind jetzt einsatzbereit.
WLAN Modem
Router
= Leuchtet
= Blinkt
B
= Leuchtet
= Blinkt
Stromleitung

6
90
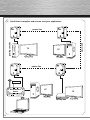
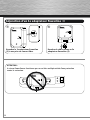
Hinzufügen eines 3. Powerline Adapters: C
C
C
Stecken Sie den 3. Powerline Adapter
(C) in eine freie Steckdose ein.
Stecken Sie das Netzwerkkabel in den
3. Powerline Adapter (C) ein.
ACHTUNG:
Das Powerline Netzwerk funktioniert nicht bei Mehrfachsteckdosenleisten mit
Überspannungsschutz.

7
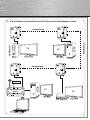
Internet
TV
PC
TV
PC
Spielkonsole
Set-Top-Box
i
A
WLAN Modem
Router
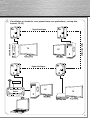
Die Installation ist abgeschlossen und Sie können Ihre Anwendungen starten.
B
CD
Stromleitung
Stromleitung
Stromleitung

8
d Bedienungsanleitung
Die Power-LED
leuchtet nicht.
Stellen Sie sicher, dass die Steckdosen funktionieren und die Powerline-Geräte nicht
an ein Verlängerungskabel, eine Steckerleiste oder einen Überspannungsschutz
angschlossen sind.
Die Powerline-LED
leuchtet nicht.
- Stellen Sie sicher, dass die Powerline-Geräte an funktionierende Steckdosen
angeschlossen sind.
- Verringern Sie den Abstand zwischen den Powerline-Geräten.
- Wenn Sie die Netzwerksicherheit eingestellt haben, sollten Sie sich vergewissern,
dass alle Powerline-Geräte denselben Verschlüsselungscode benutzen.
- Setzen Sie die Geräte auf die werkseitigen Voreinstellungen zurück.
Weitere Anweisungen fi nden Sie im Benutzerhandbuch.
Die Netzwerk-LED
leuchtet nicht.
- Vergewissern Sie sich, dass Ihr Router und Ihr Modem eingeschaltet sind und
einwandfrei funktionieren.
- Vergewissern Sie sich, dass die Netzwerkkabel funktionieren und fest an die Geräte
angeschlossen sind.
- Setzen Sie die Geräte auf die werkseitigen Voreinstellungen zurück.
Weitere Anweisungen fi nden Sie im Benutzerhandbuch.
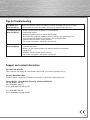
Tipps zur Fehlerbehebung
Support und Kontakt
Support- und Kontaktinformationen bei defekten Produkten:
Bitte wenden Sie sich bei Produktreklamationen an Ihren Händler oder an die Hama Produktberatung.
Internet/World Wide Web
Produktunterstützung, neue Treiber oder Produktinformationen bekommen Sie unter www.hama.com
Support Hotline – Hama Produktberatung: (Deutsch- und englischsprachig)
Tel. +49 (0) 9091 / 502-115
Fax +49 (0) 9091 / 502-272
e-mail: [email protected]

9
g
Operating Instruction
LEDs and Network Connection
g Operating Instruction
Network connection
LED Description
Power supply
(red)
- On: The device is being supplied with power.
- Off: The device is not being supplied with power.
Powerline
(green/orange/red)
- On: The adapter is connected to the Powerline network.
- Flashing: The adapter is receiving or transferring data.
- Off: The adapter has not recognized any compatible Powerline devices that use the
same encryption code.
Network
(green)
- On: The network connection is busy, but no data is being transferred.
- Flashing: Data is being transferred between a network connection and the
Powerline network.
- Off: No network connection
Power supply
Powerline LED
Network LED
POWERLINE LED Description
Green
Optimum transfer speed
Orange
Average transfer speed
Red
Low transfer speed
Off
No data transfer

10
Internet
1
3
A
2
A
Installing 2 Powerline Adapters: A + B
A
WLAN Modem
Router
Connect the network cable
to a free LAN port on your
router.
Insert the fi rst Powerline adapter (A)
into an empty socket.
Note: The Powerline network does not work with
surge protected power strips.
Insert the network cable into the fi rst
Powerline adapter (A).
Installing the fi rst Adapter (A)

11
g
Operating Instruction
Internet
4
5
6
Installing the second Adapter (B)
The fi rst Powerline adapter (A) is now ready for
operation.
WLAN Modem
Router
Insert the second Powerline adapter
(B) into an empty socket.
Note: The Powerline network does not work with
surge protected power strips.
Insert the network cable into the
second Powerline adapter (B).
A
B
B
= On
= Flashing

12
7
Internet
8
A
Insert the network cable into the
computer/laptop.
B
Both Powerline adapters are now ready for operation.
WLAN Modem
Router
= On
= Flashing
B
= On
= Flashing
power line

13
90
Adding a Third Powerline Adapter (C)
C
C
Insert the third Powerline adapter (C)
into an empty socket.
Insert the network cable into the third
Powerline adapter (C).
WARNING
The Powerline network does not work with surge protected power strips.

14
Internet
TV
PC
TV
PC
gaming consoles
set top box
i
A
WLAN Modem
Router
Installation is complete and you can start your applications.
B
CD
power line
power line
power line

15
The power LED
does not light up.
Make sure that the sockets are working and that the Powerline devices are not
connected to any extension cables, plug strips or overvoltage protectors.
The Powerline LED
does not light up.
- Make sure the Powerline devices are connected to
functioning sockets.
- Move the Powerline devices closer to each other.
- Once you have made your network security settings, you should make sure
that all Powerline devices are using the same encryption code.
- Reset the devices to their factory settings.
For further instructions, consult the user manual.
The network LED
does not light up.
- Make sure that your router and modem are switched on and
functioning properly.
- Make sure your network cables are working and fi rmly attached to
the devices.
- Reset the devices to their factory settings.
For further instructions, consult the user manual.
Tips for Troubleshooting
Support and contact information
If products are defective:
Please contact your dealer or Hama Product Consulting if you have any product claims.
Internet / World Wide Web:
Product support, new drivers or product information can be found at www.hama.com
Support Hotline – Hama Product Consulting: (German and English)
Tel. +49 (0) 9091 / 502-115
Fax +49 (0) 9091 / 502-272
E-mail: [email protected]
Fax +49 (0) 9091 / 502-272
E-mail: [email protected]

16
LED et Connexion au réseau
f Mode d‘emploi
Connexion au réseau
LED Description
Alimentation en
courant (rouge)
- Allumée : L´appareil est alimenté en courant.
- Eteinte : L´appareil n´est pas alimenté en courant.
Powerline
(verte/orange/
rouge)
- Allumée : L´adaptateur est relié au réseau Powerline.
- Clignotte : L´adaptateur reçoit ou transmet les données.
- Eteinte : L´adaptateur n´a pas détecté d´appareils Powerline compatibles qui utilisent
le même code de cryptage.
Réseau
(verte)
- Allumée : La connexion au réseau est occupée mais il n´y a pas de transfert de données.
- Clignotte : Entre une connexion au réseau et le réseau Powerline il n´y a pas de
transfert de données.
- Eteinte : Pas de connexion au réseau
Alimentation en courant
LED Powerline
LED réseau
LED POWERLINE Description
verte
vitesse de transmission optimale
orange
vitesse de transmission moyenne
rouge
vitesse de transmission faible
éteinte
aucune transmission de données

17
g
Operating Instruction
Internet
1
3
A
2
A
Installation de 2 adaptateurs Powerline : A + B
A
WLAN Modem
Router
Branchez le câble réseau à
un port LAN libre de votre
routeur.
Branchez le 1e adaptateur Powerline
(A) à une prise de courant libre.
Remarque : le réseau Powerline ne fonctionne pas sur un
bloc multiprise doté d‘une protection contre la surtension.
Branchez le câble réseau au 1e
adaptateur Powerline (A).
Installation du 1er adaptateur (A)

18
Internet
4
5
6
Installation du 2e adaptateur (B)
Le premier adaptateur Powerline (A) est alors prêt
à l‘emploi.
WLAN Modem
Router
Branchez le 2e adaptateur Powerline
(B) à une prise de courant libre.
Remarque : le réseau Powerline ne fonctionne pas sur un
bloc multiprise doté d‘une protection contre la surtension.
Branchez le câble réseau au 2e
adaptateur Powerline (B).
A
B
B
= est allumée
= la LED clignote

19
7
Internet
8
A
Branchez le câble réseau à votre
ordinateur (portable ou non)
B
Les deux adaptateurs Powerline sont alors prêts à l‘emploi.
WLAN Modem
Router
= est allumée
= la LED clignote
B
= est allumée
= la LED clignote
ligne électrique
Seite laden ...
Seite laden ...
Seite laden ...
Seite laden ...
Seite laden ...
Seite laden ...
-
 1
1
-
 2
2
-
 3
3
-
 4
4
-
 5
5
-
 6
6
-
 7
7
-
 8
8
-
 9
9
-
 10
10
-
 11
11
-
 12
12
-
 13
13
-
 14
14
-
 15
15
-
 16
16
-
 17
17
-
 18
18
-
 19
19
-
 20
20
-
 21
21
-
 22
22
-
 23
23
-
 24
24
-
 25
25
-
 26
26


Hama 00053136 Bedienungsanleitung
- Kategorie
- Spielzeuge
- Typ
- Bedienungsanleitung
in anderen Sprachen
- français: Hama 00053136 Le manuel du propriétaire
- italiano: Hama 00053136 Manuale del proprietario
- dansk: Hama 00053136 Brugervejledning
- română: Hama 00053136 Manualul proprietarului
Verwandte Papiere
-
Hama 00053143 Bedienungsanleitung
-
-
-
-
-
-
-
-
-