Seite wird geladen ...

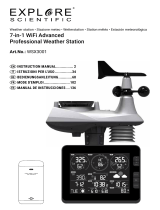
THERMO/HYGROMETER WITH MOULD ALERT WEATHER STATION
TERMO/IGROMETRO CON ALLERTA MUFFA STAZIONE METEO
THERMOHYGROMETER MIT SCHIMMELWARNUNG WETTERSTATION
THERMOMETRE/HYGROMETRE AVEC ALERTE MOISISSURES STATION MÉTÉO
TERMO/HIGRÓMETRO CON ALERTA DE MOHO ESTACIÓN METEOROLÓGICA
*Radio-controlled clock function not available in every territory / Funzione di orologio radiocontrollati non disponibile in ogni
territorio / Funkuhrfunktion nicht in jederm Gebiet d‘horloge radio-piloté n‘est pas disponible dans tous les territoires / La función
de reloj radiocontrolado no está disponible en todos los territorios
Art.No.: WSH1008
INSTRUCTION MANUAL
EN
ISTRUZIONI PER L’ U.S.O
BEDIENUNGSANLEITUNG
MODE D‘EMPLOI
MANUAL DE INSTRUCCIONES
2
14
26
38
50
IT
DE
FR
ES
MOULD ALERT

ABOUT THIS INSTRUCTION
MANUAL
GENERAL WARNINGS
• Risk of chemical burn — Keep batteries out of
the reach of children! Make sure you insert the
batteries correctly. Leaking battery acid can lead
to chemical burns. Avoid contact of battery acid
with skin, eyes and mucous membranes. In the
event of contact, rinse the affected region
immediately with a plenty of water and seek
medical attention.
• Risk of fire/explosion — Do not expose the
device to high temperatures. Use only the
recommended batteries. Do not short-circuit the
device or batteries, or throw them into a fire.
Excessive heat or improper handling could
trigger a short-circuit, a fire, or an explosion.
• Do not disassemble the device. In the event of a
defect, please contact your dealer. The dealer
will contact the Service Centre and can send the
device in to be repaired, if necessary.
• Use only the recommended batteries. Always
replace weak or empty batteries with a new,
complete set of batteries at full capacity. Do not
use batteries from different brands or with
different capacities. The batteries should be
removed from the unit if it has not been used for
a long time.
• Risk of electric shock — This device contains
electronic components. Only use the device as
described in the manual; otherwise, you run the
risk of an electric shock.
• Choking hazard — Children should only use the
device under adult supervision. Keep packaging
material, like plastic bags and rubber bands, out
of the reach of children, as these materials pose
a choking hazard.
These operating instructions are to be
considered a component of the device.
Please read the safety instructions and
the operating instructions carefully before use.
Keep these instructions for renewed use at a
later date. When the device is sold or given to
someone else, the instruction manual must be
provided to the new owner/ user of the product.
The device is intended only for indoor use.
2

• We recommend using alkaline batteries. If
emperatures regularly fall below 0°C (32°F-), we
recommend using lithium batteries.
• Avoid using rechargeable batteries. (Rechar-
geablebatteries cannot maintain correct power
equirements.)
• Insert batteries before first use, matching the
polarity in the battery compartment. 2x AAA
Batteries are required .
Weather station, Operating instructions,
2x AAA batteries.
BEFORE YOU BEGIN
SCOPE OF DELIVERY
EN
I T
DE
FR
ES
3

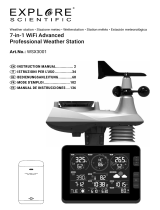
1. Press and hold [ MODE ] to enter time setting
mode. toggle to select time and temperature
display interface.
2. While in setting mode, press [ + ] to increase
one unit, press and hold to increase rapidly. In
normal mode, hold 2s enter temperature
alarm.
3. While in setting mode, press [ - ] to decrease
one unit, press and hold to decrease rapidly. In
normal mode, press is C/F display switch.
4. Press [ MEM ] to toggle the display among
current, maximum and minimum recording of
temperature/humidity. Press and hold to clear
the max/min memory records.
5. Wall Mount.
6. Battery compartment.
7. Table stand.
8. Mould Led indicator.
PRODUCT OVERVIEW
mode
+
-
mem
/ ° C /
° F
1 4
6
3
5
2
7
8
MOULD ALERT
4

PRODUCT OVERVIEW
MEMMODE
- ( °C / °F )
BUTTONMODE
Standard
mode
PRESS
Toggle between
time and
temperature
display.
Toggle between
current, maximum
and minimum record
of temperature /
humidity.
Clear max/min
memory records.
Select ℃ or ℉.
Decrease
Enter time
setting mode
Enter temperatu-
re and alarm
setting model
Confirm setting Increase
Time /
Alarm
setting
mode
HOLD
PRESS
HOLD
+
Quick DecreaseQuick Increase
5

1. Temperature/Time display
2. Humidity display
3. Humidity trend before 12 hours
[ ] Max/Min temperature/humidity
indicator
[ ] Low battery indicator
[ ] Mould indicator
[ ] temperature alarm
[ ] comfort indicator
EN
I T
DE
FR
ES
LCD DISPLAY
1
3
2
6

EN
I T
DE
FR
ES
INSERT BATTERIES
1. Remove the battery door from the back.
2. Insert 2x AAA (LR3)/1.5V batteries. Please
ensure the polarities (+/-) of the batteries
m-atch upon in stallation.
3. Reattach the battery door.
NOTE:
Replace batteries when [ ] displays, or
when the display is dim.
GETTING STARTED
7

1. Press and hold [ MODE ] button to enter into
time setting.
2. The setting parameter will flash.
3. Press [ + ] button once, the figure will increase
1 unit. Press and hold the [ + ] button, the
figures will increase rapidly.
4. Press [ – ] button once, the figure will decrease
1 unit. Press and hold the [ – ] button, the
figures will decrease rapidly.
5. Press [ MODE ] button to confirm setting and
enter to next parameter.
6. Sequence of setting: Hour > Minute > Exit
7. If there is no action in 20 seconds,the setting
will be saved and you will exit the setting
mode.
SET THE CLOCK MANUALLY
Press [ - ] button to switch Celsius (°C) /
Fahrenheit (°F).
°C/°F SETTING
8

EN
I T
DE
FR
ES
1. Press and hold [ + ] button to enter alarm
setting mode.
2. The setting parameter will flash.
3. Press [ + ] or [ - ] button to set the desired
data.
4. Press [ MODE ] to confirm setting and enter to
next parameter.
5. Sequence of setting: Upper limit On/Off >
Upper alarm temperature > Lower limit alarm >
Exit
6. If there is no action in 20 seconds,the setting
will be saved and you will exit the setting
mode.
TEMPERATURE ALARM
When the moldy definition is met, the LED
flashes once every 2 seconds, and [ ]
appears. When it flashes, press any key to return
to the alarm point and stop all flashes until the
temperature leaves the range again.
Mould Warning
9

EN
I T
DE
FR
ES
To toggle between current, minimum and
maximum records for the selected sensor press
[ MEM ] repeat edly. To clear records, press and
hold [ MEM ].
MAX/MIN MEMORY SPECIFICATIONS
Indoor comfort indication
NOTE:
When the indoor temperature is lower than -10°C
(18.0 °F), the screen displays LL.L. When the
temperature is higher than 50 °C (122.0 °F), the
screen display HH.H.
COMFORT WET DRY
Dimention
78 x 19 x 125 mm (L x W x H)
Weight
98 g (Exclude batteries)
Power :
2x AAA (LR3) 1.5V batteries
TEMPERATURE :
Temperature display range:
-10°C to +50°C (18°F to 122°F)
HUMIDITY :
Humidity range:
10% - 99% RH
10

EN
I T
DE
FR
ES
EC DECLARATION OF CONFORMITY
Hereby, Explore Scientific GmbH declares
that the equipment type with part number:
WSH1008 is in compliance with Directive:
2014/53/EU. The full text of the EU declaration of
conformity is available at the following internet
address:
www.bresser.de/download/WSH1008/CE/
WSH1008_CE.pdf
DISPOSAL
Dispose of the packaging materials properly,
according to their type, such as paper or
cardboard. Contact your local waste-dispo-
sal service or environmental authority for informa-
tion on the proper disposal.
Do not dispose of electronic devices in the
household garbage! As per the Directive
2002/96/EC of the European Parliament on
waste electrical and electronic equipment and its
adaptation into German law, used electronic devices
must be collected separately and recycled in an
environmentally friendly manner.
In accordance with the regulations concer-
ning batteries and rechargeable batteries,
disposing of them in the normal household
waste is explicitly forbidden. Please make sure to
dispose of your used batteries as required by law —
at a local collection point or in the retail market.
Disposal in domestic waste violates the Battery
Directive. Batteries that contain toxins are marked
with a sign and a chemical symbol.
RCM DECLARATION OF CONFORMITY
The product complies with electrical safety,
EMC and radio spectrum regulatory
requirements for products supplied to the
Australia or New Zealand market.
• Remove the batteries before cleaning.
• Only use a dry cloth to clean the exterior of the
device. To avoid damaging the electronics, do not
use any cleaning fluid.
• Protect the device from dust and moisture.
NOTES ON CLEANING
11

Cd
1
Hg
2
Pb
3
1 battery contains cadmium
2 battery contains mercury
3 battery contains lead
The regular guarantee period is 2 years and begins
on the day of purchase. To benefit from an extended
voluntary guarantee period as stated on the gift box,
registration on our website is required.
You can consult the full guarantee terms as well as
information on extending the guarantee period and
details of our services at www.bresser.de/warran-
ty_terms.
Would you like detailed instructions for this product
in a particular language? Then visit our website via
the link below (QR code) for available versions.
Alternatively you can also send an email to
manuals@bresser.de or leave a message on +49 (0)
28 72 – 80 74-220*. Please always state your
name, precise address, a valid phone number and
email address, as well as the article number and
name.
*Number charged at local rates in Germany (the
amount you will be charged per phone call will
depend on the tariff of your phone provider); calls
from abroad will involve higher costs.
www.bresser.de/warranty_terms
WARRANTY & SERVICE
12

13

INFORMAZIONI SUL MANUALE
DI ISTRUZIONI
AVVERTENZE GENERALI
• PERICOLO DI SOFFOCAMENTO — I bambini
possono utilizzare il dispositivo solo sotto la
vigilanza di un adulto. I materiali di imballaggio, i
sacchetti di plastica e le fasce in gomma
possono causare soffocamento e, pertanto,
devono essere conservati in modo che i bambini
non riescano a raggiungerli.
• RISCHIO DI USTIONE CHIMICA — Tenere le
batterie fuori dalla portata dei bambini. Accertar-
si di installare le batterie nel modo corretto. La
fuoriuscita di acido dalle batterie può causare
ustioni chimiche. Evitare che l’acido venga a
contatto con pelle, occhi e mucose. In caso,
lavare immediatamente le parti interessate con
un’abbondante quantità di acqua e rivolgersi a
un medico.
• RISCHIO DI INCENDIO/ESPLOSIONE — Non
esporre il dispositivo a temperature elevate.
Utilizzare solo le batterie consigliate. Evitare che
possano verificarsi corto-circuiti a carico del
dispositivo o delle batterie. Non gettare il
dispositivo o le batterie nel fuoco. Il surriscalda-
mento o l’impiego inappropriato potrebbe
generare un cortocircuito, un incendio o
un'esplosione.
• RISCHIO DI FOLGORAZIONE — Questo apparec-
chio contiene componenti elettronici azionati da
una sorgente di corrente (alimentatore e/o
batterie). L’utilizzo deve avvenire in stretta
conformità con quanto prescritto nel presente
manuale. In caso contrario, non sarà possibile
escludere il rischio di infortuni elettrici.
Il presente manuale è parte integrante del
prodotto.
Non azionare il dispositivo prima di aver
letto attentamente le istruzioni di sicurezza e le
istruzioni per l'uso in esso contenute.
Il manuale deve essere conservato in modo che
sia possibile consultarlo anche in seguito. Nel
caso in cui il dispositivo venga venduto o ceduto
a terzi, dovrà essere fornito al nuovo possessore
del dispositivo. Il dispositivo può essere
utilizzato esclusivamente in ambienti interni.
14

EN
I T
DE
FR
ES
Stazione meteo, Istruzioni per l'uso, 2 batterie
AAA.
ACCESSORI IN DOTAZIONE
• Si consiglia l'uso di batterie alcaline. Se le
temperature tendono regolarmente a scendere
sotto 0 °C (32 °F), tuttavia, potrebbe essere
preferibile l’impiego di batterie al litio.
• Evitare di utilizzare batterie ricaricabili (le
batterie ricaricabili non soddisfano i requisiti di
alimentazione appropriati).
• Al primo utilizzo, avere cura di inserire le
batterie in modo da rispettare la polarità indicata
nel relativo vano. Sono necessarie due batterie
AAA per la stazione meteo.
PRIMA DI INIZIARE
• Non smontare il dispositivo. Qualora dovesse
rilevarsi difettoso, rivolgersi al proprio rivenditore
autorizzato. Il rivenditore provvederà a contatta-
re il Centro assistenza e, se necessario, spedirà il
dispositivo in riparazione.
• Utilizzare solo le batterie consigliate. Le
batterie scariche o esaurite devono essere
sempre sostituite con una serie completa di
batterie nuove di capacità massima. Non
utilizzare batterie di marche o capacità diverse.
Rimuovere le batterie dall’unità se questa
rimarrà inutilizzata per un periodo prolungato.
15

1. Tenere premuto il pulsante [ MODE ] per accedere
alla modalità di impostazione dell'orologio.
Premerlo brevemente per visualizzare sul display
l'orologio o la temperatura.
2. In modalità di impostazione, premere [ + ] per
aumentare il valore visualizzato di una unità;
tenerlo premuto per aumentarlo rapidamente. In
modalità normale, tenerlo premuto per 2 secondi
per accedere alla modalità di impostazione
dell'allerta.
3. In modalità di impostazione, premere [ - ] per
diminuire il valore visualizzato di una unità;
tenerlo premuto per diminuirlo rapidamente. In
modalità normale, premerlo per selezionare l'unità
di misura tra °C o °F.
4. Premere [ MEM ] per visualizzare sul display i
valori di temperatura e
umidità correnti o
memorizzati (massimi e
minimi). Tenerlo premuto
per eliminare i valori
massimi e minimi
memorizzati.
5. Supporto per parete.
6. Vano batterie.
7. Supporto per tavolo.
8. Indicatore luminoso muffa.
DESCRIZIONE DEL PRODOTTO
mode
+
-
mem
/ ° C /
° F
1 4
6
3
5
2
7
8
MOULD ALERT
16

MEMMODALITÀ
- ( °C / °F )
PULSANTEMODALITÀ
Modalità
normale
PRESSIONE
SINGOLA
Visualizzazione
dell'orologio e
della
temperatura.
Visualizzazione dei
valori di temperatura
e umidità correnti o
memorizzati
(massimi e minimi).
Eliminazione dei
valori minimi e
massimi
memorizzati.
Selezione
dell'unità di
misura tra °C
e °F.
Diminuzione del
valore.
Accesso alla
modalità di
impostazione
dell'orologio.
Accesso alla
modalità di
impostazione
della temperatu-
ra e dell'allerta.
Conferma del
valore.
Aumento del
valore.
Modalità di
impostazione
temperatura
e allerta
PRESSIONE
PROLUNGATA
PRESSIONE
SINGOLA
PRESSIONE
SINGOLA
+
Diminuzione
rapida del valore.
Aumento rapido
del valore.
DESCRIZIONE DEL PRODOTTO
17

EN
I T
DE
FR
ES
1. Andamento dell'umidità nelle ultime 12 ore
2. Umidità
3. Orologio/Temperatura
[ ] Indicatore temperatura/umidità
max/min
[ ] Indicatore batteria scarica
[ ] Indicatore muffa
[ ] Allerta temperatura
[ ] Indicatore comfort
LCD DISPLAY
1
3
2
18

EN
I T
DE
FR
ES
INSERIMENTO DELLE BATTERIE
1. Rimuovere il coperchio del vano batterie
situato sul retro dell'unità.
2. Inserire 2 batterie AAA (LR03)/1,5 V. Assicu-
rarsi di rispettare l'orientamento dei poli (+/-)
durante l'installazione delle batterie.
3. Riposizionare il coperchio del vano batterie.
OPERAZIONI PRELIMINARI
NOTA:
Sostituire le batterie quando appare [ ] o
quando la luminosità del display si abbassa.
19

EN
I T
DE
FR
ES
1. Tenere premuto il pulsante [ MODE ] per
accedere alla modalità di impostazione
dell'orologio.
2. Il parametro da impostare lampeggerà.
3. Premere il pulsante [ + ] per aumentare il
valore di 1 unità. Tenere premuto il pulsante [
+ ] per aumentare rapidamente il valore.
4. Premere il pulsante [ - ] per diminuire il valore
di 1 unità. Tenere premuto il pulsante [ - ] per
diminuire rapidamente il valore.
5. Premere il pulsante [ MODE ] per confermare
l'impostazione e passare al parametro
successivo.
6. Sequenza dei parametri: Ore > Minuti > Uscita
7. Se non viene premuto alcun pulsante entro 20
secondi, o se viene premuto il pulsante [ SET ] ,
le impostazioni verranno memorizzate e
l'unità uscirà dalla modalità di impostazione.
INFORMAZIONI SUL MANUALE
DI ISTRUZIONI
Premere il pulsante [ - ] per selezionare i gradi
Celsius (°C) o Fahrenheit (°F).
IMPOSTAZIONE DELL'UNITÀ DI
MISURA °C/°F
20
/