Radialight CALYPSO DIGITAL Installationsanleitung
- Typ
- Installationsanleitung

1
CALYPSO DIGITAL
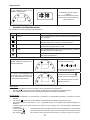
ll presente prodotto è adatto solo ad ambienti
correttamente isolati o ad un uso occasionale.
This product is only suitable for well insulated
spaces or occasional use.
Dieses Produkt ist nur für Räume geeignet, die korrekt isoliert
wurden oder für einen gelegentlichen Gebrauch.
IT
Leggere il manuale d'uso. Conservare con cura le istruzioni per ogni futura consultazione.
EN
Please retain these instructions in a safe place for further reference.
DE
Es wird gebeten, diese Gebrauchsanleitung für ein zukünftiges Nachschlagen sorgfältig aufzubewahren.

2
Volume
3
Volume
1
Volume
2
60cm
60cm
2,25m
60cm
1
4
B
A
3
1m 1m
2
D
C

3
5
7
6

4
ITALIANO
MANUALE DI INSTALLAZIONE E D’USO
Si prega di leggere attentamente queste istruzioni, prima di utilizzare il prodotto, in modo da evitare danneg-
giamenti o comunque il vericarsi di situazioni di pericolo. Qualsiasi utilizzo del prodotto diverso da quanto
indicato nel presente manuale può causare incendi, pericoli elettrici o ferite e rende nulla qualsiasi garanzia.
La garanzia non si applica ad alcun difetto, deterioramento, perdita, ferimento o danneggiamento riconducibili ad un
uso non corretto del prodotto. Rimangono garantiti tutti i diritti di legge in materia. Nessuna condizione di garanzia può
escludere o modicare le condizioni di garanzia regolamentate da leggi dello Stato che non possono essere a nessun
titolo escluse o modicate.
Prima di ogni operazione, rimuovere con cura l’imballo e controllare la perfetta integrità del prodotto. Nel caso si
evidenziassero dei difetti o danni, non installare né cercare di riparare l’apparecchiatura, ma rivolgersi al rivenditore.
Non lasciare l’imballo alla portata dei bambini e smaltirne le parti in conformità con le disposizioni vigenti.
1.
Per la vostra sicurezza
• Questo prodotto è per uso domestico e non è adatto per l'utilizzo
in ambienti commerciali/industriali o su veicoli, imbarcazioni o ae-
romobili.
• L’apparecchio può essere utilizzato da bambini di età non inferio-
re a 8 anni e da persone con ridotte capacità siche, sensoriali
o mentali, o prive di esperienza o della necessaria conoscenza,
purché sotto sorveglianza oppure dopo che le stesse abbiano
ricevuto istruzioni relative all’uso sicuro dell’apparecchio e alla
comprensione dei pericoli ad esso inerenti. I bambini non devono
giocare con l’apparecchio. La pulizia e la manutenzione destinata
ad essere effettuata dall’utilizzatore non deve essere effettuata da
bambini senza sorveglianza.
• I bambini di età inferiore a 3 anni non devono avvicinarsi al pro-
dotto se non costantemente supervisionati.
• I bambini di età compresa fra 3 e 8 anni possono solamente ac-
cendere e spegnere l’apparecchio purchè esso sia stato installato
e posizionato secondo le normali condizioni d’uso e loro siano
supervisionati o adeguatamente istruiti riguardo al corretto e si-
curo utilizzo del prodotto e ne abbiano compresa la pericolosità.
I bambini di età compresa fra 3 e 8 anni non possono collegare il
prodotto, regolarlo, pulirlo o effettuare manutenzione.
• ATTENZIONE: Alcune parti di questo prodotto possono diventare
molto calde e causare bruciature. Particolare attenzione deve es-

5
sere prestata in presenza di bambini o persone vulnerabili.
• Assicuratevi che l’alimentazione di rete corrisponda ai dati di tar-
ga: 230V AC, 50Hz.
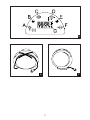
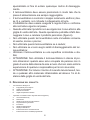
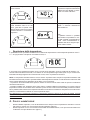
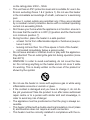
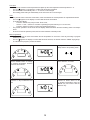
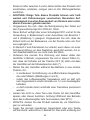
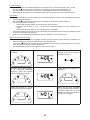
• Questa unita ha un livello di protezione IP21 ed e adatta ad es-
sere utilizzata in un bagno, escludendo le zone 1 e 2 (gura 1).
Accertarsi che l’unita non sia accessibile dalla vasca da bagno,
dalla doccia o da una piscina.
• Nella zona 3, sono consentite prese di corrente solo se protette
da un dispositivo di protezione dalla corrente residua, con una
corrente operativa residua che non superi i 30mA.
• Non abbandonate mai la vostra abitazione lasciando il termoven-
tilatore in funzionamento; in tali casi assicuratevi sempre che l’in-
terruttore sia in posizione OFF (0) e che il termostato sia in posi-
zione minima (*).
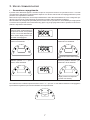
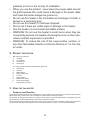
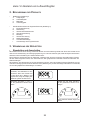
• Durante il funzionamento collocate il termoventilatore in una posi-
zione sicura ovvero:
- ad almeno 1m da oggetti inammabili o mobili (gure 2 e 3);
- lasciando libera la griglia di uscita dell’aria: nessun oggetto
deve essere presente nel raggio di 1m dalla griglia di uscita;
- mai posizionato immediatamente sotto ad una presa di cor-
rente.
• Non lasciate che animali o bambini giochino o tocchino il termo-
ventilatore. Attenzione! Durante il funzionamento la griglia di usci-
ta dell’aria può diventare molto calda ( oltre 90°C);
• IMPORTANTE: per evitare surriscaldamenti non ricoprite mai il
prodotto. Non appoggiate mai alcun oggetto o coperta sull’ap-
parecchio mentre è in funzione. Questo è chiaramente scritto
sull’apparecchio o illustrato dal simbolo
• Non utilizzate il termoventilatore in stanze sature di gas esplosivi,
di vapori generati da solventi e vernici o comunque di vapori/gas
inammabili.
• Se il cavo è danneggiato e dovete sostituirlo non eseguite questa
operazione da soli, riportate il termoventilatore ad un centro di
riparazioni autorizzato perché è richiesto l’intervento di personale

6
specializzato al ne di evitare qualunque rischio di danneggia-
mento.
• Il termoventilatore deve essere posizionato in modo tale che la
presa di alimentazione sia sempre raggiungibile.
• Il termoventilatore è costruito in doppio isolamento elettrico (clas-
se II) e, pertanto, non richiede il collegamento di terra.
• L’installazione deve essere eseguita a regola d’arte e conforme
alla normativa vigente nel paese.
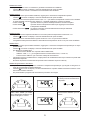
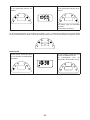
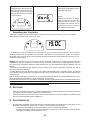
• Quando utilizzate il prodotto non avvolgete mai il cavo attorno alla
griglia di uscita dell’aria. Questa operazione potrebbe infatti dan-
neggiare il cavo e rendere il prodotto pericoloso (gura 6).
• Non utilizzate questo termoventilatore nelle immediate vicinanze
di vasche, doccie o piscine;
• Non utilizzate questo termoventilatore se è caduto;
• Non utilizzare se vi sono segni visibili di danneggiamento del ter-
moventilatore;
• Utilizzare il termoventilatore su una supercie orizzontale e sta-
bile;
• ATTENZIONE: Non utilizzate il termoventilatore in stanze di pic-
colo dimensioni quando esse sono occupate da persone non in
grado di uscire dalla stanza da sole a meno ché non siano sotto la
supervisione di qualcuno responsabile per la loro sicurezza;
• ATTENZIONE: Per ridurre il rischio di incendio tenete tessuti, ten-
de o qualsiasi altro materiale inammabile ad almeno 1m di di-
stanza dalla griglia di uscita dell’aria.
2.
Descrizione Del ProDotto
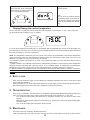
• Con riferimento alla gura 4:
A. Impugnatura per il trasporto
B. Griglia di uscita dell’aria
C. Pannello di controllo
D. Griglia di aspirazione dell’aria
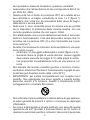
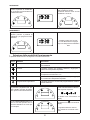
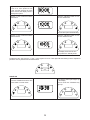
• Il pannello di controllo include i seguenti elementi (gura 5):
A. Accensione/Stand-by
B. Decremento
C. Selezione del modo di funzionamento
D. Programmazione giornaliera
E. Incremento
F. Selezione della potenza
G. DIsplay multifunzione
H. Indicatore luminoso di funzionamento
I. Indicatore luminoso modalità programmata.

7
3.
uso Del termoventilatore
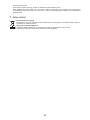
• Accensione e spegnimento
Il prodotto viene alimentato appena si inserisce la spina in una presa di corrente. Se il prodotto è nuovo o vi è stata
una interruzione della tensione di alimentazione superiore a 5 minuti il simbolo delle ore lampeggia afnchè si possa
procedere con l'impostazione dell'orario.
Rimuovendo la spina dalla presa, si interrompe l’alimentazione anche alla scheda elettronica con la conseguente per-
dita, dopo circa 5 minuti, di tutti i parametri memorizzati e il ripristino delle impostazioni di fabbrica.
Raccomandiamo di scollegare la spina dalla presa di corrente solo se il prodotto non verrà utilizzato per lunghi periodi
e di usare invece il pulsante di Accensione/Stand-by (gura 5-A) per gli spegnimenti di breve periodo in modo da non
perdere le impostazioni memorizzate.
Per accendere il termoventilatore
inserire la spina di alimentazione in
una presa di corrente. Se il prodotto
è nuovo o non è stato alimentato per
oltre 5 minuti il display mostra il sim-
bolo delle ore lampeggiare.
Utilizzare i pulsanti “+” e “–“ per im-
postare l’ora desiderata.
Premere il pulsante “SELECT.” per
confermare l’ora desiderata.
Il simbolo dei minuti inizia a lampeg-
giare.
Utilizzare i pulsanti “+” e “–“ per im-
postare i minuti desiderati.
Premere il pulsante “SELECT.” per
confermare i minuti desiderati.
Il display mostra l'ora impostata.
Il prodotto è in stand-by.
Per modicare l'ora è sufciente premere insieme i tasti "+" e "-" per 5sec. Le cifre dell'ora inizieranno a lampeggiare e
la procedura di regolazione potrà essere effettuata come sopra descritto.
+

8
ACCENSIONE
Premere il pulsante di “STAND-BY”
per accendere il termoventilatore in
modalità aria fredda.
Sul display si accende il simbolo
della modalità aria fredda.
L’indicatore luminoso sotto al tasto
STAND-BY si accende.
SPEGNIMENTO
In qualsiasi modalità di funzio-
namento premere il pulsante di
“STAND-BY” per spegnere il termo-
ventilatore.
Il display mostra l'ora corrente.
La retro illuminazione si spegne
dopo 30" dalla pressione dell'ultimo
tasto
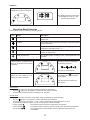
• Selezione della modalità di funzionamento
E' possibile selezionare uno dei seguenti 5 modi di funzionamento:
Icona Modalità Descrizione
Aria fredda Il prodotto funziona come un ventilatore e gli elementi riscaldanti
sono disattivati.
Comfort Il prodotto funziona per riscaldare l'ambiente, raggiungere e
mantenere la temperatura impostata.
Antigelo Il prodotto misura la temperatura ambiente e si accende qualora
la temperatura scenda sotto i 7°C.
Timer Il prodotto funziona per un tempo predeterminato per raggiunge-
re e mantenere la temperatura impostata.
Programmazione giornaliera Il prodotto funziona in accordo alla programmazione oraria im-
postata dall'utente.
La pressione progressiva del pul-
sante “MODE” permette di selezio-
nare i primi 4 modi di funzionamento.
I modi di funzionamento si attivano
nella seguente sequenza:
Le relative icone si accendono sul
display.
Il modo PROGRAMMAZIONE ha in-
vece un suo tasto specico che ne
consente l'attivazione in modo rapi-
do e semplice.
La relativa icona si accende sul
display.
Il segnalatore luminoso sotto al
tasto "PROG" si accende di colore
rosso.

9
Modalità Aria fredda
• Il prodotto funziona come un ventilatore e gli elementi riscaldanti sono disattivati.
• Il simbolo
si accende sul display a conferma dell'attivazione di questa modalità.
• Il termostato viene escluso e non inuisce sul funzionamento del ventilatore.
Modalità Comfort
• Il prodotto funziona per riscaldare l'ambiente, raggiungere e mantenere la temperatura impostata.
• Il simbolo
si accende sul display a conferma dell'attivazione di questa modalità.
• Il termostato deve essere impostato usando i tasti "+" e "-" per denire la temperatura di comfort che si desidera.
• In questa modalità, premendo il tasto "SELECT", è possibile scegliere fra 3 diverse regolazioni:
Comfort 1000W
Il prodotto funziona a potenza ridotta per limitare il consumo energetico.
Comfort 2000W
Il prodotto funziona alla potenza massima per raggiungere velocemente
la temperatura desiderata.
Comfort automatico
La potenza necessaria viene automaticamente scelta per ottimizzare
performance e consumo.
Modalità Antigelo
• Il prodotto misura la temperatura ambiente e si accende qualora la temperatura scenda sotto i 7°C.
• Il simbolo
si accende sul display a conferma dell'attivazione di questa modalità.
• Il termostato viene automaticamente regolato al valore di 7°C e non può essere modicato.
• La regolazione della potenza riscaldante è automaticamente impostata su AUTO e non può essere modicata.
Modalità Timer
• Il prodotto funziona per riscaldare l'ambiente, raggiungere e mantenere la temperatura impostata per un tempo
predeterminato.
• Il simbolo
si accende sul display a conferma dell'attivazione di questa modalità.
• Per utilizzare la modalità Timer:
- Premere il tasto "MODE" sino a portarsi nella modalità Timer;
- Utilizzare i tasti "+" e "-" per scegliere la durata di funzionamento fra 0,5-1-2-4-8 ore;
- Premere il tasto "SELECT" per confermare il tempo di funzionamento.
• Il prodotto funziona in modalità AUTO e il display alterna la visualizzazione del tempo rimanente a quella della
temperatura impostata.
• Al termine del periodo di funzionamento impostato il termoventilatore si porta in stand-by.
Modalità Programmazione Giornaliera
• Il prodotto funziona per raggiungere e mantenere la temperatura impostata per ogni singola ora del giorno se-
condo la programmazzione denita dall'utente.
• Il simbolo
si accende sul display a conferma dell'attivazione di questa modalità è l'indicatore luminoso rosso
sotto al tasto "PROG" si illumina.
• Per personalizzare il programma di funzionamento procedere come segue:
Premere per 5" il tasto "PROG"
5"
Il display indica l'ora 00 (dalle 00:00
alle 00:59) e il modo di funzionamen-
to impostato:
oppure
Usare il tasto "MODE" per modi-
care la temperatura desiderata sce-
gliendo fra Antigelo e Comfort
Premere il tasto "SELECT" per con-
fermare

10
Premere il tasto "+" per selezionare
l'ora successiva
Procedere come illustrato sopra per
impostare la temperatura desiderata
utilizzando il tasto "MODE" e confer-
mando con il tasto "SELECT".
Dopo aver visualizzato ed eventual-
mente modicato tutte le ore del
giorno, giunti alle 23 (fascia oraria
dalle 23:00 alle 23:59) la successiva
pressione del tasto "+" memorizza il
programma.
Il display indica per 5" la scritta
"donE" a conferma dell'avvenuta
memorizzazione
Nota:
In qualsiasi momento è possibile
memorizzare le impostazioni e usci-
re dalla modalità programmazione
senza dover necessariamente vi-
sualizzare tutte le ore del giorno pre-
mendo il tasto "PROG"
• Regolazione della temperatura
In qualsiasi momento è possibile visualizzare e/o modicare la temperatura di comfort impostata premendo i tasti "+"
e "-". Ad ogni pressione corrisponde una variazione di 0,5°C.
In una stanza ove la temperatura supera i 30°C è normale che il termostato, anche se posizionato al massimo, non
accenda il termoventilatore.Viceversa, in una stanza con una temperatura troppo bassa (sotto i 5°C) è normale che il
termostato mantenga l’apparecchio continuamente acceso, anche se posizionato al minimo.
NOTA: La temperatura misurata tramite il sensore interno al prodotto indica sempre la temperatura ambiente nelle
immediate vicinanze del prodotto e potrebbe differire dalla temperatura misurata con altri strumenti in altre aree della
stanza. Questa differenza può dipendere da vari fattori, come ad esempio:
- La posizione: alcune aree della stanza possono risentire di correnti o sacche d’aria calda che possono modicare la
misurazione del sensore;
- Condizioni instabili: ogni valutazione deve essere fatta in condizioni stabili di funzionamento. Per questo motivo la
temperatura Comfort non dovrebbe essere cambiata prima che siano trascorsi 60 minuti dalla precedente modica.
Non è possibile infatti valutare se la temperatura ambiente è mantenuta correttamente dal prodotto se il livello di tem-
peratura è continuamente modicato in un breve periodo di tempo.
Se la differenza tra la temperature impostata e la temperature ambiente è rilevata in condizioni di stabilità, calcolate
tale differenza e quindi aumentate o diminuite il livello di temperature Comfort sul prodotto dell’esatto valore della
differenza calcolata.
4.
cavo Di alimentazione
• Quando utilizzate il prodotto, il cavo di alimentazione deve sempre essere completamente srotolato e non deve
mai entrare in contatto con nessuna parte del termoventilatore (gura 6).
• Quando il prodotto non è in uso ed è disconnesso dalla rete di alimentazione, il cavo può essere arrotolato intor-
no alla base e la spina ssata al cavo (gura 7).

11
5.
risoluzione Dei Problemi
• In caso di surriscaldamento il sistema di protezione dell’apparecchio disattiva automaticamente l’elemento riscal-
dante ed il motore, facendo così interrompere il funzionamento del termoventilatore . In questo caso il prodotto
non funziona. In questo caso:
- Spegnere il termoventilatore e lasciarlo raffreddare per circa 15/20 minuti
- Rimuovete eventuali altre cause di surriscaldamento (per es. ostacoli di fronte alla griglia di ingresso e/o
uscita dell’aria, anomalo acumulo di sporco ecc);
- Accendete nuovamente il termoventilatore e vericatene il corretto funzionamento.
6.
manutenzione
• Questo prodotto non richiede particolare manutenzione.
• Vi raccomandiamo di pulire il prodotto ogni 6 mesi utilizzando un panno asciutto e di usare un aspirapolvere per
aspirare eventuali impurità depositate dietro la griglia di uscita dell'aria.
• Qualora sia necessario riparare il prodotto contattate un centro di assistenza autorizzato.
• Se deve essere sostituito il cavo di alimentazione ricordatevi che deve obbligatoriamente essere utilizzato un
cavo tipo 2x0,75 mm
2
H05VV-F HAR. Questa operazione deve essere eseguita da personale qualicato e
mai dall’utente nale in modo da prevenire ogni rischio di danneggiamento e/o compromissione del livello di
sicurezza.
7.
comunicazioni Di legge
Tutela dell'ambiente e riciclaggio
Afnché il vostro apparecchio non subisca danni durante il trasporto, esso è stato imballato con cura. Per
contribuire alla tutela del nostro ambiente, vi chiediamo di smaltire in modo appropriato il materiale utiliz-
zato per l'imballaggio dell'apparecchio.
Smaltimento degli apparecchi usati
Gli apparecchi che recano il contrassegno riportato a anco non devono essere smaltiti insieme ai riuti
urbani, ma vanno raccolti e smaltiti separatamente. Lo smaltimento degli apparecchi usati va eseguito a
regola d'arte, in conformità con le prescrizioni e leggi vigenti localmente in materia.

12
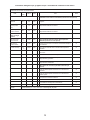
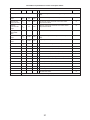
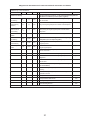
Informazioni obbligatorie per gli apparecchi per il riscaldamento d’ambiente locale elettrici
Identicativo del modello: CALYPSO DIGITAL
Dato
Sim-
bolo
Valore Unità Dato Unità
Potenza termica Tipo di potenza termica, solo per gli apparecchi per il riscaldamento
d’ambiente locale elettrici ad accumulo (indicare una sola opzione)
Potenza termica
nominale
P
nom
2,0 kW
controllo manuale del carico termico, con termostato
integrato
no
Potenza termica
minima (indica-
tiva)
P
min
1,0 kW
controllo manuale del carico termico con riscontro della
temperatura ambiente e/o esterna
no
Massima potenza
termica continua
P
max,c
2,0 kW
controllo elettronico del carico termico con riscontro della
temperatura ambiente e/o esterna
no
Consumo ausi-
liario di energia
elettrica
potenza termica assistita da ventilatore no
Alla potenza ter-
mica nominale
el
max
0,000 kW
Tipo di potenza termica/controllo della temperatura
ambiente (indicare una sola opzione)
Alla potenza
termica minima
el
min
0,000 kW
potenza termica a fase unica senza controllo della tempera-
tura ambiente
no
In modo stand-by el
SB
0,00030
kW
due o più fasi manuali senza controllo della temperatura
ambiente
no
con controllo della temperatura ambiente tramite termostato
meccanico
no
con controllo elettronico della temperatura ambiente no
con controllo elettronico della temperatura ambiente e
temporizzatore giornaliero
si
con controllo elettronico della temperatura ambiente e
temporizzatore settimanale
no
Altre opzioni di controllo (è possibile selezionare più
opzioni)
controllo della temperatura ambiente con rilevamento di
presenza
no
controllo della temperatura ambiente con rilevamento di
nestre aperte
no
con opzione di controllo a distanza no
con controllo di avviamento adattabile no
con limitazione del tempo di funzionamento si
con termometro a globo nero no
Contatti Ermete Giudici S.p.A. - via L. da Vinci 27 - 20090 Segrate (MI) Italia

13
ENGLISH
INSTALLATION AND OPERATING MANUAL
Before operating the heater, please read these instructions thoroughly to avoid damage and hazardous situa-
tions. Any use of this heater other than that stipulated in this instruction manual may cause re, electric shock
or injury, and voids all warranties.
Warranty does not apply to any defect, deterioration, loss, injury or damage caused by, or as a result of, the misuse or
abuse of this heater. The rights dictated by State law are not prejudiced. None of the terms of this warranty are to be
taken as excluding any conditions or warranties implied by State law, which cannot be excluded or modied.
Before any operation remove the packaging and check product integrity. In case of defects or damages do not try to
repair it yourself but contact your dealer.
Do not let children play with the packaging and protect the environment by disposing of the packaging in accordance
with the national regulations for waste processing.
1.
For your saFety
• This appliance is intended for normal household use and not for
use in commercial/industrial enviroment, in vehicles or on board
ships or aircrafts.
• This appliance can be used by children aged from 8 years and
above and persons with reduced physical, sensory or mental ca-
pabilities or lack of experience and knowledge if they have been
given supervision or instruction concerning use of the appliance
in a safe way and understand the hazards involved. Children shall
not play with the appliance. Cleaning and user maintenance shall
not be made by children without supervision.
• Children of less than 3 years should be kept away unless conti-
nuously supervised.
• Children aged from 3 years and less than 8 years shall only switch
on/off the appliance provided that it has been placed or installed
in its intended normal operating position and they have been gi-
ven supervision or instruction concerning use of the appliance in
a safe way and understand the hazards involved. Children aged
from 3 years and less than 8 years shall not plug in, regulate and
clean the appliance or perform user maintenance.
• CAUTION — Some parts of this product can become very hot and
cause burns. Particular attention has to be given where children
and vulnerable people are present.
• Make sure that your supply rating corresponds to what specied

14
on the rating plate: 230V~, 50Hz.
• This unit has an IP21 protection level and is suitable for use in ba-
throom excluding Zones 1 & 2 (picture 1). Do not use this heater
in the immediate surroundings of a bath, a shower or a swimming
pool.
• In zone 3, socket outlets are permitted only if they are protected
by a residual current protective device with a residual operating
current not exceeding 30mA.
• Don't leave your home while the appliance is in function: ensure in
this case that the switch is in OFF (0) position and the thermostat
is in minimum position (*).
• During function, place the heater in a safe position:
- at least 1m far from inammable objects or furnitures (see pic-
tures 2 and 3);
- leaving not less than 1m of free space in front of the heater;
- not located immediately below a socket-outlet.
• Do not leave animals or children touch or play with the appliance.
Pay attention! The air outlet grille gets hot during operation (more
than 90°C)
• WARNING: In order to avoid overheating, do not cover the hea-
ter. Do not hang anything on the heater and do not cover it while
it’s working. This is clearly written on the cover of the product or
shown by the symbol
• Do not use the heater in rooms with explosive gas or while using
inammable solvents or varnish or glues.
• If the cordset is damaged and you have to change it, do not do
the job yourselves! Take the product to an after sales authorised
repair centre or to a person with similar skill and knowledge, in
order to avoid any risk of danger.
• The appliance must be positioned so that the plug is always ac-
cessible.
• This heater is tted with a double electrical insulation circuit (class
II) and therefore does not require an earth connection.
• This heater must be correctly installed in compliance with the re-

15
gulations in force in the country of installation.
• When you use the product , never place the power cable around
the grille because this could cause a damage to the power cable
and make the heater dangerous (picture 6).
• Do not use this heater in the immediate surroundings of a bath, a
shower or a swimming pool;
• Do not use this heater if it has been dropped;
• Do not use if there are visible signs of damage to the heater;
• Use this heater on a horizontal and stable surface;
• WARNING: Do not use this heater in small rooms when they are
occupied by persons not capable of leaving the room on their own,
unless constant supervision is provided.
• WARNING: To reduce the risk of re, keep textiles, curtains, or
any other ammable material a minimum distance of 1 m from the
air outlet.
2.
ProDuct DescriPtion
• With reference to picture 4:
A. Handgrip
B. Air outlet grid
C. Control panel
D. Air inlet grid
• The control panel includes the following items (picture 5):
A. On/Stand-by
B. Decrease
C. Mode selector
D. Daily programming
E. Increase
F. Power selector
G. Multifunction display
H. Functioning pilot light
I. Programmed mode light
3.
using the Fan heater
• Power on and Stand-by
The product is powered as soon as it is plugged into a power outlet. If the product is new or there has been a power
failure longer than 5 minutes, the time icon ashes to activate the time setting procedure.
By removing the plug from the socket, the electronic board power is also interrupted with the consequent loss, after
about 5 minutes, of all stored parameters and restoring the factory settings.
We recommend disconnecting the plug from the power outlet only if the product is not being used for long periods and
use the Power / Standby button (Figure 5-A) for short-term shutdowns so you do not lose the stored settings.

16
Plug the heater into a power outlet
to turn it on. If the product is new
or has not been powered for more
than 5 minutes, the display shows a
ashing time symbol.
Use the "+" and "-" buttons to set the
desired time.
Press the "SELECT" button to con-
rm the desired time.
The minutes symbol starts blinking.
Use the "+" and "-" buttons to set the
desired minutes.
Press the "SELECT" button to con-
rm the desired minutes.
The display shows the set time.
The product is in standby mode.
To adjust the time, just press the "+" and "-" keys together for 5 sec. Time digits will start blinking and the adjustment
procedure can be performed as described above.
+
POWER ON
Press the "STAND-BY" button to turn
on the heater in cold air mode.
The cold air mode symbol lights up
in the display.
The led under the STAND-BY key
lights up.

17
STAND-BY
In any operating mode, press the
"STAND-BY" key to turn off the fan.
The display shows the current time.
The backlight turns off 30 " after
pressing the last button
• Operating Mode Selection
You can select one of the following 5 operating modes:
Icon Mode Description
Cold air The product works as a fan and the heating elements are
switched off.
Comfort The product works to heat the environment, reach and maintain
the set temperature.
Frost free The product measures room temperature and lights up when the
temperature level drops below 7 ° C.
Timer The product works for a predetermined time to reach and main-
tain the set temperature.
Daily programming The product works according to the user-programmed time
schedule.
A further pression of "MODE" button
allows you to select the rst 4 modes
of operation
Operating modes are activated in
the following sequence:
Icons light up on the display.
PROGRAMMING mode has its own
specic key that enables it to be
switched on quickly and easily.
The following icon will appear
on the display.
A red led under the "PROG" key
lights up red.
Cold air Mode
• The product works as a fan and the heating elements are switched off.
• The icon
appears on the display to conrm that this mode is activated
• Thermostat is excluded and does not affect the fan operation
Comfort Mode
• The product works to heat the environment, reach and maintain the set temperature.
• The icon
appears on the display to conrm that this mode is activated.
• Thermostat must be set using the "+" and "-" keys to dene the comfort temperature you want.
• by pressing the "SELECT" button, you can choose among 3 different settings:
Comfort 1000W
The product works at low power to limit power consumption.
Comfort 2000W
The product works at maximum power to quickly reach the desired temperature
Auto Comfort
The required power is automatically chosen to optimize Performance and
consumption.

18
Frost Free
• The product measures room temperature and lights up when the temperature level drops below 7 ° C.
• The icon
appears on the display to conrm that this mode is activated.
• The thermostat is automatically set to 7 ° C and can not be changed.
• The heating power setting is automatically set to AUTO and can not be changed.
Timer
• The product works to heat the environment, reach and maintain the set temperature for a predetermined time.
• The Icon
appears on the display to conrm that this mode is activated.
• To set the Timer Mode:
- Press the "MODE" key until you enter Timer mode;
- Use the "+" and "-" buttons to choose the operating time period among 0.5-1-2-4-8 hours;
- Press the "SELECT" button to conrm the operating time period.
• The product operates in AUTO mode and the display switches between the time remaining and the set tempe-
rature.
• At the end of the set operation period, the fan heater switches to standby mode.
Daily Programming
• The product works to reach and maintain the set temperature for each hour of the day according to program
dened by the user.
• The icon
appears the display to conrm that this mode is active, the red led under the "PROG" key lights up.
• To customize the program, proceed as follows:
Press the "PROG" key for 5 "
5"
Display indicates time 00 (00:00 to
00:59) and the set operating mode:
or
Use the "MODE" button to change
the desired temperature between
Frost Free and Comfort
Press "SELECT" to conrm
Press the "+" key to select the next
hour
Proceed as shown above to set
the desired temperature using the
"MODE" key and conrm with the
"SELECT" key

19
After displaying and editing all the
hours of the day, at 23 o'clock (from
23:00 to 23:59), a further pression of
the "+" key stores the program.
Display shows "donE" for 5 " to con-
rm the storage
Note:
You can store the settings and exit
programming mode, at any time, wi-
thout having to display all the hours
of the day by pressing the "PROG"
key
• Display/Change the comfort temperature
You can view and / or modify the comfort temperature set at any time, by pressing the "+" and "-" keys. Every time
you hit the button will correspond a 0.5 ° C variation.
In a room with a temperature exceeding 30°C, it could happen that the thermostat does not turn on the fan heater even
if it is at maximum. Vice-versa, in a room with a very low temperature (below 5°C), it is normal that the thermostat keeps
the heater constantly on, even if it is at minimum.
NOTE: The temperature measured by the inner sensor of the product is representative of the ambient temperature
nearby it and it may differ from the temperature measured using other instruments in other areas of the room. That
difference may depend on many factors including, for example:
- the installation position: some areas of the room may be affected by drafts or hot air sacs that modify the sensor
measurement;
- unstable conditions: any evaluation must be done in stable working conditions. For this purpose comfort temperature
should be changed only 60min after a previous change . It is not possible, indeed, to evaluate the room temperature
maintained by the product correctly if the comfort level temperature is continually changed in a short time.
If a difference between set temperature and room temperature is detected in stable working conditions, measure the
difference and then increase or decrease the comfort temperature on the product of the exact value of measured
difference.
4.
suPPly corD
• When using the heater the supply cord mus always be completely unwrapped and never in touch with any part
of the heater (see picture 6).
• When the heater is not in use and disconnected from the net, the supply cord can be rolled up around the pede-
stal and the plug may be locked to the cord to facilitate the storage (see picture 7).
5.
troubleshooting
• In the event of overheating, the safety device on the appliance automatically disabled the heating elements and
motor. As a result, the heater stops working and the pilot light will remain switched on . In this case:
- Turn off the fan heater putting the switch lever in 0 position and allow it to cool down for about 15/20
minutes.
- Eliminate any other possible reasons for overheating (e.g.: obstructions in front of the air inlet/outlet grilles,
build-ups of dirt).
- Turn on the fan heater again and check it works correctly.
6.
maintenance
• This product does not require any special maintenance.
• Clean the product with a dry cloth once every 6 months and use a vacum cleaner to suck up any dirt should be

20
present behind the grid.
• If the product requires repairing, contact an authorised technical service centre.
• When replacing the power cable, use a 2x0,75mm2 H05VV-F HAR type. This operation must be performed
by qualied personnel and never by the end user in order to avoid damaging the appliance and jeopardising
personal safety.
7.
legal notice
Environment and recycling
Please help us to protect the environment by disposing of the packaging in accordance with the national
regulations for waste processing.
Recycling of obsolete appliances
Appliances with this label must not be disposed off with the general waste. They must be
collected separately and disposed off according to local regulations.
Seite wird geladen ...
Seite wird geladen ...
Seite wird geladen ...
Seite wird geladen ...
Seite wird geladen ...
Seite wird geladen ...
Seite wird geladen ...
Seite wird geladen ...
Seite wird geladen ...
Seite wird geladen ...
Seite wird geladen ...
Seite wird geladen ...
-
 1
1
-
 2
2
-
 3
3
-
 4
4
-
 5
5
-
 6
6
-
 7
7
-
 8
8
-
 9
9
-
 10
10
-
 11
11
-
 12
12
-
 13
13
-
 14
14
-
 15
15
-
 16
16
-
 17
17
-
 18
18
-
 19
19
-
 20
20
-
 21
21
-
 22
22
-
 23
23
-
 24
24
-
 25
25
-
 26
26
-
 27
27
-
 28
28
-
 29
29
-
 30
30
-
 31
31
-
 32
32


Radialight CALYPSO DIGITAL Installationsanleitung
- Typ
- Installationsanleitung
in anderen Sprachen
Verwandte Artikel

Andere Dokumente
-
Ardes AR4C05 Fan Convector Heater Benutzerhandbuch
-
-
Steba E-VENT 1 Bedienungsanleitung
-
Midea NTH20-18MRA Bedienungsanleitung
-
EWT M2GTS Bedienungsanleitung
-
-
Steba PIKKOLO WM 2 Bedienungsanleitung
-
Bimar S245.EU Bedienungsanleitung
-
Silvercrest SHLF 2000 C1 Operating Instructions And Safety Instructions
-
Brandson 304023 Benutzerhandbuch