EUFAB Dual Power Kompressor Bedienungsanleitung
- Kategorie
- Kaffeezubehör
- Typ
- Bedienungsanleitung

1
© EAL GmbH, 21084 12.2022
Art.-Nr.: 21084
DUAL POWER KOMPRESSOR
12 V / 230 V
Bedienungsanleitung ............... 2
Art. No. 21084
DUAL POWER COMPRESSOR
12 V / 230 V
Operating instructions .............. 8
Réf. art. 21084
COMPRESSEUR DOUBLE PUISSANCE
12 V / 230 V
Manuel de l‘opérateur .............. 14
Cod. art. 21084
COMPRESSORE DUAL POWER
12 V / 230 V
Istruzioni per l‘uso .................. 26
Art.nr. 21084
DUAL POWER COMPRESSOR
12 V / 230 V
Gebruiksaanwijzing ............... 20

2
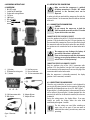
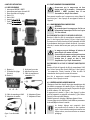
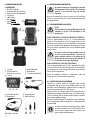
2. LIEFERUMFANG
1 x Dual Power Kompressor
1 x Kfz-Anschlusskabel für 12 V Bordsteckdose
1 x Anschlusskabel für 230 V Haussteckdose
2 x Glassicherung, ink 15 A 250 V, 6 x 30
1 x Adapter Ø 5 mm
1 x Adapter Ø 8 mm
1 x Balladapter
1 x Gebrauchsanleitung
INHALT
1. BESTIMMUNGSGEMÄSSER GEBRAUCH _________2
2. LIEFERUMFANG _______________________2
3. SPEZIFIKATIONEN ______________________2
4. SICHERHEITSHINWEISE ___________________3
5. SYMBOLERKLÄRUNG ____________________3
6. BEDIENUNGSANLEITUNG __________________4
6.1 ÜBERSICHT __________________________4
6.2 BETRIEB DES KOMPRESSORS _______________4
6.2.1 ANSCHLIESSEN DES KOMPRESSORS ___________4
6.2.2 VOREINSTELLEN DES LUFTDRUCKS ____________4
6.3 BEFÜLLEN EINES REIFENS MIT AUTOVENTIL
SCHRADERVENTIL _____________________5
6.4 VERWENDUNG DER ADAPTER _______________5
6.5 UMRECHNUNGSTABELLE PSI / BAR / KG/CM² ______6
6.6 LEDARBEITSLEUCHTE ___________________6
6.7 ERSETZEN DER SICHERUNGEN _______________6
6.8 FEHLERSUCHE ________________________7
7. WARTUNG UND PFLEGE ___________________7
7.1 WARTUNG ___________________________7
7.2 PFLEGE _____________________________7
8. HINWEISE ZUM UMWELTSCHUTZ _____________7
9. KONTAKTINFORMATIONEN _________________7
Lesen Sie die Bedienungsanleitung vor
Inbetriebnahme sorgfältig durch und
beachten Sie alle Sicherheitshinweise!
Nichtbeachtung kann zu Personenschäden,
Schäden am Gerät oder Ihrem Eigentum
führen! Bewahren Sie die Originalverpa-
ckung, den Kaufbeleg sowie diese Anleitung
zum späteren Nachschlagen auf! Bei der
Weitergabe des Produkts geben Sie auch
diese Anleitung weiter. Prüfen Sie vor
Inbetriebnahme den Inhalt der Verpackung
auf Unversehrtheit und Vollständigkeit!
1. BESTIMMUNGSGEMÄßER GEBRAUCH
Der Dual Power Kompressor ist universell einsetzbar z.B. für das
Aufpumpen von Auto-, Motorrad- und Fahrradreifen, Sportbällen
und Luftspielzeugen.
Er kann entweder mit dem 12 V-Bordnetz eines Fahrzeugs oder
mit dem 230 V-Hausnetz betrieben werden.
Dieses Gerät ist nicht dafür bestimmt, durch Kinder und
Personen mit eingeschränkten geistigen Fähigkeiten oder
ohne erforderliches Fachwissen benutzt zu werden. Kinder sind
fernzuhalten.
Das Gerät ist nicht für den gewerblichen Einsatz bestimmt.
Zum bestimmungsgemäßem Gebrauch gehört auch die
Beachtung aller Informationen in dieser Anleitung,
insbesondere die Beachtung der Sicherheitshinweise. Jede
andere Verwendung gilt als nicht bestimmungsgemäß und
kann zu Sach- oder Personenschäden führen. Die EAL GmbH
übernimmt keine Haftung für Schäden, die durch nicht
bestimmungsgemäßen Gebrauch entstehen.
WARNUNG!
3. SPEZIFIKATIONEN
Eingangsspannung: 230 V 50 Hz, AC
12 V, DC
Max. Druck: 10,3 bar / 150 psi
Max. Leistung: 120 W
Dimensionen (L x B x H): ca. 22 x 13 x 7,5 [cm]
Gewicht, ohne Zubehör: ca. 0,950 kg
Länge Luftschlauch: ca. 0,50 m
Länge 12 V – Kabel: ca. 3,50 m
Länge 230 V – Kabel: ca. 1,50 m
DUAL POWER KOMPRESSOR 12 V / 230 V

3
4. SICHERHEITSHINWEISE
• Das Warndreieck kennzeichnet alle für die Sicher-
heit wichtigen Anweisungen. Befolgen Sie diese
immer, anderenfalls könnten Sie sich verletzen
oder das Gerät könnte beschädigt werden.
• Kinder dürfen nicht mit dem Gerät spielen.
• Reinigung und Benutzerwartung dürfen nicht
von Kindern ohne Beaufsichtigung durchgeführt
werden.
• Lassen Sie das Verpackungsmaterial nicht achtlos
liegen. Dieses kann für Kinder zu einem gefährli-
chen Spielzeug werden!
• Benutzen Sie dieses Produkt nur für die dafür
vorgesehene Verwendung!
• Manipulieren oder zerlegen Sie das Gerät nicht!
• Erhöhen Sie den Luftdruck für die aufzublasenden
Objekte nicht über die Herstellerempfehlung!
• Schützen Sie den Kompressor und dessen
Komponenten vor Feuchtigkeit!
• Lassen Sie den Kompressor im Betrieb nicht
unbeaufsichtigt!
• Halten Sie Kinder fern und lassen Sie Kinder dieses
Gerät nicht bedienen!
• Decken Sie während des Betriebs niemals die
Lüftungsönungen des Kompressors ab.
• Sollte der Kompressor ungewöhnliche Geräusche
abgeben oder überhitzen, schalten Sie ihn sofort
aus und lassen ihn mindestens 20 Minuten
abkühlen!
• Überprüfen Sie den Kompressor vor Inbetrieb-
nahme. Beschädigte, gerissene oder gebrochene
Bauteile sollten ausschließlich durch qualizierte
Techniker instandgesetzt werden!
• Setzen Sie den Kompressor niemals Frost, Regen
oder Temperaturen über 30°C oder unter - 30°C
aus!
• Niemals an Menschen oder Tieren anwenden!
• Stellen Sie sicher, dass Schlauch und Kabel keinen
scharfen Kanten, Öl oder zu heißen Gegenständen
ausgesetzt werden!
• Achten Sie beim Befüllen immer auf den
korrekten Luftdruck (lesen Sie dazu in der
Bedienungsanleitung Ihres Fahrzeugs nach). Der
Kompressor kann einen Druck bis max. 10,3 bar
liefern. Bei zu hohem Druck besteht Explosions-
und Verletzungsgefahr.
• Lassen Sie den Kompressor niemals länger als
10 min ununterbrochen arbeiten, es besteht
Überhitzungsgefahr. Schalten Sie den Kompressor
nach 10 min ab und lassen Sie ihn ganz abkühlen
(mindestens 20 min), bevor Sie ihn wieder in
Betrieb nehmen.
• Der Kompressor kann bei abgeschaltetem Motor
die Batterie Ihres Fahrzeugs entladen.
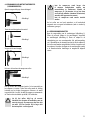
entspricht den EG-Richtlinien
Geräte mit diesem Zeichen dürfen nur im Haus
(trockene Umgebung) betrieben werden
Schutzisoliertes Gehäuse (Schutzklasse II)
Gebrauchsanleitung lesen
gekennzeichnetes Elektroprodukt darf nicht
in den Hausmüll geworfen werden
5. SYMBOLERKLÄRUNG
• Wenn Sie den Kompressor bei laufendem
Fahrzeugmotor benutzen, achten Sie auf eine gute
Belüftung in der Garage oder Halle. Es besteht
Vergiftungsgefahr!
• Trennen Sie den Kompressor von der Stromversor-
gung, wenn Sie ihn nicht benötigen.
• Verwenden Sie zu Ihrer eigenen Sicherheit
ausschließlich Zubehör oder Ersatzteile, die
in der Anleitung angegeben sind, oder deren
Verwendung durch den Hersteller empfohlen
wird!

4
6. BEDIENUNGSANLEITUNG
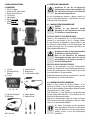
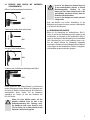
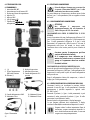
6.1 ÜBERSICHT
1 EIN / AUS-Schalter
2 Schalter für LED-Arbeitsleuchte
3 Display mit Einstelltasten
4 12 V Eingang
5 230 V Eingang
6 LED-Arbeitsleuchte
7 Luftschlauch mit
Autoventilanschluss
5 230 V Eingang
6 LED-Arbeitsleuchte
7 Luftschlauch mit
Autoventilanschluss
8 (+) Taste
9 (R)-Einstelltaste für
Einheiten
10 (-) Taste
14 230 V Anschlusskabel
15 Balladapter
11 Einheit für Druck
12 Druckanzeige
13 12 V Kfz-Anschlusskabel
16 Adapter Ø 8 mm
17 Adapter Ø 5 mm
Bild 1: Übersicht
Vergewissern Sie sich, dass der Kompressor
ausgeschaltet ist, bevor Sie ihn anschließen. Der
EIN / AUS-Schalter (Position1 in der Übersicht)
darf nicht heruntergedrückt sein.
6.2 BETRIEB DES KOMPRESSORS
Um mit dem Kompressor arbeiten zu können, nehmen Sie
zuerst den Luftschlauch (Position 7 in der Übersicht) aus seiner
Halterung auf der Geräterückseite.
Schließen Sie den Kompressor niemals
gleichzeitig an das 230 V-Hausnetz und an die
12 V-Steckdose in einem Fahrzeug an.
6.2.1 ANSCHLIESSEN DES KOMPRESSORS
ANSCHLUSS AN DIE 12 V KFZBORDSTECKDOSE:
ACHTUNG
Stecken Sie den Gerätestecker des 12 V Kfz-Anschlusskabels
(Position 13 in der Übersicht) in den 12 V Eingang (Position
4 in der Übersicht) des Kompressors. Danach stecken Sie den
Kfz-Stecker des Anschlusskabels in die Kfz-Bordsteckdose. Bei
manchen Fahrzeugen muss die Zündung eingeschaltet sein,
damit die Bordsteckdose aktiv ist.
Der Kompressor kann bei abgeschaltetem Motor
die Batterie Ihres Fahrzeugs entladen.
Wenn Sie den Kompressor bei laufendem
Fahrzeugmotor benutzen, achten Sie auf eine
gute Belüftung in der Garage oder Halle. Es
besteht Vergiftungsgefahr!
ANSCHLUSS AN DIE 230 V HAUSSTECKDOSE:
Stecken Sie den Gerätestecker des 230 V Anschlusskabels
(Position 14 in der Übersicht) in den 230 V Eingang (Position 5 in
der Übersicht) des Kompressors. Danach stecken Sie den Stecker
des Anschlusskabels in die Haussteckdose.
Nachdem der Kompressor elektrisch angeschlossen ist, wird das
Display (Position 3 in der Übersicht) aktiviert.
6.2.2 VOREINSTELLEN DES LUFTDRUCKS
Wählen Sie durch Drücken der (R)-Taste (Position 9 in der
Übersicht) die Einheit, in der der Luftdruck angezeigt werden
soll, aus. Durch wiederholtes Drücken können folgende Einheiten
eingestellt werden: PSI – BAR – kg/cm².
Durch Drücken der (+) Taste (Position 8 in der Übersicht) kann
der Wert erhöht, durch Drücken der (-) Taste (Position 10 in der
Übersicht) der Wert abgesenkt werden.
Während des Einstellvorgangs blinkt die Anzeige im Display.
Wird keine Einstellung mehr vorgenommen, zeigt das Display
nach ca. 3 sec. dauernd den Wert 0,00 an.
Die letzten Einstellungen werden gespeichert.
Nach einem erneuten Einschalten sind diese wieder
eingestellt. Möchten Sie jetzt mit anderen Werten
arbeiten, müssen Sie eine neue Voreinstellung
durchführen.

5
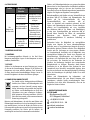
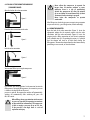
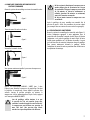
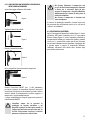
Ö nen Sie die Verriegelung am Ventilanschluss
Verriegeln Sie den Ventilanschluss
Setzen Sie den Ventilanschluss auf das Ventil
Sie können jetzt den Reifen mit dem Kompressor befüllen
Bild 2
Bild 4
Bild 3
Bild 5
6.3 BEFÜLLEN EINES REIFENS MIT AUTOVENTIL
SCHRADERVENTIL
Drücken Sie den EIN / AUS Schalter (Position 1 in der Übersicht)
um den Füllvorgang zu starten. Während des Füllvorgangs wird
im Display der aktuelle Luftdruck angezeigt. Bei Erreichen des
voreingestellten Drucks schaltet sich der Kompressor
automatisch aus. Drücken Sie nach dem Abschalten den
EIN / AUS Schalter.
Achten Sie beim Befüllen immer auf den
korrekten Luftdruck (lesen Sie dazu in der
Bedienungsanleitung Ihres Fahrzeugs nach).
Der Kompressor kann einen Druck bis max.
10,3 bar liefern. Bei zu hohem Druck besteht
Explosions- und Verletzungsgefahr.
Lassen Sie den Kompressor niemals länger als
10 min ununterbrochen arbeiten, es besteht
Überhitzungsgefahr. Schalten Sie den
Kompressor nach 10 min ab und lassen Sie ihn
ganz abkühlen (mindestens 20 min), bevor Sie
ihn wieder in Betrieb nehmen.
Lassen Sie den Kompressor niemals unbeauf-
sichtigt laufen.
Nach dem Befüllen eines Reifens kontrollieren Sie den
Reifendruck noch einmal mit einem separaten Luftdruckprüfer
(z. B. Tankstelle, Kfz-Werkstatt).
6.4 VERWENDUNG DER ADAPTER
Ö nen Sie die Verriegelung des Ventilanschlusses (Bild 2).
Setzen Sie den für Ihre Anwendung passenden Adapter in den
Ventilanschluss ein. Verriegeln Sie den Ventilanschluss (Bild 4).
Setzen Sie den Adapter in den Füllanschluss Ihres Freizeitartikels
(Ball, Luftspielzeug etc.) ein. Je nach Ausführung, kann es sein,
dass der Adapter während des Füllvorgangs festgehalten
werden muss. Jetzt können Sie den Füllvorgang starten. Entfernen
Sie den Adapter aus dem Ventilanschluss, indem Sie in umgekehr-
ter Reihenfolge, wie oben beschrieben, vorgehen.

6
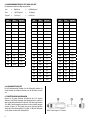
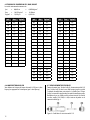
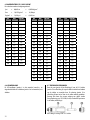
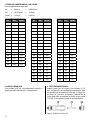
6.5 UMRECHNUNGSTABELLE PSI / BAR / KG/CM²
Die Einheiten werden wie folgt umgerechnet:
1 psi = 0,069 bar = 0,0703 kg/cm²
1 bar = 1,0197 kg/cm² = 14,504 psi
1 kg/cm² = 14,223 psi = 0,981 bar
psi bar kg/cm²
10 0,7 0,7
20 1,4 1,4
30 2,1 2,1
40 2,8 2,8
50 3,5 3,5
60 4,1 4,2
70 4,8 4,9
80 5,5 5,6
90 6,2 6,3
100 6,9 7,0
110 7,6 7,7
120 8,3 8,4
130 9,0 9,1
140 9,7 9,8
150 10,4 10,5
psi bar kg/cm²
0,5 7 0,5
1,0 15 1,1
1,5 22 1,6
2,0 29 2,2
2,5 36 2,7
3,0 44 3,3
3,5 51 3,8
4,0 58 4,4
4,5 65 4,9
5,0 73 5,5
5,5 80 6,0
6,0 87 6,6
6,5 94 7,1
7,0 102 7,7
7,5 109 8,2
8,0 116 8,8
8,5 123 9,3
9,0 131 9,9
9,5 138 10,4
10,0 145 11,0
psi bar kg/cm²
0,5 7 0,5
1,0 14 1,0
1,5 21 1,5
2,0 28 2,0
2,5 36 2,5
3,0 43 2,9
3,5 50 3,4
4,0 57 3,9
4,5 64 4,4
5,0 71 4,9
5,5 78 5,4
6,0 85 5,9
6,5 92 6,4
7,0 100 6,9
7,5 107 7,4
8,0 114 7,8
8,5 121 8,3
9,0 128 8,8
9,5 135 9,3
10,0 142 9,8
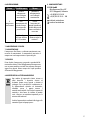
6.6 LEDARBEITSLEUCHTE
Die LED-Arbeitsleuchte (Position 6 in der Übersicht) schalten Sie
durch Drücken des Schalters (Position 2 in der Übersicht) ein und
aus.
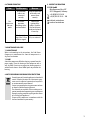
6.7 ERSETZEN DER SICHERUNGEN
Drehen Sie die Spitze (Position 20 in Bild 6) des 12 V Steckers
(Position 18 in Bild 6) entgegen dem Uhrzeigersinn bis sich diese
vom Stecker löst und nehmen Sie diese ab. Die Sicherung (Position
19 in Bild 6) wird freigegeben und kann aus dem Stecker gezogen
werden. Ersetzen Sie diese durch eine neue Sicherung gleicher
Stärke (hier Glassicherung, ink 15 A 250 V, 6 x 30) und schrauben
Sie die Spitze wieder in den Stecker, Bild 6. Bild 6: Sicherung im 12 V Stecker

7
6.8 FEHLERSUCHE
Fehler Mögliche
Ursache
Maßnahme
Der
Kompressor
arbeitet nicht
Das Anschlusskabel
ist nicht korrekt
angeschlossen.
Kontrollieren Sie den
Anschluss der Kabel
und schließen Sie sie
richtig an.
Bei Kfz-Betrieb:
Keine Spannung an
der Bordsteckdose.
Schalten Sie die
Zündung des
Fahrzeugs ein.
Kontrollieren Sie die
Sicherung für die
Borsteckdose und
ersetzen Sie sie ggf.
Die Sicherungen im
Stecker des
12 V Kfz-Kabels hat
ausgelöst.
Ersetzen Sie die
defekte Sicherung,
siehe Abschnitt 6.7
7. WARTUNG UND PFLEGE
Bei bestimmungsgemäßem Gebrauch ist der Dual Power
Kompressor wartungsfrei. Lagern Sie den Kompressor an einem
trockenen, frostfreien Ort.
7.1 WARTUNG
Schalten Sie den Kompressor vor einer Reinigung aus, trennen
Sie ihn von der Stromversorgung. Reinigen Sie das Gehäuse des
Kompressors mit einem weichen trockenen Tuch. Verwenden
Sie keine scharfen oder lösemittelhaltigen Reiniger. Lassen Sie
niemals Flüssigkeiten in das Innere des Gehäuses gelangen.
7.2 PFLEGE
Das Symbol mit der durchgestrichenen Mülltonne
bedeutet, dass Elektro- und Elektronikgeräte nicht
zusammen mit dem Hausmüll entsorgt werden
dürfen. Verbraucher sind gesetzlich dazu verp ich-
tet, Elektro- und Elektronikgeräte am Ende ihrer
Lebensdauer einer vom unsortierten Siedlungs-
abfall getrennten Erfassung zuzuführen. Auf diese
Weise wird eine umwelt- und ressourcenschonende
Verwertung sichergestellt.
8. HINWEISE ZUM UMWELTSCHUTZ
Batterien und Akkumulatoren, die nicht fest vom Elektro- oder
Elektronikgerät umschlossen sind und zerstörungsfrei entnom-
men werden können, sind vor der Abgabe des Geräts an einer
Erfassungsstelle von diesem zu trennen und einer vorgesehenen
Entsorgung zuzuführen. Das Gleiche gilt für Lampen, die
zerstörungsfrei aus dem Gerät entnommen werden können.
9. KONTAKTINFORMATIONEN
EAL GmbH
Otto-Hausmann-Ring 107
42115 Wuppertal, Deutschland
+49 (0)202 42 92 83 0
+49 (0) 202 42 92 83 – 160
info@eal-vertrieb.com
www.eal-vertrieb.com
Elektro- und Elektronikgerätebesitzer aus privaten Haushalten
können diese bei den Sammelstellen der ö entlich-rechtlichen
Entsorgungsträger oder bei den von den Herstellern bzw.
Vertreibern im Sinne des ElektroG eingerichteten Sammelstellen
abgeben. Die Abgabe von Altgeräten ist unentgeltlich.
Rücknahmep ichtig sind Händler mit einer Verkaufs äche von
mindestens 400 m² für Elektro- und Elektronikgeräte. Das
Gleiche gilt für Lebensmittelhändler mit einer
Gesamtverkaufs äche von mindestens 800 m²,
sofern sie dauerhaft oder zumindest mehrmals im Jahr
Elektro- und Elektronikgeräte anbieten. Ebenso rücknahme-
p ichtig sind Fernabsatzhändler mit einer Lager äche
von mindestens 400 m² für Elektro- und Elektronikgerä-
te oder einer Gesamtlager äche von mindestens 800 m².
Generell haben Vertreiber die P icht, die unentgeltliche
Rücknahme von Altgeräten durch geeignete
Rücknahmemöglichkeiten in zumutbarer Entfernung zu
gewährleisten.
Verbraucher haben die Möglichkeit zur unentgeltlichen
Abgabe eines Altgeräts bei einem rücknahmep ichtigen
Vertreiber, wenn sie ein gleichwertiges Neugerät mit einer im
Wesentlichen gleichen Funktion erwerben. Diese Möglichkeit
besteht auch bei Lieferungen an einen privaten Haushalt.
Im Fernabsatzhandel beschränkt sich die Möglichkeit einer
unentgeltlichen Abholung bei Erwerb eines Neugeräts auf
Wärmeüberträger, Bildschirmgeräte und Großgeräte, die
mindestens eine Außenkante mit einer Länge von mehr als
50 cm besitzen. Der Vertreiber hat den Verbraucher bei
Abschluss des Kaufvertrags bezüglich einer entsprechenden
Rückgabeabsicht zu befragen. Abgesehen davon können
Verbraucher bis zu drei Altgeräte einer Geräteart bei einer
Sammelstelle eines Vertreibers unentgeltlich abgeben, ohne
dass dies an den Erwerb eines Neugeräts geknüpft ist. Allerdings
dürfen die Kantenlängen der jeweiligen Geräte 25 cm nicht
überschreiten.
Elektro- und Elektronikgeräte der Informations- und
Kommunikationstechnik, wie zum Beispiel Computer oder
Smartphones, enthalten häu g personenbezogene Daten.
Verbraucher sind selbst dafür verantwortlich, diese vor der
Abgabe der Geräte zu löschen.

8
2. SCOPE OF DELIVERY
1 x Dual Power Compressor
1 x Car connection cable for 12 V on-board socket
1 x Connection cable for 230 V house socket
2 x Fuse, fast 15 A 250 V, 6 x 30
1 x Adapter ø 5 mm
1 x Adapter ø 8 mm
1 x Ball adapter
1 x Operating instructions
CONTENTS
Read the operating instructions through
carefully prior to initial use and observe all of
the safety notes!
Not observing such may lead to personal
injuries, damages to the device or to your
property!
Store the original packaging, the receipt
and these instructions so that they may be
consulted at a later date! When passing on
the product, please include these operating
instructions as well.
Please check the contents of package for
integrity and completeness prior to use!
1. PROPER USE OF THE PRODUCT
The dual power compressor is designed for universal use e.g.
for pumping car, motorbike and bicycle tyres, sport balls and,
in atable toys.
It may be connected to the 12 V on-board network of a vehicle
or the 230 V household network. The manometer can be used
during the lling process to monitor the pressure.
This device is not designed to be used by children or persons with
limited mental abilities or without experience and/or lack of
required specialist knowledge. Keep children away from the
device.
The device is not designated for commercial use.
Use according to the intended purpose also includes the
observance of all information in these operating instructions,
particularly the observance of the safety notes. Any other
utilisation is considered to be contrary to the intended
purpose and may lead to material damages or personal
injuries. EAL GmbH assumes no liability for damages resulting
from improper use.
WARNING!
3. SPECIFICATIONS
Input voltage: 230 V 50 Hz AC
12 V DC
Maximum pressure: 10.3 bar / 150 psi
Max. Power: 120 W
Dimensions (L x W x H): approx. 22 x 13 x 7.5 [cm]
Weight (without accessories): approx. 0.950 kg
Length of air hose: approx. 0.50 m
Length of 12 V-cable: approx. 3.50 m
Length of 230 V-cabl: approx. 1.50 m
DUAL POWER COMPRESSOR 12 V / 230 V
1. PROPER USE OF THE PRODUCT _____________8
2. SCOPE OF DELIVERY ____________________8
3. SPECIFICATIONS ______________________8
4. SAFETY PRECAUTIONS __________________9
5. EXPLANATIONS OF SYMBOLS ______________9
6. OPERATING INSTRUCTIONS _______________10
6.1 OVERVIEW _________________________10
6.2 OPERATING THE COMPRESSOR _____________10
6.2.1 CONNECTING THE COMPRESSOR ____________10
6.2.2 PRESETTING THE AIR PRESSURE ____________10
6.3 FILLING A TYRE USING THE CAR VALVE ________11
SCHRADER VALVE ____________________11
6.4 USING THE ADAPTER ___________________11
6.5 CONVERSION TABLE PSI / BAR / KG/CM² ________12
6.6 LED WORK LIGHT ______________________ 12
6.7 REPLACING THE FUSES __________________12
6.8 TROUBLESHOOTING ____________________13
7. MAINTENANCE AND CARE ________________13
7.1 MAINTENANCE _______________________13
7.2 CARE _____________________________13
8. NOTES REGARDING ENVIRONMENTAL PROTECTION _13
9. CONTACT INFORMATION _________________13

9
4. SAFETY PRECAUTIONS
• The warning symbol indicates all instructions
which are important for safety. Always follow
these, otherwise you could injure yourself or
damage the device.
• Children may not play with the device.
• Cleaning and user maintenance may not be
carried out by children without supervision.
• Do not treat packaging material carelessly. This
may become a dangerous plaything for a child!
• Only use this product for its designated purpose!
• Do not manipulate or disassemble the device!
• For the objects to be inated, do not increase the
air pressure beyond the recommendations of the
manufacturer!
• Protect the compressor and its components from
damp!
• Do not leave an operating compressor
unattended!
• Keep children away and do not allow children to
operate this device!
• Never cover the ventilation slots of the
compressor during operation.
• If the compressor emits unusual noises or
overheats, switch it o immediately and give it at
least 20 minutes to cool down!
• Check the compressor before use. Damaged,
cracked or broken components should be repaired
only by qualied technicians!
• Never expose the compressor to frost, rain or
temperatures above 30°C or below - 30°C!
• Never use on people or animals!
• Make sure that the hose and cable are not
exposed to sharp edges, oil or objects that are too
hot!
• When lling, always pay attention to the correct
air pressure (consult the operating instructions of
your vehicle for information). The compressor is
able to supply a pressure of up to 10.3 bar. If the
pressure is too high, there is a risk of explosion and
injury.
• Never allow the compressor to operate for
longer than 10 minutes without a pause,
otherwise there is a risk of overheating. Switch
the compressor o after 10 minutes of use and
allow it to cool down fully (at least 20 minutes)
before starting it up again.
• The compressor may discharge the battery of your
vehicle if the motor is switched o.
• If you use the compressor with the vehicle motor
running, ensure good ventilation in the garage or
hall. There is a risk of poisoning!
• Separate the compressor from the power supply
when it is not in use.
• For your own safety, only use accessories and
spare parts that are stated in these instructions or
that are recommended by the manufacturer!
Complies with EC directives
Insulated housing
(protection class II).
Read the operating
instructions
Labelled electrical products may not be disposed
of in the household waste
Devices with this symbol may only be operated
indoors (dry environment)
5. EXPLANATIONS OF SYMBOLS

10
6. OPERATING INSTRUCTIONS
6.1 OVERVIEW
1 ON / OFF switch
2 Switch for LED work light
3 Display with setting buttons
4 12 V input
5 230 V input
6 LED work light
7 Air hose with autovalve
connection
5 230 V input
6 LED work light
7 Air hose with autovalve
connection
8 (+) button
9 (R) button for setting units
10 (-) button
14 230 V connection cable
15 Ball adapter
11 Unit for pressure
12 Pressure indicator
13 12 V car connection cable
16 Adapter Ø 8 mm
17 Adapter Ø 5 mm
Figure 1: Overview
Make sure that the compressor is switched
o before connecting it. The ON / OFF switch
(position1 in the overview) must not be
depressed.
6.2 OPERATING THE COMPRESSOR
In order to be able to work with the compressor, rst take the
air hose (Position 7 in the overview) from its holder on the back
of the unit.
Do not connect the compressor to both the
230 V household connection and the 12 V socket
of your vehicle at the same time.
6.2.1 CONNECTING THE COMPRESSOR
CONNECTION TO THE 12 V VEHICLE SOCKET:
CAUTION
Insert the appliance plug of the 12 V vehicle connection cable
(position 13 in the overview) into the 12 V input (position 4 in
the overview) of the compressor. Then insert the vehicle plug of
the connection cable into the vehicle socket. On some vehicles,
the ignition must be switched on for the on-board socket to be
active.
The compressor may discharge the battery of
your vehicle if the motor is switched o .
If you use the compressor with the vehicle motor
running, ensure good ventilation in the garage
or hall. There is a risk of poisoning!
CONNECTION TO THE 230 V DOMESTIC SOCKET:
Plug the appliance plug of the 230 V connection cable
(position 14 in the overview) into the 230 V input (position
5 in the overview) of the compressor. Then insert the plug of the
connection cable into the house socket.
After the compressor is electrically connected, the display
(position 3 in the overview) is activated.
6.2.2 PRESETTING THE AIR PRESSURE
Select the unit in which the air pressure is to be displayed by
pressing the (R) button (position 9 in the overview). By pressing
repeatedly, the following units can be set: PSI - BAR - kg/cm².
By pressing the (+) button (position 8 in the overview) the value
can be increased, by pressing the (-) button (position 10 in the
overview) the value can be decreased. overview) the value can
be lowered.
During the setting process, the display ashes. If no more
settings are made, the display shows the value 0.00
continuously after approx. 3 seconds.
The last settings are saved. After switching on
again, they are set again. If you now want to
work with other values, you must carry out a new
presetting.

11
Press the ON / OFF switch (position 1 in the overview) to start the
lling process. During the lling process, the current air pressure
is shown in the display. When the preset
pressure is reached, the compressor switches o automatically.
switches o automatically. After switching o , press the
ON / OFF switch.
When lling, always pay attention to the correct
air pressure (consult the operating instructions
of your vehicle for information). The compressor
is able to supply a pressure of up to 10.3 bar.
If the pressure is too high, there is a risk of
explosion and injury.
Never allow the compressor to operate for
longer than 10 minutes without a pause,
otherwise there is a risk of overheating.
Switch the compressor o after 10 minutes
of use and allow it to cool down fully (at least
20 minutes) before starting it up again.
Never leave the compressor to operate
unattended.
After lling a tyre, check the tyre pressure again using a separate
air pressure tester (e.g. at a lling station, vehicle workshop).
6.4 USING THE ADAPTER
Open the lock of the valve connection (Figure 2). Insert the
appropriate adapter for the required purpose into the valve
connection. Lock the valve connection (Figure 4). Insert the
adapter into the lling connection of your leisure equipment
(ball, in atable toys etc.). Depending on version, it is possible
that the adapter will need to be held rmly during the
lling process. Remove the adapter from the valve connection by
proceeding in reverse order, as described above.
Open the lock on the valve connection
Lock the valve connection
Place the valve connection on the valve
You can now ll the tyre using the compressor
6.3 FILLING A TYRE USING THE CAR VALVE
SCHRADER VALVE
Figure 2
Figure 4
Figure 3
Figure 5

12
6.5 CONVERSION TABLE PSI / BAR / KG/CM²
The units are converted as follows:
1 psi = 0.069 bar = 0.0703 kg/cm²
1 bar = 1.0197 kg/cm² = 14.504 psi
1 kg/cm² = 14.223 psi = 0.981 bar
psi bar kg/cm²
10 0.7 0.7
20 1.4 1.4
30 2.1 2v1
40 2.8 2.8
50 3.5 3.5
60 4.1 4.2
70 4.8 4.9
80 5.5 5.6
90 6.2 6.3
100 6.9 7.0
110 7.6 7.7
120 8.3 8.4
130 9.0 9.1
140 9.7 9.8
150 10.4 10.5
psi bar kg/cm²
0.5 7 0.5
1.0 15 1.1
1.5 22 1.6
2.0 29 2.2
2.5 36 2.7
3.0 44 3.3
3.5 51 3.8
4.0 58 4.4
4.5 65 4.9
5.0 73 5.5
5.5 80 6.0
6.0 87 6.6
6.5 94 7.1
7.0 102 7.7
7.5 109 8.2
8.0 116 8.8
8.5 123 9v3
9.0 131 9v9
9.5 138 10v4
10.0 145 11.0
psi bar kg/cm²
0.5 7 0.5
1.0 14 1.0
1.5 21 1,5
2.0 28 2.0
2.5 36 2.5
3.0 43 2.9
3.5 50 3.4
4.0 57 3.9
4.5 64 4.4
5.0 71 4.9
5.5 78 5.4
6.0 85 5.9
6.5 92 6.4
7.0 100 6.9
7.5 107 7.4
8.0 114 7.8
8.5 121 8.3
9.0 128 8.8
9.5 135 9.3
10.0 142 9.8
6.6 LED WORK LIGHT
The LED work light (position 6 in the overview) is switched on
and o by pressing the switch (position 2 in the overview).
6.7 REPLACING THE FUSES
Rotate the tip (Position 20 in Figure 6) of the 12 V plug (Position 18
in Figure 6) anti-clockwise until it comes away from the plug and
then remove. The fuse (Position 19 in Figure 6) is exposed and can
be removed from the plug. Replace the fuse with another of the
same strength (here glass fuse, fast 15 A 250 V, 6 x 30) and screw
the tip back into the plug, Figure 6.
Figure 6: Fuse in 12 V plug

13
6.8 TROUBLESHOOTING
Error Possible cause Measure
The
compressor
does not
workt
The connection
cable is not
connected
correctly.
Check the connection
of the cables and
connect them
correctly.
For vehicle
operation:
No voltage at the
on-board socket.
Switch on the
ignition of the
vehicle. Check the
fuse for the boron
socket and replace it
if necessary.
The fuses in the
plug of the 12 V car
cable has tripped.
Replace the defective
fuse, see section 6.7
Do not dispose of electrical appliances in household
waste! Discarded electrical and electronic equip-
ment must be collected separately and recycled in
an environmentally sound manner.
Contact your municipal or city government on how
to dispose of old electronic equipment.
The materials are recyclable. You are making an im-
portant contribution to protecting our environment
through recycling, material recycling or other forms
of re-utilising old appliances!
Dispose of the compressor in accordance with the
laws and conditions in your country.
9. CONTACT INFORMATION
EAL GmbH
Otto-Hausmann-Ring 107
42115 Wuppertal, Germany
+49 (0)202 42 92 83 0
+49 (0) 202 42 92 83 – 160
info@eal-vertrieb.com
www.eal-vertrieb.com
7. MAINTENANCE AND CARE
7.1 MAINTENANCE
7.2 CARE
When used according to the instructions, the Dual Power
Compressor is maintenance-free. Store the compressor in a
dry, frost-free location.
Switch the compressor o before cleaning, separate from the
power supply. Clean the housing of the compressor with a
soft, dry cloth. Do not use any aggressive cleaning agents or
solvent-based cleaners. Never allow liquids to penetrate the
housing.
8. NOTES REGARDING ENVIRONMENTAL PROTECTION

14
2.MATÉRIEL FOURNI
1 x compresseur double puissance
1 x câble de raccordement automobile pour prise de bord 12 V
1 x câble de raccordement pour prise domestique 230 V
1 x fusible rapide 15 A 250 V, 6 x 30
1 x adaptateur ø 5 mm
1 x adaptateur ø 8 mm
1 x adaptateur pour ballons
1 x notice d‘utilisation
SOMMAIRE
1. DOMAINE D‘APPLICATION ________________14
2. MATÉRIEL FOURNI _____________________14
3. SPÉCIFICATIONS ______________________14
4. CONSIGNES DE SÉCURITÉ _________________15
5. EXPLICATION DES SYMBOLES ______________15
6. NOTICE D‘UTILISATION __________________16
6.1 VUE D‘ENSEMBLE _____________________16
6.2 FONCTIONNEMENT DU COMPRESSEUR ________16
6.2.1 RACCORDEMENT DU COMPRESSEUR __________16
6.2.2 PRÉRÉGLAGE DE LA PRESSION D‘AIR __________16
6.3 GONFLAGE D‘UN PNEU AVEC UNE VALVE DE _____17
VOITURE SCHRADER ___________________17
6.4 UTILISATION DES ADAPTATEURS ____________17
6.5 TABLEAU DE CONVERSION PSI / BAR / KG/CM² ____18
6.6 LAMPE DE TRAVAIL À LED ________________18
6.7 REMPLACEMENT DES FUSIBLES _____________18
6.8 RECHERCHE D‘ERREURS _________________19
7. MAINTENANCE ET ENTRETIEN ______________19
7.1 MAINTENANCE _______________________19
7.2 ENTRETIEN _________________________19
8. REMARQUES RELATIVES À LA PROTECTION DE
L‘ENVIRONNEMENT ____________________19
9. DONNÉES DE CONTACT __________________19
Lisez attentivement la notice d‘utilisation
avant la mise en service et respectez toutes
les consignes de sécurité ! Tout non-respect
de ces consignes peut entraîner des
dommages corporels, endommager l‘appareil
ou vos biens ! Conservez l‘emballage
d‘origine, le justi catif d‘achat et la présente
notice pour vous y référer ultérieurement ! Si
vous revendez ou remettez l‘appareil à des
tiers, veuillez également leur remettre cette
notice d‘utilisation. Avant la mise en service,
veuillez contrôler le contenu de l‘emballage
quant à l‘absence de dommages et véri er si
toutes les pièces sont présentes !
1. DOMAINE D‘APPLICATION
Le compresseur double puissance est utilisable de façon
universelle, p. ex. pour le gon age de pneus d‘automobiles, de
motos et de bicyclettes ainsi que pour le gon age de ballons de
sport et de jouets gon ables.
Il peut être exploité soit sur un réseau de bord de 12 V d‘un
véhicule, soit être branché sur le réseau domestique de 230 V.
Cet appareil n‘est pas destiné à être utilisé par des enfants ou des
personnes aux capacités mentales limitées ou ne disposant pas
de l‘expérience ou des connaissances nécessaires. Les enfants
doivent rester à distance de cet appareil.
L‘appareil n‘est pas destiné à une utilisation industrielle ou
commerciale.
L‘utilisation conforme aux prescriptions implique également
le respect de toutes les informations contenues dans cette
notice d‘utilisation, en particulier le respect des consignes
de sécurité. Toute autre utilisation est considérée comme
non conforme et peut entraîner des dommages matériels ou
corporels. EAL GmbH décline toute responsabilité pour les
dommages résultant d‘une utilisation non conforme.
AVERTISSEMENT!
3. SPÉCIFICATIONS
Tension d‘entrée : 230 V 50 Hz AC
12 V DC
Pression max. : 10,3 bar / 150 psi
Puissance max. puissance : 120 W
Dimensions (L x l x h) : env. 22 x 13 x 7,5 [cm]
Poids sans accessoires : env. 0,950 kg
Longueur du tuyau pneumatique : 0,50 cm
Longueur du câble 12 V : 3,50 m
Longueur du câble 230 V : 1,50 m
COMPRESSEUR DOUBLE PUISSANCE 12 V / 230 V

15
4. CONSIGNES DE SÉCURITÉ
• Le triangle de signalisation indique toutes les
instructions relatives à la sécurité. Respectez-les
à tout moment car vous risqueriez sinon de vous
blesser ou l‘appareil risquerait d‘être endommagé.
• Les enfants ne doivent pas jouer avec l‘appareil.
• Les tâches de nettoyage et d‘entretien à eectu-
er chez soi ne doivent pas être exécutées par des
enfants qui ne sont pas sous surveillance.
• Ne laissez pas traîner le matériel d‘emballage.
Il pourrait devenir un jouet dangereux pour les
enfants !
• N‘utilisez cet appareil qu‘aux ns pour lesquelles
il a été prévu !
• Ne manipulez ni démontez jamais l‘appareil !
• Ne dépassez pas les indications du fabricant
de l‘objet gonable lorsque vous augmentez la
pression pneumatique !
• Protégez le compresseur et ses composants contre
l‘humidité !
• Ne laissez pas le compresseur sans surveillance !
• Tenez les enfants éloignés et ne les laissez pas se
servir de cet appareil !
• Ne recouvrez jamais les orices de ventilation du
compresseur lorsqu‘il est en service.
• Si le compresseur fait des bruits inhabituels ou
est surchaué, mettez-le immédiatement hors
tension et laissez-le refroidir pendant 20 minutes
au minimum !
• Contrôlez le compresseur avant sa mise en
service. Les composants endommagés, rompus ou
ssurés doivent être réparés exclusivement par un
technicien qualié !
• N‘exposez jamais le compresseur au gel, à la
pluie ou à des températures supérieures à 30°C ou
inférieures à - 30°C !
• Ne jamais utiliser sur des personnes ou des
animaux !
• Assurez-vous que le tuyau pneumatique et que
le câble ne touchent pas aux arêtes vives et sont
éloignés d‘objets brûlants !
• Lors du gonage, veillez toujours à ce que la
pression de l‘air soit correcte (pour cela, consultez
le mode d‘emploi de votre véhicule). Le
ompresseur peut générer une pression max. de
10,3 bars. Une pression trop élevée entraîne un
risque d‘explosion et de blessure.
• Ne laissez jamais fonctionner le compresseur en
continu durant plus de 10 minutes car il risque de
surchauer. Éteignez le compresseur au bout de
10 minutes et laissez-le entièrement se refroidir
(pendant 20 minutes au minimum) avant de le
remettre en marche.
• Ne laissez jamais tourner le compresseur sans
Correspond aux directives de la CE
Les appareils portant ce symbole ne peuvent être
utilisés qu‘à l‘intérieur (environnement sec)
Boîtier avec isolation (classe de protection II).
Lire le mode d‘emploi
L‘appareil électrique marqué ne peut pas
être jeté dans les ordures ménagères
5. EXPLICATION DES SYMBOLES
surveillance.
• Le compresseur peut décharger la batterie de
votre véhicule si le moteur est éteint.
• Si vous utilisez le compresseur lorsque le
moteur de votre véhicule tourne, veillez à une
bonne aération dans le garage ou dans le local
d‘exploitation. Il y a risque d‘intoxication !
• Débranchez le compresseur de l‘alimentation en
tension si vous ne l‘utilisez pas.
• Pour votre propre sécurité, utilisez exclusivement
les accessoires ou pièces de rechange qui sont
indiqué(e)s dans la notice d‘utilisation ou dont
l‘utilisation est conseillée par le fabricant !

16
6. NOTICE D‘UTILISATION
6.1 VUE D‘ENSEMBLE
1 Interrupteur MARCHE / ARRÊT
2 Interrupteur pour lampe de travail LED
3 Écran avec touches de réglage
4 Entrée 12 V
5 Entrée 230 V
6 Lampe de travail à LED
7 Tuyau d‘air avec raccord
de soupape automatique
6 Lampe de travail à LED
7 Tuyau d‘air avec raccord
de soupape automatique
8 Bouton (+)
9 (R) bouton de réglage
des unités
10 Touche (-)
14 Câble de raccordement 230 V
15 Adaptateur de sou et
11 Unité pour la pression
12 Indicateur de pression
13 Câble de raccordement
automobile 12 V
16 Adaptateur Ø 8 mm
17 Adaptateur Ø 5 mm
Figure 1 : vue d‘ensemble
Assurez-vous que le compresseur est hors
tension avant de le raccorder . L‘interrupteur
MARCHE / ARRÊT (position1 dans la vue
d‘ensemble) ne doit pas être enfoncé.
6.2 FONCTIONNEMENT DU COMPRESSEUR
Pour pouvoir travailler avec le compresseur, retirez d‘abord le
tuyau d‘air (pos. 7 dans l‘aperçu) de son support à l‘arrière de
l‘appareil.
Ne raccordez jamais le compresseur à la fois sur
l‘alimentation domestique 230 V et sur la prise
12 V d‘un véhicule.
6.2.1 RACCORDEMENT DU COMPRESSEUR
RACCORDEMENT À LA PRISE 12 V DE BORD DU VÉHICULE :
ATTENTION
Branchez la che du câble de raccordement automobile 12 V
(pos. 13 dans l‘aperçu) dans l‘entrée 12 V (pos. 4 dans l‘aperçu)
du compresseur. Ensuite, branchez la che automobile du câble
de raccordement dans la prise de bord du véhicule. Sur certains
véhicules, le contact doit être mis pour que la prise de bord soit
active.
Le compresseur peut décharger la batterie de
votre véhicule si le moteur est éteint.
Si vous utilisez le compresseur lorsque le moteur
de votre véhicule tourne, veillez à une bonne
aération dans le garage ou dans le local
d‘exploitation. Il y a risque d‘intoxication !
RACCORDEMENT À LA PRISE DE COURANT DOMESTIQUE DE
230 V :
Branchez la che de l‘appareil du câble de raccordement 230 V
(pos. 14 dans l‘aperçu) dans l‘entrée 230 V (pos. 5 dans l‘aperçu)
du compresseur. Ensuite, branchez la che du câble de
raccordement dans la prise de courant de la maison.
Une fois le compresseur raccordé électriquement, l‘écran
(position 3 dans l‘aperçu) est activé.
6.2.2 PRÉRÉGLAGE DE LA PRESSION D‘AIR
Sélectionnez l‘unité dans laquelle la pression atmosphérique doit
être a chée en appuyant sur la touche (R) (pos. 9 dans l‘aperçu).
En appuyant plusieurs fois sur cette touche, il est possible de régler
les unités suivantes : PSI - BAR - kg/cm².
En appuyant sur la touche (+) (pos. 8 dans l‘aperçu), la valeur
peut être augmentée, en appuyant sur la touche (-) (pos. 10 dans
l‘aperçu), la valeur peut être diminuée.
Pendant le processus de réglage, l‘a chage clignote à l‘écran.
Si aucun réglage n‘est plus e ectué, l‘écran a che en permanence
la valeur 0,00 après environ 3 secondes.
Les derniers réglages sont enregistrés. Après
une nouvelle mise en marche, ils sont à nouveau
réglés. Si vous souhaitez maintenant travailler avec
d‘autres valeurs, vous devez e ectuer un nouveau
préréglage.

17
Ouvrez le système de verrouillage au niveau du raccord de valve
Verrouillez le raccord de valve
Placez le raccord de valve sur la valve
Vous pouvez maintenant gon er le pneu avec le compresseur
Figure 2
Figure 4
Figure 3
Figure 5
6.3 GONFLAGE D‘UN PNEU AVEC UNE VALVE DE
VOITURE SCHRADER
Appuie sur l‘interrupteur MARCHE / ARRÊT (pos. 1 dans
l‘aperçu) pour démarrer le processus de remplissage. Pendant
le processus de remplissage, l‘écran a che la pression d‘air
actuelle. Lorsque la pression préréglée est atteinte, le
compresseur s‘arrête automatiquement. Après l‘arrêt, appuyer
sur l‘interrupteur MARCHE/ARRÊT.
Lors du gon age, veillez toujours à ce que
la pression de l‘air soit correcte (pour cela,
consultez le mode d‘emploi de votre véhicule).
Le compresseur peut délivrer une pression de
max. 10,3 bars. Une pression trop élevée
entraîne un risque d‘explosion et de blessure.
Ne laissez jamais fonctionner le compresseur en
continu durant plus de 10 minutes car il risque
de surchau er. Éteignez le compresseur au bout
de 10 minutes et laissez-le entièrement se
refroidir (pendant 20 minutes au minimum)
avant de le remettre en marche.
Ne laissez jamais tourner le compresseur sans
surveillance.
Après le gon age du pneu, contrôlez une nouvelle fois la
pression du pneu à l‘aide d‘un contrôleur de pression séparé
(par exemple dans une station d‘essence ou chez un garagiste).
6.4 UTILISATION DES ADAPTATEURS
Ouvrez le système de verrouillage du raccord de valve ( gure 2).
Insérez l‘adaptateur approprié à votre application dans le
raccord de valve. Verrouillez le raccord de valve ( gure 4). Montez
l‘adaptateur sur la valve de gon age de votre article de loisirs
(ballon, jouets gon ables etc.). En fonction du modèle, il se peut
qu‘il soit nécessaire de maintenir l‘adaptateur durant le gon age.
Vous pouvez maintenant démarrer le gon age. Retirez
l‘adaptateur du raccord de valve en procédant dans l‘ordre inverse
des opérations de montage.

18
6.5 TABLEAU DE CONVERSION PSI / BAR / KG/CM²
Les unités sont converties comme suit :
1 psi = 0,069 bar = 0,0703 kg/cm²
1 bar = 1,0197 kg/cm² = 14,504 psi
1 kg/cm² = 14,223 psi = 0,981 bar
psi bar kg/cm²
10 0,7 0,7
20 1,4 1,4
30 2,1 2,1
40 2,8 2,8
50 3,5 3,5
60 4,1 4,2
70 4,8 4,9
80 5,5 5,6
90 6,2 6,3
100 6,9 7,0
110 7,6 7,7
120 8,3 8,4
130 9,0 9,1
140 9,7 9,8
150 10,4 10,5
psi bar kg/cm²
0,5 7 0,5
1,0 15 1,1
1,5 22 1,6
2,0 29 2,2
2,5 36 2,7
3,0 44 3,3
3,5 51 3,8
4,0 58 4,4
4,5 65 4,9
5,0 73 5,5
5,5 80 6,0
6,0 87 6,6
6,5 94 7,1
7,0 102 7,7
7,5 109 8,2
8,0 116 8,8
8,5 123 9,3
9,0 131 9,9
9,5 138 10,4
10,0 145 11,0
psi bar kg/cm²
0,5 7 0,5
1,0 14 1,0
1,5 21 1,5
2,0 28 2,0
2,5 36 2,5
3,0 43 2,9
3,5 50 3,4
4,0 57 3,9
4,5 64 4,4
5,0 71 4,9
5,5 78 5,4
6,0 85 5,9
6,5 92 6,4
7,0 100 6,9
7,5 107 7,4
8,0 114 7,8
8,5 121 8,3
9,0 128 8,8
9,5 135 9,3
10,0 142 9,8
6.6 LAMPE DE TRAVAIL À LED
Vous allumez et éteignez la lampe de travail à LED (pos. 6 dans
l‘aperçu) en appuyant sur l‘interrupteur (pos. 2 dans l‘aperçu).
Figure 6 : Fusible dans le connecteur mâle 12 V
6.7 REMPLACEMENT DES FUSIBLES
Tournez la pointe (pos. 20 dans la g. 6) du connecteur mâle 12 V
(pos. 18 dans la g. 6) dans le sens anti-horaire jusqu‘à ce qu‘elle
se détache du connecteur puis retirez-la. Le fusible (pos. 19 dans
la g.6) est accessible et peut alors être retiré du connecteur mâle.
Remplacez-le par un fusible neuf de même intensité (ici fusible
en verre, rapide 15 A 250 V, 6 x 30) et revissez la pointe sur le
connecteur mâle, g. 6.

19
6.8 RECHERCHE D‘ERREURS
Erreur Cause possible Mesure
Le site le
compresseur
ne
fonctionne
pas
Le câble de
raccordement n‘est
pas correctement
branché.
Contrôlez le
raccordement des
câbles et
branchez-les
correctement.
En cas d‘utilisation
en voiture :
Pas de tension sur
la prise de bord.
Mettez le contact du
véhicule. Contrôlez le
fusible de la prise de
courant et
remplacez-le si
nécessaire.
Les fusibles de la
che du 12 V du
câble automobile
s‘est déclenché.
Remplacer le fusible
défectueux, voir
paragraphe 6.7
7. MAINTENANCE ET ENTRETIEN
À condition d‘être utilisé conformément aux spéci cités pour
lesquelles il a été conçu, le compresseur nécessite pas d‘entretien.
Stockez le compresseur à un endroit sec et à l‘abri de gel.
7.1 MAINTENANCE
Éteignez le compresseur avant tout travail de nettoyage,
débranchez-le de l‘alimentation en tension. Nettoyez le boîtier
du compresseur à l‘aide d‘un chi on doux et sec. N‘utilisez pas de
nettoyants agressifs ou contenant des solvants. Ne laissez jamais
de liquides entrer à l‘intérieur du boîtier.
7.2 ENTRETIEN
Ne jetez pas les appareils électriques dans les
ordures ménagères ! Les appareils électriques
et électroniques usagés doivent être collectés
séparément et être remis aux services de recyclage.
Renseignez-vous quant aux possibilités d‘élimina-
tion d‘appareils électriques et électroniques usagés
auprès de votre administration communale ou
municipale. Les matériaux sont recyclables. Par le
recyclage, la récupération des matières ou d’autres
formes de réutilisation d’appareils usagés, vous
contribuez activement à la protection de notre
environnement !
Mettez le compresseur au rebut conformément aux
lois et aux conditions en vigueur dans votre pays.
9. DONNÉES DE CONTACT
EAL GmbH
Otto-Hausmann-Ring 107
42115 Wuppertal, Allemagne
+49 (0)202 42 92 83 0
+49 (0) 202 42 92 83 – 160
info@eal-vertrieb.com
www.eal-vertrieb.com
8. REMARQUES RELATIVES À LA PROTECTION DE
L‘ENVIRONNEMENT
F
R
À DÉPOSER
EN MAGASIN À DÉPOSER
EN DÉCHÈTERIE
OU
FR
Cet appareil
et ses accessoires
se recyclent

20
2. LEVERINGSOMVANG
1 x dual power compressor
1 x auto-aansluitkabel voor 12 V-boordcontactdoos
1 x aansluitkabel voor 230 V huiscontactdoos
1 x zekering, snel 15 A 250 V, 6 x 30
1 x adapter ø 5 mm
1 x adapter ø 8 mm
1 x baladapter
1 x gebruiksaanwijzing
INHOUD
1. REGLEMENTAIR GEBRUIK _________________ 20
2. LEVERINGSOMVANG____________________ 20
3. SPECIFICATIES _______________________ 20
4. VEILIGHEIDSINSTRUCTIES ________________ 21
5. UITLEG VAN DE SYMBOLEN________________ 21
6. GEBRUIKSAANWIJZING __________________ 22
6.1 OVERZICHT _________________________ 22
6.2 GEBRUIK VAN DE COMPRESSOR ____________ 22
6.2.1 DE COMPRESSOR AANSLUITEN _____________ 22
6.2.2 INSTELLEN VAN DE LUCHTDRUK _____________ 22
6.3 EEN BAND VULLEN MET HET AUTOVENTIEL _____
SCHRADERVENTIEL ___________________ 23
6.4 GEBRUIK VAN DE ADAPTER ________________ 23
6.5 OMREKENTABEL PSI / BAR / KG/CM² __________ 24
6.6 LED WERKLAMP ______________________ 24
6.7 ZEKERINGEN VERVANGEN ________________ 24
6.8 FOUTOPSPORING ______________________ 25
7. ONDERHOUD EN VERZORGING ______________ 25
7.1 ONDERHOUD ________________________ 25
7.2 VERZORGING ________________________ 25
8. INFORMATIE OVER DE BESCHERMING VAN HET ___ 25
MILIEU ____________________________ 25
9. CONTACTINFORMATIE ___________________ 25
Lees voorafgaand aan de ingebruikname
de gebruiksaanwijzing aandachtig door en
neem alle veiligheidsvoorschriften in acht!
Het niet naleven hiervan kan letsel, schade
aan het product of uw eigendom veroorza-
ken! Bewaar de oorspronkelijke verpakking,
het aankoopbewijs en deze gebruiksaanwi-
jzing om deze later te kunnen raadplegen!
Geef bij doorgeven van het apparaat
eveneens deze gebruiksaanwijzing door.
Controleer voor de ingebruikname de inhoud
van de verpakking eerst op beschadigingen
en volledigheid!
1. REGLEMENTAIR GEBRUIK
De dual power compressor is universeel toepasbaar, zoals voor
het oppompen van auto-, motor- en etsbanden, sportballen en
opblaasspeeltuig.
Het apparaat kan zowel op het 12 V-boordnet van een voertuig
als op het 230 V-lichtnet worden aangesloten.
Dit apparaat mag niet worden gebruikt door kinderen, personen
met beperkte geestelijke vermogens of personen zonder de
vereiste deskundigheid. Kinderen moeten uit de buurt van het
apparaat worden gehouden.
Het apparaat is niet bedoeld voor bedrijfsmatig gebruik.
Tot het reglementair gebruik behoort ook de inachtneming van
alle informatie in deze handleiding, vooral de inachtneming
van de veiligheidsvoorschriften. Elk ander gebruik geldt als
niet-reglementair en kan materiële schade of persoonlijk letsel
veroorzaken. EAL GmbH is niet aansprakelijk voor schade als
gevolg van niet-reglementair gebruik.
WAARSCHUWING!
3. SPECIFICATIES
Ingangsspanning: 230 V 50 Hz AC
12 V DC
Max. druk: 10,3 bar / 150 psi
Max. Vermogen: 120 W
Afmetingen (L x B x H): ca. 22 x 13 x 7,5 [cm]
Gewicht zonder toebehoren: ca. 0,950 kg
Lengte luchtslang: ca. 0,50 cm
Lengte 12 V-kabel: ca. 3,50 m
Lengte 230 V-kabell: ca. 1,50 m
DUAL POWER COMPRESSOR 12 V / 230 V
Seite wird geladen ...
Seite wird geladen ...
Seite wird geladen ...
Seite wird geladen ...
Seite wird geladen ...
Seite wird geladen ...
Seite wird geladen ...
Seite wird geladen ...
Seite wird geladen ...
Seite wird geladen ...
Seite wird geladen ...
Seite wird geladen ...
-
 1
1
-
 2
2
-
 3
3
-
 4
4
-
 5
5
-
 6
6
-
 7
7
-
 8
8
-
 9
9
-
 10
10
-
 11
11
-
 12
12
-
 13
13
-
 14
14
-
 15
15
-
 16
16
-
 17
17
-
 18
18
-
 19
19
-
 20
20
-
 21
21
-
 22
22
-
 23
23
-
 24
24
-
 25
25
-
 26
26
-
 27
27
-
 28
28
-
 29
29
-
 30
30
-
 31
31
-
 32
32


EUFAB Dual Power Kompressor Bedienungsanleitung
- Kategorie
- Kaffeezubehör
- Typ
- Bedienungsanleitung