National Geographic 9075100 Bedienungsanleitung
- Typ
- Bedienungsanleitung

Art.No. 9075100
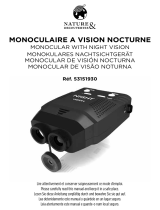
DIGITAL NIGHT VISION
BINOCULARS 3.5X
Bedienungsanleitung
Operating instructions
Mode d’emploi
Handleiding
Istruzioni per l’uso
Instrucciones de uso
Руководство по эксплуатации
DE
EN
FR
NL
IT
ES
RU

2
DE
Besuchen Sie unsere Website über den
folgenden QR Code oder Weblink um weitere
Informationen zu diesem Produkt oder die
verfügbaren Übersetzungen dieser Anleitung zu
finden.
EN
Visit our website via the following QR Code
or web link to find further information on this
product or the available translations of these
instructions.
FR
Si vous souhaitez obtenir plus d’informations
concernant ce produit ou rechercher ce mode
d’emploi en d’autres langues, rendez-vous sur
notre site Internet en utilisant le code QR ou le
lien correspondant.
NL
Bezoek onze internetpagina via de volgende
QR-code of weblink, voor meer informatie over
dit product of de beschikbare vertalingen van
deze gebruiksaanwijzing.
IT
Desidera ricevere informazioni esaustive su
questo prodotto in una lingua specifica? Venga
a visitare il nostro sito Web al seguente link
(codice QR Code) per conoscere le versioni
disponibili.
ES
¿Desearía recibir unas instrucciones de uso
completas sobre este producto en un idioma
determinado? Entonces visite nuestra página
web utilizando el siguiente enlace (código QR)
para ver las versiones disponibles.
PT
Deseja um manual detalhado deste produto
numa determinada língua? Visite a nossa
Website através da seguinte ligação (QR Code)
das versões disponíveis.
DK
Ønsker du en udførlig vejledning til dette
produkt på et bestemt sprog? Så besøg vores
website ved hjælp af følgende link (QR-kode)
for tilgængelige versioner.
PL
Prosimy więc odwiedzić naszą stronę,
korzystając z tego linku (QR Code), aby
zapoznać się dostępnymi wersjami.
CZ
Přejete si podrobný návod k produktu v
určitém jazyce? Pak navštivte naši webovou
stránku přes následující odkaz (QR Code) a
zjistěte, zdali máme Vámi požadovanou verzi k
dispozici.
SE
Önskar du en utförlig anvisning för den här
produkten på ett visst språk? Besök i så fall
vår webbsajt via följande länk (QR-kod) för
tillgängliga versioner.
FI
Haluatko tuotteen täydellisen ohjeen tietyllä
kielellä? Käy silloin sivustossamme, jossa ovat
saatavilla olevat versiot. Käytä seuraavaa linkkiä
(QR Code).
RU
Вам требуется подробная инструкция на
это изделие на определенном языке?
Проверьте наличие соответствующей версии
инструкции, посетив наш сайт по этой ссылке
(QR-код).
MANUAL DOWNLOAD:
www.bresser.de/P9075100
MANUAL DOWNLOAD:

3
DE
Bedienungsanleitung ...............................................4
EN
Operating Instructions ........................................... 10
FR
Mode d’emploi ...................................................... 16
NL
Gebruiksaanwijzing ............................................... 22
IT
Istruzioni per l’uso ................................................ 28
ES
Instrucciones de uso ............................................. 36
RU
Руководство по эксплуатации .............................. 44
DE
GARANTIE & SERVICE:
Die Garantiezeit beträgt 5 Jahre und beginnt
am Tag des Kaufs. Die vollständigen Garantie-
bedingungen und Serviceleistungen können
Sie unter: www.bresser.de/garantiebedingun-
gen einsehen.
EN
WARRANTY & SERVICE:
The guarantee period is 5 years and begins on
the day of purchase. You can consult the full
guarantee terms and details of our services at
www.bresser.de/warranty_terms.
FR
GARANTIE ET SERVICE:
La durée normale de la garantie est de 5 ans à
compter du jour de l’achat. Vous pouvez con-
sulter l’intégralité des conditions de garantie et
les prestations de service sur www.bresser.de/
warranty_terms.
ES
GARANTÍA Y SERVICIO:
El período regular de garantía es 5 anos in-
iciándose en el día de la compra. Las condi-
ciones de garantía completas y los servicios
pueden encontrarse en www.bresser.de/war-
ranty_terms.
RU
Гарантия и обслуживание
:
Стандартный гарантийный срок составляет 5
года, начиная со дня покупки. Подробные ус-
ловия гарантии, и о наших сервисных центрах
можно получить на нашем сайте www.bresser.de/
warranty_terms.
NL
GARANTIE & SERVICE:
De reguliere garantieperiode bedraagt 5 jaar
en begint op de dag van aankoop. De volledige
garantievoorwaarden en servicediensten kunt u
bekijken op www.bresser.de/warranty_terms.
IT
GARANZIA E ASSISTENZA:
La durata regolare della garanzia è di 5 anni e
decorre dalla data dell‘acquisto. Le condizioni
complete di garanzia e i servizi di assistenza sono
visibili al sito: www.bresser.de/warranty_terms.
www.bresser.de/warranty_terms
WARRANTY & SERVICE:

4
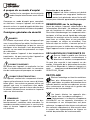
Zu dieser Anleitung
Le
sen Sie vor der Benutzung des Geräts
aufmerksam die Sicherheitshinweise
und die Bedienungsanleitung.
Bewahren Sie diese Bedienungsanleitung für
die erneute Verwendung zu einem späteren
Zeitpunkt auf. Bei Verkauf oder Weitergabe des
Gerätes ist die Bedienungsanleitung an jeden
nachfolgenden Besitzer/Benutzer des Produkts
weiterzugeben.
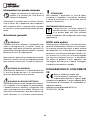
Allgemeine Warnhinweise
GEFAHR!
Kinder dürfen das Gerät nur unter Aufsicht be-
nutzen. Verpackungsmaterialien (Plastiktüten,
Gummibänder, etc.) von Kindern fernhalten! Es
besteht ERSTICKUNGSGEFAHR!
Setzen Sie das Gerät keinen hohen Temperatu-
ren aus. Durch übermäßige Hitze und unsachge-
mäße Handhabung können Kurzschlüsse, Brän-
de und sogar Explosionen ausgelöst werden!
BRANDGEFAHR!
Setzen Sie das Gerät – speziell die Linsen –
keiner direkten Sonneneinstrahlung aus! Durch
die Lichtbündelung könnten Brände verursacht
werden.
GEFAHR EINES STROMSCHLAGS!
Dieses Gerät beinhaltet Elektronikteile, die über
eine Stromquelle betrieben werden. Lassen Sie
Kinder beim Umgang mit dem Gerät nie un-
beaufsichtigt! Die Nutzung darf nur, wie in der
Anleitung beschrieben, erfolgen, andernfalls be-
steht GEFAHR eines STROMSCHLAGS!
HINWEIS!
Bauen Sie das Gerät nicht auseinander!
Wenden Sie sich im Falle eines Defekts an Ihren
Fachhändler. Er nimmt mit dem Service-Center
Kontakt auf und kann das Gerät ggf. zwecks Re-
paratur einschicken.
SCHUTZ der Privatsphäre!
Das Nachtsichtgerät ist für den Privatge-
brauch gedacht. Achten Sie die Privat-
sphäre Ihrer Mitmenschen – schauen
Sie mit diesem Gerät zum Beispiel nicht in Woh-
nungen!
Wartung/Reinigung
Trennen Sie das Gerät vor der Reinigung von
der Stromquelle! Reinigen Sie das Gerät nur
äußerlich mit einem trockenen Tuch. Benutzen
Sie keine Reinigungsflüssigkeit, um Schäden an
der Elektronik zu vermeiden. Schützen Sie das
Gerät vor Staub und Feuchtigkeit!
EG-Konformitätserklärung
Eine „Konformitätserklärung“ in
Übereinstimmung mit den anwendba-
ren Richtlinien und entsprechenden
Normen ist von der Bresser GmbH erstellt
worden. Der vollständige Text der EG-Konformi-
tätserklärung ist unter der folgenden Internet-
adresse verfügbar:
www.bresser.de/download/9075100/
CE/9075100_CE.pdf
ENTSORGUNG
Entsorgen Sie die Verpackungsmaterialien
sortenrein. Informationen zur ordnungsge-
mäßen Entsorgung erhalten Sie beim kommuna-
len Entsorgungsdienstleister oder Umweltamt.
Werfen Sie Elektrogeräte nicht in den
Hausmüll!
Gemäß der Europäischen Richtlinie
2002/96/EG über Elektro- und Elektronik-Altge-
räte und deren Umsetzung in nationales Recht
müssen verbrauchte Elektrogeräte getrennt ge-
sammelt und einer umweltgerechten Wiederver-
wertung zugeführt werden.

DE
5
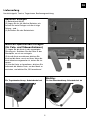
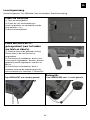
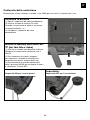
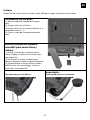
Lieferumfang
Nachtsichtgerät, Tasche, Trageriemen, Bedienungsanleitung
Batterien einlegen
(1) Batteriefach öffnen.
(2) Legen Sie 4x AA Alkaline Batterien ein.
Achten Sie beim Einlegen auf die richtige
Polung + und -.
(3) Schließen Sie das Batteriefach.
Micro-SD-Speicherkate einlegen
(für Foto- und Videoaufnahmen)
(1) Legen Sie die Karte in der angezeigten
Richtung ein. Schieben Sie die Karte in den
Steckplatz, um sie zu verriegeln.
(2) Um die Karte zu entfernen, drücken Sie
leicht auf die Karte, um sie zu lösen. Wenn die
Karte teilweise ausgeworfen ist, ziehen Sie sie
heraus.
(3) Um die Karte zu formatieren, drücken Sie
mehrmals die Modus-Taste, um das Menü zu
erreichen, und wählen Sie „SD formatieren“.
Für Tagesbeobachtung: Schutzdeckel auf
Wichtig:
Für Nachtbeobachtung: Schutzdeckel ab

6
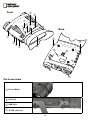
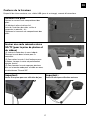
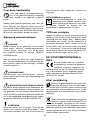
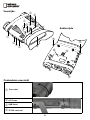
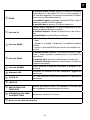
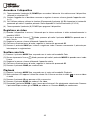
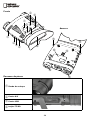
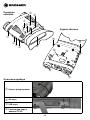
Teileübersicht
b
Scharfeinstellungsrad
c
A/V Anschluss
d
USB Anschluss
e
TF/SD Kartensteckplatz
Vorderseite
Rückseite
c
d
e
b

DE
7
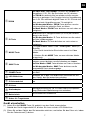
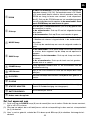
ZOOM
Im Video oder Fotos Modus: Drücken Sie ZOOM zum
Vergrößern (1.5X, 2X). Bei Erreichen von 2X, drücken
sie ZOOM ein weiteres Mal um wieder auf die normale
Ansicht zu gelangen. Das Fernglas hat eine Vergrößerung
von 3.5X. Der maximale digitale Zoom ist 2X. Es wird also
eine maximale Vergrößerung von 7X ermöglicht.
Im Wiedergabe Modus: ZOOM Taste drücken um das
Löschen-menü der aktuellen Datei zu öffnen.
Im Menü Modus: ZOOM Taste drücken um nach oben zu
navigieren.
IR Taste
IR drücken für 4 Helligkeitsstufen (0/1/2/3) bei Verwen-
dung in der Nacht.
Im Wiedergabe Modus: IR Taste drücken um die vorheri-
ge Datei wiederzugeben.
Im Menü Modus: IR-Taste drücken um nach unten zu
navigieren.
MODE Taste
• Es gibt 4 Modi: Video / Foto / Wiedergabe / Menü (in
Schleife)
• Das Gerät startet beim Einschalten zuerst im Video
Modus.
• Drücken Sie die MODE Taste, um zum nächsten Modus
zu wechseln.
SNAP Taste
Im Video Modus: SNAP Taste drücken um Videos aufzu-
nehmen, erneut drücken um die Aufnahme zu stoppen.
Im Foto Modus: SNAP Taste drücken um Fotos zu machen.
Im Wiedergabe Modus: SNAP Taste drücken um die
ausgewählte Datei wiederzugeben.
POWER Taste
Lange gedrückt halten um das Gerät ein- oder auszu-
schalten.
LCD Bildschirm
Schauen Sie in den LCD-Bildschirm und zielen Sie auf
das Objekt, das Sie betrachten möchten.
IR Schutzdeckel
Nehmen Sie den Schutzdeckel für die Nachtbeobachtung
ab.
IR Linse
Stativadapter
Montagevorrichtung für z.B. ein Stativ oder eine Kopfhalte-
rung (Stativ oder Kopfhalterung nicht enthalten).
Batteriefach
4x AA-Batterien erforderlich
Haken für Trageriemen
Gerät einschalten
(1) Halten Sie die POWER Taste (9) gedrückt um das Gerät einzuschalten.
Sobald das Gerät eingeschaltet ist, blicken Sie innen auf den LCD-Bildschirm.
(2) Zielen Sie auf das Objekt, das Sie betrachten möchten, und stellen Sie den Fokus ein, indem
Sie das Fokussierrad (1) drehen.

8
(3) Bei Nachtbeobachtung, aktivieren Sie die Infrarotbeleuchtung, durch drücken der IR-Taste (6). Erhö-
hen Sie die Helligkeit indem Sie die Taste wiederholt drücken.
Es gibt 4 Helligkeitsstufen (0/1/2/3).
(4) Durch längeres Drücken der POWER Taste (9) schalten Sie das Gerät aus.
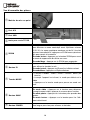
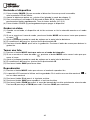
Ein Video aufnehmen
(1) Nach dem Einschalten startet das Nachtsichtgerät automatisch im Videomodus.
(2) Wenn das
1 1
MENU
Format
Auto Power Off
TV Mode
Frequency
Backlight
Language
TV Mode
PAL
1 Minute
3 Minutes
5 Minutes
No
Auto Power Off
NTSC
Backlight
2
1
3
4
Frequency
60Hz
50Hz
Language
Français
English
Español
Deutsch
Italiano
中文
Modus-Symbol nicht angezeigt wird, drücken Sie mehrmals die MODE Taste, bis
das Symbol auf dem Display erscheint.
(3) Nehmen Sie die Scharfeinstellung am Rad vor.
(4) Bei schlechten Lichtverhältnissen oder in der Nacht, aktivieren Sie die Infrarotbeleuchtung,
durch drücken der IR-Taste.
(5) Drücken Sie die SNAP Taste, um Videos aufzunehmen. Drücken Sie die Taste erneut um die
Aufnahme zu stoppen.
Ein Foto aufnehmen
(1) Drücken Sie die MODE-Taste, bis Sie in den Fotomodus wechseln.
(2) Wenn das
1 1
MENU
Format
Auto Power Off
TV Mode
Frequency
Backlight
Language
TV Mode
PAL
1 Minute
3 Minutes
5 Minutes
No
Auto Power Off
NTSC
Backlight
2
1
3
4
Frequency
60Hz
50Hz
Language
Français
English
Español
Deutsch
Italiano
中文
Modus-Symbol nicht angezeigt wird, drücken Sie mehrmals die MODE Taste, bis
das Symbol auf dem Display erscheint.
(3) Nehmen Sie die Scharfeinstellung am Rad vor.
(4) Bei schlechten Lichtverhältnissen oder in der Nacht, aktivieren Sie die Infrarotbeleuchtung,
durch drücken der IR-Taste.
(5) Drücken Sie die SNAP Taste, um Bilder zu machen.
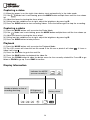
Wiedergabe (Playback)
(1) Drücken Sie die MODE Taste, bis Sie in den Wiedergabe Modus gelangen.
(2) Der LCD-Bildschirm zeigt die zuletzt gespeicherte Datei an. Wenn es sich bei der Datei um ein
Foto handelt, wird
angezeigt, bei einem Video wird angezeigt.
(3) Drücken Sie die IR Taste, um zur nächsten Datei zu gelangen.
(4) Drücken Sie die SNAP Taste, um die Videodatei wiederzugeben.
(5) Drücken Sie die ZOOM Taste, um das Löschen-menü für die aktuell ausgewählte Datei zu öffnen.
Drücken Sie IR, um nach unten zu gehen, oder ZOOM, um nach oben zu gehen. Drücken Sie SNAP
zur Bestätigung.
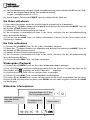
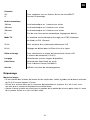
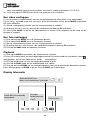
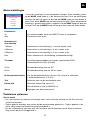
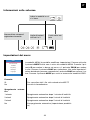
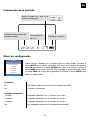
Bildschirm Informationen
1
1
MENU
Format
Auto Power Off
TV Mode
Frequency
Backlight
Language
TV Mode
PAL
1 Minute
3 Minutes
5 Minutes
No
Auto Power Off
NTSC
Backlight
2
1
3
4
Frequency
60Hz
50Hz
Language
Français
English
Español
Deutsch
Italiano
中文
1 1
MENU
Format
Auto Power Off
TV Mode
Frequency
Backlight
Language
TV Mode
PAL
1 Minute
3 Minutes
5 Minutes
No
Auto Power Off
NTSC
Backlight
2
1
3
4
Frequency
60Hz
50Hz
Language
Français
English
Español
Deutsch
Italiano
中文
1 1
MENU
Format
Auto Power Off
TV Mode
Frequency
Backlight
Language
TV Mode
PAL
1 Minute
3 Minutes
5 Minutes
No
Auto Power Off
NTSC
Backlight
2
1
3
4
Frequency
60Hz
50Hz
Language
Français
English
Español
Deutsch
Italiano
中文
Zeigt den Modus an, in dem
Sie sich gerade befinden.
Batteriestatus
Anzahl der verbleibenden
Fotos oder Zeit der
Aufnahme.
IR-Helligkeitsgrad
von 0 bis 3

DE
9
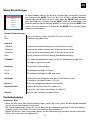
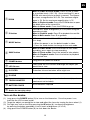
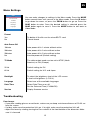
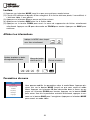
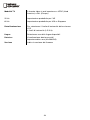
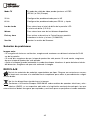
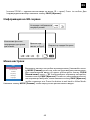
Menü Einstellungen
MENU
Format
Auto Aus
TV-Modus
Frequenz
Backlight
Sprache
Im Menü Modus können Sie diverse Einstellungen vornehmen. Drücken
Sie mehrmals die MODE Taste, bis Sie sich im Menü Modus befinden.
Drücken Sie die IR-Taste um nach unten oder die ZOOM Taste um nach
oben zu navigieren. Drücken Sie die SNAP Taste um zu bestätigen. So-
bald die gewünschte Einstellung gewählt ist, drücken Sie die SNAP Taste
erneut, um sie zu speichern. Drücken Sie die MODE Taste, um zum Video-
modus zurückzukehren.
Format (Formatierung)
Ja Um alle Dateien auf der microSD/TF Karte zu löschen
Nein Formatierung abbrechen
Auto Aus
1 Minute Automatische Abschaltung nach 1 Minute ohne Aktion
3 Minuten Automatische Abschaltung nach 3 Minuten ohne Aktion
5 Minuten Automatische Abschaltung nach 5 Minuten ohne Aktion
Nein Keine automatische Abschaltung (Standardeinstellung)
TV-Modus Der Videoausgabemodus kann auf NTSC (Nordamerika) oder PAL
(Europa) eingestellt werden.
Frequenz Anti-Flacker-Einstellungen
50 Hz Standardeinstellung für Europa
60 Hz Standardeinstellung für USA und Japan
Backlight Wählen Sie die Helligkeitsstufe des LCD-Bildschirms aus.
4 mögliche Helligkeitsstufen (1/2/3/4).
Sprache Eine der verfügbaren Sprachen auswählen
Datum/Uhrzeit Wählen Sie Datum/Uhrzeit ein oder aus.
Einstellen von Datum und Uhrzeit (JJ/MM/TT)
Version Version der Firmware anzeigen lassen
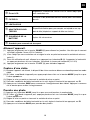
Fehlerbehebung
Schlechtes Bild:
• Wenn Sie eine Lese oder Gleitsichtbrille tragen, stellen Sie sicher, dass Sie den Mindestabstand
von 20-30 cm zum Bildschirm einhalten.
• Bei Tagesbeobachtung, stellen Sie sicher, dass der Schutzdeckel angelegt ist. Bei Nachtbeob-
achtung, stellen Sie sicher, dass der Schutzdeckel abgenommen ist.
• Stellen Sie Scharf, durch langsames drehen am Scharfeinstellungsrad vorne auf der Unterseite.
Stellen Sie sicher das scharfgestellt ist.

10
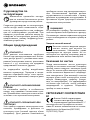
About this Instruction Manual
Please read the safety instructions and the
operating instructions carefully before use.
Keep these instructions for renewed use at a later
date. When the device is sold or given to someo-
ne else, the instruction manual must be provided
to the new owner/user of the product.
General Warning
DANGER!
Children should only use the device under adult
supervision. Keep packaging material, like pla-
stic bags and rubber bands, out of the reach
of children, as these materials pose a choking
hazard.
Do not expose the device to high temperatures.
Excessive heat or improper handling could trig-
ger a short-circuit, a fire or an explosion.
FIRE RISK!
Do not place the device, particularly the lenses,
in direct sunlight. The concentration of light
could cause a fire.
RISK of ELECTRIC SHOCK!
This device contains electronic components that
operate via a power source. Children should
only use the device under adult supervision.
Only use the device as described in the manual;
otherwise, you run the risk of an electric shock.
NOTE!
Do not disassemble the device. In the event of
a defect, please contact your dealer. The dealer
will contact the Service Centre and can send the
device in to be repaired, if necessary.
Privacy PROTECTION!
The night vision device is intended only
for private use. Please heed the privacy
of other people. Do not use them to look into
apartments, for example.
NOTES on Cleaning
Before cleaning the device, disconnect it from
the power supply! Only use a dry cloth to clean
the exterior of the device. To avoid damaging the
electronics, do not use any cleaning fluid. Cle-
an the eyepieces and/or lenses only with a soft,
lint-free cloth, (e.g. microfibre cloth). To avoid
scratching the lenses, use only gentle pressure
with the cleaning cloth. Protect the device from
dust and moisture.
EC DECLARATION OF
CONFORMITY
Bresser GmbH has issued a „Declara-
tion of Conformity“ in accordance with
applicable guidelines and correspon-
ding standards. The full text of the EU declarati-
on of conformity is available at the following in-
ternet address:
www.bresser.de/download/9075100/
CE/9075100_CE.pdf
UKCA DECLARATION OF
CONFORMITY
Bresser GmbH has issued a „Declara-
tion of Conformity“ in accordance with
applicable guidelines and correspon-
ding standards. The full text of the
UKCA declaration of conformity is available at
the following internet address:
www.bresser.de/download/9075100/
UKCA/9075100_UKCA.pdf
Bresser UK Ltd. • Suite 3G, Eden House,
Enterprise Way, Edenbridge, Kent TN8 6Hf, UK
DISPOSAL
Dispose of the packaging materials pro-
perly, according to their type, such as pa-
per or cardboard. Contact your local waste-dis-
posal service or environmental authority for
information on the proper disposal.

EN
11
Do not dispose of electronic devices in the household garbage!
As per Directive 2002/96/EC of the European Parliament on waste electrical and electronic
equipment and its adaptation into German law, used electronic devices must be collected
separately and recycled in an environmentally friendly manner.
Scope of delivery
Night vision device, Bag, Strap, Instruction manual
Install batteries
(1) Open the battery cover.
(2) Put in 4x AA Alkaline batteries.
When inserting the batteries pay attention to
the correct polarity + and –.
(3) Close the battery cover.
Insert micro SD/TF memory card
(for photo and video taking)
(1) Insert the card in the direction as shown.
Push the card into the slot to lock it.
(2) To remove the card, push it in to release.
When the card is partially ejected, pull it out.
(3) To format the card, press the mode button
several times to reach the menu, and select
„Format SD“.
Lid ON for day use
Important:
Lid OFF for night use

12
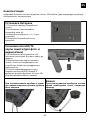
c
d
e
b
Front
Back
Parts overview
b
Focus Wheel
c
A/V Port
d
USB Port
e
TF/SD card slot

EN
13
ZOOM
When in Video or Photo mode: Press ZOOM to zoom
in at multiple levels (1.5X, 2X). Once reaching 2X, press
ZOOM one more time to go back to normal. The binocu-
lars have a magnification of 3.5X. The maximum digital
zoom is 2X. So the maximum magnification is 7X.
When in Playback mode: Press the ZOOM button to open
the delete menu of the current file.
When in Menu mode: Press the ZOOM to go up.
IR button
Press IR for 4 levels of brightness (0/1/2/3) when using the
binoculars at night.
When in Playback mode: Press IR to playback the next file.
When in Menu mode: Press IR to go down.
MODE button
• There are 4 modes: Video / Photo / Playback / Menu
(in a loop)
• When the power is on, the default mode is video
• Press the mode button to change to the next mode.
SNAP button
When in Video mode: Press the button to start video
recording, press again to stop recording.
When in Photo mode: Press the button to take photos.
When in Playback mode: Press the button to playback
the selected item.
POWER button
Long press for power on and off
LCD Screen
Look inside the LCD Screen and target the object you
would like to view.
IR FILTER
Protection lid must be taken off for night use.
IR LENS
TRIPOD ADAPTER
Mounting fixture for e.g. a tripod or head mount (tripod or
head mount not included).
BATTERY COVER
4x AA batteries required
Hooks for carrying strap
Turn on the device
(1) Long press the POWER button (9) to turn on the binoculars. Once the power is on,
look into the LCD screen inside.
(2) Target the object you would like to view and adjust the focus by turning the focus wheel (1).
(3) For night use, turn on the IR by pressing the IR button (6). Increase the brightness
by pressing the button repeatedly. It has 4 levels of brightness (0/1/2/3)
(4) Long press the POWER button (9) to shut down the device.

14
Capturing a video
(1) When the power is on, the night vision device starts automatically in the video mode.
(2) If the
1 1
MENU
Format
Auto Power Off
TV Mode
Frequency
Backlight
Language
TV Mode
PAL
1 Minute
3 Minutes
5 Minutes
No
Auto Power Off
NTSC
Backlight
2
1
3
4
Frequency
60Hz
50Hz
Language
Français
English
Español
Deutsch
Italiano
中文
Mode icon is not showing, press the MODE button multiple times until the icon shows
up.
(3) Adjust the focus by turning the focus wheel.
(4) During low light conditions or at night, adjust the brightness by pressing IR.
(5) Press the SNAP button to start recording videos. Press the button again to stop the recording.
Capturing a photo
(1) Press the MODE button until you enter the Photo Mode.
(2) If the
1 1
MENU
Format
Auto Power Off
TV Mode
Frequency
Backlight
Language
TV Mode
PAL
1 Minute
3 Minutes
5 Minutes
No
Auto Power Off
NTSC
Backlight
2
1
3
4
Frequency
60Hz
50Hz
Language
Français
English
Español
Deutsch
Italiano
中文
Mode icon is not showing, press the MODE button multiple times until the icon shows up.
(3) Adjust the focus by turning the focus wheel.
(4) During low light conditions or at night, adjust the brightness by pressing IR.
(5) Press the SNAP button to take pictures.
Playback
(1) Press the MODE button until you enter the Playback Mode.
(2) The LCD screen will show the last file saved. If the file was a photo it will show
, if it was a
video it will show
.
(3) Press the IR button to go to the next file.
(4) Press the SNAP button to playback the video file.
(5) Press the ZOOM button to open the delete menu for the currently seleted file. Press IR to go
down or ZOOM to go up. Press SNAP to confirm.
Display Information
1
1
MENU
Format
Auto Power Off
TV Mode
Frequency
Backlight
Language
TV Mode
PAL
1 Minute
3 Minutes
5 Minutes
No
Auto Power Off
NTSC
Backlight
2
1
3
4
Frequency
60Hz
50Hz
Language
Français
English
Español
Deutsch
Italiano
中文
1 1
MENU
Format
Auto Power Off
TV Mode
Frequency
Backlight
Language
TV Mode
PAL
1 Minute
3 Minutes
5 Minutes
No
Auto Power Off
NTSC
Backlight
2
1
3
4
Frequency
60Hz
50Hz
Language
Français
English
Español
Deutsch
Italiano
中文
1 1
MENU
Format
Auto Power Off
TV Mode
Frequency
Backlight
Language
TV Mode
PAL
1 Minute
3 Minutes
5 Minutes
No
Auto Power Off
NTSC
Backlight
2
1
3
4
Frequency
60Hz
50Hz
Language
Français
English
Español
Deutsch
Italiano
中文
Indicates the MODE
you are currently in.
Battery status
Number of photos or time of
recording remaining.
IR Brightness
level from 0 to 3

EN
15
Menu Settings
1 1
MENU
Format
Auto Power Off
TV Mode
Frequency
Backlight
Language
TV Mode
PAL
1 Minute
3 Minutes
5 Minutes
No
Auto Power Off
NTSC
Backlight
2
1
3
4
Frequency
60Hz
50Hz
Language
Français
English
Español
Deutsch
Italiano
中文
You can make changes to settings in the Menu mode. Press the MODE
button several times until you are in the Menu mode. Press the IR button
to go down the menu, or press the ZOOM button to go up. Press the
SNAP button to enter. Once the desired setting is selected, press the
SNAP button again to save it. Press the MODE button to exit back to
Video Mode.
Format
Yes To delete all the files on the microSD/TF card
No Cancel format
Auto Power Off
1Minute Auto power off in 1 minute without action
3Minutes Auto power off in 3 mins without action
5Minutes Auto power off in 5 mins without action
No No auto power off (Default setting)
TV Mode The video output mode can be set to NTSC (North
America) or PAL (Europe)
50 Hz Default setting for EU
60 Hz Default setting for U.S. and Japan
Backlight To select the brightness level of the LCD screen
4 levels of brightness (1/2/3/4).
Language Select one of the available languages
Date/Time Select Date/Time on or off.
Set the Date and Time (YY/MM/DD)
Version Display firmware version
Troubleshooting
Poor Image:
• If you wear reading glasses or varifocals, make sure you keep a minimum distance of 20-30 cm
from the screen.
• If at day, make sure the protection lid is on. If at night, make sure the protection lid is off.
• Adjust the focus by slowing turning the Focus wheel at the front bottom of the binocular. Make
sure it is focused.

16
A propos de ce mode d’emploi
Veuillez lire les consignes de sécurité et le
mode d’emploi attentivement avant utilisati-
on.
Conservez ce mode d’emploi pour consultati-
on ultérieure. Lorsque l’appareil est vendu ou
donné à un tiers, le mode d’emploi doit être four-
ni au nouveau propriétaire/utilisateur du produit.
Consignes générales de sécurité
DANGER !
Les enfants ne peuvent utiliser cet appareil que
sous la surveillance d’un adulte. Veuillez conser-
ver le matériel d’emballage, tel que les sacs en
plastiques et les élastiques, hors de portée des
enfants, car ces matériaux présentent un risque
de suffocation.
Ne pas exposer l’appareil à des températures
trop élevées. Ne pas court-circuiter l’appareil ou
les piles ou les jeter dans un Feu !
RISQUE D’INCENDIE !
Ne placez pas l’appareil, en particulier les len-
tilles, à la lumière directe du soleil. La concentra-
tion de lumière pourrait provoquer un incendie.
RISQUE D’ÉLECTROCUTION !
Cet appareil contient des composants électro-
niques qui fonctionnent via une source d’alimen-
tation (piles). Les enfants ne peuvent utiliser cet
appareil que sous la surveillance d’un adulte.
N’utilisez l’appareil que de la façon décrite dans
le manuel, autrement vous encourez le risque de
subir une électrocution.
REMARQUE !
Ne démontez pas l’appareil. En cas de dys-
fonctionnement, contactez votre revendeur. Le
revendeur prendra contact avec le service tech-
nique et enverra l’appareil pour réparation le
cas échéant.
Protection de la vie privée !
L’appareil de vision nocturne est destiné
uniquement à un usage privé. Veuillez res-
pecter la vie privée des autres. Ne les utili-
sez pas pour visiter des appartements, par exemple.
REMARQUES sur le nettoyage
Avant de nettoyer l’appareil, débranchez-le de
l’alimentation électrique ! Ne nettoyez l’appareil
que de l’extérieur en utilisant un chiffon sec.
Pour éviter d’endommager les composants élec-
troniques, n’utilisez pas de liquide de nettoyage.
Nettoyez les oculaires et/ou les lentilles unique-
ment avec un chiffon doux et non pelucheux
(par exemple, un chiffon en microfibre). Pour
éviter de rayer les lentilles, n’exercez qu’une lé-
gère pression avec le chiffon de nettoyage. Pro-
tégez l’appareil contre la poussière et l’humidité.
DÉCLARATION DE CONFORMITÉ CE
Bresser GmbH a publié une «Déclara-
tion de conformité «conformément à
directives et normes correspondantes.
Ce peut être consulté à tout moment sur de-
mande. L’intégralité de la déclaration de confor-
mité UE est disponible à l’adresse internet sui-
vante : www.bresser.de/download/9075100/
CE/9075100_CE.pdf
RECYCLAGE
Eliminez l’emballage en triant les matériaux.
Pour plus d’informations concernant les
règles applicables en matière d’élimination de ce
type des produits, veuillez-vous adresser aux ser-
vices communaux en charge de la gestion des
déchets ou de l’environnement.
Ne jamais éliminer les appareils élec-
triques avec les ordures ménagères !
Conformément à la directive européenne
2002/96/CE sur les appareils électriques et
électroniques et ses transpositions aux plans
nationaux, les appareils électriques usés doivent
être collectés séparément et être recyclés dans
le respect des réglementations en vigueur en
matière de protection de l’environnement.

FR
17
Contenu de la livraison
Dispositif de vision nocturne, sac, câble USB (pour la recharge), manuel d’instructions
Installer les piles
Retirez le couvercle du compartiment des
piles.
(2) Mettez 4 piles alcalines AA.
Lors de l'insertion des piles, veillez à
respecter la polarité + et -.
Replacez le couvercle du compartiment des
piles.
Insérer une carte mémoire micro
SD/TF (pour la prise de photos et
de vidéos)
(1) Insérez la carte dans le sens indiqué.
Poussez la carte dans la fente pour la
verrouiller.
(2) Pour retirer la carte, il faut l'enfoncer pour
la libérer. Lorsque la carte est partiellement
éjectée, tirez-la.
(3) Pour formater la carte, appuyez plusieurs
fois sur la touche mode pour accéder au menu,
et sélectionnez "Format SD".
Important :
Cache IR en place pour une utilisation de jour
Important :
Cache IR retiré pour utilisation nocturne

18
Vue d’ensemble des pièces
b
Molette de mise au point
c
Port A/V
d
Port USB
e
fente pour carte TF/SD
ZOOM
Lorsqu'il est en mode vidéo ou photo : Appuyez sur ZOOM
pour effectuer un zoom numérique avant à plusieurs niveaux
(1,5X, 2X). Le zoom numérique maximum est de 2X. Une fois
que vous avez atteint 2X, appuyez sur ZOOM une ou plusieurs
fois pour revenir à la normale.
En mode lecture : Appuyez sur le bouton ZOOM pour ouvrir
le menu de suppression du fichier en cours.
En mode Menu : Appuyez sur le ZOOM pour augmenter.
Bouton IR
Appuyez sur IR pour 4 niveaux de luminosité (0/1/2/3) lorsque
vous utilisez les jumelles la nuit.
En mode lecture : Appuyez sur IR pour lire le fichier suivant.
En mode Menu : Appuyez sur IR pour diminuer.
Touche MODE
• Il existe 4 modes : Vidéo / Photo / Lecture / Menu (en
boucle)
• Lorsque l'appareil est allumé, le mode par défaut est la
vidéo
• Appuyez sur la touche mode pour passer au mode sui-
vant.
Bouton SNAP
En mode vidéo : Appuyez sur le bouton pour démarrer
l'enregistrement vidéo, appuyez à nouveau pour l'arrêter.
En mode photo : Appuyez sur le bouton pour prendre des
photos.
En mode lecture : Appuyez sur le bouton pour lire l'élé-
ment sélectionné.
Bouton POWER
Une longue pression pour allumer et éteindre

FR
19
Écran LCD
Regardez à l'intérieur de l'écran LCD et ciblez l'objet que
vous souhaitez voir.
FILTRE IR
Le cache IR de protection doit être enlevé pour l'utilisation
de nuit.
LENTILLES IR
ADAPTATEUR POUR
TRÉPIED
Dispositif de fixation pour, par exemple, un trépied ou un sup-
port de tête (trépied ou support de tête non inclus).
COUVERCLE DE LA
BATTERIE
4 piles AA nécessaires
Crochets pour courroie de transport
Allumez l’appareil.
(1) Appuyez longuement sur la touche POWER (9) pour allumer les jumelles. Une fois que le courant
est établi, regarder l’écran LCD à l’intérieur.
(2) Visez l’objet que vous souhaitez voir et réglez la mise au point en tournant la molette de mise au
point (1).
(3) Pour une utilisation de nuit, allumez le en appuyant sur le bouton IR (6). Augmenter la luminosité
en appuyant plusieurs fois sur le bouton. Il possède 4 niveaux de luminosité (0/1/2/3)
(4) Appuyez longuement sur la touche POWER (9) pour éteindre l’appareil.
Capture d’une vidéo
(1) Lorsque l’appareil est allumé, le dispositif de vision nocturne démarre automatiquement en mode
vidéo.
(2) Si l’icône
1 1
MENU
Format
Auto Power Off
TV Mode
Frequency
Backlight
Language
TV Mode
PAL
1 Minute
3 Minutes
5 Minutes
No
Auto Power Off
NTSC
Backlight
2
1
3
4
Frequency
60Hz
50Hz
Language
Français
English
Español
Deutsch
Italiano
中文
Mode n’apparaît pas, appuyez plusieurs fois sur le bouton MODE jusqu’à ce que
l’icône apparaisse.
(3) Réglez la mise au point en tournant la molette de mise au point.
(4) Dans des conditions de faible luminosité ou la nuit, réglez la luminosité en appuyant sur IR.
(5) Appuyez sur le bouton SNAP pour commencer l’enregistrement des vidéos. Appuyez à nouveau
sur le bouton pour arrêter l’enregistrement.
Prendre une photo
(1) Appuyez sur le bouton MODE jusqu’à ce que vous entriez dans le mode photo.
(2) Si l’icône
1 1
MENU
Format
Auto Power Off
TV Mode
Frequency
Backlight
Language
TV Mode
PAL
1 Minute
3 Minutes
5 Minutes
No
Auto Power Off
NTSC
Backlight
2
1
3
4
Frequency
60Hz
50Hz
Language
Français
English
Español
Deutsch
Italiano
中文
Mode n’apparaît pas, appuyez plusieurs fois sur le bouton MODE jusqu’à ce que
l’icône apparaisse.
(3) Réglez la mise au point en tournant la molette de mise au point.
(4) Dans des conditions de faible luminosité ou la nuit, réglez la luminosité en appuyant sur IR.
(5) Appuyez sur le bouton SNAP pour prendre des photos.

20
Lecture
(1) Appuyez sur le bouton MODE jusqu’à ce que vous entriez en mode lecture.
(2) L’écran LCD affichera le dernier fichier enregistré. Si le fichier était une photo, il sera affiché, si
c’était une vidéo, il sera affiché.
(3) Appuyez sur le bouton IR pour passer au fichier suivant.
(4) Appuyez sur le bouton SNAP pour lire le fichier vidéo.
(5) Appuyez sur la touche ZOOM pour ouvrir le menu de suppression du fichier actuellement
sélectionné. Appuyez sur IR pour descendre ou ZOOM pour monter. Appuyez sur SNAP pour
confirmer.
Afficher les informations
1
1
MENU
Format
Auto Power Off
TV Mode
Frequency
Backlight
Language
TV Mode
PAL
1 Minute
3 Minutes
5 Minutes
No
Auto Power Off
NTSC
Backlight
2
1
3
4
Frequency
60Hz
50Hz
Language
Français
English
Español
Deutsch
Italiano
中文
1 1
MENU
Format
Auto Power Off
TV Mode
Frequency
Backlight
Language
TV Mode
PAL
1 Minute
3 Minutes
5 Minutes
No
Auto Power Off
NTSC
Backlight
2
1
3
4
Frequency
60Hz
50Hz
Language
Français
English
Español
Deutsch
Italiano
中文
1 1
MENU
Format
Auto Power Off
TV Mode
Frequency
Backlight
Language
TV Mode
PAL
1 Minute
3 Minutes
5 Minutes
No
Auto Power Off
NTSC
Backlight
2
1
3
4
Frequency
60Hz
50Hz
Language
Français
English
Español
Deutsch
Italiano
中文
Indique le MODE dans lequel
vous êtes actuellement.
État de la batterie
Nombre de photos ou durée
d'enregistrement restante.
Niveau de lumino-
sité IR de 0 à 3
Paramètres du menu
1 1
MENU
Format
Auto Power Off
TV Mode
Frequency
Backlight
Language
TV Mode
PAL
1 Minute
3 Minutes
5 Minutes
No
Auto Power Off
NTSC
Backlight
2
1
3
4
Frequency
60Hz
50Hz
Language
Français
English
Español
Deutsch
Italiano
中文
Vous pouvez modifier les paramètres dans le mode Menu. Appuyez plu-
sieurs fois sur le bouton MODE jusqu’à ce que vous soyez en mode
Menu. Appuyez sur le bouton IR pour descendre dans le menu, ou ap-
puyez sur le bouton ZOOM pour monter. Appuyez sur le bouton SNAP
pour entrer. Une fois le paramètre souhaité sélectionné, appuyez à nou-
veau sur le bouton SNAP pour l’enregistrer. Appuyez sur le bouton MODE
pour revenir au mode vidéo.
Seite wird geladen ...
Seite wird geladen ...
Seite wird geladen ...
Seite wird geladen ...
Seite wird geladen ...
Seite wird geladen ...
Seite wird geladen ...
Seite wird geladen ...
Seite wird geladen ...
Seite wird geladen ...
Seite wird geladen ...
Seite wird geladen ...
Seite wird geladen ...
Seite wird geladen ...
Seite wird geladen ...
Seite wird geladen ...
Seite wird geladen ...
Seite wird geladen ...
Seite wird geladen ...
Seite wird geladen ...
Seite wird geladen ...
Seite wird geladen ...
Seite wird geladen ...
Seite wird geladen ...
Seite wird geladen ...
Seite wird geladen ...
Seite wird geladen ...
Seite wird geladen ...
Seite wird geladen ...
Seite wird geladen ...
Seite wird geladen ...
Seite wird geladen ...
-
 1
1
-
 2
2
-
 3
3
-
 4
4
-
 5
5
-
 6
6
-
 7
7
-
 8
8
-
 9
9
-
 10
10
-
 11
11
-
 12
12
-
 13
13
-
 14
14
-
 15
15
-
 16
16
-
 17
17
-
 18
18
-
 19
19
-
 20
20
-
 21
21
-
 22
22
-
 23
23
-
 24
24
-
 25
25
-
 26
26
-
 27
27
-
 28
28
-
 29
29
-
 30
30
-
 31
31
-
 32
32
-
 33
33
-
 34
34
-
 35
35
-
 36
36
-
 37
37
-
 38
38
-
 39
39
-
 40
40
-
 41
41
-
 42
42
-
 43
43
-
 44
44
-
 45
45
-
 46
46
-
 47
47
-
 48
48
-
 49
49
-
 50
50
-
 51
51
-
 52
52


National Geographic 9075100 Bedienungsanleitung
- Typ
- Bedienungsanleitung
in anderen Sprachen
Verwandte Artikel
Andere Dokumente
-
Bresser 1877491 Bedienungsanleitung
-
Bresser Digital NV Binocular 3,5x w. recording Monochrom Bedienungsanleitung
-
-
-
-
-
 Fréhel 53151930 Bedienungsanleitung
-
Bresser 1877480 Bedienungsanleitung
-
Bresser 1877493 Digital Nightvision NightSpyDIGI Pro HD Bedienungsanleitung
-
