

“Please note that on disposal, this product must be safely recycled in accordance with relevant National legislation
relating to electrical/electronic products. If in doubt please contact your retailer for guidance.”
(European Union only)
IMPORTANT
Be sure to keep machine away from static electricity, heat sources, humidity and direct sunlight.
USA only
Your machine comes equipped with a polarized plug (one prong wider than the other). A polarized plug reduces
the risk of electrical shock. This plug is intended to fit into a polarized outlet. If the plug does not fit fully into the
outlet, reverse the plug. If it still does not fit, contact a qualified electrician to install the proper outlet. Do not
modify the plug in any way.
Use only foot control Model 21249 (UL, CSA).
IMPORTANT SAFETY INSTRUCTIONS
This appliance is not intended for use by persons (including children) with reduced physical, sensory or mental
capabilities, or lack of experience and knowledge, unless they have been given supervision or instruction
concerning use of the appliance by a person responsible for their safety.
When using an electrical appliance, basic safety precautions should always be followed, including the following:
Your 5200 sewing machine is designed and manufactured for household use only.
Read all instructions before using this sewing machine.
DANGER— To reduce the risk of electric shock:
1. An appliance should never be left unattended when plugged in. Always unplug this sewing machine from the
electric outlet immediately after using and before cleaning.
2. Always unplug before replacing a sewing machine bulb. Replace bulb with same type rated 12 Volts, 5 Watts.
WARNING— To reduce the risk of burns, fire, electric shock, or injury to persons:
1. Do not allow children to play with the machine. The machine is not intended for use by children or infirm
persons without proper supervision.
Do not allow to be used as a toy. Close attention is necessary when this sewing machine is used by or near
children.
2. Use this appliance only for its intended use as described in this owner’s manual.
Use only attachments recommended by the manufacturer as contained in this owner’s manual.
3. Never operate this sewing machine if it has a damaged cord or plug, if it is not working properly, if it has been
dropped or damaged, or dropped into water.
Return this sewing machine to the nearest authorized dealer or service center for examination, repair,
electrical or mechanical adjustment.
4. Never operate the appliance with any air opening blocked. Keep ventilation openings of this sewing machine
and foot controller free from accumulation of lint, dust and loose cloth.
5. Never drop or insert any object into any opening.
6. Do not use outdoors.
7. Do not operate where aerosol (spray) products are being used or where oxygen is being administered.
8. To disconnect, turn all controls to the off (“O”) position, then remove plug from outlet.
9. Do not unplug by pulling on cord. To unplug, grasp the plug, not the cord.
10. Keep fingers away from all moving parts. Special care is required around the sewing machine needle.
11. Always use the proper needle plate. The wrong plate can cause the needle to break.
12. Do not use bent needles.
13. Do not pull or push fabric while stitching. It may deflect the needle causing it to break.
14. Switch this sewing machine off (“O”) when making any adjustment in the needle area, such as threading the
needle, changing the needle, threading the bobbin or changing the presser foot, and the like.
15. Always unplug this sewing machine from the electrical outlet when removing covers, lubricating, or
when making any other adjustments mentioned in this owner’s manual.
SAVE THESE INSTRUCTIONS
Seite wird geladen ...
Seite wird geladen ...

SECTION I. MACHINE PARTS AND FUNCTIONS
Name of Parts ........................................................... 2
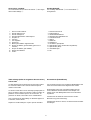
Standard Accessories ............................................... 4
Extension table (Accessory Storage Box) and Free....
Arm ........................................................................ 4
SECTION II. GETTING READY TO SEW
Connecting Machine to Power Supply ...................... 6
Controlling Sewing Speed ......................................... 8
Speed control slider .................................................. 8
Foot control ............................................................... 8
Presser Foot Pressure Adjustment Lever ................. 8
Main Function of Keys ............................................. 10
Reverse Key ............................................................ 10
Auto-Lock Key ......................................................... 10
Up/Down Needle Key .............................................. 10
Mode key ................................................................. 12
Direct Pattern Selection Keys.................................. 12
How to Drop the Feed Dog ..................................... 14
Attaching and Removing Presser Foot ................... 14
Attaching and Removing Shank .............................. 14
Raising and Lowering Presser Foot ........................ 16
Adjusting Needle Thread Tension............................ 16
Changing Needles................................................... 18
Selecting the Correct Needle for Fabrics ................ 18
Needle Definitions ................................................... 20
Winding the Bobbin ................................................. 22
Removing the bobbin ............................................ 22
Setting the spool of thread .................................... 22
Additional spool pin ............................................... 22
Threading for bobbin winding ................................ 22
Inserting the bobbin .............................................. 24
Threading the Machine ........................................... 26
Built-in Needle Threader ......................................... 28
Drawing Up the Bobbin Thread ............................... 28
SECTION III. BASIC SEWING
Straight Stitch .......................................................... 30
Starting to sew ...................................................... 30
Changing sewing direction .................................... 30
Finishing off a seam .............................................. 30
Adjusting Stitch Length ......................................... 32
Adjusting Needle Position ..................................... 32
Seam Allowance Lines .......................................... 34
Sewing on Heavy Fabrics...................................... 34
Variety of Straight Stitches and Recommended
Feet ....................................................................... 36
Gathering ................................................................ 38
Zipper Insertion .................................................. 40-42
Zigzag Stitch ........................................................... 44
Adjusting Stitch Width ........................................... 44
Adjusting Stitch Length ......................................... 44
Overcasting with Zigzag Stitch ................................ 46
Satin Stitch Applique ............................................... 46
Whip and Rolled Hem ............................................. 48
3-step Zigzag (Multiple zigzag) ............................... 48
Mending a Tear........................................................ 48
Overcasting Stitch ................................................... 50
Overlock Stitch ........................................................ 50
Double Overcasting Stitch ....................................... 50
Buttonhole Variations .............................................. 52
Classic Buttonhole ............................................. 54-58
Starting to sew ................................................. 54-56
Adjusting the Buttohole Width ............................... 58
Adjusting the Buttohole Stitch Density .................. 58
Double Layer Buttonhole ......................................... 58
Round End and Keyhole Buttonholes ..................... 60
Adjusting the Buttonhole Width ............................... 60
Stretch Buttonhole................................................... 62
Faux Chain Buttonhole ............................................ 62
Corded Buttonhole .................................................. 64
Button Sewing ......................................................... 66
Darning ................................................................... 68
Setting memory darning size ................................ 68
To adjust the evenness of darning ......................... 68
Tucking .................................................................... 70
Starting to sew ...................................................... 70
To sew shorter tacking........................................... 70
To sew same size tacking ...................................... 70
Fine adjustment screw .......................................... 70
Blind Hem Stitches .................................................. 72
SECTION IV. DECORATIVE STITCHES
Shell Tuck ................................................................ 74
Satin Stitches .......................................................... 74
Applique Sewing ..................................................... 76
Patchwork ............................................................... 76
Pattern Combination ............................................... 78
Using the Fine Adjustment Dial ............................... 80
SECTION V. CARE AND MAINTENANCE
Replacing the Light Bulb ......................................... 80
Cleaning the Hook Race ......................................... 82
Inserting the Bobbin Holder .................................... 82
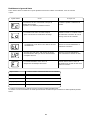
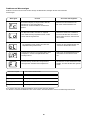
Problems and Warning Signals ............................... 84
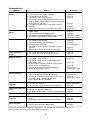
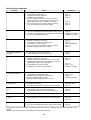
Troubleshooting ....................................................... 87
INDEX ..................................................................... 90
NOTE: Information found in this instruction manual is
current at the time of printing. We reserve the right to
change and update specifications and information as
needed.
TABLE OF CONTENTS
Seite wird geladen ...
Seite wird geladen ...

2
24
25
26
27
28
29
30
31
32
33
34
35
36
37
38
39
40
SECTION I.
MACHINE PARTS AND FUNCTIONS
41
1
2
3
4
5
6
7
8
9
10
11
12
13
14
15
16
17
18
19
20
21
22
23
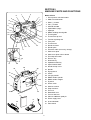
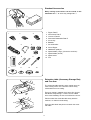
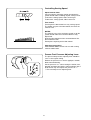
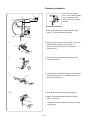
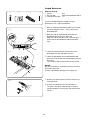
Name of Parts
1. Direct pattern selection buttons
2. Mode selection button
3. Minus (–) button
4. Plus (+) button
5. Indicator window
6. Spool holder (large)
7. Spool pin
8. Bobbin winding thread guide
9. Thread guide
10. Thread take-up lever
11. Tension regulating dial
12. Face plate
13. Thread cutter
14. Needle threader
15. Needle plate
16. Extension table (accessory storage)
17. Hook cover plate
18. Hook cover plate release button
19. Fine adjustment dial
20. Reverse key
21. Auto-lock key
22. Up/down needle key
23. Speed control slider
24. Needle clamp screw
25. Needle
26. Zigzag foot A
27. Shank
28. Carrying handle
29. Bobbin winder spindle
30. Bobbin winder stopper
31. Flywheel
32. Power switch
33. Machine sockets
34. Drop-feed lever
35. Free arm
36. Buttonhole lever
37. Presser foot lever
38. Hole for additional spool pin
39. Power supply cord
40. Instruction book
41. Foot control

3
SECTION I.
Composants et fonctions de la
machine
Dénomination des composants
1. Boutons de sélection directe des motifs
2. Boutons de sélection des modes
3. Bouton Moins (–)
4. Bouton Plus (+)
5. Fenêtre indicatrice
6. Disque fixe-bobine (grand modèle)
7. Broche porte-bobine
8. Guide-fil du bobinage de canette
9. Guide-fil
10. Levier releveur de fil
11. Molette de réglage de tension
12. Plaque frontale
13. Coupe-fil
14. Enfile-aiguille
15. Plaque à aiguille
16. Table rallonge (boîte de rangement d’accessoires)
17. Couvercle du crochet
18. Bouton d’ouverture du couvercle de crochet
19. Molette de réglage fin
20. Touche de marche arrière
21. Touche d’arrêt automatique
22. Touche de montée/descente d’aiguille
23. Curseur de réglage de la vitesse
24. Vis de pince-aiguille
25. Aiguille
26. Pied zigzag A
27. Talon
28. Poignée de transport
29. Axe de bobineur de canette
30. Butée de bobineur de canette
31. Volant
32. Interrupteur d’alimentation
33. Prises de la machine
34. Levier d’escamotage de la griffe d’entraînement
35. Bras libre
36. Levier de boutonnière
37. Levier de pied presseur
38. Trou pour broche porte-bobine supplémentaire
39. Cordon d’alimentation
40. Manuel d’instructions
41. Pédale
ABSCHNITT I
Maschinenteile und Funktionen
Teilebezeichnungen
1. Muster-Direktwähltasten
2. Modusauswahltaste
3. Minus-Taste (–)
4. Plus-Taste (+)
5. Anzeigefenster
6. Spulenhalter (groß)
7. Garnrollenstift
8. Spuler-Fadenführung
9. Fadenführung
10. Fadenhebel
11. Fadenspannungsregler
12. Abdeckplatte
13. Fadenabschneider
14. Nadeleinfädler
15. Stichplatte
16. Anstecktisch (Zubehörfach)
17. Greiferplatte
18. Freistellknopf, Greiferplatte
19. Feineinstellscheibe
20. Taste zum Rückwärtsnähen
21. Auto-Verriegelungs-Taste
22. Taste zum Hochstellen / Senken der Nadel
23. Geschwindigkeitsbegrenzer
24. Nadelklemmschraube
25. Nadel
26. Zickzack-Nähfuß A
27. Schaft
28. Tragegriff
29. Spulerspindel
30. Spuleranschlag
31. Handrad
32. Netzschalter
33. Maschinensteckdosen
34. Schieber zum Versenken des Transporteurs
35. Freiarm
36. Knopflochhebel
37. Nähfußhebel
38. Loch für zusätzliche Spulspindel
39. Netzkabel
40. Gebrauchsanleitungen
41. Fußanlasser
Seite wird geladen ...
Seite wird geladen ...

6
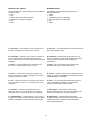
SECTION II. GETTING READY TO SEW
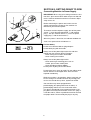
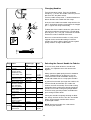
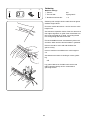
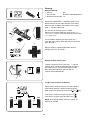
Connecting Machine to Power Supply
IMPORTANT: When using your sewing machine the first
few times, place waste fabric under the presser foot and
run the machine without thread for a few minutes. Wipe
away excess oil.
Before connecting the power cord, make sure the
voltage and frequency shown on the machine are
identical to your electrical power.
To connect machine to power supply, turn off the power
switch q. Insert the foot control plug w and machine
plug e into the machine sockets r. Insert the power
supply plug t into the wall socket y.
When the power is turned on, the indicator window will
show a test pattern then will indicate 01.
q
r
w
e
t
y
For Your Safety
Do not use extension cords or plug adapters.
Do not touch plug with wet hands.
Always turn off the power/light switch first and then
unplug from the electrical outlet. Examples:
• when leaving the machine unattended
•when cleaning the machine
Always turn off the power/light switch:
• when attaching or removing parts such as
needle, presser foot, needle plate
• when threading needle or bobbin
Do not place anything on the foot control.
Do not place heavy items on cords. Do not subject cords
to heat. Do not use damaged cords. Have the cord
repaired immediately.
While the machine is in operation, always keep your eye
on the sewing area and do not touch any moving parts
such as the thread take-up lever, flywheel or needle.
Your machine may come equipped with a
polarized plug (one prong wider than the other). A
polarized plug reduces the risk of electrical shock.
This plug is intended to fit into a polarized outlet. If the
plug does not fit fully into the outlet, reverse the plug. If
it still does not fit, contact a qualified electrician to install
the proper outlet. Do not modify the plug in any way.
Seite wird geladen ...

8
Controlling Sewing Speed
Speed control slider
You can limit the maximum sewing speed with the
speed control slider according to your sewing needs.
To increase sewing speed, slide it to the right.
To decrease sewing speed, slide it to the left.
Foot control
Pressing on the foot control can vary sewing speed.
The harder you press the foot control, the faster the
machine runs.
NOTES:
The machine runs at the maximum speed set by the
speed control slider when the foot control is fully
depressed.
Keep the foot control free from accumulation of lint,
dust and loose cloth.
Do not place anything on the foot control.
Operating Instructions:
Foot controller Model 21249 is for use with sewing
machine model 5200.
Presser Foot Pressure Adjusting Lever
The presser foot pressure adjusting lever should be
set at “3” for regular sewing.
Reduce the pressure to “2” for the applique, cutwork,
draw work and basting.
Set the pressure at “1” when sewing the chiffon, lace,
organdy and other fine fabrics. Velour and knits with a
lot of stretch may also require the pressure at “1”.
q Presser foot pressure adjusting lever
q
Seite wird geladen ...

10
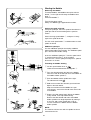
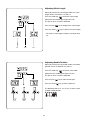
Main Function of Keys
q Reverse Key
If you are sewing 1, 2 (straight stitches), 8 (zigzag
stitch) or 9 (3-step zigzag stitch), press
and hold this key. The machine will sew in reverse
until you release the key while using the foot
control.
If you are sewing any other stitches, utility or
decorative, the machine will immediately stop and
sew a lockstitch when you press this key.
q
r
t
q
e
w
w Auto-Lock Key
Press this key while sewing 01, 02 (straight
stitches), 08 (zigzag stitch) or 09 (3-step zigzag
stitch) and the machine will sew a few
stitches in place and stop automatically.
Press this key while sewing utility or decorative
stitches and the machine will complete the stitch,
lockstitch and stop.
e Up/Down Needle Key
If the needle is up when you press this key, the
needle will go down to its lowest position. The
needle will continue to stop in the down position
If the needle is down when you press this key, the
needle will go to its highest position. The needle will
continue to stop in the up position.
NOTE: The needle will always stop in the up
position after auto thread cutting or buttonholes.
w
e
Seite wird geladen ...

12
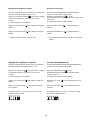
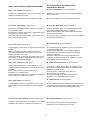
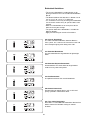
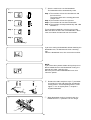
r Mode Key
Each time you press this key the mode will change in
the following order:
(1) Pattern selection mode
The green light on the top will turn on.
To select the pattern, press the key until the
pattern number of the desired stitch is indicated (see
the stitch chart below).
(2) Stitch width adjusting mode
The green light in the middle will turn on.
The stitch width of the selected pattern will be
indicated.
To alter the stitch width, press the key.
(3) Stitch length adjusting mode
The green light on the bottom will turn on.
The stitch length of the selected pattern will be
indicated.
To alter the stitch length, press the key.
t Direct Pattern Selection Keys
4 commonly used stitches can be selected by
pressing the corresponding key.
r
(1)
(2)
(3)
t
Seite wird geladen ...

14
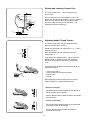
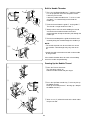
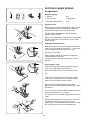
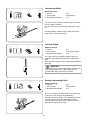
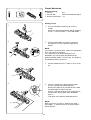
Attaching and Removing Shank
Turn OFF the power switch.
Raise the presser bar.
Turn the setscrew q counterclockwise with the
screw key to remove the shank.
To attach, match the hole in the shank w with the hole
in the presser bar e. Put thumbscrew in hole and turn
clockwise to tighten.
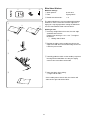
Attaching and Removing Presser Foot
Press the Up/Down Needle key until the needle
is in the raised position.
Turn OFF the power switch. Raise the presser foot
and press the lever q on back of the shank.
The presser foot will drop off.
Place the selected presser foot so the pin e on
the foot lies just under the groove w of the shank.
Lower the presser bar and attach the foot.
Each foot is marked with a letter for identification r.
How to Drop the Feed Dog
The feed dog can be dropped out of position for
special sewing techniques: free motion embroidery,
stippling, button sewing, etc.
Locate the feed dog lever on the back of the machine.
Slide the lever either to the right (down) q or to the
left (up) w. To bring up the feed dog e, hand turn the
flywheel r after sliding lever to the left.
NOTE:
The feed dog should be in the up position for regular
sewing. Turn the flywheel toward you to check if the
feed dog comes up after setting the lever in the up
position.
q
w
e
r
q
w
e
r
q
w
q
q
w
w
e
Seite wird geladen ...

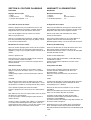
16
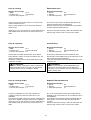
Raising and Lowering Presser Foot
The Presser foot lever q raises and lowers the
presser foot.
You can raise the presser foot about 6.5 mm (1/4˝)
higher than the normal up position w for easy removal
of the presser foot or to place heavy fabrics under
the presser foot. Pull the presser foot lever q up
beyond the normal up position e.
e
w
q
w
e
Adjusting Needle Thread Tension
The ideal straight stitch will have threads locked
between the two layers of fabric.
Needle thread tension can range from 2 – 6 q and is
normally set on 4.
Align the number 4 on the tension dial with the
setting mark w.
If you look at the needle thread e (top thread) and
bobbin thread r (bottom thread), you will notice
that there are no gaps. Each stitch is smooth and
even.
Occasionally the needle thread tension needs to be
adjusted. Examples:
— stiff or heavy fabric
— sewing more than two layers of fabric
— type of stitch
— thread
When adjusting needle thread tension, the higher
numbers tighten, the lower numbers loosen.
• Tension is too tight
The bobbin thread shows through on the topside of
the fabric and it will feel bumpy.
Turn the dial to a lower number to loosen the needle
thread tension.
•Tension is too loose
The needle thread shows through on the underside
of the fabric and it will feel bumpy.
Turn the dial to a higher number to tighten the
needle thread tension.
r
e
w
q
Seite wird geladen ...

18
w
e
r
t
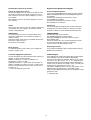
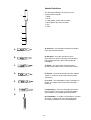
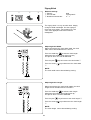
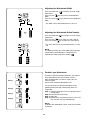
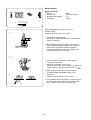
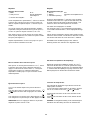
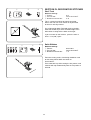
Changing Needles
Turn ON the power switch. Press the Up/Down
needle key q to raise the needle. Lower the presser
foot. Turn OFF the power switch.
Turn the needle clamp screw w counterclockwise to
loosen. Remove the needle from the clamp.
Insert the new needle into needle clamp with the flat
side r to the back, pushing it up against the stopper
pin e. Tighten the clamp screw firmly.
To determine if the needle is defective, place the flat
side of the needle on something flat (a needle plate,
piece of glass, etc.). The gap t between the needle
and the flat surface should be consistent.
Never use a bent or blunt needle, as it may cause
skipped stitches or thread breakage. Defective
needles can ruin the fabric. Always purchase good
quality needles. Change needles often.
q
Selecting the Correct Needle for Fabrics
There are many kinds of fabrics, threads and
needles. It is important to use the correct ones
together.
Always purchase good quality thread. It should be
strong, smooth and even in thickness. Use the
same thread for needle and bobbin. Always test
thread and needle size on a scrap piece of fabric.
In general, fine threads (the larger the number, the
finer the thread) and needles (the smaller the
number, the finer the needle) are used for sewing
lightweight fabrics and heavier threads and larger
needles are used for sewing heavyweight fabrics.
There are many specialty needles available from
your sewing machine dealer.
Check your needles frequently for rough or blunt
tips. Snags and runs in knits, fine silks and silklike
fabrics are permanent and are often caused
by damaged needles.
NOTE: A universal needle size 14/90 comes
inserted in your machine
Weight
Fabric Needle Type
Needle
Size
Very Chiffon, Fine Lace, Universal 9 (65)
Light Organdy Ball Point 9 (65)
Light
Batiste, Lawn, Crepe
Stretch 11 (75)
de Chine, Challis,
Handkerchief Linen,
Crepe, Taffeta, Satin
Universal 11 (75)
12 (80)
Single Knits, Jersey, Stretch 11 (75)
Swimwear, Tricot Ball Point 11 (75)
Leather, Suede Leather 11(75)
Medium
Flannel, Velour, Velvet,
Universal 14 (90)
Velveteen, Corduroy,
Linen, Gabardine,
Wool, Terry, Burlap
Double Knits, Stretch
Ball Point 14 (90)
Velour, Stretch Terry,
Sweater Knits
Leather, Vinyl, Suede
Leather 14 (90)
Heavy
Denim, Sailcloth,
Denim 16 (100)
Ticking
Coating, Polar Fleece,
Universal 16 (100)
Drapery, and
Upholstery Fabrics
Leather, Suede
Leather 16 (100)
Very
Canvas, Duck,
Universal 18 (110)
Heavy
Upholstery Fabrics
Topstitching for
Topstitching 11 (75)
Special Finish
14 (90)

19
Changement d’aiguille
Mettre l’interrupteur d’alimentation en position de marche.
Appuyer sur la touche de montée/descente d’aiguille q afin
de relever l’aiguille. Abaisser le pied presseur. Mettre
l’interrupteur d’alimentation en position d’arrêt.
Tourner la vis du pince-aiguille w dans le sens contraire des
aiguilles d’une montre pour la desserrer. Déposer l’aiguille
du pince-aiguille.
Insérer la nouvelle aiguille dans le pince-aiguille, le côté plat
r vers l’arrière, et la pousser vers le haut contre l’axe de
butée e. Serrer fermement la vis du pince-aiguille.
Pour déterminer si l’aiguille est défectueuse, placer le côté
plat de l’aiguille sur une surface plane (une plaque à aiguille,
un morceau de verre, etc.). L’écartement t entre l’aiguille et
la surface plane doit être le même partout.
Ne jamais utiliser une aiguille tordue ou émoussée car la
machine risque de sauter des points ou de casser le fil. Des
aiguilles défectueuses peuvent endommager le tissu.
Toujours acheter des aiguilles de bonne qualité. Changer
souvent d’aiguille.
Sélection de l’aiguille adaptée au tissu
Il existe de nombreux types de tissus, de fils et d’aiguilles. Il
est important de bien les associer.
Achetez toujours du fil de bonne qualité. Il doit être solide,
lisse et d’épaisseur uniforme. Utiliser le même fil pour
l’aiguille et la canette. Toujours tester le fil et la taille de
l’aiguille sur une chute de tissu.
En général, on utilise des fils fins (plus le numéro est élevé,
plus le fil est fin) et des aiguilles fines (plus le numéro est
petit, plus l’aiguille est fine) pour coudre les tissus fins, et
des fils plus épais et des aiguilles plus grosses pour coudre
les tissus épais.
Vous trouverez de nombreuses aiguilles spéciales chez
votre revendeur de machines à coudre.
Vérifiez régulièrement que vos aiguilles ne sont pas
rugueuses ou émoussées. Irréparables, les accrocs et les
filures dans les tricots, les soies fines et les matières
soyeuses sont souvent causés par une aiguille
endommagée.
REMARQUE: Cette machine est livrée équipée d’une
aiguille universelle de taille 14/90.
Poids Tissu Type d’aiguille Taille
d’aiguille
Très Chiffon, dentelle fine, Universel 9 (65)
fin organdi Pointe bille 9 (65)
Fin Batiste, linon, crêpe Stretch 11 (75)
de Chine, challis, Universel 11 (75)
toile à mouchoirs, 12 (80)
crêpe, taffetas, satin
Tricots simples, jersey, Pointe bille 11 (75)
vêtements de bain, tricot
Ball Point 11 (75)
Leather, suédine Cuir 11(75)
Moyen
Flanelle, velours, veloutine,
Universel 14 (90)
veloutine, velours côtelé,
toile de lin, gabardine,
laine, tissu éponge, toile
Tricots doubles, velours
Pointe bille 14 (90)
extensible, tissu eponge
extensible, vestes
extensibles
Cuir, vinyle, suédine Cuir 14 (90)
Épais Toile denim (jeans), Denim 16 (100)
toile à voiles, toile à
matelas
Tissu pour manteaux,
Universal 16 (100)
fibre polaire, tissus pour
rideaux et ameublement
Cuir, suédine Cuir 16 (100)
Très Toile, coutil, tissus Universel 18 (110)
épais d’ameublement
Surpiqûres pour Surpiqûre 11 (75)
finitions spéciales 14 (90)
Gewicht Stoff Nadeltyp Nadelgröße
Sehr
Chiffon, feine Spitzengewebe,
Universal 9 (65)
Leicht Organdy Kugelspitze 9 (65)
Leicht Batist, Linon, Crèpe Stretch 11 (75)
de Chine, Challis, Universal 11 (75)
Taschentuchleinen 12 (80)
Crèpe, Taft, Satin
Einfache Maschenware, Jersey,
Stretch 11 (75)
Badebekleidung, Trikot Kugelspitze 11 (75)
Leder, Wildleder Leder 11(75)
Mittel
schwerer Flanell, Velour, Samt,
Universal 14 (90)
Velvetine, Kord,
Leinen, Gabardine
Wolle, Frottierware,
Bauernleinen
Doppelte Maschenware, Kugelspitze 14 (90)
Stretchvelours, Stretch-Frottierware,
Pullovermaschenware
Leder, Vinyl, Wildleder Leder 14 (90)
Schwer Denim, Segeltuch, Jeansstoff 16 (100)
Drell
Manteltuch, Polarfleece, Universal 16 (100)
Vorhangs- und
Möbelbezugsstoffe
Leder, Wildleder Leder 16 (100)
Sehr Sackleinen, Duck, Universal 18 (110)
Schwer Möbelbezugsstoffe
Steppnadel für Steppnadel 11 (75)
Sonderfinish 14 (90)
Auswechseln der Nadeln
Schalten Sie den Netzschalter EIN. Drücken Sie die Taste
q
zum Hochstellen / Senken der Nadel, um die Nadel
hochzustellen. Senken Sie den Nähfuß. Schalten Sie den
Netzschalter AUS.
Drehen Sie die Nadelklemmschraube
w
gegen den
Uhrzeigersinn, um sie zu lösen. Nehmen Sie die Nadel aus der
Klemme.
Setzen Sie eine neue Nadel so in die Nadelklemme ein, dass
die flache Seite
r
nach hinten zeigt. Drücken Sie die Nadel
nach oben gegen den Anschlagstift
e
und ziehen Sie die
Nadelklemmschraube fest an.
Um festzustellen, ob eine Nadel schadhaft ist, legen Sie die
flache Seite der Nadel auf einen flachen Gegenstand (eine
Stichplatte, ein Stück Glas, etc.). Der Abstand
t
zwischen der
Nadel und der flachen Stelle sollte durchgehend gleich sein.
Nähen Sie niemals mit einer verbogenen oder stumpfen Nadel,
da Sie sonst Stiche überspringen könnten oder der Faden
reißen könnte. Schadhafte Nadeln können den Stoff
beschädigen. Kaufen Sie immer Nadeln guter Qualität.
Wechseln Sie die Nadeln oft aus.
Auswählen der richtigen Nadeln für den Stoff
Es stehen viele verschiedene Arten von Stoffen, Garnen und
Nadeln zur Auswahl. Es ist wichtig, dass Sie die Richtigen
zusammen verwenden.
Kaufen Sie immer Garn guter Qualität. Es muss fest, glatt und
von durchgehend gleicher Stärke sein. Im Allgemeinen ist das
gleiche Garn für den Ober- und Unterfaden zu verwenden.
Probieren Sie Garn und Nadelgröße immer zuerst auf einem
Stoffrest aus.
Im Allgemeinen werden feine Fäden (je höher die Zahl, desto
feiner der Faden) und Nadeln (je kleiner die Zahl, desto feiner
die Nadel) zum Nähen von leichten Stoffen und dickere Fäden
und Nadeln zum Nähen von schweren Stoffen verwendet.
Von Ihrem Nähmaschinenhändler sind viele Spezialnadeln
erhältlich.
Prüfen Sie Nadeln regelmäßig auf verbogene oder stumpfe
Nadelspitzen. Zieher und Laufmaschen in Maschenware, feinen
Seiden und seidenartigen Stoffen sind permanent und werden
oft von schadhaften Nadeln verursacht.
HINWEIS: Ihre Maschine wird mit eingesetzter Nadel der
Universalgröße 14/90 geliefert.
Seite wird geladen ...
Seite wird geladen ...

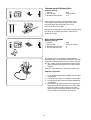
22
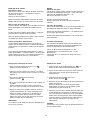
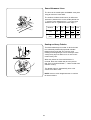
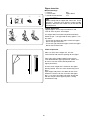
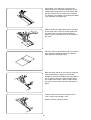
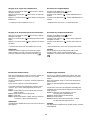
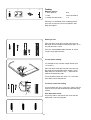
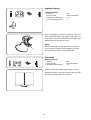
Winding the Bobbin
Removing the bobbin
To remove bobbin, slide bobbin cover plate release
button q to the right and lift away the bobbin cover
plate w.
Lift out the bobbin e.
Turn ON the power switch.
Always use bobbin type supplied with machine.
Setting the spool of thread
Lift up the spool pin. Place the spool of thread on the
spool pin with the thread coming off the spool as
shown.
Attach the large spool holder q, and press it firmly
against the spool of thread.
Use the small spool holder w to hold narrow or small
spools of thread.
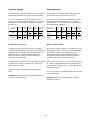
Additional spool pin
Use the additional spool pin for winding a bobbin
without unthreading the machine. The additional spool
pin is also for twin needle sewing.
Insert the additional spool pin e into the spool stand
y and then into the hole t in the machine.
Place the felt r on the spool pin and place a spool of
thread on it as shown.
q
w
e
q
w
e
r
y
t
u
i
z
x
xc
vb
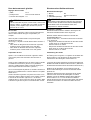
Threading for bobbin winding
z Set the speed control lever at .
Guide the thread around the thread guide u.
x Pass the thread through the hole in the bobbin
from the inside to the outside. Place the bobbin on
the bobbin winder spindle i.
c Push the bobbin winder spindle to the right.
The indicator will show .
v Hold the free end of the thread in your hand and
depress the foot control.
Stop the machine after the bobbin has spun
several times, and cut the thread close to the hole
in the bobbin.
b Depress the foot control again. When the bobbin
is fully wound, it will stop automatically.
Release the foot control and return the bobbin
winder spindle to its original position by moving it
to the left, and cut the thread with a pair of
scissors. Remove the bobbin from the bobbin
winder spindle.
NOTE:
The machine will not sew until the spindle has been
returned to the left.
Seite wird geladen ...

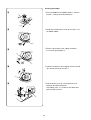
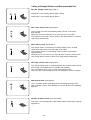
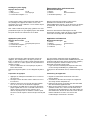
24
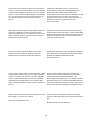
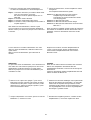
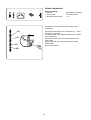
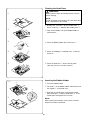
Inserting the bobbin
zPlace the bobbin in the bobbin holder w with the
thread q running off counterclockwise.
xGuide the thread into the notch on the front e of
the bobbin holder.
cDraw the thread to the left, sliding it between
the tension spring blades r.
vContinue to draw the thread lightly until the thread
slips into the notch on the side t.
bPull out about 10 cm (4˝) of thread to the rear.
Reattach the hook cover plate.
A threading chart y is shown on the hook cover
plate for your reference.
zz
zz
z
xx
xx
x
cc
cc
c
vv
vv
v
bb
bb
b
q
w
e
t
r
t
y
Seite wird geladen ...

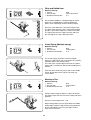
26
3
z Draw the thread from the spool. Hold the upper
thread q at the spool with your finger.
x Slip the thread under the thread guide w from the
right and down along the right channel e.
Be sure that the thread passes between the
tension disks r.
c Then draw the thread around the bottom of the
thread guide plate t.
Raise the presser foot.
Press the Up/Down needle
key to raise the thread
take-up lever to its highest
position.
Threading the Machine
q
c
b
x
v
n
x
c
v
bn
w
e
r
t
y
u
v Firmly draw the thread up along the left channel to
the thread take-up lever y and down into its eye
from the right to the left.
b Then down through the lower thread guide u.
n Slide the thread behind the needle bar thread
guide i on the left.
*Use built-in needle threader to thread the needle.
(see page 28)
i
z
Seite wird geladen ...

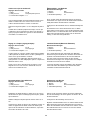
28
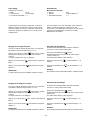
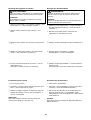
Drawing Up the Bobbin Thread
z
x
cv
e
w
e
r
z
x
c
e
w
q
w
q
zRaise the Presser foot lever.
Turn the power switch on.
Hold the needle thread with your finger.
xPress the Up/Down needle key e twice to pick up
the bobbin thread.
Draw up the needle thread q to bring up a loop of
the bobbin thread w.
c Slide 10 cm (4˝) of both threads to the back under
the presser foot.
Built-in Needle Threader
z Press the Up/Down Needle key q until the needle
is in an up position. Turn OFF the power switch.
Lower the presser foot.
Lower the needle threader lever w as far as it will
go. Hook e is automatically inserted into the
needle eye.
x Draw the thread from the guide r to the guide t.
The thread is caught under the hook e.
c Slowly release the lever while holding the thread
end and let the needle threader return to its
original position. A loop of thread is pull through the
needle eye.
v Pull the thread loop off the guide to the back and
manually bring the thread through the needle eye.
NOTE:
• The needle threader can be used with #11 to #16
size needles. Thread weight may vary from 30 to
90.
• Needle threader cannot be used with a twin needle
or wing needle.
If the needle threader does not catch a thread loop,
check the needle and positioning.
t
q
Seite wird geladen ...

30
qwe
Finishing off a seam
To fasten the threads at the beginning or end of a
seam, press and hold the Reverse key w.
Sew a few stitches in reverse to fasten the seam.
OR
To lock stitch threads at the beginning or end of a
seam, press the Auto-lock key e before sewing
begins or when reaching end of sewing.
Release foot from foot control to stop sewing.
Raise the presser foot and pull the fabric to the back
to remove it.
To cut the threads, pull the fabric to draw the threads
up to the thread cutter r as shown.
The threads are cut a proper length to start the next
seam.
When pattern #03 (lock-a-matic stitch) is selected:
The machine will sew reverse stitches at the
beginning of a seam automatically, and at the end of
the seam by pressing the reverse button once.
SECTION III. BASIC SEWING
Straight Stitch
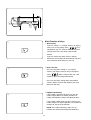
Changing sewing direction
Stop the machine a few stitches before the end of a
seam. Press the Up/Down needle key q a few times
until the needle falls on the end of the seam.
Raise the presser foot.
Pivot the fabric around the needle to change the
sewing direction as desired.
Lower the presser foot and start sewing in a new
direction.
Machine settings
q Pattern: #01
w Presser foot: Zigzag foot A
e Needle thread tension: 2–6
q
w
Starting to sew
Raise the presser foot and position the fabric next to
a seam guide line on the needle plate. Lower the
needle into the fabric where you wish to start.
Pull the needle and bobbin threads to the back.
Lower the presser foot.
Depress the foot control to start sewing. Gently guide
the fabric along the seam guide line. Let the fabric
feed naturally.
e
r
Seite wird geladen ...

32
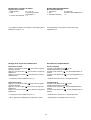
Adjusting Needle Position
When you activate the stitch width mode, the needle
position can be set between 0.0 and 5.0.
Press the mode key to activate stitch width
adjustment (the middle green light turns on).
The preset value 3.5 will be indicated.
Press the plus key to move needle right.
Press the minus key to move needle left.
The following stitches 01, 02, 03, 04, 05 and 07 have
variable needle position:
Adjusting Stitch Length
When you activate the stitch length mode, the stitch
length can be set between 1.0 and 5.0.
Press the mode key to activate stitch length
adjustment (the bottom green light turns on).
The preset value 2.2 will be indicated.
Press the plus key to lengthen the stitch length.
Press the minus key to shorten the stitch length.
* The reverse stitch length cannot be set longer than
2.5.
7.03.50.0
5.02.21.0
Seite wird geladen ...

34
15 20 4/8 5/8 6/8
1.5 2.0
4/8 5/8 6/8
Number
Distance
(cm)
Distance
(inch)
q
w
e
q
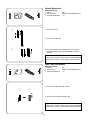
Sewing on Heavy Fabrics
The black button on presser foot “A” locks the foot
in a horizontal position when pushed in before
lowering the presser foot. This ensures even
feeding at the beginning of seams and helps when
sewing many layers of fabric such as welt seams
used to hem jeans.
When the point of an increased thickness is
reached, lower the needle and raise the presser
foot. Press in the black button q. Lower the foot and
continue sewing.
This button releases automatically after a few
stitches have been sewn.
NOTE: Increase stitch length between 3.0 and 4.0
for heavier fabrics.
Seam Allowance Lines
The lines on the needle plate and bobbin cover plate
help you measure seam width.
The numbers indicate the distance (in millimeters
and inches) between the center needle position 3.5
w and the seam allowance line q. Use the seam
allowance line as a guide for the fabric edge e.
Seite wird geladen ...
Seite wird geladen ...
Seite wird geladen ...
Seite wird geladen ...
Seite wird geladen ...
Seite wird geladen ...
Seite wird geladen ...
Seite wird geladen ...
Seite wird geladen ...
Seite wird geladen ...
Seite wird geladen ...
Seite wird geladen ...
Seite wird geladen ...
Seite wird geladen ...
Seite wird geladen ...
Seite wird geladen ...
Seite wird geladen ...
Seite wird geladen ...
Seite wird geladen ...
Seite wird geladen ...
Seite wird geladen ...
Seite wird geladen ...
Seite wird geladen ...
Seite wird geladen ...
Seite wird geladen ...
Seite wird geladen ...
Seite wird geladen ...
Seite wird geladen ...
Seite wird geladen ...
Seite wird geladen ...
Seite wird geladen ...
Seite wird geladen ...
Seite wird geladen ...
Seite wird geladen ...
Seite wird geladen ...
Seite wird geladen ...
Seite wird geladen ...
Seite wird geladen ...
Seite wird geladen ...
Seite wird geladen ...
Seite wird geladen ...
Seite wird geladen ...
Seite wird geladen ...
Seite wird geladen ...
Seite wird geladen ...
Seite wird geladen ...
Seite wird geladen ...
Seite wird geladen ...
Seite wird geladen ...
Seite wird geladen ...
Seite wird geladen ...
Seite wird geladen ...
Seite wird geladen ...
Seite wird geladen ...
Seite wird geladen ...
Seite wird geladen ...
Seite wird geladen ...
Seite wird geladen ...
-
 1
1
-
 2
2
-
 3
3
-
 4
4
-
 5
5
-
 6
6
-
 7
7
-
 8
8
-
 9
9
-
 10
10
-
 11
11
-
 12
12
-
 13
13
-
 14
14
-
 15
15
-
 16
16
-
 17
17
-
 18
18
-
 19
19
-
 20
20
-
 21
21
-
 22
22
-
 23
23
-
 24
24
-
 25
25
-
 26
26
-
 27
27
-
 28
28
-
 29
29
-
 30
30
-
 31
31
-
 32
32
-
 33
33
-
 34
34
-
 35
35
-
 36
36
-
 37
37
-
 38
38
-
 39
39
-
 40
40
-
 41
41
-
 42
42
-
 43
43
-
 44
44
-
 45
45
-
 46
46
-
 47
47
-
 48
48
-
 49
49
-
 50
50
-
 51
51
-
 52
52
-
 53
53
-
 54
54
-
 55
55
-
 56
56
-
 57
57
-
 58
58
-
 59
59
-
 60
60
-
 61
61
-
 62
62
-
 63
63
-
 64
64
-
 65
65
-
 66
66
-
 67
67
-
 68
68
-
 69
69
-
 70
70
-
 71
71
-
 72
72
-
 73
73
-
 74
74
-
 75
75
-
 76
76
-
 77
77
-
 78
78
-
 79
79
-
 80
80
-
 81
81
-
 82
82
-
 83
83
-
 84
84
-
 85
85
-
 86
86
-
 87
87
-
 88
88
-
 89
89
-
 90
90
-
 91
91
-
 92
92
-
 93
93
-
 94
94
-
 95
95
-
 96
96
-
 97
97
-
 98
98


in anderen Sprachen
- English: ELNA 520 Owner's manual
- français: ELNA 520 Le manuel du propriétaire
Verwandte Artikel
-
ELNA 540EXPERIENCE 540 Bedienungsanleitung
-
ELNA eXcellence 720 Bedienungsanleitung
-
ELNA eXplore 340 / 320 Bedienungsanleitung
-
-
-
ELNA Lotus Benutzerhandbuch
-
-
-
-
