


English .............................................................................................................. 2
Hrvatski .......................................................................................................... 24
Română ......................................................................................................... 45
Български ..................................................................................................... 67
Ελληνικά ........................................................................................................ 89
Deutsch ....................................................................................................... 111
V 1.92

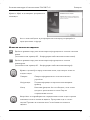
English Wireless keyboard with wireless mouse STMS 2017 A1
2
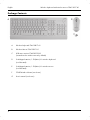
Contents
Introduction 3
Intended Use 3
Package Contents 4
Technical Data 5
System Requirements ...................................................................................................................................... 5
Safety Instructions 6
Children and Persons with Disabilities ........................................................................................................... 6
Batteries ........................................................................................................................................................... 7
R/F Interface ................................................................................................................................................... 7
Operating Environment .................................................................................................................................. 7
Copyright ........................................................................................................................................................ 8
Storing When Not Using the Product ............................................................................................................ 8
Overview ......................................................................................................................................................... 9
Before Getting Started 11
Inserting the Batteries ................................................................................................................................... 11
Connecting the USB Nano Receiver ........................................................................................................... 13
The Wristpad................................................................................................................................................. 14
Software Installation ..................................................................................................................................... 15
Task Bar Symbols .......................................................................................................................................... 16
Getting Started 17
Toggling between Operating Modes ......................................................................................................... 17
Configuring the Wireless Mouse ................................................................................................................. 17
Configuring the Wireless Keyboard ............................................................................................................ 18
Maintenance / Cleaning 19
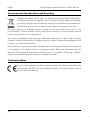
Environmental Considerations and Recycling 20
Conformity Notes 20
Troubleshooting 21
Warranty and Service Information 22

Wireless keyboard with wireless mouse STMS 2017 A1 English
3
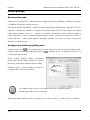
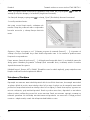
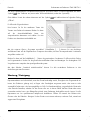
Introduction
Thank you for purchasing the wireless design keyboard with wireless mouse and USB nano receiver STMS
2017 A1. The devices feature a SmartLink technology that makes any manual synchronisation obsolete.
Several special keys and buttons on both appliances help you adapt the operation of the mouse and
keyboard to your personal wishes. The mouse features a tilt wheel (4-way scroll wheel) enabling you to
scroll horizontally as well as vertically.
Intended Use
This Keyboard and Mouse Set, consisting of a wireless keyboard, wireless mouse and USB nano receiver,
is an IT device. The device may not be used outdoors or in tropical climates. This product has not been
designed for corporate or commercial applications. Use the product in domestic environments for private
applications only. Any use other than that mentioned above does not correspond to the intended use. This
device fulfils all that relates to CE Conformity, relevant norms and standards. Any modifications to the
equipment other than recommended changes by the manufacturer may result in these directives no longer
being met. The manufacturer is not liable for any damage or interference caused by unauthorized
modifications. Only use the accessories recommended by the manufacturer.
Please observe the regulations and laws in the country of use.

English Wireless keyboard with wireless mouse STMS 2017 A1
4
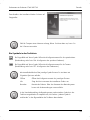
Package Contents
A Wireless keyboard STMS 2017 A1
B Wireless Mouse STMS 2017 A1
C USB nano receiver STMS2017A1-R
(inserted into the wireless mouse by default)
D 2 AAA-type batteries, 1.5V (Micro) for wireless keyboard
(not illustrated)
E 2 AAA-type batteries, 1.5V (Micro) for wireless mouse
(not illustrated)
F CD-ROM with software (not shown)
G User's manual (not shown)

Wireless keyboard with wireless mouse STMS 2017 A1 English
5
Technical Data
- 2.4 GHz radio frequency
- SmartLink technology (dispenses with the need to connect the receiver and mouse/keyboard
manually)
- Range up to 5m
Keyboard
- 20 special keys (hotkeys), 17 of which are programmable
- Volume control
- Scroll wheel
- 446 mm x 172 mm x 28 mm (LxWxH, with wristpad),
446 mm x 143 mm x 28 mm (LxWxH, without wristpad)
- 635g (without batteries, with wristpad)
- 2 batteries type AAA, 1,5V (Micro)
Mouse
- Optical sensor with selectable resolution of 800 cpi and 1600 cpi
- 8 buttons, 7 of which are programmable
- Tilt wheel (4-way scroll wheel)
- 107 mm x 57 mm x 32 mm (LxWxH)
- 68 g (without batteries)
- 2 batteries type AAA, 1,5V (Micro)
USB Nano Receiver
- 15.5 mm x 7 mm x 18 mm (LxWxH)
- 2 g
System Requirements
- Intel
®
Pentium
®
III / AMD Athlon
TM
or higher
- 1 free USB-2.0 port
- Microsoft
®
Windows
®
XP, Windows Vista
®
or Windows
®
7
- CD-ROM drive or DVD drive for installing the software

English Wireless keyboard with wireless mouse STMS 2017 A1
6
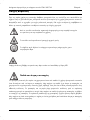
Safety Instructions
Before first using the device read the following instructions carefully and take note of the safety warnings,
even if you are familiar with using electronic devices. Keep this manual in a safe place for future
reference. If you sell or pass on the appliance, you should absolutely ensure to hand over these
instructions as well.
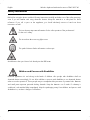
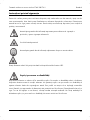
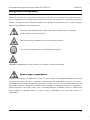
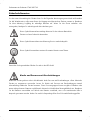
This icon denotes important information for the safe operation of the product and
for the user’s safety.
This icon alerts about a strong light source.
This symbol denotes further information on the topic.
Avoid harm to the eyes. Never look directly into the LED beam.
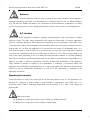
Children and Persons with Disabilities
Electrical appliances do not belong in the hands of children. Also people with disabilities shall use
electrical devices accordingly. Do not allow children or persons with disabilities to use electrical devices
when not under supervision. These people may not comprehend the presence of potential risks. Batteries
and small parts represent potential choking hazards. Keep the batteries out of reach. If a battery is
swallowed, seek medical help immediately. Keep the packaging away from children and persons with
disabilities too, as there is danger of suffocation.

Wireless keyboard with wireless mouse STMS 2017 A1 English
7
Batteries
Please always insert the batteries with the poles pointing in the proper direction. Never attempt to
recharge the batteries and under no circumstances try to incinerate them. Do not use different batteries
(e.g. old and new, alkaline and carbon, etc.) simultaneously. Remove batteries if appliance is not being
used for any longer periods of time. Inappropriate battery use may result in explosion and leakage risks.
R/F Interface
Please switch off the appliance in airplanes, hospitals, operating theatres and in the vicinity of medical
electronic system. The radio waves transmitted could impair the functionality of sensitive appliances.
Observe a minimum distance of 20 cm between the appliance and any pacemaker as the radio waves
could impair the function of the pacemaker. The transmitted radio waves may create interference noises in
hearing aids. Do not allow the appliance to be introduced in the vicinity of inflammable gases or in
environments subject to a risk of explosion (e.g. paint shops) as long as the radio component is switched
on, because the transmitted radio waves could trigger an explosion or fire. The coverage/range of the
radio waves varies depending on the surrounding and environmental conditions. In any data exchange
via wireless connections, unauthorized third parties are also able to receive the data. Targa GmbH is not
liable for any radio or television interference caused by unauthorized modifications of this appliance.
Targa furthermore accepts no liability for the replacement or exchange of connection cables and
appliances not specified by Targa GmbH. The user is solely responsible for the elimination of interferences
caused by such an unauthorized modification, as well as for the replacement or exchange of the
appliances concerned.
Operating Environment
Position the device on a firm, even surface and do not place any objects on top of it. The appliance is not
designed for operation in spaces subject to high humidity or temperatures (e.g. bathrooms) or in
excessively dusty locations. Operating temperature and air humidity: 5°C to 40°C, max. relative air
humidity 90%.
Please ensure that:
- the appliance is not exposed to direct sources of heat (e.g. heating elements);
- the appliance is not exposed to direct sunlight or artificial light;

English Wireless keyboard with wireless mouse STMS 2017 A1
8
- any contact with splashes and/or drips of water and other liquids is avoided and the device is not
operated near water; in particular, the appliance may never be submerged (do not place water-
filled objects such as vases or open drinks containers on top of or near the appliance);
- the appliance is not placed in the direct vicinity of magnetic fields (e.g. loudspeakers);
- no sources of open flame (e. g. lighted candles) are placed on top of or near the appliance;
- the appliance is not penetrated by foreign objects;
- the appliance is not exposed to strong temperature fluctuations;
- the appliance is not subjected to excessive shaking or vibration.
Copyright
The entire content of this User’s Manual is copyrighted and is provided to the reader for information
purposes only.
Copying data and information without the prior written and explicit authorization from the author is strictly
forbidden. This also applies to any commercial use of the contents and information.
All texts and figures are up-to-date as per the date of print release. We assume no liability for any
changes.
Storing When Not Using the Product
When left unused for a long period of time, remove the batteries from the wireless keyboard and from the
wireless mouse. Remove the USB nano receiver from your computer’s USB port and insert it into the
storage compartment of the mouse. Also make sure that the storage temperature is maintained between 5
°C and 40 °C. The humidity must not exceed 90% relative humidity.

Wireless keyboard with wireless mouse STMS 2017 A1 English
9
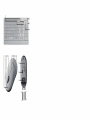
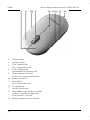
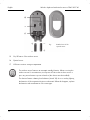
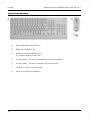
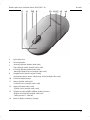
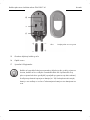
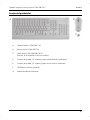
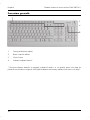
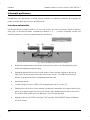
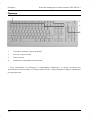
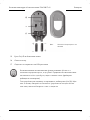
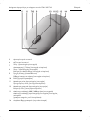
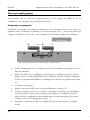
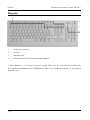
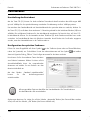
Overview
1 Special buttons (hotkeys)
2 Scroll wheel
3 Volume control
4 Battery level indicator*
* After inserting the batteries into the keyboard, the indicator will flash several times during automatic
synchronisation with the USB receiver. When the synchronisation is completed, the status indicator will
stop lighting.

English Wireless keyboard with wireless mouse STMS 2017 A1
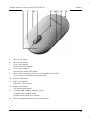
10
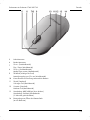
5 Left mouse button
6 Right mouse button
7
Zoom - (default mode)
Play / Pause (media mode)
8
Zoom + (default mode)
Launch Media Player (media mode)
9
Tilt wheel (4-way scroll wheel)
Volume control and mute (media mode)
10 Battery level indicator
11
Back (default)
Previous title (media mode)
12
Forward (default)
Next title (media mode)
13
800/1600 cpi toggle switch (press briefly)
Standard / media mode toggle switch
(keep pressed for 3 seconds)
14 Battery compartment lock (on the back)

Wireless keyboard with wireless mouse STMS 2017 A1 English
11
Before Getting Started
Unpack all the devices and use the package contents checklist on page 4 to verify that you have received
all items listed.
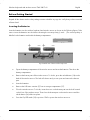
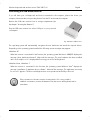
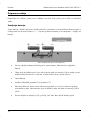
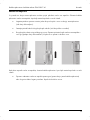
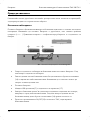
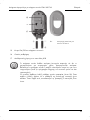
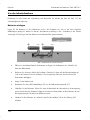
Inserting the Batteries
Insert the batteries into the wireless keyboard and wireless mouse as shown in the following figures. Take
care to insert the batteries into the device observing the correct polarity (+ and – ) The correct polarity is
labelled on the batteries and inside the battery compartment.
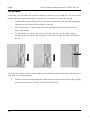
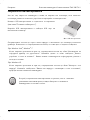
Fig.: Detailed view of bottom of the keyboard
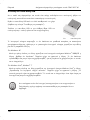
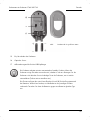
Open the battery compartment of the wireless mouse and insert the batteries. Then close the
battery compartment.
Remove the bottom part of the wireless mouse. To do this, press the unlock button (14) on the
back of the wireless mouse. The lock will release and you can open and remove the bottom
part.
Insert the batteries.
Remove the USB nano receiver (C) from its storage compartment (17).
Close the wireless mouse. To do this, insert the noses on the bottom part into the hole located
on the front of the wireless mouse. Then close the bottom part on the wireless mouse until the
unlock button (14) clicks into place.
Press the On/Off switch (15) to position "ON" to power the wireless mouse on.

English Wireless keyboard with wireless mouse STMS 2017 A1
12
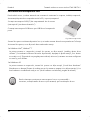
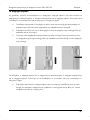
15
On/off button of the wireless mouse
16
Optical senso
r
17
USB nano receiver storage compartment
The wireless mouse features an automatic standby function. When not using the
wireless mouse for a certain time, it will power off. Move the wireless mouse or
press any mouse button to power it back on (the drivers must be installed).
The devices feature a battery level indicator (4 and 10). As soon as they light-up,
the batteries of the respective device are exhausted. When this happens, replace
the batteries with new batteries of the same type.
Fig.: Detailed view of the
o
p
ened mouse

Wireless keyboard with wireless mouse STMS 2017 A1 English
13
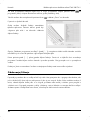
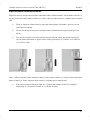
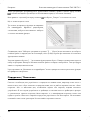
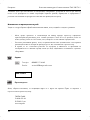
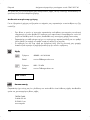
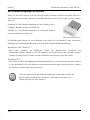
Connecting the USB Nano Receiver
If you still have your old keyboard and mouse connected to the computer, please shut down your
computer, disconnect the corresponding devices from the PC and restart the computer.
Remove the USB nano receiver from its storage compartment (see
the chapter “Inserting the Batteries”).
Plug the USB nano receiver into a free USB port on your powered-
on computer.
Fig.: Miniature USB Receiver
The operating system will automatically recognize the new hardware and install the required drivers.
Depending on the operating system installed, the following screen messages may appear:
Windows
®
XP
When the receiver is connected for the first time, the operating system Windows
®
2000/XP displays the
message „New hardware detected“. Wait until the message „The new hardware has been installed
and is now ready for use“ is displayed before using your mouse and keyboard.
Windows Vista
®
, Windows
®
7
When the receiver is connected for the first time, the operating system Windows Vista
®
displays the
message „Installation of appliance driver software“. Wait until the message „The appliances are ready
for use now“ appears. The mouse and keyboard are now operational and ready to be used.
If the connection to the nano receiver is interrupted or if it is not possible to
establish a connection, remove the batteries from the mouse and keyboard and re-
insert them.

English Wireless keyboard with wireless mouse STMS 2017 A1
14
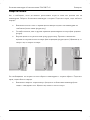
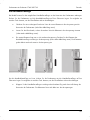
The Wristpad
If necessary, you can attach the supplied wristpad to the bottom of the keyboard. Turn the wireless
keyboard and the wristpad upside down. Preferably lay a cloth under it to avoid any damage.
Carefully slide one part of the first clip into the hole on the bottom of the keyboard by applying
slight pressure only (see the following figure on the left).
Release the pressure so that the other side of the clip clicks into the hole (see the following
figure in the middle).
The second clip is now positioned in front of the other hole. Press the clip of the wristpad
carefully into the hole (see the following figure on the right). The clips will release and click into
the hole.
To release the wristpad, turn the wireless keyboard over with the wristpad upside down. Preferably lay a
cloth under it to avoid any damage.
Carefully swivel the wristpad upwards (towards the bottom of the wireless keyboard) by slightly
pulling it at the same time. The clips will release from their holes.

Wireless keyboard with wireless mouse STMS 2017 A1 English
15
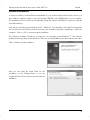
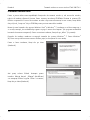
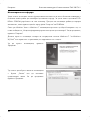
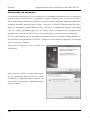
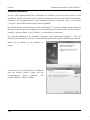
Software Installation
In order to be able to use the full function-capabilities of your wireless keyboard and wireless mouse, you
must install the supplied software. Insert the included CD-ROM in the CD-ROM drive of your computer.
The installation process should start automatically, failing that, start the CD-ROM file "Setup.exe" manually
by double-clicking it.
Only with the operating system Windows Vista
®
/ Windows
®
7 the installation will initially be stopped by
the user account control function with the message: „An unidentified program is attempting to access the
computer”. Click on „OK“ to continue with the installation.
The following installation illustrations correspond to the operating system Windows
®
7. The windows
displayed in the operating systems Windows
®
XP/Vista
®
are slightly different, but their content is the same.
Click on
Next
to start the installation.
Here you can select the target folder for the
installation via the
Change
button or use the
suggested folder. Click on
Next
to proceed with the
installation.

English Wireless keyboard with wireless mouse STMS 2017 A1
16
Click Finish to finish the setup programme.
If you are prompted to restart your computer, restart it before using the software.
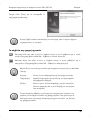
Task Bar Symbols
A double click on this symbol opens the configuration menu for the optical mouse (see page
17 – “Configuring the Wireless Mouse ” for a description).
A double click on this symbol opens the configuration menu for the keyboard (see page 18
– “Configuring the Wireless Keyboard ” for a description).
Right-click on the corresponding icon to open a menu showing
the following options:
Open Opens the configuration menu of the corresponding device.
Info Shows information about the version of the installed driver.
Exit Exits the function. If necessary, you can open the applications again
from the Start menu of your operating system.
The operating systems default settings will hide disabled icons in the task bar. It is
recommended to disabled the “Hide inactive icons” option in task bar properties.

Wireless keyboard with wireless mouse STMS 2017 A1 English
17
Getting Started
Toggling between Operating Modes
Use the CPI button (13) to quickly toggle between 800 cpi and 1600 cpi resolution for optical tracking.
Tracking at 1600 cpi offers a higher accuracy.
If you would like to toggle between standard operation and media operation on the mouse, press the CPI
button (13) and keep it pressed for a minimum of 3 seconds until the power control lamp (10) briefly
lights up. Please see the list on page 10 for information on the functions available in the media operation
mode. In media operating mode you can press the tilt wheel (9) to the left or right to adjust the sound
volume. While in standby mode the Windows audio volume can still be adjusted by turning the scroll
wheel, as long as the volume window has been enabled in the taskbar.
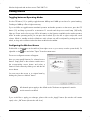
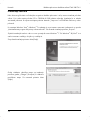
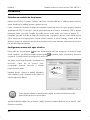
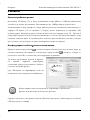
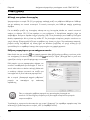
Configuring the Wireless Mouse
Double-click on the icon in the task bar (lower-right corner on your screen, near the system clock). Or
right-click on the
icon and select “Open” from the context menu.
The mouse configuration menu will appear.
Here you can specify functions for selected mouse
buttons. Simply click on the selection switch next to
the corresponding mouse button and select a
function from the menu by clicking on it with the left
mouse button.
You can restore the mouse to its original state by
clicking the „Restore to default“ button.
All selected options apply to the default mode. The button assignments for media
mode cannot be modified.
If you would like to apply your changes, please click on the „
Apply
“ button (the window will remain
open) or the „
OK
“ button (the window will close).

English Wireless keyboard with wireless mouse STMS 2017 A1
18
Configuring the Wireless Keyboard
The wireless keyboard features 20 hotkeys (quick access keys), a volume adjustment button and a scroll
wheel. Following software installation, the special keys offer the following standard functions. 17 hotkeys
can furthermore be freely programmed according to your requirements.
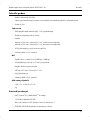
Hotkey Description
Standard internet browser (e.g. Internet Explorer)
Standard email programme (e.g. Microsoft
®
Outlook)
Internet-browser favourites
Update display
Stops loading the page in your Web Browser.
Forward (e.g. Internet Explorer)
Back (e.g. Internet Explorer)
Open desktop
Search
Start pocket calculator
Starts the standard media player (e.g. Microsoft
®
Media Player)
Previous title
Play / Pause
Next title
Sound on/off
Start Microsoft
®
Word (needs to be installed)
Start Microsoft
®
Excel (needs to be installed)
Switch computer on/off *
(Many mainboards feature a BIOS setting such as, for example, „Boot on
USB“, „Power on by USB“, or a corresponding setting). Activate this function in
order to be able to switch the computer on and off via the keyboard. Please
also consult the documentation of your computer or main board before
activating the BIOS setting.
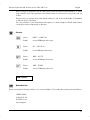
Initiate sleep mode *
Starting from sleep mode *
* not freely programmable
Seite wird geladen ...
Seite wird geladen ...
Seite wird geladen ...
Seite wird geladen ...
Seite wird geladen ...
Seite wird geladen ...
Seite wird geladen ...
Seite wird geladen ...
Seite wird geladen ...
Seite wird geladen ...
Seite wird geladen ...
Seite wird geladen ...
Seite wird geladen ...
Seite wird geladen ...
Seite wird geladen ...
Seite wird geladen ...
Seite wird geladen ...
Seite wird geladen ...
Seite wird geladen ...
Seite wird geladen ...
Seite wird geladen ...
Seite wird geladen ...
Seite wird geladen ...
Seite wird geladen ...
Seite wird geladen ...
Seite wird geladen ...
Seite wird geladen ...
Seite wird geladen ...
Seite wird geladen ...
Seite wird geladen ...
Seite wird geladen ...
Seite wird geladen ...
Seite wird geladen ...
Seite wird geladen ...
Seite wird geladen ...
Seite wird geladen ...
Seite wird geladen ...
Seite wird geladen ...
Seite wird geladen ...
Seite wird geladen ...
Seite wird geladen ...
Seite wird geladen ...
Seite wird geladen ...
Seite wird geladen ...
Seite wird geladen ...
Seite wird geladen ...
Seite wird geladen ...
Seite wird geladen ...
Seite wird geladen ...
Seite wird geladen ...
Seite wird geladen ...
Seite wird geladen ...
Seite wird geladen ...
Seite wird geladen ...
Seite wird geladen ...
Seite wird geladen ...
Seite wird geladen ...
Seite wird geladen ...
Seite wird geladen ...
Seite wird geladen ...
Seite wird geladen ...
Seite wird geladen ...
Seite wird geladen ...
Seite wird geladen ...
Seite wird geladen ...
Seite wird geladen ...
Seite wird geladen ...
Seite wird geladen ...
Seite wird geladen ...
Seite wird geladen ...
Seite wird geladen ...
Seite wird geladen ...
Seite wird geladen ...
Seite wird geladen ...
Seite wird geladen ...
Seite wird geladen ...
Seite wird geladen ...
Seite wird geladen ...
Seite wird geladen ...
Seite wird geladen ...
Seite wird geladen ...
Seite wird geladen ...
Seite wird geladen ...
Seite wird geladen ...
Seite wird geladen ...
Seite wird geladen ...
Seite wird geladen ...
Seite wird geladen ...
Seite wird geladen ...
Seite wird geladen ...
Seite wird geladen ...
Seite wird geladen ...
Seite wird geladen ...
Seite wird geladen ...
Seite wird geladen ...
Seite wird geladen ...
Seite wird geladen ...
Seite wird geladen ...
Seite wird geladen ...
Seite wird geladen ...
Seite wird geladen ...
Seite wird geladen ...
Seite wird geladen ...
Seite wird geladen ...
Seite wird geladen ...
Seite wird geladen ...
Seite wird geladen ...
Seite wird geladen ...
Seite wird geladen ...
Seite wird geladen ...
Seite wird geladen ...
Seite wird geladen ...
Seite wird geladen ...
Seite wird geladen ...
Seite wird geladen ...
Seite wird geladen ...
-
 1
1
-
 2
2
-
 3
3
-
 4
4
-
 5
5
-
 6
6
-
 7
7
-
 8
8
-
 9
9
-
 10
10
-
 11
11
-
 12
12
-
 13
13
-
 14
14
-
 15
15
-
 16
16
-
 17
17
-
 18
18
-
 19
19
-
 20
20
-
 21
21
-
 22
22
-
 23
23
-
 24
24
-
 25
25
-
 26
26
-
 27
27
-
 28
28
-
 29
29
-
 30
30
-
 31
31
-
 32
32
-
 33
33
-
 34
34
-
 35
35
-
 36
36
-
 37
37
-
 38
38
-
 39
39
-
 40
40
-
 41
41
-
 42
42
-
 43
43
-
 44
44
-
 45
45
-
 46
46
-
 47
47
-
 48
48
-
 49
49
-
 50
50
-
 51
51
-
 52
52
-
 53
53
-
 54
54
-
 55
55
-
 56
56
-
 57
57
-
 58
58
-
 59
59
-
 60
60
-
 61
61
-
 62
62
-
 63
63
-
 64
64
-
 65
65
-
 66
66
-
 67
67
-
 68
68
-
 69
69
-
 70
70
-
 71
71
-
 72
72
-
 73
73
-
 74
74
-
 75
75
-
 76
76
-
 77
77
-
 78
78
-
 79
79
-
 80
80
-
 81
81
-
 82
82
-
 83
83
-
 84
84
-
 85
85
-
 86
86
-
 87
87
-
 88
88
-
 89
89
-
 90
90
-
 91
91
-
 92
92
-
 93
93
-
 94
94
-
 95
95
-
 96
96
-
 97
97
-
 98
98
-
 99
99
-
 100
100
-
 101
101
-
 102
102
-
 103
103
-
 104
104
-
 105
105
-
 106
106
-
 107
107
-
 108
108
-
 109
109
-
 110
110
-
 111
111
-
 112
112
-
 113
113
-
 114
114
-
 115
115
-
 116
116
-
 117
117
-
 118
118
-
 119
119
-
 120
120
-
 121
121
-
 122
122
-
 123
123
-
 124
124
-
 125
125
-
 126
126
-
 127
127
-
 128
128
-
 129
129
-
 130
130
-
 131
131
-
 132
132
-
 133
133
-
 134
134
-
 135
135
-
 136
136


Silvercrest STMS 2017 A1 User Manual And Service Information
- Typ
- User Manual And Service Information
- Dieses Handbuch eignet sich auch für
in anderen Sprachen
- română: Silvercrest STMS 2017 A1
Verwandte Artikel
-
Silvercrest STMS 2017 A1 User Manual And Service Information
-
Silvercrest STMS 2219 A1 User Manual And Service Information
-
-
-
-
-
-
-
-
