Samsung LE26A450C2 Benutzerhandbuch

Kategorie
LCD-Fernseher
Typ
Benutzerhandbuch
Country
Customer Care Centre
Web Site
AUSTRIA 0800-SAMSUNG (726-7864) www.samsung.com/at
BELGIUM 0032 (0)2 201 24 18 www.samsung.com/be
CZECH REPUBLIC
844 000 844 www.samsung.com/cz
Distributor pro Českou republiku:
Samsung Zrt., česka organizační složka Vyskočilova 4, 14000 Praha 4
DENMARK 70 70 19 70 www.samsung.com/dk
EIRE 0818 717 100 www.samsung.com/ie
FINLAND 030-6227 515 www.samsung.com/
FRANCE
3260 SAMSUNG (€ 0,15/Min)
08 25 08 65 65 (€ 0,15/Min)
www.samsung.com
GERMANY 01805 - SAMSUNG (726-7864) (€ 0,14/Min) www.samsung.com
HUNGARY 06-80-SAMSUNG (726-7864) www.samsung.com
ITALIA 800-SAMSUNG (726-7864) www.samsung.com
LUXEMBURG 0035 (0)2 261 03 710 www.samsung.com/be
NETHERLANDS 0900-SAMSUNG (726-7864) (€ 0,10/Min) www.samsung.com/nl
NORWAY 815-56 480 www.samsung.com/no
POLAND
0 801 801 881
022-607-93-33
www.samsung.com/pl
PORTUGAL 80820-SAMSUNG (726-7864) www.samsung.com/pt
SLOVAKIA 0800-SAMSUNG (726-7864) www.samsung.com/sk
SPAIN 902 10 11 30 www.samsung.com
SWEDEN 0771-400 200 www.samsung.com/se
SWITZERLAND 0800-SAMSUNG (726-7864) www.samsung.com/ch
U.K 0845 SAMSUNG (7267864) www.samsung.com
TURKEY 444 77 11 www.samsung.com
ESTONIA 800-7267 www.samsung.ee
LATVIA 800-7267 www.samsung.com/lv
LITHUANIA 8-800-77777 www.samsung.lt
KAZAHSTAN 8-10-800-500-55-500 www.samsung.kz
KYRGYZSTAN 00-800-500-55-500 -
RUSSIA 8-800-555-55-55 www.samsung.com
TADJIKISTAN 8-10-800-500-55-500 -
UKRAINE 8-800-502-0000 www.samsung.com
UZBEKISTAN 8-10-800-500-55-500 www.samsung.uz
LCD TV
user manual
imagine the possibilities
Thank you for purchasing this Samsung product.
To receive more complete service, please register
your product at
www.samsung.com/global/register
Model Serial No.
BN68-01425A-00
Contact SAMSUNG WORLDWIDE
If you have any questions or comments relating to Samsung products,
please contact the SAMSUNG customer care centre.
BN68-01425A-Cover.indd 1 2008-03-03 ¿ÀÈÄ 6:49:17
English - 3
Viewing the Control Panel
1 SOURCE
Toggles between all the available input
sources (TV, Ext.1, Ext.2, AV, S-Video,
Component, PC, HDMI1, HDMI2, HDMI3).
In the on-screen menu, use this button as
you use the ENTER
button on the remote
control.
2 MENU
Press to see an on-screen menu of your TV’s
features.
3
Press to decrease or increase the volume.
In the on-screen menu, use the
buttons as you use the
and
buttons on
the remote control.
4
Press to change channels. In the on-screen
menu, use the buttons as you use
the
and
buttons on the remote control.
(Without the Remote Control, you can turn on
the TV by using the Channel buttons.)
5
(Power)
Press to turn the TV on and off.
6 Remote Control Sensor
Aim the remote control towards this spot on
the TV.
7 Power Indicator
Blinks and turns off when the power is on and
lights up in stand-by mode.
8 Speakers
The product colour and shape may vary depending on the model.
Side Panel buttons
1
2
3
4
6
7
88
5
Book-��.indb3 2008-03-03¿ÀÈÄ5:49:19
English - 5
1 PC IN [PC] / [AUDIO]
Connect to the video and audio output jack on your PC.
2 COMPONENT IN
Connect component video cables (optional) to component connector (“PR”, “PB”, “Y”) on the rear of
your set and the other ends to corresponding component video out connectors on the DVD.
If you wish to connect both the Set-Top Box and DVD, you should connect the Set-Top Box to the DVD
and connect the DVD to component connector (“PR”, “PB”, “Y”) on your set.
The PR, PB and Y connectors on your component devices (DVD) are sometimes labeled Y, B-Y and
R-Y or Y, Cb and Cr.
Connect RCA audio cables (optional) to [R - AUDIO - L] on the rear of your set and the other ends to
corresponding audio out connectors on the DVD
3
HDMI IN 1, HDMI IN 2, HDMI IN 3
Supports connections between HDMI-connection-enabled AV devices (Set-Top Boxes, DVD
players)
No additional Audio connection is needed for an HDMI to HDMI connection.
When using an HDMI/DVI cable connection, you must use the HDMI IN 2 jack.
What is HDMI?
“High Denition Multimedia interface” allows the transmission of high denition digital video data
and multiple channels of digital audio.
The HDMI/DVI terminal supports DVI connection to an extended device with the appropriate cable
(not supplied). The difference between HDMI and DVI is that the HDMI device is smaller in size, has
the HDCP (High Bandwidth Digital Copy Protection) coding feature installed, and supports
multi - channel digital audio.
DVI IN(HDMI2) [R-AUDIO-L]
DVI audio outputs for external devices.
Supported modes for HDMI/DVI and Component
480i 480p 576i 576p 720p 1080i
HDMI/DVI 50Hz
X X X O O O
HDMI/DVI 60Hz
X O X X O O
Component O O O O O O
4 AUDIO OUT [R-AUDIO-L]
Connect RCA audio cables to AUDIO OUT [R-AUDIO-L] on the rear of your set and the other ends
to corresponding audio in connectors on the Amplier or DVD Home Theatre.
5 ANT IN
To view television channels correctly, a signal must be received by the set from one of the following
sources:
An outdoor aerial / A cable television network / A satellite network
6 SERVICE
LE26A450, LE26A451
Connector for SERVICE only.
LE32A450, LE32A451, LE32A454, LE37A450, LE37A451, LE40A450, LE40A451, LE40A454
Connect this to the jack on the optional wall mount bracket. This will allow you to adjust the TV viewing
angle using your remote control.
-
-
-
-
-
-
-
-
-
-
-
-
-
-
-
Book-��.indb5 2008-03-03¿ÀÈÄ5:49:20
English - 9
You can use the TOOLS button to select your frequently
used functions quickly and easily. The “Tools” menu change
depending on which external input mode you are viewing.
1.
Press the TOOLS button.
The “Tools” menu will appear.
2. Press the ▲ or ▼ button to select a menu.
3. Press the ▲/▼/◄/►/ENTER
buttons to display, change, or
use the selected items. For a more detailed description of each
function, refer to the corresponding page.
• Anynet+ (HDMI-CEC), see page 31
• Picture Mode, see page 16
• Sound Mode, see page 22
• Sleep Timer, see page 24
• SRS TS XT, see page 22
• Energy Saving, see page 27
• Dual l-ll, see page 23
• PIP, see page 21
• Auto Adjustment, see page 30
TOOLS
1. With the power on, press the MENU button.
The main menu appears on the screen. The menu’ s left side
has icons: Picture, Sound, Channel, Setup, Input.
2. Press the ▲ or ▼ button to select one of the icons.
Then press the ENTER
button to access the icon’s sub-
menu.
3. Press the EXIT button to exit.
The on-screen menus disappear from the screen after about
one minute.
Viewing the Menus
Using the TOOLS Button
Picture
Mode : Standard
Backlight 7
Contrast 95
Brightness 45
Sharpness 50
Colour 50
Tint G 50 R 50
Detailed Settings
Picture Options
Reset : OK
TV
Move Enter Return
TOOLS
Anynet+ (HDMI-CEC)
Picture Mode : Standard
Sound Mode : Custom
Sleep Timer : Off
SRS TS XT : Off
Energy Saving : Off
Dual l-ll : Mono
Move Enter Exit
Tools
Book-��.indb9 2008-03-03¿ÀÈÄ5:49:22
English - 14
This operation allows you to change the programme numbers
of the stored channels.
This operation may be necessary after using the auto store.
1. Press the MENU button to display the menu.
Press the ▲ or ▼ button to select "Channel", then press the
ENTER
button.
2. Press the
or
button to select "Sort", then press the
ENTER
button.
3. Select the channel number that you wish to change by
pressing the
or
button repeatedly.
Press the ENTER
button.
The selected channel number and name are moved to
right side.
4. Press the
or
button to move to the position in which you
would like to change and then press the ENTER
button.
The selected channel is exchanged with the one
previously stored to the chosen number.
5.
Repeat steps 3 to 4 for another channel to be sorted.
6.
Press the EXIT button to exit.
Sorting the Stored Channels
Assigning Channels Names
Channel names will be assigned automatically when channel
information is broadcast. These names can be changed,
allowing you to assign new names.
1.
Press the MENU button to display the menu.
Press the
or
button to select "Channel", then press the
ENTER
button.
2. Press the
or
button to select "Name", then press the
ENTER
button.
3. If necessary, select the channel to be assigned to a new
name by pressing the
or
button. Press the ENTER
button.
The selection bar is displayed around the name box.
4.
The following characters are available: Letters of the alphabet (A~Z) / Numbers
(0~9) / Special characters (+, -, *, /, space)
5.
Repeat steps 3 to 4 for each channel to be assigned to a new name.
6.
Press the EXIT button to exit.
To...
Select a letter, number or symbol
Move on the next letter
Move back the previous letter
Confirm the name
Then...
Press the ▲ or ▼ button
Press the ► button
Press the ◄ button
Press the
ENTER
button
Channel
Country : Belgium
Auto Store
Manual Store
Channel Manager
Sort
Name
Fine Tune
TV
Move Enter Return
Sort
Prog. Ch. Name
0 C-- -----
1 C23 -----
2 S06 -----
3 S07 -----
4 S09 -----
5 S12 -----
6 S13 -----
7 S14 -----
8 S17 -----
9 C21 -----
TV
Move Enter Return
Channel
Country : Belgium
Auto Store
Manual Store
Channel Manager
Sort
Name
Fine Tune
Move Enter Return
TV
Name
Move Enter Return
Prog. Ch. Name
0 C-- -----
1 C23 -----
2 S06 -----
3 S07 -----
4 S09 -----
5 S12 -----
6 S13 -----
7 S14 -----
8 S17 -----
9 C21 -----
TV
Book-��.indb14 2008-03-03¿ÀÈÄ5:49:26
English - 15
Use fine tuning to manually adjust a particular channel for
optimal reception.
1.
Use the number buttons to directly select the channel that
you want to fine tune.
2. Press the MENU button to display the menu.
Press the
or
button to select "Channel", then press the
ENTER
button.
3. Press the
or
button to select "Fine Tune", then press
the ENTER
button.
4. Press the
or
button to adjust the fine tuning.
Press the ENTER
button.
5.
Press the EXIT button to exit.
Fine tuned channels that have been saved are marked
with an asterisk "
*
" on the right-hand side of the channel
number in the channel banner. And the channel number
turns red.
To reset the ne-tuning, select "Reset" by pressing the
or
button and then press the ENTER
button.
Fine Tuning Channel Reception
Channel
Country : Belgium
Auto Store
Manual Store
Channel Manager
Sort
Name
Fine Tune
TV
Move Enter Return
Fine Tune
P 1
0
Reset
Adjust Save Return
Book-��.indb15 2008-03-03¿ÀÈÄ5:49:27
English - 16
You can select the type of picture which best corresponds to
your viewing requirements.
1.
Press the MENU button to display the menu.
Press the ENTER
button, to select "Picture".
2. Press the ENTER
button again, to select "Mode".
3. Press the
or
button to select the desired picture effect.
Press the ENTER
button.
4. Press the EXIT button to exit.
Dynamic: Selects the picture for high-definition in a bright
room.
Standard:
Selects the picture for optimum display in a
normal environment.
Movie:
Selects the picture for comfortable display in a
dark room.
The Picture mode must be adjusted separately for each
input source.
You can also press the P.MODE button on the remote control
to select one of the picture settings.
Changing the Picture Standard
Picture
Mode : Standard
Backlight 7
Contrast 95
Brightness 45
Sharpness 50
Colour 50
Tint G 50 R 50
Detailed Settings
Picture Options
Reset : OK
TV
Move Enter Return
Picture
Mode : Standard
Backlight 7
Contrast 95
Brightness 45
Sharpness 50
Colour 50
Tint G 50 R 50
Detailed Settings
Picture Options
Reset : OK
TV
Move Enter Return
Dynamic
Standard
Movie
Easy Setting
1.
Press the TOOLS button on the remote control.
2. Press the ▲ or ▼ button to select "Picture Mode".
3. Press the ◄ or ► button to select the required option.
4. Press the EXIT or TOOLS button to exit.
Anynet+ (HDMI-CEC)
Picture Mode Standard
Sound Mode : Custom
Sleep Timer : Off
SRS TS XT : Off
Energy Saving : Off
Dual l-ll : Mono
Tools
Move Adjust Exit
TOOLS
Book-��.indb16 2008-03-03¿ÀÈÄ5:49:28
English - 19
1. Press the MENU button to display the menu.
Press the ENTER
button, to select "Picture".
2. Press the ▲ or ▼ button to select “Picture Options”, then
press the ENTER
button.
3. Select the required option by pressing the ▲ or ▼ button,
then press the ENTER
button.
4. When you are satisfied with your setting, press the
ENTER
button.
5.
Press the EXIT button to exit.
In PC mode, you can only make changes to the
“Colour Tone” and “Size” from among the items in “Picture
Options”.
Colour Tone: Cool2/Cool1/Normal/Warm1/Warm2
You can select the most comfortable colour tone to your eyes.
The adjusted values are stored according to the selected
Picture mode.
“Warm1” or “Warm2” is only activated when the picture mode is "Movie".
Size: Auto Wide/16:9/Wide Zoom/Zoom/4:3/Just Scan
You can select the picture size which best corresponds to your viewing requirements.
Auto Wide: Automatically adjusts the picture size to the "16:9" aspect ratio.
16:9: Adjusts the picture size to 16:9 appropriate for DVDs or wide broadcasting.
Wide Zoom: Magnify the size of the picture more than 4:3.
Zoom
: Magnifies the 16:9 wide picture (in the vertical direction) to fit the screen size.
4:3: This is the default setting for a video movie or normal broadcasting.
Just Scan: Use the function to see the full image without any cutoff when HDMI (720p/1080i) or
Component (1080i) signals are input.
"Auto Wide" function is available only in "TV", "Ext.1", "Ext.2", "AV", and "S-Video" mode.
In PC Mode, only "16:9" and "4:3" mode can be adjusted.
Settings can be adjusted and stored for each external device you have connected to an input of
the TV.
Temporary image retention may occur when viewing a static image on the set for more than two
hours.
When Double (
, ) mode has been set in PIP, the Picture Size cannot be set.
Wide Zoom
: Move the screen up/down using the ▲ or ▼ button after selecting the by
pressing the ► or ENTER
button.
Zoom
: Select by pressing the ◄ or ►button.
Use the ▲ or ▼button to move the picture up and down. After selecting
,
use the ▲ or ▼ button to magnify or reduce the picture size in the vertical direction.
After selecting “Just Scan” in HDMI (1080i) or Component (1080i) mode:
Select by pressing the ◄ or ►button. Use the ▲, ▼, ◄ or ► button to move the picture.
Reset: Press the ◄ or ► button to select “Reset”, then press the
ENTER button.
You can initialize the setting.
O You can select these options by simply pressing the P.SIZE
button on the remote control.
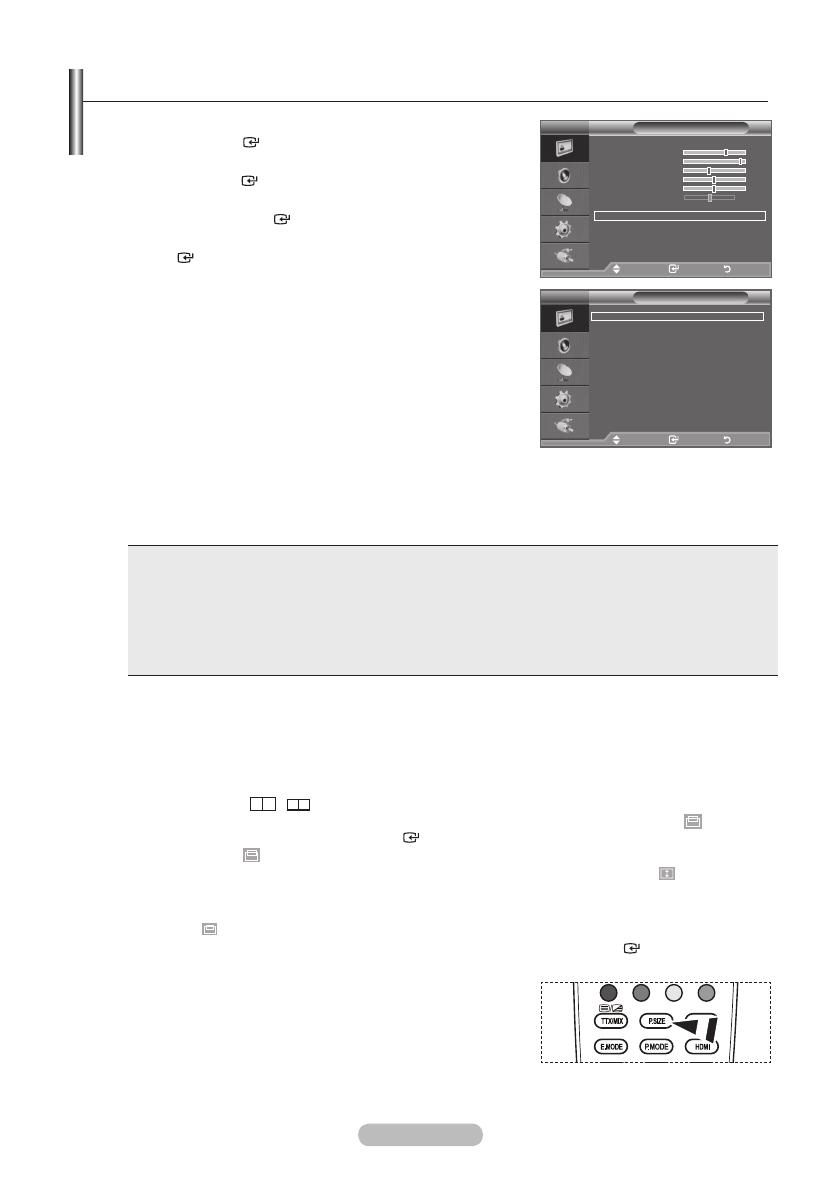
Changing the Picture Options
TOOLS
Picture Options
Colour Tone : Normal
Size : Auto Wide
Screen Mode : 16:9
Digital NR : Auto
DNle : Off
HDMI Black Level
: Normal
Blue Only Mode : Off
Move Enter Return
TV
Picture
Mode : Standard
Backlight 7
Contrast 95
Brightness 45
Sharpness 50
Colour 50
Tint G 50 R 50
Detailed Settings
Picture Options
Reset : OK
TV
Move Enter Return
Book-��.indb19 2008-03-03¿ÀÈÄ5:49:31
English - 21
You can display a sub picture within the main picture of set programme or video input. In this
way, you can watch the picture of set programme or video input from any connected equipment
while watching the main picture.
1.
Press the MENU button to display the menu.
Press the ▲ or ▼ button to select "Setup", then press the
ENTER button.
2. Press the ▲ or ▼ button to select "PIP", then press the
ENTER button.
3. Select the required option by pressing the ▲ or ▼ button, then
press the ENTER button.
4. When you are satised with your setting, press the
ENTER button.
5. Press the EXIT button to exit.
You may notice that the picture in the PIP window becomes
slightly unnatural when you use the main screen to view a
game or karaoke.
Easy Setting
1. Press the
TOOLS button on the remote control.
2. Press the ▲ or ▼ button to select “PIP”, then press the
ENTER button.
3. Press the ▲ or ▼ button to select a particular item.
4. Press the ◄ or ► button to select the required option.
5. Press the EXIT or TOOLS button to exit.
PIP: On/Off
You can activate or deactivate the PIP function.
Main picture Sub picture
Component TV, Ext.1, Ext.2, AV
HDMI 1, 2, 3 TV, Ext.1, Ext.2, AV
PC TV, Ext.1, Ext.2, AV
Source
You can select a source of the sub-picture.
Size:
/ /
You can select a size of the sub-picture.
If main picture is in "HDMI" mode, "Size" is available.
Position:
/ / /
You can select a position of the sub-picture.
In Double (
, ) mode, "Position" cannot be selected.
Programme
You can select a channel of the sub-picture only when the "Source" is set to "TV".
Viewing the Picture In Picture (PIP)
TV
Setup
Plug & Play
Language : English
Time
Melody : Off
Entertainment : Off
Energy Saving : Off
PIP
Move Enter Return
TV
PIP
PIP : On
Source : TV
Size :
Position :
Programme : P1
Move Enter Return
Anynet+ (HDMI-CEC)
Picture Mode : Standard
Sound Mode : Custom
Sleep Timer : Off
SRS TS XT : Off
Energy Saving : Off
PIP
Tools
Move Enter Exit
PIP On
Source : TV
Size :
Position :
Programme : P1
PIP
Move Adjust Return
Book-��.indb21 2008-03-03¿ÀÈÄ5:49:32
English - 22
1. Press the MENU button to display the menu.
Press the ▲ or ▼ button to select "Sound", then press the
ENTER button.
2. Select the required option by pressing the ▲ or ▼ button,
then press the ENTER button.
3. When you are satisfied with your setting, press the ENTER
button.
4. Press the EXIT button to exit.
Mode: Standard/Music/Movie/Speech/Custom
You can select the type of special sound effect to be used
when watching a given broadcast.
Easy Setting
1. Press the
TOOLS button on the remote control.
2. Press the ▲ or ▼ button to select "Sound Mode".
3. Press the ◄ or ► button to select the desired sound mode.
4. Press the EXIT or TOOLS button to exit.
Equalizer: Balance/100Hz/300Hz/1kHz/3kHz/10kHz
The sound settings can be adjusted to suit your personal
preferences.
If you make any changes to these settings, the sound
mode is automatically switched to "Custom".
SRS TS XT: Off/On
TruSurround XT is a patented SRS technology that solves the problem of playing 5.1 multichannel
content over two speakers. TruSurround delivers a compelling, virtual surround sound experience
through any two-speaker playback system, including internal television speakers. It is fully
compatible with all multichannel formats.
O
You can also set these options simply by pressing the SRS
button on remote control.
Easy Setting
1.
Press the TOOLS button on the remote control.
2. Press the ▲ or ▼ button to select "SRS TS XT".
3. Press the ◄ or ► button to select the "Off" or "On".
4. Press the EXIT or TOOLS button to exit.
TruSurround XT, SRS and Symbol are trademarks of SRS Labs,
Inc.TruSurround XT technology is incorporated under license from
SRS Labs, Inc.
Sound Features
Equalizer
Balance 100Hz 300Hz 1kHz 3kHz 10kHz
Move Adjust Return
TV
R
L
Sound
Mode : Custom
Equalizer
SRS TS XT : Off
Auto Volume : Off
TV Speaker : On
Sound Select : Main
Move Enter Return
TV
Anynet+ (HDMI-CEC)
Picture Mode : Standard
Sound Mode : Custom
Sleep Timer : Off
SRS TS XT ◄ Off
Energy Saving : Off
Dual l-ll : Mono
Move Adjust Exit
Tools
Anynet+ (HDMI-CEC)
Picture Mode : Standard
Sound Mode Custom
Sleep Timer : Off
SRS TS XT : Off
Energy Saving : Off
Dual l-ll : Mono
Tools
Move Adjust Exit
TOOLS
Book-��.indb22 2008-03-03¿ÀÈÄ5:49:33
English - 23
You can connect a set of headphones to your set if you wish to
watch a TV programme without disturbing the other people in the
room.
When you insert the head set jack into the corresponding port, you
can operate only “Auto Volume” and “Sound Select”(in PIP mode) in
Sound menu.
Prolonged use of headphones at a high volume may damage your
hearing.
You will not receive sound from the speakers when you connect headphones to the system.
The headphone volume and TV volume are adjusted differently.
Connecting Headphones (Sold separately)
TV Side Panel
You can set the sound mode in the TOOLS menu.
When you set to "Dual I-II", the current sound mode is
displayed on the screen.
1.
Press the TOOLS button on the remote control.
2. Press the ▲ or ▼ button to select “Dual I-II".
3. Press the ◄ or ► button to select required option.
4. Press the ENTER
button.
Audio Type Dual
1/2
Default
A2
Stereo
Mono MONO
Automatic
change
Stereo STEREO
MONO
Dual DUAL
1
DUAL
2
DUAL 1
NICAM
Stereo
Mono MONO
Automatic
change
Stereo MONO
STEREO
Dual
MONO
DUAL
1
DUAL
2
DUAL 1
If the stereo signal is weak and an automatic switching occurs, then switch to the Mono.
This function is only activated in stereo sound signal. It is deactivated in mono sound signal.
This function is only available in TV mode.
Selecting the Sound Mode
Anynet+ (HDMI-CEC)
Picture Mode : Standard
Sound Mode : Custom
Sleep Timer : Off
SRS TS XT : Off
Energy Saving : Off
Dual l-ll ◄ Mono
Move Adjust Exit
Tools
Auto Volume: Off/On
Each broadcasting station has its own signal conditions, and so it is not easy to adjust the volume
every time the channel is changed. This feature lets you automatically adjust the volume of the
desired channel by lowering the sound output when the modulation signal is high or by raising the
sound output when the modulation signal is low.
TV Speaker: Off/On
If you want to hear the sound through separate speakers, cancel the internal amplifier.
The +, - and MUTE buttons do not operate when the "TV Speaker" is set to "Off".
When "TV Speaker" is set to "Off", you can operate only “Sound Select” (in PIP mode) in Sound
menu.
Sound Select: Main/Sub
When the PIP feature is activated, you can listen to the sound of the sub (PIP) picture.
Main: Used to listen to the sound of the main picture.
Sub: Used to listen to the sound of the sub picture.
Book-��.indb23 2008-03-03¿ÀÈÄ5:49:34
English - 25
When you start using your set for the first time, you must
select the language which will be used for displaying menus
and indications.
1.
Press the MENU button to display the on-screen menu.
Press the ▲ or ▼ button to select "Setup", then press the
ENTER
button.
2. Press the ▲ or ▼ button to select "Language", then press
the ENTER
button.
3. Select a particular language by pressing the ▲ or ▼ button
repeatedly.
Press the ENTER
button.
4. Press the EXIT button to exit.
Choosing Your Language
TV
Setup
Plug & Play
Language : English
Time
Melody : Off
Entertainment : Off
Energy Saving : Off
PIP
Move Enter Return
1. Press the MENU button to display the menu.
Press the ▲ or ▼ button to select "Setup", then press the
ENTER
button.
2. Press the ▲ or ▼ button to select "Time", then press the
ENTER
button.
3. Press the ▲ or ▼ button to select "Timer 1", "Timer 2",
"Timer 3", then press the ENTER
button.
Three different On/Off Timer Settings can be made.
You must set the clock first.
4. Press the ◄ or ► button to select the required item below.
Press the ▲ or ▼ button to adjust to the setting satisfied.
On Time: Select hour, minute, and "On"/"Off". (To activate
timer with the setting satisfied, set to "On".)
Off Time: Select hour, minute, and "On"/"Off". (To activate
timer with the setting satisfied, set to "On".)
Repeat: Select "Once", "Everyday", "Mon~Fri", "Mon~Sat",
or "Sat~Sun".
Volume: Select the desired turn on volume level.
You can set the hour and minute directly by pressing the number buttons on the remote control.
Auto Power Off
When you set the timer On, the TV will eventually turn off, if no controls are operated for 3 hours
after the TV was turned on by timer. This function is only available in timer On mode and prevents
overheating, which may occur if a TV is on for too long time.
Switching the Television On and Off Automatically
TV
Setup
Plug & Play
Language : English
Time
Melody : Off
Entertainment : Off
Energy Saving : Off
PIP
Move Enter Return
TV
Timer 1
On Time
Repeat
Once
Volume
10
00 00 Off
:
Off Time
00
00 Off
:
Move Adjust Return
6
5
Book-��.indb25 2008-03-03¿ÀÈÄ5:49:37
English - 26
Melody / Entertainment / Energy Saving
1. Press the MENU button to display the menu.
Press the ▲ or ▼ button to select "Setup", then press the
ENTER
button.
2. Select the required option by pressing the ▲ or ▼ button,
then press the ENTER
button.
3. When you are satisfied with your setting, press the
ENTER
button.
4. Press the EXIT button to exit.
Melody: Off/Low/Medium/High
The TV power on/off melody sound can be adjusted.
The Melody does not play
- When no sound is output from the TV because the MUTE button has been pressed
- When no sound is output from the TV because the (Volume) button has been pressed
- When the TV is turned off by Sleep Timer function.
Entertainment: Off/Sports/Cinema/Game
The “Entertainment” mode enables you to select the optimal display and sound for sports, cinema
and games.
- Off: Switch the "Entertainment" function off.
- Sports: Provides the optimal picture and sound quality for sports. You can enjoy more thrilling
Colour and sound.
- Cinema: Provides the optimal picture and sound quality for cinema. You can experience a richer
picture and enhanced sound.
- Game: Provides the optimal picture and sound quality for games. This mode accelerates the
playing speed when using an external game console connected to the TV.
If you set any of the three “Entertainment” modes to On, the settings will be locked and can not
be adjusted. If you want to make Picture and Sound mode adjustments, the “Entertainment”
mode must be turned off.
The “Entertainment” settings are saved for each input source.
If you set any of the three “Entertainment” modes to On, “SRS TS XT” function is not available.
O You can press the E.MODE button on the remote control
repeatedly to change the “Entertainment” setting.
TV
Setup
Plug & Play
Language : English
Time
Melody : Off
Entertainment : Off
Energy Saving : Off
PIP
Move Enter Return
TOOLS
Book-��.indb26 2008-03-03¿ÀÈÄ5:49:37
English - 27
Energy Saving: Off/Low/Medium/High/Auto
This feature adjusts the screen brightness depending on the surrounding lighting conditions.
Off: Turns off the energy saving function.
Low: Sets the TV to low energy saving mode.
Medium: Sets the TV to medium energy saving mode.
High: Sets the TV to high energy saving mode.
Auto: Automatically adjusts the brightness of the TV screen in accordance with the scenes.
Easy Setting
1. Press the
TOOLS button on the remote control.
2. Press the ▲ or ▼ button to select “Energy Saving”.
3. Press the ◄ or ► button to select the "Off","Low",
"Medium", "High" or "Auto".
4. Press the EXIT or TOOLS button to exit.
This function is not available in "PC" mode. (40 inch)
Anynet+ (HDMI-CEC)
Picture Mode : Standard
Sound Mode : Custom
Sleep Timer : Off
SRS TS XT : Off
Energy Saving ◄ Off
Dual l-ll : Mono
Move Adjust Exit
Tools
You can select among external sources connected to your
TV’s input jacks.
1. Press the MENU button to display the menu.
Press the ▲ or ▼ button to select "Input", then press the
ENTER
button.
2. Press the ENTER
button again, to select "Source List".
Available signal sources: TV, Ext.1, Ext.2, AV, S-Video,
Component, PC, HDMI1, HDMI2, HDMI3.
You can choose only those external devices that are
connected to the TV.
3. Select the required device by pressing the ▲ or ▼ button.
Press the ENTER
button.
O
Press the SOURCE button on the remote control to toggle
between all the available source.
TV mode can be selected by pressing the TV button, number
buttons(0~9), and the P / button on the remote control.
O
You can also watch HDMI mode simply by pressing the HDMI
button on the remote control.
Selecting the Source
TV
Input
Source List : TV
Edit Name
Anynet+(HDMI-CEC)
Move Enter Return
TV
Source List
TV
Ext.1 : ----
Ext.2 : ----
AV : ----
S-Video : ----
Component : ----
PC : ----
HDMI1 : ----
HDMI2 : ----
HDMI3 : ----
Move Enter Return
TOOLS
TOOLS
TOOLS
TOOLS
Book-��.indb27 2008-03-03¿ÀÈÄ5:49:38
English - 28
Name the device connected to the input jacks to make your
input source selection easier.
1.
Press the MENU button to display the menu.
Press the ▲ or ▼ button to select "Input", then press the
ENTER
button.
2. Press the or ▼ button to select "Edit Name", then press
the ENTER
button.
3. Press the or ▼ button to select the device that you wish to
edit.
Press the ENTER
button.
4. Press the or ▼ button to select the required device.
Press the ENTER
button.
5.
Press the EXIT button to exit.
Editing the Input Source Names
TV
Input
Source List : TV
Edit Name
Anynet+(HDMI-CEC)
Move Enter Return
TV
Edit Name
Ext.1 : ----
Ext.2 : ----
AV : ----
S-Video : ----
Component : ----
PC : ----
HDMI1 : ----
HDMI2 : ----
HDMI3 : ----
Move Enter Return
----
VCR
DVD
Cable STB
Satellite STB
PVR STB
AV Receiver
Game
q
Book-��.indb28 2008-03-03¿ÀÈÄ5:49:39
English - 29
The Windows display-settings for a typical computer are shown below. The
actual screens on your PC may be different depending upon your particular
version of Windows and your particular video card. Even if your actual
screens look different, the same, basic set-up information will apply in almost
all cases. (If not, contact your computer manufacturer or Samsung Dealer.)
1.
First, click on "Control Panel" on the Windows start menu.
2. When the control panel window appears, click on "Appearance and Themes"
and a display dialog-box will appear.
3. When the control panel window appears, click on "Display" and a display
dialog-box will appear.
4. Navigate to the "Settings" tab on the display dialog-box.
The correct size setting (resolution): Optimum- 1360 X 768
If a vertical-frequency option exists on your display settings dialog box, the correct value is
"60" or "60 Hz". Otherwise, just click "OK" and exit the dialog box.
Setting up Your PC Software (Based on Windows XP)
When using an HDMI/DVI cable connection, you must use the HDMI IN 2 jack.
The interlace mode is not supported.
The set might operate abnormally if a non-standard video format is selected.
Separate and Composite modes are supported. SOG is not supported.
Display Modes
Both screen position and size will vary depending on the type of PC monitor and its resolution.
The resolutions in the table are recommended.
Mode
Resolution
Horizontal
Frequency (kHz)
Vertical
Frequency (Hz)
Pixel Clock
Frequency (MHz)
Sync Polarity
(H/V)
VESA
640×480
800×600
1024×768
1360 x 768
31.469
37.879
48.363
47.712
59.940
60.317
60.004
60.015
25.175
40.000
65.000
85.500
-/-
+/+
-/-
+/+
D-Sub Input
HDMI/DVI Input
Mode
Resolution
Horizontal
Frequency (kHz)
Vertical
Frequency (Hz)
Pixel Clock
Frequency (MHz)
Sync Polarity
(H/V)
IBM
640x350
720×400
31.469
31.469
70.086
70.087
25.175
28.322
+/-
-/+
VESA
640×480
640×480
640×480
800×600
800×600
800×600
1024×768
1024×768
1024×768
1360 x 768
31.469
37.861
37.500
37.879
48.077
46.875
48.363
56.476
60.023
47.712
59.940
72.809
75.000
60.317
72.188
75.000
60.004
70.069
75.029
60.015
25.175
31.500
31.500
40.000
50.000
49.500
65.000
75.000
78.750
85.500
-/-
-/-
-/-
+/+
+/+
+/+
-/-
-/-
+/+
+/+
Book-��.indb29 2008-03-03¿ÀÈÄ5:49:39
English - 30
Setting up the TV with your PC
Preset: Press the SOURCE button to select PC mode.
1.
Press the MENU button to display the menu.
Press the
ENTER
button, to select "Picture".
2. Select the required option by pressing the ▲ or ▼ button,
then press the ENTER
button.
3. When you are satisfied with your setting, press the
ENTER
button.
4. Press the EXIT button to exit.
Auto Adjustment
Auto adjustment allows the PC screen of set to self-adjust to
the incoming PC video signal. The values of fine, coarse and
position are adjusted automatically.
Easy Setting
1. Press the
TOOLS button on the remote control.
2. Press the ▲ or ▼ button to select “Auto Adjustment”, then
press the ENTER button.
Screen Adjustment:
Coarse/Fine
The purpose of picture quality adjustment is to remove or
reduce picture noise. If the noise is not removed by Fine-
tuning alone, then adjust the frequency as best as possible
(coarse) and Fine-tune again. After the noise has been
reduced, re-adjust the picture so that it is aligned on the
center of screen.
Press the ▲ or ▼ button to select "Coarse" or "Fine", then
press the ENTER
button.
Press the ◄ or ► button to adjust the screen quality.
Press the ENTER
button.
Position
Adjust the PC’s screen positioning if it does not fit the TV
screen.
Press the ▲ or ▼ button to adjusting the Vertical-Position.
Press the ◄ or ► button to adjust the Horizontal-Position.
Press the ENTER
button.
Image Reset
You can replace all image settings with the factory default
values.
Screen Adjustment
Coarse 50
Fine 34
Position
Image Reset
TV
Move Enter Return
Position
TV
Move Enter Return
Picture
Mode : Standard
Backlight 7
Contrast 95
Brightness 45
Sharpness 50
Auto Adjustment
Screen Adjustment
Detailed Settings
Picture Options
Reset : OK
TV
Move Enter Return
Screen Adjustment
Coarse 50
Fine 34
Position
Image Reset
TV
Move Enter Return
Auto Adjustment in progress
Please wait.
Anynet+ (HDMI-CEC)
Picture Mode : Standard
Sound Mode : Custom
Sleep Timer : Off
SRS TS XT : Off
Energy Saving : Off
PIP
Auto Adjustment
Move Enter Exit
Tools
Book-��.indb30 2008-03-03¿ÀÈÄ5:49:41
English - 31
Connecting Anynet
+
Devices
The Anynet+ system supports AV devices supporting Anynet+ only.
Check if there is an Anynet+ mark on the AV device to be connected to the TV.
To directly connect to TV
Connect the [HDMI 1], [HDMI
2] or [HDMI 3] jack on the TV
and the HDMI OUT jack of the
corresponding Anynet+ device
using the HDMI cable.
To connect to Home Theater
1. Connect the [HDMI 1],
[HDMI 2] or [HDMI 3]
jack on the TV and the
HDMI OUT jack of the
corresponding Anynet+
device using the HDMI
cable.
2. Connect the HDMI IN jack
of the home theatre and
the HDMI OUT jack of the
corresponding Anynet+
device using the HDMI
cable.
Connect only one receiver.
You can connect an Anynet+ device using the HDMI cable. Some HDMI cables may not support
Anynet+ functions.
Anynet+ works when the AV device supporting Anynet+ is in the Standby or On status.
Anynet+ supports up to 8 AV devices in total.
What is Anynet
+
?
Anynet+ is an AV network system that enables an easy-to-use AV interface for users by controlling
all connected AV devices through the Anynet+ menu when Samsung Electronics AV devices are
connected.
Anynet+ Device 1 Anynet+ Device 2 Anynet+ Device 3
TV
HDMI Cable
HDMI Cable
HDMI Cable
TV
Anynet+ Device 1 Anynet+ Device 2
Anynet+ Device 3
HDMI Cable
HDMI Cable
HDMI Cable
HDMI Cable
Home Theatre
Book-��.indb31 2008-03-03¿ÀÈÄ5:49:41
English - 33
Scanning and Switching between Anynet
+
Devices
1. Press the TOOLS button. Then press the ENTER button to
select "Anynet+(HDMI-CEC)".
2. Press the ▲ or ▼ button to select "Select Device", then press
the ENTER button.
3. Press the ▲ or ▼ button to select to a particular device and
press the ENTER button. It is switched to the selected
device.
4. If you cannot find a device you want, press the ▲ or ▼ button
to select "Setup", then press the ENTER button.
5. Press the ▲ or ▼ button to select "Searching Connections",
then press the ENTER button.
The message "Configuring Anynet+ connection..." is displayed.
When searching devices completes, the connected devices are
listed in the Anynet+ menu.
Switching to the selected devices may take up to 2 minutes.
You cannot cancel the operation during the switching
operation.
The time required to scan for devices is determined by the
number of connected devices.
When the device scan is complete, the number of found devices is not displayed.
Although the TV automatically scans devices when it is turned on using the POWER button, devices
connected when the TV is on or under a specic circumstance are not displayed in the device list.
Therefore select "Searching Connections" menu to search devices.
If you have selected external input mode by pressing the SOURCE button, you cannot use the
Anynet+ function. Make sure to switch to an Anynet+ device by using the
TOOLS button.
Move Enter Return
Setup
Anynet+ (HDMI-CEC)
: On
Auto Turn Off
: Yes
Searching Connections
Move Enter Return
View TV
Select Device
Record
Menu on Device
Device Operation
Receiver :Off
Setup
TV P9
Move Enter
Return
Book-��.indb33 2008-03-03¿ÀÈÄ5:49:43
English - 34
Anynet+ Menu
The Anynet+ menu changes depending on the type and status of the Anynet+ devices connected
to the TV.
Anynet+ Menu Description
View TV Switches from Anynet+ to TV broadcast mode.
Select Device Your TV connects to the corresponding device.
Record Starts a recording. (This menu works only for a device supporting
recording.)
Menu on Device Shows the menu of the connected device.
Example. When a DVD Recorder is connected, the DVD Recorders
title menu appears.
Device Operation Shows the play control menu of the connected device.
Example. When a DVD Recorder is connected, the play control
menu of the DVD Recorder appears.
Receiver Sound is output through the receiver.
Setup You can set the environment for using Anynet+.
TV Remote Control Buttons Available in Anynet+ Mode
Device Type Operating Status Available Buttons
Anynet+ Device
After switching to the
device, when the menu of
the corresponding device is
displayed on the screen.
Numeric buttons
▲/▼/◄/►/
ENTER
buttons
Colour buttons EXIT button
After switching to the device,
while playing a file
TOOLS
(Backward search)/
TOOLS
(Forward search)/
TOOLS
(Stop)/
TOOLS
(Play)
TOOLS
(Pause)
Device with built-in Tuner
After switching to the device,
when you are watching a TV
programme
P
<
/
>
button
Audio Device When Receiver is activated
+/- button/
MUTE button
The Anynet+ function only works when the remote control is set to TV.
The
TOOLS
button works only while in the recordable state.
You cannot control Anynet+ devices using the buttons on the TV. You can control Anynet+ devices
only using the TV remote control.
The TV remote control may not work under certain conditions. In this case, re-select the Anynet+
device.
The Anynet+ functions don’t operate for the products from other manufacturers.
In Anynet+ mode, the colour buttons may not work properly.
The
TOOLS
,
TOOLS
operations may differ depending on the device.
Book-��.indb34 2008-03-03¿ÀÈÄ5:49:43
  • Page 1 1
  • Page 2 2
  • Page 3 3
  • Page 4 4
  • Page 5 5
  • Page 6 6
  • Page 7 7
  • Page 8 8
  • Page 9 9
  • Page 10 10
  • Page 11 11
  • Page 12 12
  • Page 13 13
  • Page 14 14
  • Page 15 15
  • Page 16 16
  • Page 17 17
  • Page 18 18
  • Page 19 19
  • Page 20 20
  • Page 21 21
  • Page 22 22
  • Page 23 23
  • Page 24 24
  • Page 25 25
  • Page 26 26
  • Page 27 27
  • Page 28 28
  • Page 29 29
  • Page 30 30
  • Page 31 31
  • Page 32 32
  • Page 33 33
  • Page 34 34
  • Page 35 35
  • Page 36 36
  • Page 37 37
  • Page 38 38
  • Page 39 39
  • Page 40 40
  • Page 41 41
  • Page 42 42
  • Page 43 43
  • Page 44 44
  • Page 45 45
  • Page 46 46
  • Page 47 47
  • Page 48 48
  • Page 49 49
  • Page 50 50
  • Page 51 51
  • Page 52 52
  • Page 53 53
  • Page 54 54
  • Page 55 55
  • Page 56 56
  • Page 57 57
  • Page 58 58
  • Page 59 59
  • Page 60 60
  • Page 61 61
  • Page 62 62
  • Page 63 63
  • Page 64 64
  • Page 65 65
  • Page 66 66
  • Page 67 67
  • Page 68 68
  • Page 69 69
  • Page 70 70
  • Page 71 71
  • Page 72 72
  • Page 73 73
  • Page 74 74
  • Page 75 75
  • Page 76 76
  • Page 77 77
  • Page 78 78
  • Page 79 79
  • Page 80 80
  • Page 81 81
  • Page 82 82
  • Page 83 83
  • Page 84 84
  • Page 85 85
  • Page 86 86
  • Page 87 87
  • Page 88 88
  • Page 89 89
  • Page 90 90
  • Page 91 91
  • Page 92 92
  • Page 93 93
  • Page 94 94
  • Page 95 95
  • Page 96 96
  • Page 97 97
  • Page 98 98
  • Page 99 99
  • Page 100 100
  • Page 101 101
  • Page 102 102
  • Page 103 103
  • Page 104 104
  • Page 105 105
  • Page 106 106
  • Page 107 107
  • Page 108 108
  • Page 109 109
  • Page 110 110
  • Page 111 111
  • Page 112 112
  • Page 113 113
  • Page 114 114
  • Page 115 115
  • Page 116 116
  • Page 117 117
  • Page 118 118
  • Page 119 119
  • Page 120 120
  • Page 121 121
  • Page 122 122
  • Page 123 123
  • Page 124 124
  • Page 125 125
  • Page 126 126
  • Page 127 127
  • Page 128 128
  • Page 129 129
  • Page 130 130
  • Page 131 131
  • Page 132 132
  • Page 133 133
  • Page 134 134
  • Page 135 135
  • Page 136 136
  • Page 137 137
  • Page 138 138
  • Page 139 139
  • Page 140 140
  • Page 141 141
  • Page 142 142
  • Page 143 143
  • Page 144 144
  • Page 145 145
  • Page 146 146
  • Page 147 147
  • Page 148 148
  • Page 149 149
  • Page 150 150
  • Page 151 151
  • Page 152 152
  • Page 153 153
  • Page 154 154
  • Page 155 155
  • Page 156 156
  • Page 157 157
  • Page 158 158
  • Page 159 159
  • Page 160 160
  • Page 161 161
  • Page 162 162
  • Page 163 163
  • Page 164 164
  • Page 165 165
  • Page 166 166
  • Page 167 167
  • Page 168 168
  • Page 169 169
  • Page 170 170
  • Page 171 171
  • Page 172 172
  • Page 173 173
  • Page 174 174
  • Page 175 175
  • Page 176 176
  • Page 177 177
  • Page 178 178
  • Page 179 179
  • Page 180 180
  • Page 181 181
  • Page 182 182
  • Page 183 183
  • Page 184 184
  • Page 185 185
  • Page 186 186
  • Page 187 187
  • Page 188 188
  • Page 189 189
  • Page 190 190
  • Page 191 191
  • Page 192 192
  • Page 193 193
  • Page 194 194
  • Page 195 195
  • Page 196 196
  • Page 197 197
  • Page 198 198
  • Page 199 199
  • Page 200 200
  • Page 201 201
  • Page 202 202
  • Page 203 203
  • Page 204 204
  • Page 205 205
  • Page 206 206
  • Page 207 207
  • Page 208 208
  • Page 209 209
  • Page 210 210
  • Page 211 211
  • Page 212 212
  • Page 213 213
  • Page 214 214
  • Page 215 215
  • Page 216 216
  • Page 217 217
  • Page 218 218
  • Page 219 219
  • Page 220 220
  • Page 221 221
  • Page 222 222
  • Page 223 223
  • Page 224 224
  • Page 225 225
  • Page 226 226
  • Page 227 227
  • Page 228 228
  • Page 229 229
  • Page 230 230
  • Page 231 231
  • Page 232 232
  • Page 233 233
  • Page 234 234
  • Page 235 235
  • Page 236 236
  • Page 237 237
  • Page 238 238
  • Page 239 239
  • Page 240 240
  • Page 241 241
  • Page 242 242
  • Page 243 243
  • Page 244 244
  • Page 245 245
  • Page 246 246
  • Page 247 247
  • Page 248 248
  • Page 249 249
  • Page 250 250
  • Page 251 251
  • Page 252 252
  • Page 253 253
  • Page 254 254
  • Page 255 255
  • Page 256 256
  • Page 257 257
  • Page 258 258
  • Page 259 259
  • Page 260 260
  • Page 261 261
  • Page 262 262
  • Page 263 263
  • Page 264 264
  • Page 265 265
  • Page 266 266
  • Page 267 267
  • Page 268 268
  • Page 269 269
  • Page 270 270
  • Page 271 271
  • Page 272 272
  • Page 273 273
  • Page 274 274
  • Page 275 275
  • Page 276 276
  • Page 277 277
  • Page 278 278
  • Page 279 279
  • Page 280 280
  • Page 281 281
  • Page 282 282
  • Page 283 283
  • Page 284 284
  • Page 285 285
  • Page 286 286
  • Page 287 287
  • Page 288 288
  • Page 289 289
  • Page 290 290
  • Page 291 291
  • Page 292 292
  • Page 293 293
  • Page 294 294
  • Page 295 295
  • Page 296 296
  • Page 297 297
  • Page 298 298
  • Page 299 299
  • Page 300 300
  • Page 301 301
  • Page 302 302
  • Page 303 303
  • Page 304 304
  • Page 305 305
  • Page 306 306
  • Page 307 307
  • Page 308 308
  • Page 309 309
  • Page 310 310
  • Page 311 311
  • Page 312 312
  • Page 313 313
  • Page 314 314
  • Page 315 315
  • Page 316 316
  • Page 317 317
  • Page 318 318
  • Page 319 319
  • Page 320 320
  • Page 321 321
  • Page 322 322
  • Page 323 323
  • Page 324 324
  • Page 325 325
  • Page 326 326
  • Page 327 327
  • Page 328 328
  • Page 329 329
  • Page 330 330
  • Page 331 331
  • Page 332 332
  • Page 333 333
  • Page 334 334
  • Page 335 335
  • Page 336 336
  • Page 337 337
  • Page 338 338
  • Page 339 339
  • Page 340 340
  • Page 341 341
  • Page 342 342
  • Page 343 343
  • Page 344 344
  • Page 345 345
  • Page 346 346
  • Page 347 347
  • Page 348 348
  • Page 349 349
  • Page 350 350
  • Page 351 351
  • Page 352 352
  • Page 353 353
  • Page 354 354
  • Page 355 355
  • Page 356 356
  • Page 357 357
  • Page 358 358
  • Page 359 359
  • Page 360 360
  • Page 361 361
  • Page 362 362
  • Page 363 363
  • Page 364 364
  • Page 365 365
  • Page 366 366
  • Page 367 367
  • Page 368 368
  • Page 369 369
  • Page 370 370
  • Page 371 371
  • Page 372 372
  • Page 373 373
  • Page 374 374
  • Page 375 375
  • Page 376 376
  • Page 377 377
  • Page 378 378
  • Page 379 379
  • Page 380 380
  • Page 381 381
  • Page 382 382
  • Page 383 383
  • Page 384 384
  • Page 385 385
  • Page 386 386
  • Page 387 387
  • Page 388 388
  • Page 389 389
  • Page 390 390
  • Page 391 391
  • Page 392 392
  • Page 393 393
  • Page 394 394
  • Page 395 395
  • Page 396 396
  • Page 397 397
  • Page 398 398
  • Page 399 399
  • Page 400 400
  • Page 401 401
  • Page 402 402
  • Page 403 403
  • Page 404 404
  • Page 405 405
  • Page 406 406
  • Page 407 407
  • Page 408 408
  • Page 409 409
  • Page 410 410
  • Page 411 411
  • Page 412 412
  • Page 413 413
  • Page 414 414
  • Page 415 415
  • Page 416 416
  • Page 417 417
  • Page 418 418
  • Page 419 419
  • Page 420 420
  • Page 421 421
  • Page 422 422
  • Page 423 423
  • Page 424 424
  • Page 425 425
  • Page 426 426
  • Page 427 427
  • Page 428 428
  • Page 429 429
  • Page 430 430
  • Page 431 431
  • Page 432 432
  • Page 433 433
  • Page 434 434
  • Page 435 435
  • Page 436 436
  • Page 437 437
  • Page 438 438
  • Page 439 439
  • Page 440 440
  • Page 441 441
  • Page 442 442
  • Page 443 443
  • Page 444 444
  • Page 445 445
  • Page 446 446
  • Page 447 447
  • Page 448 448
  • Page 449 449
  • Page 450 450
  • Page 451 451
  • Page 452 452
  • Page 453 453
  • Page 454 454
  • Page 455 455
  • Page 456 456
  • Page 457 457
  • Page 458 458
  • Page 459 459
  • Page 460 460
  • Page 461 461
  • Page 462 462
  • Page 463 463
  • Page 464 464
  • Page 465 465
  • Page 466 466
  • Page 467 467
  • Page 468 468
  • Page 469 469
  • Page 470 470
  • Page 471 471
  • Page 472 472
  • Page 473 473
  • Page 474 474
  • Page 475 475
  • Page 476 476
  • Page 477 477
  • Page 478 478
  • Page 479 479
  • Page 480 480
  • Page 481 481
  • Page 482 482
  • Page 483 483
  • Page 484 484
  • Page 485 485
  • Page 486 486
  • Page 487 487
  • Page 488 488
  • Page 489 489
  • Page 490 490
  • Page 491 491
  • Page 492 492
  • Page 493 493
  • Page 494 494
  • Page 495 495
  • Page 496 496
  • Page 497 497
  • Page 498 498
  • Page 499 499
  • Page 500 500
  • Page 501 501
  • Page 502 502
  • Page 503 503
  • Page 504 504
  • Page 505 505
  • Page 506 506
  • Page 507 507
  • Page 508 508
  • Page 509 509
  • Page 510 510
  • Page 511 511
  • Page 512 512
  • Page 513 513
  • Page 514 514
  • Page 515 515
  • Page 516 516
  • Page 517 517
  • Page 518 518
  • Page 519 519
  • Page 520 520
  • Page 521 521
  • Page 522 522
  • Page 523 523
  • Page 524 524
  • Page 525 525
  • Page 526 526
  • Page 527 527
  • Page 528 528
  • Page 529 529
  • Page 530 530
  • Page 531 531
  • Page 532 532
  • Page 533 533

Samsung LE26A450C2 Benutzerhandbuch

Kategorie
LCD-Fernseher
Typ
Benutzerhandbuch